cctoide
-
Posts
92 -
Joined
-
Last visited
-
Well, I've gotten the basic export working, as you can see in the screenshots. I'm still getting a texture seam issue similar to trujillostm's, though. In certain places it's because I haven't done the vertex alignment yet, but in others the vertices are perfectly aligned, and it's in fact impossible to tell there's a seam there when you're right on top of it - but it appears when you move away. I assume it's some sort of texture filtering issue, but I have no idea what's causing it. Only other issue here is that the displacement method doesn't result in very clean coastlines (or any at all), so I will probably have to spend a long time cutting them out to match the texture. (oh, and ignore the cream-colored ocean, this is just the mesh with the texture draped over it, no semantics or ocean mesh; that's the GM background color.)

-
Ah. Well, that's one less thing to worry about... I hadn't noticed the coordinates were the same in my brief experience with the Nevada terrain in the beta. I suppose it means you can't follow real-world coordinate-based procedures on custom terrains though. Thanks for answering.
-
I've got my imagery sliced up and ready to import into Max, but I've just realized nobody seems to have touched on the question of how to get the mesh to match up with the proper coordinates ingame. All I can find about this is trujillostm's post which says that the X/Y coordinates in Max represent latitude and longitude, but I don't know what sort of relationship they have - is it linear, does it represent actual lat/long in degrees, or something else? The example maps I can find seem to have the terrain mesh in random places relative to the .max file's origin, or at least I can't find anything like it in the same place in the real world.
-
Well, I'm not quite in business yet, but I did find a way to make the imagery handling part slightly less soul-sucking. At least it worked for the area I want to create, I don't know if it'll work for others. Start by combining bands 3/2/1 as usual in Photoshop. Then grab the sea with the magic wand. Do it with "contiguous" enabled at first to make sure you're not getting anything inland. Check "anti-aliasing". Once you have the sea selected and are sure it's not grabbing any part of the land, hit delete and fill the selection with black, or whatever the background color of your file is. Then apply the Exposure adjustment to make the composite brighter. I used a consistent exposure +2,75/offset 0/gamma -0,75 across all my files for the first pass. You can also apply the exposure adjustment before deleting the sea if the file is too dark and it keeps grabbing dry land instead. After the sea is deleted hit auto color, which should get much better results than before. At this point, don't combine band 8 yet. It's easier to check that colors match across the files when you're still dealing with the smaller resolution files. The GeoTIFF data's been stripped out of these files by Photoshop, though, so it needs to be reinserted so you can more easily put them in Global Mapper. Go here and grab "listgeo_GUI", a simple interface for the listgeo and geotifcp tools. Use it to copy the GeoTIFF data from one of the original band 3/2/1 files and apply it to the composite. At this point you can click and drag the composites straight into GlobalMapper without manual georeferencing. You'll probably need to edit some of the tiles to match the rest. I recommend picking a tile with good colors and editing all the others to match it, rather than trying to make each tile match its neighbor. Note you need to apply the GeoTIFF copying tool each time you make a change - and quit GlobalMapper, as it keeps a lock on the loaded files. I mostly used the exposure and sat/hue adjustments to make my tiles match. I still had difficulty with Landsat scenes taken in different years, though. Fortunately this is much faster than using the final hi-res files as in the tutorial, and it only takes around 10 seconds to re-render the composite view in GM on my computer. Next comes pan-sharpening. I found this method useful. The basic procedure is as follows: convert your 3/2/1 composite to Lab color; enlarge by 200% to match the panchromatic (band 8) image; split the channels; load the band 8 image, and match its brightness/contrast to the original L channel; merge channels using the band 8 image as the lightness channel. After this you can use the GeoTIFF copy tool to apply the georeferencing data from the original band 8 file to the new pan-sharpened composite. Make sure to save the TIFF with no compression, in PC format, or the tool won't take it.
-
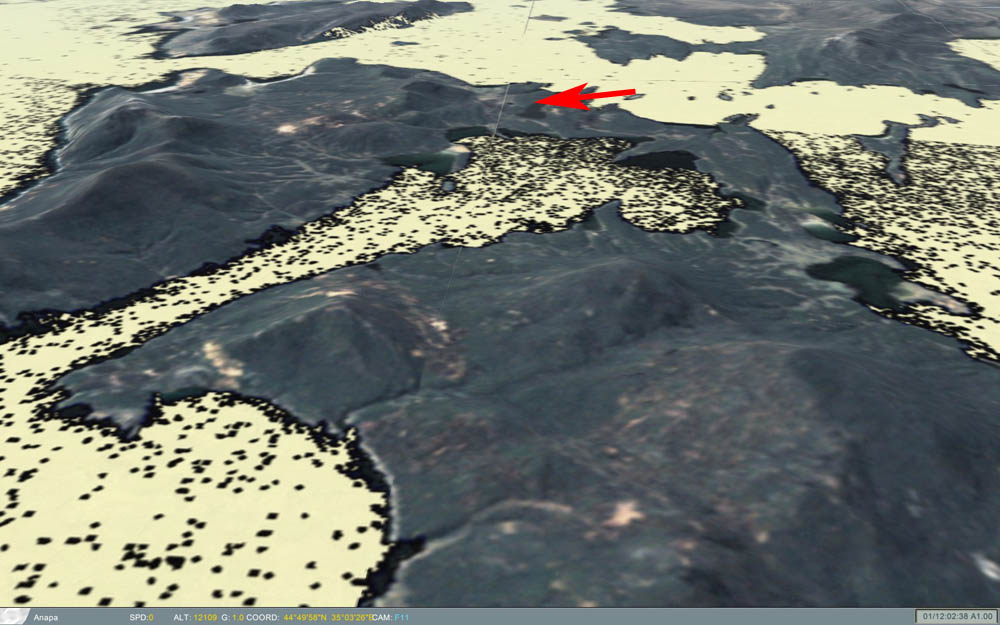
I've been trying to get into the terrain creation workflow for a while now. I first started a few months ago and then got frustrated with it, as the tutorial on the wiki gets rather confusing in certain parts. I only got as far as setting up the DEM and Landsat imagery in Global Mapper before encountering a few problems. The color correction part of the tutorial causes each combined image to end up with a different overall color, so they don't match up. I couldn't find any mention of this in the tutorial. While I got a pretty close match by trial and error, it was a chore as GM takes anywhere from three to five minutes to recalculate everything once you make a change since it's handling five 500MB TIFFs. Another problem I've found is that the Landsat scenes for this area have pretty bad cloud cover. I managed to more or less clean it up with the clone brush in Photoshop, but I don't know if this is the best solution. Landsat imagery still seems a bit low-quality compared to ED's terrain, though, I so I thought about giving T-Bone's/ED's Terragen hybrid method a try, but I can't make sense of Terragen 2... I'm not sure if he meant the original Terragen since it was posted some time ago. Any help/tips on this front? While I couldn't fix the above problems I did go ahead and sliced the DEM and imagery anyway and put it into Max to see how it looked. The area I want to cover features lots of small islands and islets, and even with the hi-res base mesh file that was posted it seems that they might disappear in the 3D model. Will I just have to manually cut them out later? Thanks in advance for any input on the above. :)
-
I think they already do that... not sure if it's in the A-10C beta yet, but in Black Shark if you landed on a FARP pad your helicopter would be repaired after a while (engines had to be off, IIRC).
-
Invulnerable makes it so your pilot profile keeps going after you are killed in a mission. When switched off it's "dead is dead" mode, aka "permadeath", "iron man", etc. You lose the virtual pilot along with the stats when you die.
-

For the curious: The "What Does it Do in Real Life?" List
cctoide replied to Stretch's topic in DCS: A-10C Warthog
Neat, I was actually thinking of doing this sometime but I didn't have much luck with Google. I think the ELEC/PNEU switch is functional, though. On my last mission the CADC happened to take the first shot and died, and I switched to pitot readings so I could RTB and land. -
According to Wags it depends on priorities and available time during development. Same for the KY-58 secure radio stack. I'm certainly interested in seeing how these will work in multiplayer if they end up doing it.
-
what display settings to run effectively
cctoide replied to markturner's topic in DCS: A-10C Warthog
I believe "scenes" is what is usually called "object detail" in other games. -
Installed 64bit only. But need 32bit binaries (for TrackIR). How
cctoide replied to ClearDark's topic in DCS: A-10C Warthog
I believe protect.exe should let you release an activation, even in the beta. Don't quote me on that, though... -
I got one of these arrows too; on a later mission I turned around and noticed there was a yellow wireframe highlight around the headrest area. If I had to guess I'd say there's a script error in that mission that's causing it to highlight the headrest. Probably a known issue.
-
I'm pretty sure it would be $60 even with a combined installation option; you're paying for the effort it took to model the Warthog and upgrade the engine, not what's on the disc/download.
-
Option 1 would be good, as long as it's made obvious the lesson is over so people aren't left wondering if it's a bug.
-
Freetrack support in DCS: A-10C Warthog
cctoide replied to tjhowse's topic in PC Hardware and Related Software
FYI, you can now use the latest version of TIRFixer to patch 32 bit Warthog to support FreeTrack. Note that if you have a 64 bit system the 32 bit files were installed to \bin\x86, those are the ones you need to patch.