Namco51
-
Posts
23 -
Joined
-
Last visited
Content Type
Profiles
Forums
Events
Everything posted by Namco51
-

List of Xbox and Playstation Gamepad Layouts for DCS: World Aircraft
Namco51 replied to Tuuvas's topic in Guides & Tutorials
Hi Tuuvas, thanks for the hard work doing this. Getting a kick out of the idea of flying with just a controller. I was mapping Viper controls using the mapping image from your imgur post and it did zoom using scroll wheel and turbo, which would work everywhere outside of cursor mode, and in this post it just says zoom view, so I assume it's using zoom slow. Why the change? I tried zoom slow first and didn't like how it behaved, then when trying to map scroll wheel, I couldn't figure out how to assign a shifted button state on the triggers using LB, so I gave up. (Actually controller went to sleep and the whole config was lost). Which do you think works better? -
Ever wanted to control DCS with a tablet?
Namco51 replied to charliefox2's topic in PC Hardware and Related Software
No, I don't have any layouts to share, it is a bit beyond me lol. I'll check out the discord, would love to get some more layouts! How do I get to a Discord invite? Thanks -
Ever wanted to control DCS with a tablet?
Namco51 replied to charliefox2's topic in PC Hardware and Related Software
Hello, This post is for future me who may want to figure this out again later, and/or someone as clueless as me. This install got a little confusing for me as a complete novice to dcs-bios and export.lua, and I just wanted to document the revelations I came across and what worked for me. It was really a LOT simpler than I thought. No disrespect to Moridar and his great work here. I love the end result, I just wasn't understanding and wanted to document it, so here goes: ********************************************************************************************** For anybody reading this who isn't already a dcs-bios/export.lua expert and couldn't get it working, let me explain it in simpler terms that may save you hours of time. The version of DCS-BIOS you want for this install is a fork of the main project called DCSFlightpanels/dcs-bios, NOT dcs-bios/dcs-bios, which, if you DO get it working, will recieve updates from dcs.exe, but will not send button presses. Link to the version you want is here: https://github.com/DCSFlightpanels/dcs-bios/releases. You want to download the DCS-BIOS_0.7.43a.zip file. You do not want the v0.10.0 DCS-BIOS hub one. That one is not compatible with this. So you download and extract BIOS_0.7.43a.zip, it's just a folder called DCS-BIOS and a really basic one-line Explort.lua. Extract them to your C:\Users\YOURNAME\Saved Games\DCS.openbeta\Scripts folder (or DCS\Scripts depending on which version of DCS you're working with. If you already have an export.lua there for something else, just add that one line to it. I spent a lot of time with the main project dcs-bios hub v0.10.0 version because I thought I should get that working first, but it would NOT see my DCS World install. It requires you to have installed DCS World using the Eagle Dynamics installer, not from having moved your install or hard drive over from anohter PC like I did. I think it also expects your DCS and Saved Games folders to be in their default locations too. That was a waste of time since the Flightpanels dcs-bios doesn't have the dcs-bios hub that was driving me nuts. Anyway, the gist of dcs-bios is, when dcs.exe (DCS World or DCS Open Beta) runs, it looks in your C:\Users\YOURNAME\Saved Games\DCS.openbeta\Scripts or C:\Users\YOURNAME\Saved Games\DCS\Scripts folder (depending on which one you launched) for the export.lua and runs that, it's painfully simple. The dcs-bios hub that comes with v0.10.0 just complicates things. With the dcs-bios part taken care of, there are 2 other components. TouchDCS and TouchOSC. The TouchDCS archive is just an exe and a folder with a couple layout files in it. The layout files are used with TouchOSC later. Extract TouchDCS literally anywhere (I stuck mine in my Eagle Dynamics program folder) and run the TouchDCSConsole.exe. Put the layouts folder on the PC you're going to run TouchOSC on, in my case a Microsoft Surface. When TouchDCS runs for the first time, it creates a config file in-place. Open that config file and edit it with the IP address of your device (Surface). Take note of the sending and recieving ports, 8000 & 9000. Over on the Microsoft Surface, TouchOCS is some kind of app for making buttons and faders and labels to control recording studio stuff and has its own installer. TouchDCS just intercepts DCS-BIOS's stuff outgoing on port 7778, then it takes that and talks to TouchOCS which is sending on port 8000/listening on port 9000. Install and launch TouchOCS. When it loads you have to File > Open one of the layouts that came with the TouchDCS archive. Hope you copied those folders to this device! Once the panel is loaded up in TouchOSC, click that little chain link button and then the "OSC" tab and configure it with the host info and ports that DCS World will be running on. The sending and recieving ports in TouchOSC will be opposite of the values in TouchDCS. It listens on 8000, sends on 9000. With all of that done, your workflow is to: 1) Launch TouchDCS from wherever you extracted it to on your main PC. 2) Launch TouchOSC on your secondary tablet PC, click File > Open > then select your layout file, like Hornet UFC.tosc, then click the little "play" button. F11 makes it fullscreen. 3) Launch DCS World and get in your aircraft and play with the cool dials and buttons on the tablet and watch them move in the sim and vice versa. It should all work, no messing with dcs-bios hub, dcs.exe takes care of talking to port 7778 and TouchDCS takes care of hearing that and talking to TouchDCS and back and forth . If you have dcs-bios hub in your system tray, you're doing it wrong, you don't want that for this. Anyway, good talk. -
Why is my engine always dying after few minutes of flight.
Namco51 replied to DmitriKozlowsky's topic in Bugs and Problems
So this explains it. Was flying from Havadarya, over water the whole time, babying the engine, temps in the green, torque within tolerances, with Engine Break turned off in Special settings, and with air temp set to 25C. I didn't take the sand filter to save weight because I didn't think I needed it, you know, with Engine Break turned off and not flying over desert and everything. Thought I was going insane. -
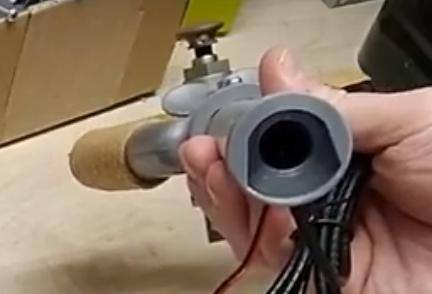
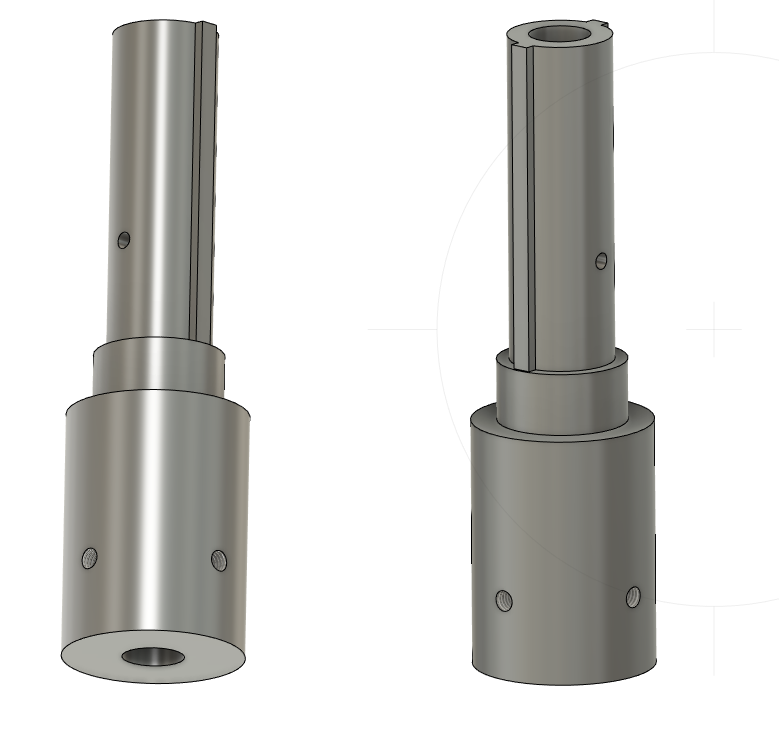
Hi Debolestis, I am in the middle of mounting my CH Fighterstick handle on my MS FFB2 shaft. I was looking for an adapter so I don't have to cut both of the joystick shafts. Does the Combat Stick have the same mounting shaft as the fighter stick? The Fighter stick shaft is 40mm tall, 12.75mm in diameter, has a divot in the shaft 27mm from the top, and has two little 2.5mm wings on it. I thought your FFB2 to Combat Stick was going to be perfect for this, but I see that it is rather tall. Is there any chance you have 1) a version that is much shorter (as short as possible (80mm)? and 2) a version that has the FFB2 spring retainer foot modeled into the base (not a huge requirement, but it would be nice to have this mechanical resistance to torque) like the Sopwith stick has: https://imgur.com/a/RnQQbAA . It also needs to be hollow so I can feed a 4mm cable through it down to the FFB2 base I guess I just need a version of your FFB2 to Combat Stick adapter where the FFB2 part of the shaft is 30mm instead of 120mm (given the Combat Stick shaft is the same as the Fighter Stick). Can you do that? EDIT: Whipped one up in Fusion 360. Was easier than I thought it would be. Going to bug a buddy of mine to print it. My new year's resolution is to buy a 3D printer, they're so cool!

-
Too bad I didn't find one of the hundred posts when I read through about 65 pages of posts in the two VR threads. There may have been 100 mentions of "the debug tool" in those threads, but not one single explanation of what that was or where to download it (and I searched). Anyway I figured it out and it wouldn't hurt in the weeks before the VR tab is added to the options menu to sticky a thread telling people to go to the Oculus website and download the Oculus SDK which contains the Oculus Debug Tool which has the Pixel Density setting in it. Not even Wags in his video mentioned where to get the damn thing! /Rant over
-
Guide to Oculus Rift Settings for a readable cockpit.
Namco51 replied to Mad Dog 7.62's topic in Virtual Reality
What is the debug tool? I'd like to adjust pixel density but I don't have a VR tab in my build. I have a CV1 and am running 2.0.2.52608. What am I missing? EDIT: Nevermind, I figured it out eventually. It's the Oculus Debug Tool https://developer.oculus.com/documentation/pcsdk/latest/concepts/dg-debug-tool/ -
LEDs don't use resistance to lower the lighting output, but rather they use Pulse Width Modulation (PWM) which basically is just turning the LED on and off so rapidly that they just appear dimmer. It's not as simple as just adding a potentiometer unless that pot is connected to the analog input of an arduino or other circuit that decides how quickly to blink the LEDs. Easiest course of action: use the TARGET software to do it. Coolest and most difficult: keep the lights turned all the way up in TARGET and add an internal circuit and a knob to your warthog throttle that will blink the LEDs according to the position of the knob.
-
How do I mount my HOTAS Warthog to my chair?
Namco51 replied to GodsPrototype's topic in PC Hardware and Related Software
I think you're on the right track. Like you I used an Ikea chair. I built this mount out of MDF to hold the joystick onto the chair: I just used 1" wood screws to hold the mount securely onto the bottom of the seat. No need to ruin the upholstery of the chair. Unfortunately this looks like it won't work for you because of the tension knob at the bottom. Also, my Ikea chair has four bolts on the sides that hold the backrest to the chair which I used to mount a panel box on the left side. I got some slightly longer ones at the hardware store, they're a standard imperial size if I recall correctly. It was pretty easy to do, just build a box that's 6.1" wide (the throttle is .1" wider at the bottom than the top) and use the removed armrest as a template to drill the holes for the mounting bolts. Mine is pretty sturdy because there's 4 bolts total (2 on the side of the seat, 2 on the side of the backrest). They hold the backrest very securely and don't feel like they're going to break or anything. The stick is very comfortable and natural feeling where it is, it's just a little hard to remove. At first I would remove the stick from the base, but lately I've been unscrewing it and taking it off between flying sessions. Sometimes I just leave it attached and lower the seat and just stand up to clear the stick. I have a couple pieces of MDF screwed in under the seat as runners to guide and hold the mount in place so I screw it in using the same holes every time. -
Everyone who tries one is absolutely blown away by the thing, even the hardest of skeptics.
-
TrackIR 4, TrackIR 5 or FreeTrack?
Namco51 replied to mr.john_doe's topic in PC Hardware and Related Software
I wasted a lot of time and money on freetrack. My freetrack setup was laggy, the hat/LEDs were messy to deal with because of the battery pack and the fact that after a couple hours the LEDs would dim and I would have to re-adjust the gain settings in Freetrack, and I could never quite get the settings in Freetrack to where it felt natural. With TrackIR, it is 3 times smoother, has much less delay betweeen the time I move my head and when the camera reacts (.1 seconds instead of .75 seconds with freetrack), and the default TrackIR settings were almost perfect (I just had to increase the pitch speed to help me see the radios better). Sure it is pricey but will be cheaper if you spend so much time trying to get freetrack to work for you and it doesn't work out. -
Using a button-modifier in DCS controller settings
Namco51 replied to todd022's topic in PC Hardware and Related Software
Keep in mind that the modifers panel has a Modifiers side and a Switches side. It sounds like you put your paddle on the Switches side. Delete it and add it to the left, Modifiers side. -
The toggle switch is a 3 pole, single throw toggle switch meaning it has 3 positions and switches between two pins at a time (it connects the middle ground pin with either the top pin, the bottom pin, or nothing in the middle position). Sometimes they're called ON-OFF-ON toggle switches. Therefore there is no "button" that registers when that switch hits the middle position. By default the forward position is Joystick button 13 and the back position is Joystick button 14. To get the middle position to register as "Nav Lights Off" in the sim, you have to make a minor edit to the C:\Users\Taproot\Saved Games\DCS\Config\Input\UH-1H\joystick\Throttle - HOTAS Warthog {xxx}.lua file. The change you have to make is to buttons 13 and 14. You're basically telling the sim that when the button for steady nav lights is released, issue the command to turn the lights off. Same with the button for flashing nav lights. Open the lua file in notepad++ and edit the line {combos = {{key = "JOY_BTN14"}, }, down = 3002, cockpit_device_id = 7, value_down = -1, name = "Nav Lights Flash", category = "Ins Overhead panel"}, to read: {combos = {{key = "JOY_BTN14"}, }, down = 3002, up = 3002, cockpit_device_id = 7, value_down = -1, value_up = 0, name = "Nav Lights Flash", category = "Ins Overhead panel"}, You're basically programming that toggle to stay on all the time to keep the light on (value=-1), but when you release the button (move the toggle to middle) turn the light off (value=0). I actually have no button set to Nav Lights Off, but through this Lua change, the command to turn Nav Lights Off is triggered when I turn off that light. Do the same with JOY_BTN13 and you're all set. One thing to notice is that in your options screen you will have two entries for "Nav Lights Flash". One is coming in off your C:\Users\Taproot\Saved Games\DCS\Config\Input\UH-1H\joystick\Throttle - HOTAS Warthog {xxx}.lua file and the other is coming in off your C:\Program Files\Eagle Dynamics\DCS World\Config\Input\Aircrafts\Default\joystick\default.lua file. The reason for this is because they do slightly different things now so the sim thinks they're two different functions. Personally I don't use the TARGET software because I can do everything in the options screen or the LUA file directly, but using a TARGET script will not hurt anything. When you run a TARGET script it ties together your throttle + joystick into one integrated device that the sim thinks is a new device with a new blank set of keybinds. So you can do both, no problem, but running it will make it harder to jump in and out of different aircraft in multiplayer that's for sure.
-
http://i.imgur.com/1tEjVVq.jpg
-
Count me in at $120 - $150 for an aluminum. Kickstarter, anyone? :P
-
Because it's a toggle. You just activate that command again to turn it off. There's no telling why the APU has an on and off while the generator only has the toggle, they just programmed it that way. You can always adding a line and a keybind for iCommandAPUGeneratorPower_Off and seeing if that does anything. As for synchronizing the iCommandAPUGeneratorPower switch, it doesn't. I started the game with Fuel Flow Override Right set to the override position and the APU in the start position. When the game started running the APU switch was on, just like my HOTAS, but the Fuel Flow switch was not in the override position. This leads me to believe that if the switch is only a toggle, then it can't synchronize the switch position with your HOTAS.
-
I don't have any idea what international shipping will be, but my charge was $3.99 USD for shipping to California. There is no problem with the gluing on the spine hopefully it lasts a long time, but seems extremely strong and flexible to me. I've been opening the book to various places and pressing it down so it lays open and it always goes back to normal after I close it. Besides regular 20# copy paper being used this book seems no different than other "perfect bound" paperbacks I've seen like textbooks and such. Unless you mean that you'd prefer spiral binding or a ring binder, then a bound hardcover book is going to have the spine glued in the same way, except for maybe it also being reinforced with cotton weave and a headband. It would have to be printed on ledger paper and folded into signatures in order for it to have been stitche or oversewn which is highly doubtful. I wouldn't worry about the glue as long as it is acid-free and dries so that it is flexible like rubber. But I'd also love to have one with the latest updates printed in A5 in that awesome binder. I probably check this damn thread twice a day for updates :D
-
I have the same problem, but think I figured out my problem. I used LWin + Home to watch the automated start up and realized that it waits an extra minute after finally NAV aligns before hitting the NAV button, then EGI on the NMSP, engaging the SAS channels and radar altimeter. If all else fails, try just waiting longer for NAV to align.
-
I just got my copy of the printed manual from Lulu for about $21 shipped after a 25% off coupon code. Big thanks to The-Sky for the Lulu link!!! It's a pretty nice printing. The pages are very bright white and smooth with no grit feeling that some laser printers seem to leave behind. It's a "perfect bound" paperback book meaning it's bound with adhesive. The edges are perfect and appear to have been guillotine cut. The images look to be printed pretty dark, like the contrast was pumped up for the print. But you soon learn why when you see how well the CDU screen images came out. Printing them off on my own they were barely readable. Lulu's copy is a level of contrast that makes them easily readable. All in all, it's a really nice copy at a great price and way better quality than I could have printed off on my own. It appears to be the 1.1.0.9 version as it seems to have all of the green corrections from the correction thread, but none of the pedantic ones in red. It's 671 pages long and somehow seems to have lost a page compared to the latest version somewhere in the startup checklist area, but I can't figure out precisely where though because a few steps are in a different order and it's pretty late. The only criticism I have is that the paper seems to be kind of thick like regular ol' #20 pound copy paper. It would have been nice if it were a little thinner to cut down on the weight (4 pounds or 1.8 kilos) a bit.
-
Hello all. My first post was a snarky comment in a silly thread so I wanted to salvage karma and say hi, lest everyone think I'm a complete troll. I'm not much of a pilot but have always been interested in aviation growing up next to LAX and have always been fascinated by the A-10. I think i love this sim due to the complexity of the systems and the stability of the platform. I am genuinely having more fun reading the manual and learning the systems, e.g. CDU, Maverick tracking, IFFCC routines, and TGP (my favorite), than actually doing missions. However missions did win a few points last night when I completed my first non-training mission and had my first "HOLY CRAP" moment when I dropped a CBU-97 on a group of 3 transport vehicles to spectacular effect. I'm very glad to join the community and will be learning for months to come. :book: I picked up DCS A-10C on the recent Steam sale and was wondering if the simulation executable knows automatically to run in 64-bit or if there are separate exe's for 32 and 64 bit? Steam is a 32-bit program so it and all the game content ends up in the default location for 32-bit apps, the C:\Program Files (x86)\Steamapps\user\common folder. Is there an easy way to determine if I am running the game in 64-bit mode? Thanks,
-
It's simple. In the eternal aft vs. forward debate, it all depends or relative orientation to the pilot. So if the control stick is deflected forward fully, you're looking down on the TMS hat and the plane on which it is mounted is now oriented horizontally to the pilot at which point the controls are now TMS forward, aft, left, and right. When the control stick is deflected back fully, the TMS hat is nearly vertical at which point the TMS controls are now up, down, X minus, and X plus. Finally, when the stick is in the neutral position the controls are north, dive, starboard, and green, of course. :joystick: