tonyswash
-
Posts
44 -
Joined
-
Last visited
-
Days Won
1
Content Type
Profiles
Forums
Events
Everything posted by tonyswash
-
The software does check for updates. I’m not bothered by that because I only use my Windows PC to play a few games so I am not very concerned by security. Everything serious gets done on my Mac. An update on my experience with the kit. A further glitch I have encountered is that if I change some control in DCS - say some key bindings - sometimes DCS World seems to restart itself when I click save. If that happens DCS seems to forget the monitor setup and the display is scrambled such that I cannot click on the Quit button because it is off screen. I get around this by having a ‘Quit DCS’ action programmed into a Streamdeck button, and an ‘Open DCS’ action on an adjacent button, and if the screen gets scrambled I can quickly quit and relaunch with just a couple of button taps.
-
I’ve just returned to DCS after a break of a few years, attracted by all the specialist cockpit kit now available, new models like the FA/18, the promise of a dynamic campaign coming soon and what was now possible with exciting kit like the Elgato Streamdeck. I have very limited desk space in my den and I wanted to construct some sort of Hornet cockpit that I could easily and quickly set up to play and stow when I was finished. After a lot of market research I settled on the various Winwing control panel offerings. Here’s my experience for what its worth, hopefully anybody considering buying the WinWing panels may find it informative. I started off by buying the Winwing Hornet UFC panel. It took just over a week to get from China to the UK and pleasingly I wasn’t charged any customs or tax. I was very pleasantly surprised by both the quality of the kit and it’s ease of set up. I ran the SimAppPro software from Winwing, downloaded and installed the Hornet config file and the UFC just worked perfectly (although I subsequently ran into some glitches - see below). The thing looks and works just like the UFC panel in the Hornet. Although it’s made from sturdy plastic and feels pretty solid it is actually very light which is perfect for me as I wanted a light weight pit setup. Based on that experience I ordered 3 MFD units from Winwing, both the button panels and the actual displays. Again it only took just over a week for it all to arrive but this time I was charged custom fees and tax. I found setting up these units more complicated but once up and running they worked great. Again lighter than I expected but the actual displays are very crisp and clear. There are quite a few extra buttons on the MFD frames you can program with anything you want. The MFDs are bigger than the Thrustmaster Cougar MFDs. Over all I think these panels, both the UFC and the full MFD displays, are good value for money and I would recommend them. There are however a few issues that would be buyers should be aware of. First all the panels come with attachable stands but these are pretty restrictive in that only two positions are possible, neither of which met my needs, and because the panels are so light if you try pushing the buttons with them sitting in the upright position they move and/or fall over. So they work best attached to something. I didn’t want to attach them to the desk as I wanted to be able to stow them away easily so I built a lightweight thin timber sheet panel box, with a slightly inclined front panel, onto which I attached the various Winwing panels. This means I can just lift the entire structure on and off my desk in one go. This leads to my first criticism which is that the back of all the panels have a small raised area, so if you want to attach them to a flat backing surface you have only a limited grip area and attaching them to a surface is a bit tricky. I did it with a combination of velcro on the raised area and a small wooden weight bearing rail for them to sit on on the tilted front surface. The Three MFDs and the UFC require seven USB sockets so I attached a powered USB hub at the back of my panel box and only need to plug in one USB cable and a power cable to get the whole thing working. All the panels come with nice long USB cables, over a metre in length, so I needed to use cable clips to stow away all the various cables neatly at the back of my panel box. However you cannot install the occasional firmware updates via a USB hub, so when the a firmware update becomes available I will need to pull each panel off the velcro to attach it directly via a USB cable to my PC. A bit of a pain. . The display panels for the MFDs need to be arranged in the Windows display setup in portrait mode underneath the main monitor. Unfortunately because I am regularly detaching the MFDs from my PC I found that Windows kept resetting the position and orientation of the three MFD displays meaning I had to rearrange them each time. I could not find a way to force Windows to remember the MFD display orientations but I found an easy solution in the app Displayfusion, which you can use to set the position of the displays properly then save it as a configuration that can be invoked though a key combination (which I have set up as a Streamdeck button). I still have a weird glitch where one of the MFD displays keeps showing the Windows task bar but I just set the Task Bar to autohide and that solves that. The final problem I had was caused by fact that I was the using the HUD only view a lot more because I don’t need to see the cockpit instruments most of the time as I have the hardware panels. However I found for some reason this view interrupts the instrument feed to the Winwing UFC panel so the instrument display would freeze and the unit would become unresponsive. Going back to the default cockpit view, with the UFC visible on the main screen, reestablishes the connection and solves this problem. To sum up. Very pleased with this Winwing kit, I’ve finally got a DSC cockpit that’s easy to move in and out of position and it makes flying a real pleasure. Here's a couple of photos. One shows the back of my instrument panel with all the cable management and the USB hub. The other shows the instrument panel in place and in use

-
Thanks for the brilliant suggestion about removing the base plates - it makes a huge difference. I can attach a light weight base now and attach it to the desk mount. Probably saved me paying for a new throttle - thanks again.
-
I currently have the Thrustmaster Warthog throttle but I find it way too heavy. I have very limited desk and den space and have to stow it away between sessions and I just find it really tedious given how heavy it is. I was wondering if the Orion2 F/A - 18 Hornet Throttle from WinWing was significantly lighter?
-
I have compiled all the A10C tutorials I could find on YouTube into a single channel, organised by topic. The channel is here: https://www.youtube.com/channel/UC90p6sHsL5PN_urMRz65NyA This channel has been up for a while but I am continuously adding new videos to it as and when I find them, so I thought it was worth reminding people about it. Enjoy :)
-
Control setup glitch
tonyswash replied to tonyswash's topic in Release Version Bugs and Problems (Read only)
I seem to have the fixed the problem. I was using a series of combined key commands as follows: AAP Steerpoint - Mark = LShift+LCntrl+M AAP Steerpoint - Mission LShift+LCntrl+X AAP Steerpoint - Flightplan LShift+LCntrl+F They all seemed to work equally well in the control config panel. It didn't matter they were a bit cumbersome because I am using a programmable keypad to actually enter the commands. The problem was that in the cockpit during flight the LShift+LCntrl+X combination never worked. So I just changed the key command for 'AAP Steerpoint - Mission' to just the single letter 'y' and that now works. So for some reason the specific key command I was using - 'LShift+LCntrl+X' - was problematic. I have no idea why but now I have a fix I am happy -
Flying a10C I have assigned keyboard shortcuts to: AAP Steerpoint - Mark AAP Steerpoint - Mission AAP Steerpoint - Flightplan The two key commands for 'Mark' and 'Flightplan' work but the keyboard shortcut for 'Mission' does not work. In the Control setup page everything seems to work OK. If I hit the key combination I have allocated to 'AAP Steerpoint - Mission' it highlights the correct command. However in the game during flight if I enter the key command it does not operate the switch in the plane. Any thoughts on what might be causing this problem, or is it a bug?
-
Windows 10 Thrustmaster HOTAS problems
tonyswash replied to tonyswash's topic in PC Hardware and Related Software
Just an update. I could not resolve the Windows 10 USB problems with the Thurstmaster kit. The Throttle was recognised and auto-configured but I could not get the stick or MFDs recognised. Everything was listed and the working in the control panel/device list so I could go through and manually allocate relevant button settings one by one in the DCS controls config panel. Tedious but its now working and DCS runs like butter on ulta settings on my new rig. From the resaerch I did to try to fix the problem it seems Windows 10 can be very tempremental about USB. I also encounted another problem which was the ASUS USB monitor I use for my cockpit only worked using one particular USB port, using any other caused some sort of clash/error. Ho hum -
Can anybody please help me. I have been running DCS on a Windows 7 PC with no problems other than a bit of an old and underpowered PC. I have a Thrustamster Warthog HOTAS and a pair of Cougar F16 MFDs. Everything ran perfectly in DCS on the Windows 7 PC. DCS automatically recognised the HOTAS, and the MFDs, and correctly mapped all the buttons. Today I took delivery of a spiffing new PC with Windows 10 Pro 64 bit installed. The problem is that although Windows device manager correctly identifies the Thrustmaster devices DCS does not. If I open the Controls config panel in DCS it seems the HOTAS Throttle is correctly identified and the keys mapped correctly, but the Joystick is mapped as ‘2 axis 19 button joystick’ and none of the keys are correctly mapped. The axis control is way off as well. Similarly the two MFDs are incorrectly listed as ‘0 axis 28 button device’ and their buttons are all mapped incorrectly (in fact each MFD has the same incorrect mapping). I have tried removing and reinstalling the devices in Windows. I have trashed my DCS file in Saved Games and letting DCS recreate a new one. I have tried all the various USB ports (front and back, USB 2 and 3). I tried connecting the kit directly, and individually, bypassing my USB port. Nothing makes DCS correctly recognise the kit. I just booted up my old Windows 7 PC and plugged the Thrusmaster kit in and ran DCS and everything was correctly identified and was working correctly with the right key mapping, so its not a hardware problem. It seems as if something in Windows 10 is not passing the right information to DCS. Can anybody help, does anybody know what might be causing the problem. I am itching to play DCS on my new (and very expensive) rig :pilotfly: The new kit spec is as follows BTW Intel Core i7 6700K EVGA GeForce GTX 980 Ti 32GB RAM 512GB Samsung SM951 Fractal Design Define R5 Black Mid Tower Computer Chassis with USB 3.0
-
I have created a Youtube A10C tutorials channel
tonyswash replied to tonyswash's topic in DCS: A-10C Warthog
I only fly the A10C at the monet and I did the work of gathering and organising the videos to help myself and then realised other people might find it useful. So no plans to add other modules at the moment but maybe in the future. -
I have created a Youtube A10C tutorials channel
tonyswash replied to tonyswash's topic in DCS: A-10C Warthog
I have added a collection of Mission Editor tutorials to the channel -
BBJ Sim USB rotary button panel
tonyswash replied to tonyswash's topic in PC Hardware and Related Software
I emailed the guy who makes the BBJ Sim panels and explained a little about the needs of flight simmers in relation to the future development his switch panels and got this interesting reply: "Hi Tony, I am pleased you are happy with your button box an I am always happy to receive exposure in relevant enthusiasts forums. To answer your questions in no particular order firstly I moved the push switches from the rotary encoders to individual switches because in racing situations it was to easy to press the switch while trying to adjust the encoder and vice-versa. I can see this would be less of an issue in a flight simulator and if I make a flight sim specific version of this box in the future I might well reincorporate them. The main issue I have in producing specific products for flight simulators is toggle switches, flight simulators need latching toggle switches and lots of them! My best solution so far is to make individual capacitor discharge circuits for each switch which work great but take around 20 minutes per switch to construct thus adding significantly to the cost compared to a similar box designed for racing where I can get away with using momentary toggles as on the whole car racers don't need the visual reference of the position of the switch relative to the sim. The alternative would be to use some sort of commercial pulse generator to give the required on/off signal but any I have found have been way too expensive to be viable. I am in the process of incorporating a couple of capacitor discharge switches into my new 'pro' range of car based boxes and if that goes well I will design the same into some flight sim specific products. Everything else I have sorted, encoders, potentiometers etc. So when I finally resolve the latching toggle issue I feel I am going to be able to produce some great products aimed at the flight sim community. In terms of time I guess we are looking at 3 to 6 months but I am not going to release anything until I get this right. Many other manufactures have the same issue and just ignore the fact that their toggles only work 1 way or if you flick them too fast don't work at all. Sorry for the long rambling email and I wish you all the best in your gaming/simming in the future. Regards, John." -
BBJ Sim USB rotary button panel
tonyswash replied to tonyswash's topic in PC Hardware and Related Software
The panel appears as 'BU8036X' in the Windows devices control panel and in the DCS control options panel so I guess that answers the question about the hardware. The click action on the rotary dials doesn't register in the Windows control panel and I remember in one of the BBJ Sim videos the maker saying he was having problems with the click action on the rotaries and was thinking of disabling them - so I guess he did. Eveb with the click action on rotaries diabled this is still a really useful panel, especially for something like the radio stack that has a lot of dial in values. It feels well made, its not too pricey, the black version blends in with a home pit nicely, and its was super simple to set up. All in all I am very pleased and may buy one of the all button versions to compliment the one I have. -
BBJ Sim USB rotary button panel
tonyswash replied to tonyswash's topic in PC Hardware and Related Software
Another small problem. The rotary dials can be depressed as another button click but CDS does not seem to recognise them. I consider it a minor problem, means 6 less button clicks but that still leaves 12 buttons and six rotaries all working. -
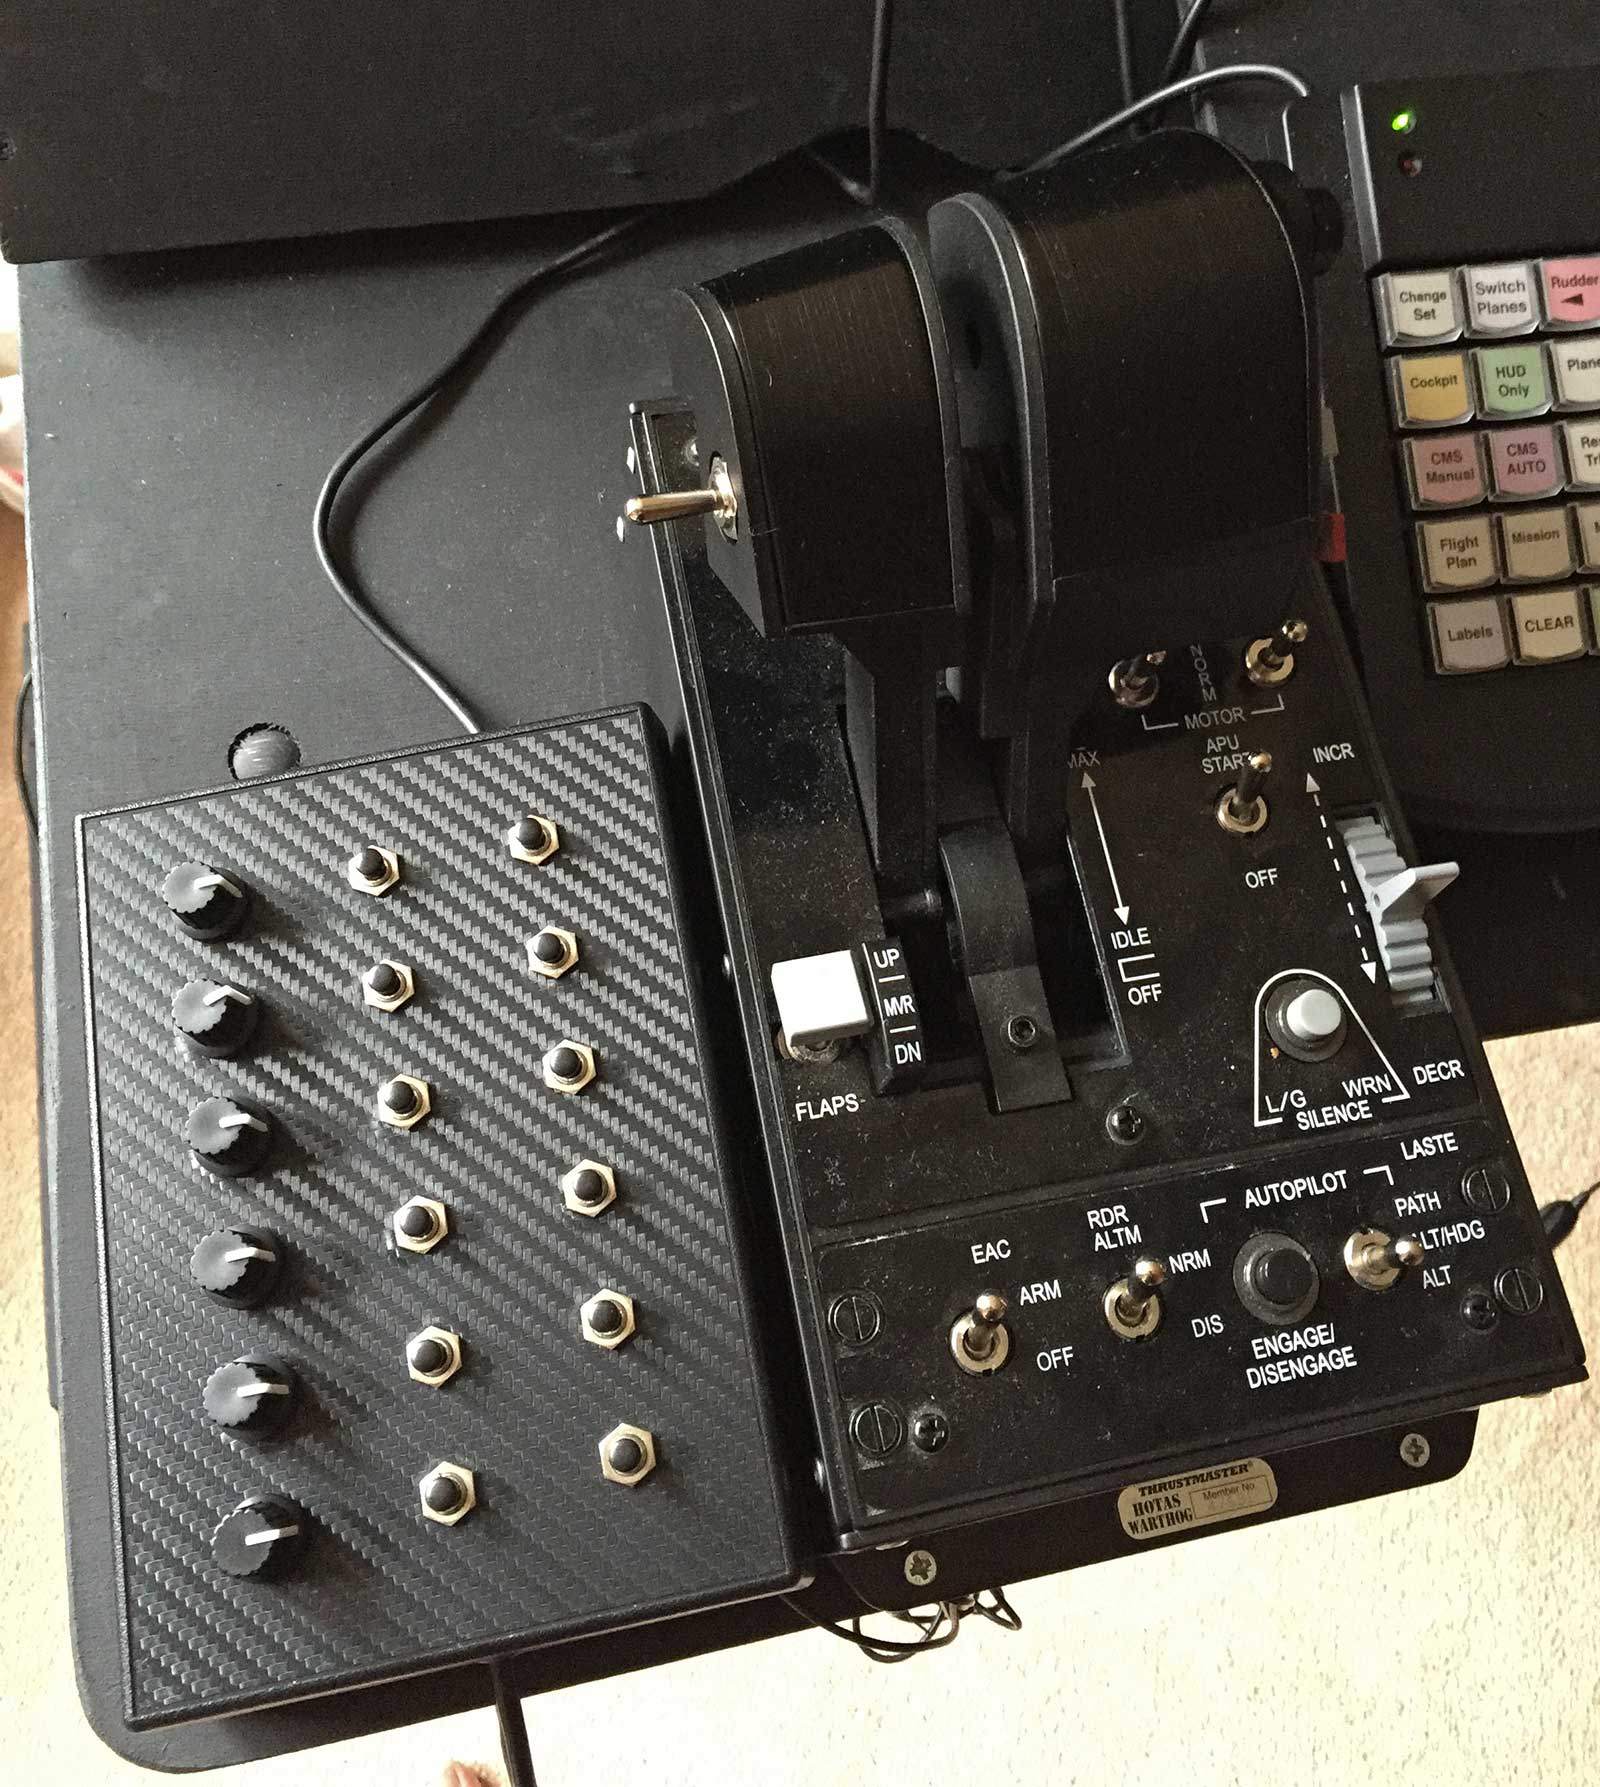
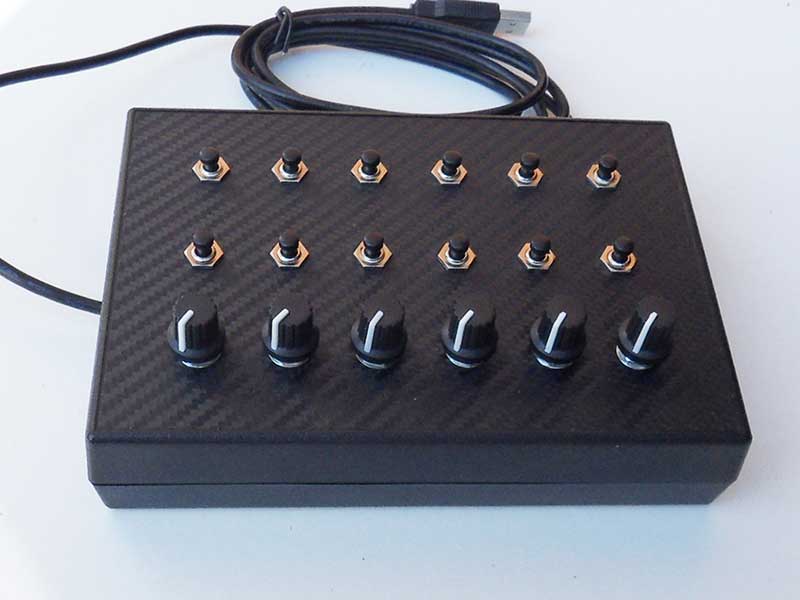
I bought one of the USB rotary panels from BBJ Sim and I am very pleased with the result. It costs £70. It has 12 push buttons and 6 rotary dials. It installed immediately on plugging into my Windows 7 PC and DCS recognised it as a controller in the controls set up panel. I am using my mine as a radio controller, the dials can change frequency, buttons to load, switch functions and switch presets. The only glitch I had was my plane spiralled out of control the first time I ran DCS with the panel attached and I discovered this was because DCS had automatically assigned various flight controls to the panel box by default including some axis. Once I deleted those the box works perfectly with my A10C. Very pleased. Here is a photo of the panel box next to the Thustmaster throttle so you can see its relative size and how well it matches the Thrustmaster kit. The BBJ Sim website is here: http://bbjsimracing.com
-
DCS: A-10C Tutorial Collection (PDF´s and Videos)
tonyswash replied to MemphisBelle's topic in DCS: A-10C Warthog
I have created a Youtube A10C tutorials channel I have created a Youtube A10C tutorials channel. Its here: https://www.youtube.com/channel/UC90p6sHsL5PN_urMRz65NyA I recently moved up from flying the A10A and the SU25T to the A10C and as a result I started to search through Youtube for training and instructional videos. I found plenty and started to build some playlists. Soon I had a lot of videos and I had sorted them into a number of themed playlists. I thought that other people my be able to benefit from the search, compilation and organisation I had done so I created this channel. I hope people find it useful. I didn’t make any of these videos and I would like to thank those who did as their efforts are so very useful. If anybody knows of other training videos that I have missed do let me know and I will add therm to the channel -
I have created a Youtube A10C tutorials channel. Its here: https://www.youtube.com/channel/UC90p6sHsL5PN_urMRz65NyA I recently moved up from flying the A10A and the SU25T to the A10C and as a result I started to search through Youtube for training and instructional videos. I found plenty and started to build some playlists. Soon I had a lot of videos and I had sorted them into a number of themed playlists. I thought that other people my be able to benefit from the search, compilation and organisation I had done so I created this channel. I hope people find it useful. I didn’t make any of these videos and I would like to thank those who did as their efforts are so very useful. If anybody knows of other training videos that I have missed do let me know and I will add therm to the channel
-
Has anybody had any experience of using the USB switch panels made by BBJ SimRacing in DCS? The panels look very inexpensive compared to any other proprietary solution out there. The guy who makes them is a car sim racing enthusiast but he claims the USB toggle and switch panels he makes and sells are fully USB plug and play. I am very tempted by some of these products but I would be reassured about buying one if I knew it definitively worked with DCS.. The website is here and it includes links to video demos of the various panels. http://bbjsimracing.com The panels themselves are sold via eBay here: http://stores.ebay.co.uk/BBJ-SimRacing?_trksid=p2047675.l2563
-
It may be even harder in real life. If you read the account of A10 operations over Kosovo (details and link below) there is a long section dealing with the protracted and multi-mission effort to find and kill just one radar station. In real life the A10 pilots seem to use binoculars a lot. Be nice to have a simulated cockpit binocular function in the game. The book I mentioned is a really great read and a free download. Its full title is: "A-10s over Kosovo: The Victory of Airpower over a Fielded Army as Told by the Airmen Who Fought in Operation Allied Force" http://aupress.maxwell.af.mil/digital/pdf/book/b_0090_haave_haun_a10s_over_kosovo.pdf
-
In the real world account of the air war over Kosovo called "A10s Over Kosovo" the A10 pilots talk about using binoculars in the cockpit to find targets - perhaps we could have that option in DCS. Press the binocular key and get a simulated view through a pair of binoculars? BTW the book "A10s Over Kosovo" in pdf form is here - very good read http://aupress.maxwell.af.mil/digital/pdf/book/b_0090_haave_haun_a10s_over_kosovo.pdf
-
What am I doing wrong - helios problems
tonyswash replied to tonyswash's topic in PC Hardware and Related Software
Solved it! I was running DCS as Admin but not Helios. As soon as I ran Helios as Admin it worked. Posted this just in case someone else has the same problem. -
What am I doing wrong - helios problems
tonyswash posted a topic in PC Hardware and Related Software
I want to create onscreen buttons to send keyboard commands to various planes. I can't get it to work. This is what I am doing - the example is creating a button to send the keyboard command 'f' to operate the flaps. This is what I am doing step by step - what am I doing wrong Open Helios Profile Editer Select the 2nd monitor Drag a button graphic on to Monitor 2 Click the Output tab Click interfaces Click Keyboard Click and hold and drag 'send keys' across to Bindings and drop it on the 'pushed' item In the properties box add the value 'f' Save profile (lets call it Flaps) Open Helios Contol Centre and select the Flaps profile, the button I made appears on the second monitor Hide control centre Open DCS and launch SU25T and start a mission Click on the new flaps button on the 2nd screen - nothing happens -
Onscreen configurable keypad on second monitor?
tonyswash replied to tonyswash's topic in PC Hardware and Related Software
I didn't realise that you could use Helios to create your own key pad for any DCS plane. I have found tutorials for how to use Helios to create a screen for controlling A10C but I have not found any tutorials for using it to create your own keypad to control other planes via macros - any pointers to such tutorials would be very handy -
I currently have a hardware programmable multi-button USB keypad set up so I can operate the Flaming Cliffs A10A. It has nice labelled buttons and it make operating the aircraft systems very easy. The problem is that I also want to fly other aircraft in Flaming Cliffs and my A10A dedicated USB keypad is not set up for other aircraft and changing keys codes and labels on a hardware keypad everytime I want fly a different plane is way too complicated. What I would ideally like to do is buy a cheap second monitor (probably touch screen) and use it to display a fully configurable dedicated on-screen key pad with specific sets of commands for each aircraft. Just to be clear DCS would run on one monitor and the second monitor would be used to just display, on the Windows desktop, a keypad I could use as a keyboard substitute for sending key commands to DCS aircraft. So what I am looking for is a piece of software that would allow me to do the following: Have an on screen configurable key pad that could run macros that would be understood by DCS as key commands. Is heavily customisable so I can design the layout and appearance of the keys to suit. Can easily switch between different key layouts so I can switch layouts for each different aircraft I fly. Any suggestions?