Kippy
-
Posts
277 -
Joined
-
Last visited
-
Days Won
2
1 Follower
-
An engine being motored by the APU should reach 26% to 28% core RPM. Ensure you meet that spec before placing the throttle to idle. After placing the throttle to idle, fuel is provided after the engine starts to rotate.
-
 An excellent addition to DCS! Thank you.
 -
DCS's RWRs are incredibly simplified out of necessity. Information pertaining to many things ELINT/SIGNIT is contained in some the most secure documents around. To put it simply: In reality the AN/ALR-69(V) synthesizes what it "sees" from the incoming signals and outputs audio that is characteristic of the threat. This is to say that different threats generate unique audio, which should be enough tell you that one shouldn't put much weight into the realism of the RWR audio we get in sim. The closest we've ever come to greatness was RAE. DCS's stock audio is more accurate to the real thing.
- 1 reply
-
- 2
-

-
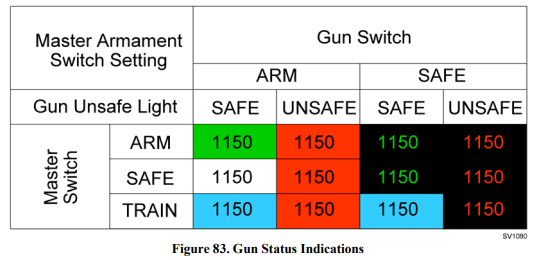
I may be wrong, but I believe the only simulated icing for the A-10C in DCS is pitot tube icing, so it would not have been icing that caused this issue. The gun must have been damaged in combat, or perhaps you may have inadvertently interrupted the clearing cycle by safing the gun after firing. At this point it's conjecture unless you have a track file or server event logs.
-
Likely a result of battle damage, if you had taken any. The GAU-8 goes though a clearing cycle within .5 seconds after every firing, designed to eliminate unfired rounds in the barrel. There are generally a few ways for a gun unsafe light to trigger according to the -1 and 3-3's I've read: Clearing Cycle fails to complete within 2.5 seconds after firing for any reason, including Interrupting the clearing cycle by safing the gun Two firing pins are detected as broken (unmodeled in DCS to my knowledge) As a side note, the X's displaying instead of the proper round counter is either a product of further damage or improper modeling of a gun unsafe condition. Every example I've seen in documentation for unsafe gun displays still show an accurate round counter.

-
Kippy changed their profile photo
-
The basics of successful two-ship employment
Kippy replied to Kippy's topic in DCS: A-10C II Tank Killer
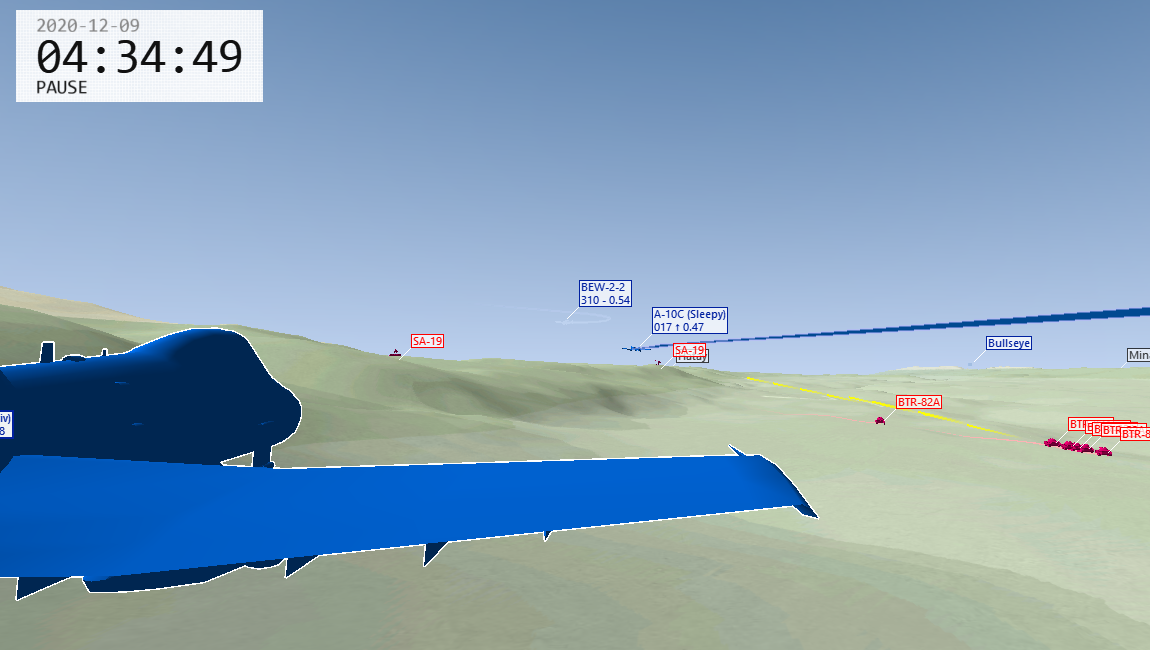
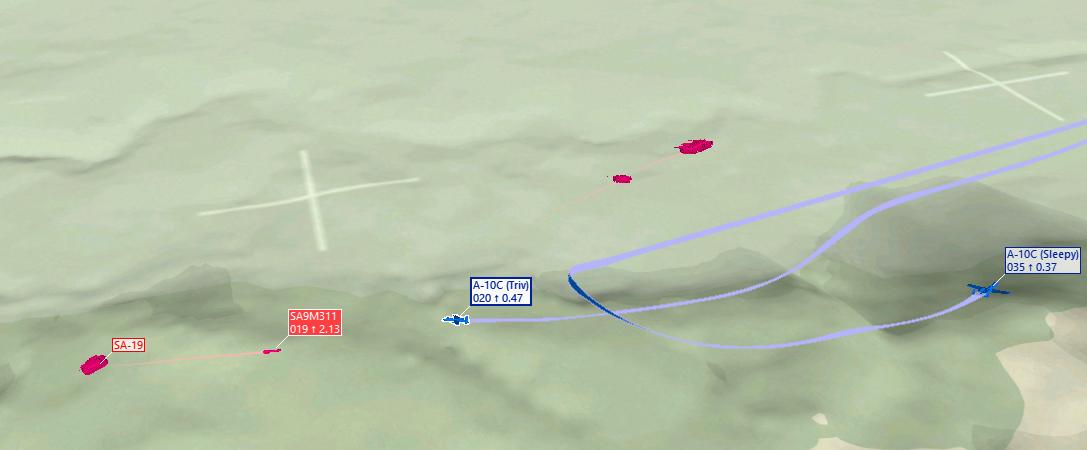
Hey Puma, thanks for the insight! A blind call from either ship really could have gone the mile here. The contracts that are executed after a blind call, should we have fulfilled them, would have whipped us into shape even before -2 stumbled into the SA-19. If that call had come from either ship shortly after my jink and reversal to the west, we could have directed a rejoin into an appropriate formation and looked to egress from the threat zone. Probably our best alternative would have been to call blind, focus on a rejoining to a formation with strong mutual support, and look to head back south where we had known there were no missile threats. From there we could have run a racetrack over the friendly FLOT until we had come up with a game plan to exit the valley. After the sortie we determined that both Triv and I needed additional training on full spectrum threat response as a two ship. Low alt pop-up threats are a real challenge because they can immediately induce task saturation and helmet fires, and that's exactly what happened to Triv and I. We went back and took a hard look at the contracts. CAF documents are clear that after encountering a threat, the standard is to defend as a flight and move to a hold. We did neither of those two things. We allowed the flight to break into essentially single ships and then continued to press with the egress. A blind call might have saved us by putting the focus back on the flight. Maybe the best course of action from there would have been a game-plan to egress the plain away from the known threat. If that for any reason was impossible and we'd absolutely must trespass the threat, we would have wanted to have made the best effort we could have to locate the SA-19s, which we knew would have been along the highway, and applied our low altitude threat egress contracts, which would be to move to a trail, approach the threat, and trespass as singletons. Element lead egresses away from the wingman, maneuvers to defeat, with -2 maintaining station outside of the enemy WEZ as essentially a cover until -1 is clear, and then -2 trespasses with -1 maintaining mutual support. Still not exactly an ideal situation, but that's an option we could have taken. Threat reactions are definitely a still weak point. Still thinking about what would have been our best options in this scenario. Any input? -
The basics of successful two-ship employment
Kippy replied to Kippy's topic in DCS: A-10C II Tank Killer
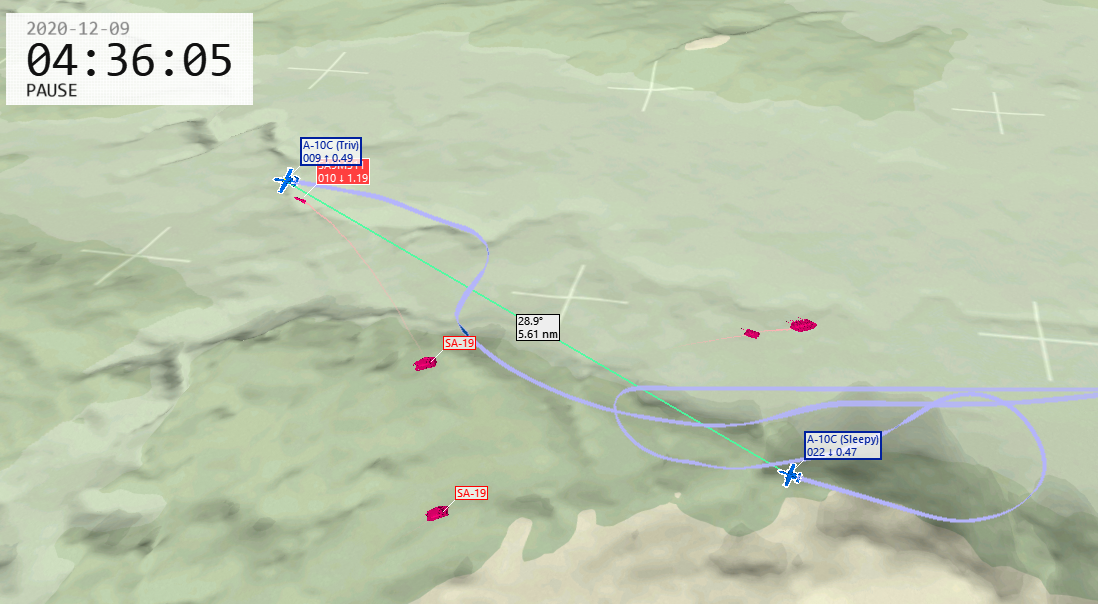
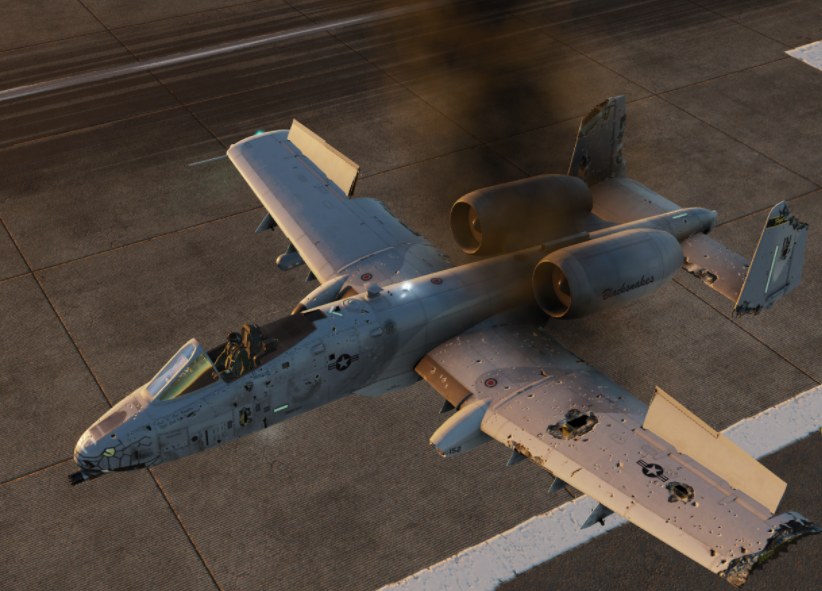
A Failure to Plan is a Plan to Fail. Attack pilots are perhaps among the most skilled and specialized warriors in human history. The tasks before them demand levels of dedication and understanding to and of their craft unparalleled in warfare before our time. Combat pilots are professionals, and professionals have standards. Be polite, be efficient, and have a plan... for every conceivable contingency. There's a reason that mission briefing guides have page counts in the double digits. What are the consequences of failing to plan? Background: As part of a squadron deployment to the Syria theater to run a campaign, 163rd pilot "Triv" and I are flying a two ship strike package targeting an enemy-held bridge and communications center in the Al-Ghab Plain. The strategic and tactical situation demanded that we mask ourselves from radar systems position on the western Syrian coast, so the sortie would occur exclusively at low altitude. The strike occurred at the first crack of dawn, rolling onto target at a precise time that gave us enough light for target identification but denied hostile optically guided AAA units visual on us. After the strike was completed, we are egressed north out of the plain towards the M4 highway, which is jointly patrolled by Russian and Turkish forces. We were feeling on top of the world after a challenging engagement with loads of restrictions and threats seemed to go without a hitch. We knew from mission intelligence that sometime later that day a Russian convoy of BTR-82s supported by SA-19 systems would be transiting the highway through the Northern part of the plain, but we assumed that they would not be on the move from Khmeimim Air Base for at least a few hours. We were wrong. As we egressed the valley in combat trail, -2 makes a harrowing call that is guaranteed to alleviate constipation: "1, Jink Left, Jink Jink!" -2 has spotted green tracers fired from the M4 highway up at -1. -1 breaks left, begins evasive maneuvers, and looks to his right to attempt to establish visual on the AAA rounds and threat. -1 has essentially performed an in-place 180 left, gained altitude and increased distance to target, and is now searching the valley to begin a retaliatory strike. However, we've got a problem: -1 has not communicated his direction of pull, intentions, or even blind/visual to -2. -2 has absolutely no idea what -1 is doing or where -1 is, as after making the jink call, -2 began to search the valley for the threat and continue egressing according to his standard contract as the unengaged ship. In the blink of an eye, mutual support has been completely shattered. A two ship, fat dumb and happy, has blundered right into a hostile convoy and failed to communicate and execute a game plan. Both jets are caught with their pants down. -1 is fixing to locate and engage the threat, -2 is attempting to continue his egress and reestablish mutual support with -1. Neither jet is accurately communicating their intentions, position, or even status to the other. To make matters even better, -2 has unknowingly flown directly into the MEZ of an SA-19 and has been launched on. -2 manages to evade the missile and continue his egress, but never succeeds in locating the SA-19 engaging him. At this point, -1 has disengaged and is able to free up some brain power. -1 determines that he is in no direct danger, but -2 certainly is. -2 has called two separate launches on him at this point, and -1 determines that his first and most immediate priority is to disregard the BTRs and re-establish mutual support on -2 who is defensive. -1 completes another 180 degree turn, steers course for -2's location, and begins to search the hills for the threat with the TGP. -2 is ultimately hit by the missile inbound on him, with it detonating below his left wing. At that point, -1 abandons plans to engage the threat and shifts priorities to egressing safely with -2 as a wounded jet. -1 tracks east between the BTRs and SA-19s at low altitude, before turning north to rejoin on a wounded -2. -2 was hit pretty hard, but thankfully retained both engines and it was determined that -2 would attempt a recovery back at Incirlik AFB. -2 recovers gear-up and jettisons the canopy for an emergency egress from the now ventilated jet. Thankfully, there would be no Sandy flights or CSAR On Scene Commander duty for -1 today. So, what is the cost of failing to plan? This is the cost of failing to plan. What Went Wrong The root of this incident stretches all the way back to the assumptions made by the mission commander (myself, admittedly) during the stages of mission planning. It was known that BTR-82s and SA-19s would be operating along the M4 highway that day, but it was assumed that the convoy would sortie well after sunrise. This is first and foremost an error of falsely understanding your enemy. I had known the threat could potentially exist during our sortie window, but I deemed it highly unlikely that we would roll snake-eyes. Proverbial dice hit the proverbial table and two ones were face up. In assuming that we would not encounter this threat, I did not brief a contingency for the flight if we would encounter the convoy. Always defeat doubts of probability with healthy skepticism. "It could happen." Once my wingman and I found ourselves canoeing downstream of the local sewage plant without a paddle, a complete breakdown of situational awareness and mutual support left both jets extremely vulnerable to even less than considerably lethal threats like the SA-19 and BTRs. We had no plan for threat response outside of simply what we anticipated in our target area. We were ripe pickings for our enemy, and only barely managed to escape what would be considered low lethality threats, and not without significant combat damage. Lessons Learned During mission planning and briefing, it is absolutely critical that all possible contingencies are planned for and addressed. The 5 minutes you will save in the mission briefing not discussing a game plan is not worth bringing a jet home Code 5, or worse, not bringing a jet home at all. There's plenty to debrief about our actual maneuvers and decisions made after going defensive, but I'll save those for another time because that debrief and analysis was long enough to eat up almost an entire additional sortie's worth of time. TL;DR? Make your briefings comprehensive and consider all contingencies. Fighter pilots are experts, and experts don't step to the jet with mission critical questions.
-
Presets on UHF radio with A10C Warthog II
Kippy replied to ggoodavish's topic in Controller Questions and Bugs
Selecting preset mode and changing presets around on the UHF radio will not change the frequency displayed in the window on the radio itself. Your currently selected channel or frequency on the radio will show on the UHF repeater in the front of the cockpit, though. Hope that answers your question -
The basics of successful two-ship employment
Kippy replied to Kippy's topic in DCS: A-10C II Tank Killer
I personally, and the rest of the community thank you for your contribution guys. It was no mistake that the first words of my post were thanking the 476th for its work, with a link directly to your the TTP. In my experience teaching guys to fly and fight in the Hog, having complex concepts explained in plain English combined with relevant visuals is very valuable. I want to see the DCS community as a whole take steps forward, not just my squadron, and so I've tried to take my experiences and share them with the public. I don't really want this thread to devolve into something like this. I spent a lot of time flying, instructing, and then writing these posts to try and improve the community's understanding of what a realistic employment looks like. If the 476th released the docs then surely you guys have a trove of knowledge and experience. I invite you to share some of it here in this thread, so we can all learn from it. Textbooks and documents can't describe every possible employment over a fluid battlefield, but having a solid grasp of the fundamentals and some experience analyzing employments goes the mile. -
The basics of successful two-ship employment
Kippy replied to Kippy's topic in DCS: A-10C II Tank Killer
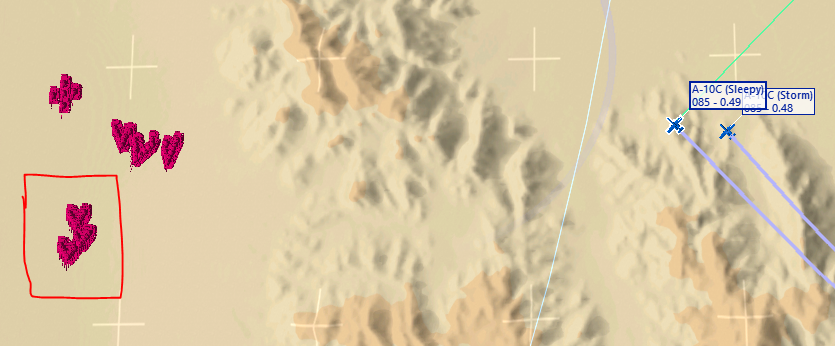
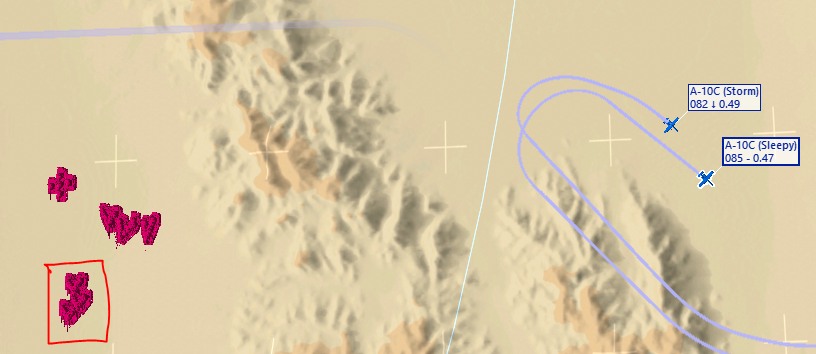
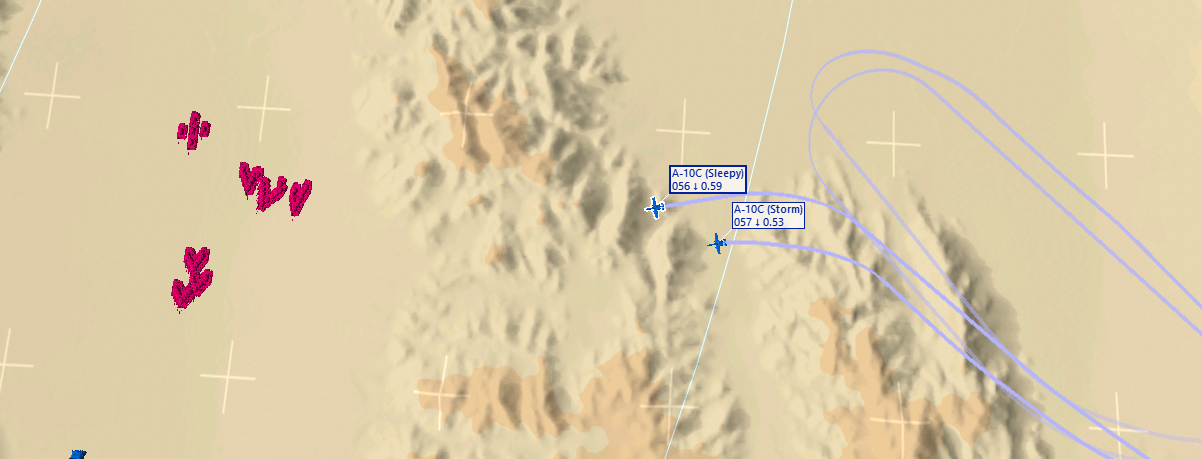
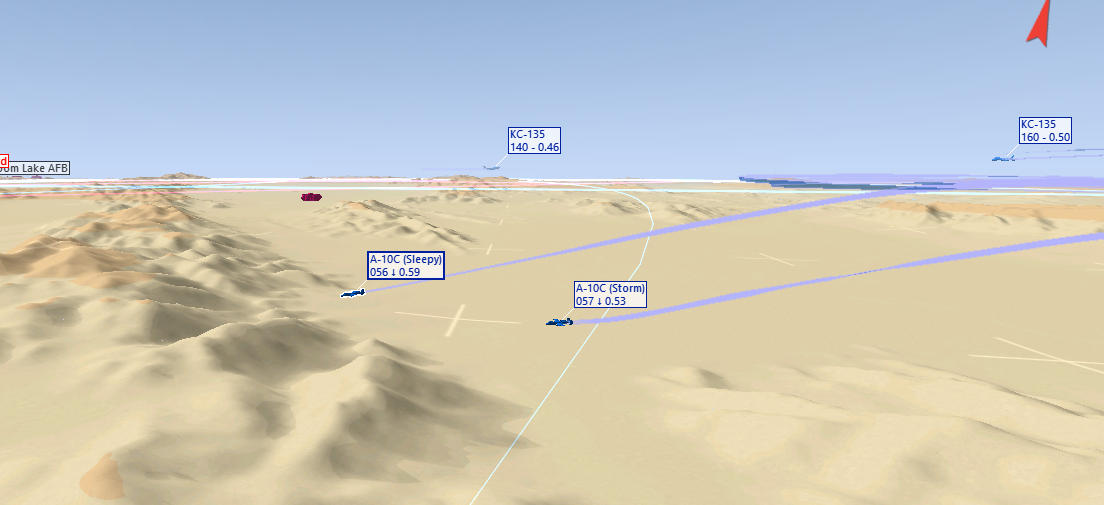
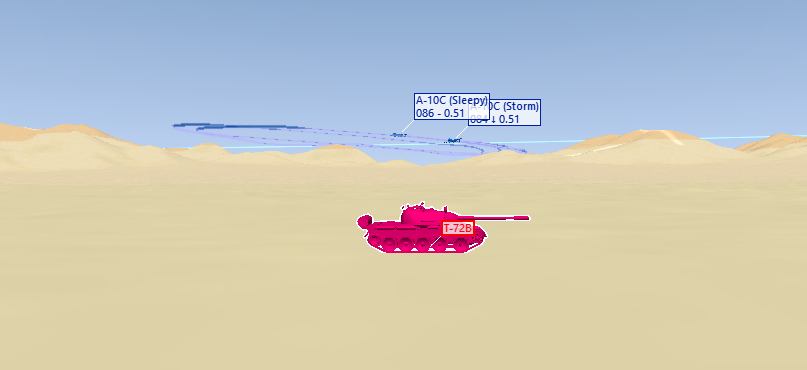
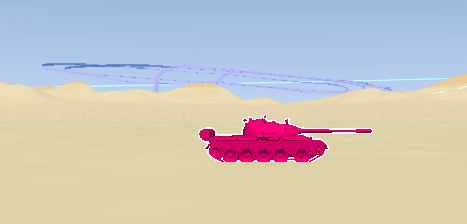
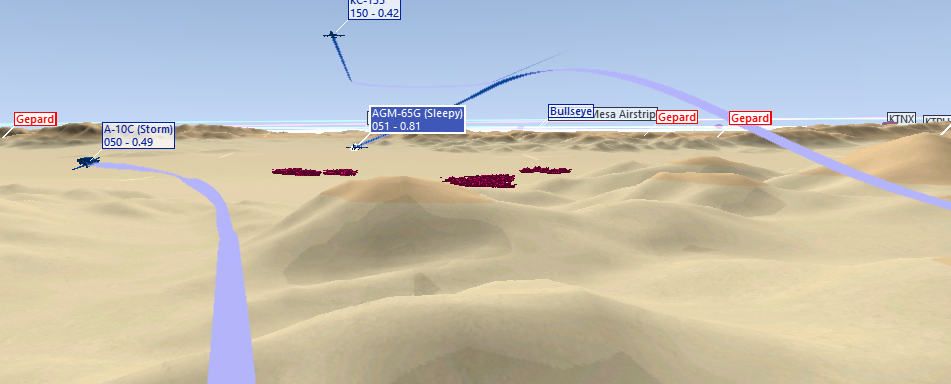
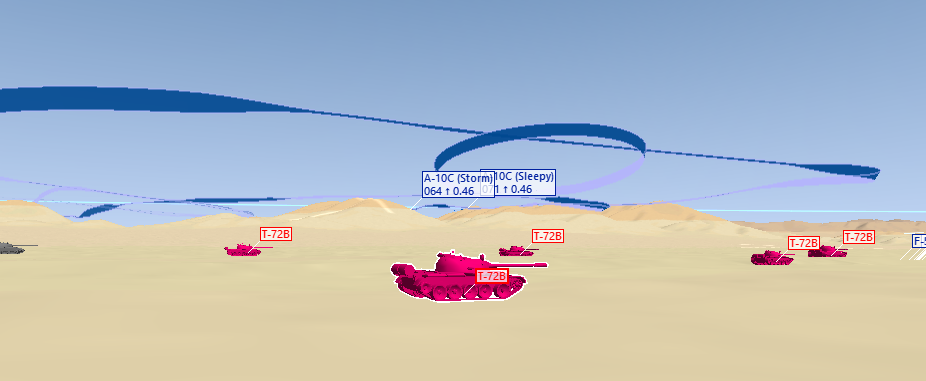
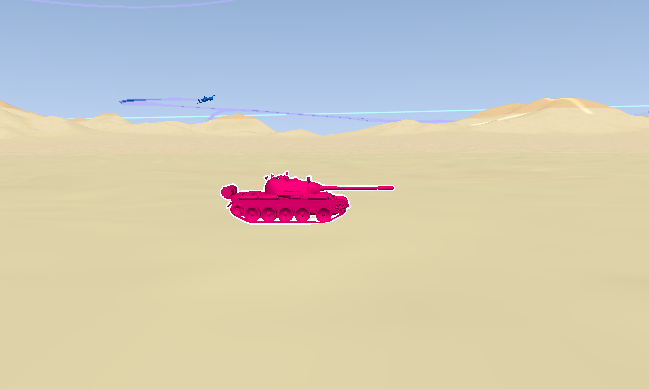
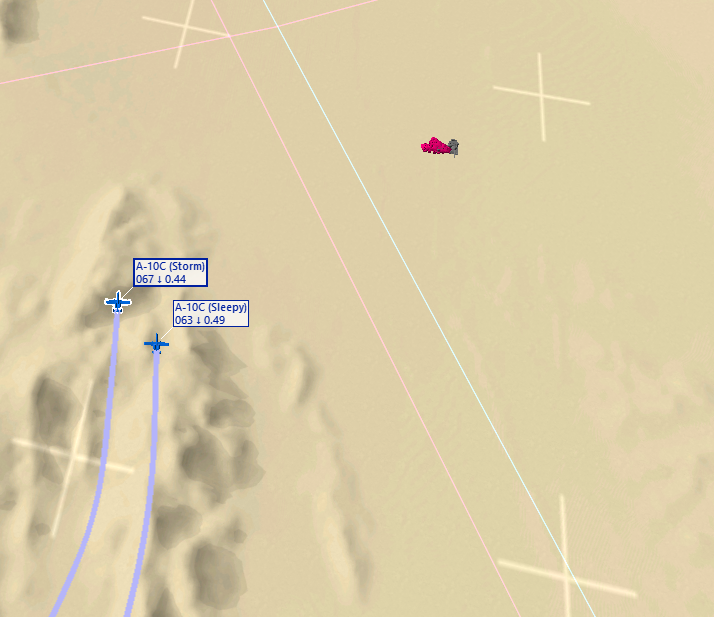
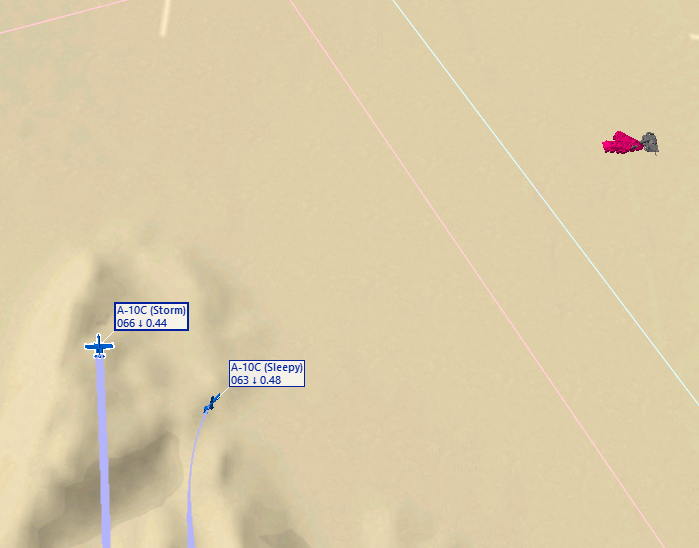
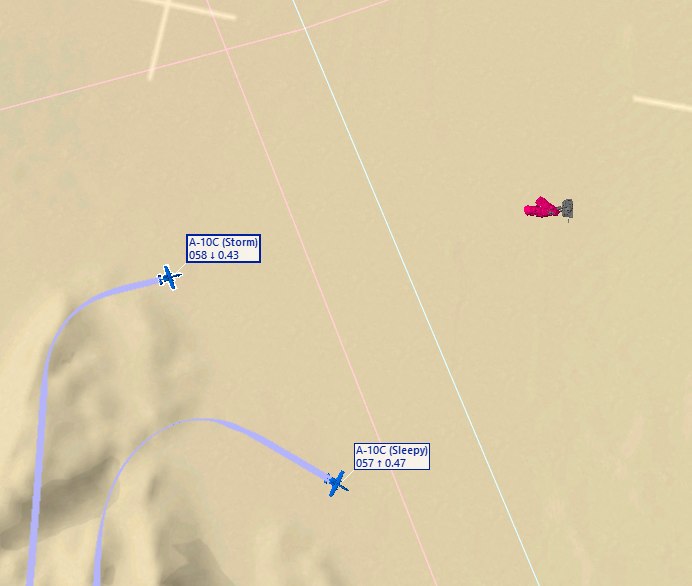
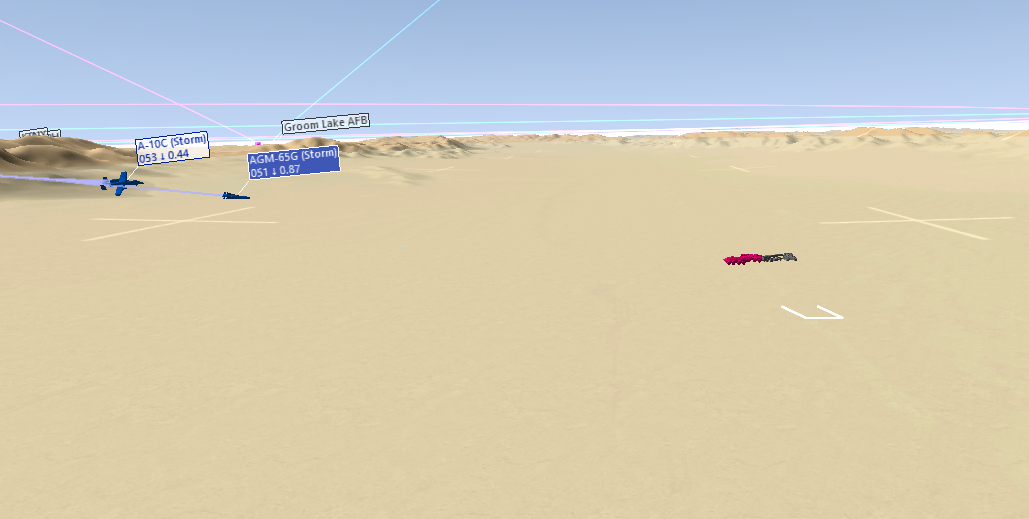
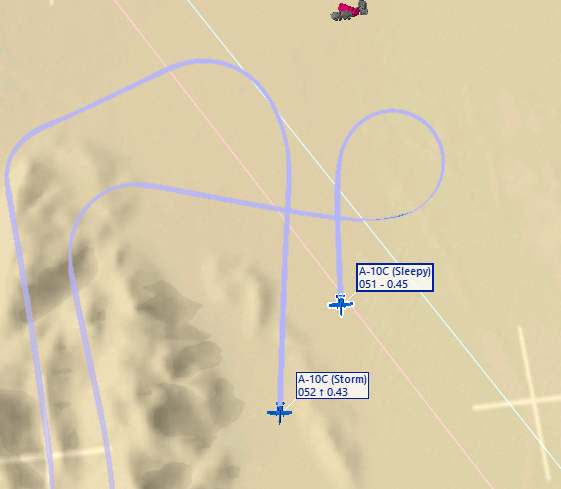
If you've got the grit to stick with it when things get challenging and helmet fires start raging, then you can learn about any tactic, technique, or procedure out there. Never stop learning and shoot to make every flight better than the last. Now that we've built an idea of what a standard shooter/cover pass looks like, let's build on it. In this post I'll introduce the principles of holding and terrain masking. Sometimes getting kinetic demands precision. If you want your element to strike a particular target via a well choregraphed strike, you're going to need time to set that up. Let's take a look at how we can gain that time. Here's an idea of what we're dealing with. We've got a two ship, led by Sleepy with Storm flying as the wingman. We're out in the desert engaging T62.04, three echelons of tanks. Our targets static and aren't going anywhere and we're trying to complete some precision strikes on specific targets, which means we've got plenty of time to hold and plan everything out for a solid fighter to fighter brief. Today's DLOs or desired learning objectives are to build proficiency with attack geometry, practice some terrain masking, and complete a few holds. The hold is flown over a small patch of terrain, with a local cluster of terrain peaked at 6018ft between our IP (RED 12) and the target. This carefully planned setup is going to give us the opportunity to spot targets with the TGP while in the hold, dive into terrain on the in leg, and pop out of it to execute our attack. First, Storm and I complete our FENCE checks and arrive at RED 13 and begin the upwind leg for our hold. I've drawn a very high quality red box around our specific target to aid in identification. Here, we complete talk-on and datalink handoffs as demonstrated in the post above. While we are completing this task, we must also fly the hold. Today's flavor of hold is a racetrack flown in wedge. The contracts for the hold are as follows Wing will swap sides (left/right) in the wedge when changing hold legs (upwind/downwind) Wingman will strive for a 1 mile, 30 degree wedge, but will prioritize tactical responsibilities (vis flow, info flow, etc.) over station keeping. Medium altitude, >10,000' AGL, jets will target 1500pph per side to regulate fuel flow. Low altitude, <10,000' AGL, jets will target 2000pph per side You can see that Storm here is definitely taking contract 2 to its full liberties here, but we're still in the hold and looking acceptable. I'm more concerned with him having his pod on target engaging in good talk-on than holding a perfect wedge. Once the talk-on is done and we've passed the fighter to fighter brief, we depart our IP (RED 12) and run in on the target. Looking at the vertical profile, you can see how once we begin the run-in, we immediately head to terrain mask. Now, when it comes to terrain masking, let's take a step back and think big picture. Like, really big picture. All warfare is based on deception, as some dude who was probably important said, and we must deceive our opponent. When working with masking, I like to think of my A-10 as a submarine. A kind of submarine that doesn't go below 0MSL except when flying in the Netherlands. Think of being in the hold as being at periscope depth, searching for your target. Obviously you must have some line of sight to the target to acquire it, so the odds are quite good that while you are watching the enemy, the enemy is watching you. If I were a Warsaw Pact scrap metal concessions stand employee and an A-10 was in my area of operations, I'd probably never take my eyes off of that devious monster except to wipe them free of my commie tears. When we get down and mask ourselves with terrain, the enemy may reasonably assume that we are on the offensive and prepare themselves, but we deny them critical knowledge such as our attack heading and time to target, along with any information they can extrapolate from that. You can see Storm and I dive for the dirt in an attempt to mask here. Now, this may not look terribly effective, but let's take a look at things from the target's perspective. Here we are in the hold, clearly visible to our threat. However, when we dive down and mask: Do you hear that? In the distance? It's the sound of this tank crew softly sobbing. You can see here as shooter (Sleepy) pops up to unmask and employ, cover (Storm) remains masked until he runs out of terrain... just in time to begin arcing the target and clearing the shooter in visually. After Shooter engages and comes off, you can see cover does some fancy maneuver to rejoin shooter wedge and egress back to the hold. As we egress, we stay low in the terrain to avoid retaliation from any potential threats. After egressing back to the hold, Storm and I swap roles and head in for a reattack, with one key difference. On this attack, Cover is also going to perform the role of decoy. Decoy is going to remain unmasked as he proceeds towards the target, hoping to draw the attention of the enemy armored force. When shooter begins his pop-up decoy becomes cover and moves to arc the target area and meet his contracts. (Visual on target, visual on shooter, AGM on stby) Poor enemy armor never knew what hit it. Attack's complete: flow wedge, flow back to the hold, set it all up again.
-
The basics of successful two-ship employment
Kippy replied to Kippy's topic in DCS: A-10C II Tank Killer
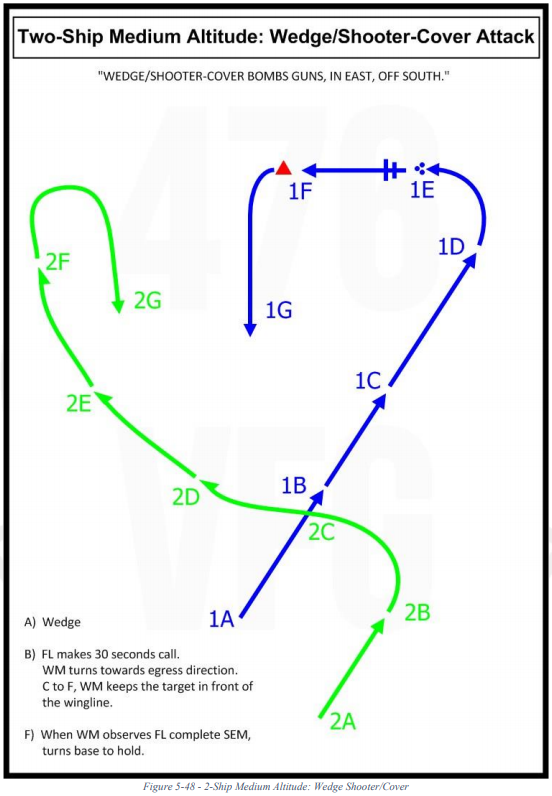
Says the one that flies this stuff with me and helps me formulate geometry! Thanks all for the positive comments guys! Let's take a look at the specifics of a Wedge Shooter/Cover pass. In this pass we have a pair of A-10s piloted by Storm and Sleepy. Storm is flight lead and will assume the roll of shooter for this pass, and Sleepy is the wingman and will assume the role of cover for this pass. The target is a cluster of BTRs to the northeast of the flight, which flight lead happens to spot visually but the wingman does not. If this happens, lead and wing will conduct datalink handoffs or verbal "talk-on" to get both ships looking at the right targets. Sometimes greater talk-on than provided in today's example is required to target perhaps a specific single BTR within a formation, but for today, all targets are equal priority and sort is at shooter's discretion. In this specific employment, it is important to understand that for cover's specific contracts, he does not need to know the individual BTR shooter is engaging, and as such, the flight doesn't waste any time passing that talk-on or data, which is actually quite challenging to do when you are in the middle of a bone-empty desert with no solid reference points. Calls like "sort western BTR" are absolutely useless in cases where you have a large, Fulda Gap tier formations of targets (even though our target today is only a small formation). It's like telling someone taking contact during a firefight in a forest that "THEY'RE IN THE TREES!!!!" Here are our contracts for today's pass: General Visual, naked, no joy, saddled, cleared, supporting are all assumed After rejoin, the flight will egress to the IP Flight will end the employment in the same formation as when started (this contract is specified by the lack of remarks of formation change in the fighter/fighter brief) Shooter Shooter will begin broadcasting his SPI when he turns in Shooter will begin his SEM immediately after employment Shooter will maintain MIL power once in until established off to maximize maneuvering energy Cover Cover will remain visual on shooter at all times Cover will remain visual on the target at all times Cover will make supporting maneuvers in the direction of shooter's off pull Cover will fly no closer to the target than the distance of shooter's employment Cover will keep the target in-front of his wingline at all times to maximize visibility Cover will visually clear shooter into, onto, and off of the target Cover will immediately call any AAA or missile threats and provide shooter with directives for a successful defense if able Cover is HOT, a 163rd vFS standard meaning that an AGM-65 will be kept on standby and should a threat engage shooter, Cover is immediately cleared hot if visual on the threat and is expected to immediately max perform the jet's nose onto target and rifle within 6 seconds of threat acquisition There's a lot of other contracts involved in there too, but I'm lazy and don't remember all of them at the moment... Those are the big ones. Lot's of stuff for cover to do. The pass begins with the flight in a wedge formation, sanitizing the valley for targets. Fighter to Fighter Brief example, with datalink talk-on: Lead would make the BTR formation his SPI via any suitable method, and send it to wing via tasking or SPI donation. At the 163rd vFS we prefer tasking because it puts a nice big red triangle over the target in the HMCS and on the tad. Our contracts specify that shooter donates SPI while in hot to give cover a view on the HMCS of shooter and his path to target, so we try and avoid using it outside of attack runs. Here, Lead will make his 30 seconds to rifle call, which is both an informative and a directive call. Cover will respond to the directive by executing a maneuver at his discretion to meet his contracts. In this case, wing has elected to arc the target. Cover provides a press call to shooter here, to let him know that everything is looking good so far from his end and that he's cleared to continue the attack. [Lead executes his turn in .] [Shooter fires his AGM-65, and begins his safe escape maneuver (SEM.)] As we can see here looking out of cover's cockpit, cover is meeting his contracts: He is visual on both the target, and shooter. Cover has an AGM-65 on standby to engage any potential threats. Lead here makes an optional call to wing here to let him that he wants him to return to the wedge formation. This call isn't required as it is assumed that is what cover will do after the pass, but none-the-less it helps shooter and cover with their mental flows. Here, cover executes an in place 270 degree turn to rejoin wedge. And this completes the pass! All contracts have been met and the attack was successful. Lead and wing will egress as fragged, and set up for another pass.
-
First and foremost, I'd like to thank the 476th vFG for their contributions to the community. Their publicly released A-10C TTP document is largely responsible for having made the study and implementation of effective employment tactics, techniques, and procedures possible for the community. I'd also like to thank @RyboPops for his work on the 163rd vFS documentation and knowledge, both of which have made these operations possible for our virtual squadron. At the core of every combat sortie for tactical aircraft is the two-ship element. We have all heard the phrase that one is none and two is one - and nowhere else do we find it to be more true than in the area of operations. The tasks and challenges of navigating a battlespace, sorting friend from foe, and prosecuting targets are nothing short of monumental. It is very easy for all of these factors to cascade and induce what we know as a "helmet fire," where a pilot's situational awareness, understanding of mission objectives, and flows all bust the hard deck at once, completely destroying all tactical effectiveness of the aircraft. One of the most effective solutions to the combat a helmet fire is to bring along your own personal firefighter - a dash 2, wingman, self-aviating baggage, or whatever other choice words you want to describe the second brain and set of Mk.I Eyeballs you have over the target area with you. With a wingman at your disposal, the monumental tasks demanded by employment become delegable and likewise much more manageable. A pair of jets, also known as an "element," comprised of a flight lead and a wingman, and here-after may be referred to as "lead" and "wing" respectively. Big picture, it is important to understand that flying with two aircraft over the battlespace rather than one creates nearly as many questions as it proposes answers for. It is for this reason that the wingman acts akin to an extension of the flight lead, following directives at the instruction and discretion of the flight lead, rather than moseying around all fat dumb and happy. It's no result of a personal spat or a god complex of the flight lead, despite what some wingmen may tell you, but rather a matter of tactical effectiveness. All's well here, but in any endeavor where roles are assigned, are there not responsibilities to follow? Hell yes there are, and there's responsibilities out the wazoo for both members of the element to fulfill. The lead and wing are a cohesive unit and shall co-operate and perform for better, or for worse. In military flying we call these responsibilities contracts, because when you boil it all down and let the white stuff float to the top, these contracts are simply agreements between lead and wing of what they will do, when they will do it, and how. Contracts are your friend. Know your contracts, memorize standardized contracts, and remember the golden rule of flying in a two ship: fulfill your contracts. Failure to fulfill contracts is the leading cause of shoot-downs and LPA investigations into accusations of verbal abuse by senior officers during debrief. "But Sleepy," you ask, "What contracts do I have specifically when flying with my friend?" Good question, enthusiastic aviator. Annoyingly, the answer to this question is "it depends." Generally speaking, contracts vary heavily by mission, but are always discussed and a consensus formed during a mission briefing. There are standardized contracts, things such as formation sight pictures to maintain, procedures to follow during a rejoin, or procedures to carry out a role during an employment. These standards can be set across an entire squadron, wing, aircraft type, or even as general USAF policy. To oversimplify, here are your responsibilities for your element: The single most important responsibility a member of the flight can have besides keeping the lift vector away from dirt is to remain visual with the other ship at all times. If you go blind - call it, even if it means scrubbing an employment to a cold pass or a knock it off call. Many maneuvers and employments make the assumption that both ships are tied visual. Remaining visual is the fundamental cornerstone of mutual support. And again, oversimplifying, here are a sample of objectives and contracts to meet specific for the A-10 for every flight: Accomplish a formation or interval departure, depending on weather conditions, training objectives, and live forward firing ordinance restrictions For a straight-ahead departure, rejoin to the briefed formation via the following contracts Lead will maintain 200 KIAS Two will re-join on the left. Wingmen will use 30 to 50 KIAS of overtake. Stabilize in route with four ship-widths lateral spacing. If an overshoot occurs or is imminent, advise the flight on the radio When accomplishing a change in left or right position during formation, the wingman will only do so by performing a cross under maneuver, for which the standard contracts are... [set by TTP document] Getting the idea yet? Good. The battle book is full of contracts and responsibilities for different situations. I could explain them all to you here, but I'm lazy and don't want this forum post to be large enough to be seen from orbit. So, very well done, ardent flight lead! Hopefully you've now gotten your element airborne with as many pieces on the airplane as practical and only seven non-mission critical redballs. What formation shall you have your flight utilize on departure? There's a few you can use, and they are broken into two categories: Administrative Formations Tactical Formations As you can imagine, administrative formations are used to... administrate the formation. Any time you are transiting non-combat airspace, around the airbase, or doing anything that generally doesn't involve turning enemies into dead-emies, you're in an admin phase of flight and are going to fly an admin form. There's a few you can choose from, all with different objectives and purposes, and they follow in no particularly intelligently organized order: Administrative Formations: Fighting Wing Super easy to fly Wingman must be a lobotomtie to mess up, but nonetheless they'll never cease to amaze Allows wingman ample heads-down time for things such as radio pushes or CDU manipulation Echelon (Left or Right, various spacing) Route Often used when navigating from steerpoint to steerpoint for long distances Not too easy, but not too demanding. Builds proficiency Close Used for wx penetration Very demanding to station-keep Often used to make an overhead break look very pretty Used to punish naughty wingmen After selecting your wingman's desired level of fatigue and navigating to the AO, you're going to want to head to a tactical formation. Pretty parade formations and proximity fused munitions don't play nice. Here's a sample of few in the A-10 community that we like to use, in no particular order: Tactical Formations: Line Flown at a 1 mile distance Great visual cross coverage, and thus great for mutual support Tons of maneuvers to move the element around and transition into other formations with ease, provided time and spacing from target and threats Shooter/Shooter AGM-65 employments Impractical at low altitudes Can be tough to station keep, is not very intuitive Inflexible when things(reattacks and pushes) are moving quickly or in close proximity to a target area Wedge Most often used Very capable low altitude formation Great maneuvering flexibility Weak against air threats Good mutual support Combat Trail Most maneuverable Cheese easy to maintain Best utilized in sorties with dynamic low alt terrain masking Great mutual support for lead Very poor (near-zero) mutual support for trailing aircraft, great way to turn -2 into flaming scrap metal in high threat environments if he keeps going blind and is more hassle than he's worth Now we're getting somewhere. Not only do we now have a rudimentary understanding of contracts, but we now have a rudimentary understanding of what formations to fly in when messing them up! Alright, so you've had some emotionally impactful heart-to-heart discussions before stepping to the jet and have held hands in the sky for a while, but now it's time to learn the basics of making stuff stop existing. Generally speaking, you are going to fly to a target area and begin searching for the next enemy vehicle, building, or infantryman for unscheduled rapid disassembly. There's lots of brevity and procedures here like datalink and holding contracts that put me to sleep, so I'm going to leave those to you to read on your own time, and instead explain the fun stuff: You and "1 repeat last" in the #2 jet are going to pick something to explode, conduct some datalink and talk-on magic to make sure you're looking at the same thing, and make it stop living. Over the target area, there are many different employment tactics to utilize, and a whole new set of contracts come into play. Each aircraft is going to assume a role, or a job with briefed contracts on every employment. Here are the roles we use in the A-10 community and what each of them do over the target area: Shooter Puts warhead on forehead Only role to actually employ weapons Cover Provides mutual support to the shooter Specific contracts will be briefed, but generally speaking cover will either arc the target or establish a parallel attack axis and visually clear shooter into, onto, and out of the target. If any threats decide to get cheeky, cover is usually briefed to have a maverick on standby and make the threat regret having been ugly. Eyeball Employs the TGP during an employment Most often lases bombs from a standoff orbit or lead/trail attack When you find your unwilling (thankfully we don't ask for consent here) ordinance recipient, you're going to conduct what's called a fighter-to-fighter brief, which is a fancy radio call containing all the gooey details of the employment. Here, flight lead will pass the desired formation, roles, weapons, impact spacing, sort, ingress direction, egress direction, and any additional remarks. Lots of info will be coming at the wing all at once, so I recommend personally having a pen and paper ready for every fighter to fighter brief. FTR-FTR-Brief calls will generally follow this radio format: [Callsign,] [Formation] [Roles] [Weapon(s)] [Effects Timing] [Sort] [Ingress] [Egress] [Additional Remarks] Here's an example of a comms flow: The fighter to fighter brief carries some contracts and assumptions of its own. There's a handful of them, best to look it up in the battle book. The attack run it itself carries standard contracts as well: Wingmen will ingress on the outside of the formation and visually clear through elements toward the target area. Flight members shall not employ forward-firing ordnance with a friendly aircraft in the HUD FOV (Clear avenue of fire must be established and maintained! CAF violations are a huge no-no and are not a great way to enhance your military flying career.) Brevity terms here, but NAKED, NO JOY, SADDLED, CLEARED, and SUPPORTING are assumed Element leads will come off the target away from wingmen Wingmen will come off in the same direction as element leads, threat permitting During an attack, all of the roles have their own contracts that they must meet during the employment. To fulfill their contracts, ships will fly patterns known as attack geometry. There are oodles and oodles of different geometries that I like to call "tactical spaghetti" because of the diagrams which resemble absolute chaos, but once broken down, are easy to understand. Here's an example of the geometry that would be flown for our hypothetical shooter cover Maverick pass in our FTR-FTR brief example. It is important to understand the geometry exists to aid in meeting contracts. Geometry is not the end all-be all of an employment, and geometry can and often must be manipulated to fit unique tactical situations. That is why it is important to understand attack geometry at a fundamental level, rather than simply flying the spaghetti pattern and wondering why it doesn't work when you don't offset your approach to the target by 45 degrees. The combat environment requires the element to be flexible and maneuver as needed to fulfill contracts. Briefed attack geometry simply gives you suggestions - modify and stretch it on the fly to make it work. And those are the basics of some of the tactics! A very watered down, very simplified, very spotty, dangerously nondescript explanation of it all, but it's what I can offer for now. I'd like to reiterate that everything here has been massively simplified, stretched, liberties taken, and all that jazz to deliver to you a "LIGHT" reading experience on the forum. There truly isn't much you can do to build comprehensive knowledge of employment and these skills rather than slogging through hundreds of pages of documentation and flying the sorties for yourself. I may write up more of these, exploring concepts in greater detail if there's any community interest, but I just wanted to perhaps help lay some foundation for higher-level discussion on tactics, techniques, and procedures here on the forum.
- 24 replies
-
- 11
-

-
-
I see, thanks for the clarification. The problem with the suggestion feature addition is that it seeks to solve a problem that has more practical solutions that work fine for the rest of the crowd. I run a 1665 unit template in Syria with no triggered spawns and a 2637 unit template in Nevada with triggered spawns and receive no serious performance hits from unit count. I know anecdote isn't really a solid argument, but big picture, none of the guys I fly with in either environment have reported performance issues related to unit count. I just want to help you get to the bottom of your problems here rather than waiting on ED to hopefully (but probably never) implement a new feature as a crutch. Syria has had some notable performance issues, specifically high memory use since release. Regarding Tacview, check this post out. It gave me a nightmare of an FPS problem on that mentioned 2637 unit Nevada mission until I disabled Tacview and rediscovered those pesky 30fps than ran off. Yes, you won't have recordings - but it's a tradeoff. Want to play an interactive PowerPoint or have acmi files? Try disabling Tacview recording, try following some Syria optimization guides (Which generally recommend to dial back preload radius and set terrain textures to "low," to summarize), and some sneaky trigger solutions... because ED is probably unlikely to implement this feature anytime soon.
-
The resource impact for triggered units is quite low. Some users fly on missions with triggered spawns for 2,000+ individual units. I have personally found issues with high unit counts only when recording Tacview files client side, so perhaps if you're running Tacview have a look there. Having units teleport to waypoints is a counterintuitive solution to a problem that's already been solved. You could use flags and triggers to determine when a group teleports, but it's just less intuitive than having a group/unit in zone trigger for a different threat group. I don't think it's a bad idea per se, cutting down on units per mission is generally a positive change, but I think if your PC goes full strugglebus mode with 50 MANPADs as opposed to 10.. I think there's larger issues at play.
-
The replay system as a whole needs a rework. Replays are vital to the debrief and the analysis of a flight. Tacview is very powerful, but I'd give up a few appendages to have proper HUD tapes.