
Sokol1_br
-
Posts
4306 -
Joined
-
Last visited
-
Days Won
2
Content Type
Profiles
Forums
Events
Posts posted by Sokol1_br
-
-
No, ATMEGA328 is not supported in MMjoy2 firmware.
Only these: ATMEGA32u4, ST90USB646, ST90USB1286 m/c - all 16 MHZ, 5V.
For avoid broken off the USB connector imobilize the cable:![[Linked Image]](https://forum.dcs.world/applications/core/interface/js/spacer.png)
-
 1
1
-
-
11 hours ago, Treker said:
Sure.. someone locally was selling WarBRD base with WarBRD stick,
In theory should be compatible, WarBRD sitck has few buttons and use Shift Register circuit, like in Warthog grip.
★ 1 x Dual-stage Trigger
★ 1 x 8-way POV Hat + Push
★ 1 x 4-way Hat + Push
★ 2 x ButtonsBut could happen that VirPil changed the Shift Register in WarBRD grip for another model other than the CD4021 used in Warthog.
I suggest ask this question in VirPil forum.
The VPC WarBRD Base is compatible with the following Tm grips (beside their own grips):
★ TM F/A-18C Hornet Grip*
★ TM Cougar Grip*
★ TM Warthog Grip*-
 1
1
-
-
Replace the potentiometer, the model used is this:
-
1
-
-
On 11/8/2022 at 5:14 PM, pr3sidentspence said:
Well, now to see if I can actually get the hall sensors' axels inserted back into the gimbal. Things look right, but they aren't going in far enough, I worry that there might be two holes that need to be aligned and I have messed that up.
Case you want replacement for the Cub Pilot UberNXT Hall Sensor, the one used is made by Midori (Japan), the QP-2H/QP-2HC.
https://www.midori.co.jp/wp/wp-content/uploads/2022/03/MIDORI-English-Catalog.pdf
https://theairtacticalassaultgroup.com/forum/showthread.php?t=18819&p=204360&viewfull=1#post204360
-
1
-
-
Relatively easy, with few clicks you load the profile for the new grip.
-
1 hour ago, Dogmanbird said:
didn't know about the haptics and electronic detents. sounds exciting

It's a new NASA tech, so on homage TECS will be released when NASA land a pair of humans on Moon, supposedly in 2024.

-
2
-
-
This deadzone in firmware is need to compensate the center play of plastics gimbals.
-
On 8/21/2022 at 9:16 AM, einarabelc5 said:
NXT doesn't fit my hand that well.
A point to notice is that NXT is no more limited to one type of grip.
SCG - pompously meaning "Space Combat Grip" - in attempt to catch the "cosmosim" community, but being in reality a "Generic Combat Grip" (don't attempt by replica of some real grip); was designed for desktop use, so they make the grip less tall possible, not much friendly for big hands.
But F-14 and KG-12A grips have more space for hands. MCG grip was not approved - by VBK; to be used in NXT base, due their heavy mass and height, too much for base springs.
-
1
-
2
-
-
This solution AxesToButton work but brakes are 0 or 100.

Instead buttons can set the twist left (from 50% default position to 0%) for generate a new virtual axis and twist right (50% to 100%) for generate another virtual axis, in both cases varying proportionately from 0 to 100% proportionately to twist axis movement, and then assign this two new virtual axes for planes that requite independent right and left wheel brakes (toe brakes).
And can use one of the new virtual axis for planes with "differential brakes" (e.g. Spitfire, MiG-21... - press wheel brakes, move rudder for select the wheel that want brake), in this case setting twist for left (more wrist friendly) plus a button or key modifier for "Wheel Brakes", for differentiate from "Left Wheel Brakes".
Advantage is that in this way you have a proportional control of brakes, instead of the "ON-OFF" of the AxesToButton.
How set the new virtual axes, using VKB DevCfg:
1 - Click in "Save" and save the actual profile in the joystick in some computer folder, just in case.
2 - In "Profile" tick for the new virtual axes the boxes "En" (enabled) and "Vs" (visible), if use axes #5 and #6 will have similar DX names: Rot X and Rot Y, but can use any number not used in the profile.
Attention that in front Brake V1 are a sign of + for one axis and - for the other axis.
In % you can set - in want; a "deadzone" for brakes axes start respond, e..g. 5%, so avoid that any small unwanted movement of twist axi active the brakes.
3 - Is for make this axes visible for games.
4 - After done click "Set" button for save this new settings of the profile in the joystick controller EPROM.
5 - After click in "Test" and see if work as expected.
EDIT - Tip for assignment:
The twist axis - Rot X axis; will be picked first than Rot Y or Rot Z, since is this axis that generate the others, so have two options for deal with this:
1 -Before hit the assignment box, twist the stick a bit for left or right and hold, open the assignment box and now twist the grip until the end of movement, the virtual axis will be picked.
2 - If don't use the twist axis in any game, in DevCfg "Profile" just un-tick the box "Vs" (visible) for axis #3 - Rot X (the twist axis), then this axis will be hidden for games.
-
On 8/8/2022 at 4:29 PM, MAXsenna said:
Hmmm... Yeah, it is. Was sure it was gonna be a force sensing one. Too small base for FFB, but it seemed kinda dampened. Hmmm...

My bet is that it's just a adjustable "clutch" like in VPC Tork pedals or the "dry-clutch" of VPC Gunfighter base.
ForceSense base it's already available - by Real Simulator; no much sense VirPil risk in compete in this "niche of a niche."
-
1
-
-
On 7/20/2022 at 2:10 PM, okopanja said:
E.g. I own the Gladiator EVO, and would like to see better macro support.
Have you tried the MACRO wizard in DevCFg, under Profile?
SpoilerIs relative easy to set, just delay settings for key press is misleading labeled as "REPEAT".
You can set up to 118 macros, can chain one MACRO with another.
E.g. in ARMA3 Wasteland mode the eject from planes, heli require type "Ctrl+V", then hit "Enter" for confirm. PITA when a IR missile have locked your plane.
For solve this I set a MACRO for VKB Gladiator Mk.II button #13.
First change this button for TEMPO mode (steep not needed), so short press is normal DX button 13, and the long press fire the MACRO.
If your MACRO need more than 4 key press (Action#) continue in the next line.
The only trick is that your next MACRO will be not necessarily the #2, but the number of the line used for start this MACRO.
If your first MACRO use 10 key press, will take the first 4 lines.
So the second MACRO will by # 5, and so on.
If your MACRO have more than one keypress sequence, for set a pause between one sequence and another use the VOID function in one cell. So the first sequence end, and start the following.
After set an MACRO in the Buttons tab link a button for fire this MACRO. And of course enable Keyboard in Global tab.
-
On 7/28/2022 at 4:00 PM, Jascha said:
In IL2 it's trickier since you have to use a software that will hide actual physical axis during the mapping (otherwise you won't be able to bind vJoy axes).
An option for set the axes in IL-2:GB (Bo'X') is edit the file "current.action) in game Input folder.
QuoteIf I recall correctly, you've said that you use your joystick twist axis as a virtual brakes with T-Link where brakes don't work gradually but only 0-1 (like BrakeV above), is this correct?
I use VKB Gladiator Mk.II twist for "wheel brakes" and this axis give me proportional movement from 0 to 100% (or like BrakeV1), not the 0 or 100% of T-Link.
Half of twist give a full axis, the "Rot X" axis, responding to twist left:
For this T-Link is not needed, just need chance two box in DeVCFG for twist axis, one removing the center position of the axis, and other for invert the response, without inversion is need twist for right, less practical than twist for left. Too don't need create virtual axis.
What I need test is the configuration in DevCFG like you did, but with the joystick twist axis (T-Rudder in your case) pressing one virtual axis for right, one for left, this will give "toe brakes" without extra software, modifiers and without need use rudder pedals.
The same axis plus a modifier button can be used for "wheel brakes". Gladiator, have two modes for buttons, so I can use trigger to be the modifier, setting one mode for ground use, where trigger is not needed. So press trigger, twist for left = wheel brakes.
I am avoiding touch Joystick Gremlin due vJoy, I have headaches with this driver setting R/C transmitter as computer controller for R/C model simulation.
 Quote
QuoteMaybe I'll post a step-by-step tutorial how to configure Gremlin for VKB T-Rudder soon (for future readers).
UPDATE:
I've posted the guide in separate topic.
Nice, I suggest post too in VKB.forum and Reddit/r/HOTAS.
-
On 7/21/2022 at 4:02 PM, Jascha said:
Left pedal ~50% down: (and right brake ~50% released).
"Dead horse"... But curious with the differences of operation between TinyBox (early T-rudder) and BlackBox - in the last the brake force being proportional to rudder movement, I check DevCfg manual, there are four options for "virtual brakes":
BrakeV - is the default setting for TinyBox of early T-Rudder Pedals, the brake force is 0% or 100%, going for 0% in one wheel when rudder is 8% off the center for this side.
BrakeV1
BrakeV2
BrakeV3
BlackBox probable use BrakeV1 or BrakeV3.
BrakeV1 - (from manual) "On rudder pedal moving differential brake of corresponding direction is engaged. It begins when rudder axis response exceeds value of % field (Fig. 3.11). 3.11. On brake button press both differential brakes work. On rudder moving idle axis will reach engaged then they will move together. On brake button release both axes will be released. Idle to zero engaged to value depending on rudder pedal response value."
Curious is that BrakeV1 in TinyBox move the virtual brake axes -, e.g. move rudder for left, engage left brake in proportional way; without need press the button in joystick, but T-link need be active. Pressing the joy button wheels is brakes 100%, even with one already braked less e.g. 50%.
Anyway brake always working with rudder movement is dangerous.
Don't figure practical use for this settings, despite looks ideal for taxi- as resemble more an "toe brakes"; is dangerous for takeoff run when the rudder is needed.
BrakeV3 is similar to Brake1, but inverted, pushing left pedal, cancel the brake force in right wheel proportional to rudder movement (from center to left). Require assignment of the brakes swapped and may make less sharp turns on ground.
BrakeV2 is similar to BrakeV but the activation seems more instantly, less than 8% of rudder movements cancel the brake in respective wheel.
-
10 hours ago, schmiefel said:
I have no clue where to get one with a better designed hat from that fits in there.
Or you make one with 3D printed parts, examples:
https://www.thingiverse.com/thing:3641494
Or try adapter a commercial "multidirectional switch", eg. the expensive OTTO.
https://br.mouser.com/datasheet/2/603/T8_T_tactile_mini_trim_switches_catalog_page-1815508.pdf
https://br.mouser.com/c/electromechanical/switches/multi-directional-switches/?m=OTTO&sort=pricing
But before analise if you have space inside the grip for fit one these.
-
1
-
-
3 hours ago, okopanja said:
Current contenders would be a Warthog, Virpil and potentially VKB TECS.
WingWing have nice models, although more specif aircraft (F/A-18) oriented (like warthog) with more attractive price.
-
1
-
-
4 hours ago, Jascha said:
@Sokol1_br Well, if you had permanently enabled virtual axes (one for left twist and the other for right twist) you could bind them both to "wheel brakes" (axis = both wheel brakes input) and corresponding wheel brakes (axis = left / right brake input) using two different modifiers.
Yes, It's a good alternative for use the twist axes, and give proportional brake for both system.
But the question is that create the virtual brake axis (just one for twist left) in (VKB) DevCfg was a "hit and miss" thing for me, took many attempts, re-flash firmware, so for don't risk in "broken" all again, just enable T-Link eventually is not big issue, I fly mostly British planes in WWII sims.
-
8 hours ago, Jascha said:
What? But don't you use the twist axis from joystick? If it's an axis, the virtual brake axes should work the same (not like buttons).
Yes, but I use "half" of twist axis (left movement) of VKB Gladiator Mk.II for "wheel brakes", because in IL-2 Sturmovik: Great Battles this command work for any plane, regardless RL they use "toe brakes" or "British brakes", giving differential brakes when used combined with rudder movement.
Need use T-Link "virtual brakes" for DCS and IL-2 Sturmovik: Clod BLITZ planes that use "toe brakes" (Luftwaffe, USAAF...) to be able to taxi.
-
3 hours ago, Jascha said:
Understand, this is better than I have, 0% or 100% only.
Could be because you are using Black Box controller - I use the old Tiny Box; and probable with this new controller you have brake force proportional rudder pedal input.

So your only problem is the axes in 100% when you expect 0%, then using (VKB) DevCfg make a backup of actual profile and test inverting the rudder axis (as above).
If this solve the brake issue, but result in rudder inverted, you can fix rudder inverting in DCS controls.
-
9 hours ago, Jascha said:
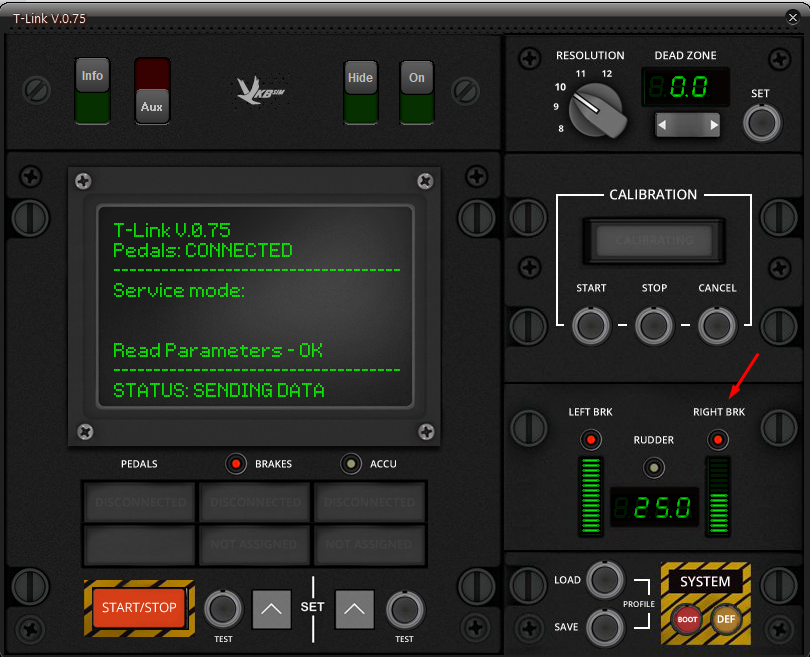
Below, Brake Source Button in, LEFT pedal at 50%, RIGHT pedal - no input:
There's something strange with your pedal axis, this 25% in Right Brake vertical bar.
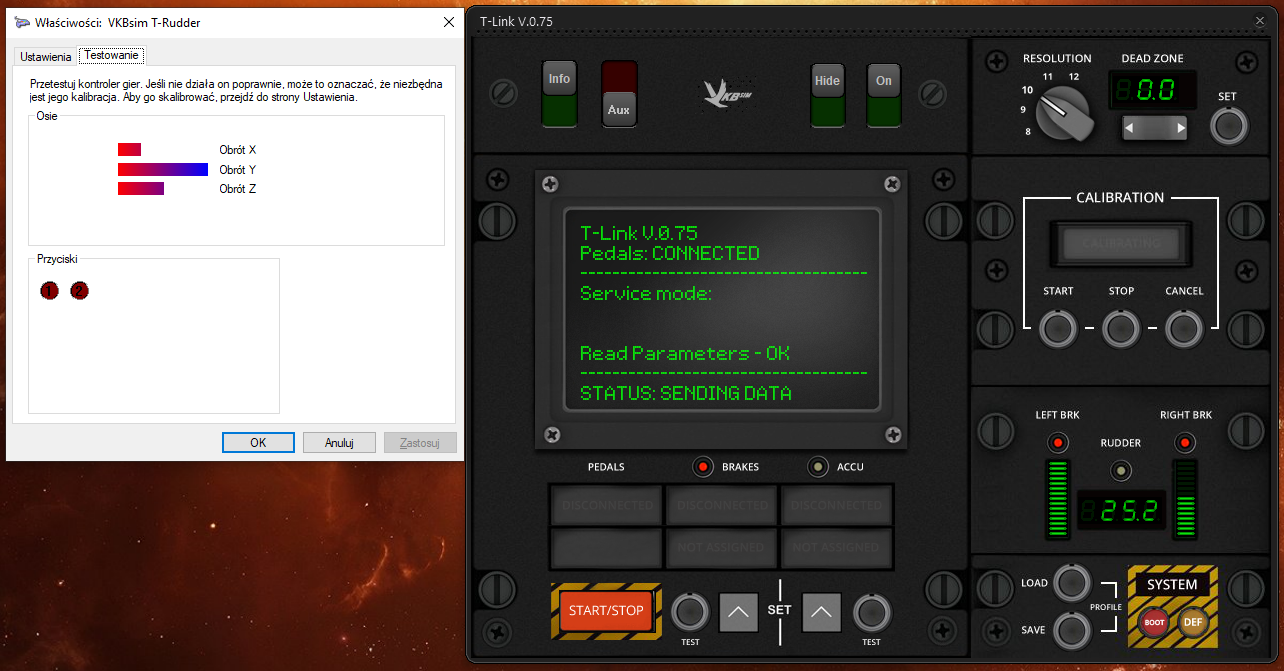
Here when I press the joy button for T-Link Brakes, the "Left brake" and "Right Brake" bars goes full (100%).
In Windows Game Controllers, notice the axis "Eixo Z" full pressed for the Right Brake (and the Y axes full down for Left Brake)
Now when I press rudder pedal for right, the axis "Eixo Z" goes for 0% as well in T-Link just one green line of vertical bar is lit.
Here no way to have 25% in the T-Link vertical bars (bakes), when the rudder balance goes (from center 50%) to ~57-58% (or 47-46%) T-Link Right Brake (or left) goes immediately for 0%.
BTW - In DCS you need invert the axis of T-Rudder in rudder assignment?
This axis is calibrated? In (VKB) DevCfg look under Test tab. If need calibrate make this in DevCfg software, don't use Windows Game Controllers.
If yes you can invert this axis in (VKB) DevCfg software (firmware configurador), is the parameter "R" - Physical data inversion in Profile.
Anyway make backup of the current profile before make changes, in Action > Save.
-
1
-
-
17 hours ago, Jascha said:
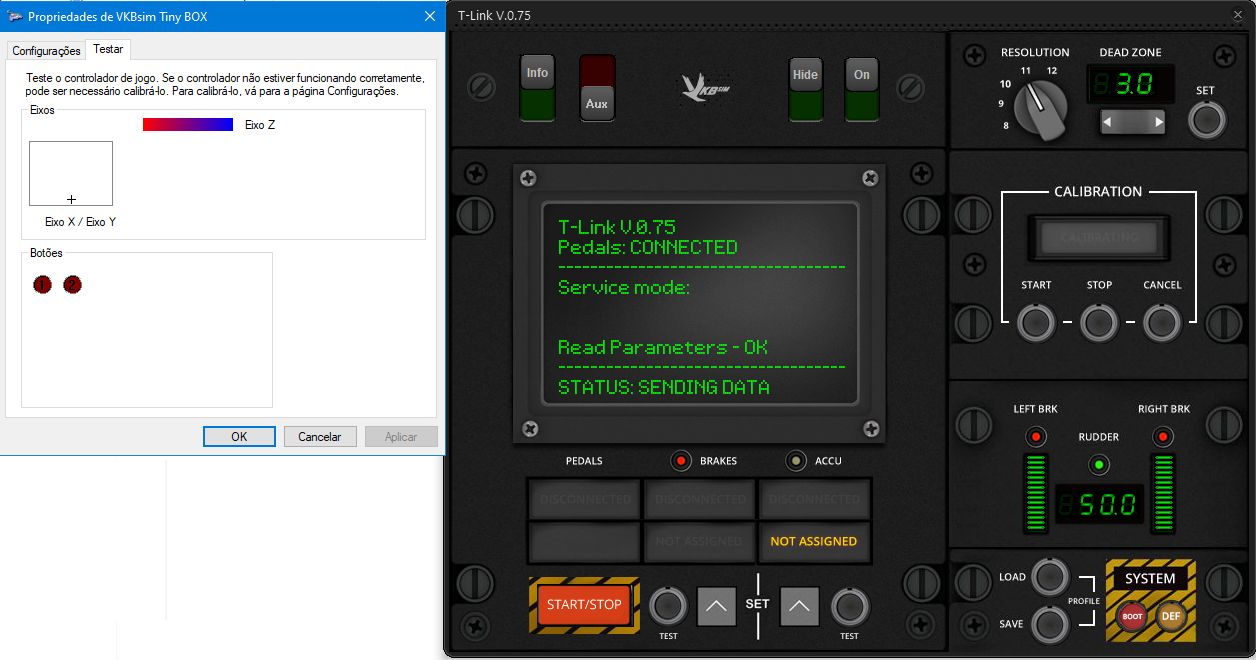
No idea what I'm doing wrong but two virtual brake axes work for me like this: just pressing the T-Link Brake source button (no pedal input at all) acts as full brake:
This is how T-Link work, by pressing the assigned joystick button the two virtual axis goes for 100%.
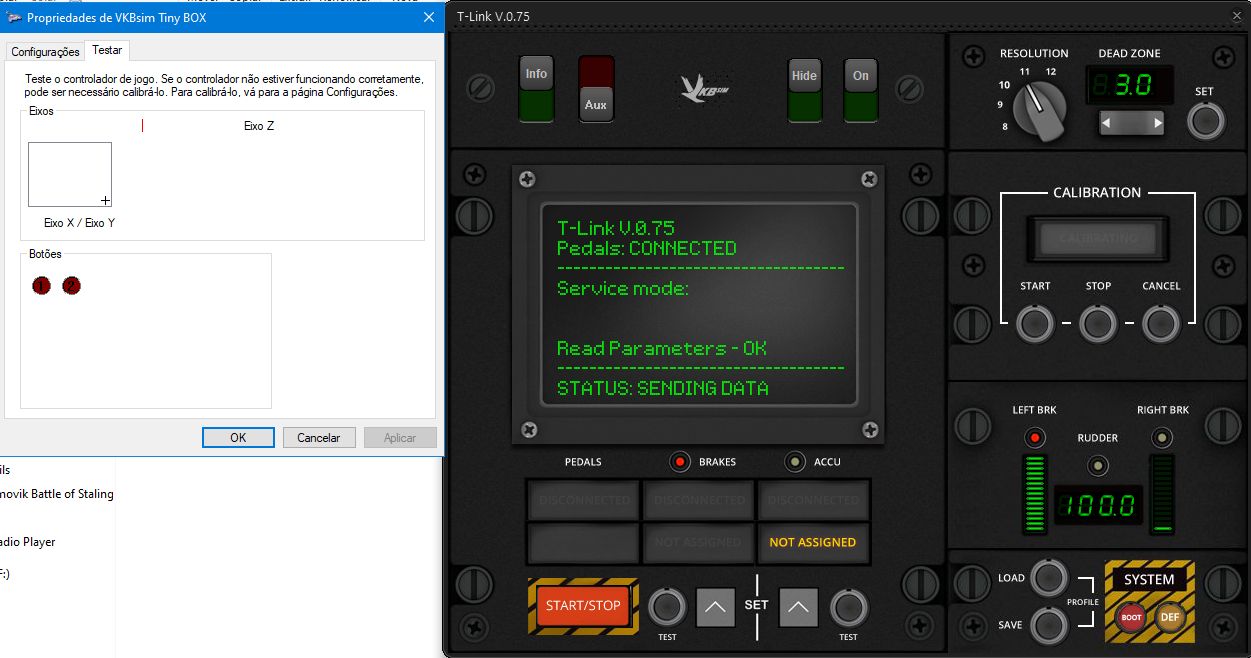
QuoteThen pressing the left and right pedal decreases the brake input. Also - in T-Link window right brake indicator is left pedal and left brake indicator is right pedal.
Below, Brake Source Button in, LEFT pedal at 50%, RIGHT pedal - no input:
Thus is correct, by moving the rudder for left, you keep the left wheel braked and release the brake on right wheel, so the plane turn left.
The pedal movement dont generate the brake force (like a "toe brakes"), but a "balance" for the two brake axes pressed by the button on joystick. It's like (RL) Spitfire brakes work, the valve controlled by Rudder pedal bar vent the pressure in the opposite wheel.
QuoteI wonder if it's possible to leave the two virtual axes permanently enabled from the VKB profile configuration tool. But this software looks like you need a PhD in mathematics to use it.
Yes, you can set the two virtual axes in DevCFG software and save in T-Rudder Black Box firmware.
See this topic, the softwares mentioned are old, this was pre T-Link release; but with actual versions work in the same way.
https://theairtacticalassaultgroup.com/forum/showthread.php?t=19016&p=206247&viewfull=1#post206247
So every time you move the T-Rudder for left or right, will press one of the two virtual axes - proportionally to rudder input (with T-Link joystick button is always pressed 100%).
See the pictures of Windows Games Controller there: https://forum.il2sturmovik.ru/topic/2030-t-rudder-от-вкб/page/4/#elControls_180536_menu
Rudder pedal axis "X Rotation" is ~25% from right of the center position (50% - rudder centered), so the virtual "Y Rotation axis" is ~25% pressed. When the "X Rotation" reach 100% the "Y Rotation" will reach 100% too.
Notice that using T-Rudder standalone the name of axes will bey different, rudder axis is X. The above names is for a combo or T-Rudder integrated with some VKB joystick.
BTW - Just don't assign this axes to right/left brakes or wheel brakes without use (DCS) modifier button, or your take off runs can end in disaster.
-
1
-
-
6 hours ago, Jascha said:
It's interesting to notice, that when you let go of the modifier (slew push on Wartog throttle in my case) the brake input will remain in position according to pedal position when the modifier was released.
Happens the same thing in iL-2: Sturmovik: Cliff of Dover BLITZ, a drawback of use an axis with modifier. You need educate yourself to release the modifier only after "reset" the axis.
-
T-Rudder axis, being a rudder control is always in 50% (middle position of the sensor), this is what cause the brake pressed in game when you hit the modifier.
In pedal with "toe brakes" the axis is a "slider" - like the throttle axis, without center position.
Try play with axis saturation - under wheel brake command in DCS controls; trying compensate this.
BTW - When I set the twist axis of VKB Gladiator MK.II for be "wheel brakes" - I don't use twist rudder on stick, but T-rudder, so this axis are without use,
I face the same problem of wheel brakes being applied, so create a special calibration for this axis using DView, that set the 0 - 100% of the axis response
in the movement 50% - 0% of the sensor (twist for left).
But you can't use this solution, because need the axis unaltered for use as rudder control.
Ask in VKB forum for a profile for T-Rudder that create a new virtual axis with T-rudder movement 50% to 100% (T-Rudder for right), and then assign this new virtual axis + modifier for "wheel brakes".
-
7 hours ago, No1sonuk said:
He said it was a Leonardo, which does have the 32u4 processor with USB.
So the more easy way to make this a "joystick controller" is flash - using the USB cable; with MMjoy2 firmware, after make the configuration (number of axes, buttons, encoders) is done though MMJoySetup GUI.
Well explained there: https://www.sas1946.com/main/index.php?topic=58176.24
Other option is RealRobot configurator.
-
What Arduino? Some models don't have USB, need to be used as "joystick controller".
![[Linked Image]](https://i.postimg.cc/K8h48q7X/PRO-Micro-cable-fit.jpg)


Thrustmaster Warthog Floor Mount
in Thrustmaster
Posted · Edited by Sokol1_br
Floor mounted joystick is not good idea - conflict with knees, chair and desk; anyway:
https://warthog-extensions-by-sahaj.com/
Custom springs.
https://warthog-extensions-by-sahaj.com/product-category/springs/