Alex_rcpilot
-
Posts
547 -
Joined
-
Last visited
Content Type
Profiles
Forums
Events
Everything posted by Alex_rcpilot
-

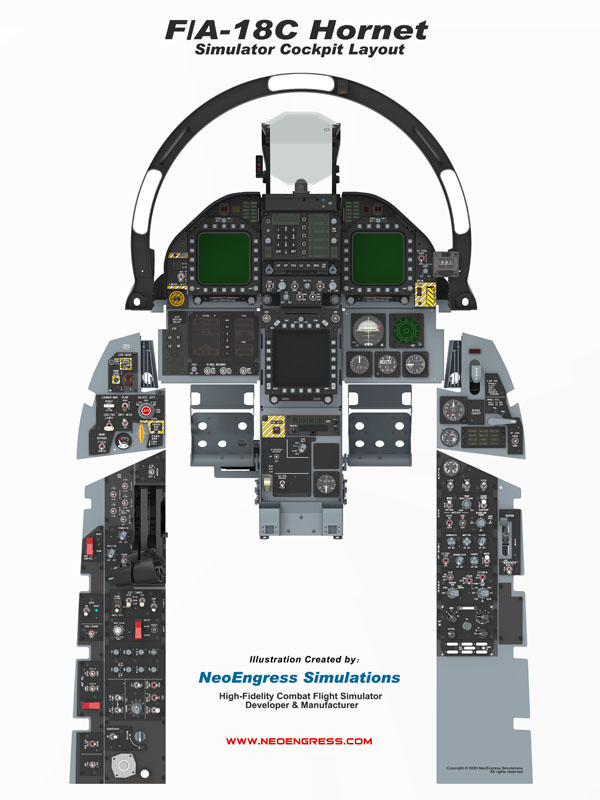
F/A-18C cockpit 2D layout illustration at 4220x5200
Alex_rcpilot replied to Alex_rcpilot's topic in Home Cockpits
No problem. My pleasure. -
My engineering approach to a Hornet pit build project
Alex_rcpilot replied to Alex_rcpilot's topic in Home Cockpits
Thank you man. We're also trying to make more stuff accessible, hopefully we will meet somewhere in between in the future. -
The full image is huge so I've put it on my site https://www.neoengress.com/downloads for download. The following preview should offer an idea of how it looks: When I started planning on my cockpit build last April, there wasn't a whole lot of info for my reference. It took so much painstaking cross-referencing till I came this far. Now if you're also in search of a dependable poster, this one might be of some help. I did a render job straight from the actual CAD model of my prototype-proven cockpit so it's totally original. A bit of courtesy would be appreciated if the copyright text doesn't get removed. This thread is solely set up to make the poster accessible to more people, for anything else regarding my original project please refer to other pages on my site or my pit building thread. Have fun.

-
My engineering approach to a Hornet pit build project
Alex_rcpilot replied to Alex_rcpilot's topic in Home Cockpits
Thanks bro, I'm also trying to find more ways to further bring down the cost. -
My engineering approach to a Hornet pit build project
Alex_rcpilot replied to Alex_rcpilot's topic in Home Cockpits
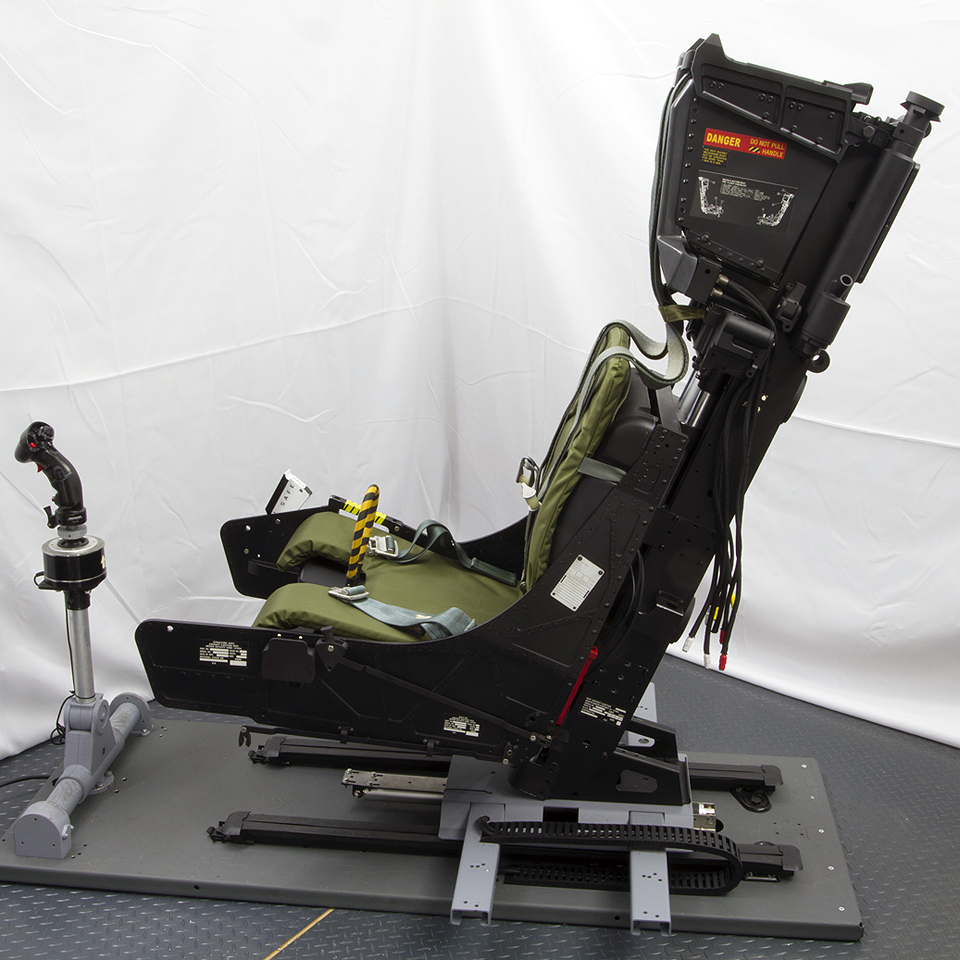
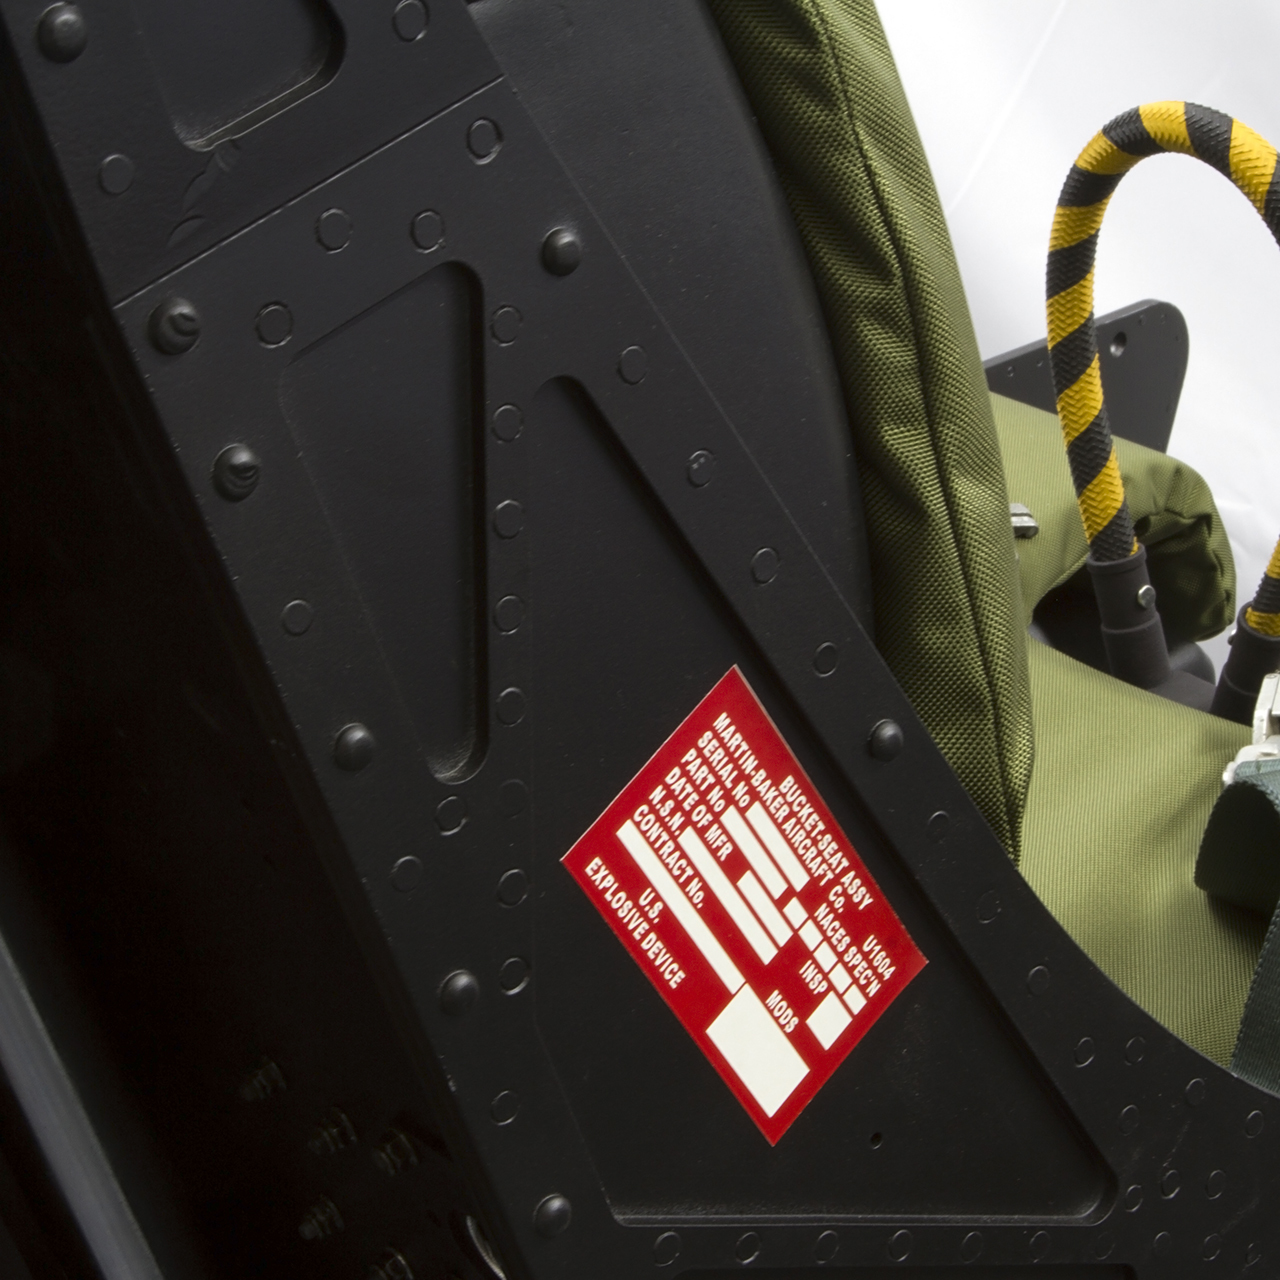
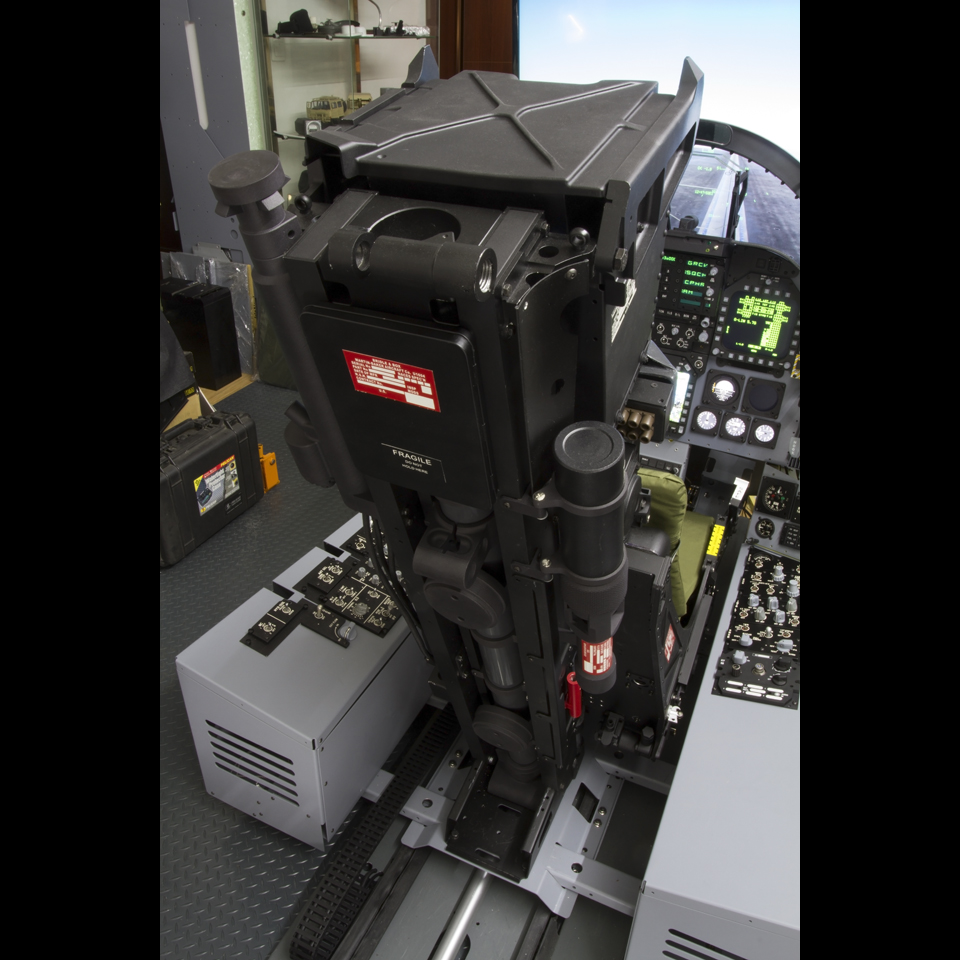
I've managed to build a site https://www.neoengress.com which is live now. It's not much, but enough for a start. As an update on the seat, here are some render jobs and pics. That lengthwise rail is bit of a hassle, to use it I had to feed the cables to the seat through a drag chain. Aluminum sheets are joined with flush rivets: More info can be found on the site, you guys are more than welcome here. Thanks for your support along the way. https://www.neoengress.com/naces-ejection-seat
-
My engineering approach to a Hornet pit build project
Alex_rcpilot replied to Alex_rcpilot's topic in Home Cockpits
Sure, and thanks. I'll announce it before long. Just replied, glad to be in touch again. That's the Winwing throttle I've purchased to fill the spot. This project has been so tedious that I hadn't been able to finish my own throttle unit design. I'll post updates once it's finished. -
My engineering approach to a Hornet pit build project
Alex_rcpilot replied to Alex_rcpilot's topic in Home Cockpits
Speaking of which, it's actually high time for me to haul ass with production if I'm determined to make a Christmas delivery. lol Nope, that NACES came as part of this project. Also built from scratch. Here's a video of how you adjust the seat bucket height with the switch box: I thought it'd be cool to have the entire aft portion of the cockpit on the rail, so I've adopted a dual toggle version of the switch box from another NACES variant, and used the second switch for lengthwise adjustment. I'm optimizing this feature so it won't increase the shipping cost. Thank you both and welcome to my project :thumbup:
-
My engineering approach to a Hornet pit build project
Alex_rcpilot replied to Alex_rcpilot's topic in Home Cockpits
Thanks so much for the attention. I'll be attaching a video in this reply. Actually I've been getting so much encouragement lately that I've finally decided to start a business and manufacture some cockpits & ejection seats based on an upgraded version of this project. Meanwhile, there are so much cockpit wizardry lying around my lab that I haven't disclosed yet. This business will provide the funding I need to develop more cockpits, modules and components for the flight simulation community. Despite my engineering background (mostly as an employee), for the past decade I've only been casually involved in the simulation hardware business. At most I would help some of my friends make their own solutions. Now I will be directly involved in this new business, I hope this cockpit will be a good start. Here's a demo video of this cockpit in action. Some of you may have already watched it. It's branded NeoEngress Simulations. It's meant to symbolize a gamer's novel ingress to a virtual combat world. I only wanted to highlight the control mechanisms with this video because they are the most anticipated features one would ask for with a physical pit. Curved projections, navigation and tactics can wait a bit. Hope you will enjoy this one for now. -
Helios 1.6 - Official Thread
Alex_rcpilot replied to derammo's topic in PC Hardware and Related Software
Thanks man. That's so kind of you. :thumbup: -
Helios 1.6 - Official Thread
Alex_rcpilot replied to derammo's topic in PC Hardware and Related Software
No probs and thanks. I'll try and reach out to him for that matter. -
Helios 1.6 - Official Thread
Alex_rcpilot replied to derammo's topic in PC Hardware and Related Software
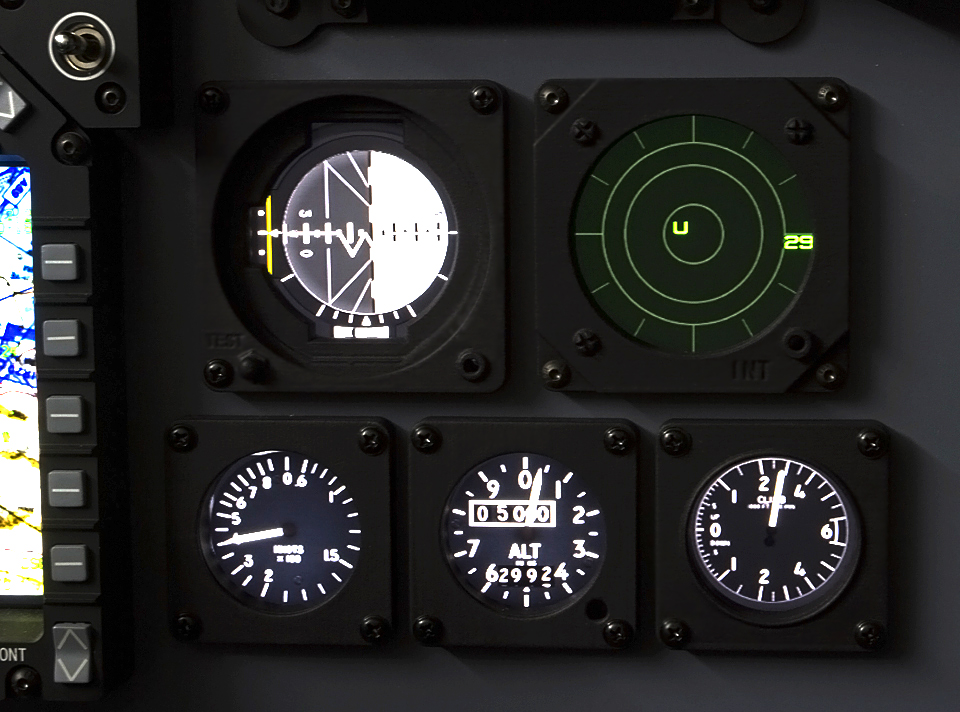
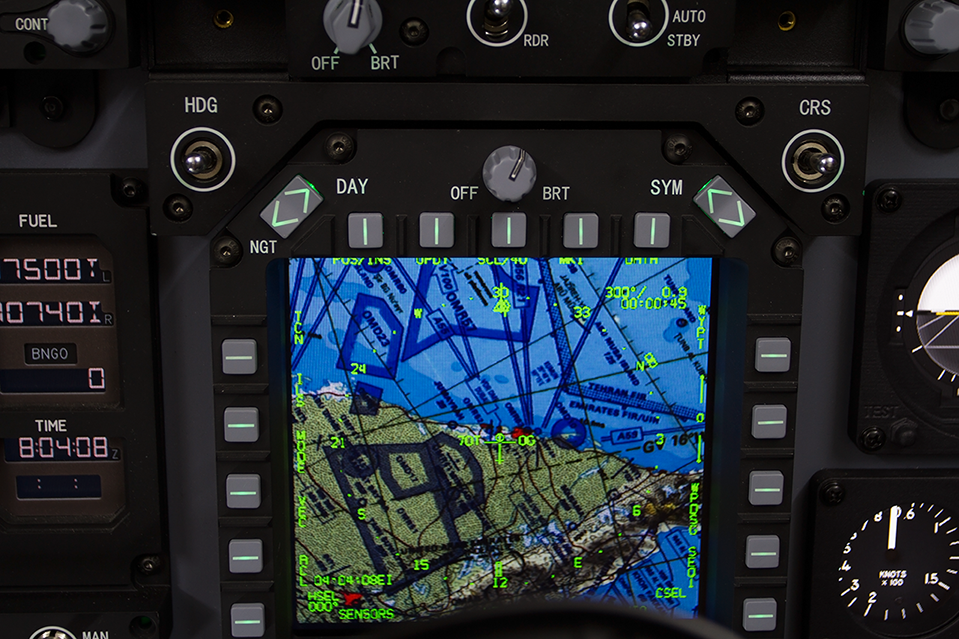
AoA indexer and RWR mask Just dropping by with some latest findings. First things first, you guy's have done a stunning job with the new Helios and profiles. I've edited the scripts so my hardware can tap into the reports. As I recently upgraded to Helios 1.6 and adopted Captain Zeen's latest profiles for the Hornet, I discovered that my AoA stopped working. It took me some time to compare the code with DCS BIOS which fortunately is still working, and I found that ED/Belsimtek has changed the export value type for AoA lamps from integer to float. And when these lamps light up their values are all smaller than 1, which would always read as 0 if probed as integers. So in Helios_F18C.lua from the Mods folder, I changed the format argument within these lines: Helios_Udp.Send("483", string.format("%.1d", mainPanelDevice:get_argument_value( 4)) ) -- CPT_LTS_AOA_HIGH > "Caution Panel", "GUN UNSAFE", "Lit if gun is capable of being fired." Helios_Udp.Send("487", string.format("%.1d", mainPanelDevice:get_argument_value( 5)) ) -- CPT_LTS_AOA_CENTER > "Caution Panel", "OXY LOW", "Lit if oxygen gauge indices 0.5 liters or less." Helios_Udp.Send("490", string.format("%.1d", mainPanelDevice:get_argument_value( 6)) ) -- CPT_LTS_AOA_LOW > "Caution Panel", "SEAT NOT ARMED", "Lit if ground safety lever is in the safe position." from "%.1d" to "%0.1f". Without the changes Helios would have thought these lamps remained off and never refreshed them after the initialization. For a moment I thought maybe we could adapt the DCS BIOS approach which treats anything less than 0.5 as 0, as shown in their following code: if dev0:get_argument_value(arg_number) < 0.5 then value:setValue(0) else value:setValue(1) end But then it occurred to me that the AoA Indexer is actually dimmable, maybe that's why they switched from integer to float? As I turned down the AoA brightness knob on the HUD panel, I found that the "ON" value of these three lamps also dropped from 0.9 to 0.1, (but the in-game indexer didn't seem to be dimmed, maybe it's still a WIP) So for these indicators we clearly can't use 0.5 as a threshold. It wasn't a problem for me, as I processed the float value in my own software. But thought you guys might need to know and decide what to do with it. I'm not a professional programmer and I would never have come up with something like Helios. But at least I could try to help improve it. On another note, I see what you've done with zooming in the latest profile editor GUI versions, now I can hold down Ctrl and use mouse wheel to zoom in and out, which feels much more convenient than the older versions. It'd be even cooler if the zoom could be implemented with the mouse cursor as center. I'd like to show you a small touch I've made with my F/A-18C profile. I've noticed that the legacy RWR viewport doesn't come with the greenish filter mask, so I've made one for myself. I just put an empty panel over the viewport area and loaded a png image with alpha settings. Here's the raw png file I've made: End results looked close to what I was going for. I'm sure Captain can make a much better one if he is interested. Thanks and keep the good work guys.
-
My engineering approach to a Hornet pit build project
Alex_rcpilot replied to Alex_rcpilot's topic in Home Cockpits
Thanks Robin, it does feel pretty cool to sit inside. :pilotfly: It's been a month since I cound find time for this project. The updater had been acting up too, so I was only able to finish a major update yesterday with a 10GB+ download. I spent several hours replacing my old Helios 1.4 with the latest 1.6 version and its files, loved it. I've modified the new sample F-18C profile to fit my pit, all the gauges and viewports are working. Even the blurry RWR is looking normal now. It was actually my own fault, the width setting in my monitor config file was too wide and I never noticed it till today. Everything felt better except for the AoA indexer. I can no longer seem to get it lit up now. No value is registered when the AoA is active. I spent the last few hours trying to pinpoint the culprit, wish it was something I could fix, but it's starting to feel like a DCS bug to me. Helios uses mainPanelDevice:get_argument_value( ) to fetch indicator status. The parameters for AoA indicator lamps are 4,5 and 6 according to the latest scripts. I thought ED might have changed their definitions, so I went to my DCS Installation folder\Mods\aircraft\FA-18C\Cockpit\Scripts\MainPanel\lamps.lua and confirmed they remained the same: -- AoA Indexer Lights create_caution_lamp(4, CautionLights.CPT_LTS_AOA_HIGH) create_caution_lamp(5, CautionLights.CPT_LTS_AOA_CENTER) create_caution_lamp(6, CautionLights.CPT_LTS_AOA_LOW) In Helios script it says the following: Helios_Udp.Send("483", string.format("%.1d", mainPanelDevice:get_argument_value( 4)) ) -- CPT_LTS_AOA_HIGH > "Caution Panel", "GUN UNSAFE", "Lit if gun is capable of being fired." Helios_Udp.Send("487", string.format("%.1d", mainPanelDevice:get_argument_value( 5)) ) -- CPT_LTS_AOA_CENTER > "Caution Panel", "OXY LOW", "Lit if oxygen gauge indices 0.5 liters or less." Helios_Udp.Send("490", string.format("%.1d", mainPanelDevice:get_argument_value( 6)) ) -- CPT_LTS_AOA_LOW > "Caution Panel", "SEAT NOT ARMED", "Lit if ground safety lever is in the safe position." So I'm supposed to get something like "483=0" or "490=1" when I pitch up and down during approach. In the F1 view I could clearly see the in-game AoA flashing wildly, but these values were nowhere to be found. If anyone has encountered the same problem please let me know. Thank you. -
My engineering approach to a Hornet pit build project
Alex_rcpilot replied to Alex_rcpilot's topic in Home Cockpits
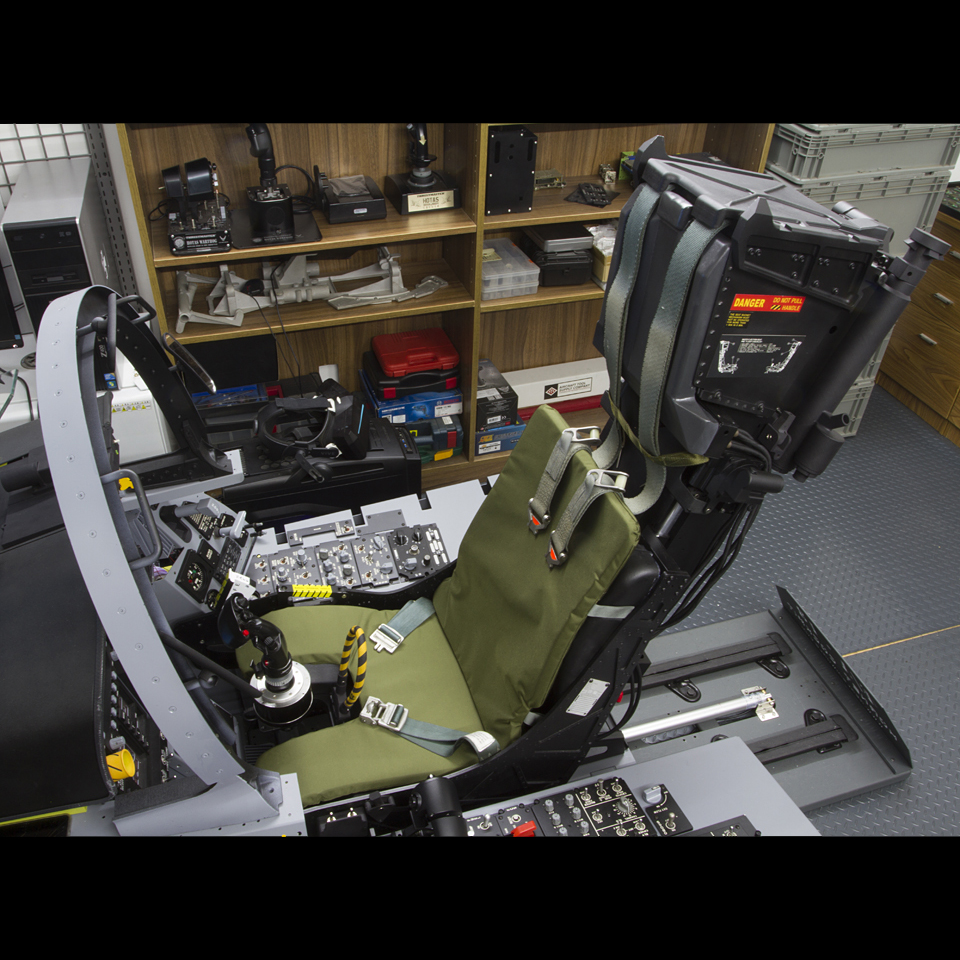
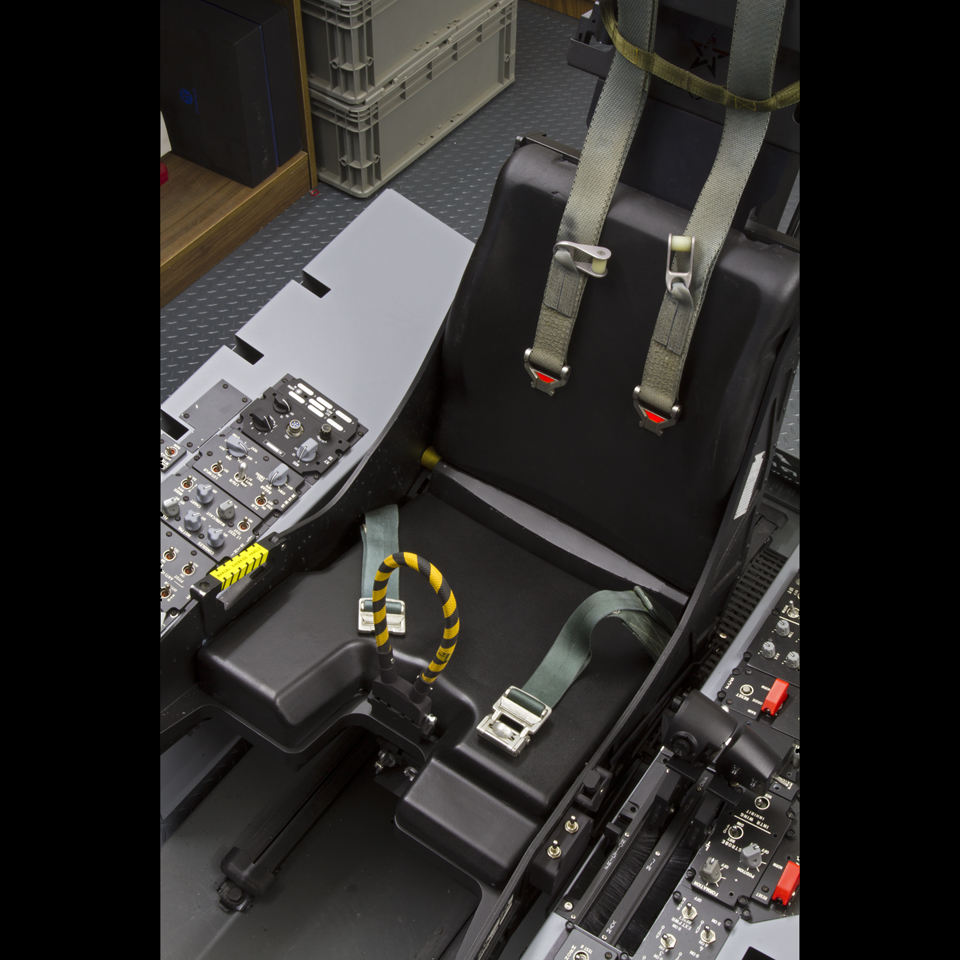
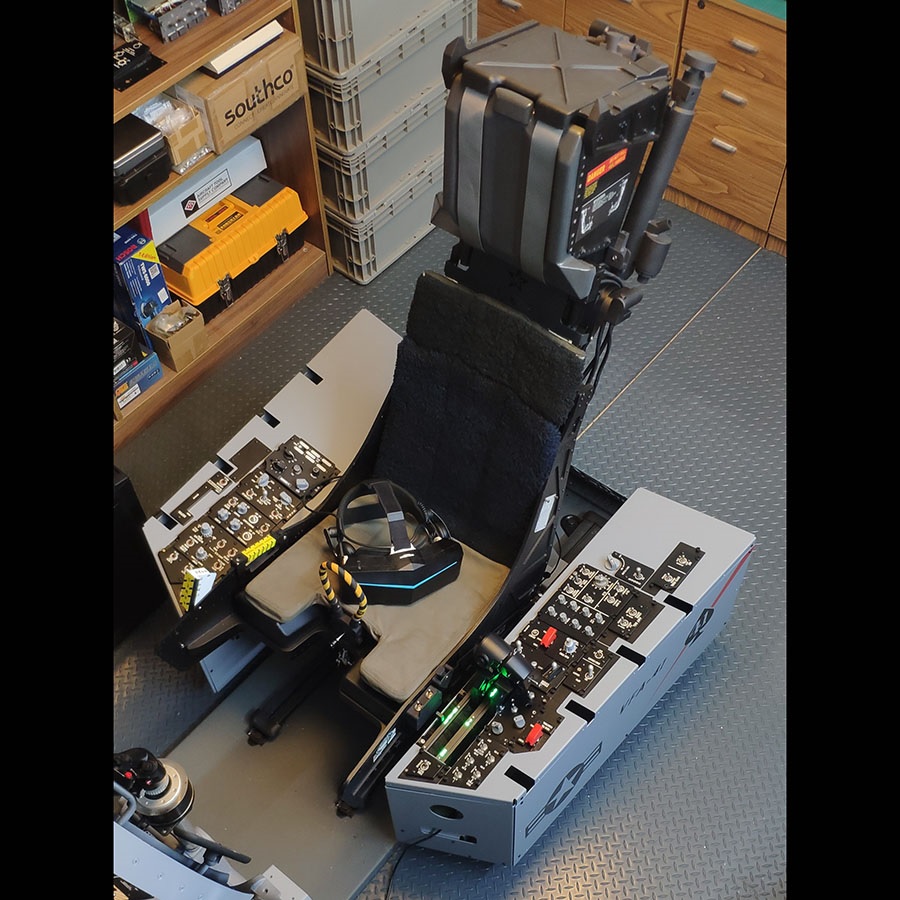
It's been a busy week. The seat and side consoles are almost complete. They make up the aft portion together, and there's an electric cylinder which moves them back and forth. We've thought about attaching the stick base to the seat too, but found out that it has more cons than pros for us.
-
My engineering approach to a Hornet pit build project
Alex_rcpilot replied to Alex_rcpilot's topic in Home Cockpits
Hope I'd still have my good eyesight at that point, lol That'd be a cool build too. The older the aircraft, the more mechanical parts there are. Hence more fun.
-
My engineering approach to a Hornet pit build project
Alex_rcpilot replied to Alex_rcpilot's topic in Home Cockpits
As far as I can see, whether I switch to HUD-only view (Alt+F1) doesn't make any difference on viewport export quality. However, I also feel that my HUD contrast is not high enough. It gets difficult to see against the bright sky under broad daylight. I've turned the HUD brightness knob to the max but sometimes still need to rely on the HUD view on the MDI. It didn't occur to me the symbols on the HUD could be thinner than they were supposed to look. -
My engineering approach to a Hornet pit build project
Alex_rcpilot replied to Alex_rcpilot's topic in Home Cockpits
Well, this project is at phase 2 now, cost constraints from the very first post no longer applies, and I get to indulge myself a bit. Half a dollar for 1cm³ feels acceptable to me. :music_whistling: At least it's cheaper than aluminum CNC parts. -
My engineering approach to a Hornet pit build project
Alex_rcpilot replied to Alex_rcpilot's topic in Home Cockpits
Yeah a lot of old stuff stopped working. I've also noticed that third party software like Helios kept evolving too. Code got more organized. I guess some setbacks are worth it. My instrument monitor maxed out at 1920x1080, which is more than enough. No display is connected to the HUD in my pit. The HUD is not functional, just an eye candy sitting on top of the UFC. The HUD overlay from the Alt+F1 view is more than enough for me. I did some supercarrier flights today, the sunset in DCS looks kinda cool. -
My engineering approach to a Hornet pit build project
Alex_rcpilot replied to Alex_rcpilot's topic in Home Cockpits
I have yet to look into it, and the RWR too. My previous post only used default settings. And frankly I'm not impressed with that. I tried some MDI tweaks that I found a few months ago from another thread, which were supposed to enhance the sharpness of the MDI display, but it no longer works. I have a feeling I will need more help from the community on this one. -
My engineering approach to a Hornet pit build project
Alex_rcpilot replied to Alex_rcpilot's topic in Home Cockpits
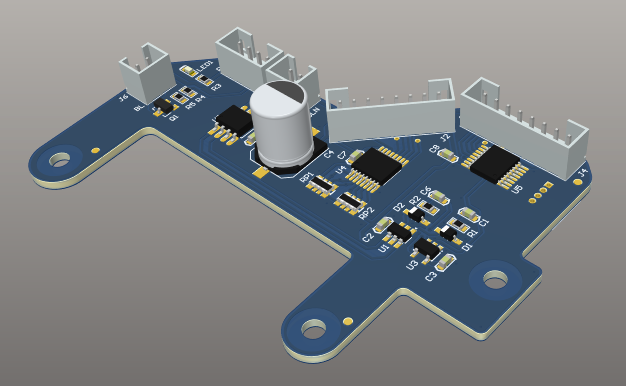
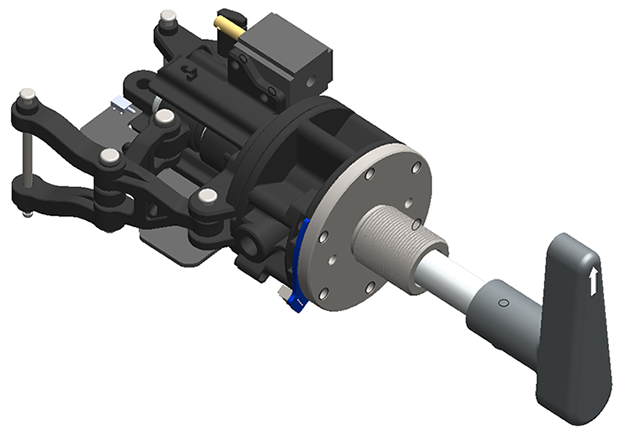
Thank you man. I've done some tests today and I'm pretty happy with the results. My commercial grade vendors always have some serious skills to show off :pilotfly: I've made a screenshot of the game play with the AMPCD view port and the in game AMPCD view side by side. These images are both generated by DCS World. The in-game view obviously is rendered with virtual environmental lighting effects. But you can always zoom in to get a closer view. While the view port extracts the raw image which is free from visual effects, you can't enlarge this display area once the game is running. All I did was locating this view port on the monitor behind the MIP mask. The strokes of those symbols look kind of bold by default. I think they can be adjusted by tweaking some lua files. I've also got some problems with the RWR image, it gets blurry. But generally they are all software issues, I'm not worried about them, just need to fix those scripts. Better jump in behind that bow AFTER everything has been properly set up, or else they'd get in the way of a lot of things on screen which can actually be annoying :) These two were a bit difficult to design. But much easier to fabricate - William found a supplier who makes 3D printed parts out of fiber reinforced nylon, so I decided to give it a try. As shown in the following drawing, the wing fold handle actually has a lot of structures hidden behind the sheet metal. There's a bistable linkage which helps lock the shaft in either extended or stowed position. I still don't trust plastic parts with heavy duty linkages, will upgrade 'em to metal sooner or later. I've built some electronics inside the nylon housing. While the interface PCB is attached to the bottom of it, which makes this unit another MCAD-ECAD hybrid design, just like the landing gear unit. I've been testing this handle a lot, all the latch positions feel pretty distinct to the touch, the springs also feel strong enough for gaming. It also stows in the HOLD position, which doesn't show on the animation above. The parking brake can't get more complex than this, so I'll just skip that part.
-
My engineering approach to a Hornet pit build project
Alex_rcpilot replied to Alex_rcpilot's topic in Home Cockpits
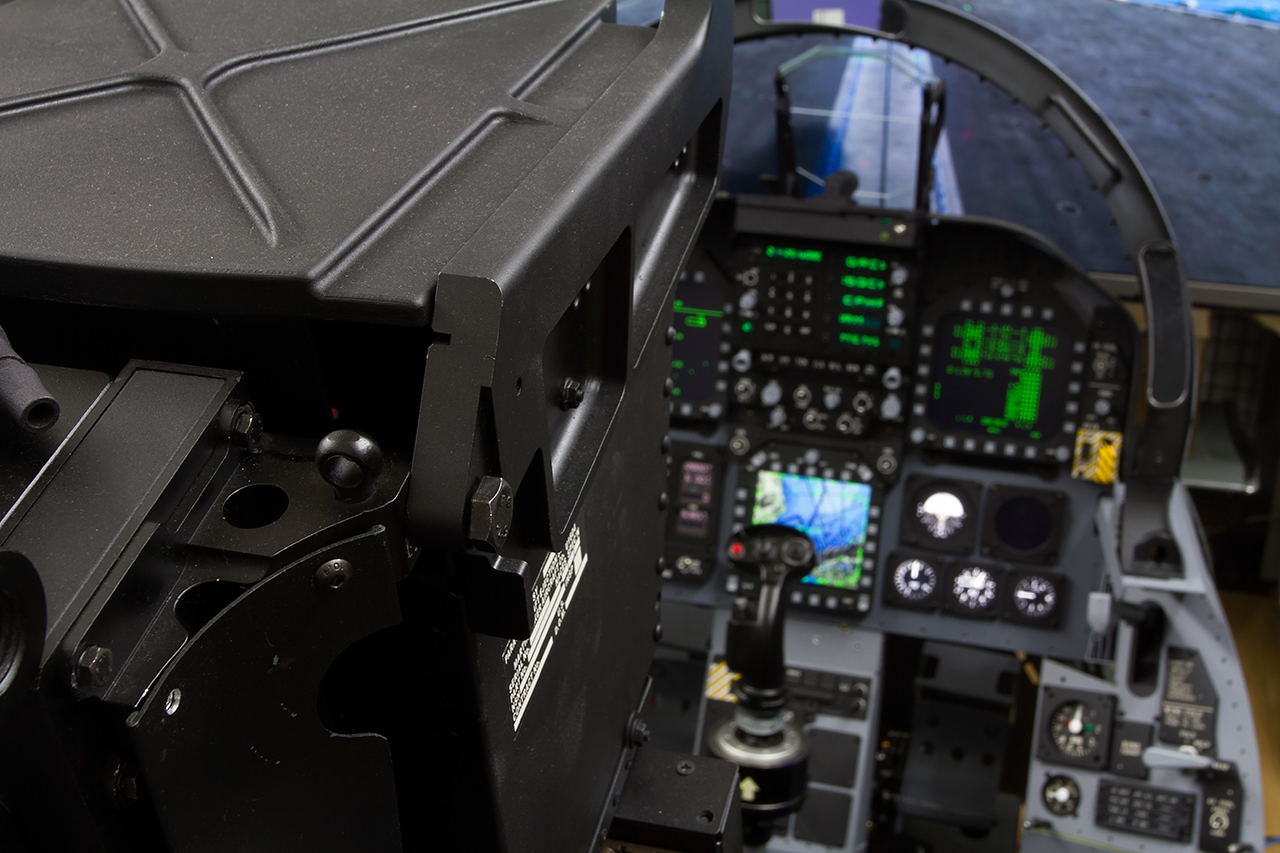
Came back with some updates. I've decided I couldn't live without the vertical panels, so here they are. Here's a pic just to show you where I'm at at this moment. All the levers and knobs are fully functional. Some of the features are not yet supported in DCS, I can work around that with my own code. The HUD and canopy frame are just there for cosmetics. The frame is sturdy enough so those handles are functional too. Plus, a batch of new parts fot the Martin Baker seat have also been built with the help from my friend William. Now I get to put the pit together. I'll log back with more progress. Cheers.
-
That looks cool. I've got a bunch of synchros I've been wanting to drive with DC supply and modern electronics. Almost finished the schematics when I came across this one gauge whose rotor winding has one end internally connected to a phase line of the stator winding. Not a big deal with old fashing transformers but drives me nuts with inverter bridges.:doh: I've put it aside till I can work out a better feedback circuit.
-
Custom cable harness suppliers are most likely to provide such services. To them your precious switches are just another component they can attach to the ends of those cables. Not much of a standardized solution, but should be the closest to what you're looking for.
-
I'd also recommend the BU0836 series if your goal is just getting a pit built with certain amount of customized features. But I could feel the itch to try out something new every time someone comes across electronics, and I'd rather encourage people to unlock their potentials. Try not to think about all the big words when starting, coz that's how textbooks bore the crap out of people. It seems like a pure brain job to work with microcontrollers but muscle memory also plays a critical role in the learning curve, especially during the initial stage. Lots of guys freak out when they start reading all the gibberish from datasheets and reference manuals. While they didn't realize it's important to build some confidence by watching youtube tutorials and copy all the moves step by step. Set up the environment, connect the board and debugger, get a flashing LED sample project working, then go back and try to figure out why it worked. USB is further down the line. You may have a thousand questions now but after you get your first couple of sample projects working, you'll be able to ask them in a different way. Fortunately most of the answers are readily available.
-
The STM32duino community is still growing, for now the majority of STM32 users are programming the chip directly without a middle layer bootloader like the Arduino. The whole idea of Arduino is making hardware friendly to software engineers. But so far it's still not equally convenient with STM32 as with AVR. If you can't get the HID sample projects to work, you may need to start programming the chip directly like hardware engineers. ST offers a package of tools. They include free utilities like the following: ST MCU finder - A parametric list that helps you find the best MCU for your project. STM32 CubeMX - A graphical design aid utility which lets you configure the chip and generate a complete framework of code based on the libraries you picked. STM32CubeIDE - A free integrated development environment from ST that allows you to edit, compile, download or debug the chip. You could also use ST-link or J-link debuggers during your development. They help a lot.
-
My engineering approach to a Hornet pit build project
Alex_rcpilot replied to Alex_rcpilot's topic in Home Cockpits
Thanks gents. I've been a bit busy lately. Plus I needed to learn some new stuff. Will keep working on this project once these are sorted out. @Noluck Would be a shame if they have tossed those parts. Hats off, what an experience to be part of the history of the hard core flight simulator industry! I wish I had that experience because it felt so exciting just reading your text. The advancement in electronics did bring forth plenty of better tools for us, especially in the human-machine interfacing domain. And I happen to have taken tremendous interest in this area. The purpose of this project isn't just building a pit so I can sit there and play, it's more of an experiment for me to apply what I've learned to something practicle so I can come up with even better stuff in the future. I do intend to continue with this project and build it into a full cockpit. It's just that I'd want to hold things back a bit before they are ready for release. Kinda wanted them to look good in pictures:D. But I'm not obsessive–compulsive enough to withhold all of the early prototypes. Here's a video of my latest test with the landing gear unit. You might wanna wear a pair of shades coz that light was so bright that I needed to dim it way down afterwards. Plus I was using the Helios export protocol in the video, and the gear handle light wasn't included in the data stream. But now I've also incorporated DCS BIOS protocol, the problem for the light has been solved, still gotta rely on my standalone logic to implement that downlock though. I'll make another video with the new parts and software. I will be working for most of the time so I won't log back regularly, and I can PM you my contact info if you wish to stay in touch.


.jpg.a55672db79ec89e8b338340bc887bab9.jpg)