Orrn
-
Posts
14 -
Joined
-
Last visited
-
I bought the caps from the electronic supplier reichelt. To all who reacted: thanks so much for your appreciation! Before I started this projekt my "crafting" skills were actually not very good. I did not know how to solder or how to wire Electric circuitry. It was an interesting learning process! I can only encourage everyone to learn Things like that, It is very rewarding.
-
I cannot recall it 100% accurate, but i guess about 30h. Most time-intensive work was the soldering. However, planning, reading into the Topic etc, took more than that :D While aiming for a low pricetag, that did not succeed. The Overall cost were ca. 300 € The most expensive parts were: - CDU-Panel from pcflights 50€ - AAP-Panel from pcflights 27 € - BBI-64 USB-Interface 46€ - BBI32 USB-Interface 29€ - LCD- Screen 27€ -Tactile Switches 14€ and of Course, lots of small bits and pieces!
-
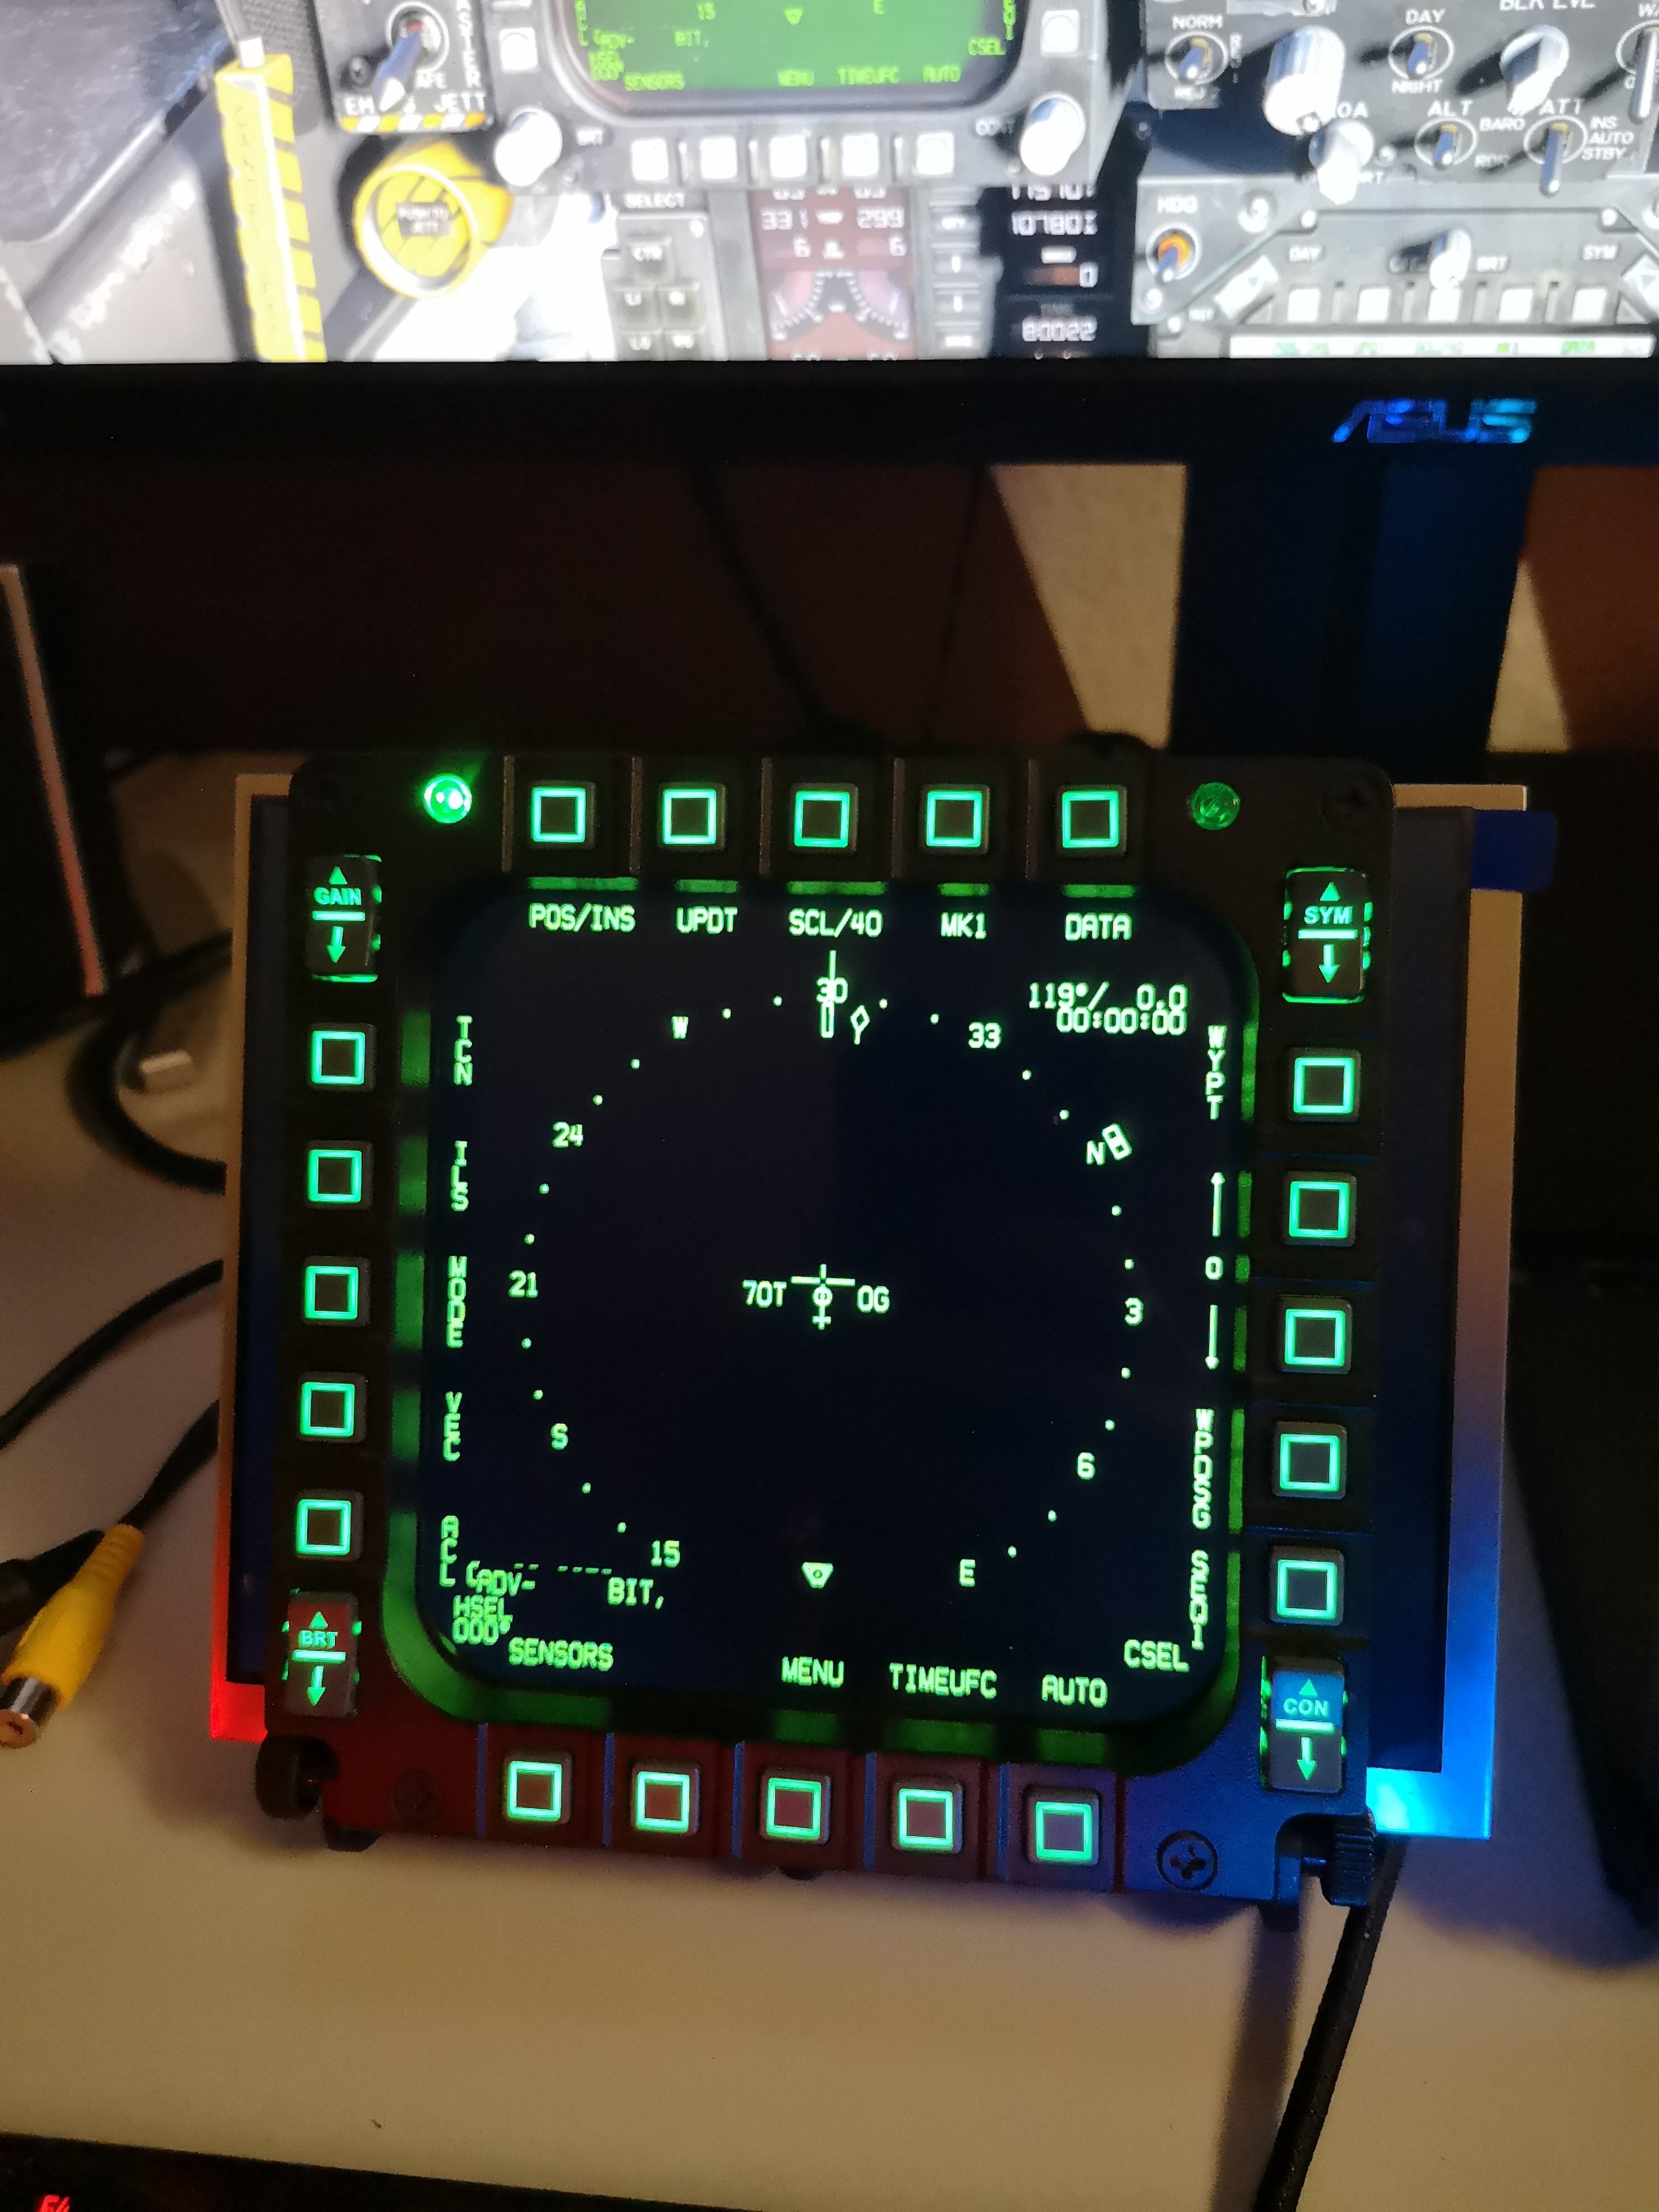
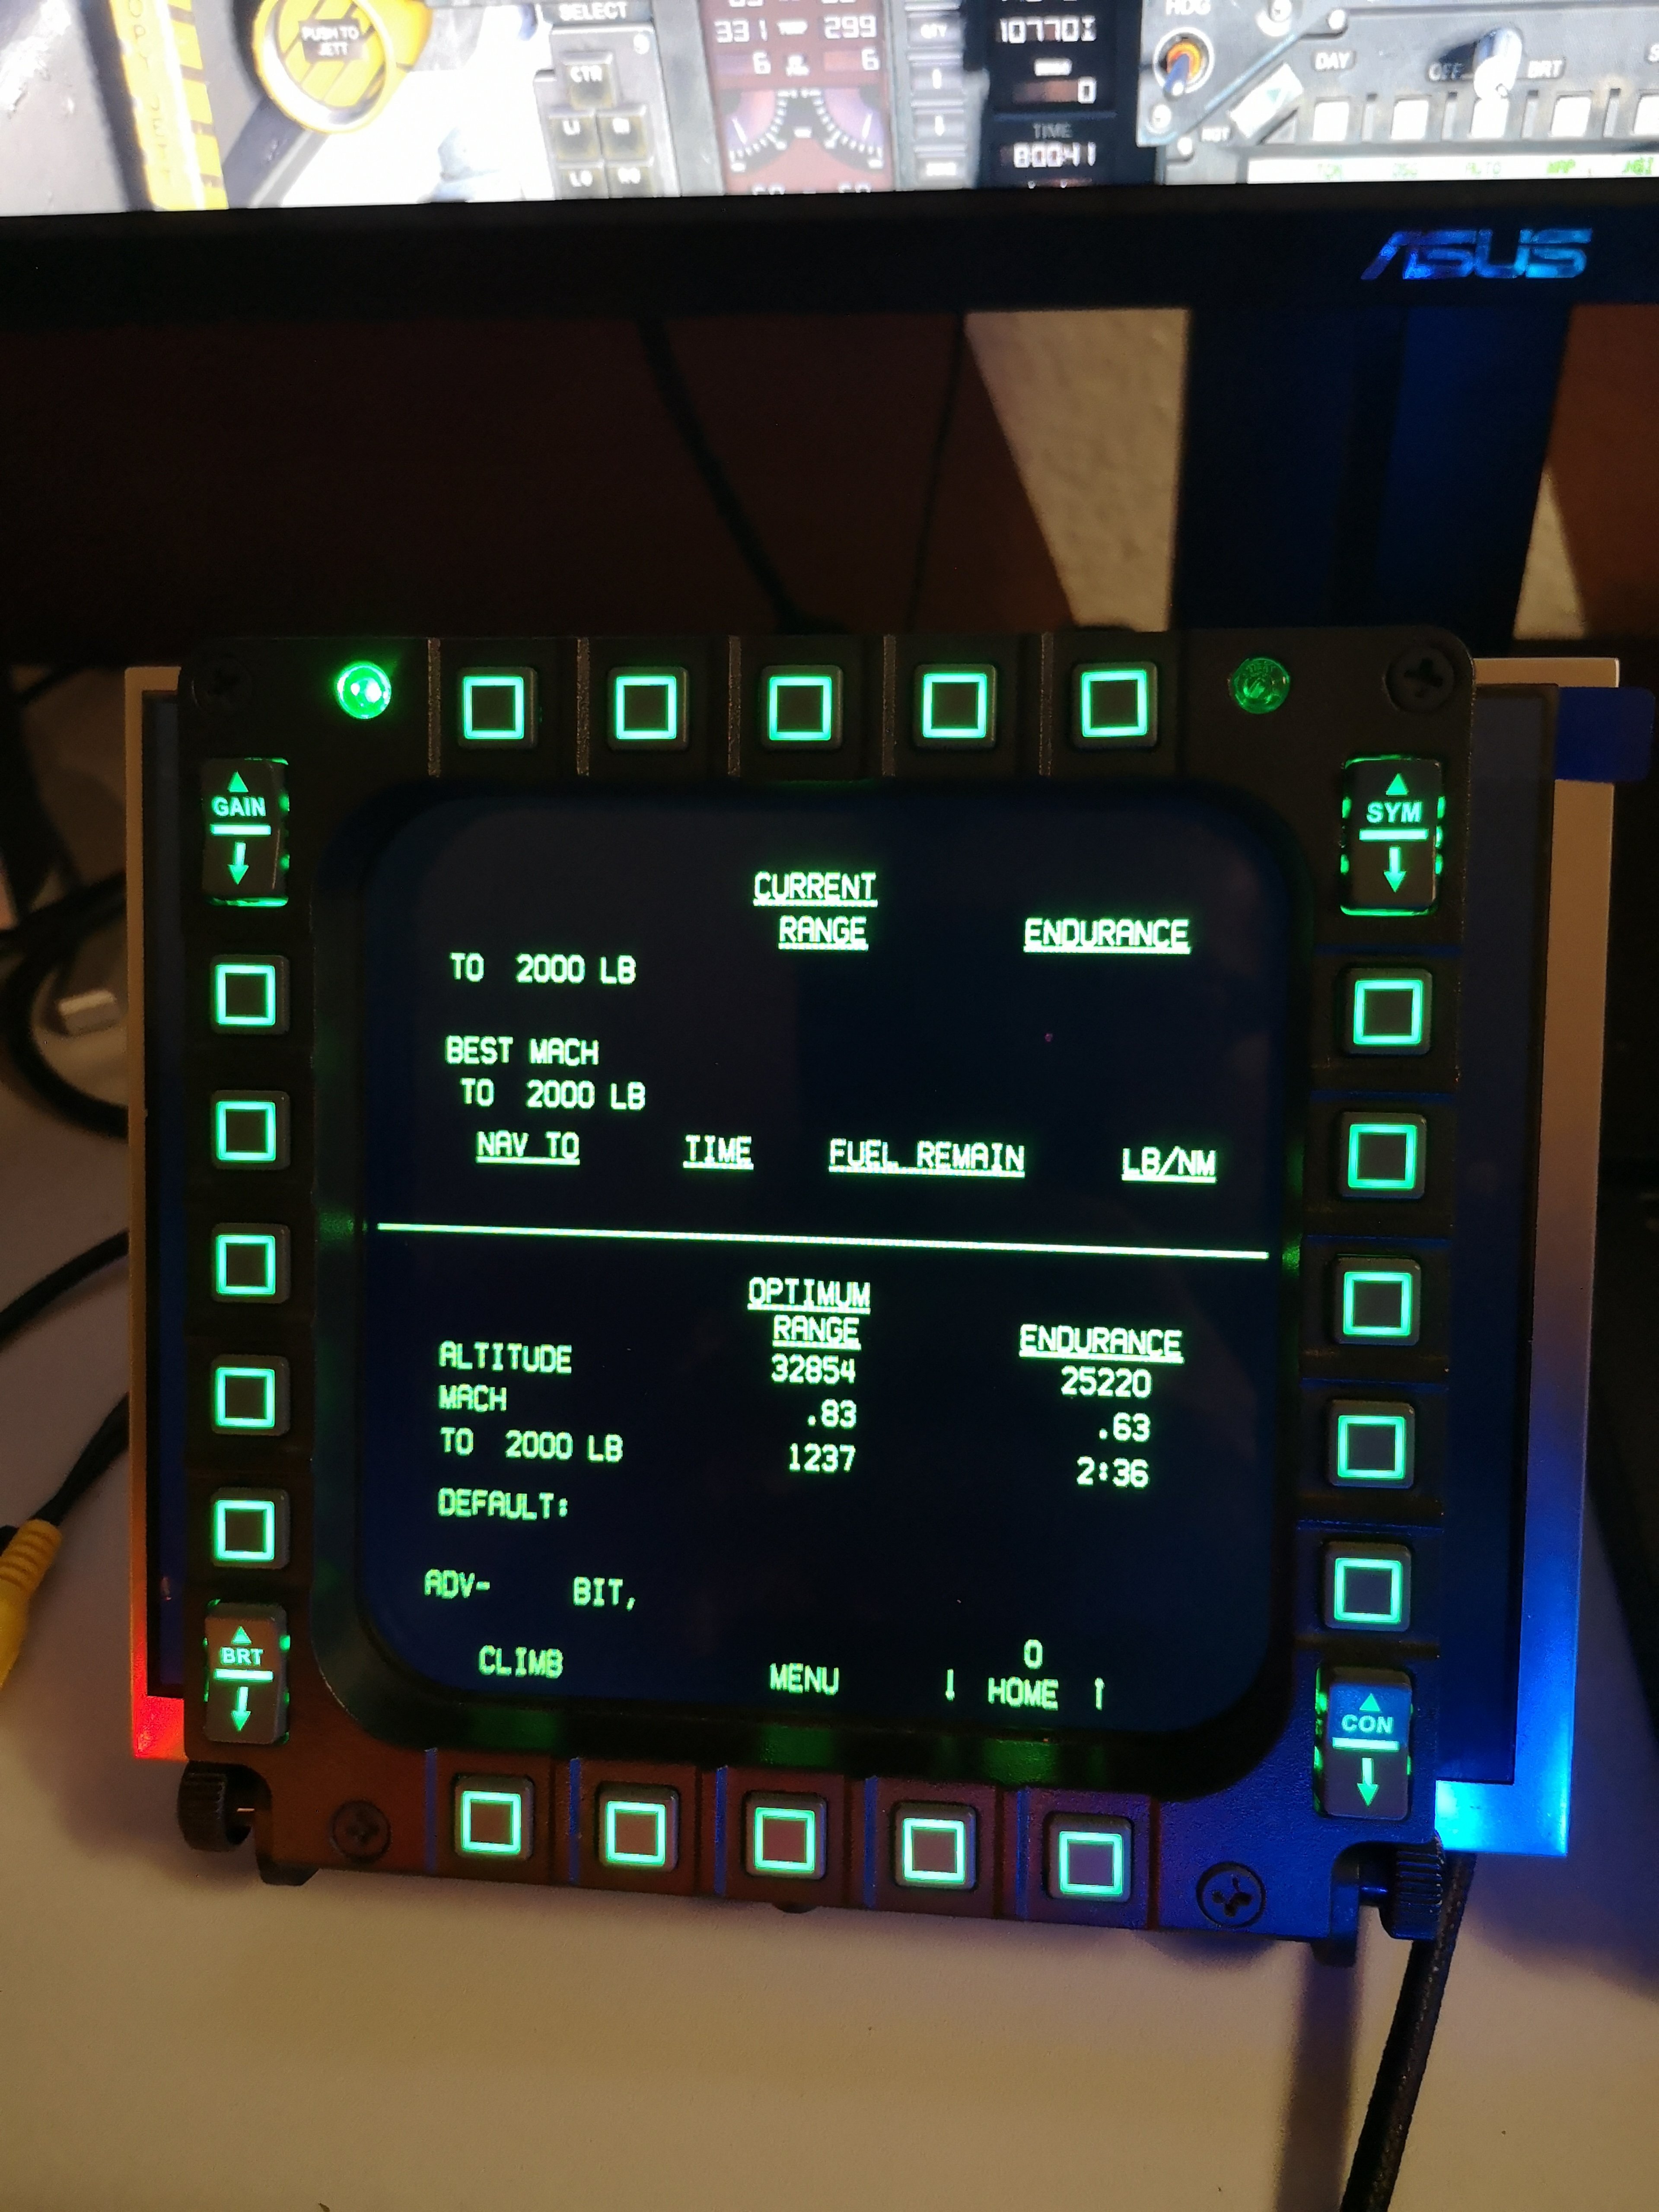
Hello, after weeks and month of searching the Forums, annoying other Forum users and planning, I finally finished my A-10C CDU and AAP Replica build. For quite a lot of Pictures, I recommend opening my Photo Album for reference when reading this post. As basic Panels i used the parts from PC-flights (CDU, AAP) Those come in two parts, one clear-acrylic backlight-ready baseplate and one black coated faceplate which are screwed together and hold the labeled Buttons. All the electronic parts such as LEDs, tactile switches, resistors, wires etc. I ordered from a german comany, called Reichelt ( https://www.reichelt.de/) As a Controller for the 63 Push-Buttons of the CDU, I planned to use the Leo Bodnar BBI64 Button Box Interface. The Count of 63 Buttons Comes from the fact, that the CDU actually has 67 Buttons but 3 of them are not functional in DCS, so I decided to leave them out. This is actually convenient because the Button Box interface only supports 64 Inputs :thumbup: For the AAP I used the BBI-32 Interface, also from Leo Bodnar. The Base The first step was to glue the two stripboards together, because a single one was to small. Then I used the clear acrylic part of the CDU as a "mask" to arrange the tactile switches on the board. I noticed that a centered positioning of every single switch was not possible due to the nature of the stripboard's hole layout and spacing. This will not become a Problem later on. Following this, I soldered all the switches in place so they could not move anymore. The Backlighting For Backlighting I used exactly 52 Green LEDs (3 mm Diameter) For Planning I used a resistor-calculator like this As Input I use a 12V-Power supply unit. So I had to wire the LEDs in row: Each row has a 220Ω Resistor and 3 LEDs (3 x 3V plus the voltage which gets taken by the resistor = 12V). Since 52 cannot be devided by 3, I had 17 rows built as described and one single LED wired to a 470Ω resistor. Mathematically the LEDs are supplied with 15 mA each, wich makes them shine REALLY bright! But if you assemble the Panels, it gets dimmed, so one can look at it without being blinded. As "connectors" between the Elements in each LED-Row i simply used the legs of the parts I had to clip off anyways. In my Circuit, Red is Plus and Black is GND The USB-Controller As mentioned before, I used a Plug and Play USB-Controller which gets recognized py your PC as an Input device for easy configuration. Once connected, you are able to configure every input-button in DCS by simply assigning a button (just as with a standart Keyboard) But first, I had to connect every single tactile switch on the PCB to an Input pin and a GND-Pin on the USB-Controller. For this, I used two-pin connectors to put onto the pin Strip. I build a carrier plate from the stripboard - residue i had and mounted the USB-Board onto it. Then I took distance pieces and mounted the whole carrier Assembly onto the Base-PCB. After that I started to build the two-wire connectors from each I/O-Pin on the USB-Board to the nearest tactile switch. The actual layout does not make a huge Impact, so I simply opted for the shortest wire length. To Keep Things "tidy" I used cable ties to hold the wires together. The AAP After I finished all the wiring for the CDU-Buttons, I repeated the process for the AAP-Unit. The Panels from pc-flights also come in two parts, just like the CDU. For the AAP electronics i sawed out a smaller Base-PCB and connected it to the CDU-PCB with four screws. Then I screwed the BBI-32 USB interface for the AAP onto the carrier Assembly for the CDU (piggy-back-style). This way I have both USB-Connectors sticking out on the same side. The Backlighting-LEDs have the same layout as the others from the CDU (3 in a row). Note: today (25.05.2020), the Backlight for the AAP is not yet finished and not in use. The Display Unfortunately, finding a LCD-Screen in the Right size, with the Right connectors and for the right puropose was not that easy. I wanted the Display to have Display-Port, HDMI or at least DVI or VGA for simply connecting it to my PC. The second most important was the size of the screen. It had to fit into the recessed Opening in the Panel and the Controller had to be really flat so that I was able to fit it between the backlight-panel and the PCB. After searching the Internet for many Hours I came across this Screen Since it had everything i expecteded and the dimensions seemed to fit nearly exactly, I ordered it from Amazon. Note: There are several Distributors like OSOYOO or Kuman or else. They all ship the exact same LCD-Screen with the exact same Circuitry, just a different brand Name. I ordered this one: https://www.amazon.de/gp/product/B07D49C1XJ/ref=ppx_yo_dt_b_asin_title_o02_s00?ie=UTF8&psc=1 The screen was shipped in around 10-15 days from China, even during the corona-situation. As I unpacked the screen, I noticed that the Circuit Board was fitted to the backside of the Display with double-sided adhesive. In order to fit the screen into my CDU-Assembly, I had to divide the screen and the Circuit board with a very sharp knive VERY CAREFULLY, so I did not hurt the flat-flex connector cables which are veeeeeeery nimble. Also I had to remove the GPIO-Pin-Header on the backside of the Circuit board, because it was taking up to much height. I removed it by simply, but also very carefully clipping and sawing it away, piece by piece. I Always took Attention, not to bend the board or the screen. After successfully removing the adhesive and the GPIO Pin-Header, I simply folded the screen onto the back side of the Circuit Board and attached the Screen with double sided adhesive tape onto the rim of the clear-acrylic plate. After that, I finally was able to screw everything tight, put in all 5 cables (this is not optimal, but it works) and put the damn Thing to work. After flying for a couple of Hours, I have to say that I am very pleased with the Outcome of this 6-Month Project. The CDU-Replica is a perfect Addition to Input devices like the TM-Warthog or the MFD-Screens and makes flying the A-10, and especially using the CDU much more fun and "naturally Feeling". Of Course I was not able to cover every little Detail in this post. I had to lern About electronics myself and I even had to learn how to solder, because I never did this before. All in all, this Project was a rewarding and educational experience. If you have any Questions on any Detail, feel free to contact me! Also, I am open to CONSTRUCTIVE criticism! Fly safe!
-
Thrustmaster MFD Cougar Pack - LCD Home Edition
Orrn replied to Speedbird696's topic in Thrustmaster
I have a Geforce GTX 970 installed which has 3 Displayports, one HDMI and one DVI-D input. I connect the LCD-Screens via a Displayport to HDMI cable with hdmi on the LCD-Screen side of it. The only thing i had to install in addition was a little tool called "MEAZURE" to..well measure the size of the displayed area and soforth. If you have any questions whatsoever about the build or need any help, dont hesitate to contact me! Edit: Link to the HDMI-DP cables: https://www.amazon.de/gp/product/B00Z05JMKO/ref=ppx_yo_dt_b_asin_title_o01__o00_s00?ie=UTF8&psc=1 -
Thrustmaster MFD Cougar Pack - LCD Home Edition
Orrn replied to Speedbird696's topic in Thrustmaster
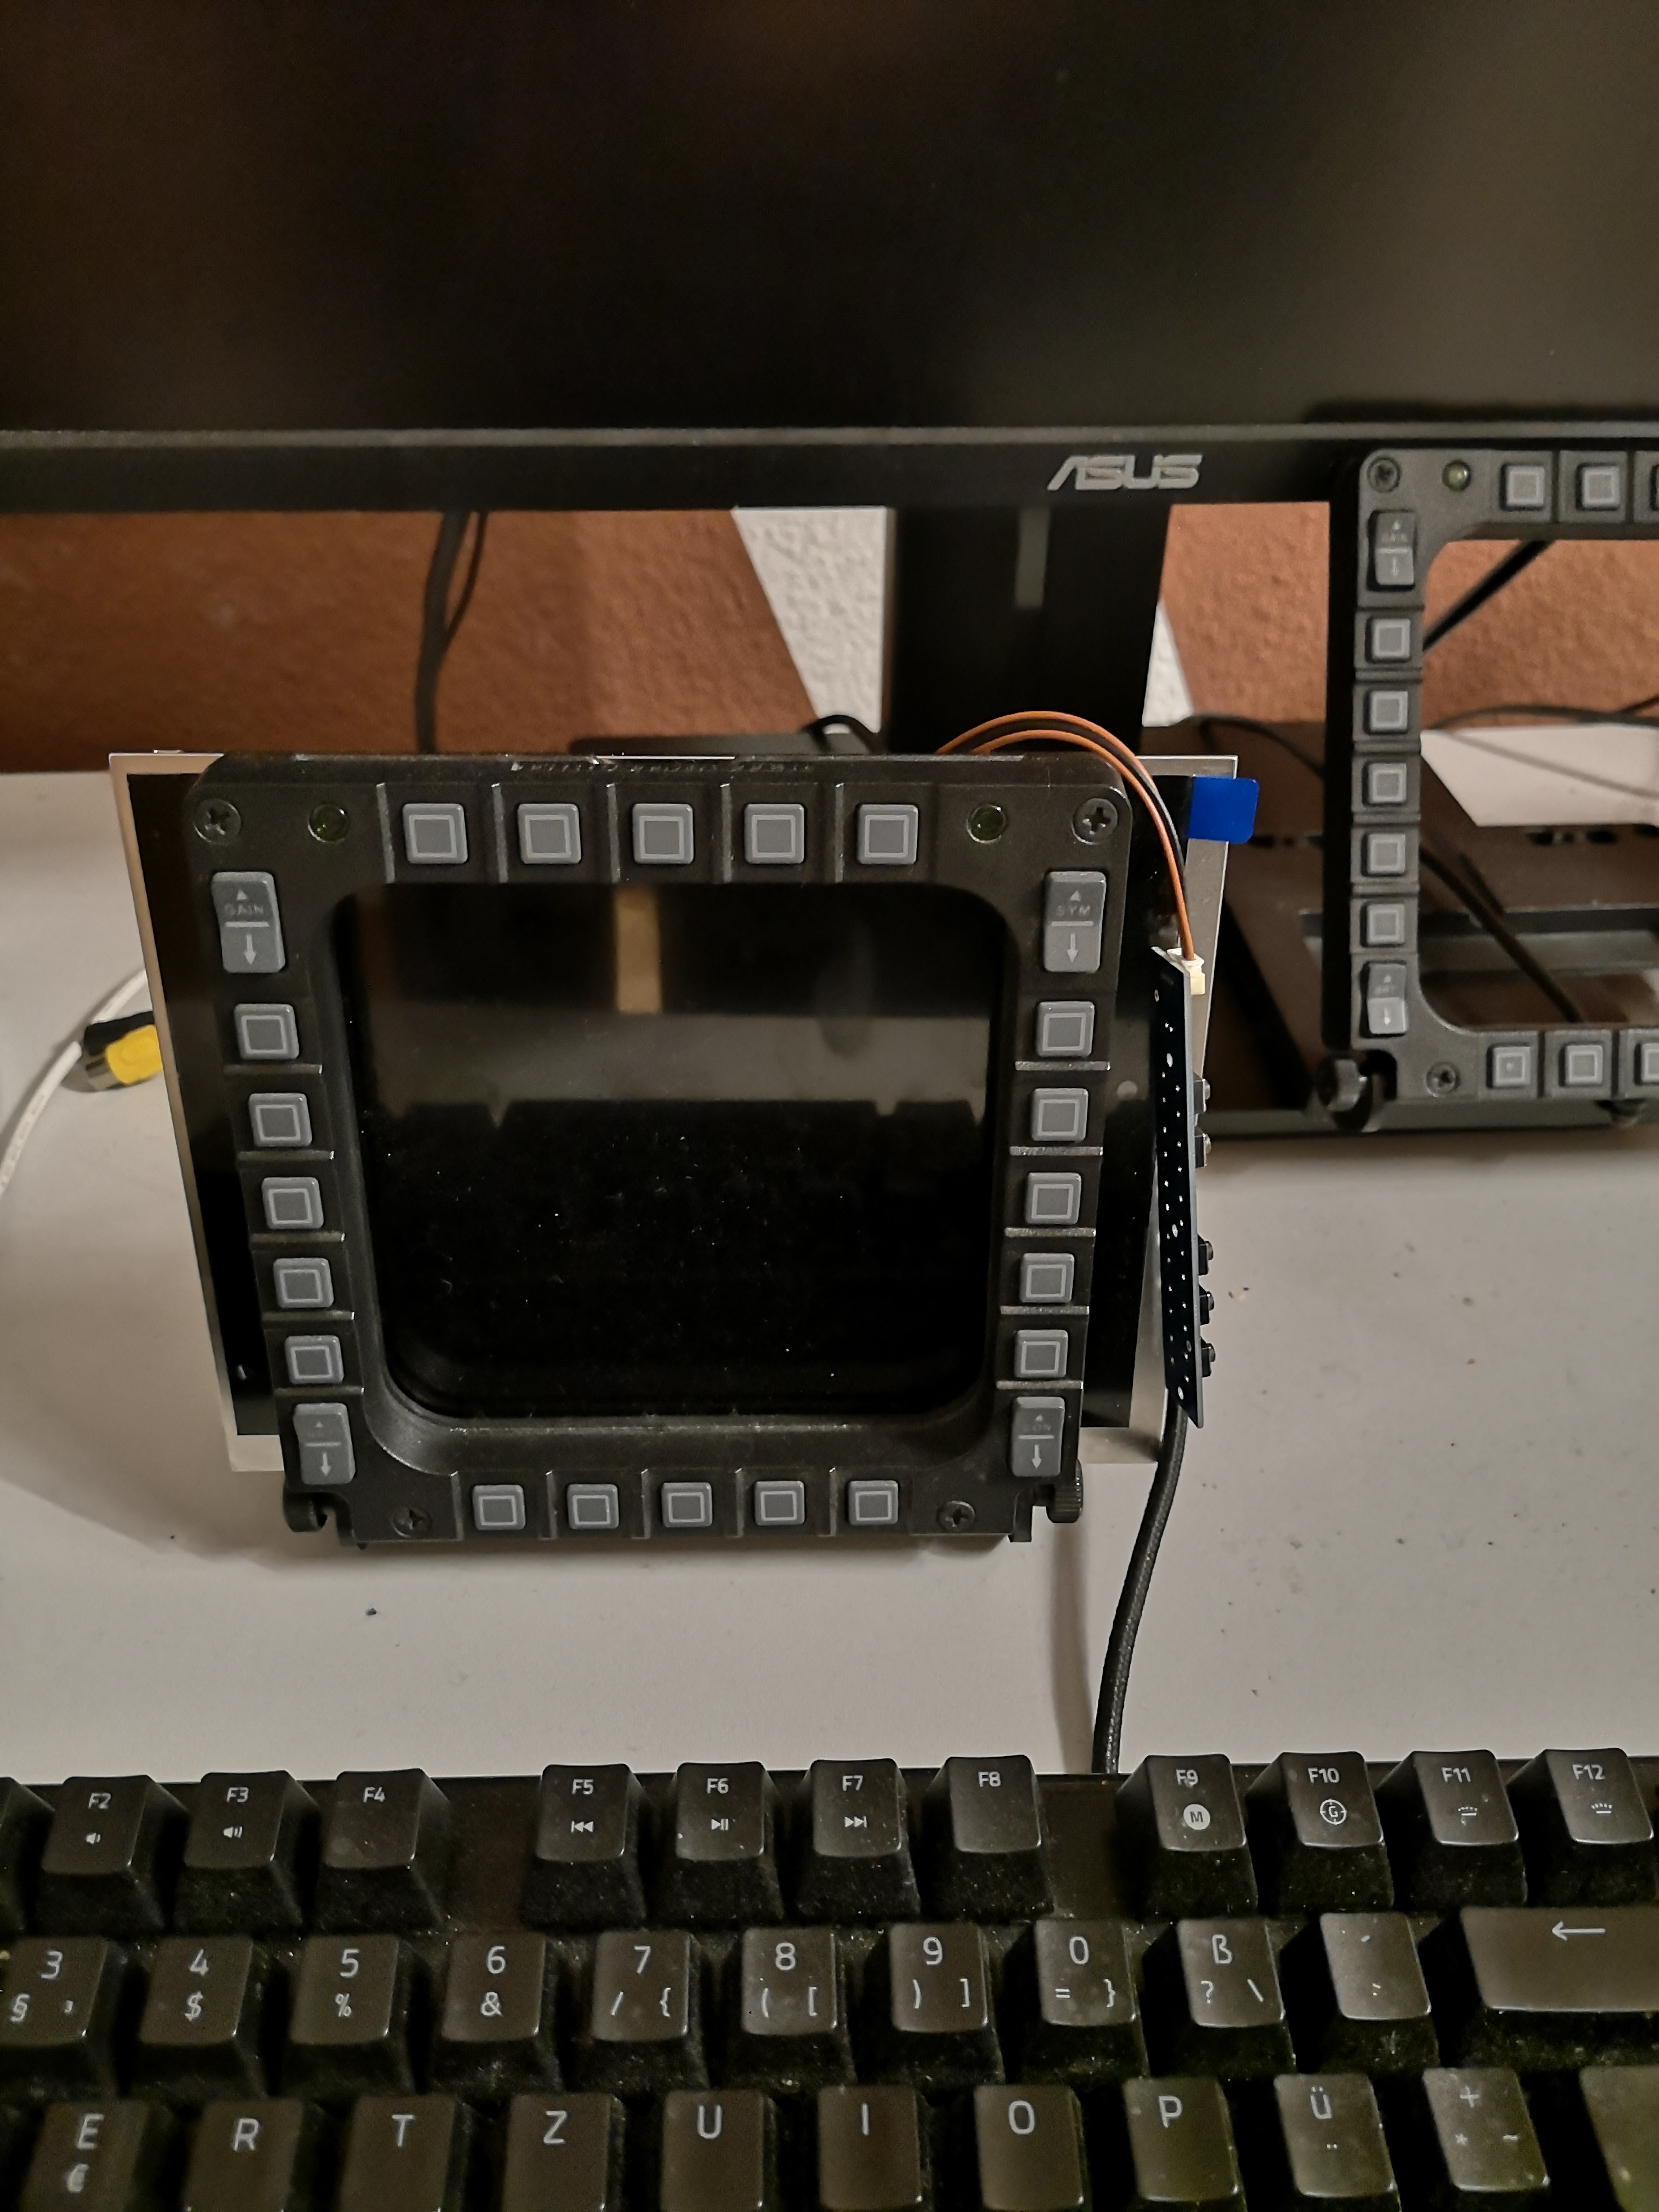
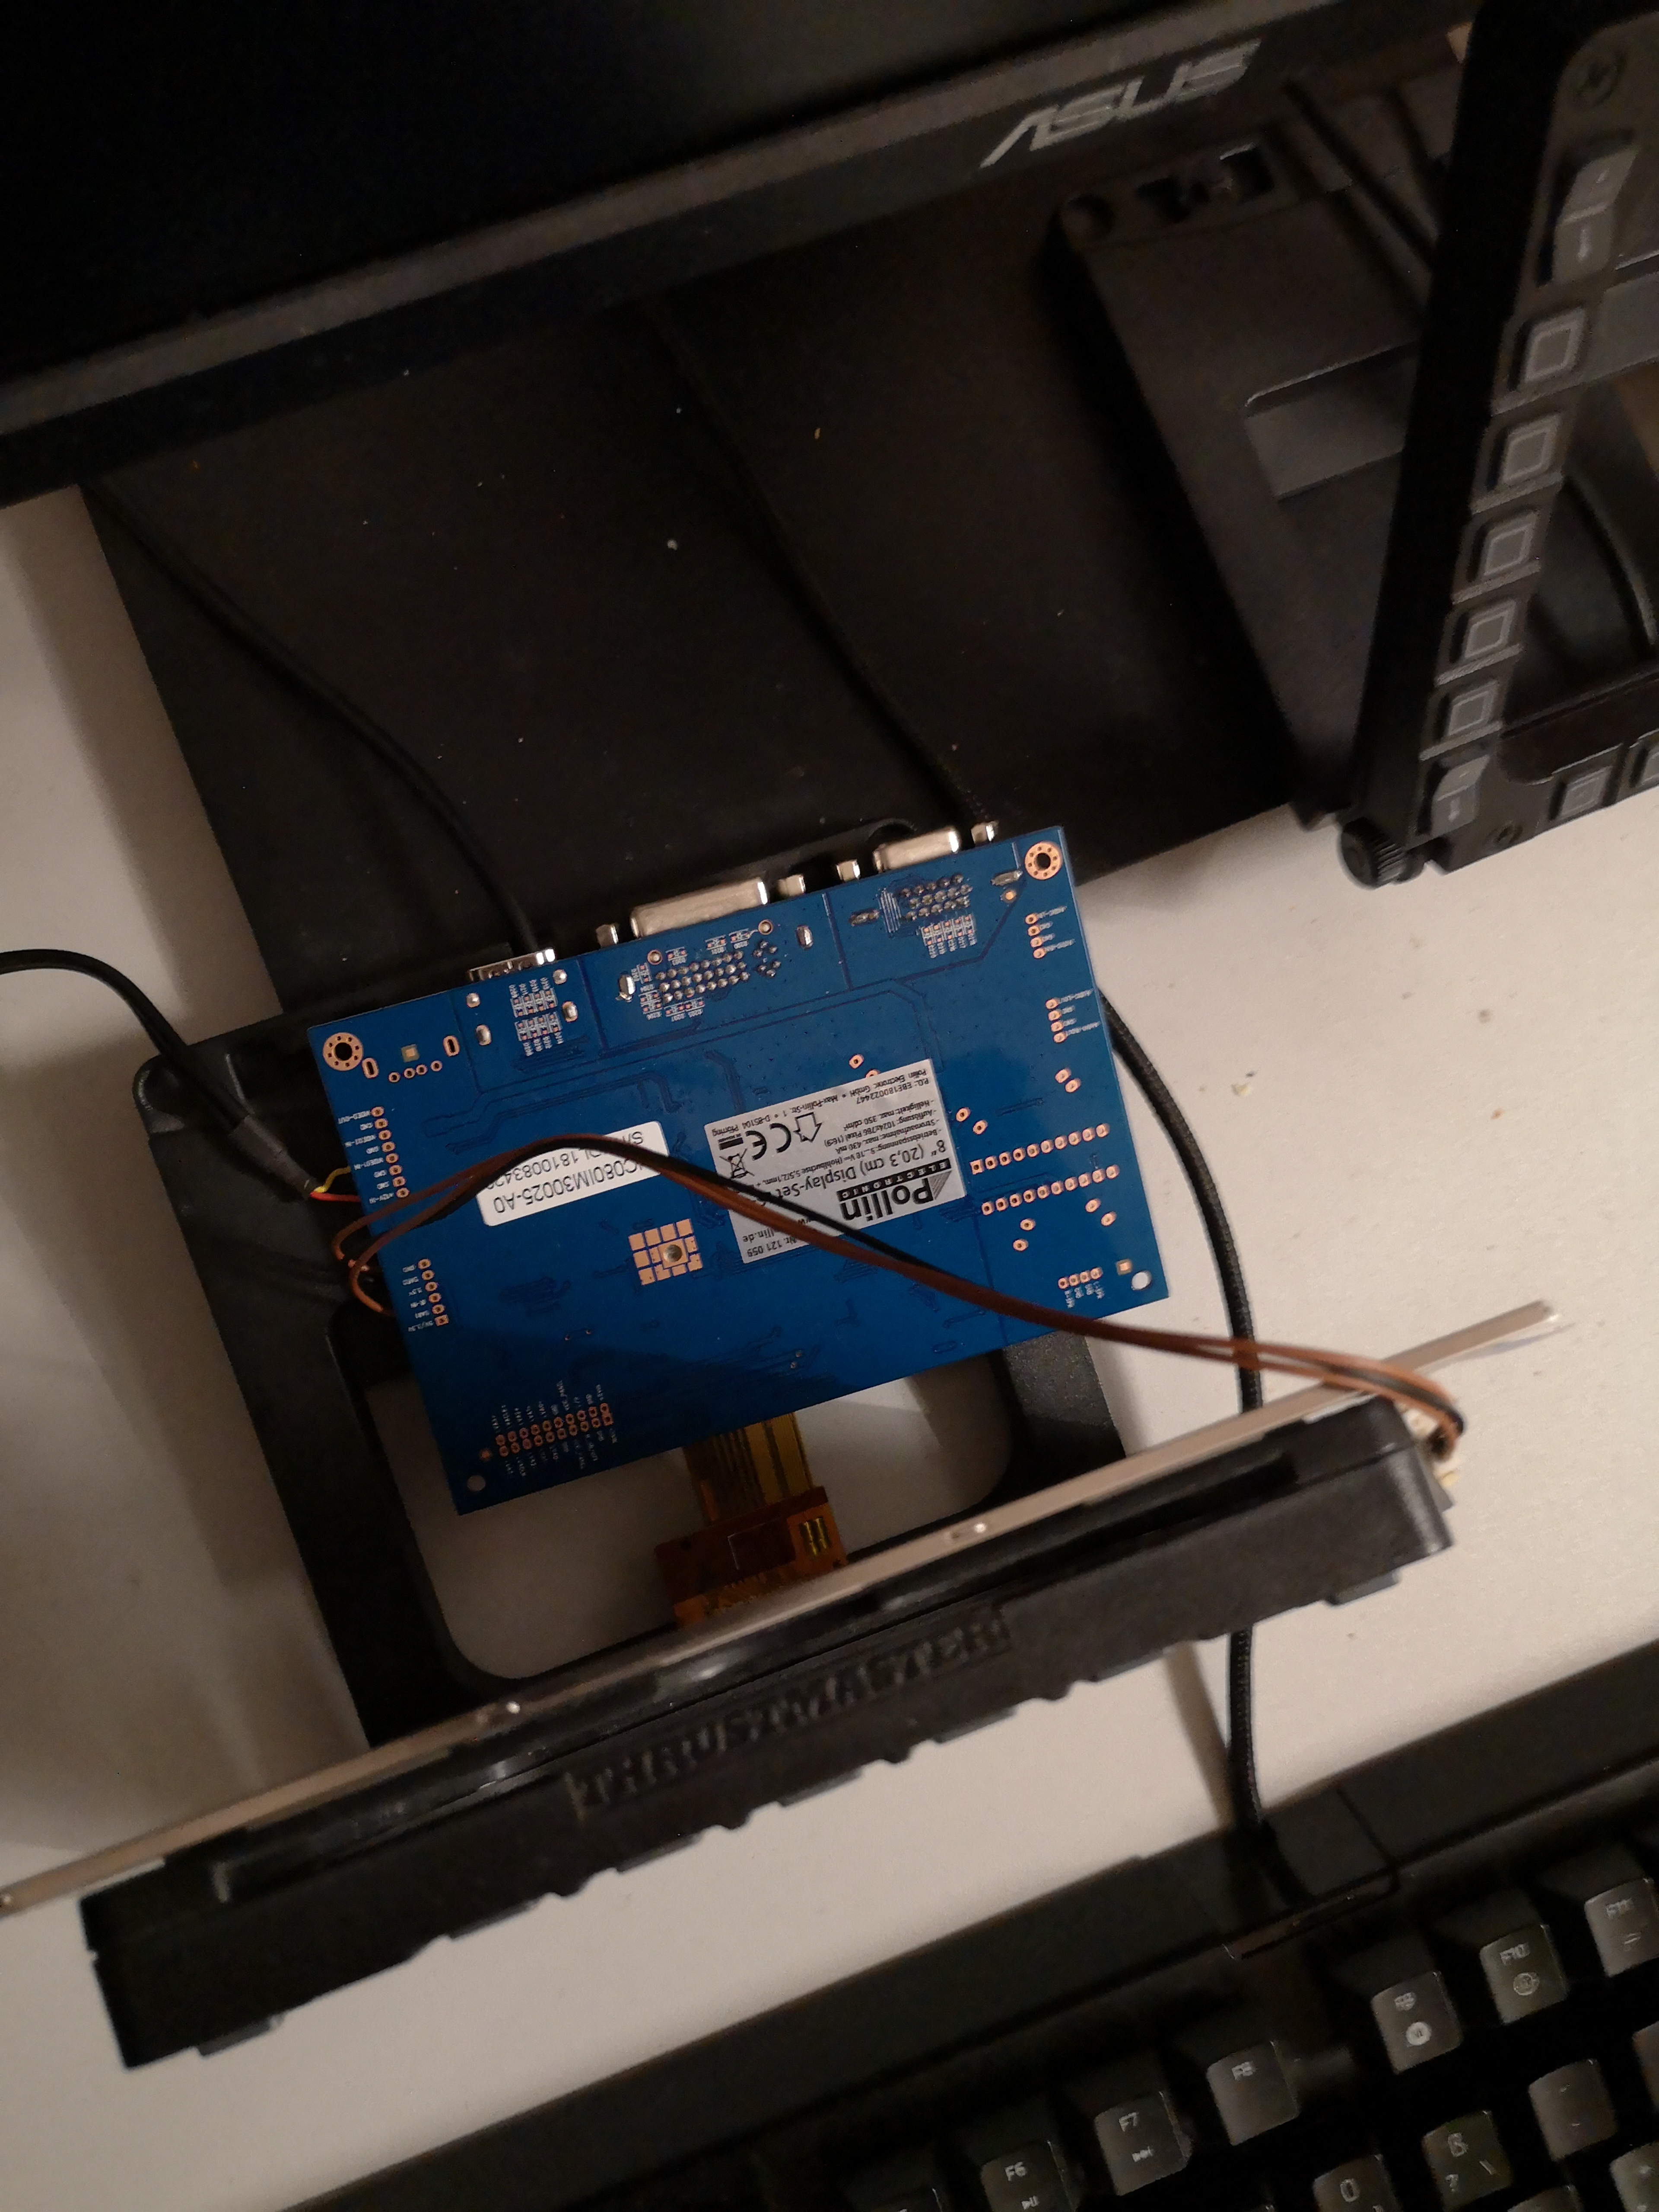
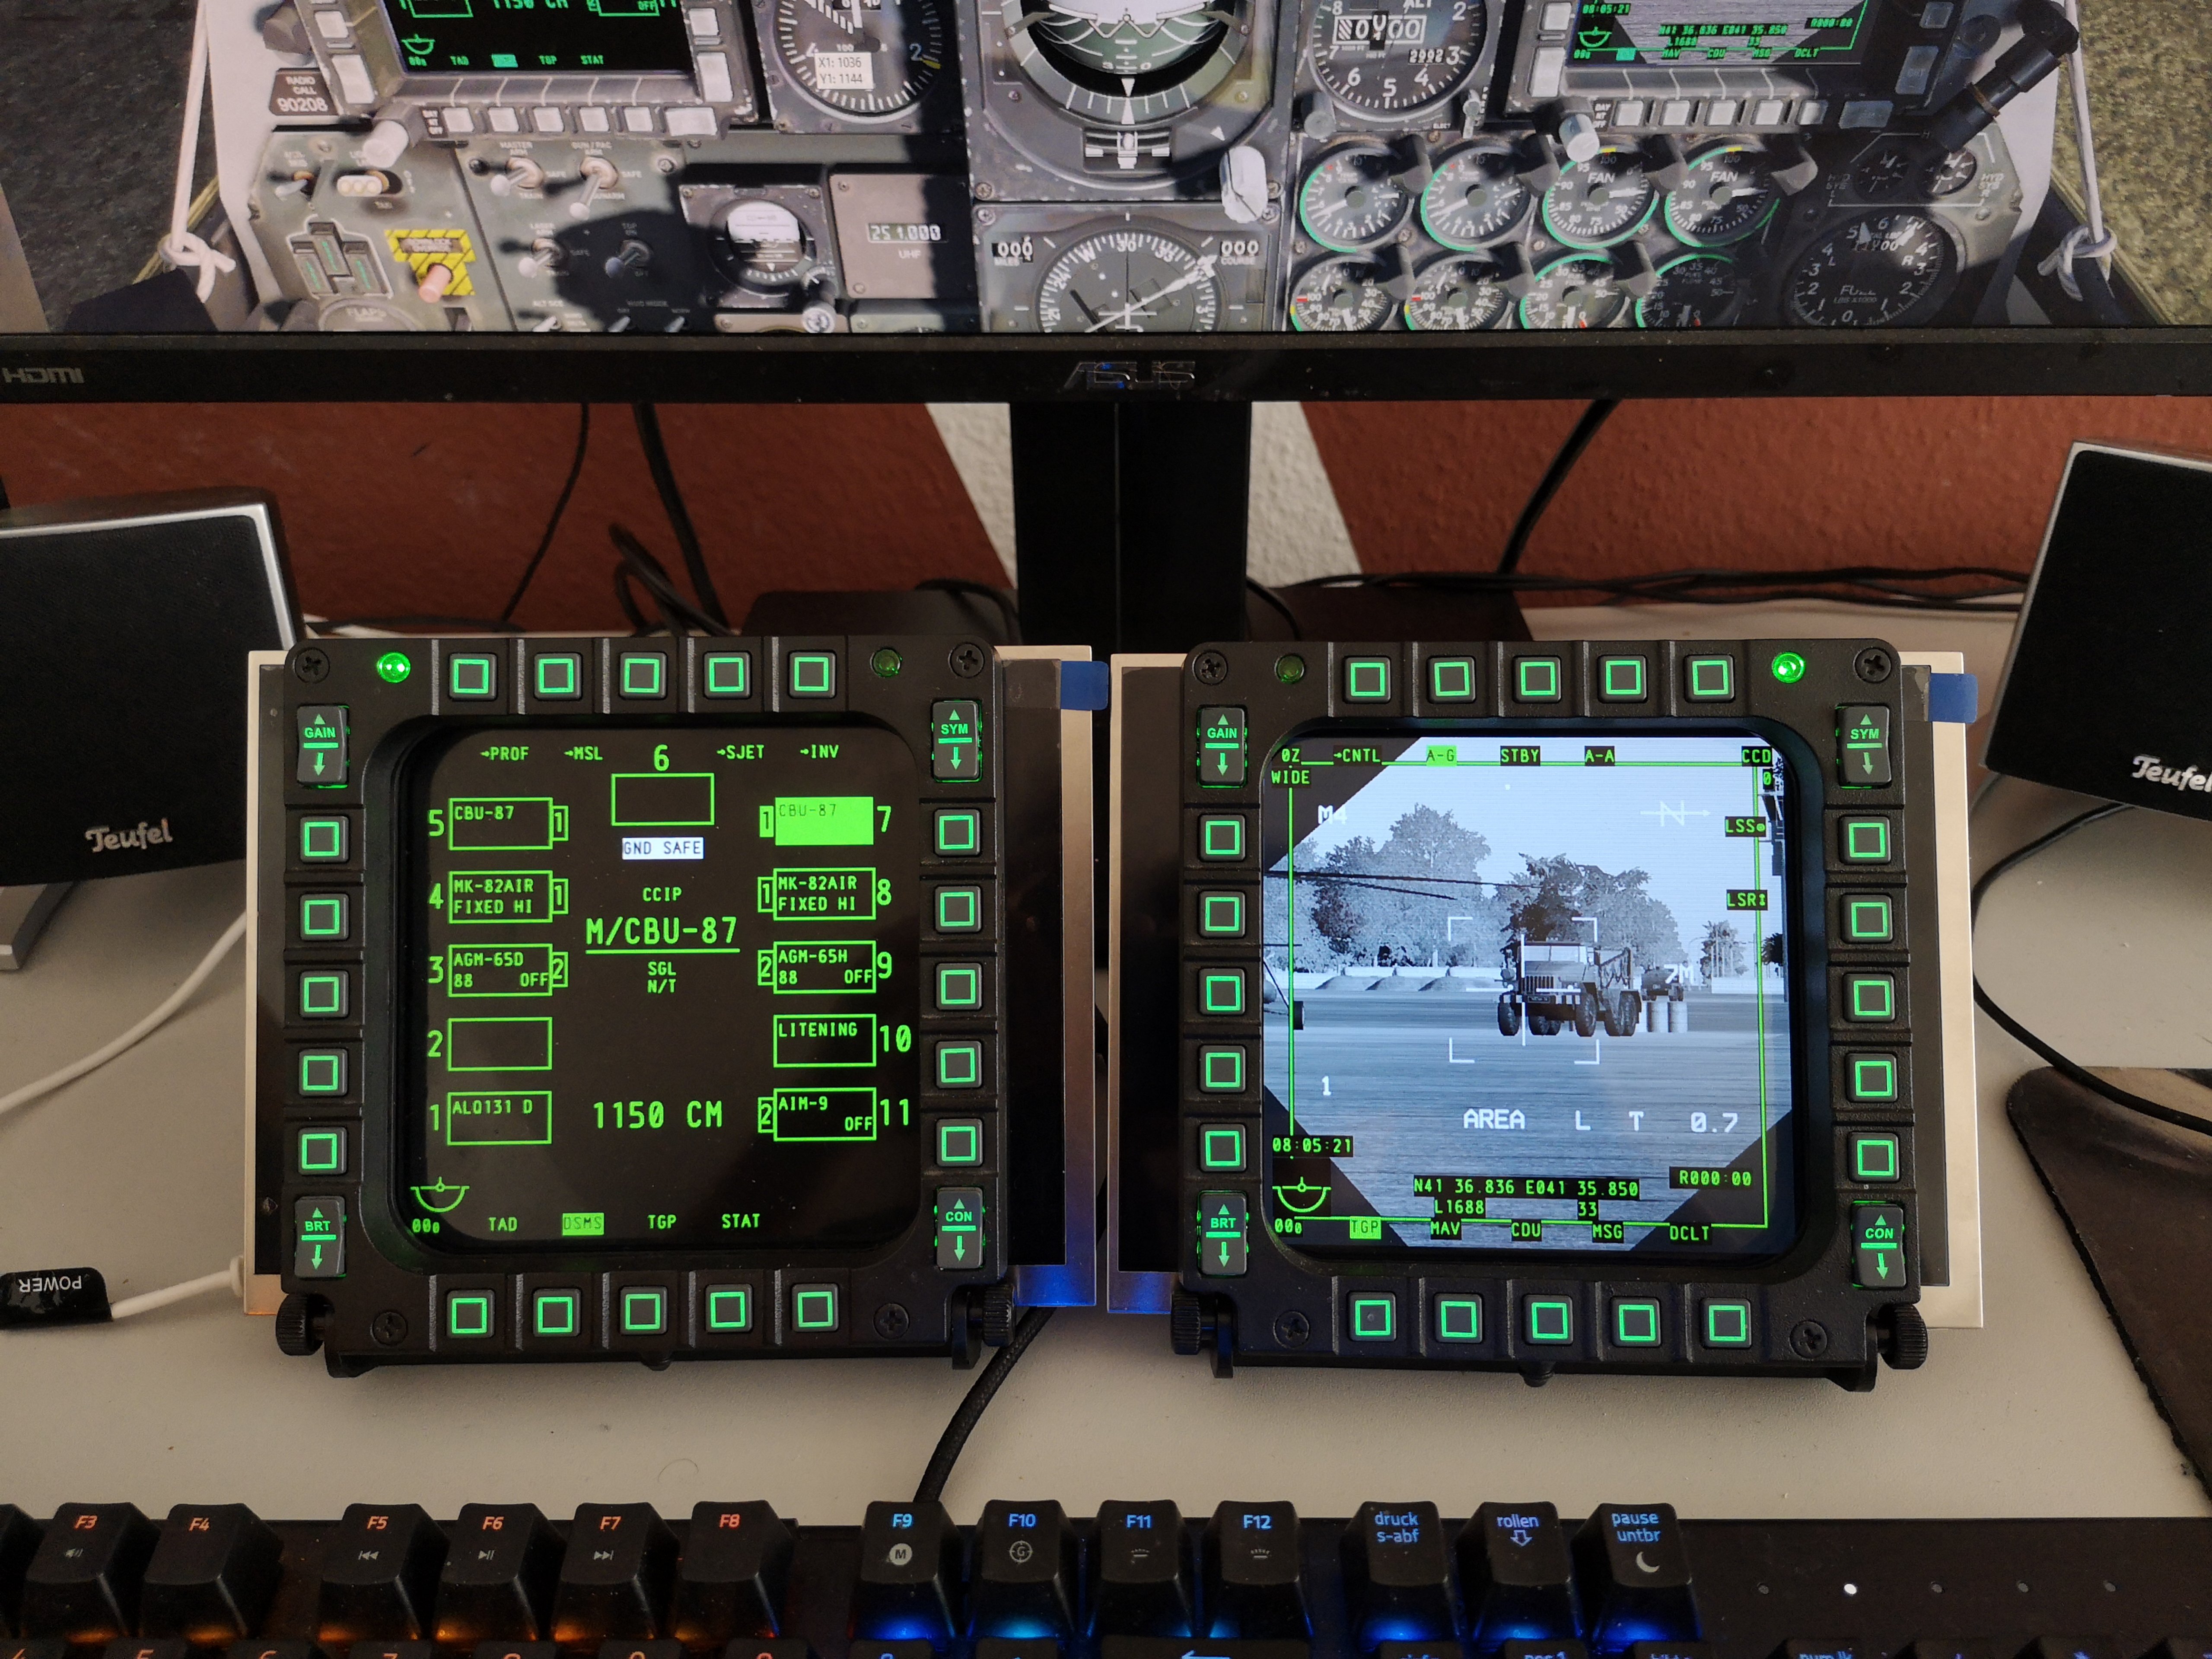
So after it took me a while to find and finally buy one of the LCD-Screens suggested in this thread, I started building. For the Build i use this screen twice: https://www.pollin.de/p/display-set-ls-8-20-3-cm-8-hdmi-dvi-vga-cvbs-121059 I simply attached the LCD-Screen centered onto the MFD with double-sided adhesive tape (TESA Power Strips, cut into little 2x1 cm pieces). Since the Screens are covered with a protective foil, I have no worries about damaging them. Regarding the control board I was facing two problems: 1. this one is a bit bigger than the one speedbird used in his original build. 2. the display connector is not in the middle of the board but offset As one can (hopefully) see in the Image, the "offset"-issue is not quite a problem because the board does not stick out to the side of the screen. After I customized the .lua file to match my screen setup, the result is quite pleasing. My second screen arrived today so I will install it in the same fashion as the first one tonight. After all, I have still two things on the to-do-list: 1. Cut plastic fields to the size of the "excess" -screen estate left and right to the MFD-Canvas to cover it up neatly. 2. Find a way to mount the control board behind the screen in an elegant fashion. (Maybe sticking it onto the backside of the LCD-Screen itself?) Maybe you guys have some ideas on how to solve these two issues? Of course, this is not nearly the build quality of the OP and the other folks who build their own cases and whatnot for the screen. I admire your work and hope that you can give me constructive critizism and inspiration for my work. Last but not least, hopefully this post was understandable, for I am from Germany and not a native english speaker. :music_whistling: EDIT: I added two photos of the working complete setup with two screens. Really makes the DCS experience even better than it already is! Fly save, Orrn
-
Thrustmaster MFD Cougar Pack - LCD Home Edition
Orrn replied to Speedbird696's topic in Thrustmaster
Wow nice. I'd love to have an A10-C UFC or even better a CDU. :) -
Thrustmaster MFD Cougar Pack - LCD Home Edition
Orrn replied to Speedbird696's topic in Thrustmaster
That is one nice setup. I am wondering what kind of input device that is, over your stream deck device? Edit: typo -
Thrustmaster MFD Cougar Pack - LCD Home Edition
Orrn replied to Speedbird696's topic in Thrustmaster
One last question: Did you use this display to build it into the mfd? If so, can you post a picture of the fit? Otherwise, im gonna order it and try it out :) -
Thrustmaster MFD Cougar Pack - LCD Home Edition
Orrn replied to Speedbird696's topic in Thrustmaster
That 8 inch display seems to be perfect, or nearly. I did some drawings and calculations. obviously the screen would stick out only about 15 mm on each side. For 70 euro it seems a bit pricey but i think I just have to invest that. Can you tell me if i just have to plug in the hdmi and it will get a signal -
Thanks for the heads-up, Cobra. I am still missing my package. You have received a mail from me. Cheers
-
Thrustmaster MFD Cougar Pack - LCD Home Edition
Orrn replied to Speedbird696's topic in Thrustmaster
Thanks for the input. You're right. The screens fit really nice without sticking out on the side too much, or creating a gap in the display area. I will have to see if i can get a hold of these babies. I am based in Germany. Oh and, nice work creating the mfds! -
Thrustmaster MFD Cougar Pack - LCD Home Edition
Orrn replied to Speedbird696's topic in Thrustmaster
Hello Friends, since I bought myself a pair of TM Cougars recentl, because i followed this project with great interest, I want to do this Mod myself. This is such a nice work that it inspired me. It is 2018 now and I am facing some problems: 1. I cannot find a fitting LCD screen because all the suppliers linked in the thread are sold out or not longer available 2. I cant figure out how i am supposed to export the ingame mfd screen onto the external mfd monitors. Thanks for your help. Fly save! -
So, how do the T-Shirts fit? I am tall (1,85 m) and average built guy. Normally i wear size M. Can I expect that this should fit me, or do your shirts deviate a bit in any direction? Edit: Oh and in case of not fitting, how is the return managed?
-
Hello there, I was wondering if there are any DCS-playing, or general aviation-interested people in the Region of Upper Franconia, Germany (I live in the Region of Bayreuth fyi) who like to exchange thoughts and maybe play DCS together. I have one "Squadmate" already but you know..the more the merrier! Oh, by the way I speak german as my mother tongue, of course :) Fly safe!