rdibley
-
Posts
24 -
Joined
-
Last visited
-
I've had the MongoosT-50CM2 with the Thrustmaster F-18 grip for a couple of years now, and I highly recommend the combo. The Virpil base is simply amazing. I wrote a review on their webpage, so I won't repeat it here, but it is so good in so many ways. The only "negative" I can even think of is that you have to mount it to something, but I don't know if that's fair to call it a negative. Once you start using it, you'll never want to go back to your Thrustmaster base. The F-18 grip is very nice, and I only had a little bit of trouble where the grip and the shaft had a little bit of slip. After fixing that, it's great. There's a good thread on modifying the weapon release and NWS buttons, and there are some posts where people have replaced the standard hat switch with a MIL-SPC part. Take a look for yourself, but switching the sensor select and trim switches, while possible, looks difficult. Personally, I'm fine with it as-is. All of the functionality is the same, just the two switches are swapped. I don't even think about it. Unless you're a purist or you're building a harrier cockpit, you'll probably be happy without swapping the switches.
-
Threadlock would definitely work in the short term, and maybe permanently? I don't know. It's a simple fix and worth a try. You got me thinking... another idea would be to use bonding putty. It's like a stick of clay that you knead, then it hardens like an epoxy. You wouldn't need to use much, just a little on the curved ribs on the right grip, and then wrap wax paper around the shaft as you press it into the putty.
-
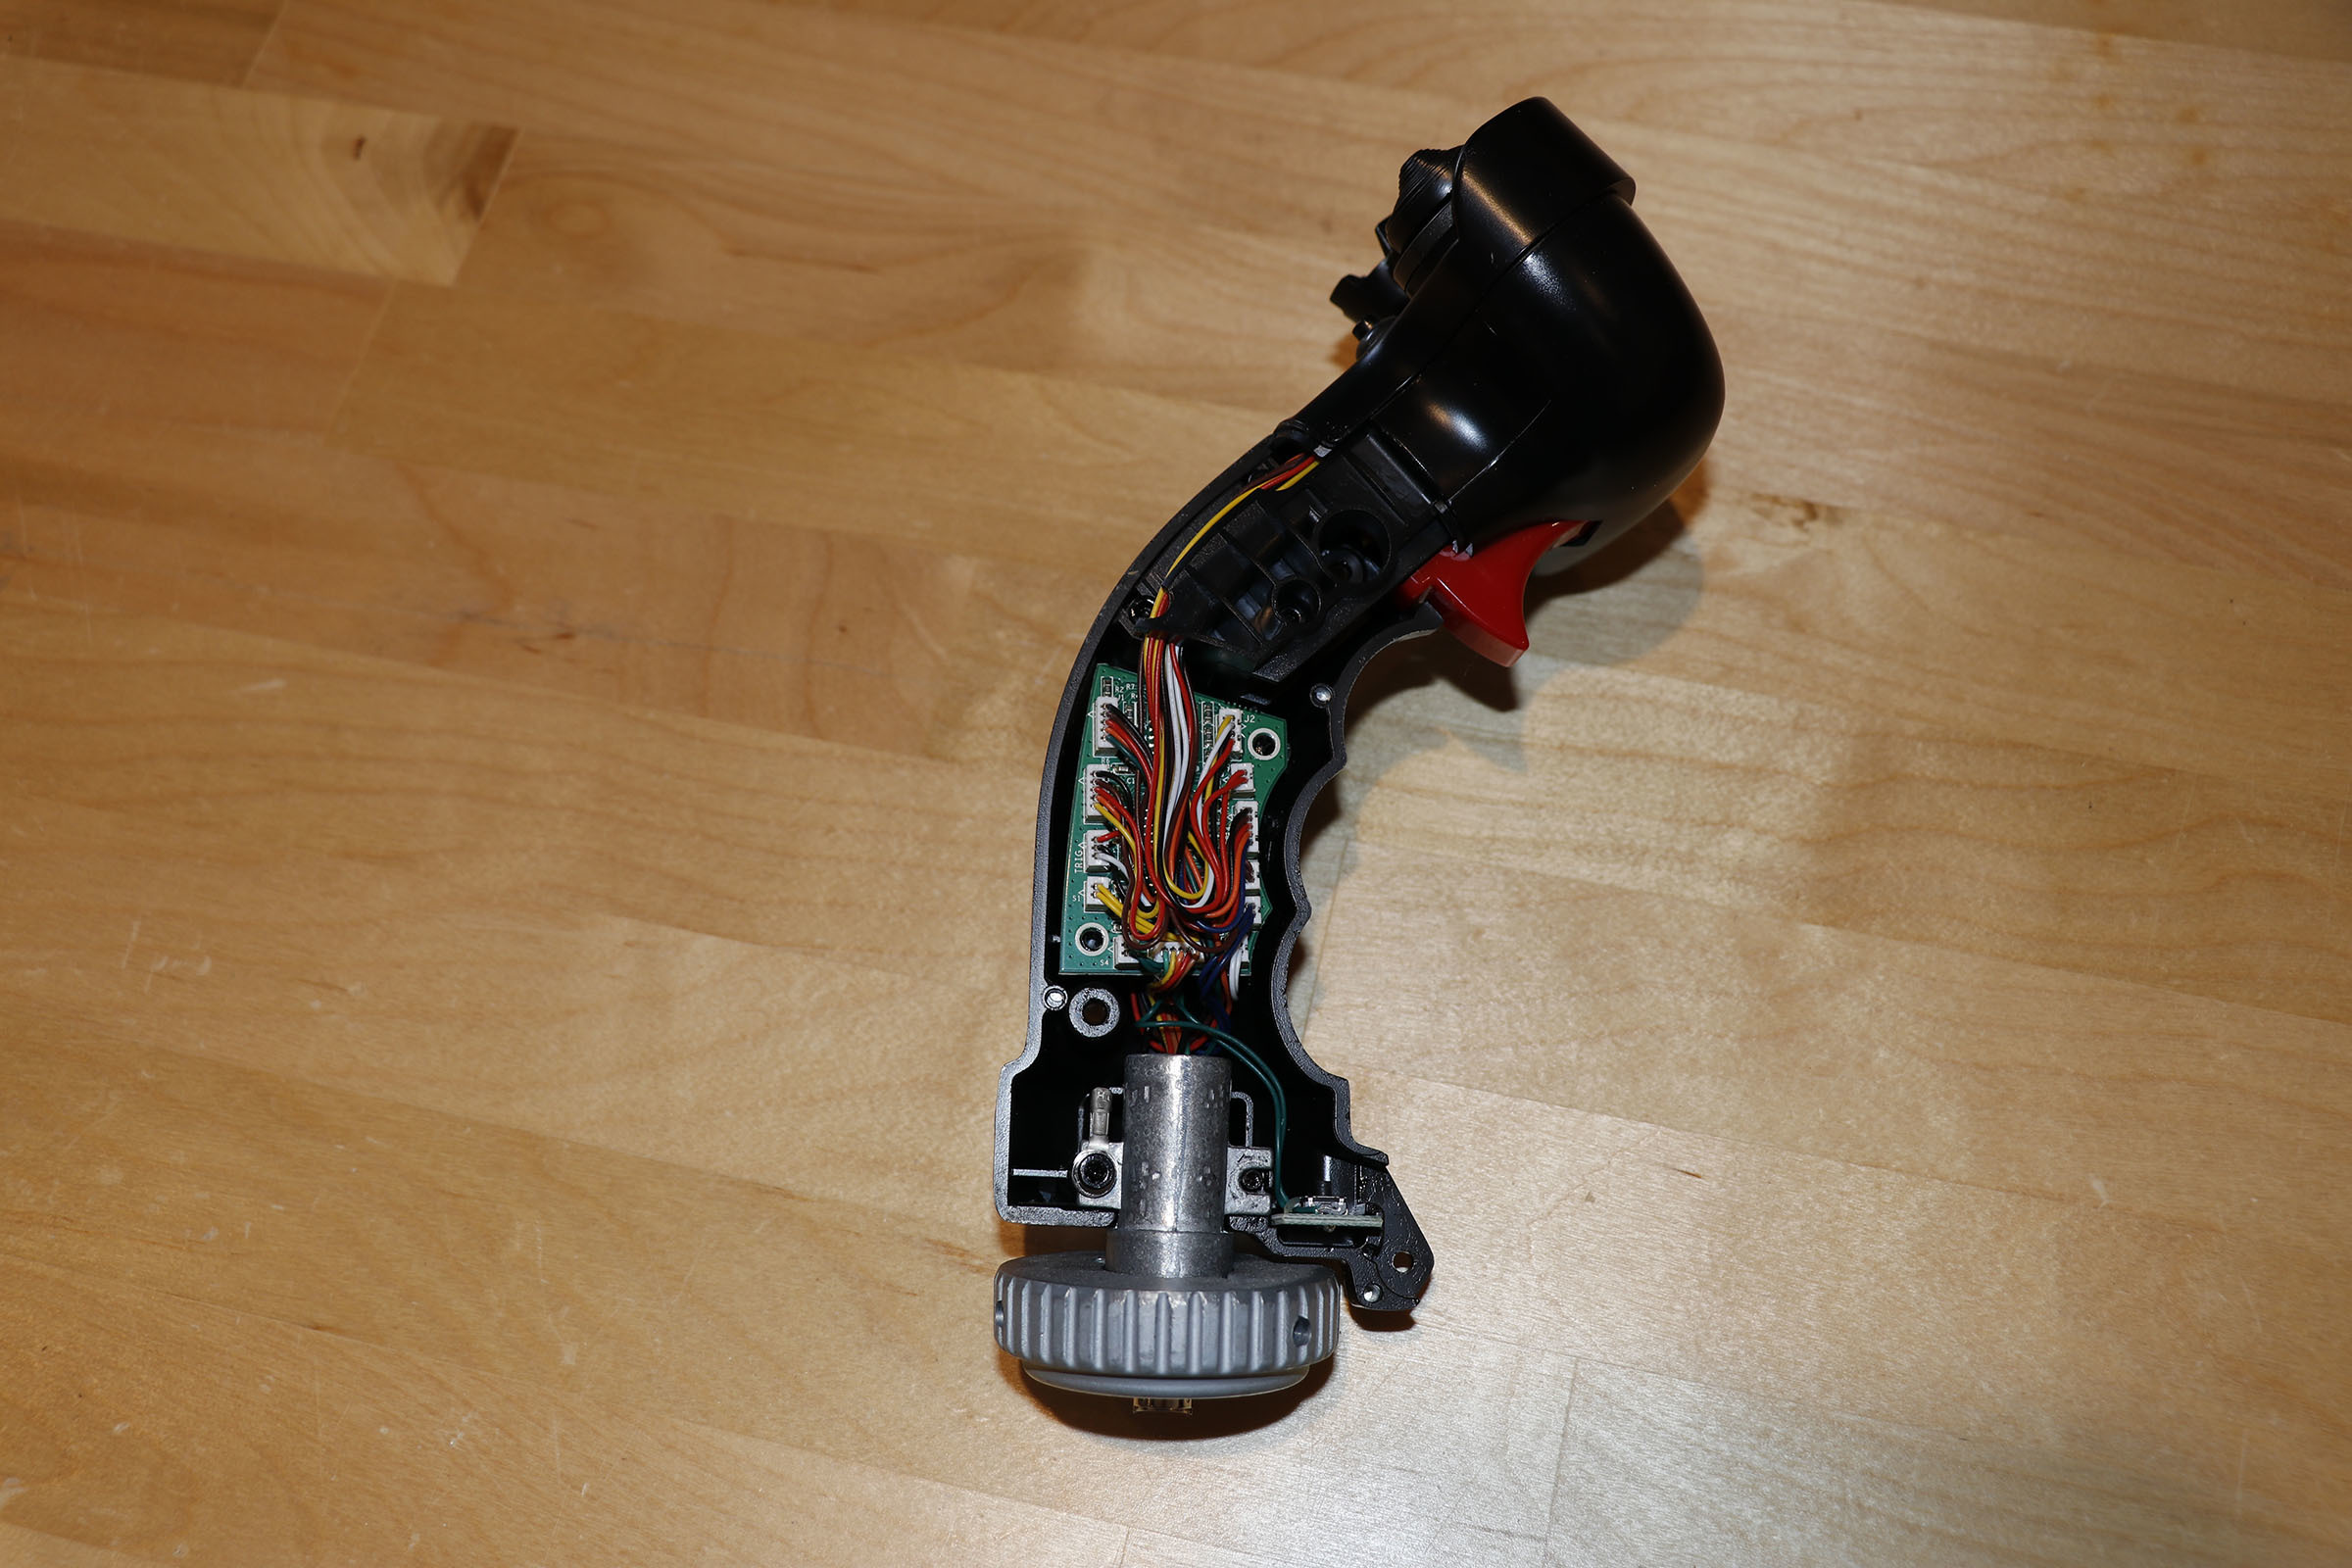
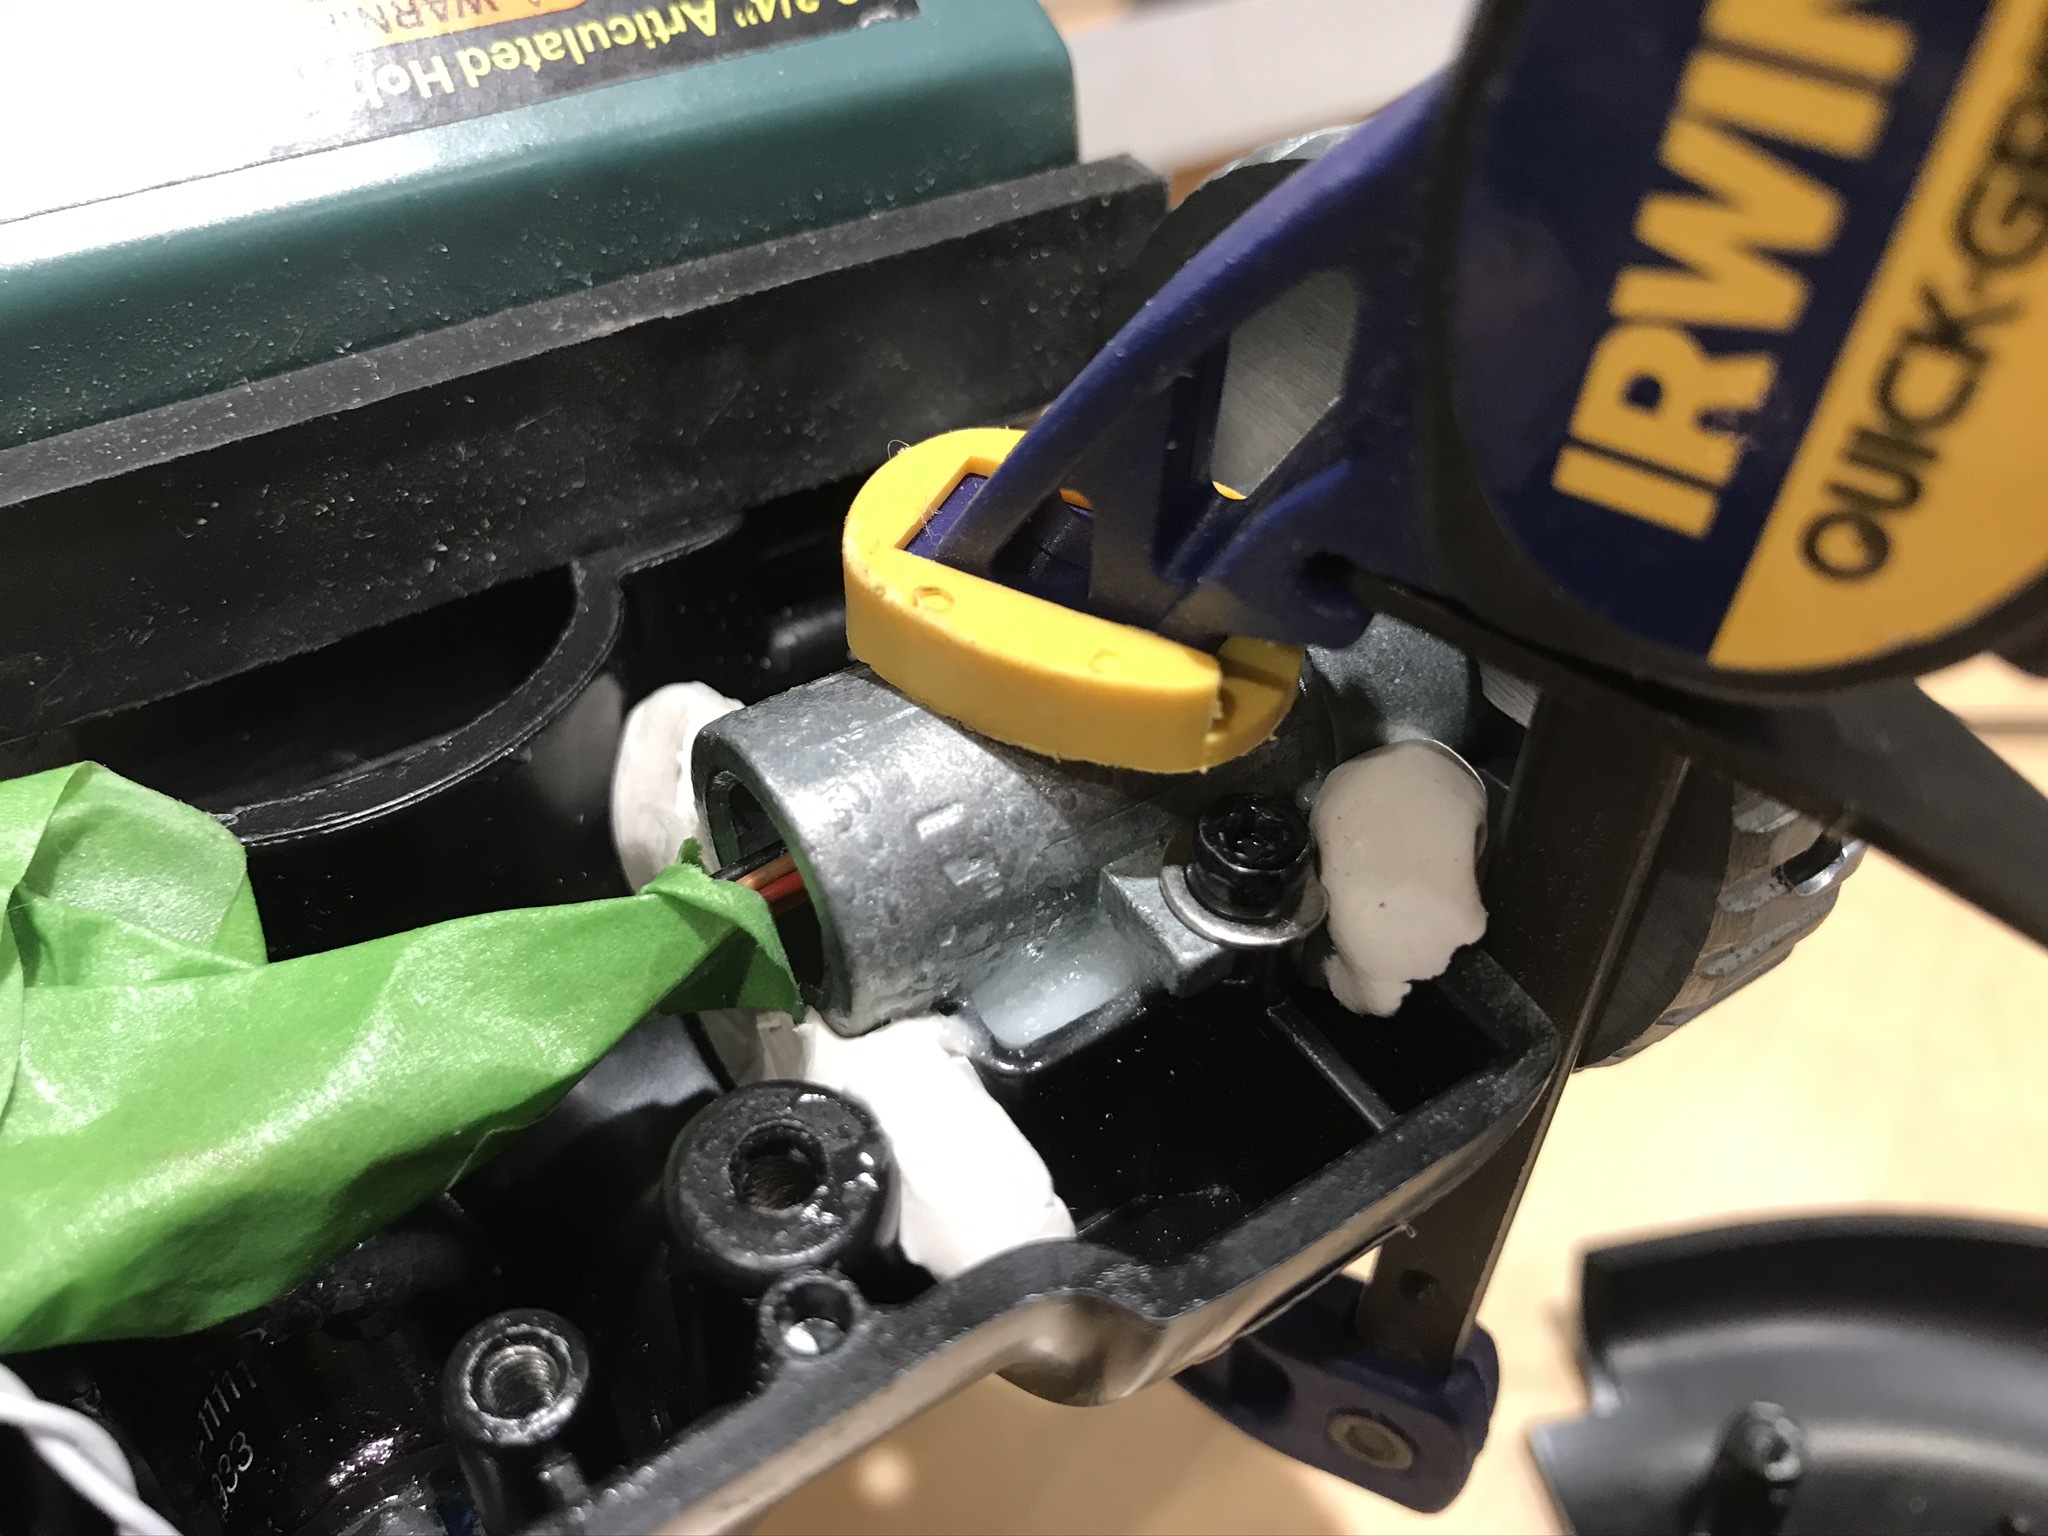
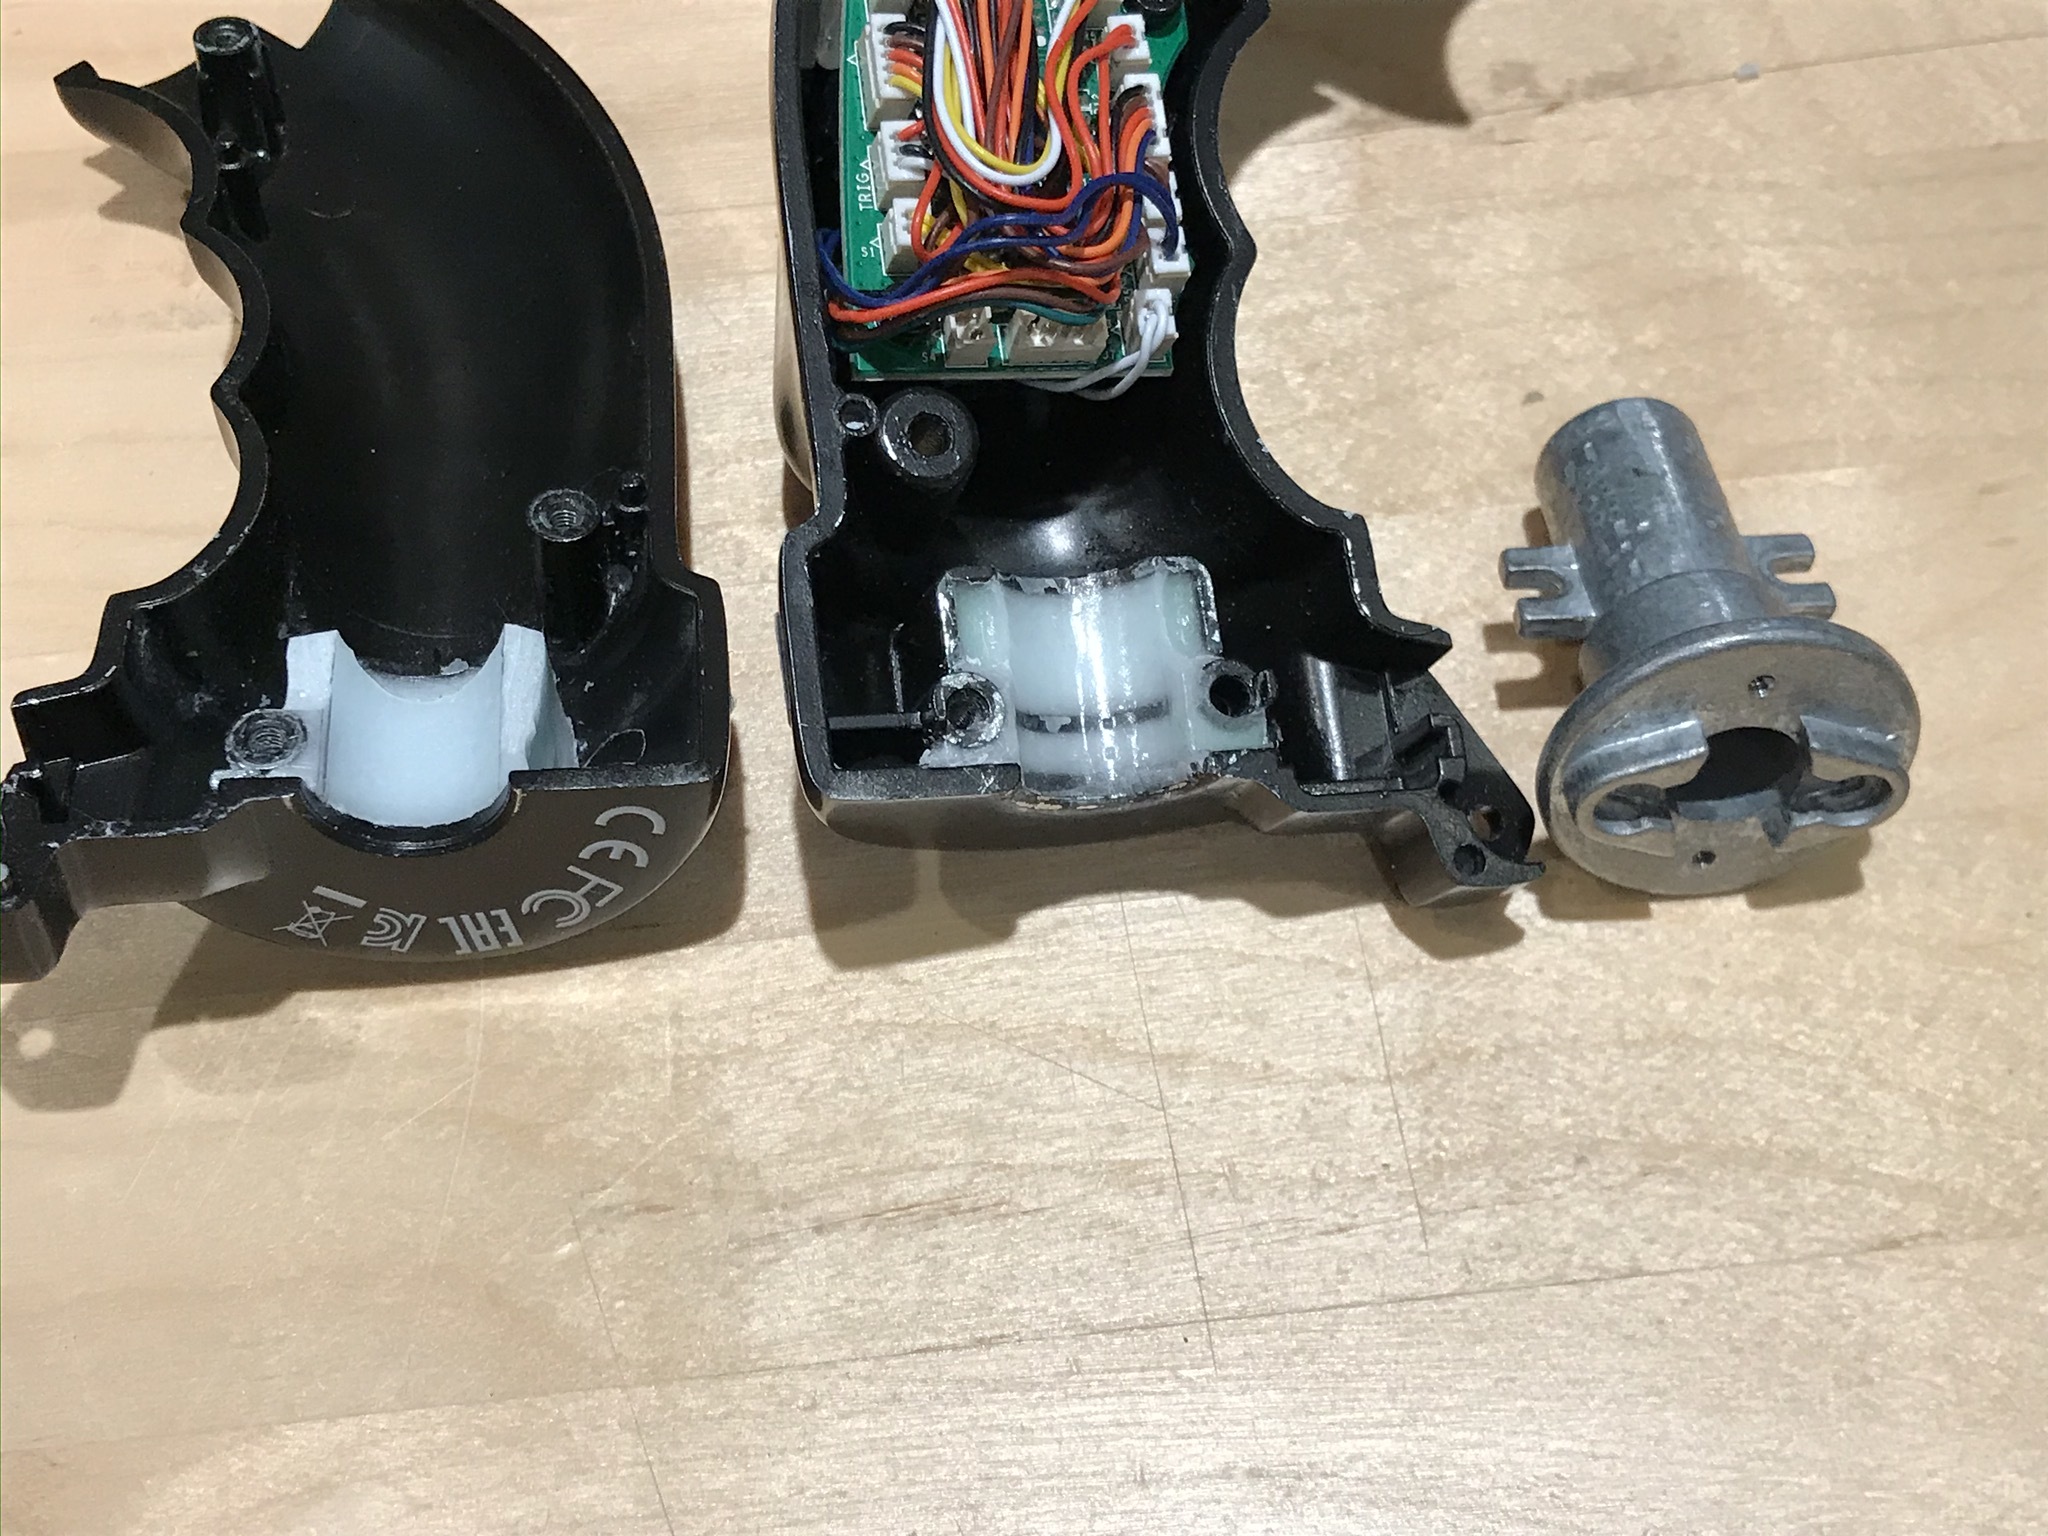
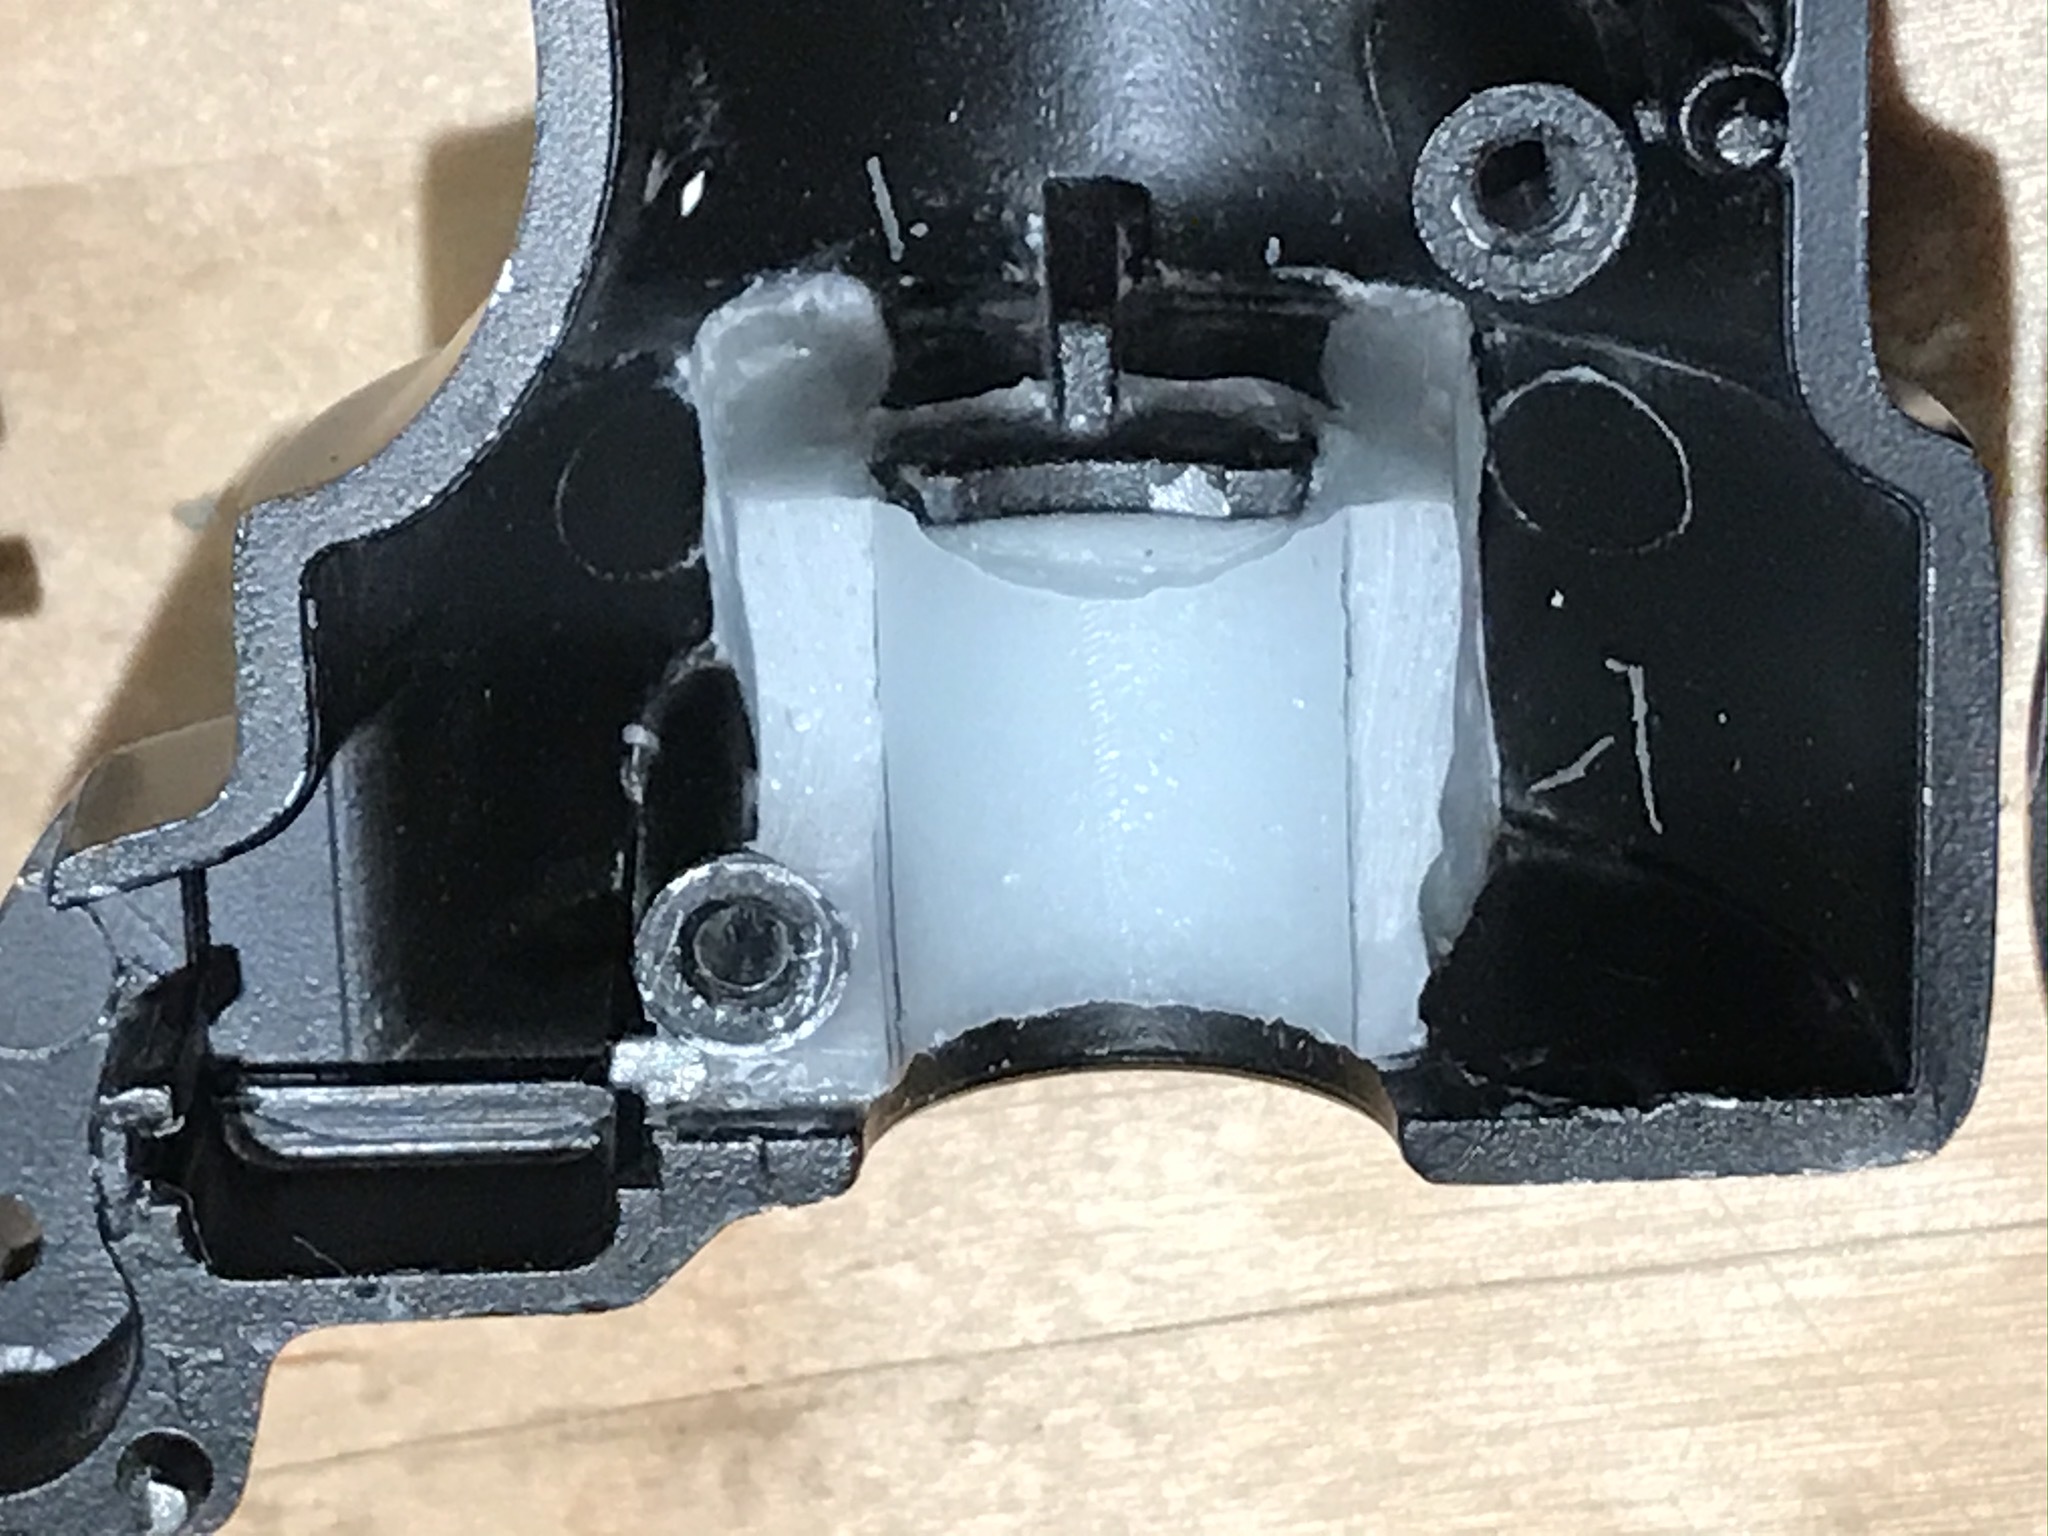
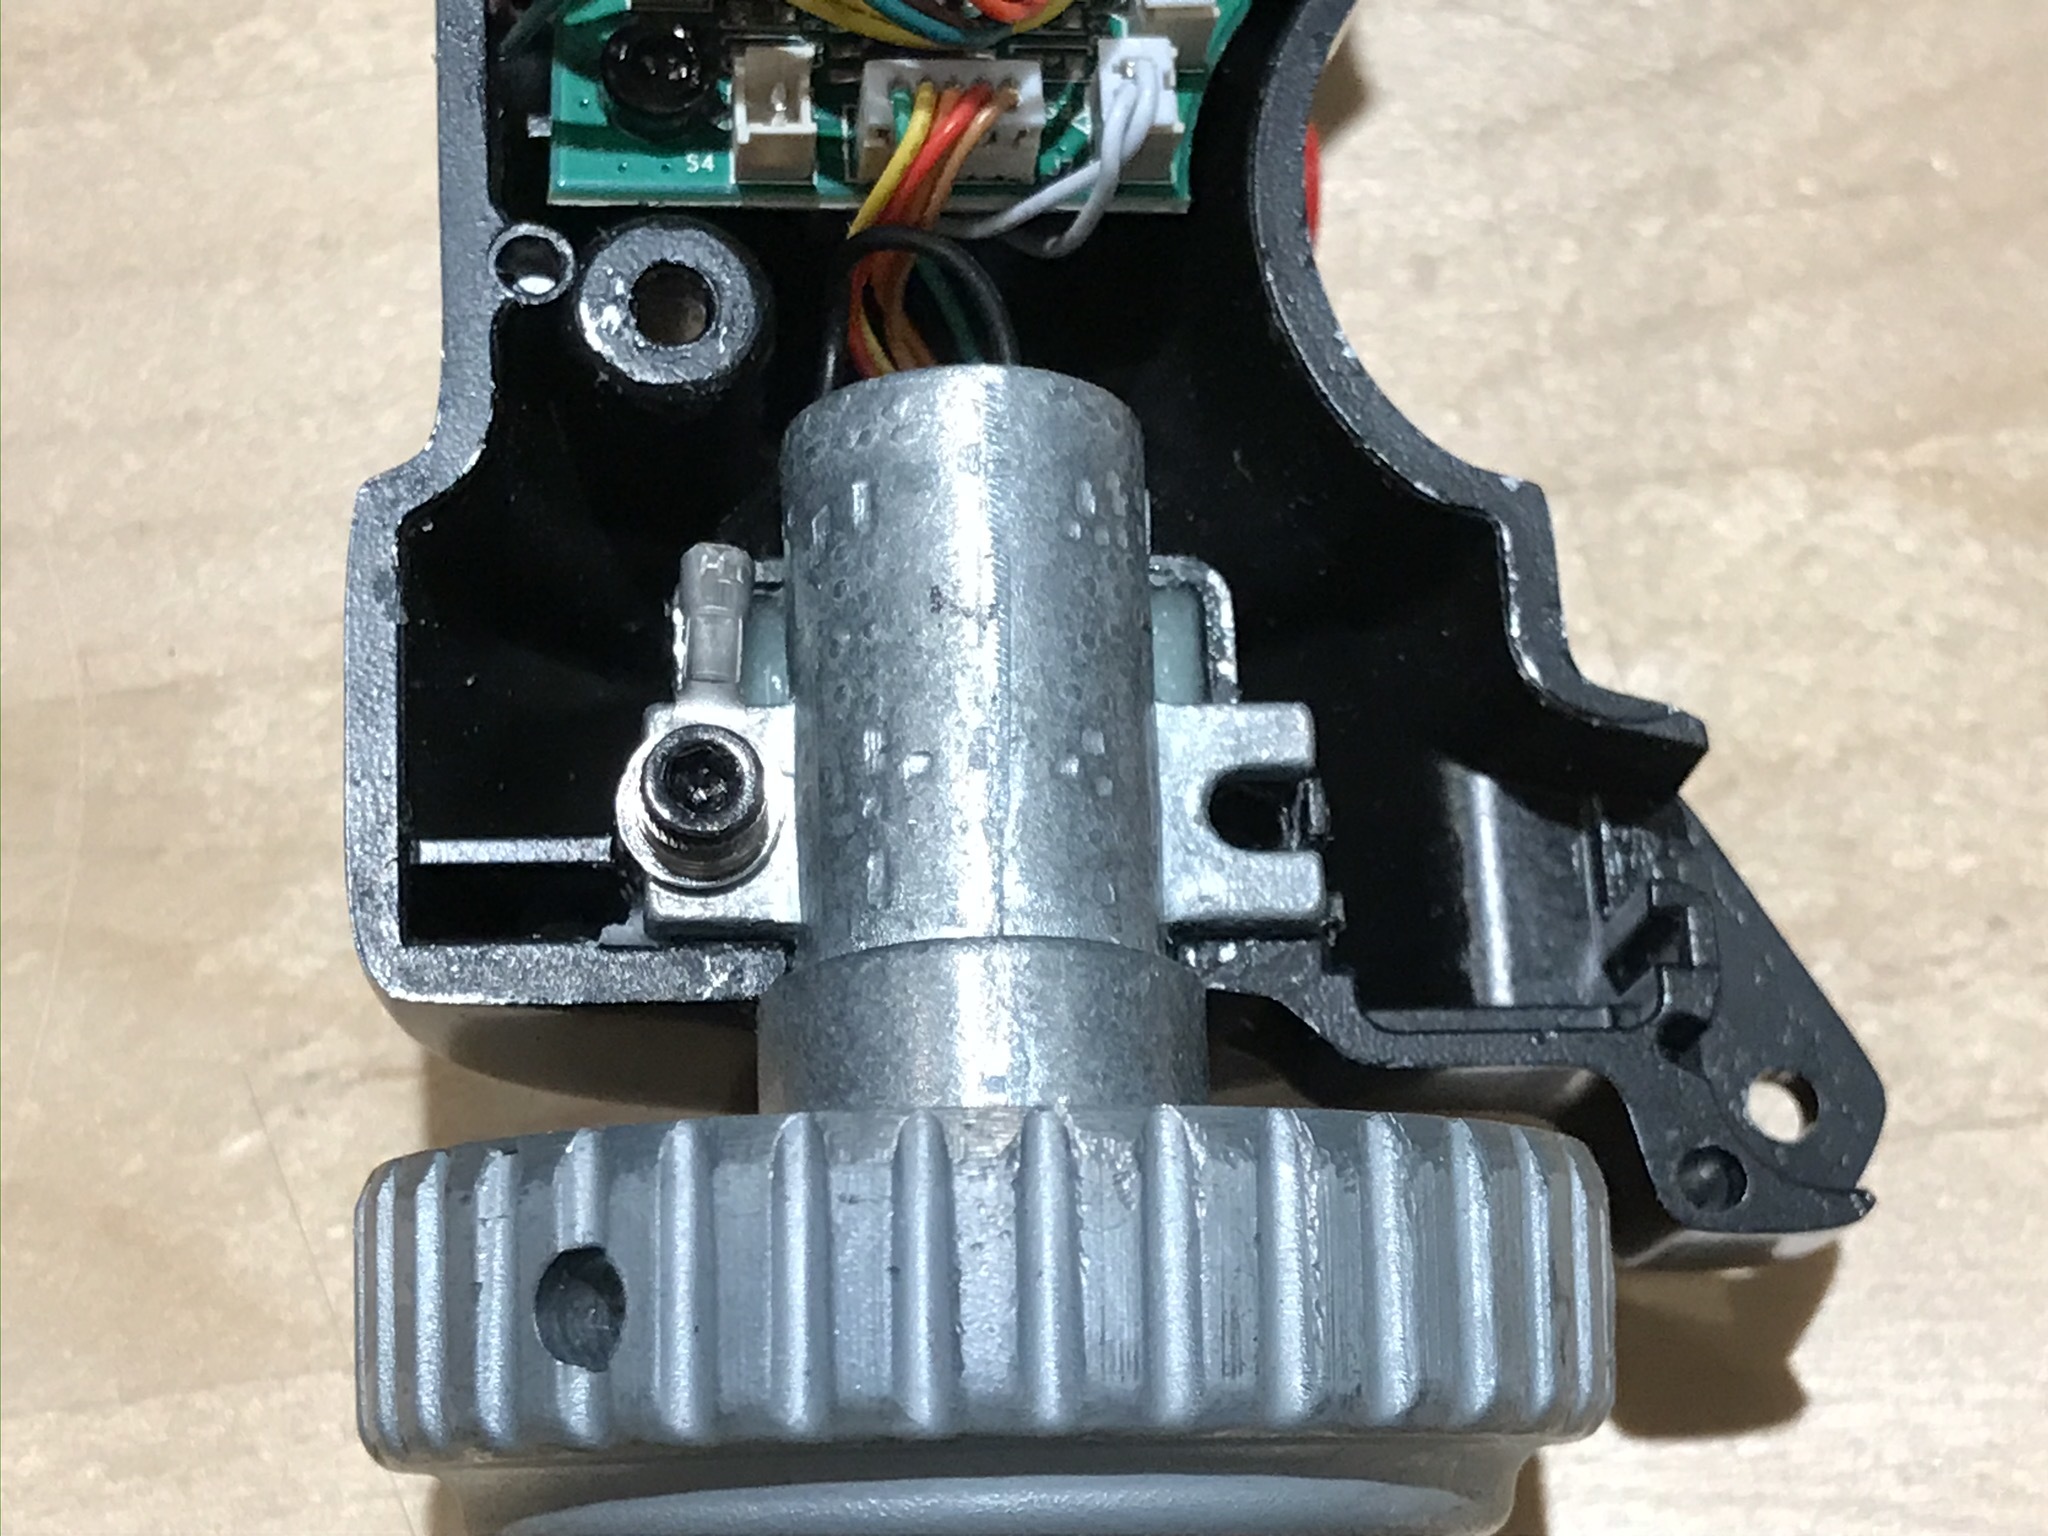
First, thanks for figuring out the switches and posting your tutorial. I bought a couple OTTO switches back in January and only got around to replacing them last week. I added another unnecessarily complex but awesome modification that you might be interested in. The Problem: After maybe 6 months of regular use with my F-18 stick, I started noticing a "clunk" in the pitch axis that would occur when going from large positive to large negative stick motion, and vice versa. It took me a while to narrow down what was causing it, but I finally figured out that the joystick shaft to grip interface was loose. Not so loose that you could wiggle it with your hand, or that it would happen with small (low stick force) motion, but when you input large pitch commands, it would slip and rotate to one side. Move it in the other direction and it would slip and rotate to the other side. You don't notice the change in angle, but you can feel it when it happens. I describe it as a "clunk," but maybe there's a better name for it. Inside the joystick, the shaft has two forks on each side, the one to the rear of the joystick being screwed to the left grip half, and the one at the front of they joystick squeezed together when the two halves are joined with the external screw. There are curved ribs on each of the grip halves that are supposed to secure around the shaft to hold it in place. [ATTACH=JSON]{"data-align":"none","data-size":"full","data-tempid":"temp_261892_1605125933265_256","title":"IMG_1068.JPEG"}[/ATTACH] In reality, the ribs aren't an exact fit, so there's a little bit of wobble without the screws in place. Tightening the rear screw secures the shaft, but the pitch axis is really only secured by friction. The roll axis seems to be unaffected in that the screw seems to keep it in place, but maybe I just didn't notice it. I tightened the rear screw and that fixed the issue for a short time, but eventually it loosened up again. With the forces that are put on the sick with regular use, you just can't expect the friction fit of this one screw to keep it from moving. The Solution: After modding the two OTTO switches, I bedded the shaft to each of the grip halves with epoxy and filler. Now it's a perfect fit and there's no clunk anymore. I'll warn you that I would not recommend it if you don't have much experience with this, and there's a better than average chance that you might glue the two halves of the grips together permanently. (I nearly did that myself) I started with the left side, and put non-hardening clay on the top and bottom of the cavity where the epoxy would go. This keeps it from flowing out of either end around the shaft. I cleaned the shaft and sprayed it with PVA release to keep the epoxy from adhering to it. I used MGS L285 epoxy and West Systems 404 filler, mixing it to a gel consistency that wouldn't run. I filled the cavity most of the way, then installed the shaft and screwed it in place, and pressed the clay into the shaft to seal it up. I then added enough epoxy in the small gap so that it was filled to the top of the cavity. After about a day, I removed the shaft (a little stuck, but eventually came out) and the clay and cleaned it up. I then blocked off the other side with clay, making a similar cavity as on the left, and put some more clay around the base and in the screw hole. I removed the wiring harness from the shaft (keep track of the direction) and plugged the top end of the shaft with more clay to keep the epoxy out. The top of the shaft would press into the clay as you put the two halves together. I installed the shaft on the left grip and applied more PVA to the combined assembly in the area where the right grip would make contact. Then poured epoxy and filler into the right side clay cavity and secured the two halves with clamps, keeping the right grip facing down. This is where you can really get yourself into trouble, and I nearly glued the two halves together myself. Since it's closed up, you have to guess at the amount of epoxy to fill, and you cant wipe away excess that might overflow. I used too much epoxy and it overflowed out of the clay cavity and around the screw that attaches the shaft to the left grip. It did not come apart easy, but I eventually got it. I had to later replace the screw as I bent the original while trying to get the two halves apart. If I were to do it again, I would do progressive fills, adding a little at a time to the right grip. This would mean more cleanup, more fixing the clay, and more applications of PVA, but it reduces the chances of gluing it together permanently. After a fair amount of cleanup and trimming, the shaft now fits perfectly with no wobble, even without the screws. Time will tell, but while I understood why it would loosen up with use before, I just can't see how it could happen again after this mod. Regarding the epoxy and filler, I used what I happened to have, but you can probably get similar results with other products. Just make sure to use a good release film. If you're looking for one-stop shopping, Brownells makes a rifle bedding kit (Item FGA01114) that sells for around $30 and includes everything you'd need: the release material, hardener, and epoxy with the thickener already added.

- 111 replies
-
- 1
-

-
- thrustmaster
- warthog
- (and 3 more)
-
There are just a few tips I'd like to add to your post on the F-18 grip: A tip for geting the nosewheel steering switch out without too much force or damage: The switch has two plastic retaining tabs that have to be pressed in to remove the switch. In my case, one of the tabs was on the near side and one on the far side, hidden from view. Use the short end of an allen wrench on the far side to reach around the switch and push in the plastic retainer tab while keeping pressure on the switch to push it out of the mounting hole. When you get it, you will feel a slight movement of the switch as the tab clears the opening and starts into the hole. Keeping pressure on the switch, then depress the near tab and it comes right out. Take a picture of the paddle switch assebmly before taking it apart. I didn't, and it took me a bit of trial and error to get it back together. I think I have it right, but I'm not 100% sure I put the washer on the correct side. If anyone knows or can take pictures of their unmodified joystick, please post them! Also, the shaft for the nosewheel has an E-clip on one side and an O-ring on the other. I didn't realize it was an O-ring and removed the E-clip, but It's a lot easier to remove the O-ring.
-
I'm not a troll, guys. You just don't agree with me. When I read this update: "We have worked hard to increase the range and visibility of lights to enhance the night flying experience. We know that it is far from perfect and will continue to improve the look and feel at night." I was really looking forward to trying it out. When I did, it didn't look right. I was disappointed. I adjusted the gamma and it looks better, but they're not there yet. As they said, they will continue to improve the look and feel at night, and I'm giving feedback and hoping for the best. I just want it to look realistic. I want it to look the same as when you get in a plane (in real life) fly over a city at night and look out the window, even if that means that certain colors aren't going to look bright or things might be hard to see. Regarding the runway lights. I'm not talking about the runway lighting, but the taxi lights. They're dim, they're blue, and aren't visible 8 miles out. At least, not like they are currently represented in the game.
-
I fly VR only. I gave it another try, and set my gamma to 1.0 initially but was way too dark, a gamma of 1.5 seemed more reasonable so I went with that and things looked much better than before. I think I had the gamma turned up too high from the earlier version and that was part of the problem. What is the recommended gamma for VR with a HTC Vive? The stars look better now, but there's still something a little off with them. Maybe it's that they only render the highest magnitude (brightness) stars, so there are a bunch of bright points in the sky with nothing else? In real life, you see the dimmer stars as well. This is done reasonably well with the Vive load screen with the stars in the background, but even that's not perfect. With the gamma turned down, the taxi lights at the airports look better, but are still too visible/bright from a distance. As for other colors being too bright, Dubai is a good example. Many of the buildings are illuminated with a blue-white color, and the city just looks artificial (blue) from altitude. Some of the shipping areas have red lighting, and it is just too intense. Anyway, the intent of this post isn't to just throw stones, but to give feedback that will hopefully improve things. Understood that it's a work in progress, and hoping they'll be able to dial things in.
-
I live out in the desert, where most of the time you can see the constellations pretty easily. Drive 20 miles out of town on a dark night and you can see the Milky Way. I know what you're saying, but the stars just don't look right in the game. They are way too bright (and big). As I was playing the updated version, I turned down the gamma and it looked better, but still it was too much. What is the recommended gamma setting, by the way? About the cities, I've flown over cities and the picture you show looks like real life. I don't know how to describe it, but the game looks less like the light is coming from light sources and reflecting off buildings and the ground, and more like everything is glowing? Not sure if that makes sense. Also, there are too many colors in the game. If you look at your picture, it's mostly orange, red, and yellow. No bright greens or blues, but I recall very vivid colors in the game. I can say that certain things, like the blue lights of a distant airport, are way too bright. Our eyes don't pick up on blue at night very well, and something like that would be difficult to see and would look faint and fuzzy. In the game, they're crystal clear. I'm not saying I have the answers, and I'm not even saying that I'm correct, there's just something off about it and it doesn't look right.
-
Prior to the update, I always thought that night flying wasn't too far off from the real thing. My favorite missions are those in the middle of the night with no moon out, where you have to rely on the aircraft instruments and sensors. I'm really disappointed with how it looks after the update. To start, the APU light in the F-18 is blinding when it comes on. Some of the other lights are similar. Everything is much brighter than before. Ok, so maybe it just means that I need to turn the brightness down with everything and adjust the gamma setting. But it's still very bright. The stars look terrible in VR. They used to be small, dim points of light, maybe a little too dim when the moon isn't out. Now they're extremely bright, blue, and their size is too large. It looks like a game from the 1990's played at 320x240. It looks very artificial. The cities in the Persian Gulf map look like something out of TRON. They just glow way too bright. On top of that, I tried a mission with a tanker, and the tanker wasn't visible at all, even with night vision goggles. In general, everything looks too much like a cartoon or a video game, and less like a simulator. I hope they can tweak the settings to get it more realistic. Right now, it's just ruined for me.
-
[UNABLE TO REPRODUCE] JDAMs wont drop on Right Wing Stations
rdibley replied to Xeon's topic in Bugs and Problems
This issue has been solved with the last F-18 update. -
I'm seeing slightly different behavior, but I think you're onto something. I'm using a Virpil MongoosT-50, and without changing the defaults settings for TDC slew, it stops if you put in large TDC inputs in either axis. I've changed the slope of the curve in both axes to reduce the maximum value. This slows the slewing, but gets rid of the stopping issue when going to full microstick deflections in either axis. However, the problem still appears when I put in large diagonal inputs. Scaling back even further eventually eliminates the diagonal input issue, but then the slewing is way too slow. To me, it seems like they're not handling the TDC analog inputs correctly, as if they're not applying limits to the inputs, or they're using a variable type that is too small and they're getting rollovers or something like that. By the way, I'm seeing this issue with the Harrier DMT and TPOD, so it doesn't appear to be a TPOD only issue. Also, I have not had any issues with the F-18.
-
I tested it out a little. The LSS of the TPOD does not function properly. It does do some search pattern, but it isn’t anything that makes sense. Sometimes it oscillates a few degrees left and right of center, other times it’s making wide circles around the periphery of the viewable area. When I could get it to oscillate about the centerline, I was able to steer the point onto the target and have it lock on, but it would only stay locked on to the target for a short time, the. It would reset back to the weird search pattern. So yeah, it doesn’t work properly. I was able to use the DMT in LST mode to lock onto the target, and then used the SLAVE mode to slew the TPOD onto the target. Worked great.
-
Sorry, Djmitri, I should have RTFM. I'm going to go back and give it another try. I'll try out the slave mode too. Both sound really helpful. Harlikwin, understood about the DMT. That works fine for me. But there are times when the TPOD is more useful than the DMT. In my particular case, I was flying a CAS mission at night and looking for targets near the lased target, but not specifically the lased target. As for what it's called, this is going to drive you both nuts, but the Razbam guide calls the LSS the "Laser Spot Track Mode."
-
Has the LSS on the TPOD been implemented as of now? I tried using it, and it appears to scan and lock onto the lased target for a short time, then it goes back into a search mode again. The pattern the tracking head takes when searching seems a little strange, spinning around in azimuth with little elevation change. Also, the optics are functioning during the search mode. On the hornet, the display goes black while searching. Since it’s the same pod, it would seem to me that the two are implemented differently, or the harrier isn’t complete. Anyone know what’s going on?
-
That's not the part that gets me. They keep pushing that they have the F-16 stick to go with the new DCS F-16 module, but they don't mention anything about the throttle quadrant. I'm really confused as to why Thrustmaster didn't do anything about this prior to the release. They have the Cougar throttle quadrant already designed. They would need to redo the interface, but how hard would that be? They seem to have very little invested in development. Maybe the aircraft sims are too small a market for them? They've been milking the Warthog HOTAS for so long, I can't help but think they'll be redoing the stickers on these bases to reflect the 20th anniversary 10 years from now.
-
I was initially going to wait for it to be sold with a base, then decided to buy the stick and a Virpil base. Problem solved.