DudleyAz
-
Posts
44 -
Joined
-
Last visited
-
 Hi all, Just a quick addon to this topic. I was having the same issue while building a new profile to reflect some hardware changes in my simpit. I was having the similar issue where a simple Helios button trying to send a single character (in my example "p"). I found that if I used my mouse to click the Helios button, it would send the character. So that proved that Helios was capable of sending the keyboard output binding I had assigned. However, I was building my profile to allow a physical button press on a new button box to send a key command. Helios would recognize the physical button press, but wouldn't send the keyboard output binding ("p", "g", nothing) on to anything (IL-2, DCS, or even just to the notepad). I started to recall I had this issue in the past (getting old sucks). I was just hunting around in the Helios button INPUT bindings window tried unchecking the "Bypass Cascading Triggers" box and NOW IT WORKED! This works for simple and complex keyboard bindings. I hope this helps someone whose been having this issue. Cheers Dudley null
-
I have the TC MPDs, and they're fantastic! So you can bet I'll be getting the Keyboard. Can't wait...
-
+1 on the need for a Force Trim reset control. I've also noticed at times that when I adjust the force trim, it won't recognize either the pitch or roll inputs unless I wipe the controls quickly. However, in the mean time I've stumbled on an unintended workaround if I am struggling to get myself retrimmed to a neutral position. Just jump into the CP/G seat, then back to the Pilot seat. The program will automatically reset the force trim. I have those commands mapped to an unused button on my collective to make it quick and easy. Doesn't negate my desire for a cheat to reset the Force Trim... but there ya go. Cheers, Dud
-
DudleyAz changed their profile photo
-
Thanks for taking this to the team BIGNEWY! The -64 is amazing... especially the overall quality of the whole module for a day one early access release! I agree with Stackhouse that I much prefer flying with the monocle visible. While just moving the interface down a bit so the outer ring isn't obstructed would work, I honestly prefer the lower left corner of my vision as the preferable spot, just like it is when not in VR (it can move with my vision in VR or be parked in a single spot in the background). Thanks, Dud.
-
Universal military aircraft homecockpit project
DudleyAz replied to Viper1970's topic in Home Cockpits
That's impressive work. I'd love to see pics of the printed items! What make/model of switches are you planning on using for all the hats? -
So I just started experiencing a new problem with my Reverb G2 and WMR. Within the last couple of weeks, any time I launched WMR (either directly by clicking on the icon or by just putting on the headset) my display would reset and cause all sorts of issues with using my primary and other monitors in my simpit. After a tech support call to HP (no help at all), uninstalling and reinstalling everything related to WMR, the G2, Steam VR, etc, and searching all over the internet for problems with the G2 resetting the desktop resolution, I stumbled upon the real issue. Our friends at Microsoft changed how WMR was handling Win32 applications, and they decided to 'pre-install' three extra virtual displays whenever WMR launched. These extra virtual monitors were causing my real world two monitors to readjust and made a mess of things. Thankfully, they provided a simple, quick solution to the issue. https://docs.microsoft.com/en-us/windows/mixed-reality/enthusiast-guide/using-microsoft-edge#monitor-and-input-handling-issues I made the registry change, and everything is back to working just fine. Wish I would have found the solution 6 hours ago when I started on this journey to make things work right... again. I thought I would put the solution here and share with all of my fellow virtual flyers! Have a great day! Dud
-
That did it! That's exactly what I needed. Thanks Adrian!
-
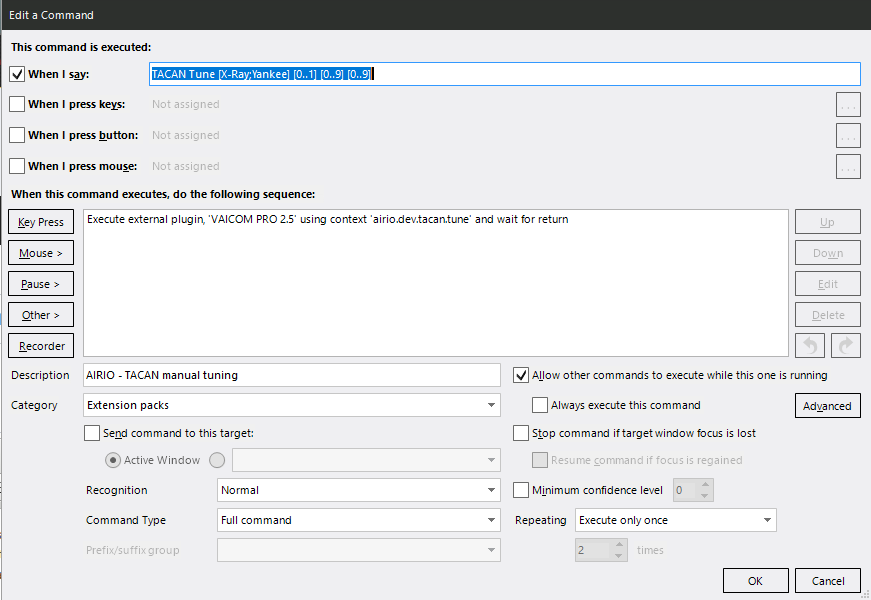
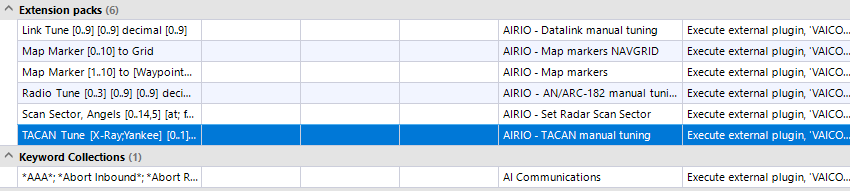
So I have just gone back to using VAICOM with DCS. I have everything working wonderfully, all VA and VAICOM files are current as of today (6-13-21). Everything is working wonderfully except Chatter. I get the dreaded "vaicom unable to access command. command not available (chatter)" error. I do have the chatter extension, and I went back and revalidated the key. Chatter does show up in the 'LIST'. So after poking around in VAICOM and numerous forums for awhile, I think I have figured it out... There is no Chatter command in the Profile Edit - Extension packs command list. I seem to remember there being a Chatter command previously. So my question is, can anyone share the command syntax with me for their Chatter command. It should look something like this: but with all the Chatter information in it. I tried figuring it out myself, but no luck. Any help would be greatly appreciated! Dud
-
Outstanding way to start the year out right! Way to go ED!!
-
I'm back again! So I have made great progress and have figured out a lot about MOOSE and getting the results I am looking for, except for one item that still has me stumped. When using the SPAWN command, I believe I should be able to spawn more than one target group at a time... yes? Here's the setup: I have created a Blue player radio item in ME that allows the player to request a Red fighter group be spawned. MOOSE does this wonderfully be selecting a random template group, and spawning them in a random Spawn zone. PERFECT! However, I would like the Blue player to have the ability to request a second, simultaneous Red group to be spawned. The request works, and the script does spawn a new group, but it DE-SPAWNS the first group instead of adding another Red group. I have the init limit set to allow for up to ten groups and unlimited units with :InitLimit( 10, 0 ) I have tried this with values of 100,100 and it doesn't make any difference. There are no other Red units active in the game at the time, soooo... I'm stuck. Anyone have any ideas? The MOOSE script is attached. All help is appreciated! Dud A2A Tasking.lua
-
Thanks again Fubar! So when I looked at my mission after reading your comments, it dawned on me that while I had the template groups created (MiG-19, MiG-21, etc), I had failed to actually create a RED CAP unit and place it on the map!! Oops... :doh: Then to see what else I had messed up, I followed your advice and took the script all apart and worked it step by step from single simple spawn, to random group spawn, to random zone spawn. That's when I found I had the syntax wrong for the REDCAPSpawnZones table.. it was originally: REDCAPSpawnZones = { "RED CAP Zone W", "RED CAP Zone WNW", ... When it should be: REDCAPSpawnZones = { ZONE:New( "RED CAP Zone W" ), ZONE:New( "RED CAP Zone WNW" ), ... With those errors fixed and some general cleanup, I can now use a radio menu command to randomly spawn a group in a random zone. Tomorrow I'll work on getting the rest of the features I want in the mission to work. I'll probably break something else and come crying for help again when I get over my head... but who knows! :D Thanks much for the help, Dud
-
Thanks for the info Fubar and Habu. I made the changes suggested, however I still don't get any farther in making things happen in the lua script. With the changes suggested, it now looks like this: -- STATUS MESSAGE ********************** MESSAGE:New("Air to Air Tasking has started.", 15):ToAll() -- This sets all of the locations where RED CAP groups may spawn. -- These zones must be placed where you want them on the mission editor map, and be named exactly as listed below. RedCAPSpawnZones = { "RED CAP Zone W", "RED CAP Zone WNW", "RED CAP Zone NW", "RED CAP NNW", "RED CAP Zone N", "RED CAP Zone NNE", "RED CAP Zone NE", "RED CAP Zone ENE", "RED CAP Zone E" } -- This sets the groups to choose from for RED CAP spawns. -- These groups must be placed somewhere on the mission editor map, and be named exactly as listed below. RedCAPGroups = { "RED CAP AJS37", "RED CAP C-101CC", "RED CAP F-5E", "RED CAP JF-17", "RED CAP MiG-19P", "RED CAP MiG-21", "RED CAP MiG-23MLD", "RED CAP MiG-25PD", "RED CAP MiG-29A", "RED CAP MiG-29S", "RED CAP MiG-31", "RED CAP Su-27", "RED CAP Su-30", "RED CAP Su-33" } -- STATUS MESSAGE ********************** MESSAGE:New("RED CAP variables set.", 15):ToAll() -- This creates the actual RED CAP group. RED_CAP_1 = SPAWN:New( "RED CAP 1" ) -- identifies the spawning group :InitLimit( 10, 10 ) :InitRandomizeTemplate( REDCAPGroups ) :InitRandomizeZones( REDCAPSpawnZones ) RED_CAP_1_SPAWN = RED_CAP_1:Spawn() -- actually spawns the group -- STATUS MESSAGE ********************** MESSAGE:New("RED CAP 1 has spawned.", 15):ToAll() -- This assigns the RED CAP group to a zone to patrol CapPlane = GROUP:FindByName( "RED_CAP_1_SPAWN" ) PatrolZone = ZONE:New( "BLUE DOGFIGHT Zone" ) AICapZone = AI_CAP_ZONE:New( "BLUE DOGFIGHT Zone", 300, 8000, 500, 750 ) AICapZone:SetControllable( CapPlane ) AICapZone:__Start( 1 ) -- They should statup, and start patrolling in the PatrolZone. -- STATUS MESSAGE ********************** MESSAGE:New("RED CAP 1 has been assigned to zone.", 15):ToAll() When I initiate the tasking, I get the first message (just like before), but that's it. No spawned Red Cap and no other messages. I have been through the Moose docs and the Discord stuff, but from what my simple mind can tell, this should work.... but nuthin... :joystick: Any other thoughts? Thanks, Dud
-
Hi all, Let me start by saying that I am an absolute beginner when it comes to using MOOSE. I have spent the better part of a week getting MOOSE and LDT set up and trying to learn how to use it correctly. It is simply amazing in what it can do, but I'm apparently not able to figure it out. Now I'm stuck and don't know what I have wrong in my lua file. :wallbash: I have a mission where I want to randomly spawn AI aircraft to one of several zones based upon the player asking for an 'air to air tasking' via the radio F10 options menu. I have the radio menus working within DCS Mission Editor, and I have verified that when I select the 'air to air tasking' option (F10 > F1), it does start my MOOSE lua script "Air to Air Tasking". I confirmed this by inserting a message at the beginning of the script to tell me the script has started (line 11). But that is as far as it gets. I get no error messages, and nothing else happens. I have watched the wonderful tutorial videos and read the Moose User Guide, but I'm a novice in lua scripting and I can't figure out what the issue is. Any help or guidance that can be provided would be GREATLY appreciated! :helpsmilie: (FYI... the F10 > F3 and F4 radio entries are for future use and don't lead anywhere right now.) I have attached the lua scripts and the miz file. Thanks in advance for your help! Dud Air to Air Tasking.lua Radio initiated message.lua Test Mission Caucuses.miz
-
Just a bump on this topic. I was reading in other posts that wind direction/speed will be used to select your runway. This is true on most runways, but Nellis is a unique case in that they have a hard rule to not allow departures from 21 to avoid overflying the strip. So regardless of the wind speed you will be told to takeoff from 03 and land on 21... if you choose to listen to the tower that is! :music_whistling:
-
F18 MFD exports now work with a very quick tweak.
DudleyAz replied to Cowboy10uk's topic in DCS: F/A-18C
I found that these settings in the RWR init file made my exported RWR readable again. However, it makes the in game cockpit RWR symbols almost invisible. I chose to have my exported one work. D:\Eagle Dynamics\DCS World\Mods\aircraft\FA-18C\Cockpit\Scripts\TEWS\indicator\RWR_ALR67_init.lua shaderLineParamsUpdatable = true shaderLineDefaultThickness = 0.08 shaderLineDefaultFuzziness = 0.03 shaderLineDrawAsWire = false shaderLineUseSpecularPass = true