
trigen
-
Posts
593 -
Joined
-
Last visited
Content Type
Profiles
Forums
Events
Posts posted by trigen
-
-
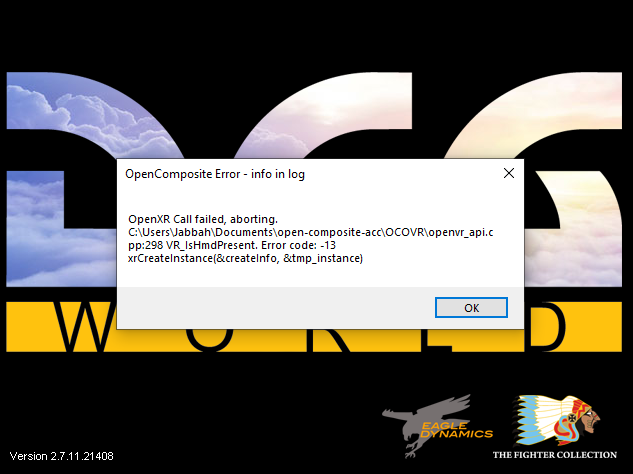
I keep getting this error but cant find anything on it. Any tips?

-
 1
1
-
-
Turned out to be a server setting that seemed a bit counter intuitive as its actually still on even when Easy com text and check mark is greyed out and says "Easy com no (Local)" when you look at the server in the MP list. It would be good if this stay white
-
23 hours ago, Frederf said:
Sounds like normal behavior with "easy communications" helper on. Easy comms does weird non-realistic stuff because it's not the setting which is simulating reality the closest.
It does the same thing (MP Wildcats server) and It was not an issue previous patch so as far as i can see its something that has been introduced now. Easy coms is also: no (local) on the server so it should be off but i see i do get frequencies up in the radio menu so it may be on anyway or it could be a script thing.
In SP and easy coms off it does not shift into the frequency but it does when easy com is on. -
Hello
Openbeta 2.7.6.12852
MP, Syria tested.
UHF and VHF
Presets will change to the frequency, front DED and in coms page when contacting any option such as ATC or Tanker via radio menu. There is no change in the actual set presets. See track.
-
On 8/26/2021 at 2:03 PM, J-1775 said:
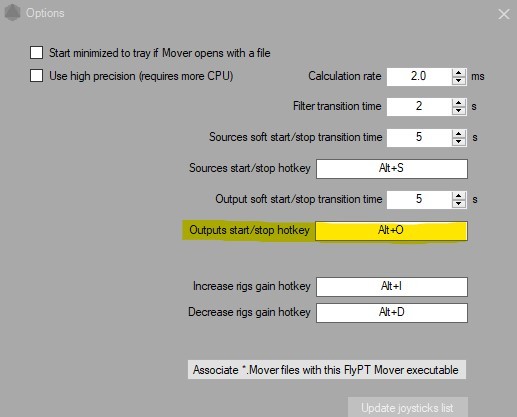
It probably answers only part of your question, but in case you overlooked it it may help: there's a hot key in FlyPT's option to start/stop all output. I trigger it with a Voice Attack command using the last words before I crash: «O my god»...

Thank you I do use those functions. But its those pesky ones you dont see that gets you So its better to have a trigger in the script that detects it as soon as it hits and before the rig throws you out.
-
Haven't done any scientific tests but its been known for quite a while and i hope they sort it properly in the coming months as its high on ED's roadmap list. "
"The planned poll features to be delivered by the end of 2021 for DCS: F-16C Viper includes:
- Flight model and FLCS tuning. This focuses on angle of attack and G, and we believe it will result in more accurate sustained turn performance, instantaneous turn"
-
1
-
 2
2
-
On 7/21/2021 at 6:18 PM, NineLine said:
We have several adjustments planned that we hope to include in August., thanks!
I see sizes seems to be have been increased in the latest patch but its just as dim. Hope there will be more to come real soon
-
2
-
-
Its far to dim. Struggle to see it. Its not just in VR
-
In for example Pt Mover you have a ground and air setting. Since this is mainly a sway issue when starting to move you can set a spike filter on that force alone on the ground and not have this issue. I dont know how their software works but i would ask them for these options.
-
1 hour ago, BIGNEWY said:
Please attach screenshots of your DCS settings and VR options.
Specifically your PD value
Let us know which headset and if you use other vr software like steam vr your settings there also.
Im using a reverb G2 and to my eyes it looks ok.
Please provide a reference for ok.
KFA 3090 gaming
AMD 5900X
All nvidia drivers.
Steam VR 1.18.7
Pitool 271FW 298
75hz
Current in use Pimax 8k X .Also included and tested but no longer in posession. Hp reverb G2, Vive pro 2 . Settings = VR presets 2x AA (and anything in between really) Any PD ranging from 2200 to 5500. Its better or worse depending on SS and AA. At the top of those ranges its mostly gone but not quite. With the current VR performance its limited what you can turn on in terms of AA.
Also acknowledged by me and others in 2d.
On the text i show in the video it will flicker as long as a cloud or i suppose white is in the background. On the blue sky there are no issues.
Planes in general are most affected if you have a cloud and the sun in this orientation. The same goes for hills.
-
4
-
-
While some are a bit blunt my OP post isnt. There's also a fair few of graphical issues in DCS that has been there for years and they just dont acknowledge it so stop excusing it . Shadows, Soft shadow transition, massive shadow flickering. Ultra shadows was removed from menu but no mention why. They seem to have no ill effects. Visibility issues depending on resolution. How hard is it really to implement if resolution is XX then do XX pixels for dot instead of just one pixel? Not very id imagine and this is well documented. We had an enhance model size at one point but removed.
Im essentially blind in VR until it becomes a 3d model with my 4k HMD and its the same on my 4k monitor, Ground and air units. Yes DCS clouds are a new thing but there seems to be a massive lighting issue in DCS and while you can get away with in 2D its extremely noticeable in VR.
Its almost impossible to convey trough video and especially with YT compression but if you look closely on this video you will see that any text in front of the clouds will start to shimmer like crazy. Since this also feels like a lighting issue the same goes for aliased roads, runway textures, well game wide really. Surely something could be done about this edge reflection shimmer? AA does help somewhat but not much. Supersampling has marginal effects.
And here's one just flying in 2d with no AA on which was perfectly fine before but no longer. You get a sense from the fences and such how it generally feels in VR, just much worse with the magnification.
-
5
-
-
It really feels to me that the new clouds and system since 2.7 introduce a huge amount of shimmering/aliasing that wasnt there before. You can see this really well if your wingman is flying in front of any clouds and on hillsides where there are clouds behind. Roads as well. In short it affect everything. In VR the picture is boiling. Its honestly so bad it shouldn't be acceptable.
I would add videos and screenshots but its so easy to see that its not possible to not be aware of it. While i love the clouds its made the game a nightmare in VR. I would really appreciate it if you could start looking at all the graphic bugs cause there are many.
-
9
-
-
These are the brand used in the FSSB. They also sell adehsive https://www.hbm.com/en/9803/strain-gauges-for-experimental-stress-analysis/
-
Hello
Im trying to figure out how i can make a if else condition so that i stop an export script or execute a autohotkey file when the player is dead, the aircraft damaged etc. This must execute regardless of mission MP SP and so on. I find it really hard to find any proper information on the triggers and how to do it but i remember i ran a dofile autohotkey file 10 years back on server restart so it should be possible
--[[

DCS LUA SCRIPT FOR FLYPT MOVER 2.9.8
====================================
Version from 18 04 2020
This file should be placed in the folder "C:\Users\YOUR USERNAME\Saved Games\DCS\Scripts\Hooks".
If the "Hooks" folder doen's exist, create it.

]]--

local FlyPT_Mover_Callbacks = {}

function FlyPT_Mover_Callbacks.onSimulationStart()

    log.write('FlyPT_Mover', log.INFO, "Starting data export")
    package.path = package.path..";.\\LuaSocket\\?.lua"
    package.cpath = package.cpath..";.\\LuaSocket\\?.dll"
    socket = require("socket")
    DCSClient = socket.udp()
    DCSClient:settimeout(0)
    DCSIP = "127.0.0.1"
    DCSPort = 4124 -- If changed, the source should match this value
    DCSClient:setpeername(DCSIP, DCSPort)

end

function FlyPT_Mover_Callbacks.onSimulationFrame()

    local acceleration = Export.LoGetAccelerationUnits()
    local speed = Export.LoGetVectorVelocity()
    local pitch, roll, yaw = Export.LoGetADIPitchBankYaw()
    local rotationSpeed = Export.LoGetAngularVelocity()
    local altitude = Export.LoGetAltitudeAboveGroundLevel()
    local o = Export.LoGetSelfData()
    --[[
    LatLongAlt.Lat -- Latitude in degress
    LatLongAlt.Long -- Longitude in degress
    LatLongAlt.Alt -- Altitude in meters MSL
    Heading -- Heading in radians
    Pitch -- Pitch in radians
    Bank -- Bank in radians
    ]]--

    local mechInfo=Export.LoGetMechInfo()
    --[[
    gear          = {status,value,main = {left = {rod},right = {rod},nose =  {rod}}}
    flaps          = {status,value}
    speedbrakes   = {status,value}
    refuelingboom = {status,value}
    airintake     = {status,value}
    noseflap      = {status,value}
    parachute     = {status,value}
    wheelbrakes   = {status,value}
    hook          = {status,value}
    wing          = {status,value}
    canopy        = {status,value}
    controlsurfaces = {elevator = {left,right},eleron = {left,right},rudder = {left,right}}
    ]]--

    local alarm = Export.LoGetMCPState()
    --[[
        returned table keys for LoGetMCPState():
        "LeftEngineFailure"
        "RightEngineFailure"
        "HydraulicsFailure"
        "ACSFailure"
        "AutopilotFailure"
        "AutopilotOn"
        "MasterWarning"
        "LeftTailPlaneFailure"
        "RightTailPlaneFailure"
        "LeftAileronFailure"
        "RightAileronFailure"
        "CanopyOpen"
        "CannonFailure"
        "StallSignalization"
        "LeftMainPumpFailure"
        "RightMainPumpFailure"
        "LeftWingPumpFailure"
        "RightWingPumpFailure"
        "RadarFailure"
        "EOSFailure"
        "MLWSFailure"
        "RWSFailure"
        "ECMFailure"
        "GearFailure"
        "MFDFailure"
        "HUDFailure"
        "HelmetFailure"
        "FuelTankDamage"
    ]]--


    local stall = 0
    for k,v in pairs(alarm) do
        if k == "StallSignalization" then
            if v == true then
                stall = 1
            end
        end
    end

    -- local engine = LoGetEngineInfo()
    --[[
    RPM = {left, right},(%)
    Temperature = { left, right}, (Celcium degrees)
    HydraulicPressure = {left ,right},kg per square centimeter
    FuelConsumption   = {left ,right},kg per sec
    fuel_internal      -- fuel quantity internal tanks    kg
    fuel_external      -- fuel quantity external tanks    kg
    ]]--

    -- The FlyPT Mover uses Z for vertical and Y to the front
    -- That's the opposite in DCS
    -- Values sent in one string, separated by spaces
    socket.try(DCSClient:send(
    --               00   01   02   03   04   05   06   07   08   09   10   11   12   13   14   15   16   17   18   19   20   21   22   23
    string.format("%.4f %.4f %.4f %.4f %.4f %.4f %.4f %.4f %.4f %.4f %.4f %.4f %.4f %.4f %.4f %.4f %.4f %.4f %.4f %.4f %.4f %.4f %.4f %.4f",
    acceleration.x,                             -- 00 = Lateral acceleration (G)
    acceleration.z,                             -- 01 = Lateral acceleration (G)
    acceleration.y,                             -- 02 = Vertical acceleration (G)
    speed.x,                                     -- 03 = Lateral speed (m/s)
    speed.z,                                     -- 04 = Longitudinal speed (m/s)
    speed.y,                                     -- 05 = Vertical speed (m/s)
    rotationSpeed.y,                             -- 06 = Rotation speed around y (yaw in rad/s)
    rotationSpeed.x,                             -- 07 = Rotation speed around x (roll in rad/s)
    rotationSpeed.z,                             -- 08 = Rotation speed around z (pitch in rad/s)
    o.Heading,                                     -- 09 = Yaw position (rad)
    o.Bank,                                     -- 10 = Roll position (rad)
    o.Pitch,                                     -- 11 = Pitch position (rad)
    Export.LoGetTrueAirSpeed(),                 -- 12 = Air speed (m/s)
    Export.LoGetAircraftDrawArgumentValue(1),     -- 13 = Front/Rear landing gear (0 to 1)?
    Export.LoGetAircraftDrawArgumentValue(2),     -- 14 = Turning landing gear (0 to 1)?
    Export.LoGetAircraftDrawArgumentValue(4),    -- 15 = Left landing gear (0 to 1)?
    Export.LoGetAircraftDrawArgumentValue(6),     -- 16 = Right landing gear (0 to 1)?
    Export.LoGetAltitudeAboveGroundLevel(),     -- 17 = Vertical position relative to ground (m)
    mechInfo.flaps.value,                         -- 18 = Flaps amount (%)
    mechInfo.gear.value,                         -- 19 = Delployed landing gear (%)
    mechInfo.speedbrakes.value,                 -- 20 = Speed brakes (%)
    mechInfo.canopy.value,                         -- 21 = Canopy open (%)
    stall,                                         -- 22 = Stall alarm (0 or 1)
    Export.LoGetModelTime()                     -- 23 = Time in seconds
    )))
end

function FlyPT_Mover_Callbacks.onSimulationStop()
    log.write('FlyPT_Mover', log.INFO, "Data export stopped")
    if DCSClient then
        DCSClient:close()
    end
end

DCS.setUserCallbacks(FlyPT_Mover_Callbacks)
-
Interesting. I have PCTRL but with some new leap motion integration in DCS ive grabbed a leap motion controller too. This seems to have a more stable pointer than PCTRL so it would be fun to try it. Maybe i can use the pointctrl as a input device instead of making a new ring too. PCTRL has the same issue with things in the back and close being somewhat tricky to click.
Mind sharing the HW details on your ring? I already have the switches needed. I really prefer to be able to set thing as i'd like and DIY instead of relying on other people.Cheers!
-
Ive gone ahead and grabbed one in the hopes that they really put some proper time into this. Its really the easiest and cheapest solution we have. if they could add a slight color change on the fingertip when you are at a good spot that would be great too.
-
I love it!
I have plans to do the same with mine and ive done my own AP panel and ICP too. Ive had nygel on mine for quite some time and i have a counterweight on the throttle arm for perfect balance -
Hello
Quite some time back my idle detent start stop programming suddenly stopped working and the throttle is inverted. What the weird thing was is that i dont need to invert the axis in any game full forward works fine., it works as normal but now every programming software things 100% is 0 %
The old TM viewer also see it as max and i have not touched the pot which is a hall sensor conversion. And well its bee working fine for years
Now i have to set it like this
More than likely its a windows issue.
-
FSSB with angle adjust v 0.9
4 amp version to combine strain gauges into one and get double resolution and gain range. You need to set all amps to 0 so you get the full range. Then in the code it will reverse one as one will compress and the other expand so they cancel each other out in this configuration. If you place one on top and one on the bottom you dont need to reverese. After its combined into one axis.
Basic. 2 amp/pot version. Should be working properly but report any bugs.
It will rotate both axes to emulate the HW setup in the f16 stick.
Todo. Add different force levels and tie into HW switches.
Huge thank you to alto777 on the Ardunio forums for helping me out. No chance i could have done it without him. And a nudge to gcjr as well. Cheers!
//https://github.com/MHeironimus/ArduinoJoystickLibrary
// Amps ive used https://www.ebay.com/itm/174794426405
// DL smoothed library from the ardunio IDE

#include <Joystick.h>
#include <Smoothed.h>

#include <Adafruit_ADS1X15.h>

#include<Wire.h>

Adafruit_ADS1115 ads;

/* Angle adjust math you set the angle on the first line with -12 (minus is clockwise) or XX value. Enable with true or false */

int SensorRotationEmu = false;
int angle = -12;


// Add pins for the different ranges. Just using a variable for now. Not currently implementd
// Max force from trigger height.
// Max force for y is about 8kg
// Max force for X left is about 8kg  X right is about 6kg
// Max force in kg
int YMaxforce = 8;
int XMaxforce = 8;

// set amount of smoothing for the axis
int SmoothValue = 5;

// Set the joystick range. Only set the positive number. Center point will be this number divided by two
int joyLowRange = -32767;
int joyHighRange = 32767; // 65534

/*
Set flags for Joystick axes. For some reason it refuse to work with only X Y so ive added rudder and throttle
For the true false flags, use this list. Its all in  Joystick.h
    bool includeXAxis = true,
    bool includeYAxis = true,
    bool includeZAxis = true,
    bool includeRxAxis = true,
    bool includeRyAxis = true,
    bool includeRzAxis = true,
    bool includeRudder = true,
    bool includeThrottle = true,
    bool includeAccelerator = true,
    bool includeBrake = true,
    bool includeSteering = true);
  */
Joystick_ Joystick(JOYSTICK_DEFAULT_REPORT_ID,
  JOYSTICK_TYPE_MULTI_AXIS, 32, 0,
  true, true, false, false, false, false,
  true, true, false, false, false);

// Add smoothing for all axis
Smoothed <int> YfAxis;
Smoothed <int> YbAxis;
Smoothed <int> XlAxis;
Smoothed <int> XrAxis;

// init joystick libary
void setup() {
    Joystick.begin();
    Serial.begin(38400);
    Wire.begin();
    ads.begin();

  // ads.setGain(GAIN_TWOTHIRDS);  // 2/3x gain +/- 6.144V  1 bit = 3mV      0.1875mV (default)
  // ads.setGain(GAIN_ONE);        // 1x gain   +/- 4.096V  1 bit = 2mV      0.125mV
  // ads.setGain(GAIN_TWO);        // 2x gain   +/- 2.048V  1 bit = 1mV      0.0625mV
  // ads.setGain(GAIN_FOUR);       // 4x gain   +/- 1.024V  1 bit = 0.5mV    0.03125mV
  // ads.setGain(GAIN_EIGHT);      // 8x gain   +/- 0.512V  1 bit = 0.25mV   0.015625mV
  // ads.setGain(GAIN_SIXTEEN);    // 16x gain  +/- 0.256V  1 bit = 0.125mV  0.0078125mV


    ads.setGain(GAIN_ONE);    // +/- 0.256V  1 bit = 0.0078125mV


 // Sets joystick ranges
  Joystick.setYAxisRange(joyLowRange, joyHighRange);
  Joystick.setXAxisRange(joyLowRange, joyHighRange);


// Begin smoothing.
  YfAxis.begin(SMOOTHED_AVERAGE, SmoothValue);
  YbAxis.begin(SMOOTHED_AVERAGE, SmoothValue);
  XlAxis.begin(SMOOTHED_AVERAGE, SmoothValue);
  XrAxis.begin(SMOOTHED_AVERAGE, SmoothValue);

}
void loop() {

 // Serial.println(String("Sintheta:")+ sintheta);
 // Serial.println(String("Sintheta:")+ costheta);


// Read the value from the sensor using 4x so they will be combined later.
  int YfAxisValue = ads.readADC_SingleEnded(0); // Front strain gauge
  int YbAxisValue = ads.readADC_SingleEnded(1); // Back strain gauge

  int XlAxisValue = ads.readADC_SingleEnded(2);// left strain gauge
  int XrAxisValue = ads.readADC_SingleEnded(3); // right strain gauge

 // Add the new value to both sensor value stores

  YfAxis.add(YfAxisValue);
  YbAxis.add(YbAxisValue);
  XlAxis.add(XlAxisValue);
  XrAxis.add(XrAxisValue);

  // Get axis from smoothed

// Y
  int YfAxisSmoothValue = YfAxis.get();
  int YbAxisSmoothValue = YbAxis.get() + 16383;

// X
  int XlAxisSmoothValue = XlAxis.get();
  int XrAxisSmoothValue = XrAxis.get() + 16383;


  // Since we use 4 amsp 2 front 2 back that are set to 0v to get the full range one way we we need to remap one for each to reverse the numbers

  /*
  YbAxisCValue = map(YbAxisCValue, 1023, 0, 0, 1023);
  XrAxisCValue = map(XrAxisCValue, 1023, 0, 0, 1023);
  */
  YbAxisSmoothValue = map(YbAxisSmoothValue, joyHighRange / 2, 0, 0, joyHighRange / 2);
  XrAxisSmoothValue = map(XrAxisSmoothValue, joyHighRange / 2, 0, 0, joyHighRange / 2);

  // combine axises and then adjust to 12 degree rotational offset

  float  XcombinedValue = (XlAxisSmoothValue + XrAxisSmoothValue);
  float  YcombinedValue = (YfAxisSmoothValue + YbAxisSmoothValue);


  if (SensorRotationEmu == true) {
    const float sintheta = sin(angle * PI / 180);
    const float costheta = cos(angle * PI / 180);

  //float x, y;
  //float newX, newY;

  // move the origin to 0 so the angle rotation is correct
    YcombinedValue -= joyHighRange / 2; // now joyX is -1023 to 1023
    XcombinedValue -= joyHighRange / 2; // same
    //Serial.println (String("Y translation:") + YcombinedValue);

    float newX =  XcombinedValue * costheta - YcombinedValue * sintheta;
    float newY =  XcombinedValue * sintheta + YcombinedValue * costheta;

   // Send the values to the joystick library and move origin back so the center point is 1023
    Joystick.setYAxis(newY + joyHighRange / 2 );
    Joystick.setXAxis(newX + joyHighRange / 2 );

}
  else {
     float  Xc = (XlAxisSmoothValue + XrAxisSmoothValue);
    // Send the values to the joystick library
    Joystick.setYAxis(YcombinedValue);
    Joystick.setXAxis(XcombinedValue);
    //Serial.println(XcombinedValue);

      char buffer[96];
      for (int kk = 0; kk < 4; kk++) {
      sprintf(buffer, "Y f: %d Y b: %d X L:  %d X R %d Y comb: %d X comb: %d \n", YbAxisSmoothValue, YfAxisSmoothValue, XrAxisSmoothValue, XlAxisSmoothValue, XcombinedValue, YcombinedValue );
      Serial.println(buffer);
      }

  }


}
-
Thank you very much for the tip Boltz! Turns out it was that easy but i would never have figured it out myself as im a math muppet so i enlisted the help of some very clever guys on the ardunio forums!
/* please put some text you'll search for one day here */

const float sintheta = sin(-12 * PI / 180);
const float costheta = cos(-12 * PI / 180);

float x, y;

float newX, newY;

void setup()
{
	Serial.begin(115200);

	Serial.println(sintheta);
	Serial.println(costheta);

// set some x y vales here, whatevs

 	x = 13.2;
  	y = 14.6;

// do the maths

	newX = x * costheta - y * sintheta;
	newY = x * sintheta + y * costheta;

// and print the results here to see if

	Serial.println(newX);
	Serial.println(newY);
}


void loop()
{
}
At the moment i need to add and subtract a certain number to get the center point to be correct and that isnt 1:1 and it changes depending on bitrate so with the help of the same guys i hope to find a better way to calculate that on the fly. It does however appear to work correctly. Still working out the kinks.
void loop() { // Serial.println(String("Sintheta:")+ sintheta); // Serial.println(String("Sintheta:")+ costheta); // Read the value from the sensor int YfAxisValue = analogRead(YfAxisPin); int YbAxisValue = analogRead(YbAxisPin); int XlAxisValue = analogRead(XlAxisPin) + Offset; int XrAxisValue = analogRead(XrAxisPin) + Offset; // Add the new value to both sensor value stores YfAxis.add(YfAxisValue); YbAxis.add(YbAxisValue); XlAxis.add(XlAxisValue); XrAxis.add(XrAxisValue); // Get axis from smoothed // Y int YfAxisCValue = YfAxis.get(); int YbAxisCValue = YbAxis.get(); // X int XlAxisCValue = XlAxis.get(); int XrAxisCValue = XrAxis.get(); // ******** Y Axis *************** // Since we use 4 amsp 2 front 2 back that are set to 0v to get the full range one way we we need to remap one for each to reverse the numbers YbAxisCValue = map(YbAxisCValue, 1023, 0, 0, 1023); XrAxisCValue = map(XrAxisCValue, 1023, 0, 0, 1023); // combine axises and then adjust to 12 degree rotational offset float YcombinedValue = YfAxisCValue + YbAxisCValue ; float XcombinedValue = XlAxisCValue + XrAxisCValue ; newX = XcombinedValue * costheta - YcombinedValue * sintheta - 199 ; newY = XcombinedValue * sintheta + YcombinedValue * costheta + 248; // added + 248 here to conpensate for center. I can also add these at Joystick.setYAxis(newY + 248) // Set joystick Axis Joystick.setYAxis(newY); Joystick.setXAxis(newX); -
if you want to know how this all actually works you can follow this post. There's more in depth how ive set things up with the pots and why im using 2 inputs for each axis. but mainly im researching how to do the angle adjust.
https://forum.arduino.cc/t/joystick-how-to-add-xx-offset-angle-to-x-y-for-12-degree-offset/888828/7 -
Using ardunio micro
Smoothed library: Dl trough Ard software.Joystick library https://github.com/MHeironimus/ArduinoJoystickLibrary
https://www.ebay.com/itm/174794426405Ive had to make some compromises and use 4 ebay amps then combine those into 2 axes with one on each side. I invert one of the amps to get + - It works very well and cost me about 35 euro instead of 400++ due to the WH r3 being out of production. Plus their support professionalism = no comment... You should probably connect each axis strain + 1 pot and resistor for a wheatstone bridge but i had this stuff.
I will program all the axis features the FSSB has and add a physical switch to change things around. Maybe later i will add a software solution.The easiest way would be to just solder on wires to the top circuit board but i needed the space so i took it out. Apart from the connection rod to the stick which needs to be strong im quite sure you could easily 3d print something similar and have no cross talk in the axes. Then you could have your own force sensing stick that does move a bit but with less force than steel which is of course best.
Ignore the melted wires on the connection. I did a last ditch attempt to save it and baked it in the oven to reflow (which ive rescued other boards with) thinking the wires would not melt. I added new shielding.
Please note Force and offsets and not currently working. Just added varables
//#include <AnalogSmooth.h>

#include <Joystick.h>
#include <Smoothed.h>

/*
For the true false flags, use this list. Its all in  Joystick.h
    bool includeXAxis = true,
    bool includeYAxis = true,
    bool includeZAxis = true,
    bool includeRxAxis = true,
    bool includeRyAxis = true,
    bool includeRzAxis = true,
    bool includeRudder = true,
    bool includeThrottle = true,
    bool includeAccelerator = true,
    bool includeBrake = true,
    bool includeSteering = true);
  */
Joystick_ Joystick(JOYSTICK_DEFAULT_REPORT_ID,
  JOYSTICK_TYPE_MULTI_AXIS, 32, 0,
  true, true, false, false, false, false,
  true, true, false, false, false);


// Variable

#define YfAxisPin A0
#define YbAxisPin A1
#define XlAxisPin A2
#define XrAxisPin A3

// Add pins for the different ranges. Just using a variable for now.
// Max force from trigger height.
// Max force for y is about 8kg
// Max force for X left is about 8kg  X right is about 6kg
// Max force in %
int YMaxforce = 100;
int XMaxforce = 100;

// add offset to X Y  WIP need to figure out how to angle
int Offset = 0;

// Add smoothing for all axis
Smoothed <int> YfAxis;
Smoothed <int> YbAxis;
Smoothed <int> XlAxis;
Smoothed <int> XrAxis;

int SmoothValue = 30;

// init joystick libary
void setup() {
    Joystick.begin();
    Serial.begin(38400);
  // Ranges are 1023 by default
  Joystick.setYAxisRange(0, 2048);
  Joystick.setXAxisRange(0, 2048);


// Begin smoothing.
    YfAxis.begin(SMOOTHED_AVERAGE, SmoothValue);
    YbAxis.begin(SMOOTHED_AVERAGE, SmoothValue);
    XlAxis.begin(SMOOTHED_AVERAGE, SmoothValue);
    XrAxis.begin(SMOOTHED_AVERAGE, SmoothValue);


}
void loop() {

// Read the value from the sensor
  int YfAxisValue = analogRead(YfAxisPin);
  int YbAxisValue = analogRead(YbAxisPin);

  int XlAxisValue = analogRead(XlAxisPin);
  int XrAxisValue = analogRead(XrAxisPin);

 // Add the new value to both sensor value stores

  YfAxis.add(YfAxisValue);
  YbAxis.add(YbAxisValue);
  XlAxis.add(XlAxisValue);
  XrAxis.add(XrAxisValue);


// ******** Y Axis ***************

  int YfAxisCValue = YfAxis.get();
  int YbAxisCValue = YbAxis.get();


  // remap Yaxisback
   YbAxisCValue = map(YbAxisCValue, 1023, 0, 0, 1023);
  int  YcombinedValue = YfAxisCValue + YbAxisCValue;
// Set joystick Axis
  Joystick.setYAxis(YcombinedValue + Offset);

 // debug prints for serial monitor
 // Serial.println (String("Yf:") + YfAxisCValue);
 // Serial.println (String("Bf:") + YbAxisCValue);
 // Serial.println (String("Y combined:") + YcombinedValue);

// *********  X axis  **************

  int XlAxisCValue = XlAxis.get();
  int XrAxisCValue = XrAxis.get();

  XrAxisCValue = map(XrAxisCValue, 1023, 0, 0, 1023);
  int  XcombinedValue = XlAxisCValue + XrAxisCValue;

  // Set joystick Axis
  Joystick.setXAxis(XcombinedValue + Offset);

 // debug prints
 // Serial.println (String("Xl:") + XlAxisCValue);
 // Serial.println (String("Xr:") + XrAxisCValue);
 // Serial.println (String("X combined:") + XcombinedValue);


}
-
1
-
-
Well its been reported forever and there's still no fix. The Lod distance is like 20 meters or so before you get extremely bad flickering soft shadows. At this point its just not acceptable. So excuse my language when i say what the f are you doing ED when you cant fix or at least give us a shadow lod distance option? Tree shadow res and such is a flickering mess too and we have to install Kegetys VR mod to fix it. Why cant you add this to the game?
Added multi-sampled terrain shadow sampling (less aliased shadows with MSAA)
– Added alpha-to-coverage support for trees and tree flat shadows (less aliased trees with MSAA)
There's so many issues with easy fixes that are just not acknowledged and completely ignored -
Hi there
Got some questions about a conversion as my FFSB r3 decided to just die for practically no reason (second hand, out of warranty) and i do not wish to pay 415+ eur when i can fix it for 30-40 using some strain gauge amps and ardunio. While ill loose the software there's not really many axis features in the FSSB software that i cant program in ardunio in a few days. Just the angle shift really.
While im fairly sure i need 4 amps is it possible to get away with 2 amps with 2 gauges connected?
What ive noticed on the ones ive tested (and now lost track of so im unable to test ) is that there's a fair amount of noise even with 10x filter in MMjoy2 using these https://www.ebay.com/itm/183934688576 Would a capacitor in between the gauge and the board be fine? If so, what would be sufficient? Or any suggestions for amps are welcome.
As you can see its easy to just tap into here and just use the FSSB hardware.


.jpg.acbee9f5012c6d4f6a212d85fd9dd857.jpg)
OpenXR Guide - Deprecated - This time for real (▀̿Ĺ̯▀̿ ̿)
in Virtual Reality
Posted
Not that i can see.