Cripple
-
Posts
323 -
Joined
-
Last visited
-
Days Won
1
Content Type
Profiles
Forums
Events
Everything posted by Cripple
-
+1 Also, this thread seems to be getting a teeny wee bit "rivet-counting" in tone for my liking. Historical authenticity only goes so far when you are sitting in front of a PC going "weeeeeee-dakka-dakka-dakka". For all the empahasis on sim-pits and leather flying helmets (must get me one...), it's still a *simulation* - not a replication of historical events. I'm all for a more appropriate WW2 map, either France or North Africa. However, so long as there is a degree of balance on the servers, I'm not too fussed which mark of plane squares up against which other one. I think there are more important details to focus upon, particularly as this seems to be the only combat sim currently focusing on them. :)
-
Fair enough. :) Oh, and to confuse matters there seems to have been *extended* wingtips too - for three different types of wingtip. Annoyingly I can't find the info I have on the wingtips (or lack there of) and the effects on performance, so I'm going on memory here. The anecdotal rule-of-thumb seems to be: - truncated wingtips for low-level roles and better rolling performance - "normal" elliptical wingtips for the interceptor role - extended "pointy" wingtips for high-level work You can see that it makes sense (aesthetics aside) for DCS et al to model a fighter that can be used for ground-pounding to show off the work they've done on the terrain, rather than a lot of blue sky and fluffy clouds. A wee bit more fun for the player too, I imagine. Bottom line is that it doesn't really matter so long as we get some sort of Spitfire. Much as I like the elliptical wingtips, it's not like you get to see them as you are buzzing along, do you? :D
-
I'd want the aesthetics personally, actually... :P Now, correctly me if I am wrong, but I was under the impression that the clipped wing version wasn't "better" per se. It had a better roll rate, and was deemed better for lower altitude work, but traded this for worse performance at higher altitude than the wing-tipped version. Yes? It's a matter of *where* you want the improvement. I am for the regular wing for aesthetics (looks more like a "Real" Spitfire) and the high altitude performance.
-
Know it well.... bit rich for my wallet though! ;-) Heh heh - do we ever "finish" cockpit builds? Hope to have something completed by the end of the year though... How does one eat an elephant? One bite at a time. :)
-
Evening all, Wow, 900+ views. :) No updates on the wood-working as I'm waiting on a lift to get more wood. However, here are a couple of shots of the grip. It was an ebay sand-cast, cleaned up, spray painted, with a sawn bolt epoxied in to place. The brake lever is a bike brake lever. Grip was whipped with string then wrapped with duct-tape. Electrics and springs to be added later. Still need to fabricate the BBC (guns :P) button too. Not museum-quality, but more than sufficient for the inside of a spit-pit - particularly with an HMD on.

-
Evening all, Just a quick update. This is a proof-of-concept dry-fit of the frame 8 panel (below the dash) on the lower longerons. All the (lower) panels are now notched to fit, and the longerons are marked up. You can see the top upper longeron notches in the pic. Just needs assembled now (glue and angle brackets, methinks), and I'll have a curved box to sit inside making vrooooooooooooooooooom-dakka-dakka noises. ;-) The (internal) debate now is whether I assemble this stage before or after I begin to: a) mark and cut the upper frames, and b) redecorate the "hanger" it will live in - currently used as a cutting room.
-
Scotland: where men are Real Men, and have huge... radiators. :P The original Spitfire was fabricated out of aluminium. I chose to use wood as I'm not going for a museum quality facsimile, just as glorified cardboard box to sit in and make vrooooooom noises; I also have close to zero experience with working aluminium. What I do know is that you basically have to build everything twice: once in wood for a mould/jig/whatever, and then again in the aluminium over it. Hasn't stopped this lot though... http://forum.keypublishing.com/showthread.php?50540-Spitfire-Simulator-man-building-metal-spit Or this fella who built smaller scale spits and a mustang. http://www.spitfireinmyworkshop.net/spitfire.php Neil - I love the the spitsim bits but I'm going down the home fabrication route myself. As much for cost as anything else (I think my full budget, including new pc and HMD, is about the same as a set of controls), but also for the "fun" (cough) of learning about hall sensors and interfacing. I'd also be terrified to mod any of the spitsim parts! Got a cast replica grip from ebay, tidied it up, and got my thinking cap on about how to farb up my own BBC button etc. Watch this space. :)
-
Thanks. Should get some more done over the next few days. Need to paint the "hanger" too though. I'm in Edinburgh, Scotland, UK. One of the reasons I've plumped for the spit (despite there not being an option to fly it... yet) is because of the historic association between Edinburgh, 603 Squadron and the Spitfire. That's why there's one sitting outside the local airport. :) (First RAF victory in WW2 was a Ju-88 downed locally, actually. People tend to concentrate on the south of England and forget about the Scottish Blitz. It's actually not that far to fly across the North Sea, but I digress.) http://en.wikipedia.org/wiki/No._603_Squadron_RAF
-
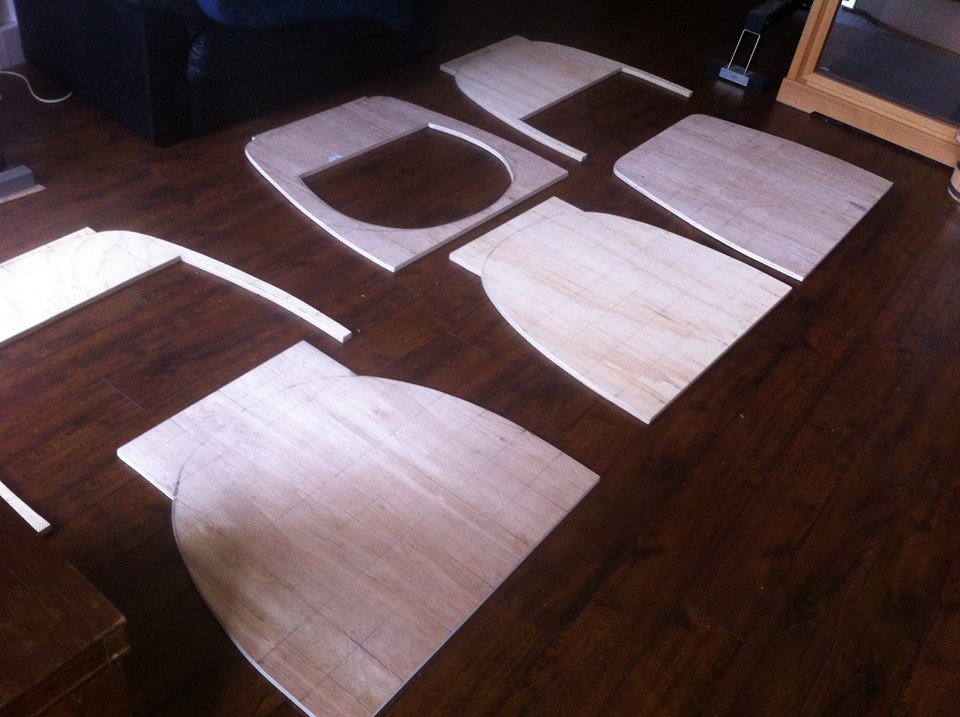
Thanks for the support. :) I've now got all the frames cut and shaped and sanded and stuff (mostly hand finished, I prefer that for "feel" whilst working). Next step is to mark out the lower longerons and mount the frames on those, then attach the upper longerons. Think of it like making a full-scale balsa plane (we all did that in our youth, yeah?) and you'll not go wrong. Attached are a few images of the completed frames. On frames 8 and 9 you can hopefully see what I meant before by stopping the cut at waterline -2 for mounting the rudder pedals. I also decide to cut frame 10 rather high as I'll be using that as a support for the base of the seat.
-
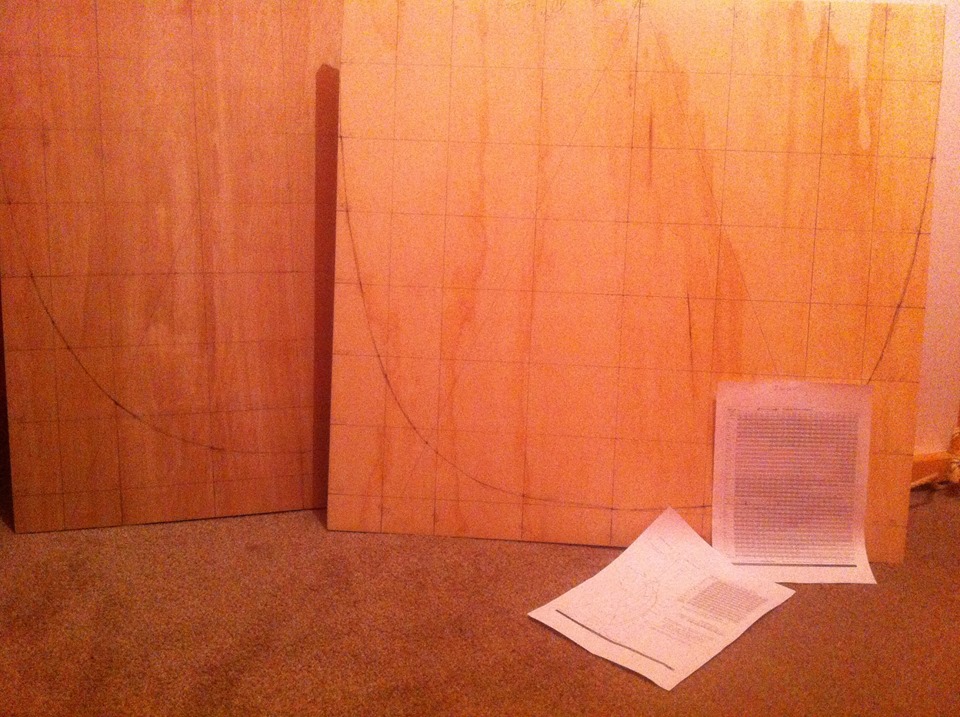
Evening All. First post here, so apologies in advance for any faux pas... I've been inspired by seeing some of the wonderful (mostly modern) sim-pit builds on here and by playing dcs so decided to finally build the Spitfire sim-pit I've been humming and hawing about for literally years. Here we go... the plan is to build it out of wood for cost and relative simplicity of working, and to build between frames 7 and 12 of the fuselage - which encompasses the cockpit and fits within my boxroom nicely. The broader plan is to have an physically accurate, although not necessarily high-fidelity, spitfire cockpit for use with both the DCS Mark IX and the Rift (or other HMD) when both of these finally surface. Essentially, the physical controls and switches will be in their correct place and connected via a Bodnar Board to the sim, while the HMD will allow me to use the virtual cockpit rather than puddling about with servo'd dials etc. I've used the frankly *excellent* information provided by this Canadian chap. The ebook is well worth picking up at the price, and if anything has too much detail. At least I'll know where to put all the rivets though... :P http://monfortonpress.com/ Using that I was able to draft the lower frames (below the fuselage datum) directly on to 18mm ply that had been cut in to rectangles by the hardware store, before jigsawing them out and cleaning them up with surform files and steel wool. The frames taper upwards as one moves aft, but I made the decision to extend them vertically downward at buttline 2 to the same depth as frame 7 - thus making a flat base for the pit. Erm, you might need to be looking at the above plans to follow that statement, sorry. The plan is to use 33x33mm softwood as longerons; two along the bottom (at buttline 2 again) and two along the top edge. This should give a solid lower hull that I can build the upper surface on top with by a similar method. Then I'll sheath the whole thing in probably 1mm poster board. I've also made the design decision to cut the holes in frames 9 and 8 (both forward of the pilot) to waterline -2, which is about the right height to mount rudder pedals on sliding drawer tracks running over the top, rather than building the authentic pedals. Anyway, enough waffle... talk is cheap, so here are a few pics of the build so far. So far, so good, particularly as I'm a nurse ("Jim") not a joiner... Back to work now. :)