supanova
-
Posts
82 -
Joined
-
Last visited
Content Type
Profiles
Forums
Events
Everything posted by supanova
-
The perennial question. How to improve Maverick hit rate?
supanova replied to supanova's topic in DCS: A-10C Warthog
I do hope I have enough understanding of them to do that now. ;) -
The perennial question. How to improve Maverick hit rate?
supanova replied to supanova's topic in DCS: A-10C Warthog
I moved the targets in front of the track, with a 100% hit rate. I would suggest that Yurgon is correct. The telegraph poles are distracting the Mavericks. I also tried locking up and lasing the targets before setting the mark points, but that still gives me about a 50% hit rate. The mission files are attached. sn_exercise_a10_mavs.miz sn_exercise_a10_mavs_FIX.miz -
The perennial question. How to improve Maverick hit rate?
supanova replied to supanova's topic in DCS: A-10C Warthog
The mark point is using the coordinates, so the mode shouldn't matter. I put up an external view of three of the four missiles. I can't seem to get the timing right to record all four: I will try some more experiments and report back later. -
The perennial question. How to improve Maverick hit rate?
supanova replied to supanova's topic in DCS: A-10C Warthog
If you look at the TGP mark point setup, all four vehicles are in the open, I'm placing the mark point close to the target, and I'm locking on the mark point position. I don't think the Mavericks can be locking onto any other heat source. I have the impression from testing that the Mavericks want the range below 4 miles regardless of whether they are D or H models. -
The perennial question. How to improve Maverick hit rate?
supanova replied to supanova's topic in DCS: A-10C Warthog
I would be surprised if using D's was the problem. The infrared profile is pretty distinct with nothing to really present a false positive. The temperature is also 20C on the caucasus map. I tried the same exercise with the H's. I couldn't get a lock on the first target until less than five miles, and even then on two passes I missed the first shot on a Shilka but hit the three T72s. The first shot always goes long, whether I'm using the D's or the H's. Also on subsequent tests no hit on the Shilka at four miles, but a hit at three. -
The perennial question. How to improve Maverick hit rate?
supanova replied to supanova's topic in DCS: A-10C Warthog
Mis-selected private for unlisted. Apologies. -
I'm trying to understand the AGM-65D with the A-10C. I've tried various approaches, descending from 8,000, 6,000, and 4,000 feet, and I've started firing at the four marked targets at 7 and 4 miles, but whatever approach I take I achieve a hit ratio of 25-50%. You can see in the video below that I'm only hitting the last target in this example. I'm probably making a simple mistake, but I can't think what it is. Or are they just that innacurate? Any help would be appreciated. The complete attack from marking targets to execution: Alpha fired at 7.0 miles, 2760 feet: ?t=189 Bravo fired at 5.9 miles, 2600 feet: ?t=201 Charlie fired at 4.8 miles, 2340 feet: ?t=215 Delta fired at 3.8 miles, 2040 feet: ?t=227
-
I have had an issue with right roll in the Hornet, and located the cause of that to the TM Warthog throttles. I tested with a simple mission, no wind. With both throttle axes used and coupled and no other control input the aircraft rolls right when adjusting power. When using a single axis the bank angle indicator does not move. I have tried calibrating with the TM calibration tools, using deadzones, adjusting saturation, curves, and various combinations, but the only way that I could remove the right roll has been to use a single throttle axis. The only other solution that I can think of would be to uncouple the throttles, and manually adjust power, which I suppose would be more realistic.
-
Overhead landing pattern: ICLS: CCIP & Mk 82: CCIP & Snakeye: Electronic Countermeasures: Launch and Departure:
-
After more research it appears the A-10 has a particularly bad trim system, which is apparently a joke even among A-10 pilots, and we're also the recipient of the punchline.
-
The A-10 appears stable when the VV is centered on the zero pitch line. Below the line it rolls right, and above it rolls left. To avoid roll I have to constantly add and decrease pitch trim. No matter what I do with power and pitch trim the aircraft goes between the two states. The same is true whether I use one or both throttles.
-
I did some testing to try to isolate the problem. I'm using a TM Warthog, which I suspect is a common factor. I used the Hornet for testing as it's a simpler test to replicate, using a custom mission, with no wind. When both throttles are used and coupled power inputs produce significant roll. When one throttle is used to control both engines no roll is produced. Note even when using one throttle RPM is not always symmetrical. I have tried a curve of 30, which seems to reduce the effect to a more manageable level, but roll still occurs. I will try to replicate the test with the A-10, but I suspect this is the problem with the aircraft for some users.
-
I'm working through operating the aircraft and learning its systems. As I do that I create tutorial videos which reinforce the learning process and hopefully help others following the same process. Startup: Taxi and Takeoff: Flight path navigation: TACAN Approach: ILS Approach: GAU-8: Hydra 70 rockets: Litening TGP: Mk 82 LDGP & AIR: Target Designation Cue: Laser Guided Bombs: http://www.youtube.com/watch?v=HRtTUzBhxqA CCIP using 82 30DB2 Profile: https://www.youtube.com/watch?v=m4805YgF-7I TACAN approach at Nellis using approach chart: https://www.youtube.com/watch?v=iVMLOckAtaA Overhead Landing Pattern: https://www.youtube.com/watch?v=aHDOEphtWas AGM-65 Mavericks: https://www.youtube.com/watch?v=gHVWPgpCjF8 AGM-65 Maverick Quick Draw: https://www.youtube.com/watch?v=11QF0asAVX4
-
There's no reason you shouldn't be able to trim the aircraft for straight and level flight.
-
The problem is that when you centre the TVV the aircraft can still have roll in it, which is made worse by the coarse nature of trim. You can't just fine tune it with a small amount of trim, because the aircraft will just roll through it in the opposite direction. Personally I wish the A-10C trim was a bit finer, and the F/A-18 trim a bit more coarse. Note: TM Warthog stick
-
There's a link to the Battle Book in the video description.
-
I put together a rather imperfect demonstration of the technique: I want to thank everyone that contributed to this thread. Your input and assistance was invaluable. I particularly want to thank Eddie for his input and also of course the Battle Book which he created and the help he has provided to the community. Without input from people like Eddie our communities would be much poorer.
-
I seem to have misunderstood the lasing process with HOT. Thanks for the clarification. I also made the rather basic mistake of missing the difference between nautical miles and miles. However I am placing the aim-off point at 30 degrees with the DRC on the target at release. I have found the aim-off point at the greater distance hard to achieve, but I will make a few more attempts to see how that works out. Thanks again.
-
I just want to confirm I understand HOT altitude and how to set it with the laser, because I think I misunderstood it previously: When in CCIP mode, you press the data rocker switch, and lase the target while the altitude is flashing? Or do I have that completely wrong?
-
I was thinking in terms of this thread: https://forums.eagle.ru/showthread.php?t=118975 Thanks for the tip on the ruler. I set the AOD to 1056 feet.
-
You're probably right about the AOD, Frederf. I was estimating smoke placement and I think I read it wrong. I do wish we had a ruler tool to mark out the distance on the ground. I've adjusted for the next attempt. What does HOT stand for? Height of target?
-
I this this is much closer. I'm about 400 feet low, but I think that's because of the initial pull. I'm using the 34 mil depressible pipper to line up with the AOD during the pull. Excuse the climb at the end. I was busy looking at the pitch ladder. https://youtu.be/c6c7BUXBAIM?t=264 You can go back to the start to see the process I'm following. I seem to be collecting bug reports. False inverse video, BDU-33's often not emitting smoke, and replay starting in accelerated time and sometimes quitting early.
-
I have only seen the real world example in my first post, and I have to presume there's a good reason for the initial nose up pitch. It would be useful to have input from an actual A10 pilot. I posted another practise video. I think I'm a little too close initially, but I think aircraft roll may make that look a little worse than it is. I suspect that's why the dive angle is 35 degrees. I also straighten out a fraction early, but I'm at least mostly getting a solid tone. I placed smoke at what I think is 0.2 miles from the target. How useful is the gun cross for measuring AOD? That might be a quick and easy reference. It took a while for me to realise I was only getting a single drop from stations 5 and 7. After switching to 3 and 9 I'm getting pairs. I don't know why stations are inverse white. I usually have that on the right station, though sometimes they're both green. Switches are set to armed, and as you can see, bombs come off the aircraft. https://www.youtube.com/watch?v=SjegjU7J6WQ
-
I put up a video of my best attempt so far. I'm too slow at the start and I think that affects the climb. I probably also reduced power in an attempt to slow things down a bit. The timing of the roll out is all over the place, and I tried to force the DRC onto the target, something I realised was a mistake as soon as I started to do it. I didn't even look for the AOD, I was too busy trying to line up on the target. https://www.youtube.com/watch?v=lv-NDD_wY1k I'll post another vide when I have something worthy of approval as proper technique. ;)
-
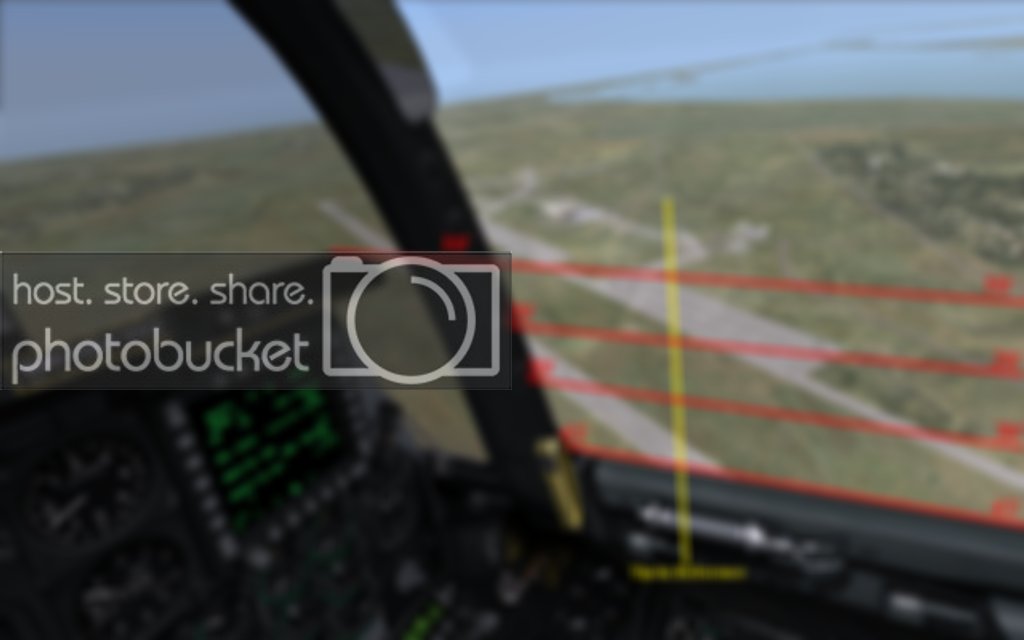
I'm trying to put a mental picture to what I'm doing. With 82 30DB2 in mind: Base Altitude is 5.1, or 5,100 feet AGL, Airspeed is 280 IAS. Base Range is 1.2, or 1.2 miles from the target. At Base Range I pull 5 degrees nose up, and then roll into the attack. Track Altitude is 3.6, or 3,600 feet AGL, which is the point at which the desired dive angle should be achieved, and the target should be under the PBIL and the Pipper should begin tracking up to the target. Release Altitude is 2.8, or 2,800 feet AGL. Aim-off distance is 0.2. I understand I have to be established on that at Track Altitude. I'm then pointed at the Aim-off point, until I can set Track reference, which in the video example would be the DRC. I don't understand what an Aim-off distance of 0.2 is and what that looks like. 0.2 of a mile? I'm not sure how to gauge that. The canopy cues would be Roll-in Target Placement? So you'd start the attack with this profile when the target was level with the bottom dust plug? I've attached a picture I think was posted by "Eddie" in a much earlier thread on the subject. I assume the red lines indicate the dust plugs and the yellow line the position of the target at the start of the attack?