Jericho
-
Posts
4 -
Joined
-
Last visited
Content Type
Profiles
Forums
Events
Everything posted by Jericho
-

HOTAS buttons stop working mid flight
Jericho replied to yinlad's topic in Controller & Assignment Bugs
Check your power settings, under windows, for what ever profile you have running. Under additional or advanced settings, make sure your PC isn't setting your bluetooth or USB devices into a powered down state. -
T. HOTAS Warthog Throttle not Recognize by the PC
Jericho replied to Itaylevi16's topic in PC Hardware and Related Software
Heya. Had issues with both joystick and HOTAS over the course of ownership (even replaced some buttons myself!). But what you are describing sounds like the firmware is lost. Good news is, it's a simple fix! Check this doc here: https://ts.thrustmaster.com/download/accessories/pc/hotas/manual/HOTAS_Warthog/HWarthog_Bootloader_Method.pdf Now, I will say, for SOME reason I can't explain, some USB ports on my PC WOULD NOT get the HOTAS enough power to function or be fully recognised by Windows. I opted for a Powered USB hub, which gave the unit enough juice. But for both events of where the Joystick or the HOTAS wouldn't be recognised I did the firmware bootloader method. 1. install latest driver pack, don't plug anything in, restart 2. as per instruction, depending on your device, hold down the 2 buttons indicated in the doc, and plug in your device. And hey presto! it flashes the firmware back to the stick or hotas and windows is happy again! 3. you for sure should not think your USB ports are all working "ok"!! From a providing power to the device stand point (those LED's clearly need juice...). So before you bin your lovely setup, just get a power USB extender and try that. Hope this helps chaps! So fed up with the constant fixing of things and not getting to PLAY, but it's a necessary evil it seems :) -
HOTAS buttons stop working mid flight
Jericho replied to yinlad's topic in Controller & Assignment Bugs
Just want to chirp in here, maybe not helpful, maybe it is - i'm not signed up for the Open Beta but my f18 hornet controls just would not work at all, no matter what I tried. The keyboard bindings were ok, just no stick or throttle axis or any of the buttons. Every other module though works! So I don't think it's ED per se, but maybe something with the module devs. I re-installed the module for the f18 but still busted. The spitfire, Su-25 (the one that came with DCS), SU-33, TF-51D and UH-1H all work PERFECTLY. So I'm thinking in my situation at least, there is a bug between the f18 mod and whatever patching on DCS, at time of writing it's 2.7.14.24228. I have also tried loading the default controls back, thats in the module directory. Still no dice. Update 1 - ok... managed to recover. So so strange. Heres what I did: 1. ran a complete repair 2. uninstalled the f18 mod 3. reinstalled the f18 result - still busted 4. clicked on each controller and select "reset category to default". Still busted 5. found a thread somewhere talking about the default controller lua files for the module - DCS World\Mods\aircraft\FA-18C\Input\FA-18C\keyboard and \joystick. 6. loaded up the Warthog HOTAS and Joystick respectfully, loaded up keyboard from this dir 7. bloody well WORKS!! 8. ... no. idea. Will now get back into testing custom mappings and see if that works still. AGAIN, need to stress - ALL the other mods of mine worked fine, though in retrospect I never did any custom mappings for them as I'm just playing the f18 mod for now.. Hope this helps someone out there. -
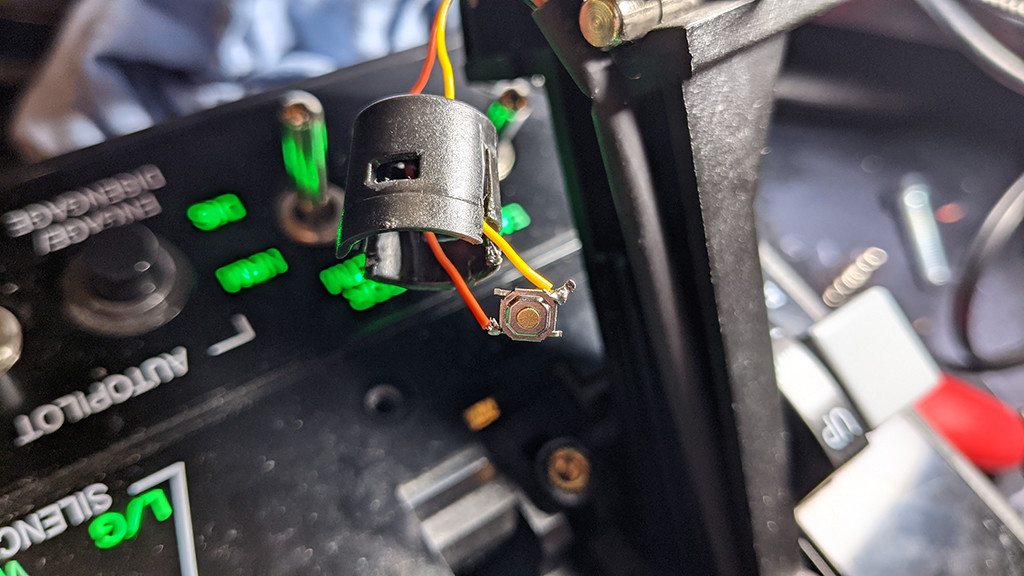
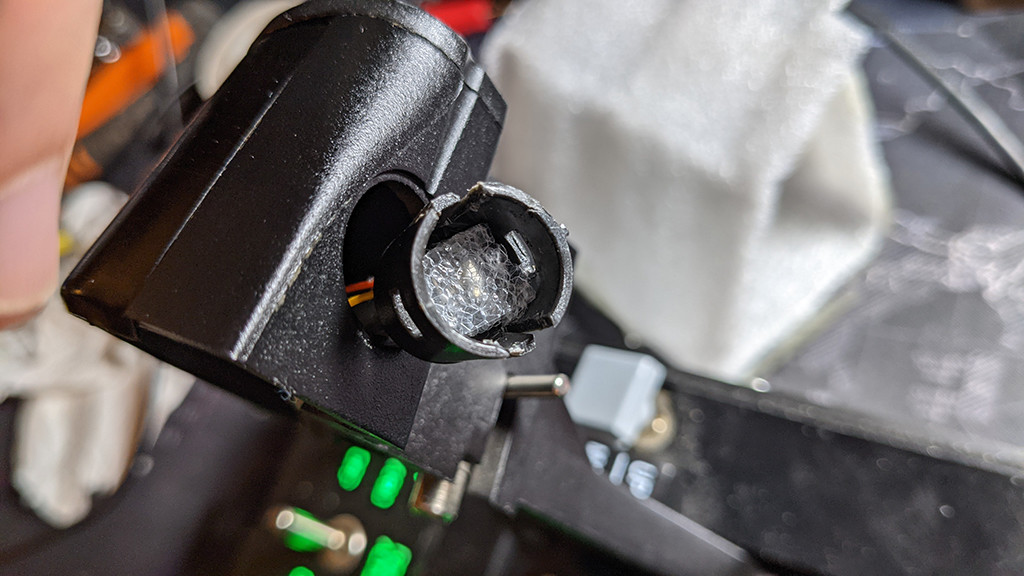
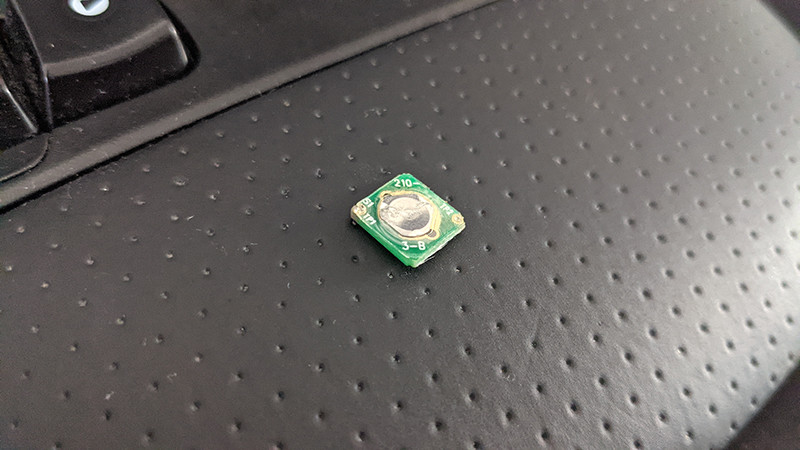
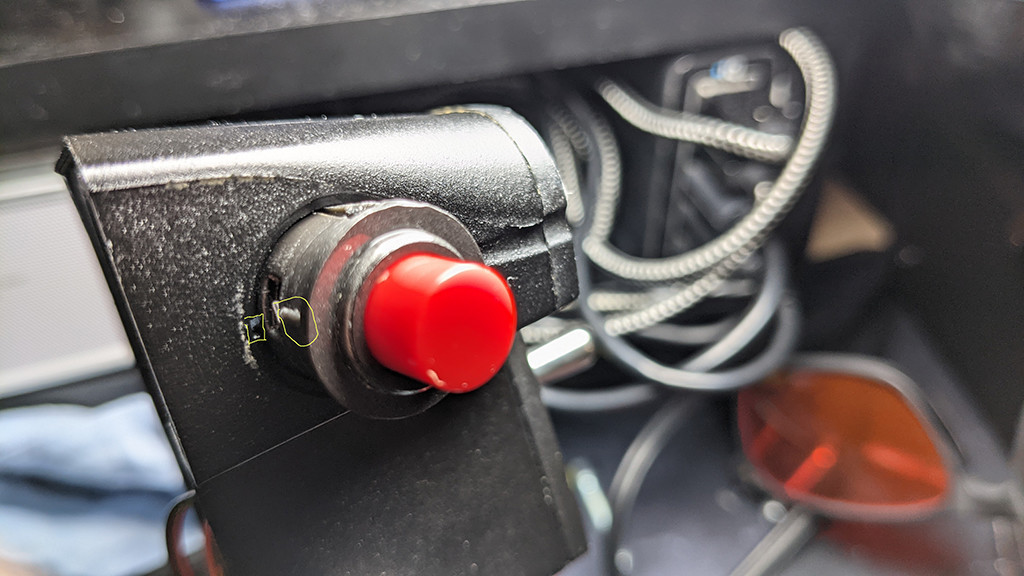
2021 - for those who, like me, landed here after the dreaded "button 15" failure I wanted to greatly thank the posters to this point, as it helped me a lot to get to resolution. And this is my first post here, I waited patiently for 24 hours to have the privilege but wanted to really share my experience and help anyone else like you have helped me. TL;DR - managed to resolve issue by following above disassembly instructions and soldering in a 6mmx6mm tactile button in it's place, bought a 100 of them off Amazon for £6. If you DM me I can post you some if you are in the UK I am tempted to tear down the entire system and replace ALL of these types of buttons, as the new tactile one is 1000% better IMHO. A nice little affirmative "click" to proceedings. Full (and long read, but I am excited by the results! So please bare with me): My set is out of warranty, Thrustmaster was responsive to my lot, asking for proof of purchase and photo of original serial number sticker (so don't ever chuck them away..), but also a video of the fault. By this time, I had fixed it already... so not sure what the next steps would be. Didn't fancy paying through the nose for replacement button, via Thrustmaster or some of the other recommendations here. Don't need a "mil spec" button, and the best price I could get from Mouser or the like was around £30 (that's more than 10% of the cost of a WHOLE NEW SET of HOTAS ). Plus, it didn't quite match the casing for the existing button, so... not for me. I opened the casing, removed the wires from number 15, pushed in the 2 clips holding the button in the throttle hosing and using the advice above, wedged a small screwdriver in and around the plastic to disassemble the entire button. As expected, the el-cheapo "dome" switch TM put in this very expensive case was metal fatigued. I used a needle under the plastic covering the button to pop it back out, but once pressed down, it stays down. Could not locate a suitable 9mmx9mm replacement, so opted for something smaller but just as flat, as to not raise the profile. The little switches I got look like below and got them from Amazon (link here) and if you like, I can send you some : Looking like this soldered in... be SURE TO THREAD THE WIRES through the hosing 1st! added a bit of glue underneath it to hold it centre in the housing too, and some hot glue on the solder to ensure they don't break (can also see the plastic housing chewed up by repeated attempts to open this button, more on this later... ) The next tricky bit was... assembly. My 1st attempt, when re-assembling, I pushed too hard on the red button, destroying the switch and shorting it. TIP HERE IS: the button housing has a small indent, so it goes in a very specific way into the throttle. Don't force it, apply pressure around the red bit of the button, not ON it, else this can happen: The next issue was, the switch is made out of metal, so the spring would short out the switch. I was about to cover it with more hot glue, a perilous endeavour, when my genius girlfriend suggested using the actual packing material instead ! (This was an excellent solution, did not make the button spongy at all and good for the environment all in one. I used the duff 9mm dome switch as a template for size, cut a square and inserted over the button, like so: While the button is still out of the case, snap the assembly back together (don't exert force on the red button if you can help it. TEST IT! Make sure it all still works before you make the effort of final assembly (did I mention I had to take this thing apart a bunch of times? yea...) Lastly, make sure you position the indent on the case with the little ridge on the button, as it will only slide in one way (that's what she said...). Indent and ridge: And that's it! Job's a good'n, and guys, honestly - the new setup really does feel so much better. Wish TM didn't cheap out on these s**ty metal dome switches. I will over time be switching the other 5 over also. And if you have some solder, and iron and the will to do this, it's real simple like. Take your time, read the advice and good flying, Captain.