zamboni
-
Posts
248 -
Joined
-
Last visited
Content Type
Profiles
Forums
Events
Everything posted by zamboni
-
There was one or two Georgian Hammer missions that in the last patch they seem to have "modified"....When I say modified, they seemed to have taken an "escort mission" and changed it to a "take out a bridge" or "take out the HQ" mission. Problem is they forgot to take out the radio calls for the tanks moving out and stuff. I'm really hoping they did finally fix some of the included missions and fixed them well. If they didn't fix them, maybe we can get the mission designer to tell us what they wanted in the mission, and I am sure someone here in he forums can fix them right :).
-
I've seen several posts that say the Prepare Mission can bork things up...that there are only a few things that you can change that will not goof things up. Maybe someone else can chime in with some specifics.
-
Devil's Cross 04A In this mission the advancing Russian troops have some room to maneuver. You job is to provide some CAS support of the 1-5 CAVs orderly retreat to safer climes. Again I load up with 4 Mavs + 4 CBU-97s and a little extra fuel. The first thing you need to take care of is to watch yourself when taking off. After the F-15s take off, there will be a flight of A-10s that are preparing to land. The guy in the tower is not the brightest bulb and WILL give you clearance to takeoff AND give them clearance to land. The previous time I tried this mission I was able to take off, I heard #2 say he was rolling and he never took off. That was because while he was on his takeoff roll, the other flight of A-10s landed in front of him and somehow their wings ended up being interlocked on the runway. They didn't blow up or anything....shoulda got a screenshot :) If you cant get in the air right after the F-15s, it may be better for the A-10s to land so you can make sure the rest of your flight can get into the air safely. When you get near the CP, be careful of your position. There are a bunch of MANPADS around and a variety of rolling SAMs to cause you grief if you get too far West. I've always had problems with situational awareness in this mission so just make sure you don't get lost! Because the advancing troops have a bit more room to maneuver in this mission, they will try to flank your troops during the retreat. Attack runs on the assigned target may bring you over top of flanking tanks and other armor...make sure you are high enough that you don't take some AAA damage. After JTAC give me the first target I tell wingman to engage air defenses and second element to go after armor. (forgot to broadcast my SPI to them though :/). JTAC aborts and then I try to recall them mid attack. When JTAC gives me the third target, a ridge blocks my TGP view, needed to be a bit more north to be able to see them, send in the rest of the flight to take care of them instead. JTAC aborts on the 4th target right when I was going to take out some armor with a CBU...a SA-8 was lighting me up at the time so it may have been a good thing I broke off. He may have fired if I continued. After I broke that off, I decided to see if I could locate that SAM site and take him out. I make a mark in the direction I got the rwr warning, and was going to go south and see if I could get him to light me up again so I could triangulate....but I never got the spike. It turns out from the looking at TACVIEW, that Chevy flight took it out. When I couldnt find the SAM, I tried to use the radio call from Chevy to locate the SAMs they were calling out, but found some artillery and decided to take them out with mavs. At this time, some MiGs were showing up on the RWR, so it was time to get out of dodge and head home. Notes: I ended up getting a 64% mission score for this mission. It is virtually impossible to get a 100% on this mission. Looking at the mission in the editor and seeing the scoring for this mission. You get 50 for taking off, and 3 points each for 12 tankers and 4 HQ vehicles making it to a safe retreat zone and 2 pts for landing. Artillery will take a big chunk out of the tankers and the advancing tanks will also take out several more....this is even before you will reach the battle area. For my mission, 4 tankers were able to make it to safety. I also noticed at least one and maybe two goofs in the mission. #1 goof is that the trigger zone for the safe retreat of the vehicles is too small. You are supposed to get points if they reach the trigger zone. Problem is the vehicles will continue through the trigger zone and exit out of it. If they exit the trigger zone, the points you get will come off the board. I modified the zone size and placement so it had the same zone point, and contained the entire rest of the retreat route so the points don't come off of the board. The second goof in the mission has to do with the JTAC target assignment. There are four armor assault groups that advance on your troops. It is only scripted that JTAC can assign three of them. The fourth group is one that will attempt to flank your troops and will be allowed to advance without being called as a target. In this mission I had added a new FAC assignment for that fourth group (that was the group I was about to hit with the CBUs before they were killed off by someone else). Hopefully tomorrow night or Friday at the least I will try to get the final mission done and posted. Hopefully the new patch will be available for the weekend :)
-
Devil's Cross 03B Here is the third installment of the Devil's Cross series. The commentary on this mission is going to be a bit short because -- for this mission the times I have played through it -- there really isn't that much for you to do. The enemy tank columns are rolling into a defensive tank position that has a superior defensive position and is set to get slaughtered regardless of the CAS support. Again for this mission I loaded out 4 Mavs and 4 CBU-97s. I didn't even use any of em :). When I reached the CP, contacted JTAC, got target and then sent the second element in to take out air defenses. Then sent in #2 to take out some armor. You'll probably notice that I end up losing the target in the TGP. I spend a bunch of time trying to find them again. I had to resort to visually looking for smoke of the taken out tanks and using the HUD to set SPI and then slew the TGP to that. By the time I decide to try and take out some armor myself, JTAC contacts me to say that there aren't any left. I took a look around (turned on the labels to make sure :) ), and then turned around to head for home. In this mission if you or your flight cant take the enemy tanks out yourself, your tanks in a superior position will take them out. All that is left is to return home and bank your 100% mission score. Although you didn't get any kills for yourself, you did let your flight rack up some shacks and gain some experience :).
-
You say you have 4GB of RAM on one stick. I personally would get a matching 4GB stick (same speed and size as your other stick) so I would be able to run in dual channel memory mode. Along with the additional memory, you get a boost in being able to run in the dual channel mode. Thing is, I am not sure if you can use two different memory sizes to be able to run in dual channel mode. I did a quick search and I'm still unclear if you can get dual channel mode with 4GB in one slot and 2GB in another slot. Ive read in one place you have to have identical size/speed memory, another place said it didn't matter. I've always bought matching sticks of ram....but I am not sure if things have changed with newer motherboards released in the past couple of years.
-
I think you would need to go to LCtrl+F11 to to to the free camera first. Then that view seems to get added to the list of views when you press F11. But to possibly hijack this thread if the that is what the OP needed, I have something slightly different I was thinking about last night (This may be what the OP means also...dunno). There was a thread on a different section that was dealing with the CBU burst heights, and I was thinking of doing some comparisons. To do a proper comparison I would need to add a view manually through some .cfg file, so that *same exact view* would be available across different times I would run the mission. I poked around in the .cfg and some of the .lua files and could not find anywhere where I could add such a custom view. My original thought was to try and replace one of the airfield views that are available with the F11 key, but I could not find where the settings for those views are found. Any idea if this is possible? Also, I was also trying to figure out how to change the default view/FOV when using the F7 key or some of the external views. When using the F7 key, the view is just way too close to the unit that shows up. In the view.lua file I tried changing the value for "ExternalViewAngleDefault = 60.0", but that didn't seem to work. Any ideas on this also?
-
CBU-97: Height of Function and target altitude "issues"...
zamboni replied to Bahger's topic in DCS: A-10C Warthog
I dunno how accurate the HOF is, but I have only used (so far) either 500 or 700 ft. Based on the results I have gotten with the 700ft, I really don't think I would want to set it any higher. I have never changed the spin settings on it either. I have a feeling you will have to tweak the spin settings along with the burst height to get coverage that is satisfactory. Another thing to remember is, that I get widely different burst patterns if I am doing a CCRP delivery from about 15K, compared to a CCIP run. You also have to remember that you will get a more concentrated hit with a CCRP at 15K because the bomb is going to be more vertical. On a 20-30 degree CCIP run, the bomb spread will be elongated along the fall line to have more of an elliptical pattern. Probably the only way to be sure if things look like they are operating correctly is to see if there are published specs on CBU spread with X burst height and Y spin rate and compare it to what you get in the sim. I personally think that 1200ft HOF is just way to high to get any type of puck concentration over your target, and they are being even more dispersed by the angle you are dropping them in your CCIP delivery. -
I guess it does come down to the mission writer's preference. I understand the spawning if you want to randomize the use and placement of some units...but in the campaign mission, they are part of the mission objective. In this one, halfway through they hold at a waypoint before being cleared to move further. Was just wondering why they couldnt have just be held at the beginning instead of being spawned in
-
Earlier today there was a question about one of the stock campaign missions. (Push - 5-1). I opened up the mission in the editor and noticed that it was missing the group activation commands when you select the radio items for them to move. It got me thinking on why they chose to do a group activation of the two groups. In that mission you get a slight pause as the groups spawn and are activated. I was wondering why the columns couldn't be active on mission start at a pre-staging area, told to move and then hold at the first waypoint (have them reach that WP before the radio item ordering them to move will show up). Then when the radio item is selected, they proceed to their destination/next hold point. If you do it this way you wouldn't have that pause when the radio item is selected and the units activated. Is this because the designer is afraid the units may get destroyed too early? or is it something with mission planning that I am unaware of?
-
Maybe I am missing something here (or I am a rather easy fellow to please :) ), but why does each patch need the setup/tweaking that you go through? I cant really say that I have done anything much to the sim/files since the release version. My framerates are acceptable to me, got my HOTAS setup the way I like it, not sure what else I would have to tweak.
-
I don't think I have ever played this mission before. I just loaded it up in the mission editor to see what is going on and have figured out the problem. There is something missing in the trigger section for two things. Open up the Push - 5-1 in the mission editor. Open up the triggers Click on "1 ONCE (PIKE TO DAKOTA RADIO REMOVE)" In the ACTIONS window click NEW Set ACTION to GROUP ACTIVATE Set GROUP to US M1A2 PLT 1 Pike then Click on "1 ONCE (MAPLE TO DAKOTA RADIO REMOVE)" In the ACTIONS window click NEW Set ACTION to GROUP ACTIVATE Set GROUP to US M2A2 PLT 1 Maple Then save. The two groups of tanks should now appear when you tell them to move. I don't have all the trigger stuff down yet though....by the way I read the triggers it will give you a "win" as soon as you tell them to move to Nevada. But adding the above trigger will get things moving.
-
Just added some raw footage from the attack in the previous mission. I know my video making skeels suck but wanted to give it that "man with a camera in the middle of who knows what action". It is also hard to control the movement with the mouse when you are at full zoom...also...it sucks that my CBU-97 bomb run was basically blocked by the trees :(. Rod, thanks for the feedback, I know what you are saying about wasted time...but I don't feel like I did waste time though. Main reason is because I didn't want to rush into the area without letting SEAD do their job. No use jumping in on the columns when you end up spending time dodging SAMs that SEAD hadn't gotten to yet instead of firing off Mavs :). When I got the target from JTAC, I started straight at the columns, I held back on the speed so I didn't get to the target too fast (the whole SEAD thingy). Even with holding back speed I was still going around 230 on ingress. Most of my time looking at the target was me just checking things out and wasting time until the flight got within Mavs range. I cut loose the second element to attack the AAA right about 8-9nm out. No use letting them go at it any sooner, I think. I had already thought about letting #2 go for the AAA, and saving the second element mavs for the tanks....but the previous time I did this mission, I DID send #2 for the AAA, but he only went 3 for 4 on the Shilkas leaving one of them. I didn't want to run the risk of him missing one or two of them while I swung around for my bombs run....so I sent #3 and #4 in to make sure they were taken out. As for sending #3 and #4 for one side or the other of the formation....I would if I could trust them to actually attack the targets I tell them to :). I had previously did some testing and they seem to attack the first target they find within a 5000m radius. If I tell them to attack the left side and a column on the right side is closer, I believe they would attack the ones on the right instead. Maybe they will get the AI tweaked sometime and they will be better. I also probably could have told them to attack the left side from the south or something....but I just didn't want to experiment in the middle of a mission. As for the gun run I did. I wasn't sure if the wingies had any CBUs left. There was one tank left and I decided to give it a pie in the sky shot. Totally missed with the guns though. Hard to hit anything when you are completely relying on HUD symbology to line things up. Heard the wingman call he was going on his attack run, I should have broke my run off at the time but I said "what the hell", good things his bombs were on target, not sure If I could have gotten him with it so dark out there. One of these days I will actually fire up multiplayer, haven't tried it yet. Gonna have to do it sometime soon.
-
Getting rid of menu items in your .trk replays
zamboni replied to zamboni's topic in DCS: A-10C Warthog
I think I figured that out last night. I was playing around with some of the key bindings in the menu trying to figure out what some of the mystery commands were for and I ran across the command "Switch Dialog" (LShift + \). It turns out that the Switch Dialog command switches the box outline between the two things at the top left of the screen. For example (this is me using the easy comms setting), lets say you check in with JTAC, get your 9 line, readback and he gives you your data and clears you hot. At this point you will have those two nasty things at the top left. The second one will now have a box outline. Now lets say before you go in and attack you want to talk to AWACS to see if there are any air threats around. You dont have any option to go back from the JTAC menu. If you hit F12 or Esc and then hit \, it brings up the same JTAC menu again. First thing you might think of is checking out with JTAC but why do that for just contacting AWACS? Here you would hit the LShift-\ key and the outline box will shift to the leftmost item on the top left, and you will now be in the base menu and able to contact AWACS. When you finish with AWACS, hit LShift-\ again and you are back at the JTAC menu where you left it. Those options are kinda up there to "park" the radio menus, and switch between them. I just played around with it some and It may not be working correctly though. -
If you select the tad and do china hat forward short, it cycles from NORM to EXP 1, second press goes to EXP 2, and then back to NORM with the third press. Both the EXP 1, and EXP 2 modes are oriented with North up....but the map does not follow your plane, you have to slew the map manually. You can zoom in and out with the DMS up and down (short) keys to get a wider FOV
-
Getting rid of menu items in your .trk replays
zamboni replied to zamboni's topic in DCS: A-10C Warthog
After thinking about it a bit this morning, I probably could have just changed all of the \coord lines to coord{0, 0, 0, 0}. If you do that, you would basically be telling the sim to start all of those menus at the top left corner of your monitor, and give the box size no dimensions. All of the menus would therefore be stuck in one pixel at the top left of your screen :) I think I have a half decent understanding on just how those files are used to place the menus on screen, and can be used to say move the radio menus from the right side to the left. If anyone is interested, let me know and I can try and explain it a bit more. -
I tried to use the track feature, but invariably something would be busted with the .trk and it would end up way different than the mission actually happened. For example in one mission I had an explosion (not caused by me) that took out a bridge. The caused the column to pile up and I used that to my advantage. When I went to use the .trk to record. The bridge was intact, and when I went to destroy them in the .trk, they just rolled on through because the bridge wasn't destroyed :(. That is why I settled on recording with FRAPS as I fly the mission. I have the full version of FRAPS. so I just hit the record button and FRAPS records continually through the flight....although it breaks up the video into 4 GB chunks. The first mission in the OP I think it netted me about 16 different files each of 4GB. Because I wasn't trying to do extensive editing, I could have loaded the first video into VirtualDub and then use the Append command to add all the other parts of the video. Would have added a little title at the beginning and then did compression using the Xvid codec for final .avi export. That would have decreased the size quite a bit. I didn't do it that way because I have been trying to test out Adobe Premiere. I threw all of the video segments in there and, did a title and some other minor tweaks and then exported it using the MainConcept H.264 video codec. I selected 2 pass VBR encoding and tweaked the Target Bitrate to give me an estimated File size under the 2GB limit for YouTube. Luckily the quality was pretty good at the bitrate that I chose. I didn't actually change my loadout. I had selected the CBU-97s in the mission editor. What I was doing on the Ramp was going into the Inventory page and changing the burst height for the CBUs from the default 500ft to 700 ft. It didnt switch the weapons.
-
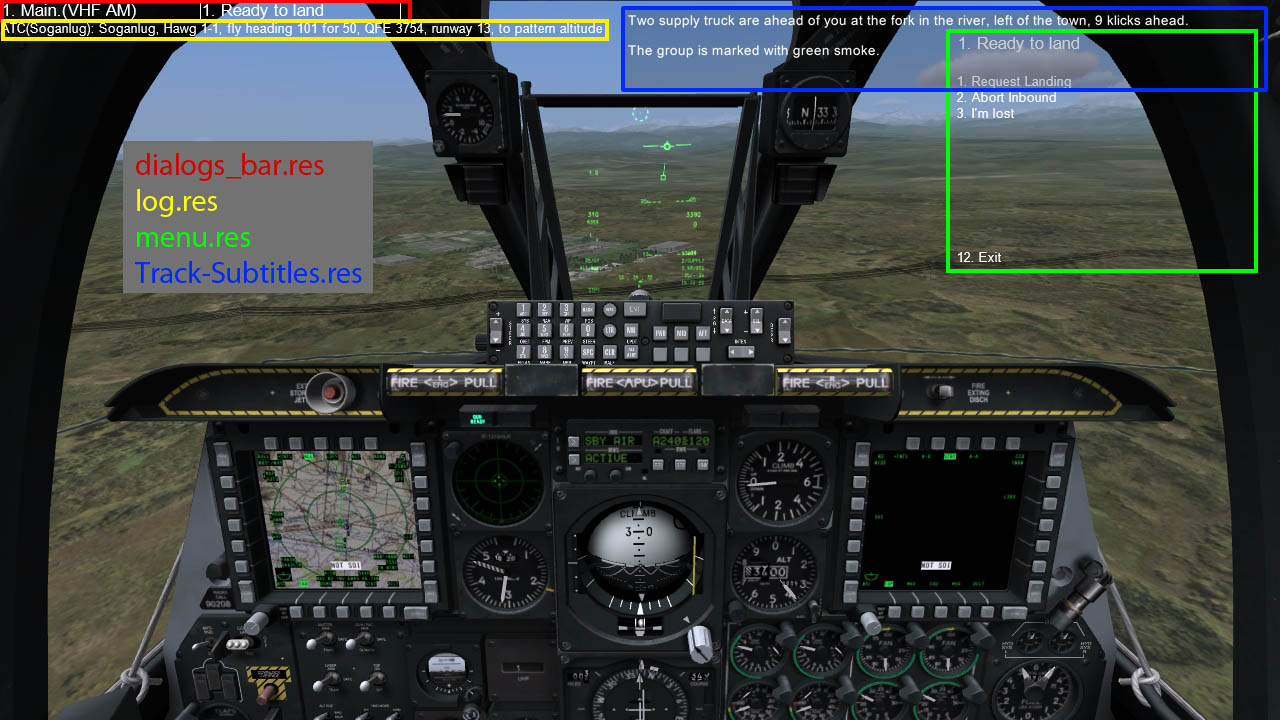
Recently I have been doing some mission recordings using FRAPS. Ive been doing them as I play the mission so FRAPS records everything that is in the screen. This weekend I was trying to pull some outside the cockpit action from the .trk files, but the radio menus showed up in the .trks along with the radio calls from wingmen and other flights. I did a search to see if there was an easy way of getting rid of them but there really isn't. I decided to poke around in the different files to see if I could get rid of them, and I believe I have succeeded! I think these are the main four things that need to be edited if you want to completely get rid of the text on the screen. Here are the four and the names of the files that need to be edited (there may be more but these are the ones I needed to get rid of for my video :) ) 1) Annoying radio stuff at the top left that you usually get when contacting ATC, JTAC, Tankers, Etc. --- dialogs_bar.res 2) If you have subtitles enabled, they will still be in the .trk even if you turn off subtitles before playing the trk. --- log.res 3) The radio menus --- menu.res 4) If you did an instant action or a mission that has pop-up messages or dialog --- Track-Subtitles.res The Track-Subtitles.res file is in the /Eagle Dynamics/DCS A-10C/FUI/Resources folder, the other three are in the /Eagle Dynamics/DCS A-10C/FUI/Resources/Radio folder. First thing to do is backup all of these files! These are the edits I did using notepad++: dialogs_bar.res: For each value of coord{w, x, y, z}, I changed them all to coord{0, 0, 0, 0} log.res: changed the value under \multicolumnlistbox\begin coord{w, x, y, z}, to coord{0, 0, 0, 0} menu.res changed line 4 to \coord{1024, 0, 1024, 768}, changed line 16 to \coord{2, 0, 0, 0}, changed line 27 to \coord{0, 50, 0, 0} Although I didnt change the Track-Subtitles.res file to check, I am sure if you edit the second coord value in line 15 to \coord{0, 0, 0, 0} it should work. Just remember to replace the unmodified files when you want to have the menus back when you fly the sim

-
Devil's Cross 02B video In this CAS mission you are tasked to defeat an assault from the Motor Rifle Regiment attacking from the West. Your 4 person flight will be aided by AWACS, a CAP flight and a SEAD flight to help take out the major SAM threats. For this mission I again loaded out our flight with 4AGM-65Ds + 4 CBU97s and a TGP pod. The ramp start, takeoff and ingress are uneventful. I circle at the CP and contact JTAC. He assigns us the tanks from one of the two regimental groups. When I first spot the column(s) with my TGP, the original two armor columns have split off into several columns showing a wider front. We push from orbit and head towards the columns. As we head towards the targets, the column formation changes again and shows a broad line of T-80s with a line of BMP-2s behind and some Shilkas bring up the rear for AAA cover. At around 8nm out I send #3 and #4 to attack the AAA guarding the columns with Mavs. Order #2 to hold 8 miles out. At this point, I decide to break right and flank the column from the North. My plan was to his the leading line of T-80s with a ripple of CBUs down the line to see how many I could take out. Then send in the rest of the flight to mop up with the Mavs they had left. As I turn in on the line of tanks, I basically guess at the lead to give when release, and rely on the SPI diamond in the HUD. I pickle off the 4 CBUs and it ends up I did some significant damage to the line. The debrief showed I ended up taking out 11 of the tanks with that one pass :). On egress from the line I send in the rest of the flight to take out armor with their mavs as I pull back to a safe distance and height to wait. After the flight finishes their attack I roll in to fir off my Mavs on the BMP-2s. I wanted to get rid of them because they cause havod with their guns when you are low and slow over the target....and right now the wingman AI when dropping unguided bombs, they get too close and too slow and are a prime target for the BMPs. When I take 3 of the BMPs out JTAC calls for a new target, the armored vehicles that are left in the advancing attack. After getting the new target, I call for the rest of the flight to hit the armor with their CBUs while I fire off my last Mav. I hit one BMP with the mav and the flight takes out a couple with their first CBU run. I attempt to go guns on one tank and completely miss, but #4 comes in with a CBU run to that that last tank out. When that tank is destroyed JTAC comes in to tell us we have cleaned the area of threats. Unfortunately #3 got taken out by one of the BMPs. A final scan of the area with the TGP and eyeball showing things he rest of us clear the area and head back to base. Back at base the debrief shows that I took out 16 of the armored vehicles, with 11 of them coming from my CBU run. The mission score only turned out to be 75% though. After the mission I opened it up in the ME to see how the points were distributed. You get 50 pts for starting the mission and 1 pt for landing. You are supposed to get 25 pts for delaying the column from reaching their destination and 25 points for completely wiping them out. Turns out we didn't get the 25 for delaying the column, but I think the way the mission goes it will be very tough to get the delay points. The column doesn't stop and defend like they do in the first devil's cross mission, they keep charging forward. Totally destroying the units would be tough also because our flight barely took them all out even with my 11 kills on my CBU run. As it turns out, the flag for the points are kinda screwed up in they reference the wrong flags. Something that should be addressed by the developers (or you could go in and edit the mission yourself to correct it if you feel like doing so). Although this mission didn't net us the complete 100% score, I felt this mission to be more satisfying than the first Devil's Cross mission. Our flight of 4 ended up taking all of the armor out, and surely helped save the lives of some of our retreating forces. The lighting was tricky here, NVGs would be no use here, good use of the IR Mavs and IR from the TGP helped spot the armor and put weapons on target (even though I was guestimating on how much lead I needed on dropping my CBUs). We will see what is store for us in Mission three next time!
-
Okie dokie. Was just wondering because I thought (my memory may not be correct) that it didn't happen all of the time.
-
1) Create a quick mission in the mission editor that has you start in the air. Choose a load-out without any missiles or anything and just fly around. 2) When you get tired of hearing the about to stall and stall warnings, quit the quick mission and then go to the controls page, and tune your pitch and roll axes with a bit of curvature. 3) tweak the curvatures until you are happy with the amount of joystick movement necessary to maneuver without stalling. 4) Go back and try different loadouts for the plane just to get a feel how it flies. The training instructor is a harsh mistress. You may need a bit of practice before trying for the final exam :)
-
I just wanted to check in to see if this was normal or possibly a bug. I have noticed several times during missions that one or more of my wingmen after getting shot down/bailing out etc will still have his aircraft's SADL symbol on the TAD. I don't know if this is supposed to be like this. Part of me thinks that this is a bug in that it should be disappear when the plane goes down, but part of me thinks that maybe there is a transceiver that may be attached to the pilot when he bails and would be useful in for locating the pilot for possible SAR. Any ideas?
-
Okie, here is a short video showing just what you shouldn't do in the waning parts of a mission. At this point in the mission, all four of our flight have expended all mavs and CBUs (I loaded up with 4 mavs + 4 CBU97s + a little extra fuel). #3 was either shot down or RTB because of damage. Since our flight had only guns left, JTAC sent and ABORT! and then assigned us to go after the BMP-2s with guns. A sane flight leader would have said "too dark, cant see targets...lets RTB and have a few brews". But not me. I decided to designate the BMP-2 with the TGP, and then put the pipper over the SPI in the HUD to see if I could be effective at taking out the BMPs. Because the gun pipper dot obscures the SPI in the HUD, I am only kinda guessing at where to aim. Goal was to attack from 2mi - 1.5 mi and break off before the BMPs got a bead on me. When the video starts, I have already taken out maybe 2 BMPs and I'm about to go after the third. The columns were originally moving from west to east. There are no threats to the east, north or south. I'm trying to attack the BMPs from the side from the South. When the video begins I roll in from the South and fire off a burst and egress to the SE, I pump chaff/flare on egress....but I don't notice that my flares go from LOW to N/L. On my next pass I come in from the South and stupidly egress to the WEST. I am now SW of the target. Although you may want to call the AI stupid, they still have Eagle eyes. #4 shouts out "Air defense target 1 o'clock". Of course, I ignore him.....and then put the stupid label on me...what direction do I turn when I search for that last BMP-2? You can guess what happens next. Fixated on the TGP, I ignore the RWR and launch signal for a couple of seconds and then BAM! Of course from above you can see that I had no flares even if I did act quickly enough. I was lucky enough to get out of dodge alive with only a broken left MFD. I want to give a huge tip of my hat to the ED coders. When I first looked at the video I was blown away by just how good everything looks in this sim. The fading sunlight on the countryside looked marvelous, and when I zoomed in on the HUD, the town/city below looked so realistic with the streetlights etc. And to top it off, the view through the TGP on the MFD was stunning with the smoke remnants passing in front of the target in view. Top notch! I went through the second mission last night again and was able to get the whole thing recorded via FRAPS. I'm going to get that together and try to post it sometime tonight.
-
Sinky, although you may have given up on your Cougar, I think that Drako's profile for the sim is a really good starting point. I changed a few things with my profile to make things a bit easier for me, I could attach my profile if you are interested (along with notes to what I had changed).
-
Jet was my first "flight sim" back on my old Atari 1040ST! I have always loved flight sims, and probably have bought most of the combat flight sims I could find. I always loved the button mashing and the detailed systems, but for some reason the complexity of systems drove me off of many of the sims. Falcon 4.0, Janes F/A-18 were two that were like that. I loved it when IL-2 first came out because I could just get behind the stick and just fly :). There is something about A-10C Warthog that is not like Falcon 4.0 and the other complex sims....Its complex, but not enough to drive me crazy. It may have something to do with being away for flight sims for a while, or it may have something to do with The comprehensive manual that lays out stuff out in an easy to understand manner. Wait....I now remember why some of those other sims had a short shelf life for me. They basically required a decent joystick/throttle with programing PLUS you basically had to map every cockpit function to the joystick or remember way too many keyboard combinations. Head tracking with something like TrackIR PLUS CLICKABLE COCKPITS makes everything so much easier. Less fumbling with the keyboard. (Edit: when I mean clickable cockpits, I do not mean homemade cockpits, I mean the ability to use your mouse and look around at the cockpit on screen and be able to manipulate switches and buttons and dials with your mouse). If you want to get into the A-10, at minimum I think a decent joystick/throttle/rudder setup PLUS something like TrackIR is necessary for full enjoyment. Touchscreens and stuff are nice, but I dont think you would be at a disadvantage at all....you may have an advantage because they may be too busy making sure their equipment is working right :)
-
Ooohieee... I DIDN'T delete the videos of the second mission (that didn't record completely). Sometime tomorrow I will try to post the video of it. I'm going to edit out the takeoff and stuff (and go through till the end when FRAPS gave up the ghost).