

Stang
-
Posts
309 -
Joined
-
Last visited
-
Days Won
1
Content Type
Profiles
Forums
Events
Posts posted by Stang
-
-
Hi Kris,
I'm happy to answer you questions below in BLUE
hey StangThese plans look amazing and I'm giving some serious thought to buying but I have a few queries if you could oblige me.
Thank you for the kind words.
First, I'd like to direct you to the Official F/A-18C Cockpit CAD Plans HERE
And Second, the Actual Cockpit Build Pictures HERE
Ask away my friend.
Roughly how much and of what material the project will require. I'd like to be able to get a ball park cost for the project from a CNC company here in Doha.
Lets break the Cockpit into 2 parts to answer that. First up is the Cockpit itself. It includes the Center Tub, Side Tubs, Side Switch Consoles, Side Intermediate Consoles, Center Pedestal, Main Instrument Panel and Vertical MiP/Monitor Mount.
For the "Basic" Cockpit, you will need :
2 - 4' x 8' Sheets of 3/4" (or 19mm) MDF or Plywood
3 - 4' x 8' Sheets of 1/2" (or 12mm) MDF or Plywood
These are shown in the drawing HERE
For the Cockpit, there are a number of available Accessories. The Cockpit CAD Plans include 4 different Main Instrument Panel Options, Different Main Instrument Panel Supports, Canopy Bow, DDI & AMPCD Formers, the Eyebrow Warning Light Formers and other accessories, shown HERE Depending on what you accessories you add to your build, this could be 1 to 3 more 4' x 8' Sheets of material.
Is the seat plan separate to the Hornet plan or included? if not included any suggestions on type of seat that will fit in the gap?
The Martin Baker MK-14 SJU17A NACES Ejection Seat is part of the Cockpit plans. It is still a work in progress. As with all my CAD Plans, once you purchase them, you get free updates for life. So, when the Seat is finalized, you can then build it. I am estimating the time frame to competition on the seat by or before the end of the month. The engineering is done, I just need the time to cut it out and test it.
Secondly, Any F/A-18 Seat or "my" F-16 Seat for that matter, will fit in the F/A-18C Hornet cockpit, "as long as," it is no wider than 21 inches. Several people use a Car seat as they are more comfortable and easier to adjust to your liking. I am also able to cut you out a seat kit from the OpenHornet Project, when it is ready and released as well. Totally up to you. You can see the OpenHornet Designed Seat that I Built HERE
Can the project be split into chunks? eg can I send them a specific file for the main panel to be cut so I can get that and put it all together then build up the courage for the rest?
Absolutely yes you can. As part of the F/A-18C Cockpit CAD Plans, you get 3 files, The first one is just for you and contains almost 400 engineering drawings, all with dimensions in both inches and mm. The next 2 files are identical in what they contain, but 1 is in DWG format and the other in DXF format. These two formats are compatible worldwide with different CNC Shops. They are the cut files for the CNC or Laser Shop you choose to cut your kit out with. They only contain the parts for the Cockpit.
I'm thinking gf getting the Thrust master TPRS petals and have the TM 1600 pedals at the moment, how will they work with the plans as i think the main panel central panel might be wider than the gap between the pedals particularly on the T1600 ones.
The Cockpit CAD Plans were designed with the ThrustMaster TPR Pedals in mind, and they will fit with plenty of room to spare. You can see them modeled HERE
do the plans accommodate fitting places for the TH Warthog kit? is there a mount for the stick to go in the centre and a recess for the thrust levers?
I did not put a specific mount for "any" stick or throttle, because none of them are the same size. If I chose the ThrustMaster Stick and Throttle, you might have the Winwing, and visa-versa. Any of them will fit. You will need to cut out the Side Console for your Throttle and decide if you want your stick mounted to the floor with an extension tube, or on a riser. This is the beauty of the Cockpit Kit, you can modify it to meet your exact needs.
Roughly how much time does the kit take to construct and is it suitable for a total novice. I'm talking just the structure as I'm planning on the buttons and switches as an ongoing project.
Kris, if you can screw two boards together, you can build the cockpit. It does not take any special skills or tools. A cordless screwdriver is nice though. I have several people building the cockpit now, with no former experience. If they get stuck, they give me a ring and I walk them through it. Ask the guys in my Facebook Group called "The Cockpit Shop". They will tell you I have been known to be on a Skype video call with them at midnight or early before the sun comes up, because that's when they are working on their cockpit, and needed a little guidance. I am always happy to help. Please join the Facebook group and ask the guys their thoughts on building and on the cockpit. I think you will like what you hear :thumbup: You can find my Facebook Group HERE
Many thanks for your time
Thanks Kris, I'm always happy to help. Let me know if you come up with other questions.
Stang out
Kris H
-
Deadman,
Why do you need to prove it?
You are a man of your word, and if others don't believe it, its their loss, not yours.
Stang out
-
Look great Jself,
Keep it going!
Stang out
-
Great work Sharkfin61,
You're making fast progress, keep it up!
I am linking a tool below that you will come to love with Cockpit work, if you don't already have it.
Its a set of Snappy Tools Quick-Change 5-Piece, Countersink Drill Bit Set with Rotating Depth Stop.
You can drill your clearance holes by Screw # size, and cut the countersink at the same time with a depth STOP, so you don't over drill the Countersinks. Less than 50.00 and works great with all woods.
Also, with MDF and Plywood's, if you use a good wood glue, the joint will be stronger than a mechanical fastened joint, once the glue sets up. I like Gorilla Wood Glue, but any wood glue will do. Just be sure you don't need to take it apart after you glue it...once its set, its done.
The link for the Tool Set is HERE
Keep up the great work! :thumbup:
Stang out
-
hegykc
They look GREAT my friend. :thumbup:
I may be able to help with P-51D Throttle. Lets talk some more.

Stang out
-
Hey Spitty
I love you man ! :thumbup:
Stang out
Dont forget the WW2 crowd as well.. -
This may help.
Like I said....30 Degrees. Rotated from Vertical...30 degrees back.
Stang out
-
That panel looks Sharp Deadman!!
Stang out
-
Hi Ben,
Sent you a PM back.
Stang out
-
Hey Guys
Great work on this Switch List
Deadmeat, for the Elec/Gen L & R, you mentioned a "beefier" switch.
How about he Honeywell 101TL1-3D ?
WAIT....the ELCT Panel Gen L&R are ON OFF.... not ON<->ON
How about the Cutler-Hammer / Eaton 8857K47 ON<->OFF
Stang out
[quote=DeadMeat;
2 position locking switch, pointy head Cutler-Hammer/Eaton style: 7
-Comms/ILS UFC ON<->ON (8855K8)
-Comms/Master ON<->ON (8855K7)
-C.measures/Aux rel ON<->ON (8855K8)
-Elec/Gen L ON<->ON (8855K8, likely something beefier)
-Elec/Gen R ON<->ON (8855K8, likely something beefier)
-Ldg gear/Anti skid ON<->ON (8855K8)
-Master/Master arm ON<->ON (8855K8)
-
That's some fine craftsmanship there Gladman!
Keep up the great work.
Stang out
I should say that I'm currently building the Hornet pit. Its going together very nicely. The plans are awesome. -
Hi Guys
Just thought I's share the status of the F/A-18C Cockpit CAD Plans, the Assembly Instructions and the actual Build Pics (WiP).
Enjoy and let me know if you have any questions.
F/A-18C Cockpit CAD Plans HERE
F/A-18C Cockpit Assembly Pictorial HERE
F/A-18C Cockpit Live Build HERE
By the way...the first one that can tell what item or items is installed wrong in the build, gets $50.00 OFF the $155.50 price of a Set of F/A-18C Cockpit CAD Plans!! If you have already bought the plans or a pre-cutout Kit, you don't qualify :lol:
Good luck :thumbup:
Stang out
-
Hi Tricky11,
Got your PM and replied.
Stang out
PM Sent -
That last video shows the turn rate and pitch authority in the Hog is so much higher than DCS models, especially at <200 knots. Please fix the flight model.
Stang out.
-
MAN!...that thing is GORGEOUS !!
Stang out
-
Great work
Is it a Dogfight Boss Cockpit that your building?
Stang out
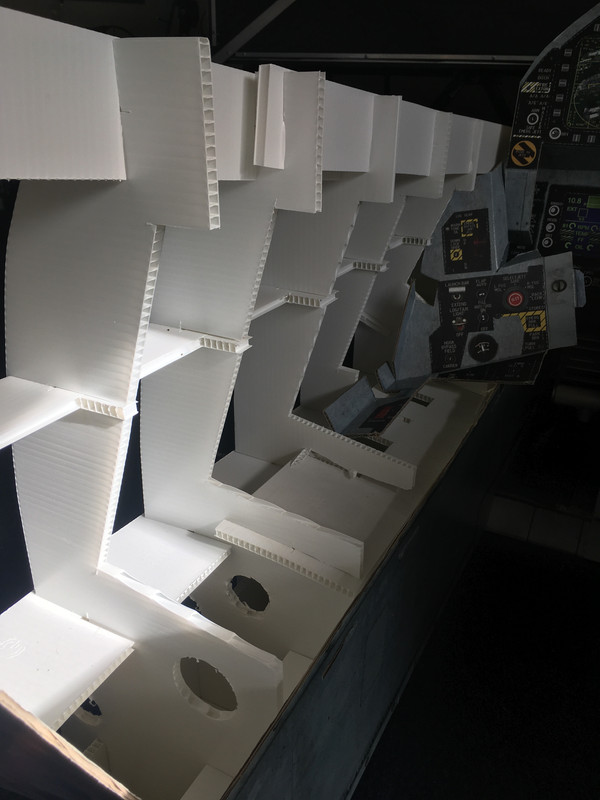
A long time between drinks - but being locked up at home has the project moving again.First step was sorting out how to mount the panels.
So remove the cardboard panels from the tub
Take a bunch of measurements and then cut out acrylic for the 'base' panel, and the cut out spots for individual panels. I'm cheating - so just lasering the mounting holes, and the taping them for 4mm screws. The right hand side is awaiting the same treatment.
The individual panels are 3 layers of 3mm acrylic, the same construction used in the A10 put.
-
There is HUGE progress with the Open Hornet Cockpit. When its done, you guy will be blown away!
Stay tuned
Stang out
-
Why isn't your backside in the backseat of an AH-64 killing bad guys and breaking their shit?
Stang out
-
I know the guys are busy and now with the Virus issues, real life is causing issues for everyone.
I'm sure jrsteensen will drop by with an update as he has time.
Stay safe and healthy out there Guys!
Stang out
-
Thanks Kward
Shoot me a PM and we'll get you hooked up.
When you see the P-51D plans and everything they contain, you're going to be blown away.
I'm happy to help
Stang out
droooool Okay, I will definitely buy the P-51 plans assuming I can afford the asking price. And await the F-14 plans with bated breath. I don't know if I'll have room for a full-size build, but I guess we'll see. -
Hi KWard,
The short answer is no, for the AutoCAD part. Yes to the F-14 part.
If you don't own a CAD software package or have CAD skills, AutoDESK makes a free CAD file viewer / printer. Its called DWG TrueView. Link below.
CAD VIEWER / PRINTER LINK HERE
You can use that simple program to view my CAD Files. Each aircraft Cockpit's CAD file I make, includes all the drawings in 1 single file. The P-51D is up 374 individual drawings. The CAD DWG TrueView program will let you view all the drawings, zoom in and out and print out anything you like and just what you need. My CAD plans come setup for a CNC Shop to be able to cut out the parts you want without needing layout charges. I actually do custom layouts for anyone that buys the plans from me, to meet their project, for free.
In reference to the F-14. I have started building the CAD package. Information on the F-14 is incredibly limited and thus taking longer than I would have liked. Secondly, the cockpit for the F-14 is HUGE. If you're going to make a 2 seater like the real Tomcat, I hope you have plenty of room for it, as you'll need it. Its not going to fit in the spare bedroom, that's for sure!
Below is a link to the CAD plans I make and the Kits that I now cut out. I have my own CNC Router and can cut everything out in house, rather than going to a CNC Shop and paying their markup. This means all you have to do is order the parts you want, I cut them out and ship them to you, and screw them together. Easy Cheesy :thumbup:
LINK TO MY CAD PLANS AND KITS HERE
Below is a picture from my new Shop Sabre SS23 CNC Router, with a vacuum table and Dust Collection.
Let me know if I can help
Stang out
I saw in another thread that you're working on an F-14 as well? I'd be interested in that, and maybe the P-51 as well. But I'm not familiar with autocad--do I need it to view/use the plans? Or other specialized software? -
Really coming together NICE!!
How are you engraving the panels? Or are they decals?
Also, are the MFDs Thrustmaster?
Keep going and Great Work :thumbup:
Stang out
Got to work on the UFC housing and panel integration, Map gain/Spin Recovery panel and the Master Arm Panel. The UFC will run through DCS Bios I should have it up and running this weekend.The UFC is designed to be able to be released and removed for servicing similar to the DDI's and HI. I need to do work on the Map gain/Spin Recovery panel and the Master Arm Panel to put switches into the panels, I'm waiting for these to be delivered which is taking a long time! the rst of the panels will be inoperative and just for looks. and wont take long to get them screwed on when the arrive.
The next major project is the MK14 seat. I'm considering using Aligloss panels laminated together for the seat with just the seat pan done in MDF, I have had good success with the HUD frame using this technique. I'm saving that for last to install as I'm constantly taking the panel apart at the moment there's not much point in putting them on yet.
Some update photos:
-
Got it
Thanks :thumbup:
Stang out
Yes. You go down from system file, to track file, to untracked contacts. Then you can pick additional targets. -
That is really KICKASS Nicka117!!
Great Work :thumbup:
The only thing I see missing is a huge Sub Woofer that should be right behind your seat.
Stang out


P-51D, F-16C & F/A-18C CAD Plans by Stang
in Home Cockpits
Posted
PM sent MrDaviem :thumbup:
Stang out