
[MVP] Mugga
-
Posts
296 -
Joined
-
Last visited
Content Type
Profiles
Forums
Events
Everything posted by [MVP] Mugga
-
To compliment the seat I have purchased a 1952 USAF Backpack Parachute with harness, which when the seat is finished will live in the back-rest, as it formed part of the padding pilots needed.
-
@Awger it's got entirely out of hand.... that is for sure! Up early this morning and out to the workshop to get another coat of paint onto the ejection seat. The seat inside surface will need another coat, then it will be ready for its clear coating. I also managed to get the headrest adjustment pins painted in silver and remounted to the seat today, they too will require clear coating. The bottom of the seat will also need painting, and I will hang the seat in the workshop for that to be done. I have taken a range of detail photographs which I will post below. Of note is the ejection seat foot-rests which were quite badly corroded and pitted as a result. A shame that they look as damaged as they do, but that's what leaving an ejection seat outdoors for 30 years does! This week coming I will spend a few evenings painting up all of the seat arm-rest assemblies and accessory brackets. Once they are painted, I will set about re-assembling them and installing all of the new hardware and spacers etc. Exciting to see it coming together! I have all of the original pneumatic air lines for the seat and harness and will start having these replaced with new hoses and fittings, so the finished product will look complete. Need to research a commercial business that does hoses to get these done. Am still trying to track down a NOS lap seat-belt, as the one I have is quite badly sun-damaged and will look terrible on the restored seat.
-
Another big day in the workshop, this time focused on closing out the paintwork on the Ejection Seat. First pass of the matt black paintwork has been applied to the external surfaces, which will receive another full coat, then two coats of 2 pack clear. Reason for the 2k clear is to provide a strong and durable clear surface, given that it will endure me climbing into and out of it regularly. I am really happy with how the black was applied, only managed to get a couple of runs, but they will sand out before the next coat is applied. I have bagged up all of the accessory attachment hardware and this will be replaced with all new cad-plated aviation hardware. This will give the seat a great 'freshly overhauled' look and feel. Once I have the arm-rest assemblies re-installed, I will start the refurbishment of all of the ejection activation accessories. This includes the action handles and all of the control arms and connections. I was able to gently place the arm-rest assemblies into position, for some quick photos so that everyone can get a sense of how the finished product will look. \
-
Making progress on the main canopy frame, with a trial fitting of parts this evening.
-
The NOS undercarriage retraction unit has arrived from the United States and is in excellent condition. Complete with all internal workings and external handles/lights. This is an awesome addition to the sim pit build.
-
@Xpendable your doing the MVP proud with that build! Will be epic when you have it finished. Much like my F86 Sim Pit build, it takes years to collect all of the necessary parts. Take your time, enjoy the journey and be in no rush to ever finish it!
-
Took the main canopy side panels and rear curve panel across to the media blaster today to be taken back to bare metal. The curved rear panel is badly corroded underneath and the media blasting will remove all of this. Once I receive these panels back, I will then spend some time preparing the various flush patch repairs that are needed, where the panels have either been cut, cracked or drilled. When finished, they will once again look flight-ready! The next step will be to send the main canopy frame to media blasting, but before I can do that, I have to remove all of the stainless and steel items. When media blasting, you must be careful not to cross-contaminate by having alloy and steel items together. Media blasting steel and alloy together can impregnate the alloy with fine particles of steel, which results in electrolysis of the alloy resulting in corrosion.
-
Sourced a Pressure Demand Oxygen Regulator (MB-2). Built by Bendix. There are around four different versions of this panel, manufactured by four different companies. Each are interchangeable on the F86 Sabre.
-
Acquired an original F86 Sabre Pilot G-Suit Regulating Valve for the sim pit.... Am leaning towards rigging up a compressed air system (compressor and tank-reservoir), that could deliver regulated pressure on-demand via a solenoid valve, activated by G-Meter values output to DCS BIOS. This would result in G-Suit inflation and deflation as aircraft G increases and decreases. Add this to the Butt-Kicker and VR and I would provide impressive immersion!
-
@jocko417 the entire F86 Sim Pit build has gotten well out of hand... what started as a great idea is well on its way to becoming a nightmare. Having come as far as I have with it, I am determined to get it assembled and finished. However, with news of the F100 now hitting DCS... I think I will be expanding my cockpit building to include a Hun pit. I managed to miss out on an F100 forward cockpit section not long ago, but have bumped into one in the US that may be for sale at the right price!
-
On the tools this evening drilling out the countersunk flush rivets on the main canopy side panels. The previous owner had dismantled the frame, but had not fully drilled out the original rivets, leaving a significant number of heads with 1/2 tails etc. An hour in the workshop had them all drilled out. Next step is to take the panels to the media blaster to have them taken back to clean bare metal, then to spend some time on them repairing the damaged sections with flush patches. The main canopy has clearly had a hard life since being removed from the aircraft it was once attached too. Cracks, dents, bends and power-saw cuts are all there - including a series of cracked and enlarged screw holes along the very bottom of the trim edge, which I can only imagine were possibly screws used to prevent the canopy from being opened on the aircraft it was once attached too. Not to worry, by the time I have applied the necessary repairs, it will all look flight ready! Key to these kinds of restorations, is to get all of your parts refurbished and ready before starting the assembly, otherwise you find yourself starting and stopping too much. Best to get everything together and refurbished, then focusing on a full assembly of everything.
-
Sorting through more of the main canopy parts this evening. Have grouped together all of the canopy release handles (left and right) and will give these a clean up tomorrow at the workshop, They both require a little panel beating of the stainless security clip that retains the opening arm. Also got the ADF Loop Antenna bracket out and will give this a media blast and paint with primer. Now chasing down the aft loop antenna support.
-
Purchased a few more original F86 Sabre items over the past day. Two original Ejection Seat security pins, which will look great attached to the seat in the pit. I also purchased a NOS weapons control panel overlay. It is not identical to the one in DCS... but it is close enough!
-
Great work on the throttle pack @Hiromachi! I will be doing more work on mine over the next week in the evenings and will post some updated photos.
-
Spent some time in the workshop today with @V_Seraphim_V#0728 working on the Sabre's Main Canopy frame. Work included panel beating and trial fitting of the bottom fairings, which run the full length of the canopy frame. We also took some time assessing how we will go about fabricating the two canopy slider trucks, that hold the frame into the sliding tracks each side of the cockpit. Having had time to take a very good look at things, a decision was taken to send the frame to the media blasters and have them give it a once-over and have it epoxy primed. The justification for this is the general condition of the aluminum structure, which has clearly spent a considerable amount of time opened to the elements, with surface corrosion showing in a wide range of places. Another sub-project is the canopy retraction gearbox (located along the stainless retract rail). The gearbox looks to be in reasonable condition, and will need to be removed, dismantled and carefully restored to working condition. As part of my collection of spares is the canopy retraction electric motor drive. So if we can get the gearbox working, we can hook up the electric drive motor and have it sliding on command! I will be heading out to the workshop again tomorrow and will put a couple of hours in, drilling out old rivets and rivet tails. The previous owner had dismantled the canopy frame, however, did not drill out rivets properly or entirely. There are a significant number of rivets that need removing before we can even contemplate an assembly.
-
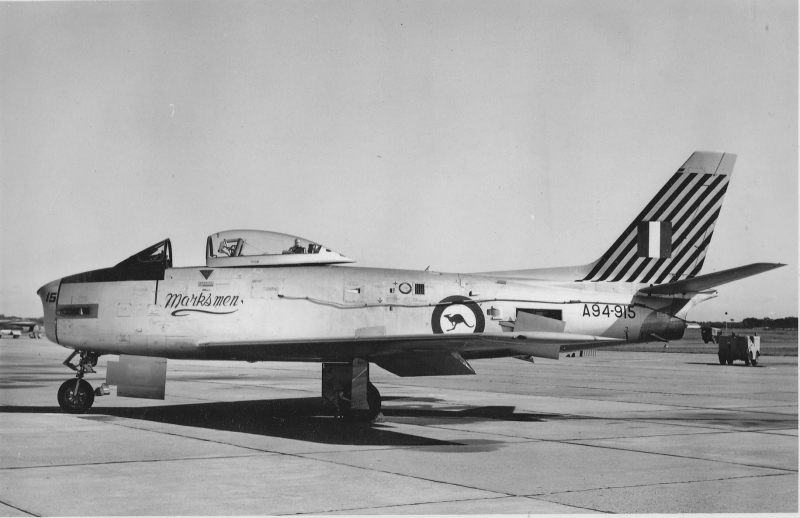
Thanks @Hiromachi would appreciate that. On another note... your DCS Forum profile picture... is that a CAC Boomerang?
-
@jocko417 Did you end up getting your throttle quadrant rigged up and working within DCS? I have started tearing my unit down in preparation for repainting and setup for Arduino/DCS BIOS.
-
Spent some time this evening starting to clean up the throttle quadrant, along with mapping out how all of the control inputs will be implemented. The throttle grip has a three position switch for the Speed Brakes (Open, Neutral, Closed). It has a MIC button (for radio comms), it has a CAGE button (switches the gunsight gyro cage on and off) and a twist action (which controls the gunsight wingspan range). The twist action drives a central shaft within the grip which extends down into the quadrant and is directly connected to a potentiometer. Levers on the throttle quadrant consist of the Throttle arm, the flap selector arm and the fuel cut off arm (which also has a relight switch) on the Australian Sabres. The flap selector works by engaging a micro-switch (located at the bottom of the quadrant) in different positions.
-
I took the Ejection Seat arm-rest assemblies into the workshop today and got time this afternoon to media blast the left and right arm rest support tubes, arm-rest trays and the ejection seat initiator cheek mounts. Everything cleaned up nicely, with the exception of one of the arm-rest trays which has an extremely hard epoxy like glue residue on it. I was initially a little concerned with the two alloy castings that sit atop the arm-rest support tubes as they looked quite corroded and brittle. These castings support the ejection handle assemblies. As I started media blasting I was certain that they would blow-out, and dissolve... but I was pleasantly surprised as they did not! That aside, everything was given a quick primer coat. I still have the two smaller initiator accessory mount brackets and the left and right hand seat sides to media-blast and paint. Once they are cleaned down and primed, I will hang all of the parts in the workshop and paint everything in the colour coat, then finish clear coats.
-
Also got time in this evening to tear down the fuel control and stores jettison panel. The unit that I have differs somewhat from the F86F Sabre as it is out of an Australian CA27 Sabre, which used the panel for the Missile Tone, Selection and Jettison controls. You can see the application of a cover plate that accommodated the MISSILE functionality and how the underlying original panel has been modified a number of times during the service life of the aircraft. With the panel carefully dismantled, we can now make a template from it so that replica units can be fabricated from sheet alloy. This original unit will be paint-stripped and repainted.
-
Got some time this afternoon after work to tear down the right hand forward control panel in preparation for paint-stripping and repainting. Whilst I am doing this, I will also make up a sheet metal template for the panel so that replica units can be fabricated.
-
Spent time this evening completing the panel template for the left hand console control panel (air-conditioning and flight control alternate trim & hydraulics). Anyone looking to make their own panels will appreciate having access to accurate artwork.
-
Am currently negotiating to acquire the above F86 Sabre canopy perspex and complete mounting frame (located in Canada) which has a really interesting history to it. The unit is in brilliant original condition - free of scratches or cracks - and could easily be used on a flying Sabre. If successful, this will be another fantastic addition. Now the exciting part... the canopy was removed from the restored RCAF Golden Hawk One which Vintage Wings Canada restored a number of years ago, and which performed at airshows in both the US and Canada. So... the MVP F86F Sabre Sim pit will have both original RAAF Marksmen and RCAF Golden Hawks equipment installed - making this build even more epic! Many thanks to [MVP] G.LOC (MVP Canada) who will travel out to inspect the canopy and to oversee its packing and shipping... Fingers crossed he lets it out of his hands and onto Australia.
-
Got time to design the 'RADAR RANGE SWEEP' panel this afternoon, nothing too difficult with this one. You can find reference to this component in the original manufacturers illustrated parts manual Page 2-567 - Part#170-74068 - NAMEPLATE, AN/APG30 Radar Potentiometer Control. It uses the AN3220-1 bakelite control knob - which is a common control knob for the F86 Sabre cockpit. Dimension of the backing plate is 57mm tall x 53mm wide. Cannot believe that I have managed to track-down and source two of the black switch guards on the left hand console control panel. [MVP] IndianaShane had spent some time producing a 3D model of the switch guard as we were confident that we would be needing to manufacture them, given they are rarely available. The attached name plates may need to be cut down in size and painted, but that is not so much of an issue. Just great that we now have the original top guards!
-
![[MVP] Mugga](https://forum.dcs.world/uploads/monthly_2021_03/MVP.thumb.png.398f5fa5eaf57799a81da76f4cc64fc1.png) Hopefully this gets sorted out sometime soon!
Hopefully this gets sorted out sometime soon!

