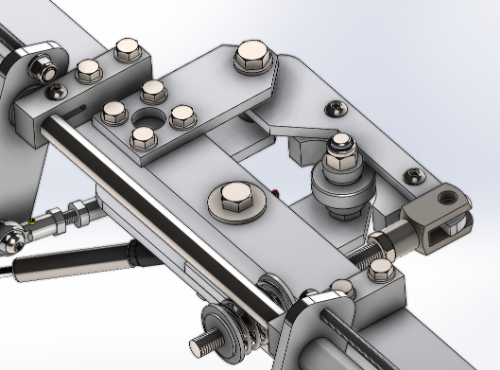
edmuss Posted February 14, 2023 Posted February 14, 2023 (edited) edit 01/05/2023: Updated this with a new mechanism and a stupid long extension, because, well why not? See post down below [Original Post] In an effort to make the DCS rotary wing experience a little more authentic (within reason) I wanted to make my warthog stick behave more like a cyclic and be able to use the without spring stick option. Thereby when you release the stick it stays where it is. In addition to this I also wanted it to be able to be used as a conventional joystick which returns to centre without having to spend any time reconfiguring it all Having picked up a 3D printer at Christmas I set about solidworks trying to devise a mechanism that would work. Design constraints being that it has to fit my warthog stick with its 75mm extension, be self contained to the stick alone and still fit onto the quick release stick socket that I have on my chair. My initial plan was to attempt to utilise a pair of small motorcycle steering dampers to control the two axis and give a non-centring stick, I prototyped this and whilst it achieved the goal, they proved too stiff to realistically use. Fast stick movements were impossible and the friction force was sufficient to actually lift the warthog stick off its gimbal and give very exciting results whilst flying; in addition there wasn't a quick and neat solution for disengaging the dampers. I had the dampers set up in a parallel system and the differential movement between both controlled the motion in both axis simultaneously. Video Link I then set about designing a friction damper that could then be disengaged with a lever mechanism, I'm a cyclist as well so I have metres of spare brake cables so I figured that a bowden cable actuated cam would work. Using an old magura hydraulic brake lever that I had in a spare parts box I worked out the ergonomics of fitting it to the stick handle. Modelled up the joystick and lever and placed the pivot it in the right approximate place; designed a bracket for it and sent it to the printer. Decided to make it a 2 part clamp that would sit on the narrow shaft of the stick and support the handle (a known weak point on the warthog stick) In addition to being a mechanical axis trimming device I also wanted it to be able to activate the trim systems in DCS, this would mean adding some switches to the lever. So I added 4 extra ones for good measure I had an existing USB controller board with 16 spare inputs so I didn't have to purchase any extra hardware, just connect the wires. With the trim input side of things manifest, I turned to the physical locking of the axes themselves. Initially I prototyped an eccentric cam mechanism that clamped against a steel through rod but I struggled to overcome cable drag whilst providing enough spring tension to give the friction needed to lock the axis in place. I had also designed in the same package format as the damper prototype (two parallel mechanisms) but there simply wasn't enough holding force to keep it steady in the roll axis. I changed tack and redesigned it to be one lock attached to each axis and work on a sprung plunger appling friction to the through rod rather than the eccentric cam. Pulling the lever would pull the plunger off the through rod against the spring, releasing the lever would clamp the through rod up again. Printed a mounting ring to fit the warthog base and a lock mechanism along with a 2-1 cable splitter and it looked a bit like this.... By and large it worked pretty nicely from a mechanical standpoint, still no electronics but proof of concept was good Found that the 3D printed cable splitter wasn't man enough to take the M6 threads for the barrel adjusters so iterated the design to have aluminium blocks at each end to take the threads and loads from the cables. Ammended the lock design to incorporate an over centre cam toggle that can be used to push the plunger off the rod and effectively free the stick up again for fixed wing use - takes about 5-10 seconds to convert which is perfect. Screencap of the model with transparency to show the workings. Wired up the switches with a length of repurposed cat5 ethernet and all buttons work nicely. Final solidworks design looks like this... The final design works a bit like this Video shows the stick unlocked (the stick is already quite well self damped/weighted) and has never returned to centre with a quick action, engage the locks and it's solid; it is still possible to get the locks to slip if you put enough force in. Because the warthog spring is still in the gimbal it still finds it's own centre and it's easy to recentre the trim in operation. The through rods need to be cut down by about 100mm but they currently don't get in the way so it's not a major issue. Flying helos now is so much smoother because there is no cumulative cyclic error if you don't get it back to centre at the right time, simply pull the lever and it smoothly transistions movement as you move the stick. Added bonus, I also have a 4 button box attached to the stick that I can use for map and view functions without having to dual bind other controls Apologies for the slightly long post! TL:DR I stopped my warthog stick returning to centre Edited May 1, 2023 by edmuss 5 1 Ryzen7 7800X3D / RTX3080ti / 64GB DDR5 4800 / Varjo Aero / Leap Motion / Kinect Headtracking TM 28" Warthog Deltasim Hotas / DIY Pendular Rudders / DIY Cyclic Maglock Trimmer / DIY Abris / TM TX 599 evo wheel / TM T3PA pro / DIY 7+1+Sequential Shifter / DIY Handbrake / Cobra Clubman Seat Shoehorned into a 43" x 43" cupboard.
skypickle Posted February 14, 2023 Posted February 14, 2023 clever design. It seems that damping requires the lever to be held? If it's a hydraulic system, how could you get lever compression to RELEASE the damping mech? 4930K @ 4.5, 32g ram, TitanPascal
edmuss Posted February 14, 2023 Author Posted February 14, 2023 (edited) 52 minutes ago, skypickle said: clever design. It seems that damping requires the lever to be held? If it's a hydraulic system, how could you get lever compression to RELEASE the damping mech? There are no dampers on the stick, just the friction clamps holding the axis in place. It's purely mechanical friction, no hydraulic component now. The compression springs in the lock keep the friction clamps pushed onto the rod and pulling the lever pulls them off edit: I may have confused you my mentioning the hydraulic brake lever. I've only used the actual lever blade, it's from a magura HS33 from the mid 90s Edited February 14, 2023 by edmuss Ryzen7 7800X3D / RTX3080ti / 64GB DDR5 4800 / Varjo Aero / Leap Motion / Kinect Headtracking TM 28" Warthog Deltasim Hotas / DIY Pendular Rudders / DIY Cyclic Maglock Trimmer / DIY Abris / TM TX 599 evo wheel / TM T3PA pro / DIY 7+1+Sequential Shifter / DIY Handbrake / Cobra Clubman Seat Shoehorned into a 43" x 43" cupboard.
skypickle Posted February 14, 2023 Posted February 14, 2023 I thought you said you used a magura lever. Isnt that hydraulic? 4930K @ 4.5, 32g ram, TitanPascal
Dragon1-1 Posted February 14, 2023 Posted February 14, 2023 I think he only used the lever part, not the hydraulics.
edmuss Posted February 14, 2023 Author Posted February 14, 2023 8 minutes ago, skypickle said: I thought you said you used a magura lever. Isnt that hydraulic? 2 minutes ago, Dragon1-1 said: I think he only used the lever part, not the hydraulics. That's correct, one of these lever blades give or take Ryzen7 7800X3D / RTX3080ti / 64GB DDR5 4800 / Varjo Aero / Leap Motion / Kinect Headtracking TM 28" Warthog Deltasim Hotas / DIY Pendular Rudders / DIY Cyclic Maglock Trimmer / DIY Abris / TM TX 599 evo wheel / TM T3PA pro / DIY 7+1+Sequential Shifter / DIY Handbrake / Cobra Clubman Seat Shoehorned into a 43" x 43" cupboard.
corbu1 Posted March 29, 2023 Posted March 29, 2023 Wow, that is a super clever construction!! I‘m speechless 1 DCS Version: 2.9.21.16362 Modules: UH-1H - SA342 - KA-50 BS3 - MI-24P - MI-8MTV2 - AH-64D - CH-47F - OH-58D - UH-60L(Mod, n.i.) - OH-6A(Mod, n.i.) - A-10CII - F-16C - F/A-18C - AJS37 - F-14 - MiG-21bis - JF-17 - Mirage F1 - MiG-29A - C-130J (prepurchase) - F-4E - F-5E - FC2024 -Combined Arms - Supercarrier - NTTR - Normandy2.0 - Channel - Persian Gulf - Syria - SA - Sinai - Afghanistan - Kola - Iraq - Cold War Germany — Waiting for: BO-105 - AH-1G/F(Mod) - secret DCS Helo - Balkans map DCS-Client: 9800X3D, 64GB 6200, RTX3090, 1TB M2 NVMe(win10), 4TB M2 NVMe(DCS), VR VivePro2, PointCTRL, Vaicom, Wacom Intuos S with VRK v2Beta DCS-DServer: 11600KF, 64GB 3600, GTX1080, 1TB M2 NVMe(win10), 2TB M2 NVMe(DCSDServer), DCS Olympus Simpit: NLR Flightsim Pro Cyclic: TM Warthog Grip with 30cm Extension + VPforce Rhino FFB FW Stick: TM Warthog Grip and Base, Throttle: TM Warthog Pedals: Komodo Sim. with Dampers Collective: VPC Rotorplus+AH-64D Grip Other: NLR HF8, Buttkicker (3*MiniConcert), TotalControls AH64D MPD‘s and EUFD, Alain Dufour’s AH-64 TEDAC, TM MFD, Streamdecks (1*32,3*15,1*6), VPC CP#1
edmuss Posted April 28, 2023 Author Posted April 28, 2023 This has all changed! I now have an 18" extension on the warthog with a new trimmer mechanism that works even better for rotary wing Watch this space, will put an update in soon. 1 Ryzen7 7800X3D / RTX3080ti / 64GB DDR5 4800 / Varjo Aero / Leap Motion / Kinect Headtracking TM 28" Warthog Deltasim Hotas / DIY Pendular Rudders / DIY Cyclic Maglock Trimmer / DIY Abris / TM TX 599 evo wheel / TM T3PA pro / DIY 7+1+Sequential Shifter / DIY Handbrake / Cobra Clubman Seat Shoehorned into a 43" x 43" cupboard.
BitMaster Posted April 29, 2023 Posted April 29, 2023 Amazing what one can do with time, skills and some crazyness Love those Magura's on my old Zaskar-LE, they just work, not year after year, decade after decade, haha Gigabyte Aorus X570S Master - Ryzen 5900X - Gskill 64GB 3200/CL14@3600/CL14 - Sapphire Nitro+ 7800XT - 4x Samsung 980Pro 1TB - 1x Samsung 870 Evo 1TB - 1x SanDisc 120GB SSD - Heatkiller IV - MoRa3-360LT@9x120mm Noctua F12 - Corsair AXi-1200 - TiR5-Pro - Warthog Hotas - Saitek Combat Pedals - Asus XG27ACG QHD 180Hz - Corsair K70 RGB Pro - Win11 Pro/Linux - Phanteks Evolv-X
edmuss Posted May 1, 2023 Author Posted May 1, 2023 (edited) Finally getting round to updating this! Whilst the original trimmer mechanism worked really quite well, I was finding that the slight drag from the rods and the reasonably heavy spring pull in conjunction with the extension only being 75mm was causing really fine control to be pretty difficult at times, particularly when trying to hover the hind which needs far more tiny cylic inputs compared the to hokum. Time to make a bigger extension I say! Found some 1 1/4" x 1/4" aluminium bar stock and bent it into a nominal gooseneck shape, then jumped into solidworks again and set about redesigning a trimmer that could work with the much larger extension. I had the idea of a single point brake acting upon a dome that was attached to the top of the gimbal and fleshed it out, the brake plunger is tipped with, and the dome is machined from EPDM. The plunger is spring loaded and a single cable pull from the grip lever pulls it off the dome, essentially making it a dead stick that will flop all over whilst the trim lever is held. To try to replicate the stick deflecting from it's trimmed position I designed a translational spring that can move in two axes, this sat between the dome and the gimbal to all the stick some sprung movement when the trim lever isn't being pulled. The total monstrosity looks like this The brake dome, translational spring and spider framework to hold the brake. A really bad video of the brake plunger engaging with the brake dome, also shows the translational spring movement Another video showing operation of the stick and trimmer It's not perfect as there is a little slop in the translational spring, I may print a heavier spring off to see if it stabilises better but as long as you have the stick stationary when you release the trim lever it generally stays where you want (a lighter grip would make this a non-issue but the warthog grip weighs at least a million kg!). I may explore replacing the rubber dome with a printed one as it may give a more positive interface with the plunger and it's also suffering from a bit of wear and I keep getting black rubber crumbs all over the place In addition to being far superior for fine control (I can hover the hind now without much hassle at all) the ability to be able to give cyclic input without having to hold the trim lever is a big bonus, the translational spring is sufficient enough to resist fingertip inputs and gives about +/- 1" of movement at the top of the grip. Total height of the stick now is 28" and it sits on the floor with the grip just above my thighs, I have to reduce the saturation of the axes in DCS to 75% in order to achieve full input at the limits of physical range but that doesn't cause any issues. Because there is only a single spring to pull now, the lever pull tension is halved which makes it easier to give the smaller cyclic inputs. Super happy with it so far, more tweaking to do but it works nicely Edited May 1, 2023 by edmuss 1 Ryzen7 7800X3D / RTX3080ti / 64GB DDR5 4800 / Varjo Aero / Leap Motion / Kinect Headtracking TM 28" Warthog Deltasim Hotas / DIY Pendular Rudders / DIY Cyclic Maglock Trimmer / DIY Abris / TM TX 599 evo wheel / TM T3PA pro / DIY 7+1+Sequential Shifter / DIY Handbrake / Cobra Clubman Seat Shoehorned into a 43" x 43" cupboard.
edmuss Posted May 6, 2023 Author Posted May 6, 2023 Carried out some tweaks to improve the feel of the lever. Replaced the rubber brake dome with a printed version, this has a far more accurate profile (the rubber dome was machined by spinning a rubber disk in a pistol drill and using a metal file to lathe it to shape) so will give a more consistent gap to the brake plunger. The natural layer steps from the 3D printer gives a good friction surface for the plunger to grip against. Additionally the rubber on rubber interface has a tendency to stick together after a while ago this releases much more freely. Reshaped the lever and printed it off. This version has a bellied gap at the back so that the trim can be pulled with the middle finger whilst leaving enough space for the ring and pinky fingers to get the the NWS button and pinky paddle on the warthog grip. It's also a lot stiffer so that it will pull cable more directly rather than flexing and making the action feel mushy. One further immediate mod to carry out tomorrow will be to move the upper cable barrel adjuster to a tapped hole through the aluminium extension, currently it's fitted to the underside of the lever bracket which is flexing a fair amount against the spring tension. Eliminating the flex will give a much more positive lever feel and will hopefully be the last tweak needed Ryzen7 7800X3D / RTX3080ti / 64GB DDR5 4800 / Varjo Aero / Leap Motion / Kinect Headtracking TM 28" Warthog Deltasim Hotas / DIY Pendular Rudders / DIY Cyclic Maglock Trimmer / DIY Abris / TM TX 599 evo wheel / TM T3PA pro / DIY 7+1+Sequential Shifter / DIY Handbrake / Cobra Clubman Seat Shoehorned into a 43" x 43" cupboard.
Recommended Posts