mue
-
Posts
78 -
Joined
-
Last visited
Content Type
Profiles
Forums
Events
Everything posted by mue
-
The main problem with the oculus rift in its current state is the low resolution. If you want to use it for flight simming you need at least full hd resolution (1920x1080). Especially for reading the instruments and gauges in the virtual cockpit. I use a big touch screen (1.40 m x 0.80 m) that gives me 90 degree fov (comparable to the oculus rifts fov) with a resolution of 1920x1080. And I can say I wouldn't go lower with the resolution. The second problem is with manipulating the virtual cockpit controls. Many of you suggested devices like kinect or leapmotion. But I think some gloves that gives you haptic feedback will also be needed. Until these problems are solved I stay with my big touch screen and trackir: http://forums.eagle.ru/showthread.php?t=89624
-
Have you ever thought to make the screen touchable. With only a webcam and an IR illuminator I made my rear projection screen touchable. It costs me 40 EUR. The software is free. See this thread.
-
No, I haven't added heat sinks yet. The magnets are rated for maximum temperature of 130 degrees celsius. I had the magnets powered on for 2 hours and although they are getting really hot I think they are way below maximum temperature. However the holding force of electro magnets decrease with increasing temperature. But I haven't noticed that in my construction. So likely I leave it without heat sinks. Edit: I made some temperature measurements: After 1 hour the magnets reached a temperature of 40 degrees celsius. Metal shaving occurs, but it's minor. I think (actually hope) it's not a problem in the long term. What do you mean with magnetising the metal bar? I can't think of any problems with it. I also thought about reversing the clutch mechanism, but I haven't found an easy solution.
-
Yes, it's a good idea. My construction is kind of "historically grown": First I built the damper/magnet mechanism in the (for me) easiest way as possible: beside the joystick. Only then I realised that the stick needs to be balanced and I added the counter weight. But at this time I was just too lazy to rebuilt the damper/magnet mechanism.
-
Thank you!
-
I would like to know if the trim behaviour I get with HelicopterTrimmerTauInverse=0.0 is the same as enabling the ff option like you have. If you don't mind can you please test it? I couldn't test it myself because I don't have a ff controller and enabling ff in my setup does nothing.
-
Didn't work for me :( http://forums.eagle.ru/showpost.php?p=1618086&postcount=6
-
good bye re-center dance or how i added force trim to my joystick I disabled the "virtual force trim" with HelicopterTrimmerTauInverse=0.0 in FMOptions.lua. The autopilot seems still to work. At least heading hold works properly. But I'm not completely sure if pitch/bank hold is set correctly after releasing the trim button: If I'm in a (what seems to me) trimmed forward flight and I press and hold the trim button (without moving the joystick) the nose pitches further down until I release the trim button. After trim release the nose pitches up. I think the pitch hold is still set to a more horizontal attitude although I was in a trimmed forward flight. Probably my force trim joystick is fighting with the autopilot. If I press and hold the trim button, the autopilot disengaged and the nose pitched further down. Fortunately if I only briefly "tap" the trim button (no long trim button holding times) this behavior isn't noticable.
-
It has no special reset trim button. To reset the trim you have to center the stick and press-release the trim button.
-
That's what the forum is for isn't it?
-
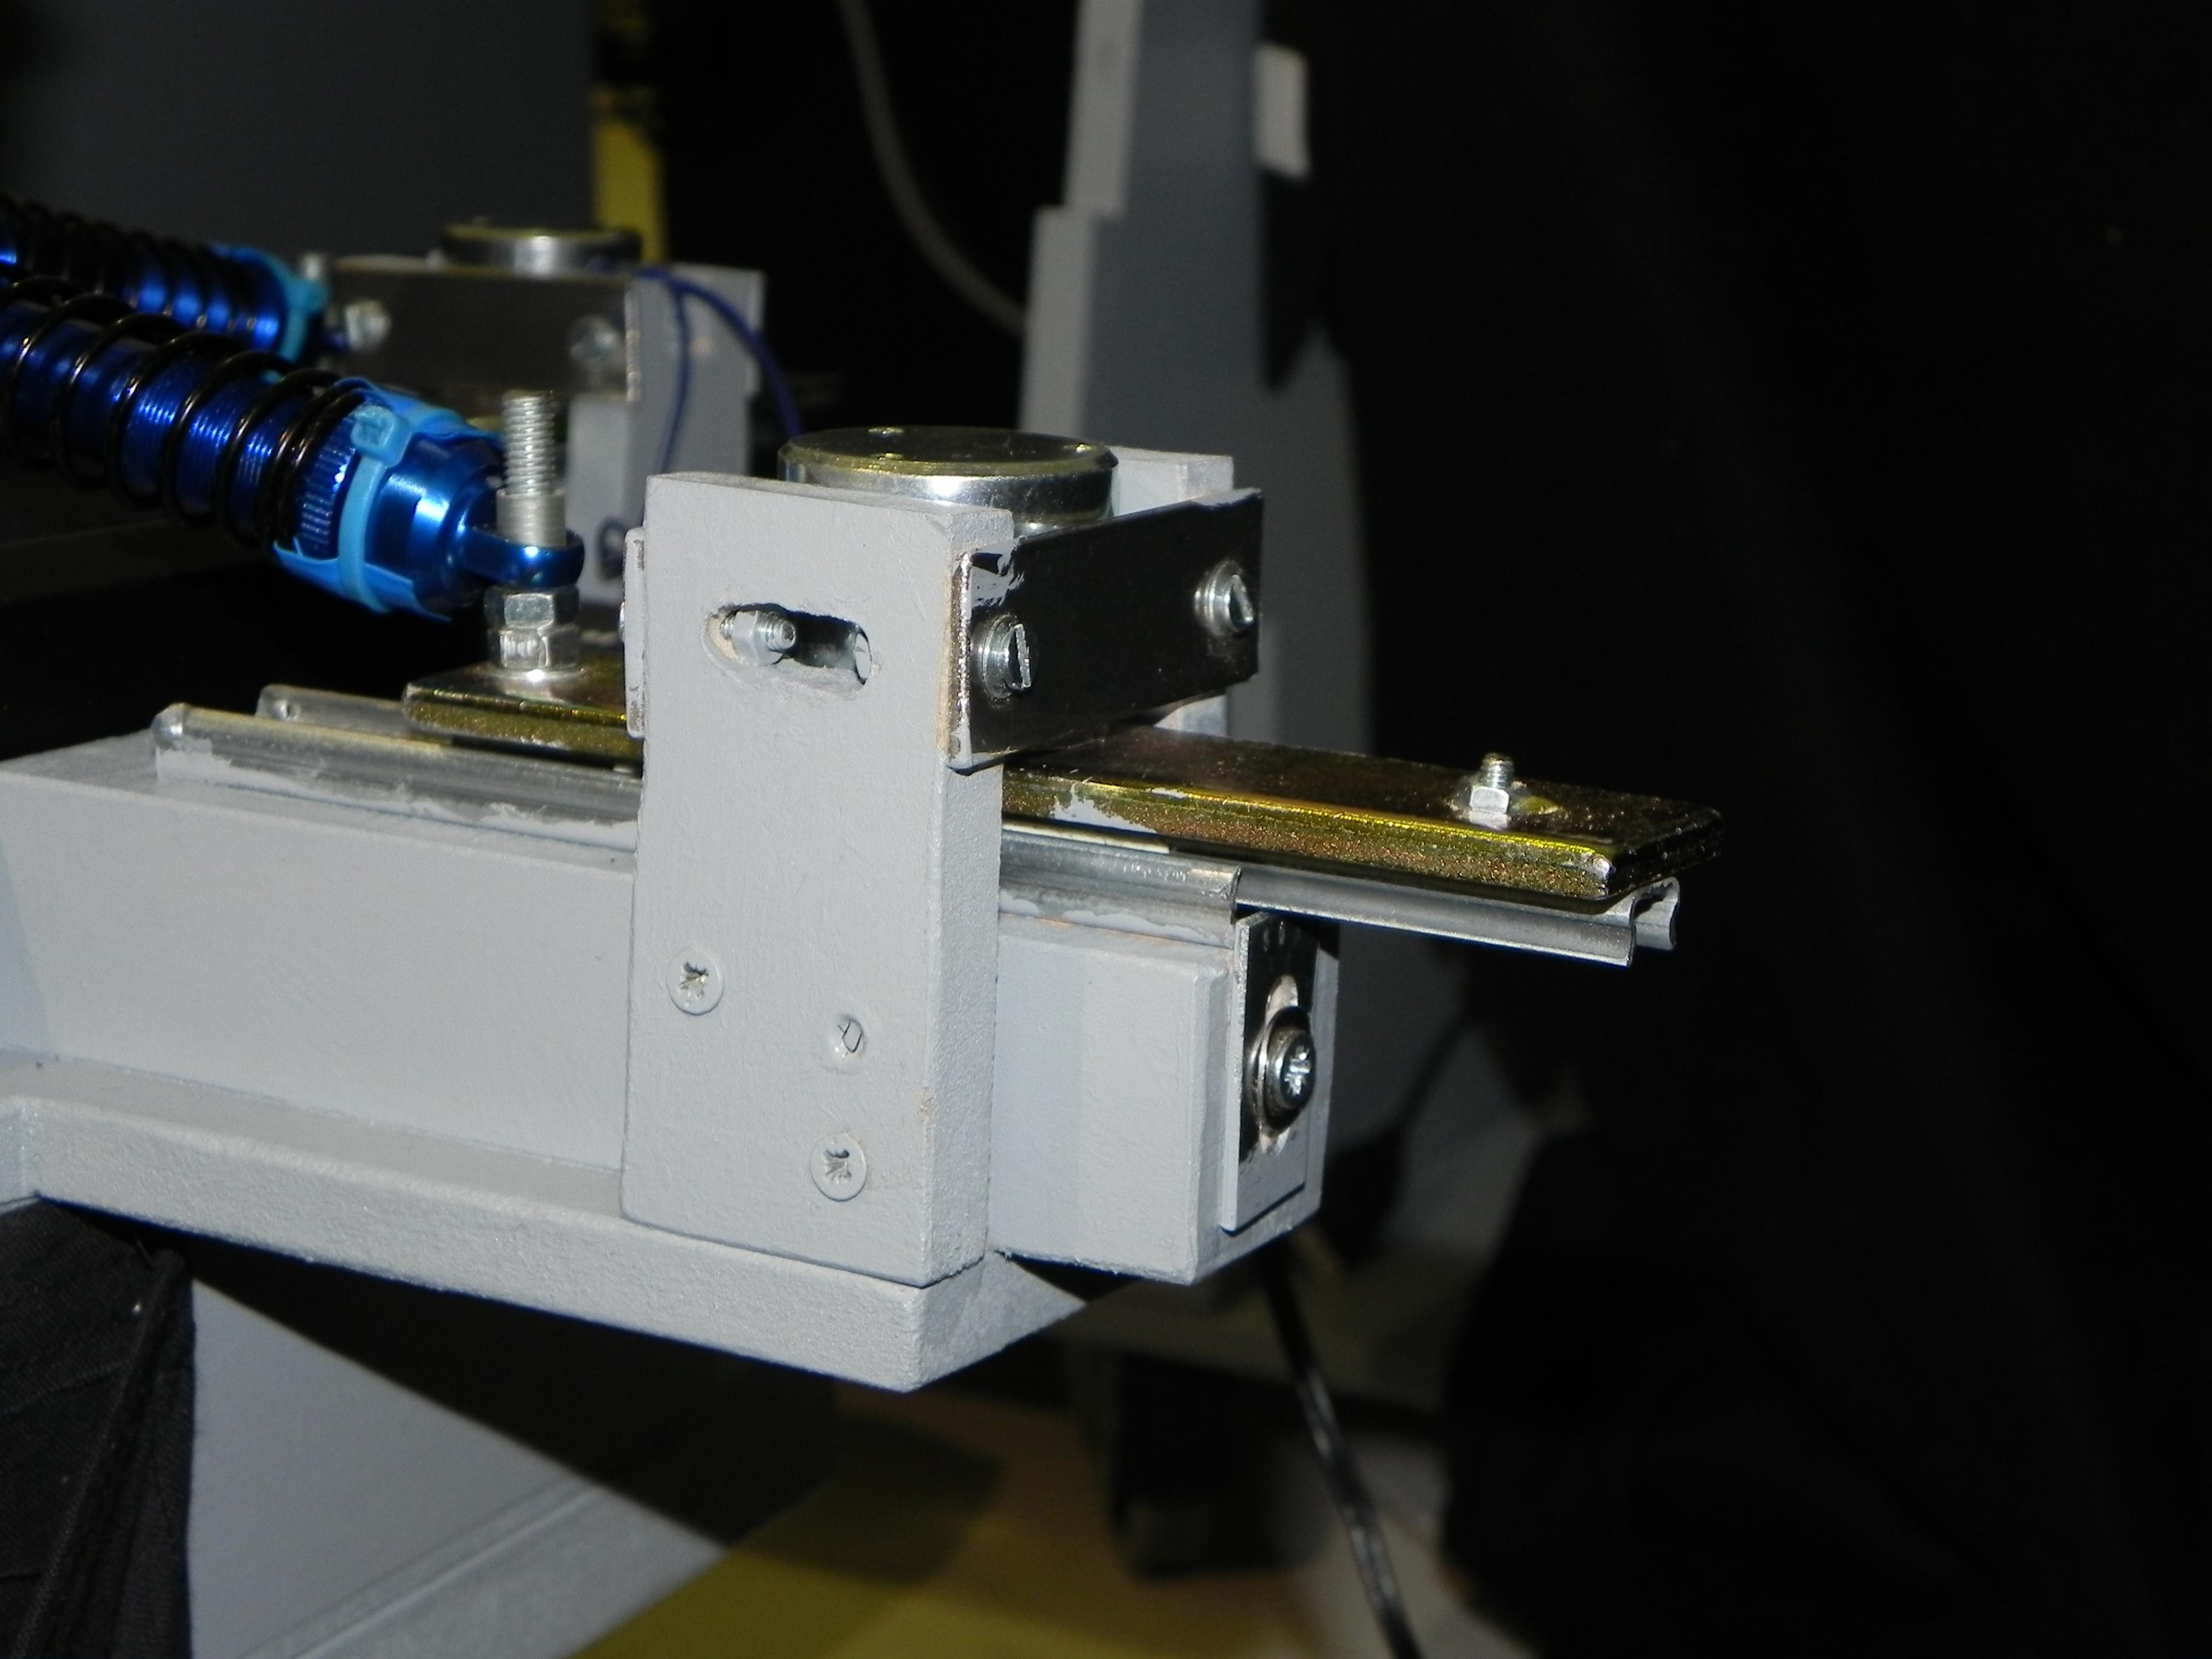
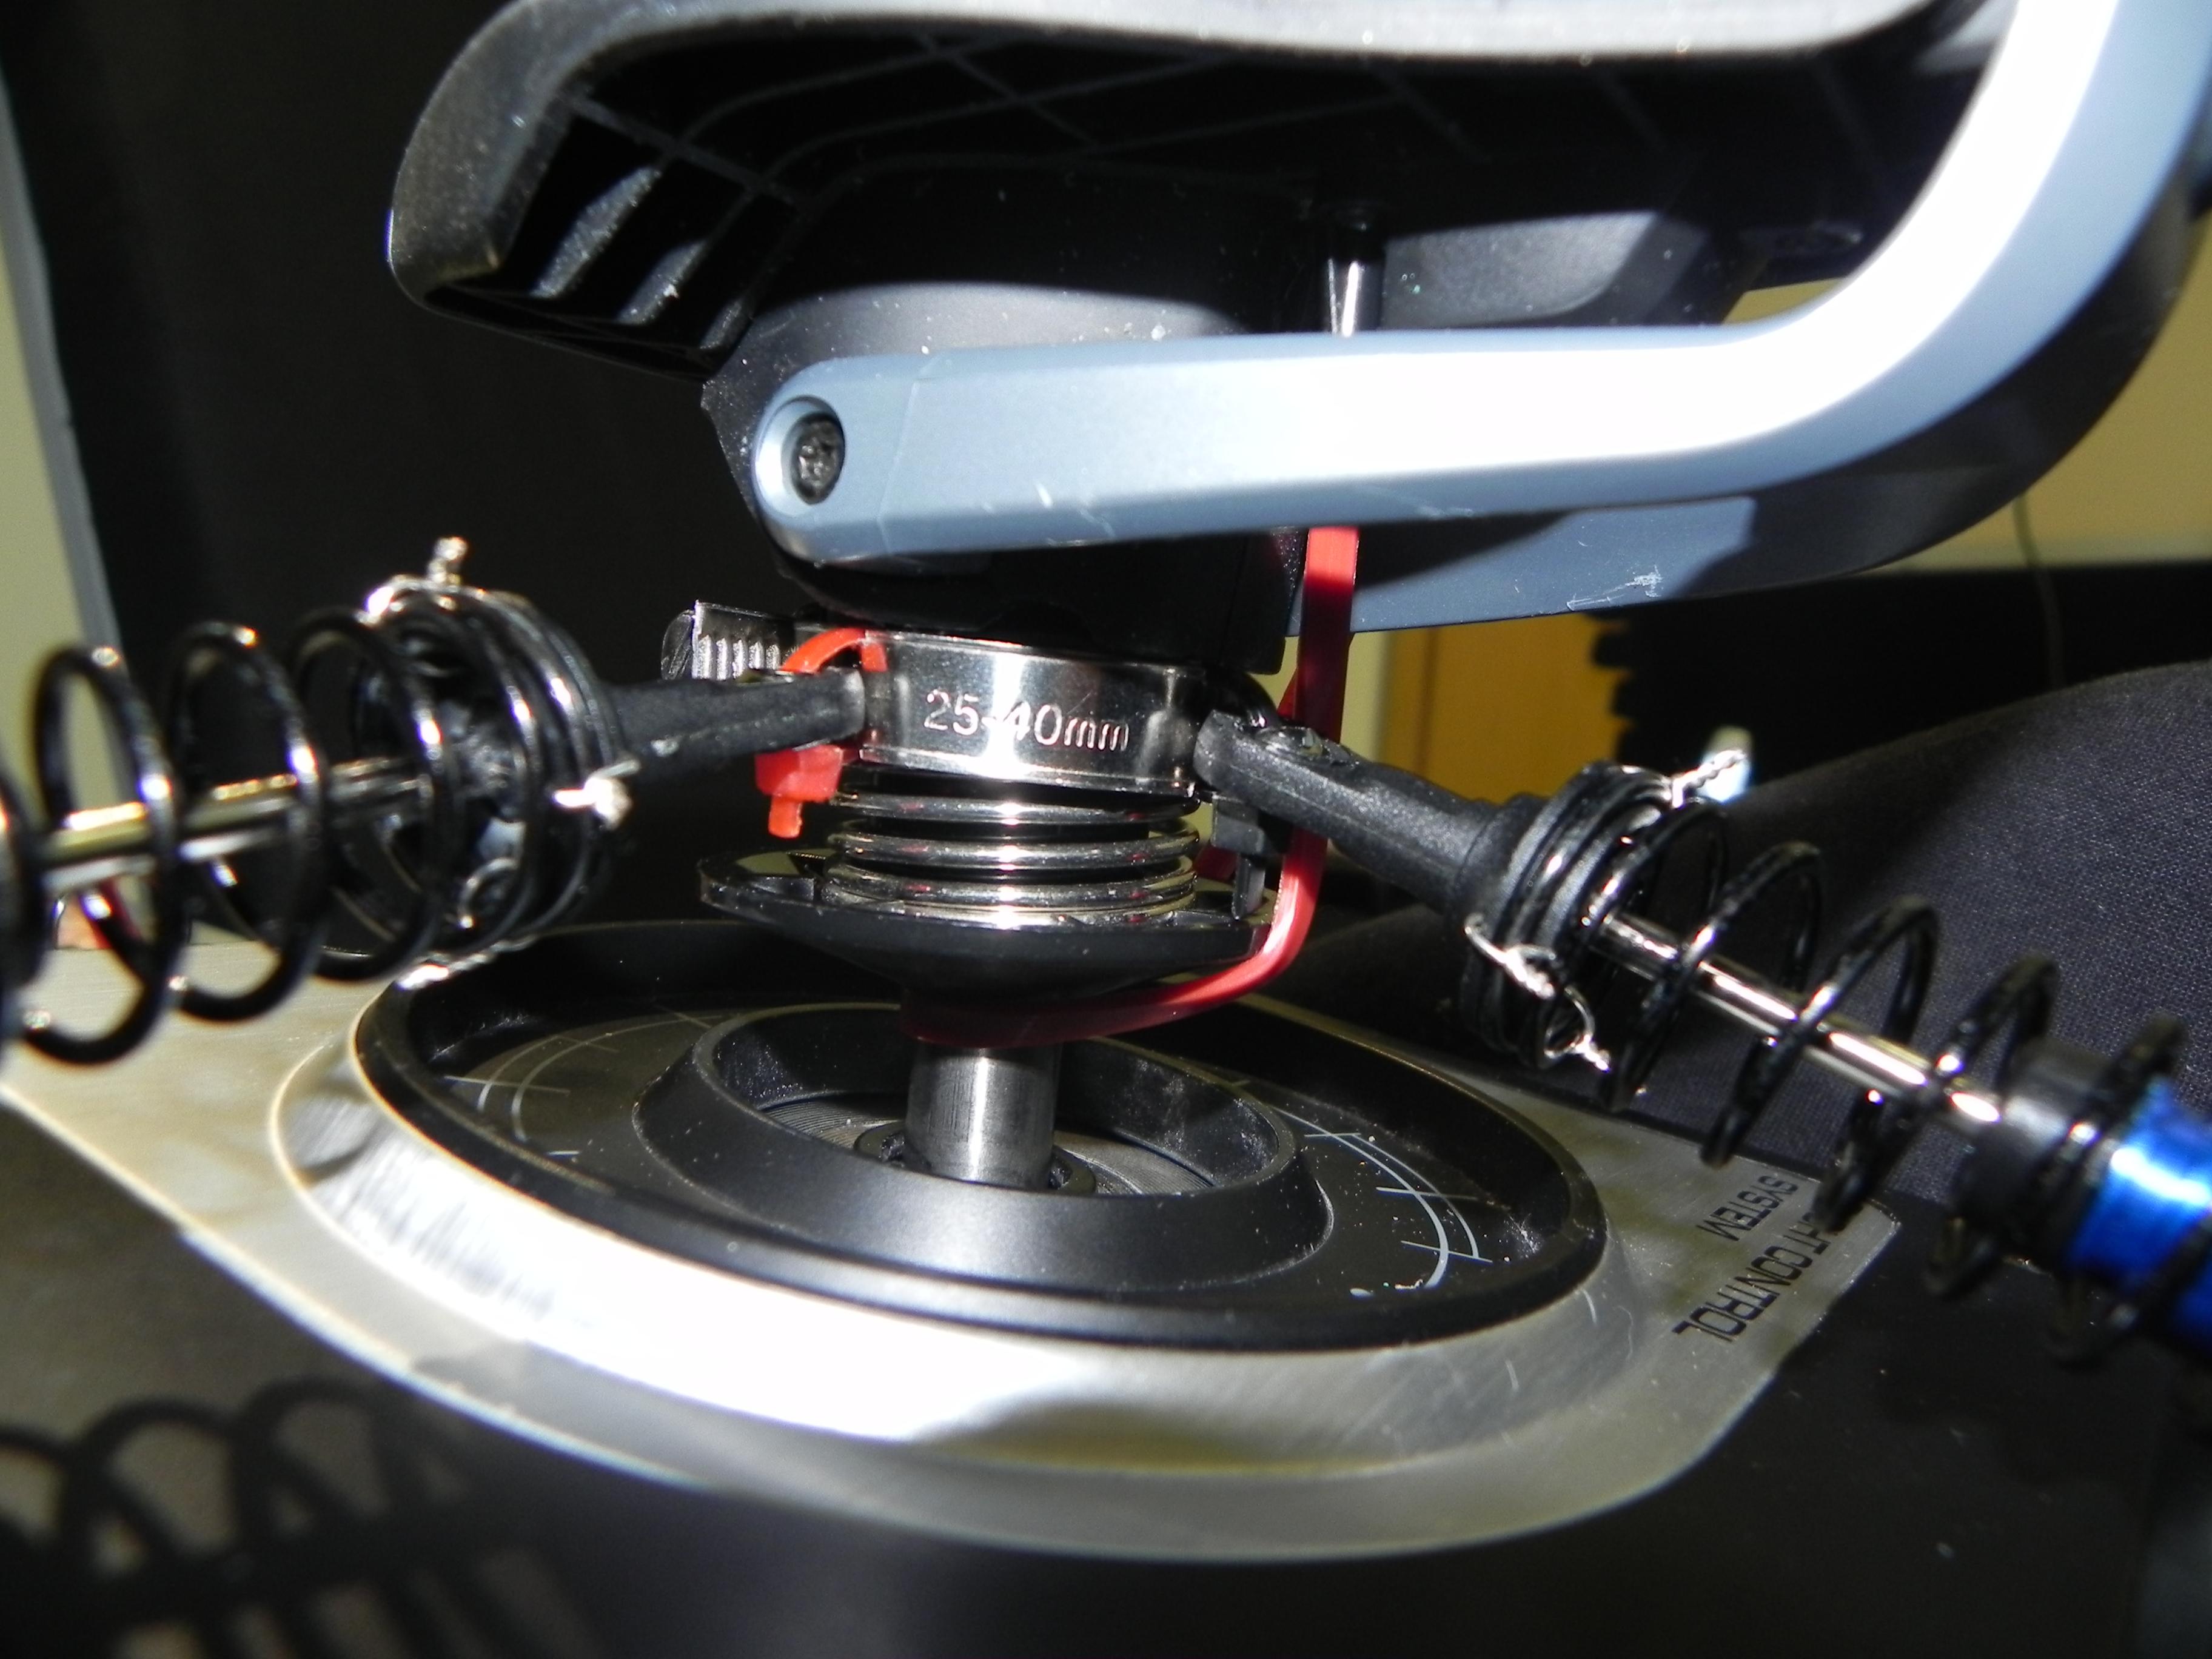
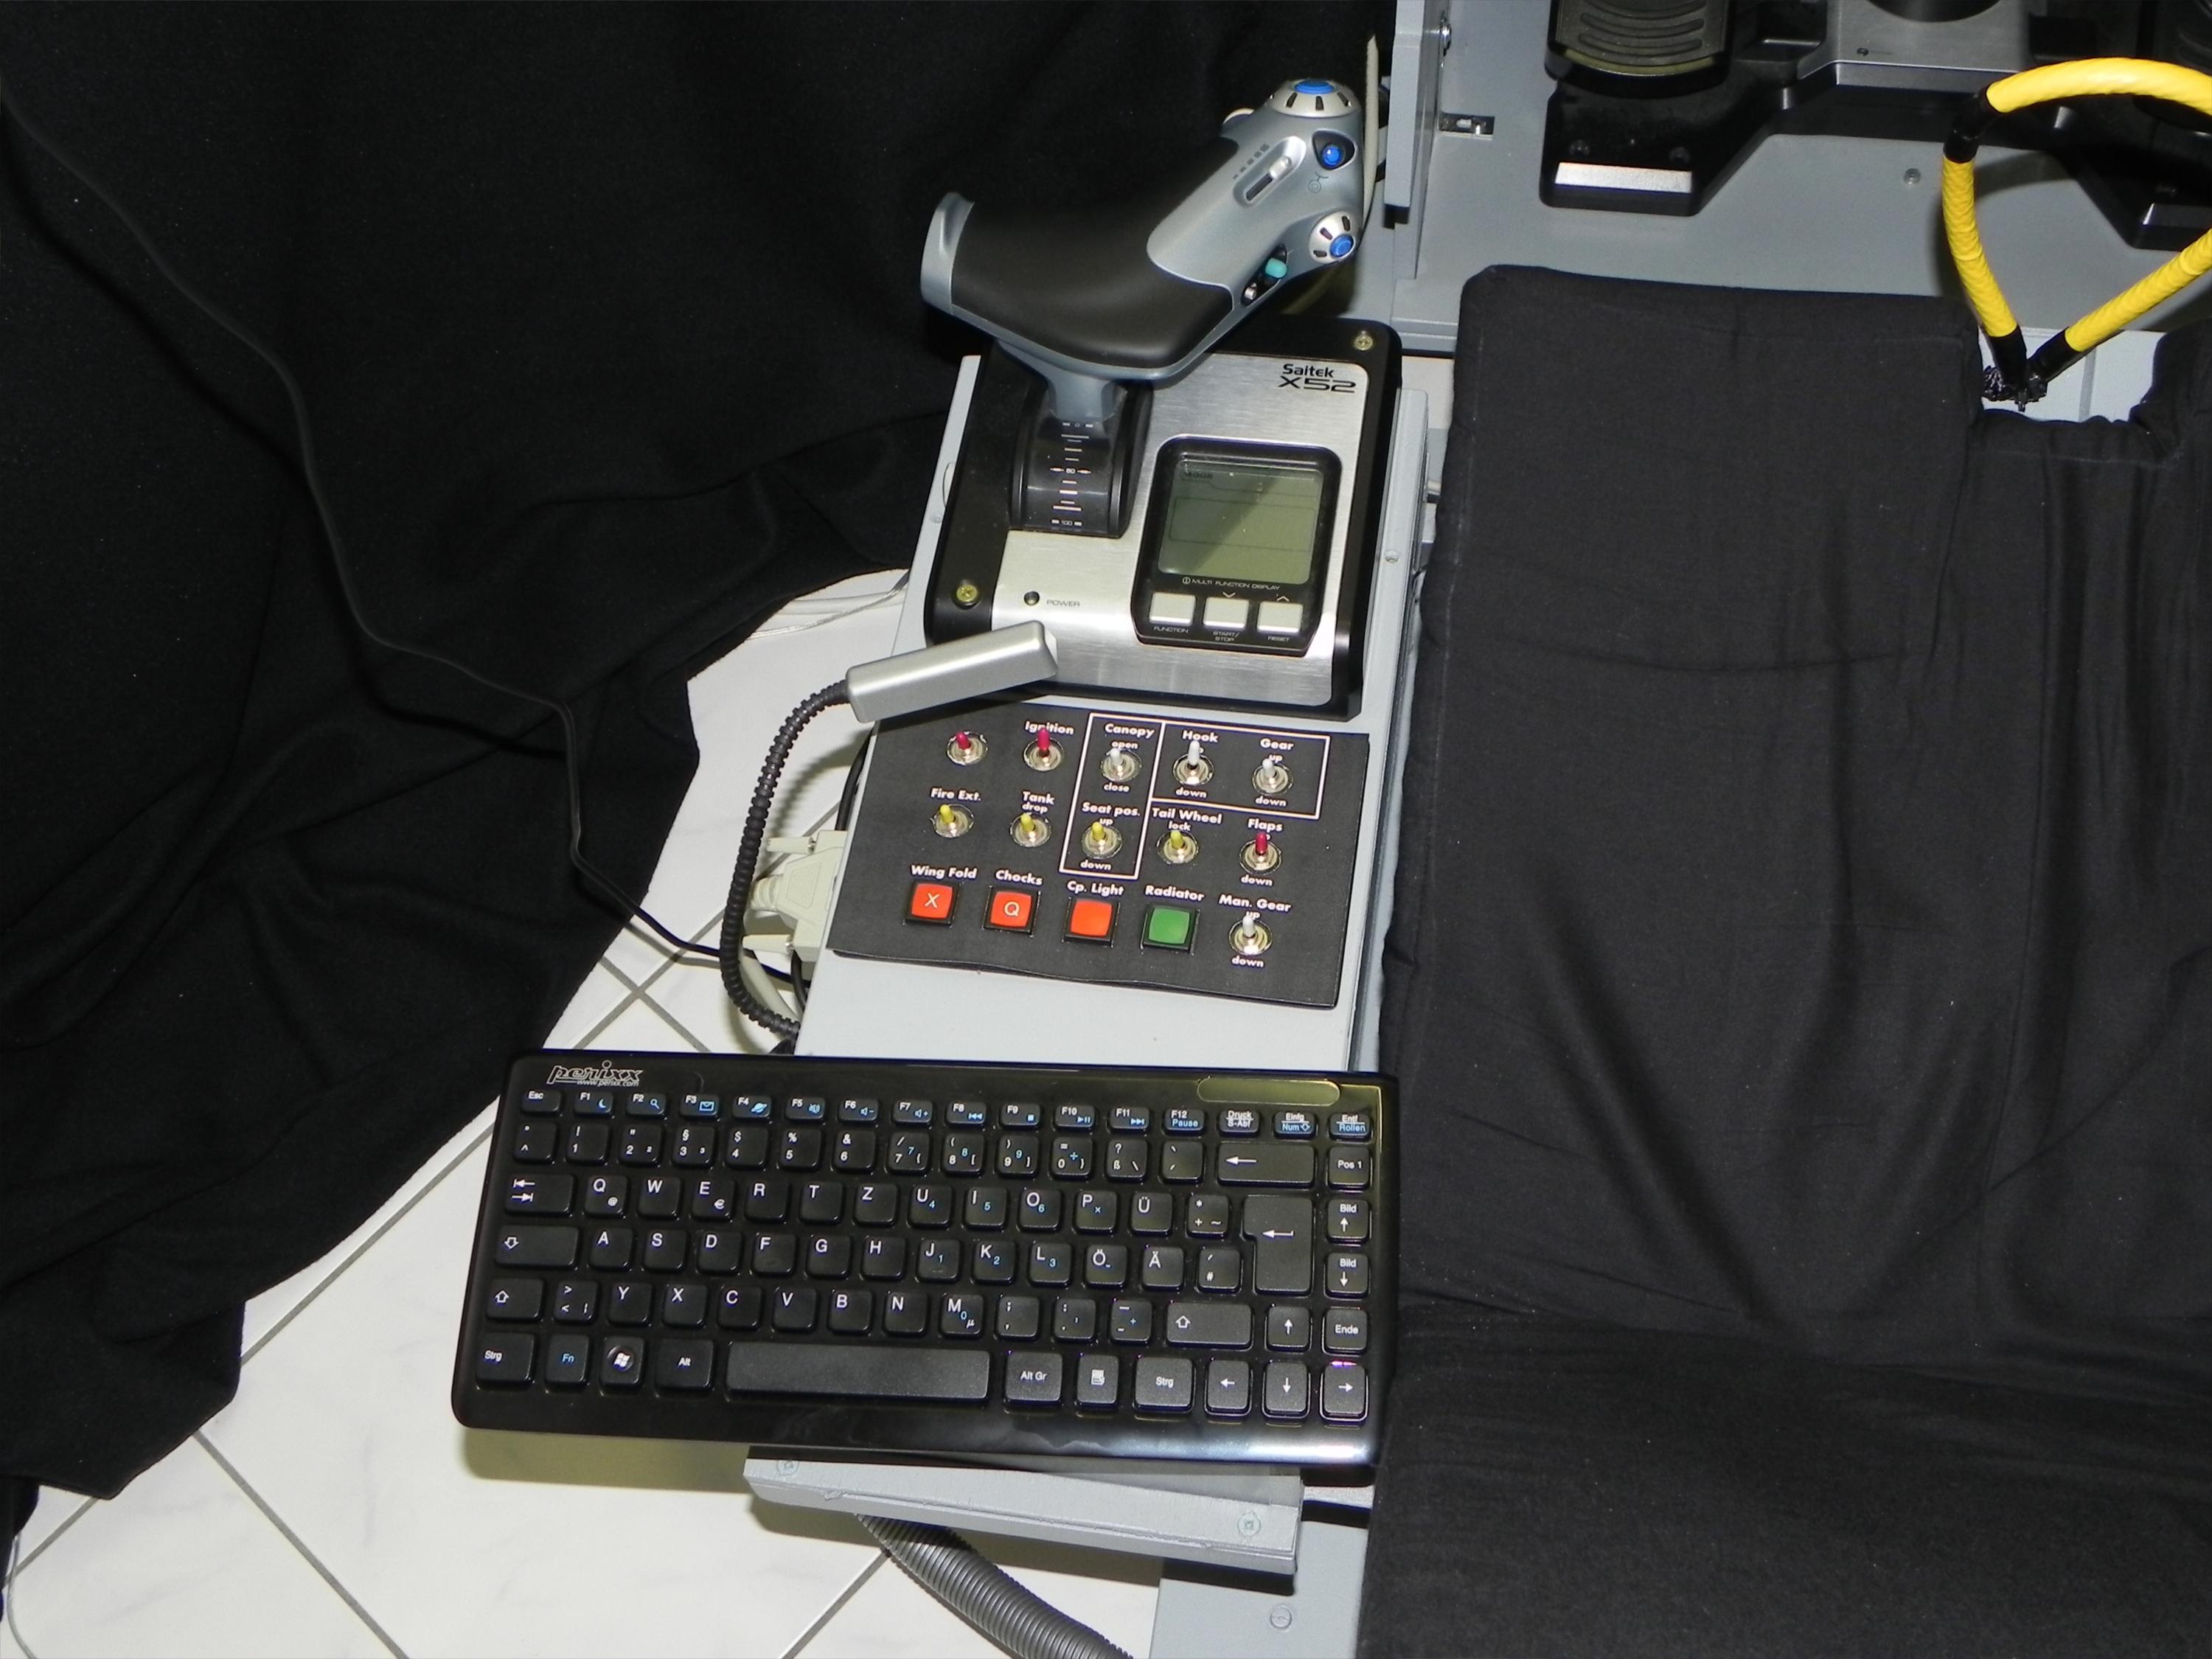
Inspired by this http://forums.eagle.ru/showthread.php?p=1586007 and this http://forums.eagle.ru/showthread.php?t=50522 I decided to add force trim functionality to my x52 joystick. The result you can see here: For the spring mechanism I used rc car dampeners. I removed the silicon oil and the seal rings to eleminate the dampening effect and any friction. Then I replaced the original spring with a shorter one and fixed both ends of the spring to the dampener. Now the spring acts in push and pull direction. The clutch is made up of a drawer slide, a steel bar and a holding magnet (and some wood for the frame/base). Electric holding magnets are available with different holding forces. The magnets I use have a holding force of 100 N. The lower part of the drawer slider is bolted to the wood frame. The upper part is attached to the metal strip and to the dampener. The magnet is placed on the steel bar and fixed to the wood frame so that it can not move in the horizontal direction. If the magnet is unpowered, the steel bar can slide under the magnet. If the magnet is powered, the steel strip is clutched by the magnet. To make this force trim construction work properly, the joystick has to be "balanced". "Balanced" means that the center of gravity of the stick should be in or near the gimbal joint of the stick. The CG of the x52 stick is above and slightly in front of the gimbal joint. Therefore I made a hole in the bottom of the x52 casing, extended the stick tube and attached a counter weight. The next picture shows the electrical part. It takes the signal from the joystick button (the trim button) and via an optokoppler and a relay the magnets are unpowered (trim button pressed) or powered (trim button unpressed). It means that the magnets are powered most of the time. Unfortunately powered magnets are getting hot. So probably I have to add some heat sinks. I still have to make some long time testing. In the following picture you can see the connection of the dampeners with the stick and the disabling of the center spring. For using the force trim joystick with DCS:Black Shark I had to change the in game trim behavior by 1.) disabling the center trim method and 2.) setting in FMOptions.lua HelicopterTrimmerTauInverse=0.0

-
I'm really satisfied with my current setup. Before I finished it, I already thought about a curved screen, possibly with multiple projectors to increase the fov any further. But now I can say that 90 degrees fov with a planar screen together with trackir is absolutely sufficient for me. It seems the nuigroup wiki is currently broken. The rear diffused illumination technique I used for the touch functionality is also explained here.
-
I also don't use the trackir pause button. Thus I'm forced to keep my head steady while I manipulate the cockpit switches.
-
The view angles of the side views depend on the fov angle (zoom) you have set: fov angle = sideview angle. For example if your fov angle is 70 degrees then you side views are "looking" 70 degrees to the left / right. If you zoom in (fov angle decrease) then your sideviews are looking more forward.
-
Triple Screen + Touch - how would you set it up?
mue replied to Treudd's topic in PC Hardware and Related Software
Actually it's not a monitor. It's a rear projection screen with a full hd projector. So the resolution is 1920x1080. The touch functionality is diy: webcam + ir illuminator + software. See this thread. -
Triple Screen + Touch - how would you set it up?
mue replied to Treudd's topic in PC Hardware and Related Software
My experience is similar to what GregP wrote. I also tried a helios setup but wasn't fully satisfied with the immersion it gave me. Now my setup is one very big touch screen with utilization of the clickable virtual in-game cockpits. My touch screen has the size of 1.4 meter x 0.8 meter. I sit at a distance of 0.7 meter from the screen. That gives me a real fov of 90 degrees. With the in game fov set to 90 degree, the cockpit and instruments appear in the same size like in real life. It's really quite immersive to look around in the cockpit and able to operate the switches, knobs and dials. And yes, using the virtual cockpit with trackir is a little bit difficult at first, but you are getting used to it. -
I have had the same problem. The cause was the faulty connection cable between throttle and joystick (one plug had a loose connection). I replaced the cable and haven't had any problems since then.
-
That doesn't help. You still have to center the joystick, otherwise you get a "bump" because the joystick position is added to the new virtual center position.
-
Enabling force feedback doesn't work. It seams the program detects that my joystick (X52) is not a force feedback device and therefore ignores this option. I made the following test: I disabled the central position trimmer mode, enabled force feedback. In the cockpit I opend the control indicator window. Then I moved the joystick away from the center and hold it there. Now I pressed-released the trim button multiple times. The trim behavior I aim for would let the ingame cyclic stay in place. But in this test the cyclic moved farther away from the center with every trim press-release. Fortunately I found this solution: Setting in FMOptions.lua the variable HelicopterTrimmerTauInverse = 0.0 seams to result in my desired trim behavior.
-
Is it possible to change the trim behavior for non force feedback joysticks as follows: If I trim, it should only set the autopilot (attitude,heading,...) WITHOUT changing the new virtual center position of the joystick. The reason I ask is because I want to modify my joystick: remove the center spring and add dampers so that the stick is held in place if I release it. The mod is described in this thread. The problem (also mentioned in this thread) is: if I trim the helicopter, the joystick should stay in the same position (like in real life). But unfortunately the non ffb trim behavior forced me to center the joystick.
-
For the rear projection screen you might consider using a more sturdy material (e.g. acrylic sheet suitable for rear projection). I use Plexiglas Crystal Ice White WM500 SC from plexiglas-shop.com for my setup. (unfortunately it seems that this very material is only available in europe) The sturdy material gives you other options as fabric materials for building the supporting frame: I built my 3 screen setup without distracting vertical frames between the screens. You can see my 3 screen setup (but currently I use only the center screen) on the first picture in this post: http://forums.eagle.ru/showthread.php?p=1475540
-
Yep, "power glove" comes to my mind. My original plan was a 3 projector setup, therefore the 3 screens. I sat in the center between the screens (distance 1,0 m to the screens). That gave me a fov of 210 degree. For the cockpit instruments I planned to use helios on a touchscreen tft monitor. I tested this setup (I borrowed two other projectors from friends and put a tft monitor in front of me). The immersion of flying was quite good with such a large fov. But the immersion of sitting in a cockpit were not. I realised, to get the "cockpit immersion", I have to build a cockpit replica like a lot of you guys had. But like you said, that is very time consuming. And you are fixed to one aircraft. Maybe in the future I will go this way. In the meantime I use the virtual cockpits of the flight sims.
-
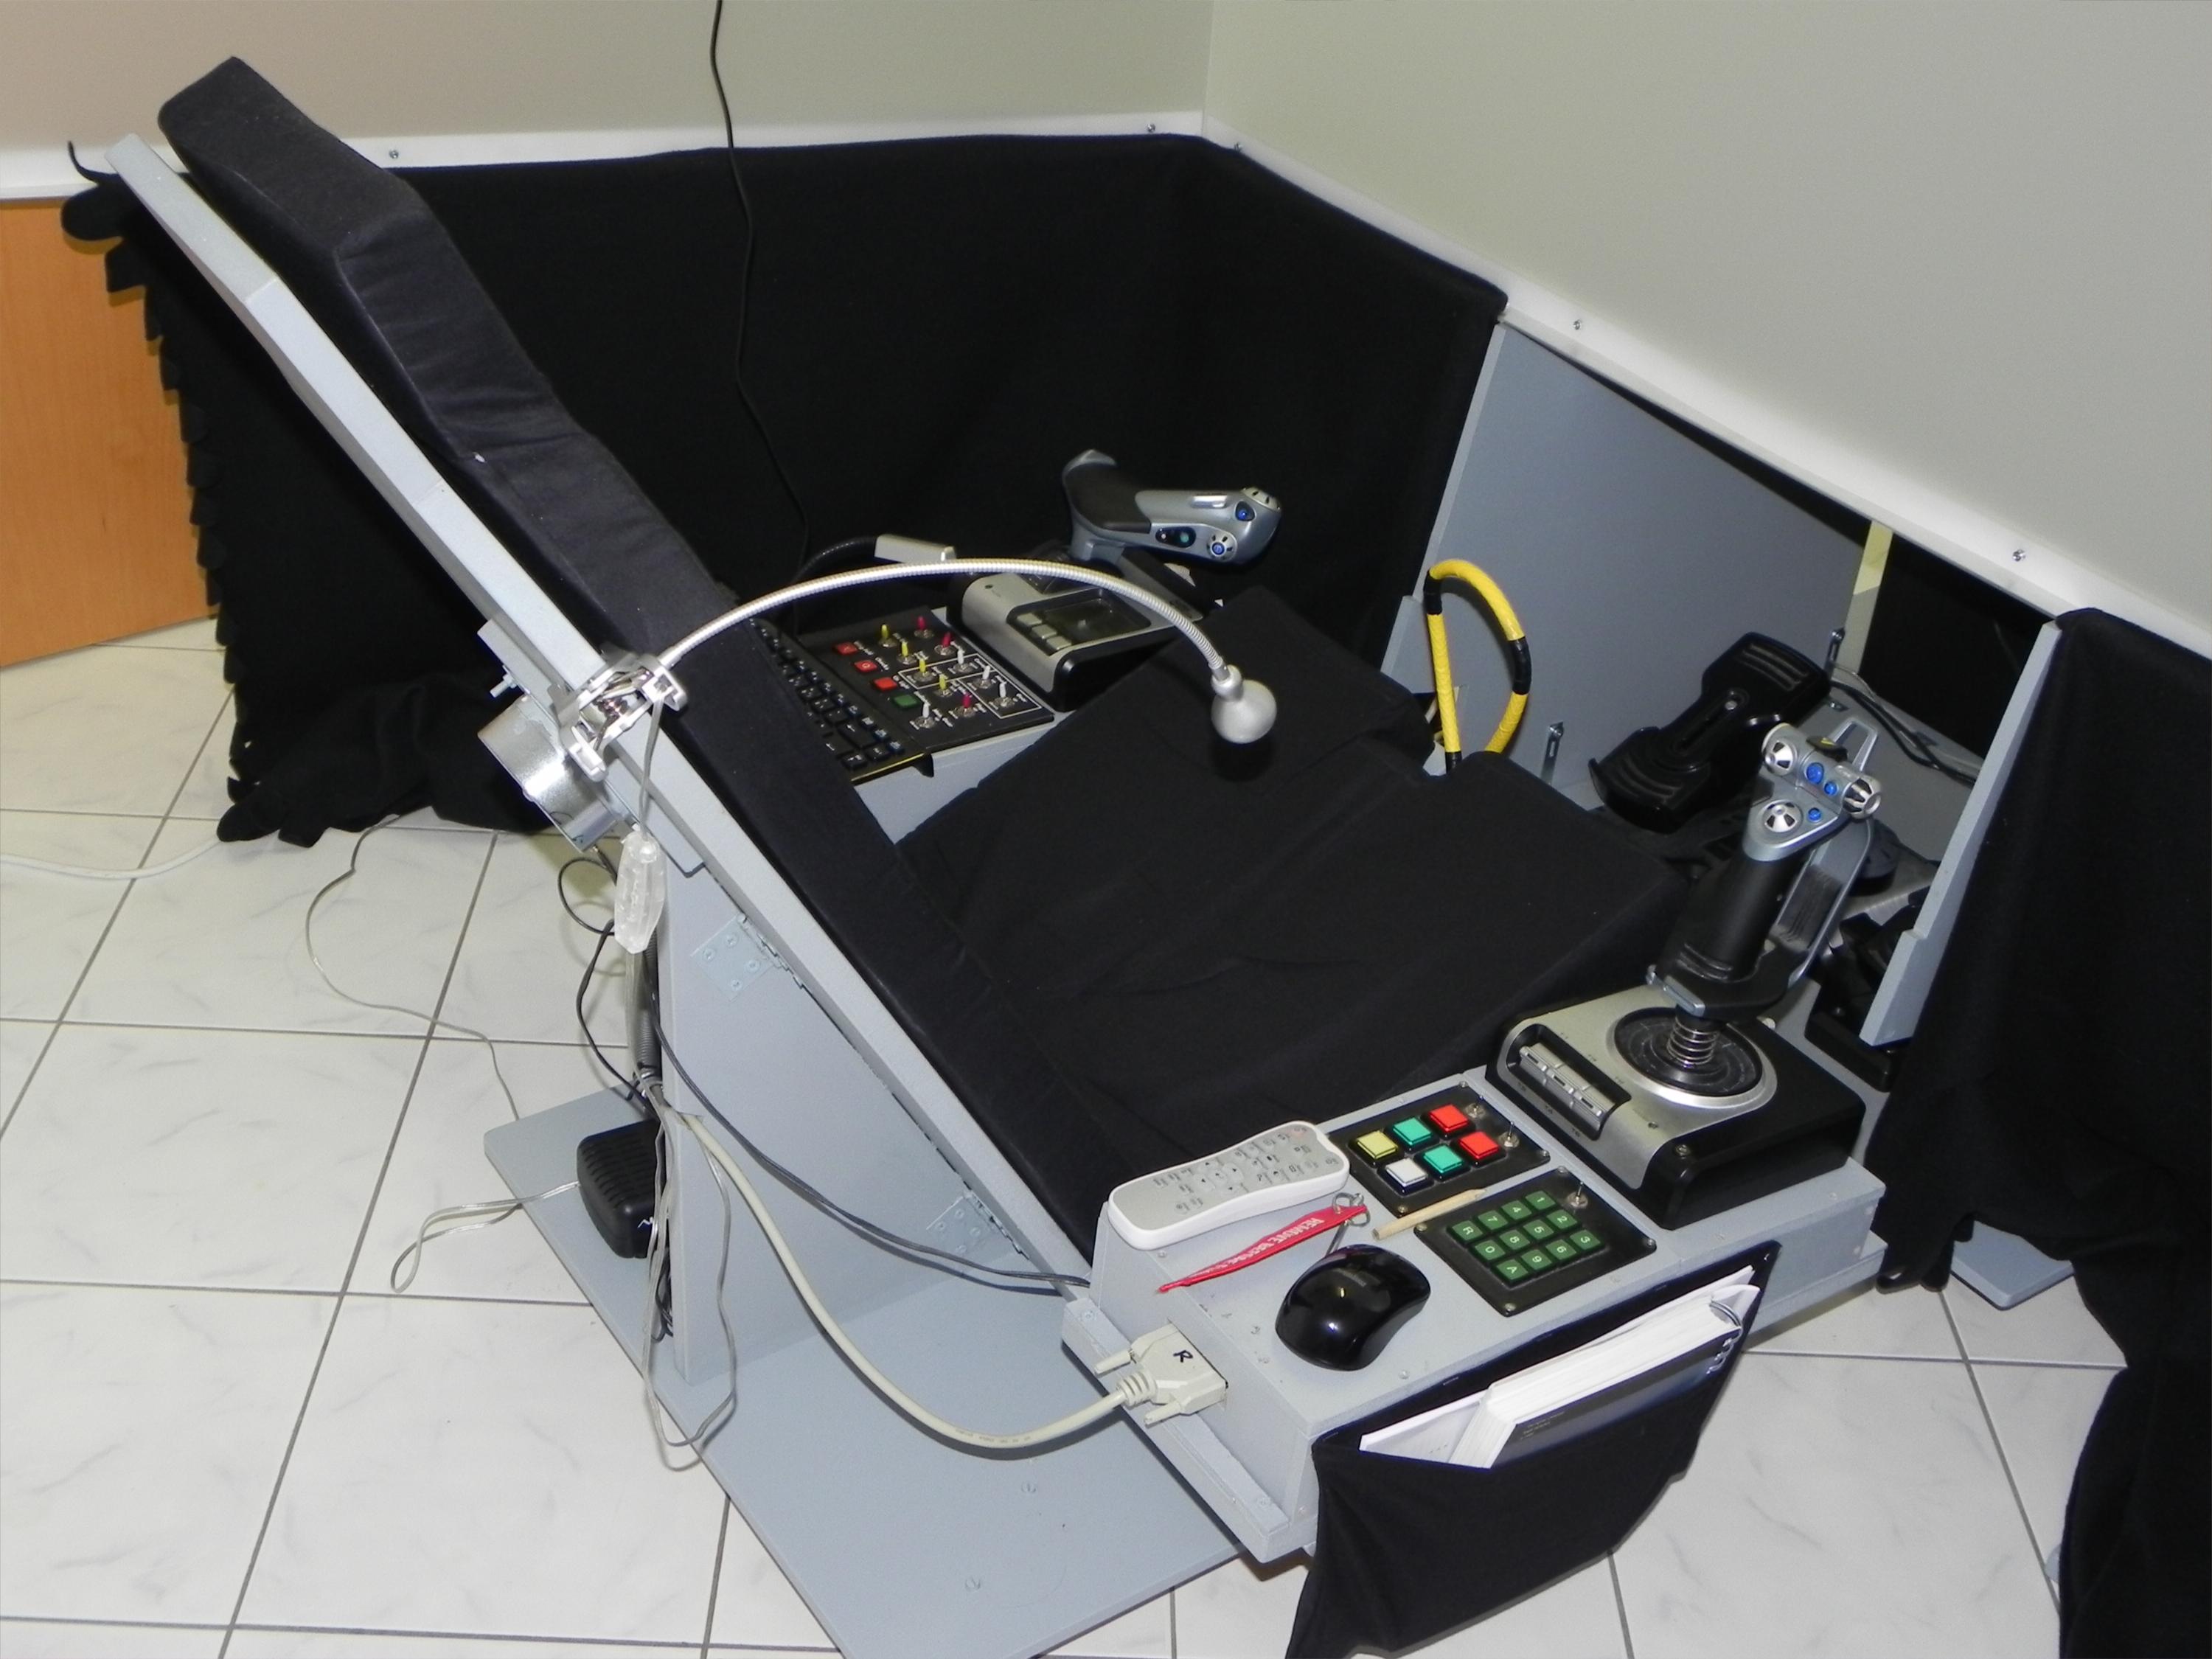
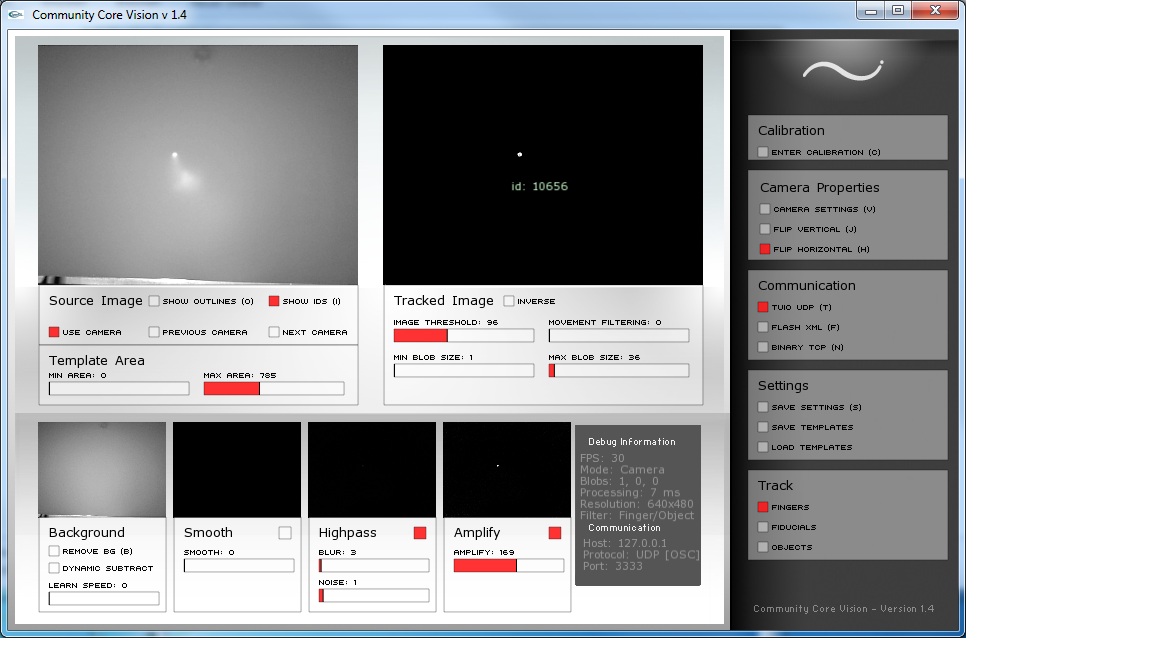
Hi all! I've been a lurker of this forum for quite a while. It's very interesting to see your fantastic home cockpits. Today I will show you my more or less "virtual" cockpit. It consists of a rear projection screen and a seat. In the following picture you can actually see three screens, but the two screens on the sides are currently only used as "blinds". For the rear projection screen I use "Plexiglas Crystal Ice White WM500 SC". The matte surface is on the side of the seat. I tested different types of plexiglas from plexiglas-shop.com and I found this has the best price-perfomance(image quality)-ratio. Better material for rear projection is of course their rear projection material but it's way more expensive. The screen is 1,4 m wide and the distance between my head and the screen is 0,7 m. That gives me a real fov of 90 degrees. With the virtual view in the simulation software set to 90 degrees fov this setup is quite immersive. The resolution of a full hd projector is sufficient. But sitting so near to a big screen has a disadvantage: Where to place the trackir cam? I found a solution that works quite well. I placed the trackir cam in the upper part of the screen and the vector clip on top of my headphones. Sitting so near to the screen also has an advantage: I can touch the screen. So why not adding touch functionality to my screen (not to the whole screen, but to the region I can reach with my fingers: the lower middle region of the screen)? Adding the touch functionality costs me less than 40 EUR. The information for this I found at nuigroup.com. The guys there build DIY multitouch tables. The method I use is called Rear Diffused Illumination. You need an IR illuminator, a (slightly) modified webcam, a proper rear projection screen and some software. The functional principle is explained here: http://wiki.nuigroup.com/Diffused_Illumination. The following picture shows my setup: screen on the left, webcam in the middle, projector and IR illuminator on the right. I build the IR illuminator myself with 80 IR-LEDs. In the following picture you see more than 80 LEDs, but the upper LEDs are not used. As webcam I use the XBox Live Vision Cam. The webcam has to be modified that it only can see IR light. That means: removing the IR filter and adding a filter for visible light (simply put two layers of overexposed color negativ film in front of the cam) The software I use for blob detection/tracking is ccv 1.4. It processes the webcam images and gives the blobs (position where you touch the screen). I wrote a kind of mouse driver, that takes the blobs as input and translates them to left click, right click and mouse wheel movement. I made a video that shows the touch screen in action. Left click is a tap. Right click is touch + move right. Mouse wheel is touch + move up or down. In the end some words about the seat: It's based on the design "SimLight" from xflight.de. I modified the design and added consoles left and right for panels. Depending on the sim I play, I can change the paper "overlays" on the left panel.