KLaFaille
-
Posts
291 -
Joined
-
Last visited
1 Follower

-

solved Unable to set head set target designation
KLaFaille replied to SKYWARRIOR's topic in Controller Questions and Bugs
Make sure you're in AG mode SCS towards screen wtih TGP to make SOI NWS button a few times to return targeting pod to VVSLV SCS FWD to make HUD / HMD SOI Look out the cockpit and put the HMD on something you want to target TDC Depress and the designation diamond will show up over what you're looking at. You can slew using the TDC if need be. NWS will clear the designation and the aiming circle will appear again. Once designated, SCS towards which ever screen you have the TGP on to make it SOI With JDAMs, once you designate a spot and give it coordinates, you won't get the aiming circle again. With the HMD as SOI, you'll only have the crosshair with dot, and you place that over whatever you want to target and TDC Depress. The diamond will then appear at that location and the coordinates of what you designated are now loaded into the JDAM. Press NWS to undesignate and you can TDC Depress over a new target. You can still SCS towards the TGP to make it SOI and fine tune your aim point, then TDC Depress again to enter the coordinates under the TGP aim point. Once the JDAMs are gone, or you switch to something like an LGB or dumb bombs, you'll get the aiming circle in the HMD again. -
The seat occupant's shoulder harness is attached to an inertial reel that works like the seat belt in a car. They can lean forward and away from the seat, but if they lean (or are jolted) forward too quickly the reel locks preventing further movement. During an ejection there's a device that, like the leg and ankle restraints, forcefully pulls the shoulder harness against the seat back. Whether that would allow a dude to lean his head against the canopy and peek, I don't know. Really, I was just having a bit of fun. At least a human player can keep an eye on the fuel, I suppose. It's probably for the best anyhow. Wouldn't want to interrupt the hour long nap the guy in back can take during tanking. A flight of Phantoms has to take off six hours earlier than everyone else just to top up their tanks to be on time with how long it takes to fuel on the boom. I think four Hornets or about twenty Vipers would be done before one F-4 finishes.
-
I had a mission where I lost the entire vertical stab and rudder, like all if it, down to the fuselage. The plane was a little sluggish afterwards but no roll, pitch, or yaw problems and made it back to base for a rather uneventful landing, other than having only 70lbs of fuel left. I wish I had the track to share.
-
Gun burst quantity and Fuel tanks managment
KLaFaille replied to SturmVogel's topic in DCS: F-4E Phantom
Yep, considering the depth of system modeling it may very well be. Maybe @Zabuzard could chime in with the answer. I just know I wasn't going to frame-by-frame count how many were actually going down range. -
Gun burst quantity and Fuel tanks managment
KLaFaille replied to SturmVogel's topic in DCS: F-4E Phantom
1. If you mean is it possible to stop the gun as soon as you release the trigger, it is not. When the trigger is released the gun automatically fires and clears itself of ammunition as the barrels stop rotating. How many rounds are fired after releasing the trigger depends if the gun rate is set to high or low, there is no way to set a burst quantity. In reality the gun clearing itself might lead to unfired rounds being returned to the magazine and thus becoming unusable, but I don't believe that happens in the game. I could be wrong though. 2. Yes, you need to actively start fuel flow from externals. External tanks are fed from whatever the switch on the fuel panel is set to, either wings or center. When an external tank is feeding the internal ones, you'll see the fuel quantity on the totalizer increasing. The totalizer only displays internal fuel, there is no means of displaying external fuel. The pumps will transfer some fuel from the external tanks, then shut off for a bit which will illuminate a green advisory light on the caution panel. After a while, they will start transferring fuel again, and the light will extinguish. This is normal and repeats until the selected tanks are empty. You know your external tanks are empty when the fuel totalizer stops increasing and the green advisory light does not go away. It takes a while, so don't jump the gun and jettision tanks when you first see the totalizer stop and green light illuminate. https://youtube.com/watch?v=2u2yLEM1iHM&si=9Q1tTyrZAVGc48PU -
Not aircraft, no. Quite the opposite, actually. Instead of things up at 35K it's things down below "in excess of 800 feet." Many, many moons ago I had ambitions of building an A-10C pit using mil-spec parts, Amphenol connectors, the whole nine. I collected a ton of real panels, throttles, gauges, ADI, HSI, even an ARC-210 head. All that along with some DZUS rails, a bag of a couple hundred fasteners, and the installation tools are floating around here somewhere. I gained a lot of knowledge through research, reading mil-specs, tech pubs, manuals, so that's how I tend to notice discrepancies like this. I totally understand not being able to un-see it. Sorry about that.
-
Understood. It's not something that affects anything or which would even be noticed unless you know, so maybe one day down the road. At the very least it's something to keep in mind and apply when researching and modeling future cockpits / modules. Have a good one.
-
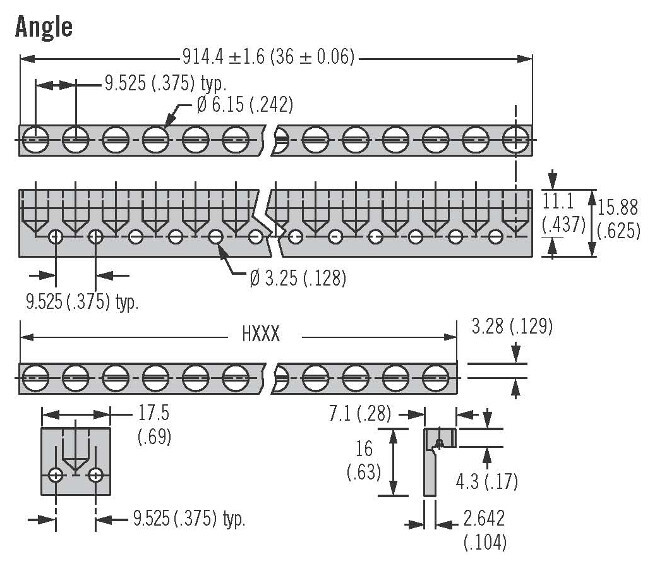
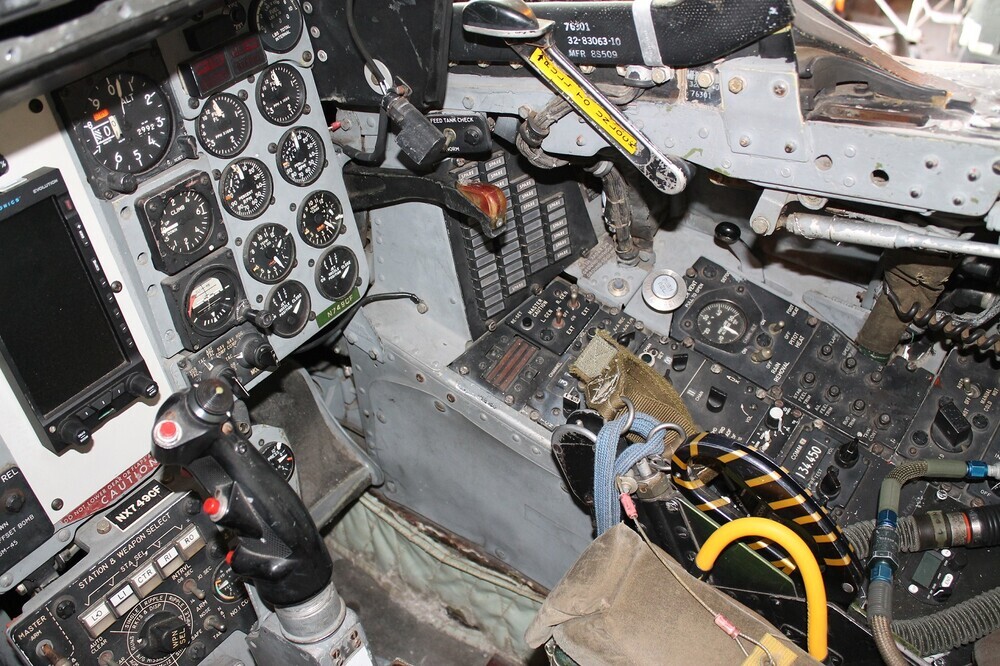
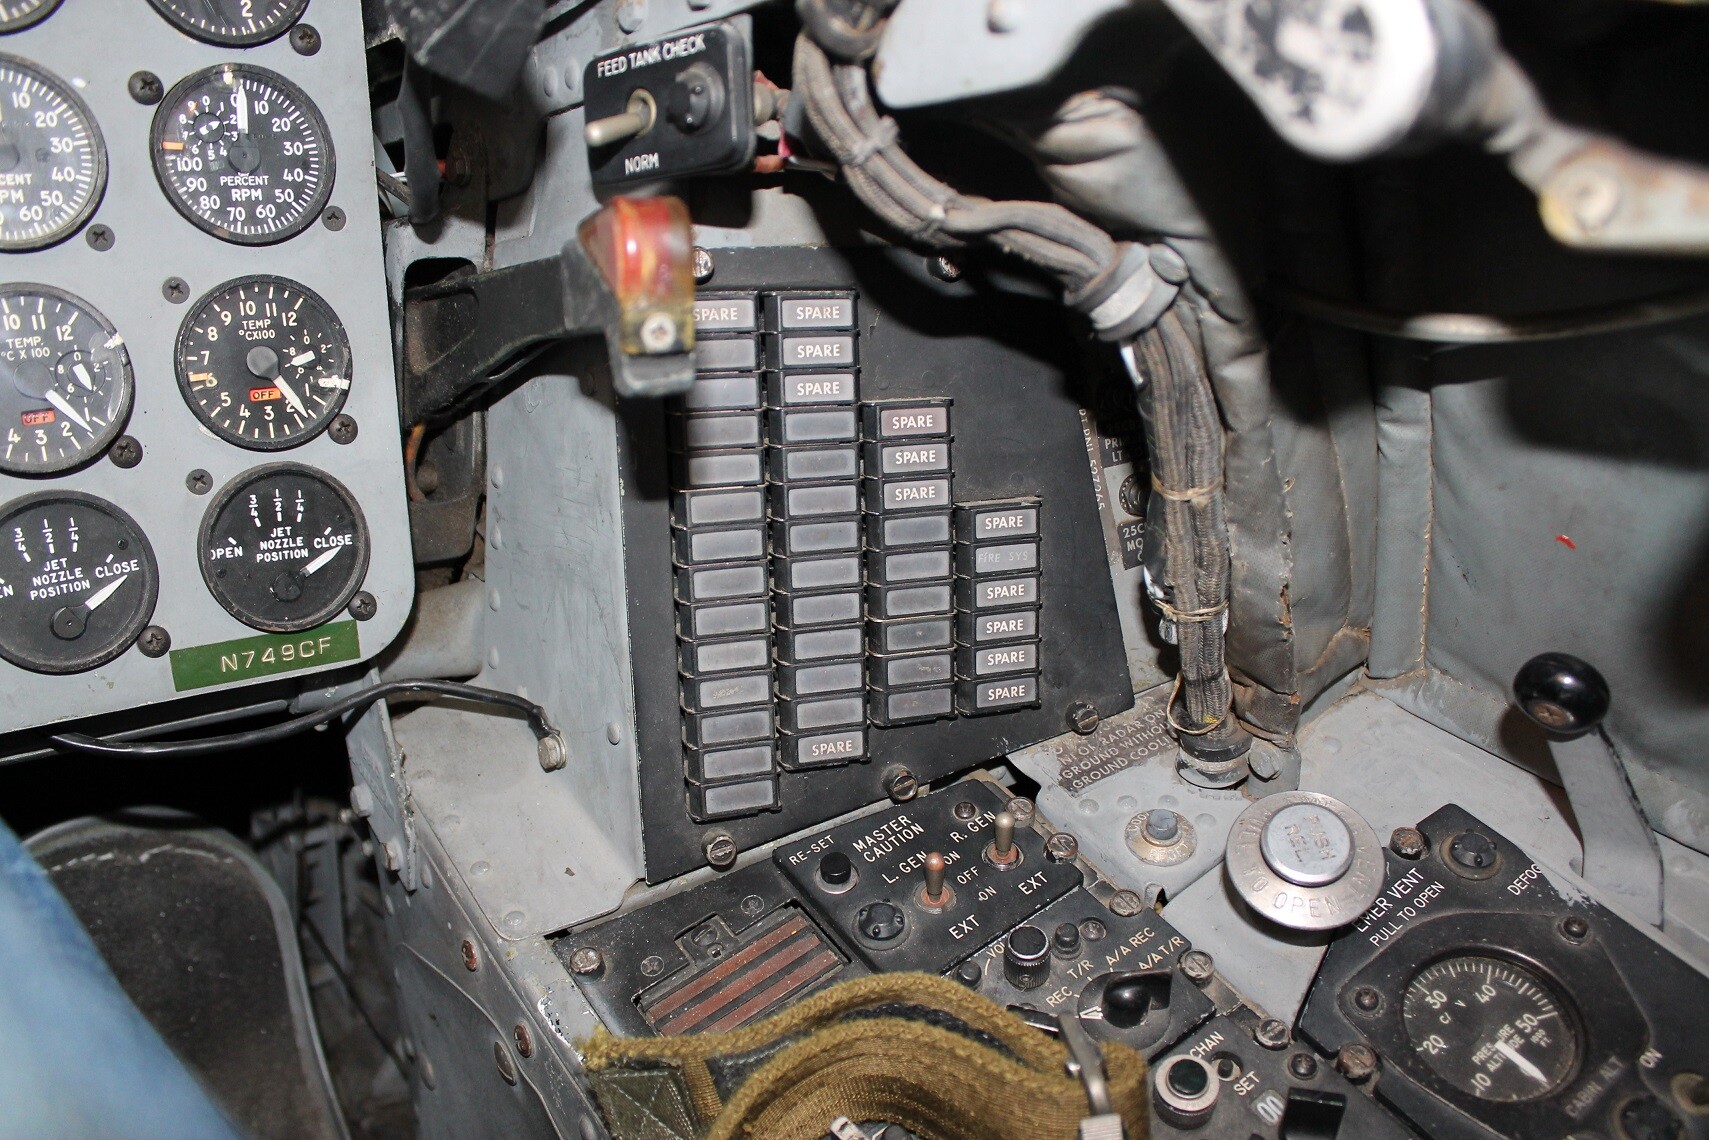
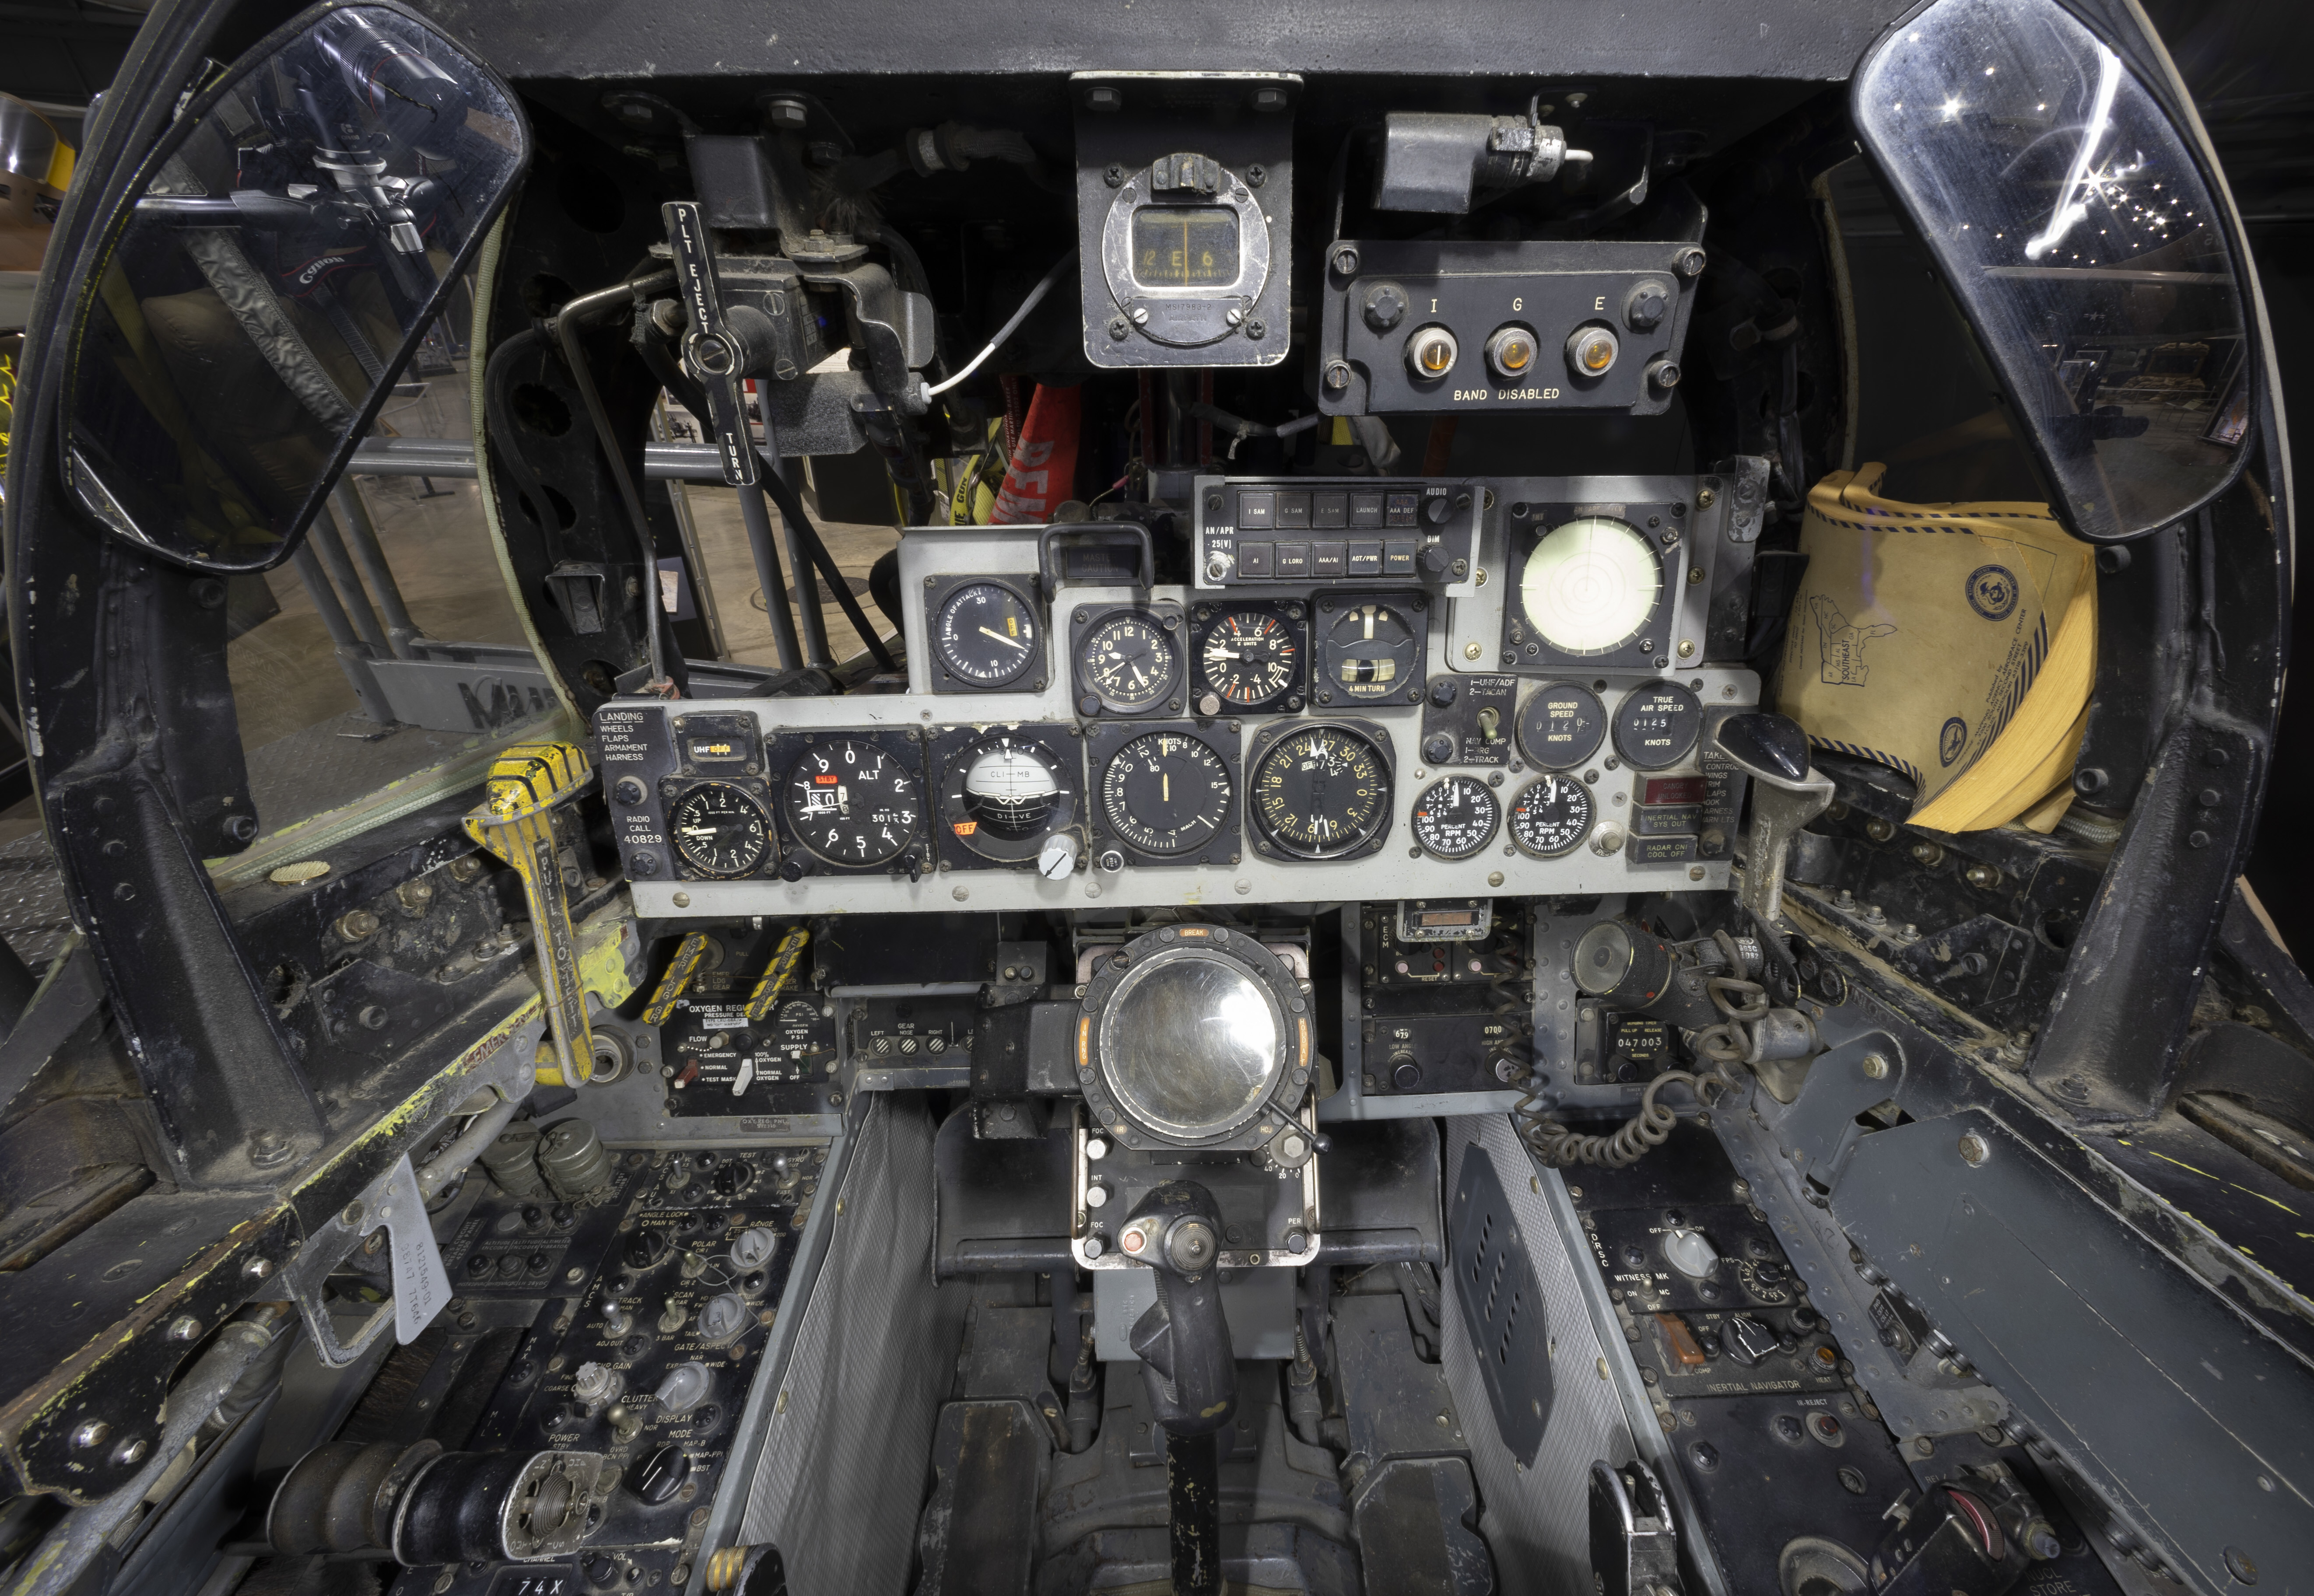
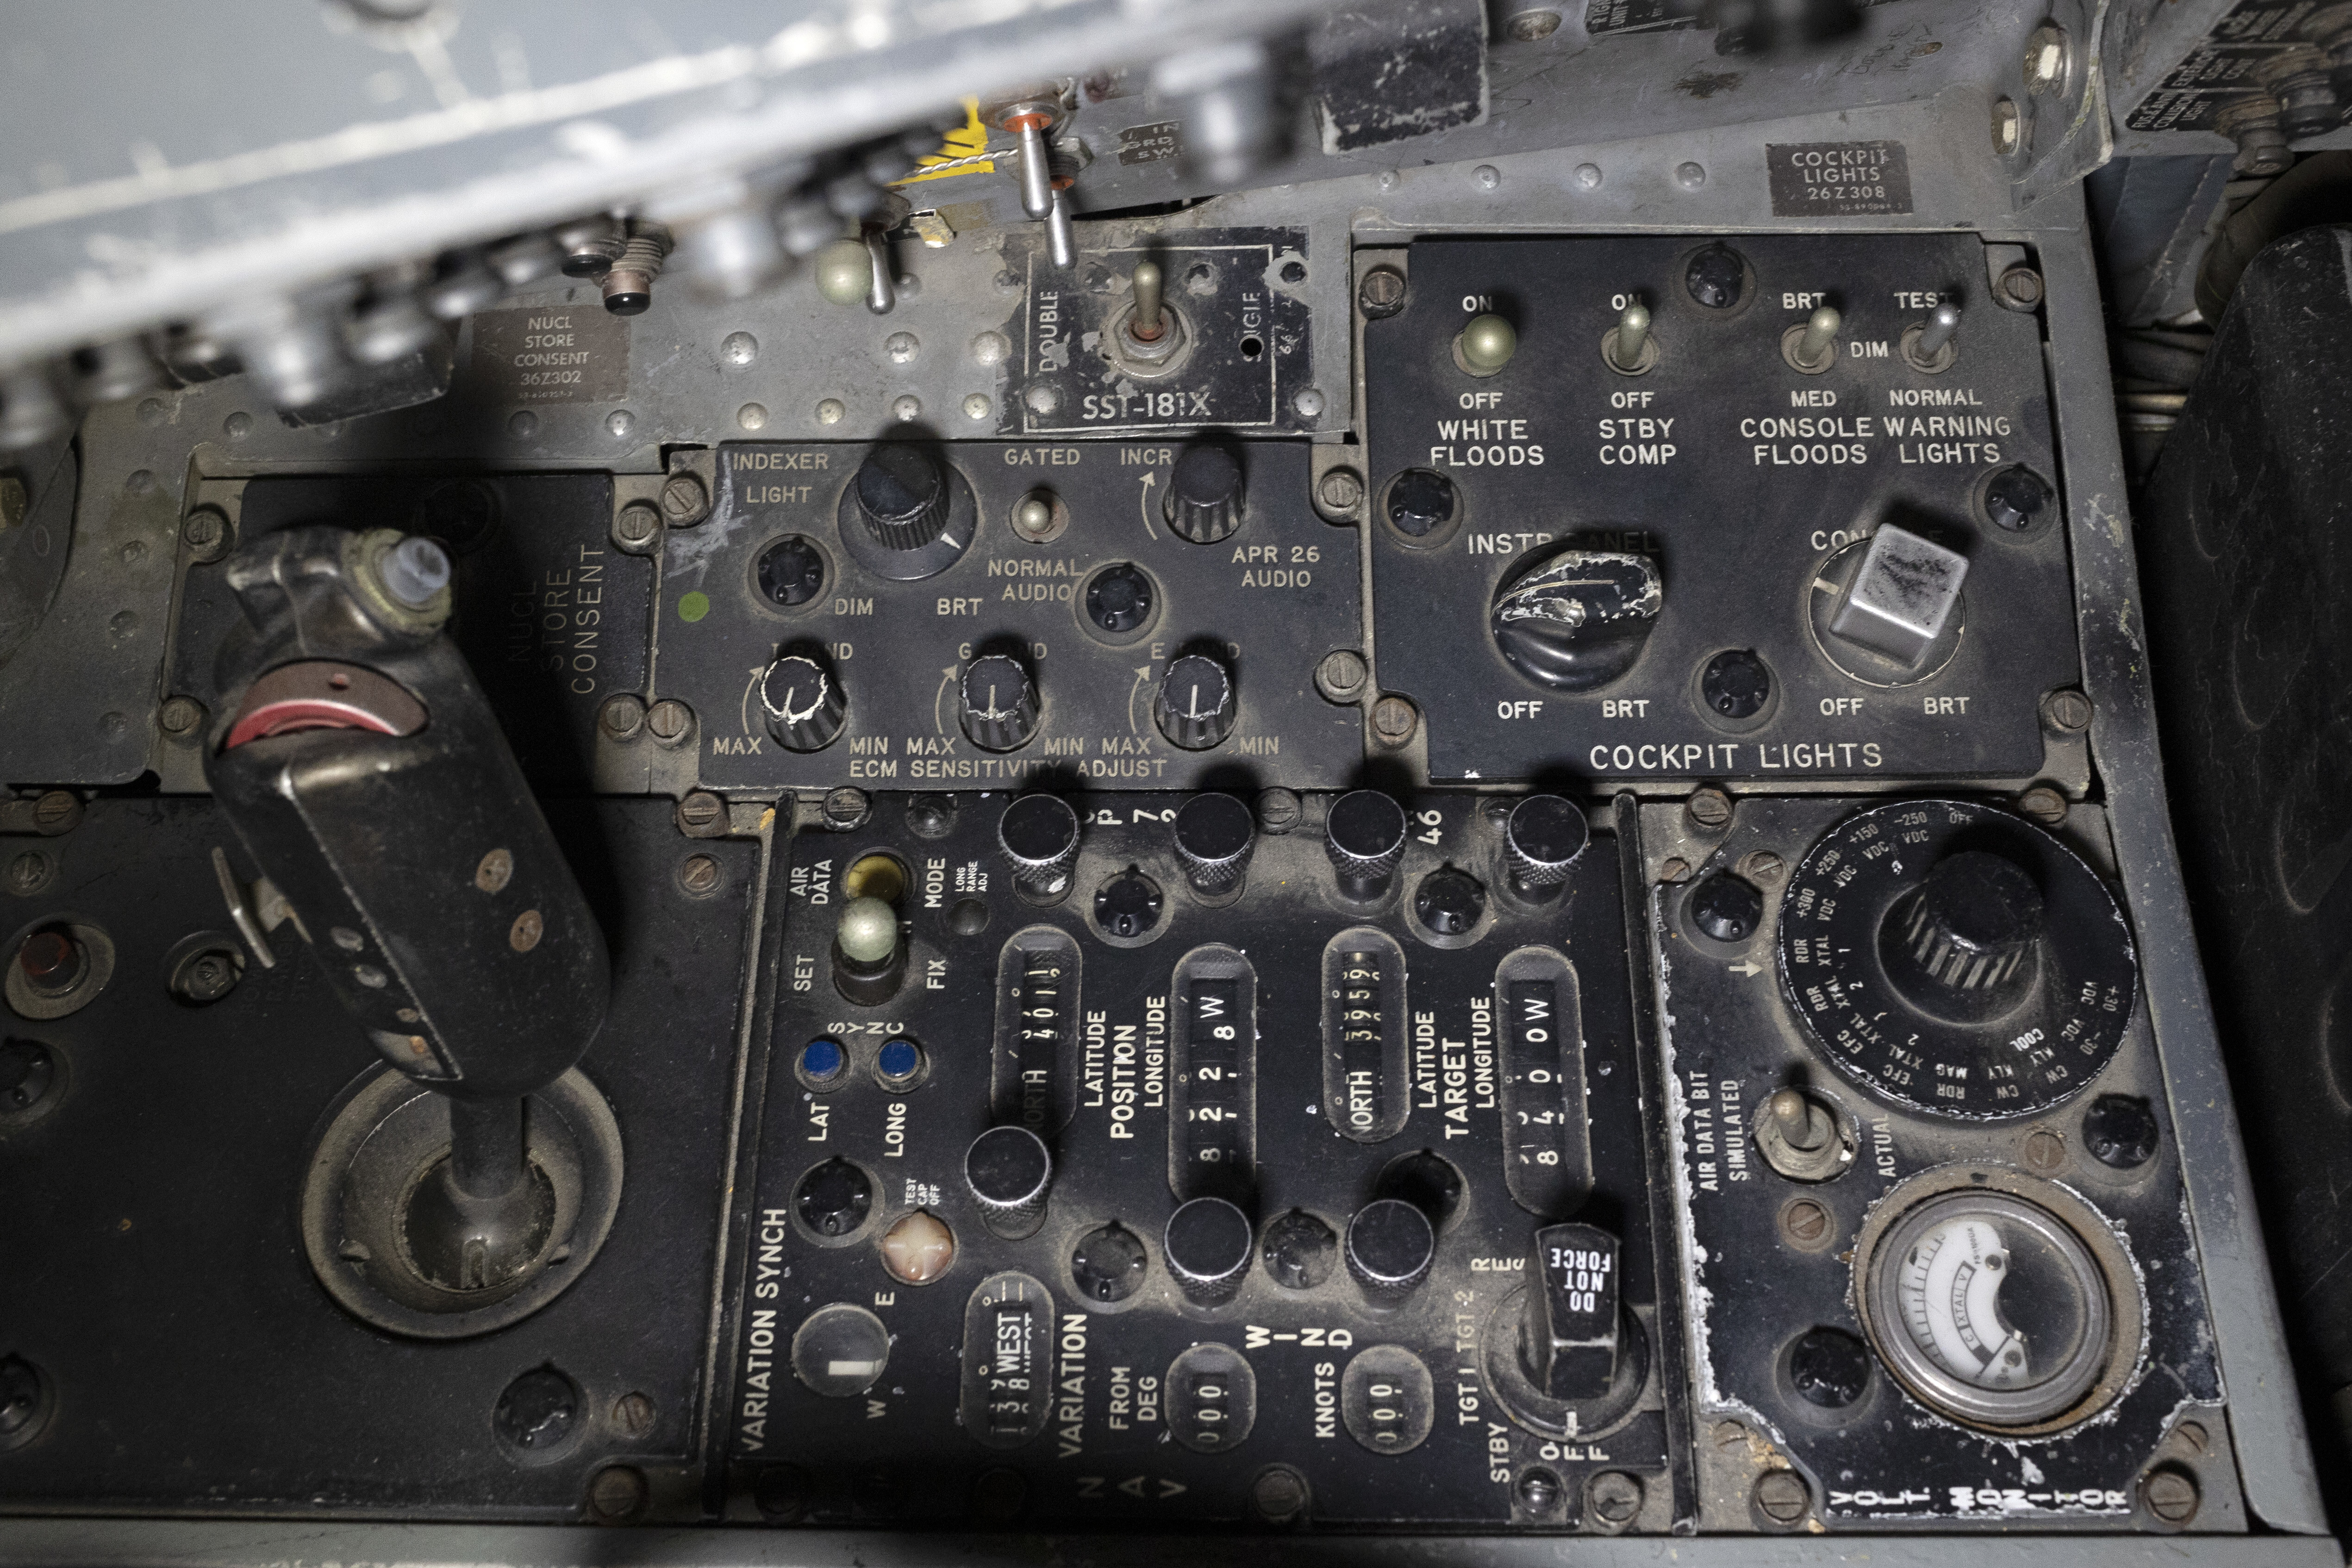
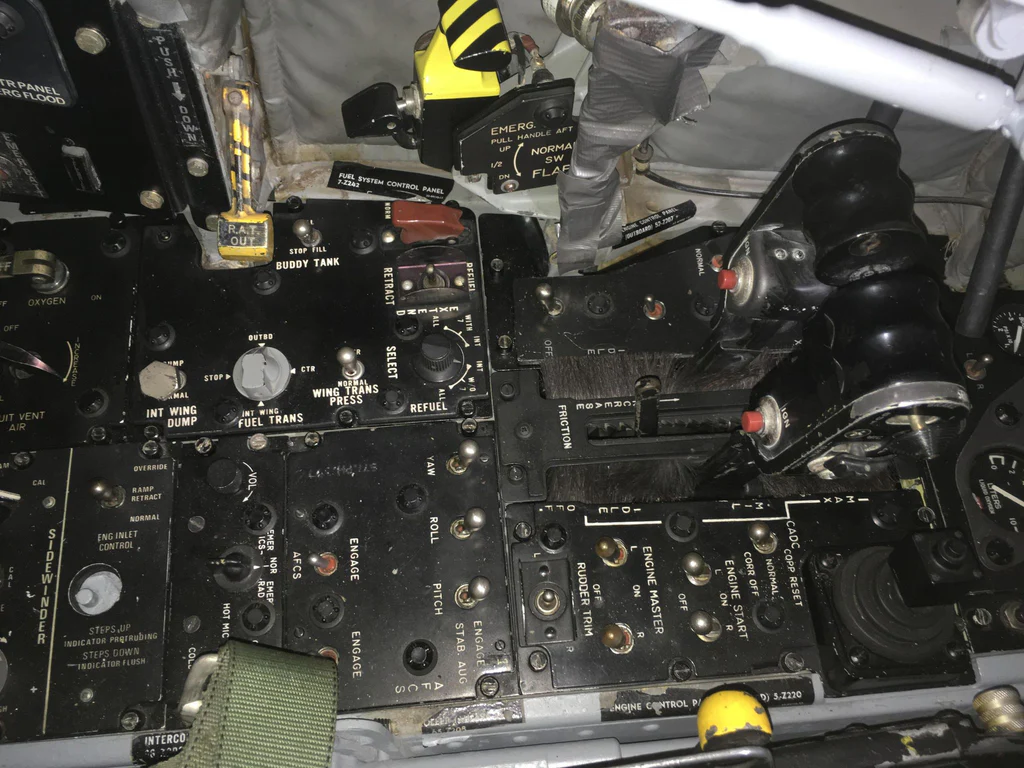
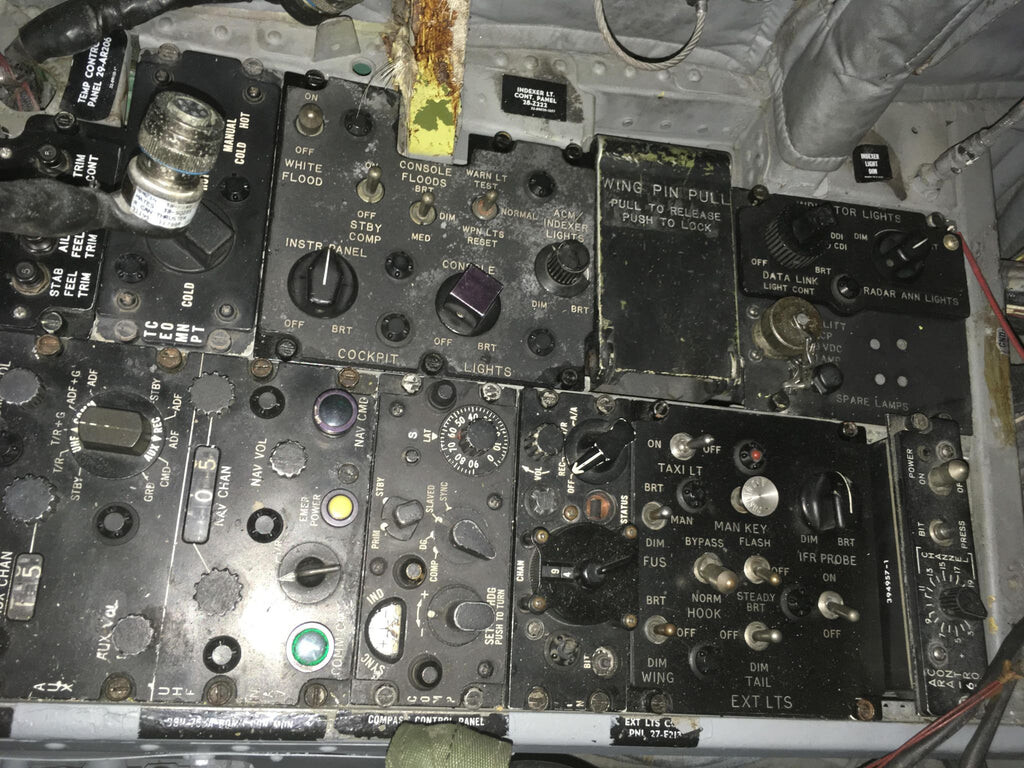
@Dominik96 That's great! I'm glad I was able to contribute something helpful. Speaking of cockpit art, there’s one other issue that might be addressed. FWIW, the Tomcat module has the same issue. If the IFF and TACAN were nit-picky, this might be next level so feel free to tell me to pound sand. While the fasteners used to secure control panels might look like regular threaded screws, they are not. They are DZUS (pronounced zeus) fasteners which are spring loaded 1/4 turn fasteners that interface with rails containing regularly spaced holes with a metal wire bisecting them. The fasteners, when perpendicular to the rail they are installed to, are unlocked. When the fastener is turned 90 degrees such that the slot is parallel to the rail and wire, they are locked down. You can see the cam slot of the fasteners in the video of the IFF roller switch I posted earlier. As they are depicted in the game, the front cockpit has the majority of the fasteners unlocked or somewhere in between locked / unlocked. While most panels are secured to long rails, some panels such as the throttle and de-ice panels are attached to single hole DZUS rails which results in the fastener slot being aligned athwart the cockpit as opposed to forward and aft like the majority of the other panels. The ANTI-SKID / LOX gauge panel has the bottom fasteners locked when the slots are forward / aft and the top ones are locked when athwart. The slats/flaps boost pump gauge panel and caution light panel use similar single hole rails, and the fasteners for those are correctly oriented in game. In the WSO cockpit, all the fasteners on inboard panels on the right console are in the unlocked position, the right outboard panels are correct. On the left side console, most of the fasteners on the panels are unlocked and should be facing forward / aft. The APX-80A panel isn’t fully seated, it’s pulled out maybe 25-30mm, hanging down, and you can see the DZUS rail the mounting plate of the panel should be parallel to and in contact with. With the rail in that position the fasteners would be locked when the slots are up and down. That may have been how the panel was in the scanned jet, but it’s certainly incorrect for a flight worthy aircraft. Other than the cable harness, there would be nothing securing the panel to the jet. The other three panels left of the radar, as well as the gun camera / AVTR panel have their fasteners unlocked. Likewise, to the right of the radar, the LABS and ECM panels are unlocked and above them you can see the DZUS rails and bisecting wire the fasteners attach to. The TARGET DESIGNATOR panel below the radar has the fasteners unlocked. Even if the DZUS fasteners as depicted in the game are in the same positions that they were in the real jet that was scanned, most of the panels would be loose or falling out of the consoles if the jet flown with them in those positions. The following videos from 10% True features cockpit tours of the front and back cockpits of an F-4G at the USAF museum, and show which fasteners should be in which position. While one or two may be unlocked, they are generally positioned as they should be. Unfortunately, the 360-degree views don’t seem to be on the USAF museum website anymore. With the F-4G being a modified F-4E, the DZUS rails are in the same orientation in both. Pilot: https://www.youtube.com/watch?v=02RQ6sB9Kiw WSO/EWO: https://www.youtube.com/watch?v=yTF8JyCxqiM Attached below are photos from various Phantoms and stills from a video with an empty cockpit with the DZUS rails exposed . A few images were originally posted by @Diesel_Thunder and the F-4 he works on (short nose Phantom is best Phantom, btw ). He could certainly confirm the correct orientation of the various fasteners. While the front panels and pedestals in both cockpits had many differences between variants, the side console DZUS rails were generally the same.

-
I altered the behavior of the in-game IFF panel by changing the switch types in the clickabledata.lua file from default_3_position_tumb to default_springloaded_up_3pos_switch in lines 73-77 and the knob to default_springloaded_first_knob at line 67. The 3 position switches are fine now, and the knob is spring loaded to HOLD as in real life. However, like the compass sync knob, it does roll over from it's the last non-spring loaded position to the first when left clicking, due to a right click putting it in the spring loaded position. I didn't do much digging into getting the roller switches being able to advance to 0 on the next left click after they are on 3 or 7, like how the dials on the laser code panel behave. Changing cycle from false to true at line 561 in clickable_dsl.lua did allow the next left click to return the dial to 0, but it counted backwards from 3 or 7, versus rolling over to 0. It's all a bit pedantic with the IFF test switches not serving any real function in the game, but they do mimic the behavior of the real panel now. Just for funsies, here's the actual transponder numeral switch in operation. I love the ingenuity and engineering that goes into aircraft parts and pieces. @Zabuzard --IFF Panel Pilot elements["IFF_code_knob_help"] = default_springloaded_first_knob(_("Select Mode 4 Function"), devices.IFF, device_commands.PILOT_IFF_CODE_Knob, cockpit_args.Pilot_IFF_Code, 4, pilot_only) elements["IFF_test_reply_help"] = dim_test_lamp(_("IFF Reply Lamp (push to test, rotate to dim)"), devices.IFF, device_commands.PILOT_IFF_REPLY_LIGHT_PRESS, device_commands.PILOT_IFF_REPLY_LIGHT_ROTATION, cockpit_args.PILOT_IFF_REPLY_LAMP_PUSH, cockpit_args.PILOT_IFF_REPLY_LAMP_ROTATION, pilot_only) elements["IFF_test_knob_help"] = dim_test_lamp(_("IFF Test Lamp (push to test, rotate to dim)"), devices.IFF, device_commands.PILOT_IFF_TEST_LIGHT_PRESS, device_commands.PILOT_IFF_TEST_LIGHT_ROTATION, cockpit_args.PILOT_IFF_TEST_LAMP_PUSH, cockpit_args.PILOT_IFF_TEST_LAMP_ROTATION, pilot_only) elements["IFF_master_knob_help"] = multiposition_switch_limited(_("Select Master Mode"), devices.IFF, device_commands.PILOT_IFF_MASTER_Knob, cockpit_args.Pilot_IFF_Master, 5, 0.25, false, 0.0, pilot_only) elements["IFF_audio_help"] = default_3_position_tumb(_("Select Mode 4 Indication"), devices.IFF, device_commands.PILOT_IFF_AUDIO_LIGHT_SW, cockpit_args.Pilot_IFF_Audio, false, true, pilot_only) elements["IFF_M1_help"] = default_springloaded_up_3pos_switch(_("M1 Off/On/Test"), devices.IFF, device_commands.PILOT_IFF_M1_SW, cockpit_args.Pilot_IFF_Mode_1, false, true, pilot_only) elements["IFF_M2_help"] = default_springloaded_up_3pos_switch(_("M2 Off/On/Test"), devices.IFF, device_commands.PILOT_IFF_M2_SW, cockpit_args.Pilot_IFF_Mode_2, false, true, pilot_only) elements["IFF_M3_help"] = default_springloaded_up_3pos_switch(_("M3 Off/On/Test"), devices.IFF, device_commands.PILOT_IFF_M3_SW, cockpit_args.Pilot_IFF_Mode_3A, false, true, pilot_only) elements["IFF_MC_help"] = default_springloaded_up_3pos_switch(_("MC Off/On/Test"), devices.IFF, device_commands.PILOT_IFF_MC_SW, cockpit_args.Pilot_IFF_Mode_C, false, true, pilot_only) elements["IFF_rad_test_help"] = default_springloaded_up_3pos_switch(_("Set Monitor-Radiation"), devices.IFF, device_commands.PILOT_IFF_RAD_TEST_SW, cockpit_args.Pilot_IFF_Test, false, true, pilot_only) elements["IFF_Mode4_help"] = default_2_position_tumb(_("Set Mode 4 On/Off"), devices.IFF, device_commands.PILOT_IFF_M4_SW, cockpit_args.Pilot_IFF_Mode_4, pilot_only) elements["IFF_M1_Tens_help"] = multiposition_roller_limited(_("Set M1 code (tens)"), devices.IFF, device_commands.PILOT_IFF_MODE1_CODE_TENS, cockpit_args.Pilot_IFF_Mode_1_Tens, 8, true, nil, pilot_only) elements["IFF_M1_Uni_help"] = multiposition_roller_limited(_("Set M1 code (ones)"), devices.IFF, device_commands.PILOT_IFF_MODE1_CODE_ONES, cockpit_args.Pilot_IFF_Mode_1_Units, 4, true, nil, pilot_only) elements["IFF_M3_Thousand_help"] = multiposition_roller_limited(_("Set M3 code (thousands)"), devices.IFF, device_commands.PILOT_IFF_MODE3_CODE_THOUSANDS, cockpit_args.Pilot_IFF_Mode_3A_Thounsands, 8, true, nil, pilot_only) elements["IFF_M3_Hundred_help"] = multiposition_roller_limited(_("Set M3 code (hundreds)"), devices.IFF, device_commands.PILOT_IFF_MODE3_CODE_HUNDREDS, cockpit_args.Pilot_IFF_Mode_3A_Hundreds, 8, true, nil, pilot_only) elements["IFF_M3_Ten_help"] = multiposition_roller_limited(_("Set M3 code (tens)"), devices.IFF, device_commands.PILOT_IFF_MODE3_CODE_TENS, cockpit_args.Pilot_IFF_Mode_3A_Tens, 8, true, nil, pilot_only) elements["IFF_M3_Uni_help"] = multiposition_roller_limited(_("Set M3 code (ones)"), devices.IFF, device_commands.PILOT_IFF_MODE3_CODE_ONES, cockpit_args.Pilot_IFF_Mode_3A_Units, 8, true, nil, pilot_only) elements["UHF_aux_vol_help011"] = default_springloaded_up_3pos_switch(_("Set Position Identification"), devices.IFF, device_commands.PILOT_IFF_IDENT_MIC_SW, cockpit_args.Pilot_IFF_Ident, false, true, pilot_only)
-
Fuel usage in the Hornet has some odd behaviors and is supposedly being looked into.
-
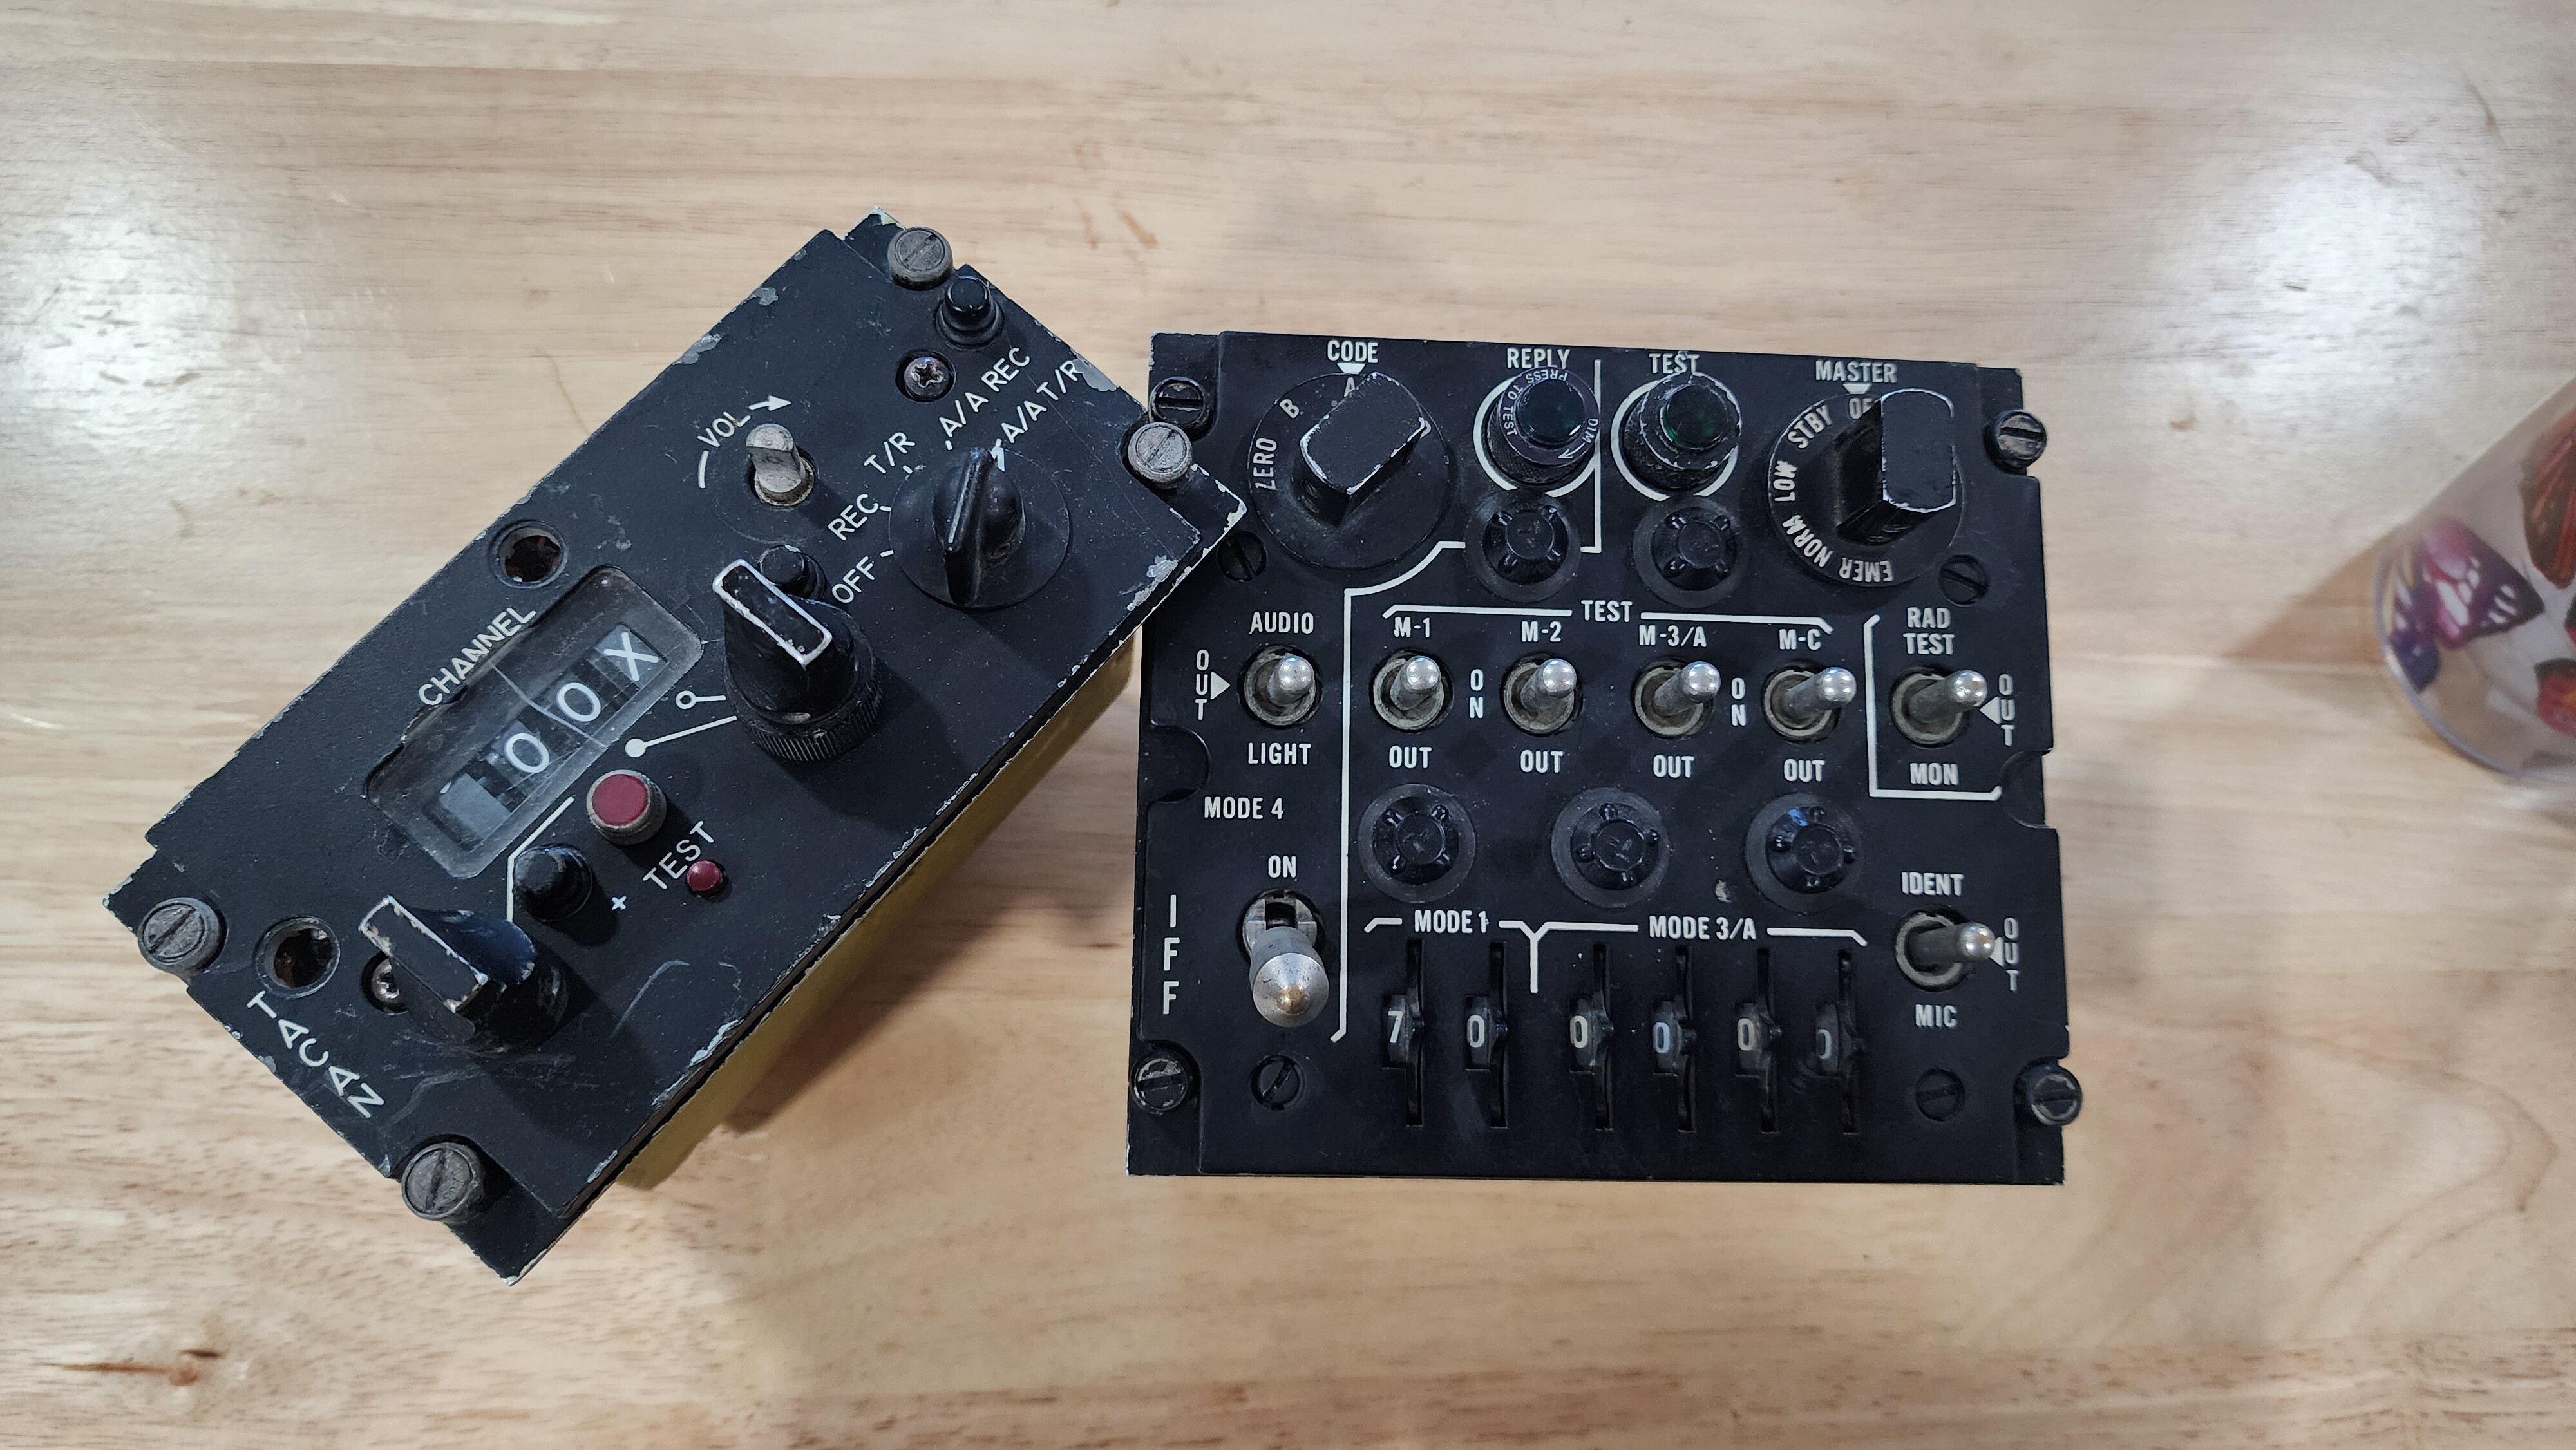
Categorize this under nit-picking or for the sake of accuracy, your choice. I own the real control heads so I thought I'd share some differences between the real thing and what's in the game. The knobs for adjusting the TACAN channels are parallel to the side of the panel when at the 0 and 5 positions, and have 36 degrees of throw between digits. For the IFF control head, the four mode test switches, the RAD TEST switch, and the IDENT switch are all spring loaded when in the forward position and return to center upon release. The CODE knob is spring loaded when placed in the hold position and returns to "A" when released. The light dimming shutters for the REPLY and TEST lights have about 45 degrees of rotation between full open and full closed. The transponder code thumb wheels do not have hard stops at 3 or 7 and will roll over back to 0. Video of the IFF control head:
-
Yep. I have experienced the same behavior in all autopilot modes where the plane trims the roll automatically, including HSEL. When doing CAP, I used like orbiting up around 45k - 48k and found the plane oscillating on my first fight after the update. I've had it start oscillating a couple degrees either way and then increasing to nearly 40 degrees as it fails to capture the heading. It reminds me of the wing-rocking autopilot bug on the A320 when MSFS first released.
-
It influences the operation of the AOA indexer's on-speed light and serves as a reminder to set up the aircraft appropriately for landing. If you are gear down for a carrier approach without the hook deployed, the on-speed light will flash on and off when the switch is in the carrier position. The on-speed light with the switch in the field position will stay steady without the hook being lowered. You place it in either position depending on whether you're landing on a carrier or an airfield, usually in conjunction with the anti-skid switch: FIELD & ON for airfield; CARRIER & OFF otherwise.
-
The plane used to instantly stop pitching and maintain its attitude when you pulled slight aft stick and then let it center before the update. Now, doing the same, the plane will continue to pitch up slightly past where you let off the stick, and in order to prevent that, forward stick needs to be applied where it was never necessary to do so before. The plane briefly feels "bouncy" before it settles. The effects on normal maneuvering are negligible, but when it comes to the incredibly fine control needed during refueling, it definitely throws off all muscle memory. Because of this, I've found it very easy to overcorrect by applying too much forward stick where it wasn't necessary in the past, which can result in PIO. It's definitely frustrating having to learn how to handle this new behavior after you've already mastered refueling.