
ShaunX
-
Posts
629 -
Joined
-
Last visited
Content Type
Profiles
Forums
Events
Posts posted by ShaunX
-
-
11 hours ago, Fatie89 said:
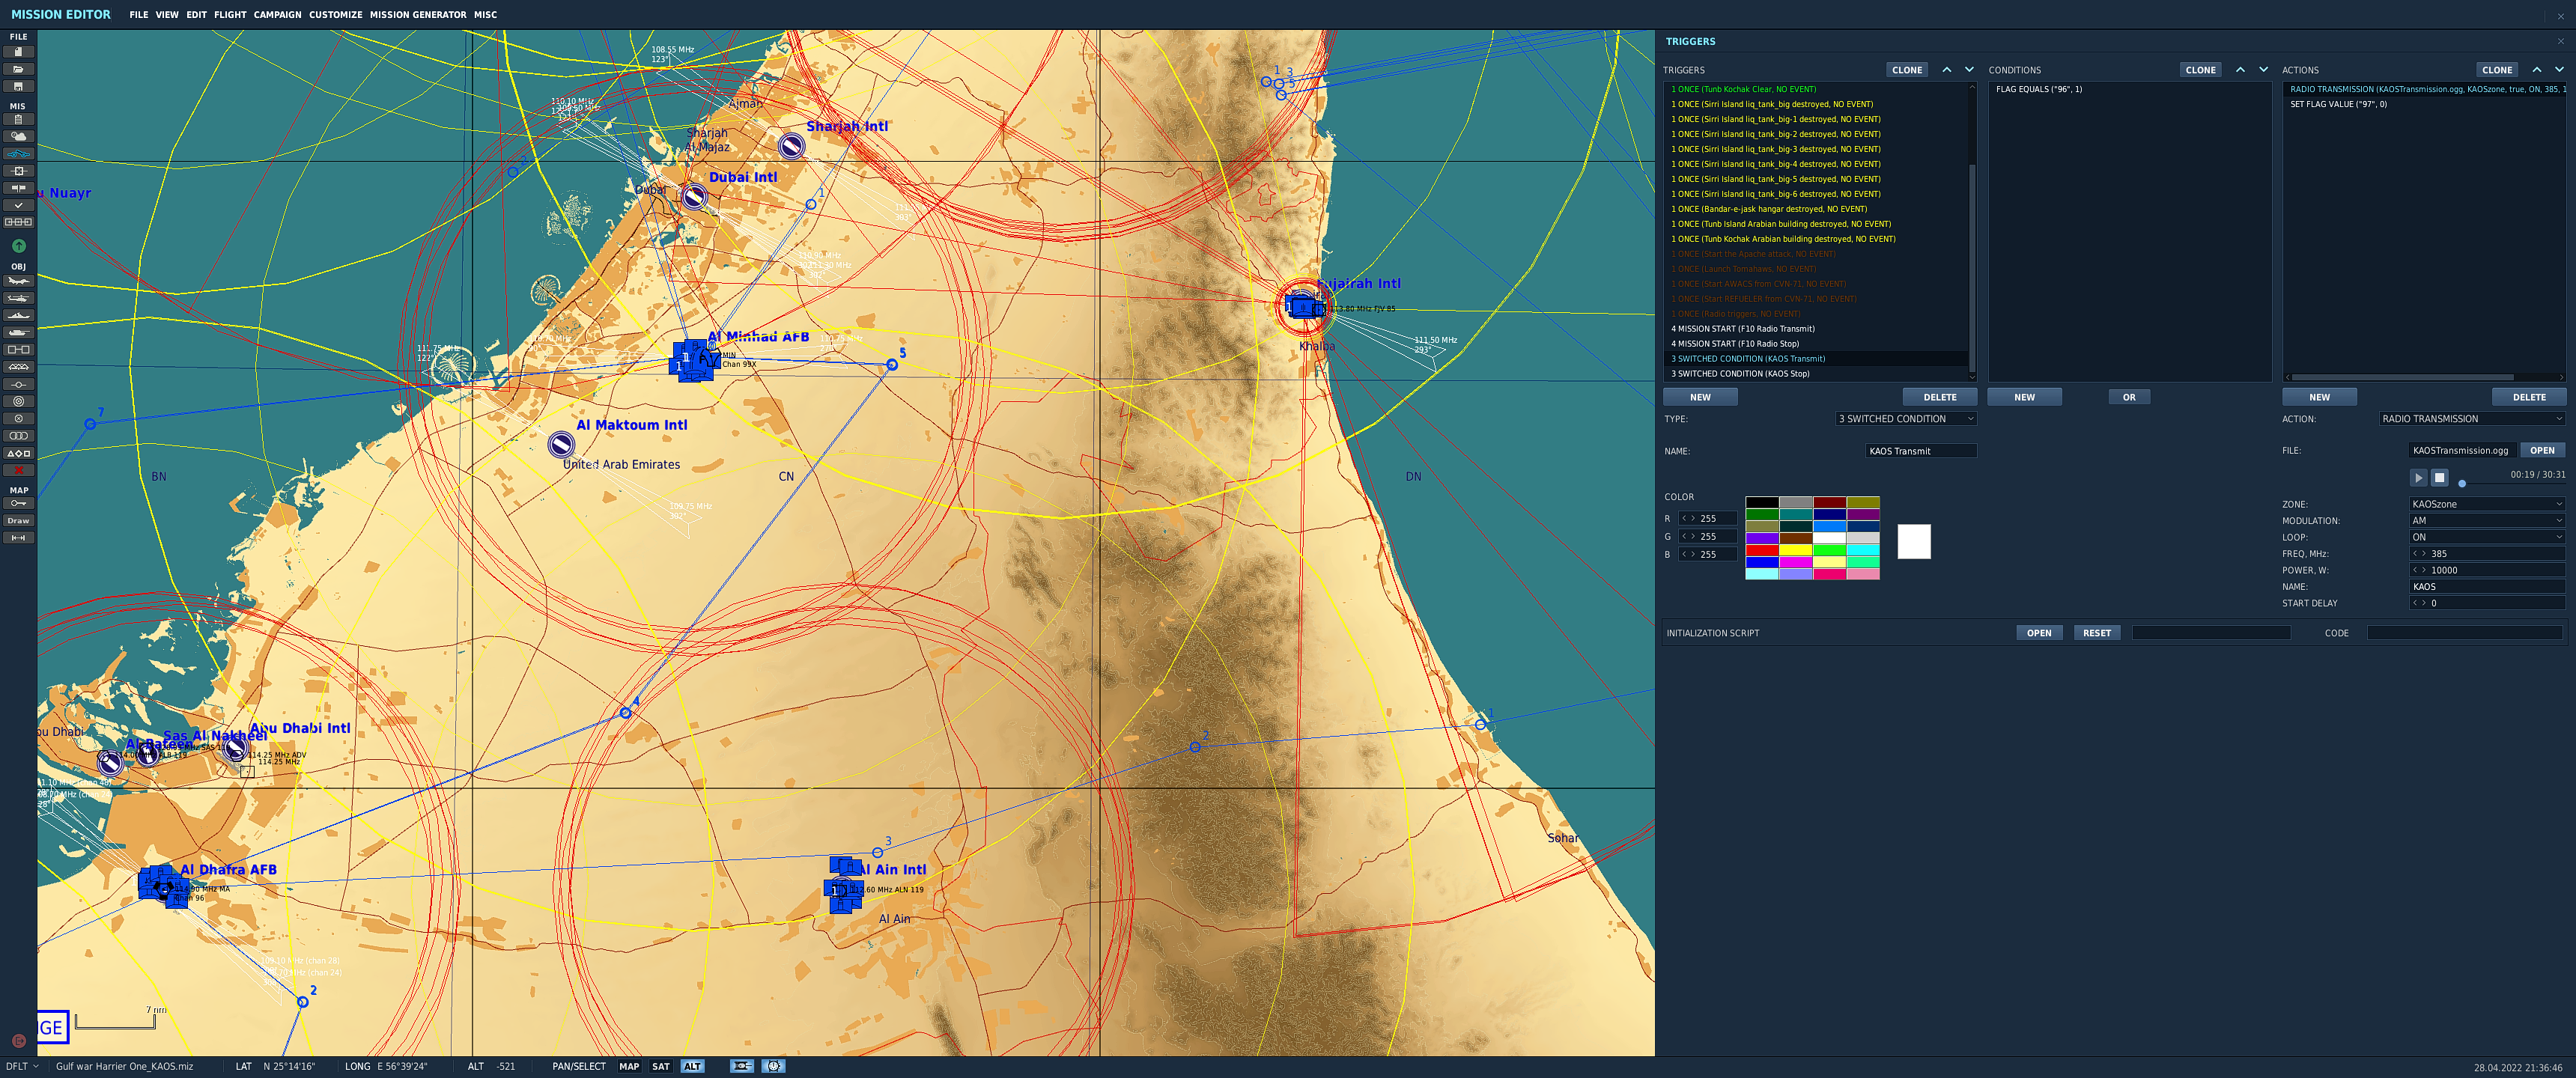
So now that I got the app working, I can't get any sound while in DCS. As you can see on the image, I've played the track for 19 seconds and there is no sound. Creating another mission without any triggers except the KAOS triggers still does not play any sound. The file works with VLC.

Hi,
Sorry you're having problems. I probably won't get a chance to look at this till next week I'm afraid.
In the meantime, AM radio transmissions in DCS can be impacted by terrain as in reality (and I don't believe DCS allows for any ionospheric refraction). Can you check that your aircraft has a clear line of sight to the radio transmitter (which the app places near the centre of the terrain map - the transmission eminates from the centre of the KAOSzone at ground/sea level). No mountains/hills in the way ?
If that's not it, please make a new simple KAOS mission with a single, small transmission file, them PM me the .miz file.
Are you on the latest open beta ? I haven't had the chance to check it with recent updates so hoping they haven't affected it.
-
2 hours ago, speed-of-heat said:
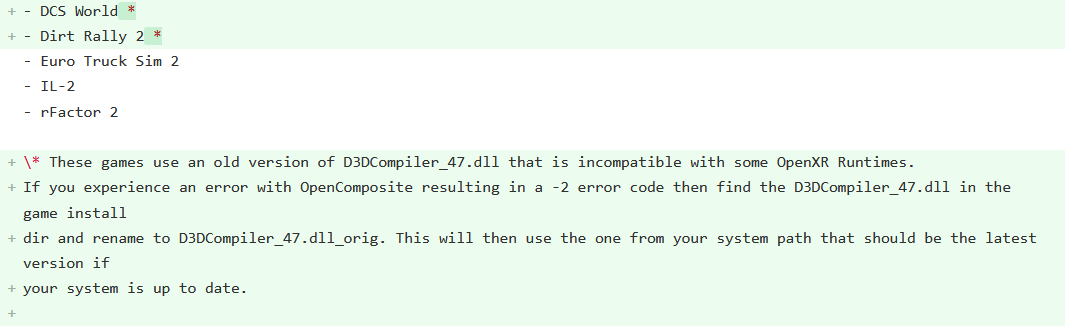
Fun Fact, not helpful but fun, removing the existing D3DCompiler_47.dll from the bin folder has the same effect as adding in the new one

Useful fact, at least for me, I had to do a check on existing files for the repair to work. I get no errors either using or not using the ini file.
from the Update README.md in the OpenComposite Gitlab..
-
 3
3
-
-
2 hours ago, Picchio said:
I MUST use FSR! Jokes aside, yeah, I've also tested the latest build but as I said the issue has been consistent through each and every build. All OpenXR-related applications are up to date. I might try a deep uninstall, cleaning the relevant registry entries as well, assuming that I can find all of them. I agree that it must be something system-specific... at any rate, I've been in contact with mbucchia in Discord, hopefully he will be able to help me in debugging. Oh well!
Have you tried using OXRTK's NIS upscaling instead of FSR ?
-
2 hours ago, DeltaMike said:
Among them, it may make your sweet spot bigger, as one poster recently reported
..and I'll confirm it again. I previously struggled to crane my old neck over far enough to get a sharp focus on the rear side cosole dials in the hornet. I either had to adjust my seated position or use a hand to move the headset over and down a little on my face. At 150% SS however, I can focus on them without intervention.
-
1
-
-
I'm late to the party here because I really couldn't see how this could improve on what I considered was excellent visual quality and performance with my 5900X/3090 config.
Couldn't have been more wrong.
With OXR 100%, OXRTK NIS 60% sharpening (no upscaling), MR on and unlocked, my regular high DCS settings, MSAAx2, no shader mods and now flat terrain shadows too (!!!) the performance is pretty similar, but visually there's just a massive improvement in clarity and with much less aliasing.
Then I turned OXR to 150% and ditched MSAA. Wow. visual quality is astonishing and my previously small G2 sweet spot is significantly bigger. My 3-9 line with MR is solid at 45FPS in almost all scenarios. I've turned civilian traffic to high because it's clarity at range is a real immersion enhancement.
I was still getting micro stutters on the 3-9 low over cities and Guam, presumably flipping between 45 and 30 fps so I tried fixing MR at 30 FPS in OXRTK. Now it's smooth as a baby's bottom everywhere and I honestly can't tell the difference between locked 30 and 45. Only exception is fast aircraft flybys which ghost as I suppose you'd expect at 30 fps.
Really thought I'd still miss FHolgar's CAS Colour Reshade sharpener, but even that is blown away at these settings.
Only thing I do miss is Necksafer, but I note Nobiwan has already started discussions with mbucchia in his Discord so may be on the horizon.
Massive thank you to @nikoel and @edmuss for the excellent guides.
-
5
-
 1
1
-
-
6 hours ago, DeltaMike said:
Or, when I'm sitting there waiting for them to finish refueling, how I keep trying to rest my elbow on the cockpit sill
Before I built my VR Pit I clean fell out of my office chair and ended up on the floor doing exactly that

-
1
-
-
On 2/27/2022 at 7:35 PM, LeeHrvy said:
Issue resolved. went into mission editor and noticed the trigger zone was only like 10ft. i extended the trigger zone to encompass the airfield allowing it to trigger.
Glad it's working for you now.
However, I don't see how the size of the trigger zone could have caused the problem. The population of the F10 commands is not related to a zone, they just trigger on mission start. The KAOSZone is only required to define the origin of the radio transmission.
So that's a strange one. I suspect that just the act of updating the mission in the ME, which effectively rebuilds the mission file, has somehow resolved the issue.
Let me know if you have any more problems.
-
16 hours ago, LeeHrvy said:
I am able to get this to work in SP, however it will not bring up the start stop options in the F10 menu when in Multiplayer.
Can you PM me the mission, .miz file and I'll take a look
It works fine in MP for me
-
2 hours ago, sirrah said:
I've been using Fholger's shader mod for a few months now and I absolutely love it. Colors are so incredibly vivid (grass actually looks green instead of grey-ish), the (imho) ugly and persistent haze in DCS is gone or at least reduced. Everything just looks much more crisp! Also being able to enable/disable this shader mod by simple pressing the "Home" or "End" key makes it so easy to see the image improvement.
Now, if I'm not mistaking, this shader mod (as well as the one from Kegetys) also improve performance, right?
Forgive me if I perhaps jump to conclusions here and feel free to correct me if I do, but I get the idea that most DCS (VR) users are using some kind of shader mod. So...
Perhaps this is a stupid question, but why doesn't ED implement some sort of shader mod/option to their core game?
This particular mod definately doesn't improve performance, in fact it degrades it. However, I can't live without it either! It's actually an early Reshade mod which he developed to work with SteamVR games. Reshade has since been upgraded such that its native version 5.0 will now work with SteamVR and DCS out of the box. That said, if you particularly like this version's effect (which uses the VR CAS Color.fx Reshade effect) then I don't think it's worth upgrading to Reshade 5.0 unless you want to experiment with other Reshade effects.
If you want mods that improve VR performance then the reccomended ones are vrperfkit (also by FHolgar) and the Simplex Shader mod.
Simplex is here : https://www.digitalcombatsimulator.com/en/files/3317762/ (It's a cut down version of kegetys' which passes IC check)
vrperfkit is here : https://github.com/fholger/vrperfkit
..though you actually want this version https://github.com/cedriclmenard/vrperfkit/releases/tag/v0.2.2-dcs-ffr
which fixes his Fixed Foveated Rendering mod to work in DCS (which buys you even more performance)
Note that if you want to use FHolgar's reshade mod along with vrperfkit then you need to rename one of their dxgi.dll files (as they both use it) as d3d11.dll. Doesn't matter which one you change.
-
3
-
3
-
-
2 minutes ago, zildac said:
It does seem far more complex than it is, mainly due to the fact that the majority of the threads are long and sometimes polluted (not with intent, just the way these conversations evolve). However, I would thoroughly recommand @speed-of-heat post here if you haven't already read it, read his OP that he regularly updates as things change.
There is no need to compile anything unless that's your thing. You can simply utilise the dkxgi.dll included in the mod as is. In terms of what I am using currently, I am more than happy with the performance and visual acuity I get with the following (shimmering aside, but that isn't getting fixed anytime soon, at least until the render engine is rewritten for VR and the aliasing issues resolved):
Vrperfkit (if you want to use this in conjunction with Reshade you need to rename a dll as they both use dxgi.gll so rename one of them to d3d11.dll)
Taz DCS VR Shaders mod for 2.7.9.17830
Reshade 5.0
I use a bunch of others but these are the main GFX and performance affecting ones. The complete list is below.
+1 on the @speed-of-heat thread recommendation !
Also note that although Vrperfkit also includes Fixed Foveated Rendering, which will save you another 0.5 - 1.0 ms frametime, his functionality doesn't work in DCS.
You need this fixed version which is forked from FHolgar's
https://github.com/cedriclmenard/vrperfkit/releases/tag/v0.2.2-dcs-ffr
-
2
-
1
-
-
-
On the subject of Colour enhancement, have you tried using LUT's in Reshade ? These apply a pre-defined colour lookup table (LUT) at pretty much zero performance cost.
Try the attached MultiLUT.fx in Reshade's shaders folder and MultiLut_atlas1.png file in the textures folder.
You can then cycle through the included 17 colour presets provided in the atlas from the Reshade overlay
There are some quite extreme examples in the atlas but one or two of them look pretty good in DCS.
The point is that you can quite easily create your own LUT to use by taking a screenshot in DCS, overlaying it with the standard neutral LUT in an editor like photoshop (or the free online photopea), then alter the colour balance, contrast, vibrance etc of the screenshot to your liking and when you save the image again, that LUT will now hold the settings of that colour scheme and you can load that in Reshade.
Only played around with it a bit and I'm sure it will take a better artistic eye than mine to come up with colour balances that will improve different DCS terrains, but it does look like an interesting tool that might yield some visual improvements in the right hands with almost zero performance impact.
(Delete the ".REMOVE" from the filename. I just added it to prevent the image from displaying here)
There's an excellent vid explaining LUT creation, either from within the game or from a screenshot in an image editor (which looks like the easier method to me)..
-
1
-
1
-
-
5 hours ago, johnbowzer said:
@ShaunX I notice in the other files for other reshade and variants there is always a ReShadePreset.ini, would i just rename your test1.ini to that to use as is, or ?
Doesn't matter what it's called, you just need one to hold your preset parms. You can actually define multiple versions of it from the overlay to hold different parmsets.
I wouldn't just rename it though. It's referenced in ReShade.ini - "PresetPath=.\test1.ini"
-
3 hours ago, Ready said:
Yes and because of the small sweet spot it really is quite tiring to watch these recordings in 2d, because the camera goes all over the place all the time, following the eyes. Well for me it's the VR experience that is most important anyways, so every little bit of extra performance we can get is very welcome.
..so why not save the flight as a track file then replay it in 2D with vrperfkit off and record that for your Youtube ?
-
Great review. Thanks for taking the time to share your experience.
-
1
-
-
Just to add a little more complication, here's another sharpener you may want to give a try.
It's from the same guy who wrote the VR_CAS_Color shader, I got it from this archive..
https://github.com/martymcmodding/qUINT
Note that you need to place both qUINT_sharp.fx and its header file qUINT_common.fxh in your shaders folder as he doesn't use the regular ReShade.fxh header
-
1
-
-
2 hours ago, speed-of-heat said:
my current yml
 Upscaling: render the game at a lower resolution (thus saving performance),
# then upscale the image to the target resolution to regain some of the lost
# visual fidelity.
upscaling:
  # enable (true) or disable (false) upscaling
  enabled: true
  # method to use for upscaling. Available options (all of them work on all GPUs):
  # - fsr (AMD FidelityFX Super Resolution)
  # - nis (NVIDIA Image Scaling)
  # - cas (AMD FidelityFX Contrast Adaptive Sharpening)
  method: nis
  # control how much the render resolution is lowered. The renderScale factor is
  # applied to both width and height. So if renderScale is set to 0.5 and you
  # have a resolution of 2000x2000 configured in SteamVR, the resulting render
  # resolution is 1000x1000.
  # NOTE: this is different from how render scale works in SteamVR! A SteamVR
  # render scale of 0.5 would be equivalent to renderScale 0.707 in this mod!
  renderScale: 0.8
  # configure how much the image is sharpened during upscaling.
  # This parameter works differently for each of the upscaling methods, so you
  # will have to tweak it after you have chosen your preferred upscaling method.
  sharpness: 0.2
  # Performance optimization: only apply the (more expensive) upscaling method
  # to an inner area of the rendered image and use cheaper bilinear sampling on
  # the rest of the image. The radius parameter determines how large the area
  # with the more expensive upscaling is. Upscaling happens within a circle
  # centered at the projection centre of the eyes. You can use debugMode (below)
  # to visualize the size of the circle.
  # Note: to disable this optimization entirely, choose an arbitrary high value
  # (e.g. 100) for the radius.
  radius: 0.7
  # when enables, applies a MIP bias to texture sampling in the game. This will
  # make the game treat texture lookups as if it were rendering at the higher
  # target resolution, which can improve image quality a little bit. However,
  # it can also cause render artifacts in rare circumstances. So if you experience
  # issues, you may want to turn this off.
  applyMipBias: true

# Fixed foveated rendering: continue rendering the center of the image at full
# resolution, but drop the resolution when going to the edges of the image.
# There are four rings whose radii you can configure below. The inner ring/circle
# is the area that's rendered at full resolution and reaches from the center to innerRadius.
# The second ring reaches from innerRadius to midRadius and is rendered at half resolution.
# The third ring reaches from midRadius to outerRadius and is rendered at 1/4th resolution.
# The final fourth ring reaches from outerRadius to the edges of the image and is rendered
# at 1/16th resolution.
# Fixed foveated rendering is achieved with Variable Rate Shading. This technique is only
# available on NVIDIA RTX and GTX 16xx cards.
fixedFoveated:
  # enable (true) or disable (false) fixed foveated rendering
  enabled: true
  # configure the end of the inner circle, which is the area that will be rendered at full resolution
  innerRadius: 0.6
  # configure the end of the second ring, which will be rendered at half resolution
  midRadius: 0.7
  # configure the end of the third ring, which will be rendered at 1/4th resolution
  outerRadius: 1.0
  # the remainder of the image will be rendered at 1/16th resolution

# Enabling debugMode will visualize the radius to which upscaling is applied (see above).
# It will also output additional log messages and regularly report how much GPU frame time
# the post-processing costs.
debugMode: false

# Hotkeys allow you to modify certain settings of the mod on the fly, which is useful
# for direct comparsions inside the headset. Note that any changes you make via hotkeys
# are not currently persisted in the config file and will reset to the values in the
# config file when you next launch the game.
hotkeys:
  # enable or disable hotkeys; if they cause conflicts with ingame hotkeys, you can either
  # configure them to different keys or just turn them off
  enabled: false
  # toggles debugMode
  toggleDebugMode: ["ctrl", "f1"]
  # cycle through the available upscaling methods
  cycleUpscalingMethod: ["ctrl", "f2"]
  # increase the upscaling circle's radius (see above) by 0.05
  increaseUpscalingRadius: ["ctrl", "f3"]
  # decrease the upscaling circle's radius (see above) by 0.05
  decreaseUpscalingRadius: ["ctrl", "f4"]
  # increase the upscaling sharpness (see above) by 0.05
  increaseUpscalingSharpness: ["ctrl", "f5"]
  # decrease the upscaling sharpness (see above) by 0.05
  decreaseUpscalingSharpness: ["ctrl", "f6"]
  # toggle the application of MIP bias (see above)
  toggleUpscalingApplyMipBias: ["ctrl", "f7"]
  # take a screen grab of the final (post-processed, upscaled) image.
  # The screen grab is stored as a dds file next to the DLL.
  captureOutput: ["ctrl", "f8"]
  # toggle fixed foveated rendering
  toggleFixedFoveated: ["alt", "f1"]
Thanks man! Definite performance improvement with Foveated rendering enabled in this version
-
Confirmed same problem. With that change End key now works in 2D but not in VR.
Ah well, I guess it's only day 2 of the release
-
Also, there's a checkbox in VR_CAS_Color - "Single image for both eyes". In 2D mode I can see a clear enhancement in clarity when I uncheck the box with the 2D menu. In VR, using the SteamVR overlay, I see no difference at all checked or unchecked.
-
4 minutes ago, zildac said:
Something is definitely off, but I'm using your archive and the included .INI files from the archive. The only change I’ve made thus far is to map the "END" key to effect enable/disable. Odd. And it does indeed register as such in the "Home" menu when toggled. But no change to the image in the HMD. The dxgi.log looks fine too I can see the shaders compiling etc. Is it perhaps that you HAVE to use the Steam VR menu to toggle the effect in the HMD, the statement from the release notes suggests possibly. I'll dig a controller out....
Weird. Works fine for me, and I can change settings in 2D with the home menu.
Can't see any obvious flags. Maybe these..
NoReloadOnInit=0
NoReloadOnInitForNonVR=0Definately no remnants of your previous install in DCS\bin ?
-
11 minutes ago, zildac said:
Something odd going on my end, I’m only seeing the effect in the mirror, not in the headset. I can ramp the sharpening up to 15 (just to make the enable/ disable obvious) and I can see it applied to the 2D mirror, but no change in the HMD

in the release notes ..
"this marks the first release with VR support for games using SteamVR. ReShade creates a separate effect runtime for VR, so you can configure different effects for what is displayed on the monitor to what is displayed in the VR headset"
..so there's maybe a flag somewhere ?
-
Here's a zipped OvGME version of Reshade 5.0 - https://1drv.ms/u/s!Ah0QNaTr5MUPnCRRXRXNliYzaO09?e=0pmakA (on Onedrive as too big to attach here)
Tested and working. Everything just goes to DCS\bin as per fholgar's original version.
Note: The excellent VR_CAS_Color.fx shader that did the sharpening in fholgar's original VR Reshade is not included in any of the effects packs available in the Reshade 5.0 setup, so I've imported it from fholgar's original as it's definately the best sharpener for VR. I've also included the SweetFX shaders which include Vibrance and LumaSharpen mentioned in Supmua's post. I tried Lumasharpen but I don't find it anywhere near as good as VR_CAS_Color.fx, YMMV.
There is an ini file called test1.ini in my version, which just implements VR_CAS_Color.fx with the sharpening settings I was using in Holgar's version but you can obviously just delete it or change its settings in the interface or edit the ini itself.
-
7
-
-
From the "Varjo Aero: Opinion" thread..
-
1
-
-
On 12/29/2021 at 12:14 PM, WHOGX5 said:
Well, it doesn't make 100% sense as it's currently implemented in DCS. Chaff is most effective near the notch and (IIRC) the ALQ-184 as a +-30° cone fore and aft where it's effective. So when you're in an aspect where you want to drop chaff you wouldn't want to use the jammer and vice versa. I just assume that the SEMI and AUTO modes in the real F-16 are advanced enough to adapt to the aspect of the aircraft to the engaging unit, otherwise it feels like they'd be completely useless, just constantly jamming and dropping countermeasures as long as you're spiked, no matter the situation.
Thanks, I really hadn't considered that.
So, would you say, with the DCS implementation, that if would be more effective to use CMS fwd or left to dispense, and only use aft and right to activate and deactivate ECM as appropriate ?
Radio KAOS for DCS
in DCS Modding
Posted
Strange one.
Well for some reason, DCS doesn't seem to like the audio transmission file that RadioKAOS generated from your selection. I can't explain why as the file itself plays fine in any media player.
To make the mission work and play the transmission, all I did was to use RadioKAOS to update your mission with an audio transmission I got it to generate from one of my own tracks.
Please give this a try to confirm it works for you tooShauns KAOS test map_KAOS.miz
Shauns KAOS test map_KAOS.miz