.png.e5e3ad6c82228316e65e1ef6eb0d0bae.png)

CourageousPotato
-
Posts
16 -
Joined
-
Last visited
-
If targets are masking (radar can't distinguish location difference between tracks), the additional tracks will show at a fixed offset relative to the first track and will be flashing. They won't be individually selectable until the radar breaks them out.
-
F-15E Radar Modes HOTAS Diagram & Azimuth vs Elevation Plots
CourageousPotato replied to CourageousPotato's topic in F-15E
Anecdotally, at least in the 2TWS, 4TWS, and maybe HDT modes, I saw a difference in radar performance (track accuracy on flanking/cold targets) when I toggle PRF manually with PB6. I haven't looked recently enough to remember if the mode label changed H vs M. If there is differing info out there, this could also be a difference between sim and IRL behavior. -
Anecdotally, I had issues with JDAM single-release when the selected weapon was not the "next in sequence" to come off the jet. Maybe it would work better when the full set of stores is in 1 PACS program and it's rippled like that?
-
F-15E Radar Modes HOTAS Diagram & Azimuth vs Elevation Plots
CourageousPotato replied to CourageousPotato's topic in F-15E
v2.2: Coolie-short behavior added Entering NDTWS from Mini-Raster uses the same AutoAcq controls as entering TWS from STT Legend for block colors Still unknown: What makes TWS switch TWSH <-> TWSM? Is it automatic with target distance?
-
F-15E Radar Modes HOTAS Diagram & Azimuth vs Elevation Plots
CourageousPotato replied to CourageousPotato's topic in F-15E
Oh that's neat! I'll take a look for myself and add this to the diagram. -
F-15E Radar Modes HOTAS Diagram & Azimuth vs Elevation Plots
CourageousPotato replied to CourageousPotato's topic in F-15E
https://www.drawio.com/doc/faq/import-diagram -
F-15E Radar Modes HOTAS Diagram & Azimuth vs Elevation Plots
CourageousPotato replied to CourageousPotato's topic in F-15E
Diagrams.net. Here is the v2.1 file: F-15E Modes.xml -
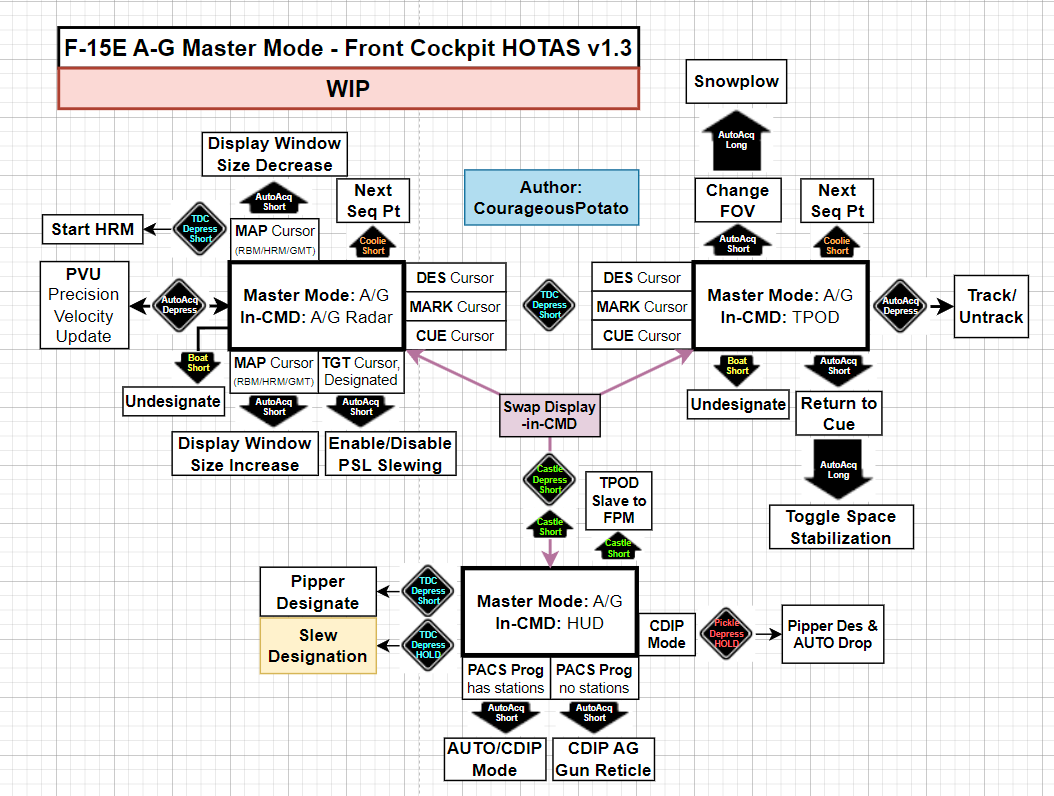
Similar to my other post about A-A Master Mode HOTAS (and radar modes details), this is a diagram for HOTAS mappings in the front cockpit for A-G Master Mode. I arranged the modes in how they are related by switch direction, so it's more of a map than just a table of state transitions like the manual provides. Inop modes are colored yellow. I haven't updated it since November 1st 2023 so there may be discrepancies with the current state of the module. Notably, smart weapons like JDAMs weren't in the module yet.
-
- 8
-

-

-
F-15E Radar Modes HOTAS Diagram & Azimuth vs Elevation Plots
CourageousPotato replied to CourageousPotato's topic in F-15E
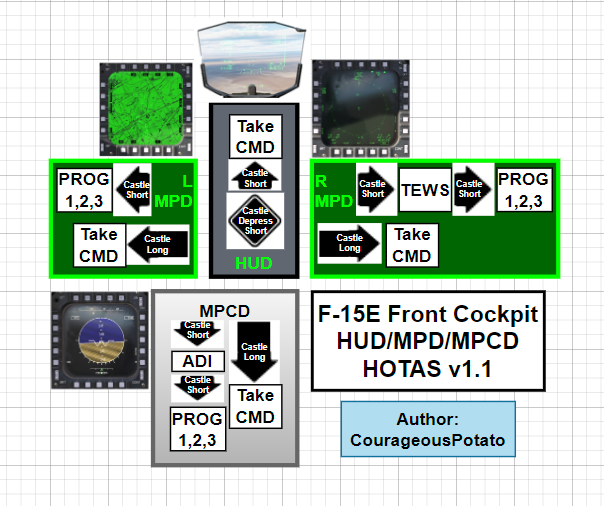
Revised front cockpit displays diagram, v1.1.
-
F-15E Radar Modes HOTAS Diagram & Azimuth vs Elevation Plots
CourageousPotato replied to CourageousPotato's topic in F-15E
Updated diagrams to v2.1. HOTAS diagram got extra details on SRM and GUNS modes, AZ/EL plot got slight formatting changes and markers for slew on guns mode. -
F-15E Radar Modes HOTAS Diagram & Azimuth vs Elevation Plots
CourageousPotato replied to CourageousPotato's topic in F-15E
A-A Master Mode diagram improved for version 2.0. I was able to cut out most of the overlapping flow lines.
-
F-15E Radar Modes HOTAS Diagram & Azimuth vs Elevation Plots
CourageousPotato replied to CourageousPotato's topic in F-15E
Ok thanks, I'll edit the diagram accordingly. Another item I just discovered is NDTWS has alternate functionality for Auto-Acq switch IIRC: Auto-Acq back short seems to switch between TWSH and TWSM. -
CourageousPotato changed their profile photo
-
F-15E Radar Modes HOTAS Diagram & Azimuth vs Elevation Plots
CourageousPotato replied to CourageousPotato's topic in F-15E
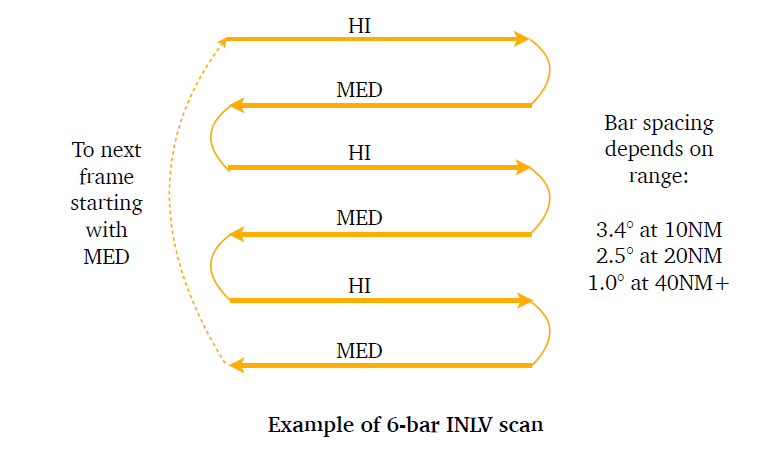
Hmm the elevation bars may not be correct on the AZ-EL plot. I just came across this figure in the manual, which says (at least for RWS INLV) that bar spacing varies with range (which I'm guessing is the range of the Acq Sym, or the radar range scale). I had based the TWS scan sizes on the 1.5 degree bar spacing given for 2TWSH and 4TWSH and 1 degree bar spacing given for 3HDT and 2HDT. Does anyone know the exact behavior of the radar elevation bars in RWS? Do these elevation bars overlap, causing the typical double-returns that are seen sometimes?
-
F-15E Radar Modes HOTAS Diagram & Azimuth vs Elevation Plots
CourageousPotato replied to CourageousPotato's topic in F-15E
Updated Radar Modes diagram to add DTT, Boat switch, and Coolie controls. Thanks for the reminder! Here is another diagram I made, with the HOTAS sequences for front cockpit HUD/MPD/MPCD handling.
-
F-15E Radar Modes HOTAS Diagram & Azimuth vs Elevation Plots
CourageousPotato replied to CourageousPotato's topic in F-15E
Yes, move the Acq Sym (TDC Cursor) over the 4TWSH letters on the radar display and TDC Depress short to enter NARROW scan mode. NARROW is pretty situational; it helps when you have two TWS tracks that are separated by ~20,000 ft at ~40nm, but bandits separating in azimuth will quickly leave the scan volume.