No.401_Speed
-
Posts
29 -
Joined
-
Last visited
Content Type
Profiles
Forums
Events
Everything posted by No.401_Speed
-
For the eight years I've been flying DCS, the replay function has not worked. I'm guessing that it takes considerable memory to record these tracks, memory which could be used to improve sim performance overall. If ED can not fix the replay function, then please make it possible to disable the function entirely. I know that others have posted on this before, so it's not new, but I also didn't want to bury my suggestion at the end of a long forgotten thread. Speed
-
Bumb Acquisition & Spotlight Mode Thanks for the clarification guys. I've learned a bit more and look forward to continuing that process. That explanation of bump acquisition makes perfect sense, because I was sure that I had read somewhere that to activate bump acquisition when in STT, the SCS was pushed forward. So when I originally posted that and then read information pertaining to BVR/Upper function, I thought that I made a mistake when I then found the process described whereby the SCS is pushed toward the Attk Rdr display when in STT. So now it makes sense. Sorry for my bad guess on spotlight, seemed logical at the time but I shouldn't have assumed that to be correct. Last thing I wanted to do was add incorrect information to the discussion. My bad. Your posts are pure gold gents, keep em' coming. Without the benefit of a technical manual, this is our best option to learn. Wags produces some excellent videos on the basics, while Grim Reaper, Spudknocker and others get into more nuts and bolts, but the discussions here are best at teasing out the nuances of the Hornet and it's systems. Cheers Speed
-
Spotlight Mode I just wanted to step back to Preendog's remarks to help us all better understand how the radar works and how we as pilots need to understand how to optimize our sensors to get the information/lock status desired. What Preendog and others (including myself) described is Spotlight mode. This mode is entered anytime you place the cursor over an empty space on the Attk Rdr display and TDC depress. That will direct the MC to focus all radar energy onto a small patch of sky as the radar sweeps a narrow azimuth in an attempt to pick up any return signal. If nothing is found, it defaults back to the last setting while placing the cursor top left. When you perform a spotlight search of a HAFU provided by AWACS or another donor and fail to get any altitude or velocity data and are not able to designate/acquire it, that simply means that the radar is not pointing in the correct location. Example: Last night I flew with some of the guys in our training server, launching from a carrier and at 35,000' feet wet nearing the coast north of Sochie I followed a group of contacts displayed on the SA page. As I crossed the coast and these appeared on the Attk Rdr display I attempted a Mode 4 interrogation but failed to get any data. I switched to the SA page and placed the cursor over each of the contacts and got some BRA data but that didn't help. So I switched back to the Attk Rdr and attempted to conduct a UCTR on one of the contacts now only 25-30 nm to my 11 o'clock. Nothing. I then called up the AWACS to request Bogey Dope and got the clue I needed. As I was flying inland with contacts clearly showing ahead, I had my radar elevation set at 57 - 23K'. When the Bogey Dope BRA data was supplied, I depressed my radar elevation down to something like 35-8K' and there they were flying along the mountain valleys at 11,000'. Now I was able to place the TDC cursor over the HAFU, complete Mode 4 and then designate and acquire them into STT. So thanks to your posts and questions, we've learned a few new things about radar and sensor configuration this week. Thanks guys, hopefully this has been useful for you as well. Cheers Speed
-
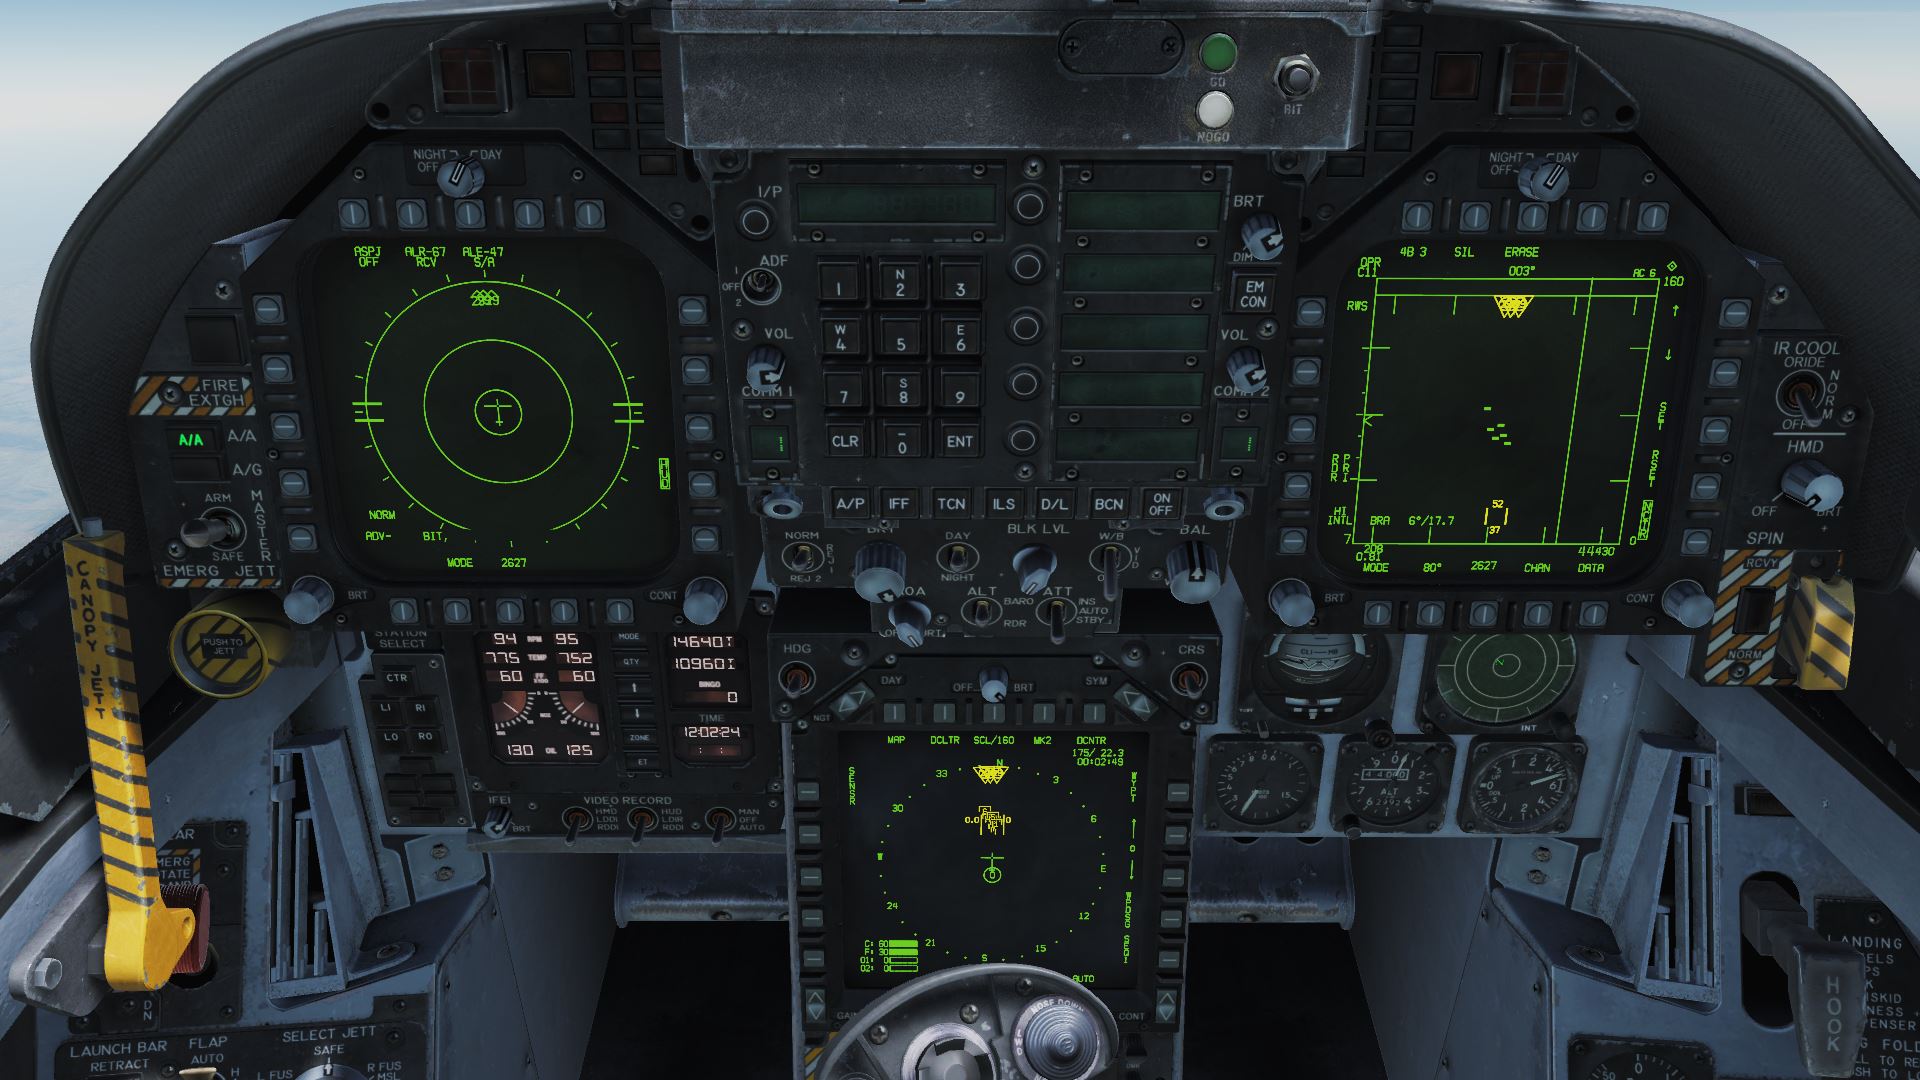
Radar Range & Target Acqusition Yeh the original tests were all done with the MiG-29s. I just ran two more scenarios as a possible answer to Paco's original question. First scenario much like the original except that I spread six aircraft including the Su-25, Su-27, Su-33, MiG-27, MiG-29, Mirage 2000 at a range of 120 nm at altitudes ranging from 30-40,000'. Radar was set at 4B, 160nm, 80 degree sweep centered at approx 10nm. In the pic below, you can clearly see that all six aircraft are detected within that 80 degree sweep. So with no AWACS or donor support the latest update now .34644, the Hornet radar seems to be working fine (aka under ideal conditions). I think the second pic might answer Paco's question. I ran the test a second time at a much closer range and purposely set some of the bogeys beyond the 80 degree sweep. I knew they were out there only twenty miles or so in front of me, but the radar cone sweeping to my front just could not detect them. Part of the learning process is how to manipulate and leverage your sensor capabilities. Case in point: at such close range about half of these aircraft got behind me (I cheated and only armed them with guns) but I managed to track them all down except the Su-33. I couldn't find it by sweeping with AACQ enabled, so I switched to ACM and initially used VACQ as I turned a tight bank looking for it. It was not until I used WACQ and uncaged it to scan the horizon as I turned, that the radar finally picked it up low and just below the horizon. So knowing the unique capabilities of each sensor configuration and then matching that to the best weapon for the job, will help you locate and bring down your target.

-
Manual Designation versus Automatic Acquisition I ran a few more tests to confirm that the Hornet's radar can still detect out to 75-80 nm with LTWS enabled. No problems. Detection ranges seemed comparable with LTWS on or off. Next I wanted to re-test manual designation versus automatic acquisition using AACQ. The tracks attached demonstrate how update 34108 behaves in either mode. I have no mods and I use the techniques described by Wags in his training videos. The first track shows target detection without any Datalink donors. The HAFU are depicted in yellow with only the top portion displayed, ergo ownship data. I proceed through Mode 4 interrogation and the radar returns fail the IFF and remain yellow, however because only one source (ownship) is providing return data, the HAFU remain yellow. In order for you to achieve Hostile confirmation, you would need to get within +-20 nm, in a relatively high aspect angle and complete a UCTR. That's a bit too close for comfort. I then designate each raw return as L&S and DT2. Once within range, I depress the TDC over the L&S to acquire it into STT. The first target is engaged, then the second target is designated and acquired as the L&S and engaged. The second track shows the same engagement, no AWACS, using AACQ after Mode 4 interrogation. You can see problems with achieving and maintaining a lock and it must be done repeatedly throughout the engagement. Don't know why this is? Note about these tracks: You guys are probably pretty familiar with the different outcomes that a replay can deliver, so if it looks like I'm chasing empty sky or focusing on the ground with nothing to see, you'll understand why. DCS Open Beta 25534108 Hornet Radar Designate LS_DT2 Successful Bump Pilot Speed 14 Aug 19.trk DCS Open Beta 25534108 Hornet AACQ Pilot Speed 14 Aug 19.trk
-
Periodic Acquisition Failure Hi GrEaSeLiTeNiN, Short answer is "I don't know". I can say that of the ten or so tests that I ran in an identical 1 vs 2 scenario, half with and the other half without AWACS/Donor support, there was one during which I was unable to achieve a lock by any means. It may just come down to a periodic glitch in the sim software? Excellent chart. Something like that should have been in the Hornet manual. Cheers Speed
-
A/A Mode & Sensor Configuration Hi gents, Been following your discussion with interest and just wanted to chime in to say that Sk000tch is providing you with some very sound advice. Based on my limited knowledge, I'd recommend that you do not get into the habit of turning your LTWS off as it limits what you can accomplish with your sensor package. More on that below if you're willing to read it all. And that brings me to my second bit of advice. This subject is rather complicated and the functions and interactions of radar and weapons systems takes some effort to understand. Do yourself a favor and study the material because even though it makes little sense the first time you read it, in time you will develop a deeper understanding of it. To add to Sk000tch's comments I've included some material below that I posted today on the No.401 Sqn forum. If you really want to learn more, then read it all, if not, then just ignore the remainder of this post. Sorry it's long, but I can't find any shortcuts. 401 Squadron Forum I've been hitting the "books" again after the most recent update to find out what has changed with target acquisition. It certainly seemed like something was broken, but the bug reports and various posts on the ED Forum point to a different scenario. Seems that we (I) have been learning radar target acquisition and sensor/datalink functions and integration within the context of a "work in progress" and what was becoming routine is now evolving beyond an incomplete model to something closer in function to the actual system. Prior to LTWS implementation and perhaps during further development of PLID, UCTR, Datalink etc, it was a simple matter to place the cursor on the target brick and manually acquire and then designate each via manual or AACQ. But now, with these other functions beginning to roll out of the DCS development factory, this "simplified" mode of target acquisition simply does not function as it did. First, many have reported a failure to lock when placing the TDC cursor over a HAFU and trying to acquire/designate that as the L&S. It's happened to me many times and looks like the MC is directing the radar to scan a tight azimuth over the HAFU but then releases it and defaults the radar back to RWS with the cursor high and to the left. REASON: the HAFU symbol on your Attk Rdr display is likely a trackfile being provided to you by AWACS or another donor aircraft via Datalink but that your radar has not yet detected. Possible solution is to place your radar in SIL mode, enter SENSORS on your SA display and switch off SURV function (PB 15). This will clear the deck so to speak, so that you can then switch SIL off, and allow your radar to sweep and detect the targets. Second, AACQ not acquiring new target. If you have designated your L&S via AACQ and want to back out to BVR mode in order to see and select another target on your Attk Rdr display, you must activate the undesignate switch. You also have the option of moving the SCS toward the Attk Rdr display while in AACQ to activate bump acquisition which will place a temporary exclusion zone around the original L&S while it performs a search for another target for ten seconds (note: this will be implemented in future updates). That's along time in a closing fight with missiles inbound, and by then your second target may have closed sufficiently to be outside of the gimble limits of your sweep. So after ten seconds the only target remaining may be the original L&S target (I've had this happen many times where the radar simply returns to the original L&S without every finding the second target). Remember to undesignate when you want to exit AACQ back to full BVR mode. Then you will see your original targets displayed on the Attk Rdr display. Third. Since the latest update, manual acquisition of the L&S target via one depress of the TDC completes designation (as in fast acquisition) preventing you from acquiring a DT2 trackfile. I just learned after reading the radar material again, that since implementation of LTWS, that if you disable LTWS, the radar will lock a target with one depress of the TDC. In order to acquire a L&S target trackfile along with a DT2 trackfile, LTWS must be activated. With this configuration, you can then acquire your L&S target by placing the cursor back over the HAFU with star (L&S) and depressing the TDC a second time, or place the TDC cursor over the L&S and move the SCS toward the Attk Rdr display to activate AACQ. Hopefully, future DCS updates will enable Bump Acquisition via movement of the SCS toward the Attk Rdr display while in AACQ to seek and lock the next target in priority sequence. (Sorry gents, I had to edit this bit as I made an error in how to perform bump acquisition) Read on if you want to get if from the original source: 5.3.1 Designation via TDC Trackfiles can be designated by slewing the cursor over the undesignated HAFU symbol and depressing the TDC. This mechanization only applies to visible HAFU symbols (e.g. TWS, RAID, A/EL format, or RWS with LTWS selected). Attempting to designate a raw hit from VS or RWS (without LTWS selected) will instead immediately acquire it into STT. (that little bit of knowledge didn't stick the first dozen times, so maybe this time?) When the cursor is slewed over an undesignated trackfile's HAFU, a TDC depression designates the trackfile as either the L&S or DT2. If no L&S has yet been established, then this first depression designates the target as the L&S. If a L&S trackfile designation already exists on another trackfile, then the depression designates the target as the DT2. Any previous DT2 designation on another trackfile is cleared. If a designation occurs on the L&S, the L&S is then acquired into STT. When the TDC is depressed with the DT2 under the cursor, the DT2 is upgraded to the L&S designation and the previous L&S is demoted/re-designated as the DT2. This applies to both the Attack format and the AZ/EL format. Note that a TDC depression/release while over the L&S commands the Radar into STT acquisition on the trackfile as described in the preceding paragraph. To summarize: Designating a pre-existing L&S target, enters acquisition (STT) immediately Designating a raw hit (no HAFU displayed), enters acquisition (STT) immediately Designating an undesignated trackfile makes it the L&S. If another track was previously the L&S, the old track is made the DT2 5.3.2 Designation via Undesignate Yes, it's a genuine oxymoron. Undesignate can be used for several designation functions, the behavior of which is dependent on whether or not a L&S or DT2 already exists (this has not been tested but I do know that the stepping function has not yet been implemented for the DCS F/A-18C: Initial L&S Designation - When no L&S designation exists, the initial Undesignate activation makes the highest ranking trackfile the L&S. Target Stepping - When the L&S exists, but not a DT2, the Undesignate switch allows stepping the L&S designation to other MSI trackfiles. With rapid selections of Undesignate, the desired trackfile can quickly be declared the L&S. In this rapid sequence, the MC steps the L&S in the order of rank, through the top eight trackfiles. (NOTE: virtually identical to the bump acquisition function) Target Swapping - When a L&S and DT2 trackfile both exist, the Undesignate switch swaps the designations between the two (assuming none of the overriding conditions below hold true). Other Radar functions that make use of Undesignate take precedence over the Designation functions as follows: Exiting Auto Acquisition (AACQ) Exiting Spotlight mode Exiting FLOOD mode Exiting ACM modes In any of these cases, Undesignate first performs the aforementioned function and only then can it be used for designation functions. 5.3.3 Designation via Acquisition If the Radar is commanded into STT by any means, the corresponding trackfile is always declared as the L&S if it was not already. For example a TDC designation from VS or RWS (without LTWS enabled), will immediately both declare the trackfile as the L&S and enter STT. Likewise, Fast Acq, AACQ, or ACM modes which all ultimately command STT, will accomplish the same thing. This guarantees that the L&S designation is applied to the desired trackfile even if the acquisition is not successful. FOLLOW UP I ran another few tests with LTWS enabled and was able to acquire separate L&S target and DT2 using manual acquisition. But then after designating the L&S target and upon engaging with a couple of AMRAAM, I could find no quick reliable way to switch onto DT2. The only way that seems to work (sometimes) is to undesignate, wait a second or two for the radar to sweep, then move the cursor onto the second target and depress the TDC twice. It only worked once, when I took a few extra seconds before going defensive (total of 40 sec with a missile literally hundreds of feet away) and managed to get a lock. Every other time as I was evading missiles from the L&S target, I was unable to get a lock on the second aircraft. I would put the cursor over the HAFU, double tap the TDC depress and nothing would happen. I only ever got the second aircraft in ACM mode with the AIM 9x. I only experienced one event when the radar entered a narrow azimuth sweep over a HAFU that I had completed Mode 4 interrogation and which clearly showed a full Hostile reading. In this case I had set my radar to 80 nm as usual, but changed the bar setting to 2 with the sweep setting set to 140 degrees. I could not obtain a lock via manual or AACQ.
-

[LATER IN EARLY ACCESS] Fast Acquisition via AACQ
No.401_Speed replied to No.401_Speed's topic in Bugs and Problems
Fast Acquisition via AACQ Roger, Thanks for the update. Manual mode still works fine for this purpose so we'll use that until further refinements are made to the other modes. Cheers Speed -
Previously I was able to acquire DT2 or a third/fourth trackfile while in RWS by placing the TDC cursor over the HAFU in the Attk Rdr and then execute fast acquisition via moving the SCS toward the Attk Rdr display to activate AACQ. I ran more than a dozen tests this week in one versus four/two scenarios using the MiG-29s and after firing an AMRAAM at the lead aircraft as my L&S target, that target would be undesignated, the TDC cursor would be placed over the DT2 and AACQ would be activated to initiate fast acquisition. In virtually every case, the radar would reacquire my original L&S target and all subsequent AMRAAM would guide on the lead aircraft. I also tested bump acquisition with a L&S target acquired into STT via AACQ, and by pushing the SCS forward, bump acquisition was not activated but moved into ACM mode as it would normally when not in STT. Is this something that can be fixed?
-
Return to Search I believe you are referring to the Undesignate switch on your HOTAS which functions exactly as you describe.
-
Splash One Gaming SATAL 2019 29/06/19 Just wanted to say well done to MOltar and the pilots of 51st Bisons and IRIAF. This was the first live event that I've watched and I hope to follow these match-ups more closely in the future. We (401-450 Sqns) are well into our conversion training on the Hornet and Tomcat and have been talking about the possibility of entering a team in 2020 or beyond. Great job, keep it up. Speed
-
RWS Track Files You are correct. Thanks for that. I've spent more time studying the radar, targeting and missile systems of the Hornet than time flying, but there is always more to learn. I double checked some of the material read before and sure enough, there it was. Range While Search (RWS) - The RWS mode provides detection of targets including high-closure rate, head-on attacks and low-closure rate, tail attacks. RWS allows for unrestricted scan volume size and scan centering control. The target data is presented in a range versus azimuth format and is typically presented in a synthetic blip scan ("brick") format but trackfiles are also generated and can also be displayed in RWS as Hostile Ambiguous Friendly Unknown (HAFU) symbols. Cheers Speed
-
Auto Acqusition Mode Hi gents, The short answer to the original question is that you use the undesignate switch on the stick to command an exit from AACQ, with a catch: if you have a L&S target in STT from AACQ, then the undesignate switch will command the MC to undesignate the L&S target for 10 seconds in order to allow the MC to sweep for the next highest threat target, excluding the original L&S target you just undesignated. If after 10 seconds the radar does not detect another, then AACQ will redesignate the original L&S target back into STT. If you wish to undesignate and exit AACQ, then activate the undesignate switch twice back the SCS into its higher level functions from which you can then go back into BVR mode, or drop the SCS down into the lower function ACM modes to select WACQ, VACQ or use the weapon select switch to select guns in GACQ mode. The other thing about radar functions you need to understand, is that acquisition is not the same as designation (commonly referred to as "lock"). When a raw data brick is displayed on the Attk Format DDI, the pilot must acquire the target by one of any number of methods to create a track-file within the MC. You can do this manually by positioning the TDC cursor over the raw brick and then depress the TDC once. The radar return is then acquired as a track file and your radar will continue to track that return unless it is lost due to vectoring beyond the radar sweep gimble limits or you exceed your aging settings etc. In order to lock the target, you would need to position the TDC cursor over the HAFU if one has been generated, or the return brick and then depress the TDC a second time. That will designate the track-file as your L&S target and place the MC/radar into STT mode. Where AACQ differs is in it's automated process of acquiring and designating the target as your L&S target straight into STT mode. There is not need to manually execute these two functions. I like to use it when I'm up against multiple targets. While in BVR mode I manually acquire all targets on my Attk Radar so that the MC then creates multiple track-files. Then as I close to within launch range I'll position the TDC cursor over the radar return that I wish to engage first, and then push the SCS toward the Attk Radar DDI to activate AACQ which will then automatically designate that target as my L&S target in STT. Then as the fight progresses, you can use the undesignate switch to "unlock" your L&S target if you get a successful hit, so that the MC can quickly switch onto the next highest threat target, designate that as your L&S target in STT. So long as you have not exceeded your radar gimble limits, all of these track-files will remain within your MC and can be quickly acquired using AACA. Once you get into a heat-seeker turning fight under 10 nm, you may want to switch into ACXM mode. But before you do, the AACQ works equally well when slaved to your AIM-9, just remember to un-cage the seeker head and the radar will tell it where to look. The only function I've not been able to use is the bump acquisition feature. Seems this has not been implemented in the Hornet functions. Here's a cut and paste of some of the learning material I've posted over on the 401 Sqn forum. 6.1 Automatic Acquisition (AACQ) The Automatic Acquisition (AACQ) mode is available in all search modes and provides a head-up means to acquire targets (enter Single Target Track (STT)), at ranges beyond the Air Combat Maneuvering (ACM) Modes. Strictly speaking, AACQ is not a dedicated radar mode; It does not change scan volumes, range scales, PRF or aging from the previously selected mode. AACQ can also be used from within the STT mode in order to simultaneously reject, or "bump" the currently tracked target and acquire a new one. In addition, AACQ may be used in place of manual TDC acquisition (e.g. manually Designating with the acquisition cursor over a track) in what's called Fast Acquisition. AACQ is commanded by moving the Sensor Control switch toward the Attack format when the TDC priority is already assigned to the format and the Radar is operating in either the RWS, VS, TWS, or STT modes. When the AACQ mode is active, the label AACQ will appear in the upper-left corner of the Attack format just outside the tactical region border. The behavior of AACQ is different depending on which radar mode is active and/or whether the TDC cursor is currently over a hit. Switching to AACQ was confusing at first since it does not have any specific switch position. Remember to move the SCS left if the left DDI is set to Attack Radar, or move the SCS right when the Right DDI is set to Attack Radar. By moving the SCS toward the DDI with Attack Radar already set, you activate AACQ. If the Radar is not in STT, the Radar retains existing search parameters and attempts acquisition based on the following priority: MSI trackfile under cursor - Fast Acq. Launch & Steering target if it exists. ACQ Point cue if it is displayed. The closest track in RWS or TWS, or the fastest track in VS. If there is no target under the cursor, the Radar performs AACQ and attempts to acquire the highest priority MSI trackfile. If an L&S designation exists, then it is acquired first. If an L&S designation does not exist, then the Radar will attempt to acquire the highest priority MSI trackfile. If this highest priority trackfile is being intentionally suppressed (e.g. HAFU is not displayed) then the ACQ point cue is displayed and the Radar will acquire the corresponding target. If no targets are available which meet the previous criteria, the Radar will remain in AACQ until a target appears, at which point it will immediately acquire it. In many cases, when no L&S exists, the ACQ Point cue will indicate the first eligible/highest priority trackfile, and selection of AACQ will result in the Radar acquiring the target at that location. For all search modes (RWS, TWS, VS), the Radar remains in AACQ until a target lock is achieved, an ACM mode is selected, the Gun is selected (Radar enters GACQ), the AACQ mode is rejected, or A/A master mode is exited. The ACQ mode may be manually exited via the Undesignate switch SHFT+DEL, which commands the Radar to return to the last selected search mode (RWS, VS, TWS). AACQ cannot be selected if the Radar is in GACQ or in any ACM mode.
-
Korea! 1952 - 77 (F) Squadron Operations 9 February 2019 The guys from 77 (F) Sqn enjoyed another session of great A2A action this past Saturday and many thanks to the MiG drivers who put up thirteen sorties between them. We enjoyed these flights especially due to the MiG pilots employment of effective flight/element tactics. Well done! We had a similar night of action a couple of weeks ago and I took the opportunity then to write up a detailed account of it based on a Tacview track I created from the replay. Here's a description of that review from Saturday the 9th of Feb (Sunday 10th Feb for those of you in Europe and Australia). This account is far more detailed than usual, but it was such a great encounter it deserved to be recorded in the 401/450 Squadron op log. 2400 hrs 9 February 2019 77 (F) Squadron RAAF Roster A/C # 917/Green # 1 - Devil A/C # 959/Green # 2 - Infidel (guest pilot sortie #2) A/C # 960/Green # 3 - Squiz A/C # 961/Green # 4 - Kookaburra A/C # 963/White # 1 - Speed A/C # 964/White # 2 - A/C # 967/White # 3 - Alpine A/C # 976/White # 4 - Hawk Narrative (all times are server local) Sortie #1 C/S Dropkick was tasked to destroy a vehicle control point at MGR FJ 55. Six Sabres rolled down runway 1 2 at K-55 wheels up at 9:45:23 hours local time. With White Flight leading and Green Flight close behind, the two three-ship flights banked away from K-55 is a tight, well disciplined formation. Dropkick picked up the outbound heading of 350 degrees, completed Fence In and settled in for the short sortie to the target area. At 9:56:55 hrs local, White Lead ordered echelon right to set up for initial attack run. As White rolled onto the target from the North, Green Flight crossed left above White to set up cover over the objective. At 9:59:00 hrs, White Flight engaged T1 with rockets destroying the entire section of six vehicles including four heavy cargo trucks and two mobile AAA units. As White Flight pulled up and to port to set up for a gun run, Green Flight rolled in from the South to engage the buildings designated T3, T4 and T5 scoring hits against and destroying all three targets. White Flight then mounted a single gun run along the tree line adjacent to the road while Green Flight engaged the two bunkers designated T2 scoring hits, but causing no damage. At 10:04:00 hours White Lead a White Four flew a low altitude run down the valley in order to capture a few BDA photos. Meanwhile, White Three broke formation to fly further down the valley where he attempted to engage an AAA unit from low altitude. Unfortunately, White Three was shot down by a ZU 23-2 unit. No chute was observed. The remainder of C/S Dropkick rejoined on the back-bearing to RTB at K-55 at 10:12:15. Sortie #2 It was 10:40:15 hrs by the time C/S Dropkick took off again for their second sortie. Green Flight welcomed a guest pilot "Infidel" who lent his skill and experience to Green Flight. This second sortie was based on Mission Sheet #7 CAP 3. White Flight experienced a string of technical glitches that delayed their take-off for ten minutes. Green Flight however took off and climbed toward 39,000' on an initial heading of 360 degrees, turning onto 270 degrees to set up as high cover. White Flight finally rolled off the end of runway 1 2 at 10:53:15. White Flight banked away from K-55 to pick up their outbound heading of 330 degrees continuing their climb-out to CAP cruise altitude. Within minutes of overflying the lower foothills North of K-55, White Three called out contrails at 11 o'clock high. White Lead tallied the four ships of Green Flight but also spotted a lone bogie approaching low on an intercept course. As Green Flight had just completed their first circuit past Maykop, and had just turned toward the coast and were in the process of banking left again onto 360 degrees, they had not tallied this aircraft. The bogie approached along 150 degrees or 11 o'clock to Green, but even though he was coming fast at 35,000', no one in Green had yet tallied this threat. Suffering comms problems again, White Lead relayed through White Four, who contacted and warned Green Lead of the bogie. At 11:05:32, MiG#1 (Coosjoaquin) engaged Green Four who was lagging some distance behind. In that same instant, Green One and Two executed a hard bank to starboard to engage MiG#1. MiG#1 closed rapidly on Green Four but overshot his target without scoring any hits so he extended in a climbing left bank to 38,000' while Green One and Two extended a short distance South. Green Two pulled high right as Green One completed his turn to engage MiG#1 in a head on pass. In exchanging bursts, neither pilot registered any hits but just beyond the merge, MiG#1 fired a snap shot that narrowly missed Green Two crossing his front. MiG#1 then climbed high right to separate from Green One who climbed high left. At 11:07:48 hrs MiG#1 skillfully reversed to engage Green Two then descending through 32,000' in a right bank. Green Two spotted the threat and snap rolled his Sabre left to break contact with MiG#1 attacking from behind. This allowed Green Three to slip into firing range and threaten MiG#1 but this pilot used his considerable flying skills to instantly reverse left and dive under Green Three. As the action continued, Green Four completed RTB at K-55. Meanwhile, Green Two re-engaged MiG#1 with a short burst that missed. Three seconds later Green One fired three well placed bursts but MiG#1 again expertly rolled inverted to dive away from danger. This caused Green One to overshoot so he immediately pulled up and to the right to make way for Green Two and Three who now took up the pursuit. The MiG pilot evaded this new threat by pulling hard right and using maximum thrust to climb away but Green Three managed to squeeze off a short burst that narrowly passed by the cockpit of the jinking MiG-15. This action set up a rolling scissors as Green Three pulled his Sabre above the MiG (and no doubt vanished in the act) as the increasingly desperate MiG pilot tried to extend away to the NW. But escape was not yet possible as Green One had re-positioned for a head on pass to fire a long burst at the passing MiG. This action turned the MiG hard left just as Green Two pulled once again into effective gun range. Green Two then fired a steady burst that ripped along the entire length of his opponent's fuselage. An instant later Green Two fired a second burst sending a steam of .50 cal rounds into the stricken MiG-15. In a flash, the MiG exploded. It looked to White Flight, orbiting North of the fight at 38,000', as if the MiG split into three sections rising up like a fountain of burning wreckage then cascading down in an arc to the ground below. With the action seemingly over, White Flight cruised high above Green Flight who were now rejoining on a heading of 060 degrees five thousand feet below. Dropkick then turned onto 120 degrees and extended toward the coast intending to RTB at K-55 for fuel and ammo. But at 11:18:40 hours, White Three reported a pair of contrails at 9 o'clock to the North and climbing. Green Lead checked fuel and once he was satisfied that enough remained for another round, ordered Dropkick to turn onto a 360 degree to intercept. White Flight banked smoothly to port and jettisoned tanks to prepare for this second round. White Lead then suffered another system failure when his tank release failed to function. Using the emergency jettison control he watched as the big 200 gal tanks cartwheeled away from his starboard wing, then confident of flying a clean aircraft, continued to climb toward the incoming bogies. As the second engagement got underway, MiG#1 (Coosjoaquin) barreled in on a head-on attack against Green Lead, while MiG#2 (Brunson) trailed in echelon right some distance behind. White Flight pushed higher to 39,000' to commence a cross over above the merge. Watching below as Green Lead and MiG#1 exchanged fire at the merge, White Lead observed hits on the MiG. White Flight continued to pull up in a right arc high over the MiG to gain position for the pursuit. MiG#1 then leveled his wings to climb above con then rolled left to dive back into the fight. White Flight were well positioned and now dropped in lag pursue of MiG#1 closing the gap as he re-entered con toward Green Flight below. Green One had by now reversed and charged in for a second head-on pass firing a short burst at MiG#1. Green Two joined White Lead in pursuit of MiG#1 as both aircraft passed through .90 Mach. At 11:24:27 hrs MiG#1 was forced to counter another head-on pass as Green Three fired a burst that narrowly missed the nose of his opponent's aircraft. With the pilot of MiG#1 distracted by Green Flight, White Lead closed to within effective gun range to fire three short bursts that forced MiG#1 to jink yet again. Each aircraft manoeuvred to gain an advantage in the thin air at 38,000' but it was Green Two and White Lead who managed to retain position to fire bursts in rapid succession. White Lead quickly fired a second burst that scored hits on the left rear fuselage. MiG#2 now entered the fight from the North, passing beneath MiG#1 to bank around to the left in an attempt to engage wingmen White Three and White Four. At 11:26:20 hrs, MiG#1 snap rolled, reversed and dove away. This manoeuvre took MiG#1 below con at .90 Mach with White Lead in pursuit, but the MiG was able to climb out effectively while White Lead dropped lower to remain out of buffet. While at first this seemed to place White Lead at a disadvantage, since the MiG initially climbed higher, the greater speed retained by the Sabre allowed it to out-climb the MiG to regain a position above and behind the MiG. Green Three now rejoined the fight to fire a short burst as Green Two closed the gap while squeezing off a snap shot. But in diving onto the climbing MiG, Green Two overshot his intended target and slipped below and to the right. White Lead continued to edge his Sabre into point blank range then squeezed a burst just as the MiG filled his gun sight. A stream of .50 Cal rounds tore into the wing root and port side fuselage forcing MiG#1 into a hard bank to port but unfortunately for him, he was caught squarely with a second burst by White Lead. MiG#1 now used his considerable skill in an attempt to break clear of Dropkick while MiG#2 was engaged with White Three and Four ten miles to the East. Green One and Green Three now re-engaged MiG#1 each firing short bursts while jockeying for position. MiG#2 disengaged from White Three and Four and he seemed to take up a heading toward a passing flight of cargo planes at 30,000' above. But as Green One fired three bursts almost at the same time that Green Two fired three of his own, MiG#2 suddenly banked left toward MiG#1 undoubtedly in response to a call for some assistance. Before MiG#2 could influence the fight however, Green Two fired again to score more hits on MiG#1. The time was now 11:30:52 as MiG#1 pulled a high scissors to expertly dive down, fire and hit Green Two with a near fatal burst from his cannons. Green Two, now smoking badly and unsure of the extent of damage to his Sabre stayed with Green One as the pair continued the chase MiG#1. Just then, a burst of fire passed by Green Lead too close for comfort and he was forced to break left (White Three was closing on Green One and had fired past him at the MiG). White Three then passed very close to but overshot the MiG. This allowed MiG#2 to pull onto the six of White Three to fire a short burst but no hits were registered. The fight now began to die out as MiG#1 was critically damaged and unable to regain altitude. He struggled along at 7,000' toward Maykop but crashed at 11:35:49 before reaching the airport. MiG#2 redirected toward the passing cargo aircraft enticing Green Flight and the remainder of White to chase him for a while, but Green Lead called bingo fuel to lead Dropkick back to K-55. All aircraft completed RTB at 11:45:00 hours.
-
Trimming the F-86F-35 for Level Flight The Sabre is very sensitive to acceleration/deceleration forces. So long as you are accelerating, the pitch will rise forcing the pilot to trim nose down. When decelerating, the pitch will drop and the pilot will need to trim the nose higher to maintain relatively level flight. So long as the speed is changing, the Sabre will porpoise and with every adjustment by the pilot using the control stick, that flight characteristic will get worse. Learn to fly the Sabre hands-off and you will be able to achieve level flight trim. You can trim the Sabre to achieve level flight but as already stated above, the exact amount of pitch input will depend upon throttle settings that are adjusted for altitude, speed and payload/fuel on-board (e.g. weight). Once you reach cruising altitude with 120 gal tanks, settle into a cruise of .85 Mach, then throttle back to 85-80% so that you can maintain that speed. Add very small pitch adjustments until you achieve level flight, then control roll with small taps left/right of the control stick. You must fly hands off to achieve level flight except as is needed to control a left roll tendency at high-Mach. With tanks off flying a clean aircraft, the throttle will need to come back almost to idle as the Sabre will want to speed up past .95 Mach beyond which stable flight is nearly impossible. Speed
-
Static versus dynamic weather - stuttering Hi SeaQuark, Thanks for updating the server. All of us from 77 (F) Sqn were happy to get back onto the server last night and we continue to fly our regular events on Saturdays at 2400 Zulu. We did notice some bad stuttering last night, which seems to be a problem with the .26479 release of open beta. I've just read through the bug reports and it seems that this version is presenting some problems with crashes and flickering black screens. While those issues are for the developers to address, I stumbled onto a post that might be of interest to you related to fps performance stemming from static versus dynamic weather settings. I know for myself that the instance of stutter is most pronounced in the vicinity of Sukhumi and Gudauta which typically has a layer of cloud cover, and then improves as we fly inland. In the post below, tests were carried out which demonstrate the instances of stutter/lower fps when using static weather, versus the complete absence of stutter when dynamic weather has been enabled. Not sure if this will be of use to you, but just wanted to bring it to your attention. https://forums.eagle.ru/showthread.php?t=230657 Cheers Speed
-
Korea! 1952 Server Status Has the Korea! 1952 server reverted to DCS Release? We have not seen it in open beta over the past two weeks?
-
Since the 2.5.3.24984 update to open beta, the replay function is not working. Last night when logging onto the PvP server, the replay map first appeared followed shortly with the normal in-cockpit spawn. This morning when attempting to replay last nights flight, replay started with the coalition selection page, and after selecting Red/Blue/Spectator, DCS then linked back to the live PvP server. Tried the repair function and experienced the same malfunction. Speed
-
MiG Alley - Saturday 2400 Zulu Hey Great Job Grizzly and Metzger and to the other four MiG pilots! This was by far the best contest we've had to date, and make no mistake, we love the challenges and are continuing to learn ourselves. The reason that I posted our ops log here is that for the first time I could detect a series of tactics being played out between both sides and that's what made this such a classic engagement. Also being evenly matched between MiG-15/F-86 both sides enjoyed a great series of engagements while everyone survived (sorry about sortie #2). Our guys were really pumped after that third sortie and everyone logged off that night looking forward to next week, so here's hoping that enough interest exists to make it a regular event. We fly two full four ship flights in the Korea! 1952 server at 2400 hours Zulu on Saturday's and we fly the same time on Thursday nights as well, so if you want additional practice, jump in and look us up. Hopefully we'll see you and your mates again on Saturday!! Cheers Speed
-
Korea! 1952 - 01 December 2018 We had a great flight last night and I just wanted to share that with any of you looking to join into the action. We fly Saturday nights at 2400 hours Zulu. Here's the action from last night that I posted to 401/450 Squadrons' forum ops log today. Narrative Sortie #1 Seven pilots lined up on the apron ready for a multi-task mission against Red forces at Taupse and Maykop A/F. White Flight took off from K-55 at 5:17:44 local time followed immediately by Green Flight at 5:17:55 hours. Squadron cohesion continues to improve as each flight cleared the runway and took up their sortie heading of 300 degrees in tight, well spaced formations. With minimal MiG activity being reported throughout the region, C/S Dropkick were tasked to hit the key port facilities at Taupse to choke off the flow of supplies to Maykop A/F. Armed with sixteen HVARs each, C/S Dropkick flew unmolested up the coast and rolled in to attack the Taupse docks and surrounding power plants at 5:34:37 hours. All pilots released their ordnance onto assigned targets and turned onto their return heading of 120 degrees. Rejoin was completed at 25,000' with all A/C landing safely at K-55 by 6:01:42 hours local. Sortie #2 White and Green Flights completed re-fuel and re-arming with 120 gal drop tanks and M-64 GP bombs to deliver a second blow against Taupse harbour. Taking off at 6:19:40 and 6:19:50 respectively, C/S Dropkick proceeded back onto their original heading of 300 degrees stepped in flights of 20,000' and 15,000' inbound to the target area. White Flight rolled in first at 6:39:53 hours local followed by Green Flight one minute later. Generally speaking this sortie achieved good results with 10 x M-64 bombs impacting into the target area. Both flights then proceeded onto 060 degrees and accomplished rejoin very effectively. As White and Green Flights proceeded at 35,000' Green Lead tallied a lone MiG-15 on patrol SE of Maykop A/F. The MiG pilot turned into the flight of Sabres and merged head-on with Green Lead then turned aggressively against Green Two and Green Four. White Flight took a brief opportunity to turn against the MiG but Green Flight quickly regained the advantage and in the dog-fight that ensured, Green Three engaged and destroyed the MiG. C/S Dropkick reformed onto heading 150 to RTB with all A/C returning safety to K-55 by 7:19:51 hours local time. Sortie #3 Seven pilots prepared their aircraft for further operations against a growing number of MiG-15s now reported to have scrambled from Maykop A/F. Whereas minimal opposition was put up against Dropkick during the initial two sorties (i.e. 1 x MiG-15 recon), the MiG response now was significant and likely in response to the loss of their patrol aircraft. At 7:34:57 White Flight lifted off from K-55 with Green Flight hot on their heels. Expecting immediate resistance, flight lead ordered Dropkick to climb in a right hand circuit over K-55 and upon reaching 20,000' and with no reports of inbound bogies, White and Green Flights proceeded on heading 335 degrees to intercept the MiG flight forming up near Maykop A/F. White Flight took the lead to initiate contact with the MiG-15s while Green Flight followed at a discrete distance to counter any initial moves made against White Flight. The MiG flight leader must have tallied Dropkick at about the same time that White and Green Leaders tallied them, as at 7:53:30 he dispatched MiG#1 and MiG#2 in a pincers against White Flight. At 7:55:00 MiG#1 moved aggressively into pursuit of White Flight while MiG#2 attacked head-on. At 7:55:37 hours, as MiG Leader (MiG#5) cruised at 41,000' on a heading of 185 degrees and five miles north of White Flight (who were then at 35,000' heading 350 degrees), he ordered MiG#3 and MiG#4 (who were still twelve miles to the NE), to climb from 28,000' and 15,000' respectively against the right flank of Green Flight, then at 38,000' and closing on MiG#1. MiG#6 seemed to have been assigned to cruise below con at 17,000' and was at this time some distance North and heading southward toward the fight. Now Dropkick's tactics began to pay off as MiG#1 was forced into a hard right turn behind White Flight, who just merged with MiG#2 by executing a right turn into his attack. At 7:55:48 hours MiG#3 and MiG#4 struggled to climb into the fight having now lost too much energy to manoeuvre against Green Flight. For the time being, these two MiGs are neutralized and forced to dive away. At 7:56:16, White Fight reversed left climbing to 39,000' forcing MiG#2 to overshoot and pass below at 36,000'. The reversal of White Flight also threw off the attack by MiG#1 who countered by climbing to 40,000' while turning hard left in pursuit of White Flight. Green Flight continued to close with MiG#1. By 7:57:05 hours MiG#1, now down to 38,000', sees the danger from Green Flight (also at 38,000') to his rear and breaks off his pursuit of White Flight to enter into a high-speed left turn. White Flight is then free to reverse left against MiG#2 as he continues his left bank in an attempt to engage Green Flight. This causes MiGs#1 and #2 to separate thereby allowing Green and White to engage these MiG's with a numerical advantage. At 7:57:22 MiG#2 is caught in a bracket between White Two out front, and White Four at his six. As MiG#2 turns against White Two at 38,000', White Lead opens his turn to pick up speed while allowing White Two and MiG#2 to turn inside his turn. White Lead now takes up the pursuit of MiG#2. As the fight enters a large left hand pursuit, Green Lead and then Green Two alternately fire bursts against MiG#1. Green Flight are closely packed together and as MiG#1 breaks hard left, Green Lead, Two and Four miss the turn and extend some distance North of the main engagement area. However, at 7:58:14 Green Three breaks away from the rest of Green Flight in hot pursuit of MiG#1 to continue the fight. Now as each fight devolves into one versus one battles, Green Lead calls for a rejoin on a heading of 150 degrees. Since neither side has scored any hits up to this point, each pilot rejoins as they can and soon all of the Sabres and many of the MiGs are making their way along that same heading. As White Flight attempts to rejoin and climb back to altitude, White Lead and White Four tally a MiG-15 directly to their front. White Lead advises White Two as to their altitude and heading while White Four prepares to support White Lead's initial attack from astern. Closing to within 1,800' White Lead fires a long burst forcing MiG#1 to take evasive action in a hard turn to the right. Just at about the same time, Green Flight re-engages with two or three MiGs and enter into another confusing turning fight. White Lead pursues MiG#1 in a series of hard turns while White Four provides cover all the while fending off attempts from MiG#4 to get into the fight. White Lead fires multiple bursts with no apparent effect but after several intense minutes the fight descends low over Bullseye where MiG#1 successfully manages to escape. White Lead breaks off and extends away once visual contact is lost but White Four now comes under attack from MiG#4. White Lead reverses onto an intercept heading based upon the headings being provided by White Four, but in the end no further contact is made and White Four succeeds in eluding his attacker. Soon thereafter Green Flight breaks free, rejoins and then head back into the fray against the remaining MiGs. White Flight RTB low on fuel and Winchester on ammo (White Four) and eventually Green Flight returns with all ships accounted for. Great job by all pilots involved and a hell of a lot of fun. Cheers Speed
-
Ping Limits Any chance we can raise the ping limits from 350 to 450? Some of our guys are having trouble getting into the server and once in, we seem to be experiencing some strange rubber banding effects. Not sure if this effect is linked to the ping limits, but we didn't have this issue before the ping limits were set? Speed
-
Saturday Multi-Squadron Coop Hi Kayos, We've adjusted our start time on Saturdays to 2400 hrs Zulu. Since you have a seven hour difference between Vancouver and UTC (Zulu time), your start time would be 5 PM local on Saturday afternoon. We normally spawn into the server fifteen minutes early to complete our load-outs and comms checks and will then go over the mission brief before pushing off by 5:15 PM your time (or 0015 Zulu). You can check in on SRS comms CH 05 for general chat, or you're welcome to switch to CH 07 which we use as our Sqn channel. We normally fly two Sabre flights (6 to 8 planes) and fly two sorties usually in combination of CAP or Escort followed by a strike or CAS mission. You're more than welcome to introduce yourself and join into a flight or you can access the mission plans via the Virtual 401/450 Squadron forum at http://401squadron.canadaboard.net/ 39th VFS also fly a multi-squadron event 1800 hrs Zulu to facilitate time for the Euro community so you can pick whichever time best suits your schedule. Either way you're more than welcome. Speed P.S. I've updated our mission orders to capture critical information on one sheet. Here are a couple of examples of missions we flew with 39th VFS over the last couple of months.
-
No lables No lables please. That would kill the immersion and we'd stop flying.
-
WWII Assets Pack Korea! 1952 Server I'm in favour. a. the B-17 is a better stand-in for the B-29. b. the B-17 has defensive capability and actually drops bombs. c. period correct AAA including flak so that we're not flying 50s aircraft against modern AAA. d. period correct armour etc same as above. We have to acknowledge that this is a lot of work for SeaQuark. I would recommend, that if the vote is in favour of the Assets Pack, then we, as the community, keep our expectations in check and allow SeaQuark to make these changes incrementally or even on a test basis to ensure that the WWII assets do not impact server performance. Start with the B-17 and see how it goes, then maybe by the time the winter map re-appears, some additional items can be added. I'm also not in favour of anything that would prevent someone from joining the server, but the Assets Pack is a relatively small investment given the very high quality of the flight experience that is provided in the Korea! 1952 server. Are fliers not "forced" to buy the specific 50s era aircraft in order to fly in the server? Same thing with the Assets Pack as far as I'm concerned as it completes the period correct environment that the server seeks to create. Speed
-
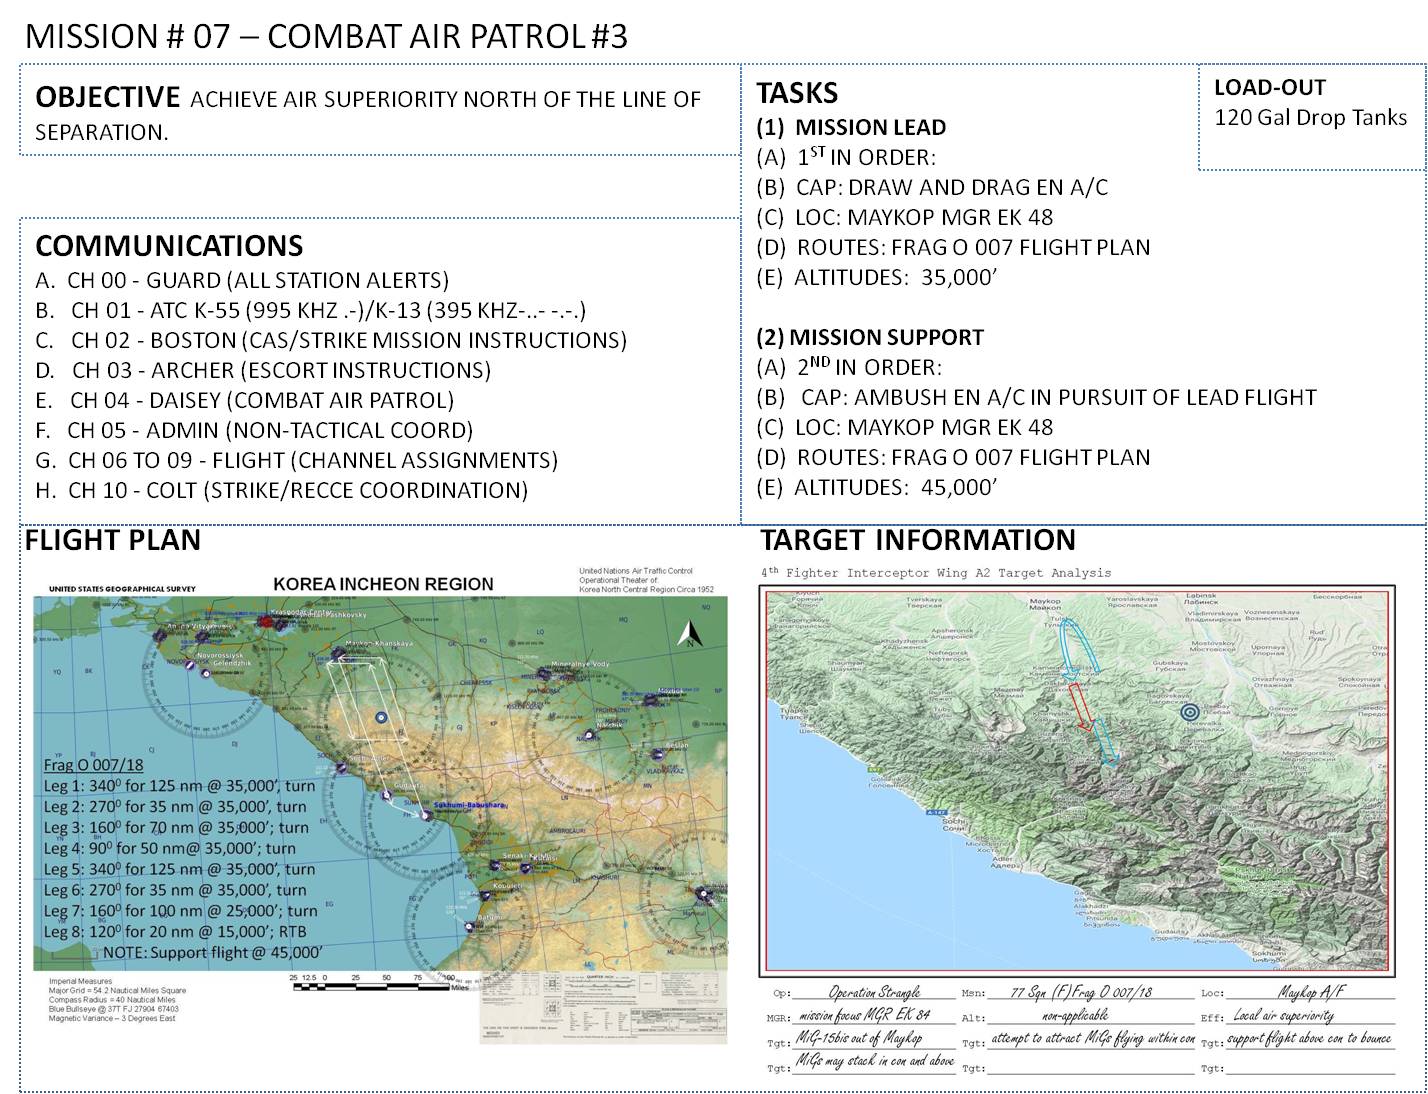
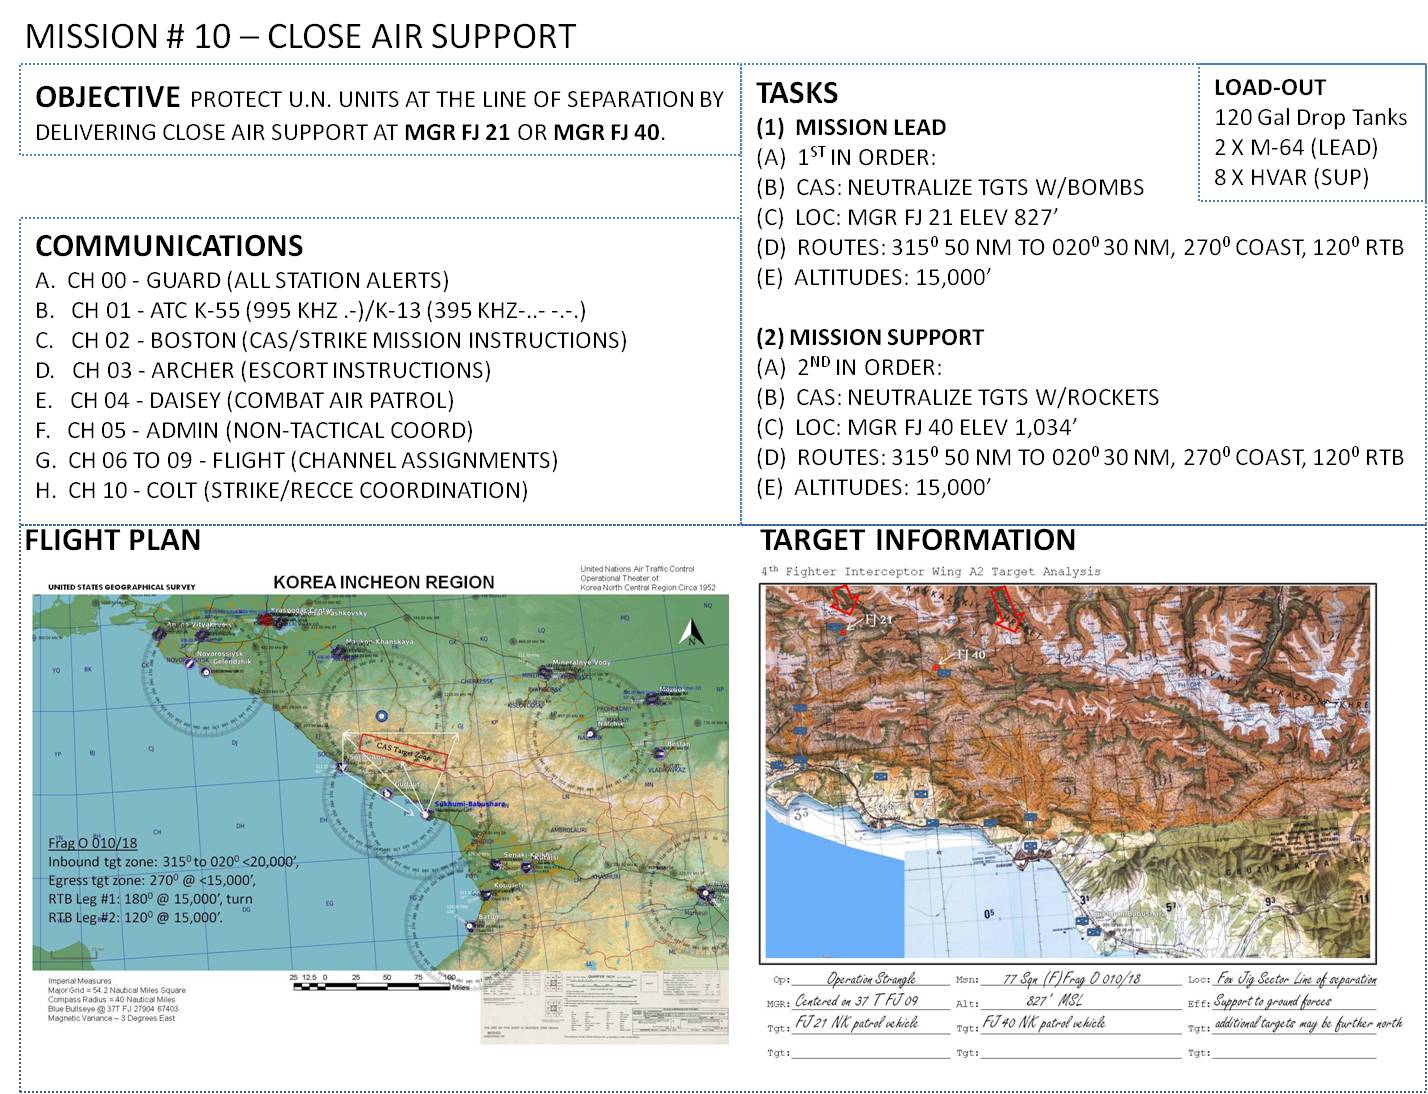
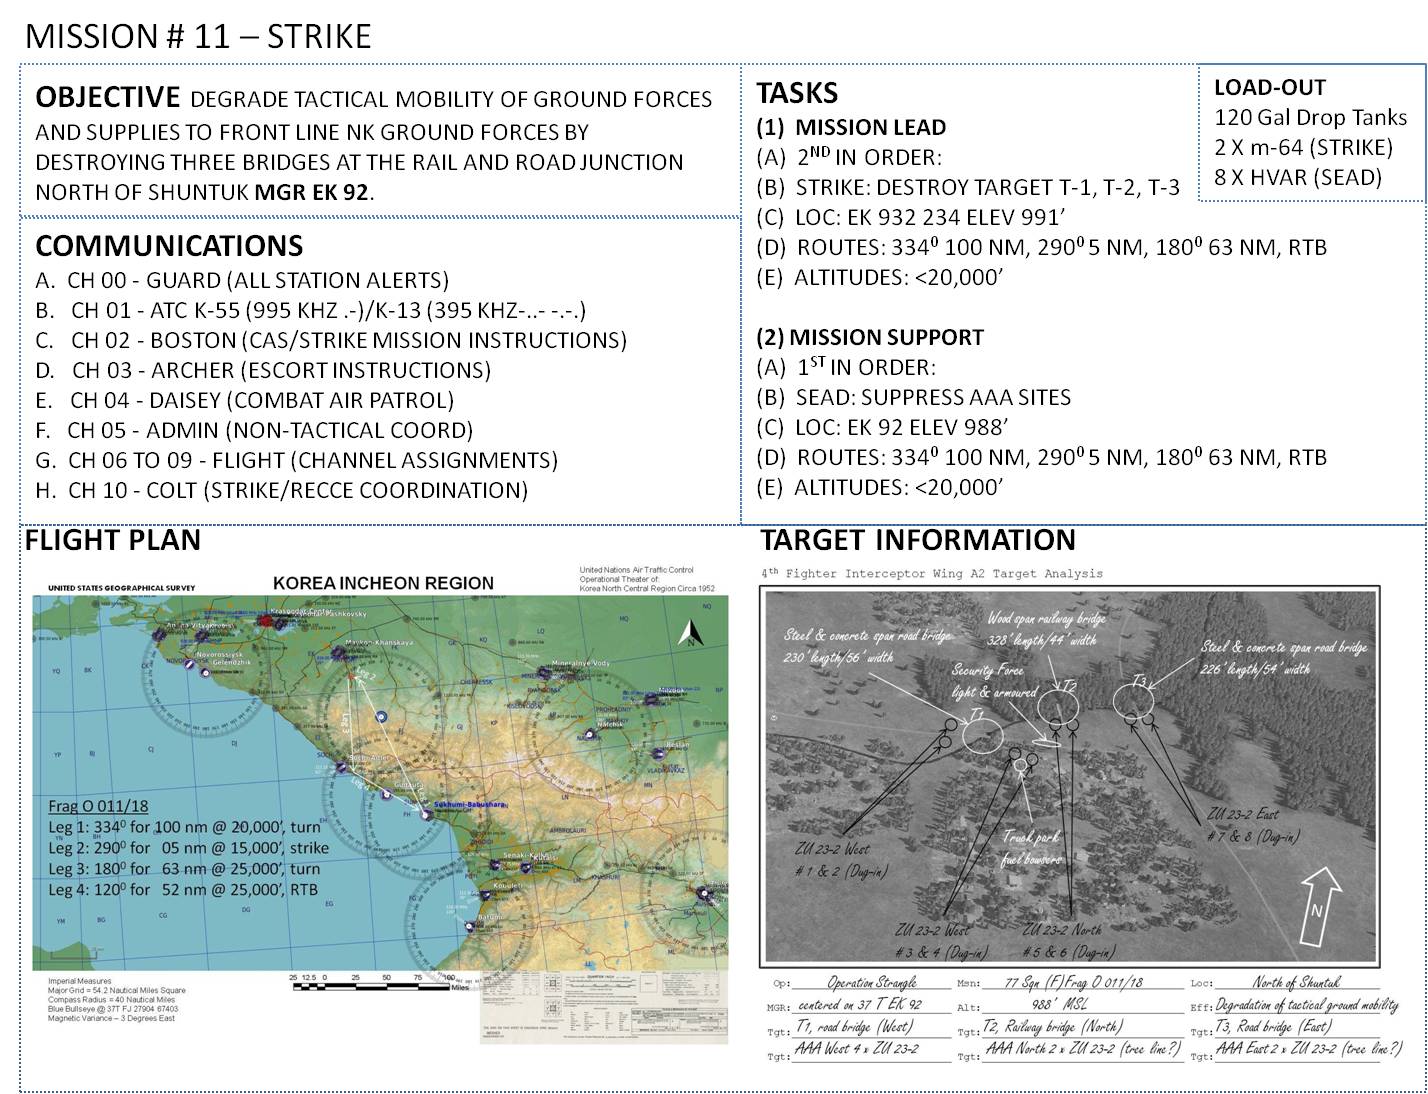
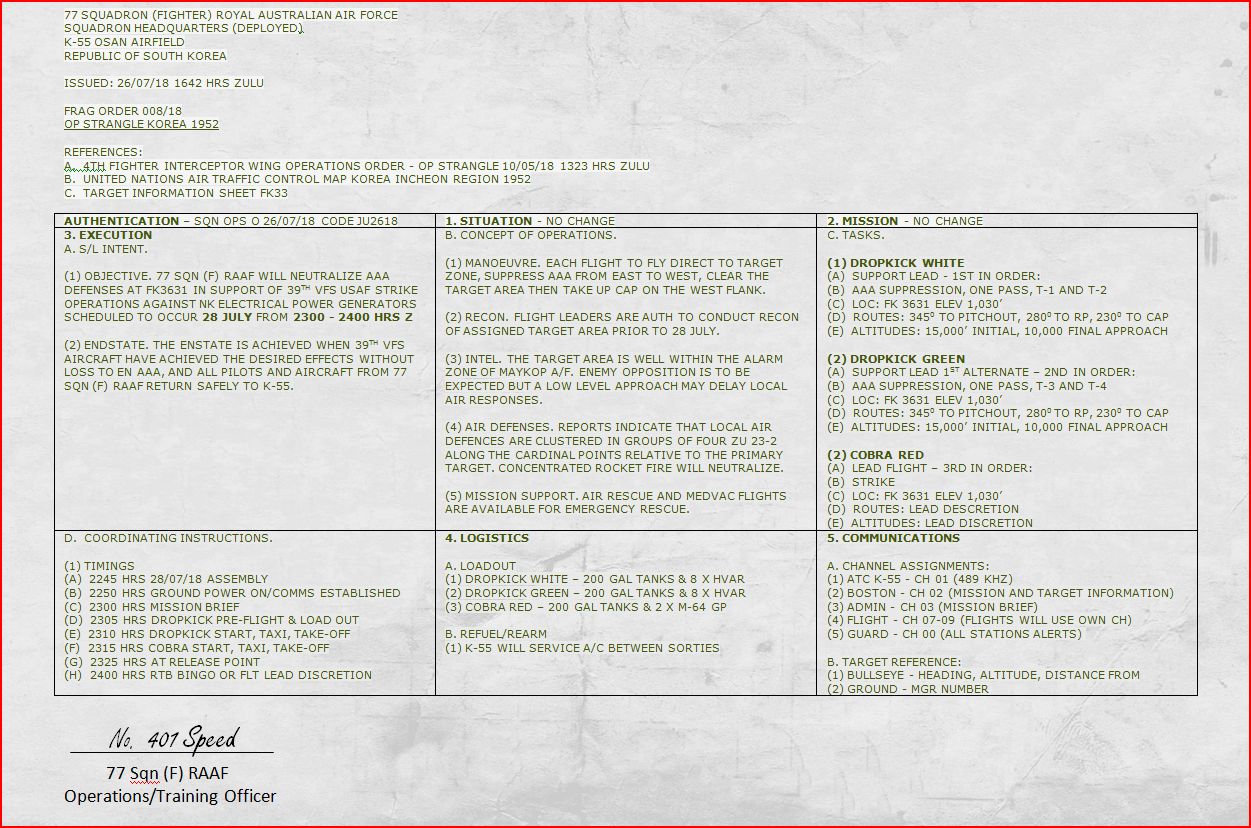
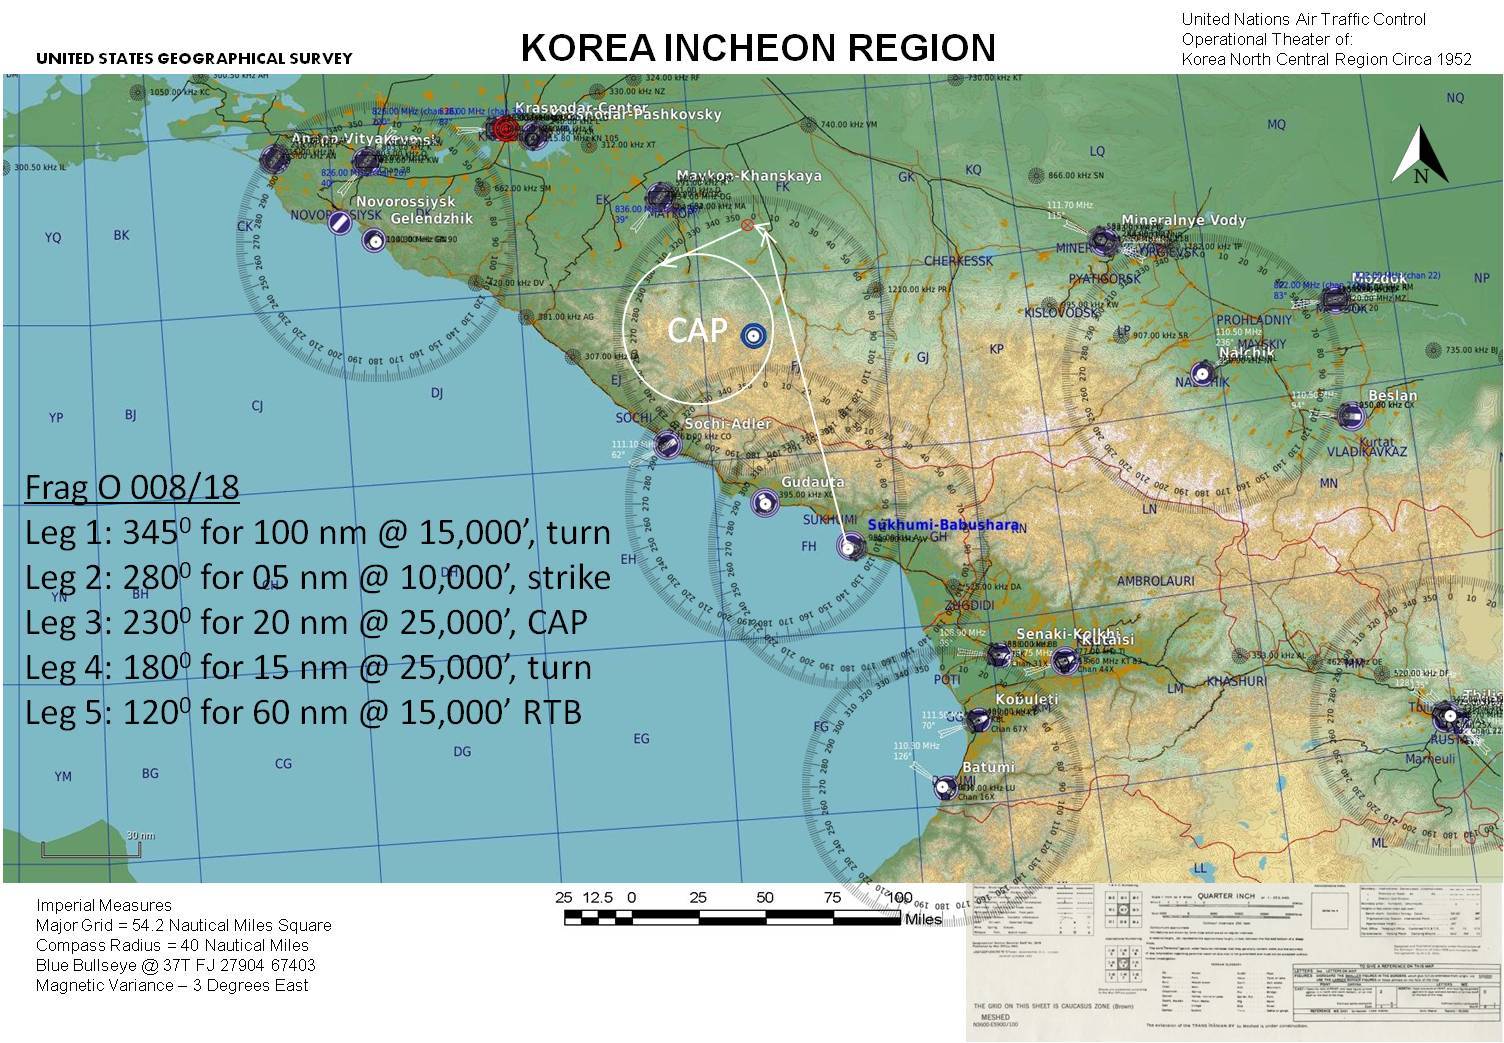
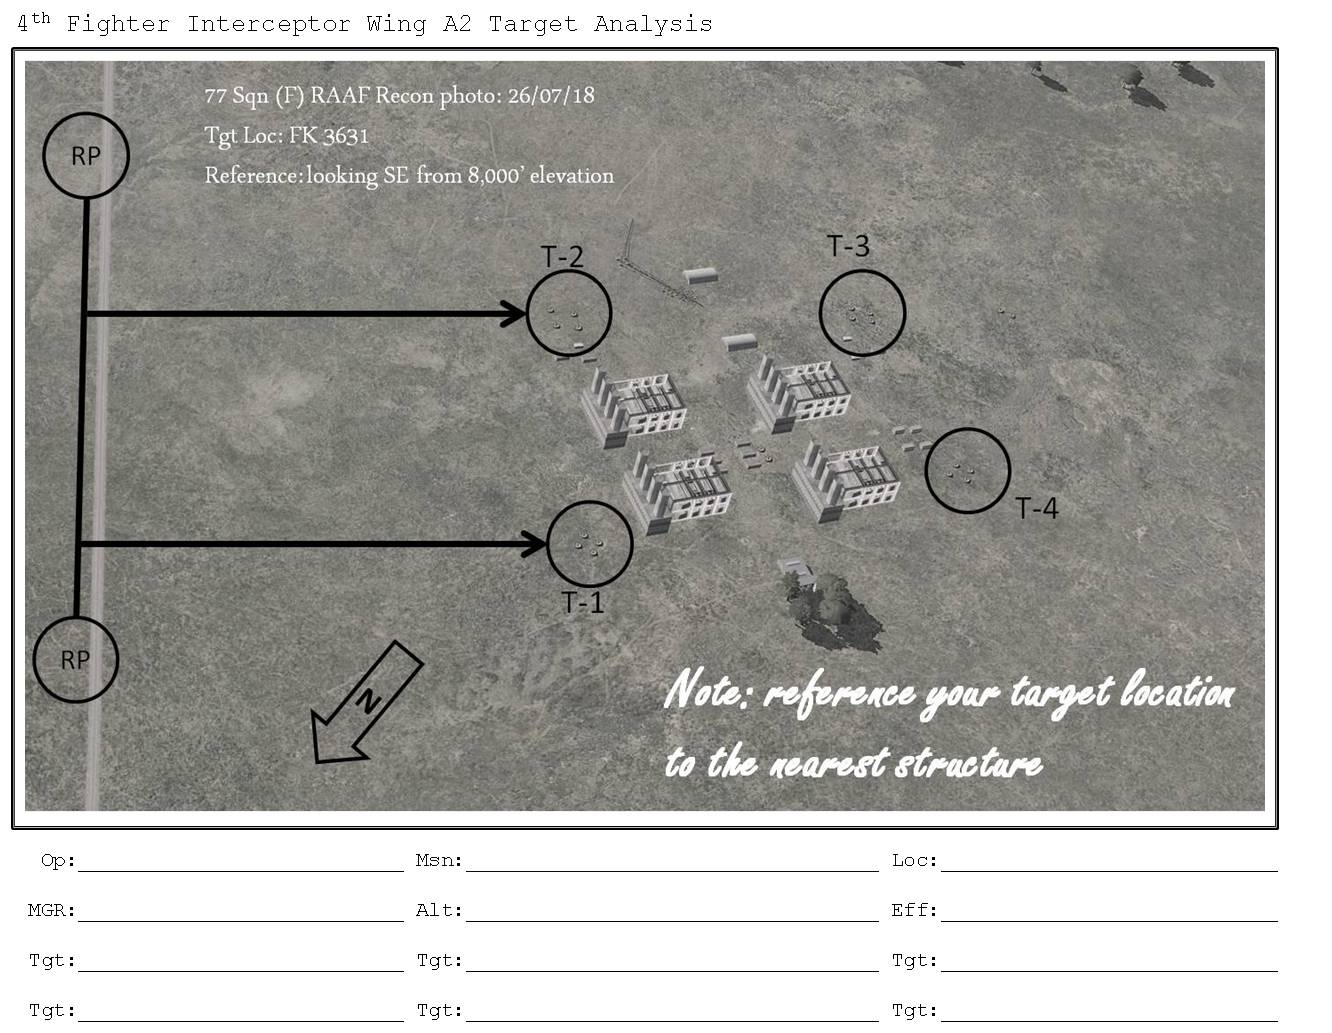
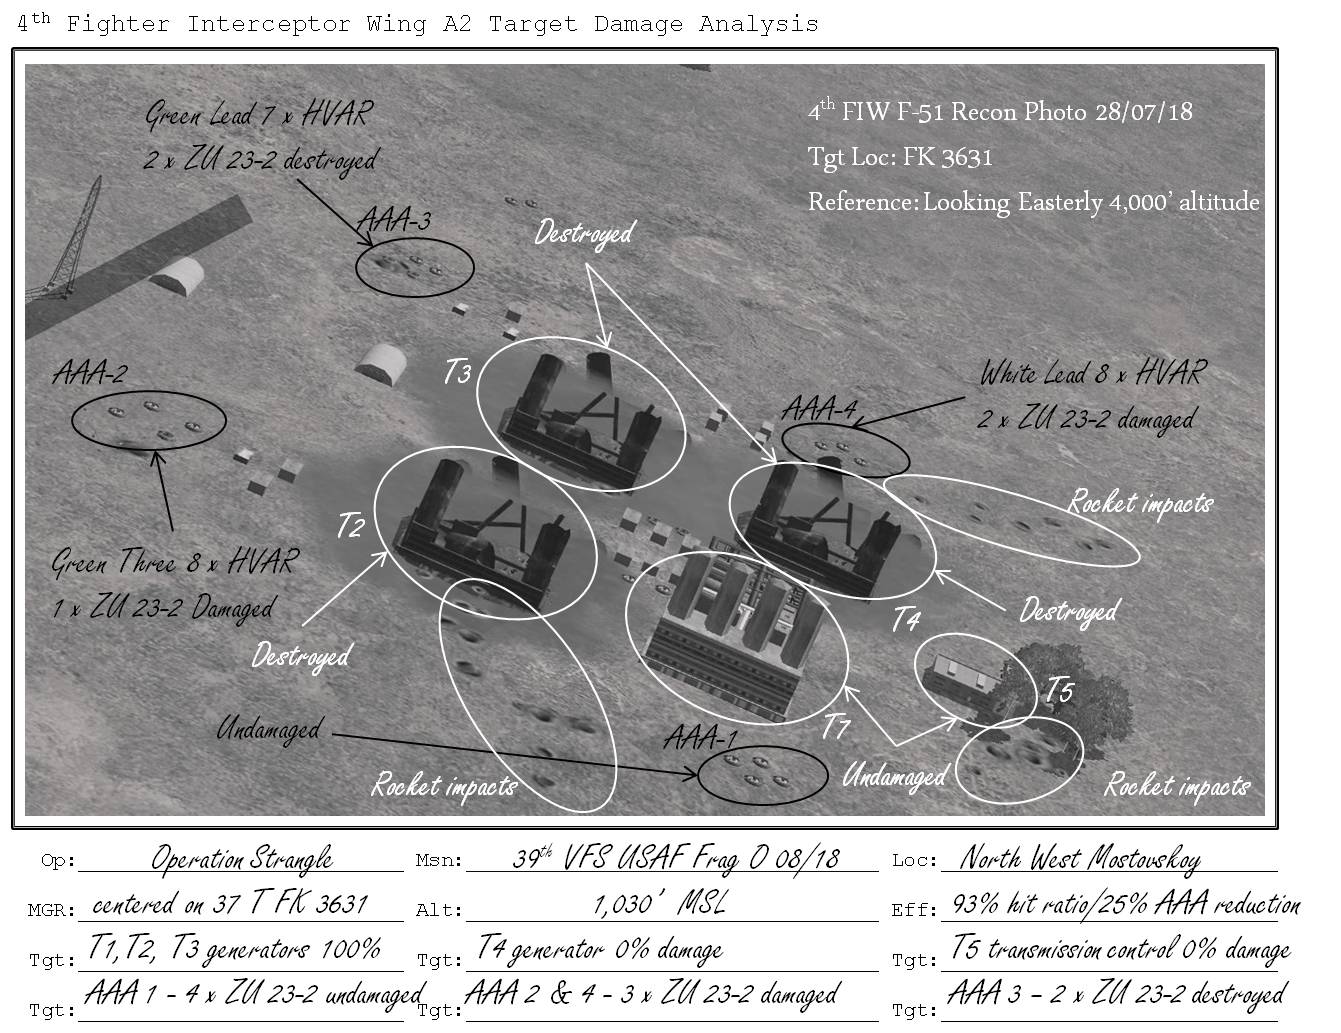
Multi-Squadron Coop - 2300 Zulu Saturday F-86 Sabre/MiG-15bis Fagot pilots, For those of you who have yet to plug into SeaQuark's Korea! 1952 multi-squadron coop missions held each Saturday at 2300 hrs, you're not only missing one of the best servers available to DCS flyers but also an excellent opportunity to immerse your team into a very realistic simulation of air combat during the Korean War. Our weekly mission objectives are aligned with the historical events of the Korean War, specifically those relating to Operation Strangle, the U.N. interdiction campaign employed during the stalemate of 1952. https://en.wikipedia.org/wiki/Operation_Strangle_(Korean_War) Squadron leads alternate mission planning responsibilities weekly. With two squadrons participating currently, that's one mission plan ever other week. More squadrons involved, the planning load drops accordingly. The lead squadron picks the mission objective, while the supporting squadron(s) provide the tactical support requested. Typical lead/support combinations are Strike/SEAD or CAP/Cover. Timings, locations, payload are coordinated before and confirmed during the pre-mission brief. In-flight coordination is then maintained via SRS. Each group generates it's own mission orders, flight plans if desired and even target recon photos tailored to the preferences of that squadron. The lead squadron then issues specific instructions to the support squadrons advising them of the mission objective, timings and support effects requested. At other times, the lead squadron may forego advanced planning and opt instead for a mission from BOSTON or ARCHER control and then request tactical support from the other participating flights at the end of the mission brief. Your team will face a variety of tasks each week that will challenge your mastery of the aircraft you fly, be it dive bombing a ground target with an F-86 or intercepting incoming Sabres over the objective area in your MiG15. With additional squadron/flight participation, both sides can plan their objectives and use their specific tactics within the immersive environment created by SeaQuark. If you would like to see your mission plan ideas executed by five or six full Sabre flights, then get in touch with SeaQuark and he'll help you and your mates get started. Our mission packages will only get better with time as we improve our individual and multi-squadron skills. We just flew our 11th mission and plans are underway for many more. Below is a sample of the orders generated by 77 Sqn (F) for our 8th mission. Each squadron has their own approach and here's an opportunity for your group of four or more fliers to get creative and enjoy multi-squadron operations.

SquadronRAAF.jpg.d73309f6c77c01e6ccd45abf47a33356.jpg)