londo-cat
-
Posts
101 -
Joined
-
Last visited
Content Type
Profiles
Forums
Events
Everything posted by londo-cat
-
Ah yes... the old Suncom F-15E Talon Joystick (or also known as the Suncom Strike Fighter Series "SFS"), it also came with a throttle too which was kind of ungainly. I bought it about 15 years ago I think, part of a combo pack (Stick and Throttle), back when Windows 95 was NEW! I had always hoped that Suncom would eventually put out a USB Based Joystick, but sadly they went out of business... Recently I had been thinking of buying an old Suncom SFS and gutting it and then using it it in the KA-50 since they share a common shape and with some modification, it could be made to look *more* like the KA-50 stick. :thumbup:
-
I like the gearshift rubber grommit - very inventive! The collective is a very interesting combo of a plumbing supplies and joystick throttle - once again very inventive!
-
I own an older EPIC board which I used on my F-16, but was thinking of going with the EPIC USB now. I totally think it's the *pro* way to go, although a bit expensive, moreso than the cheaper alternatives. EPIC boards are very very cool! :thumbup: I ordered the EPIC USB, 32 Digit Display Controller, 32 Point Output Module, Expansion Module and the Gauge/Meter Module. Expensive yes! But - you want ultimate control of your pit, this is the gold standard for sure!
-
I see you have been watching SG1 a bit lately? Are you planning on building the entire gate?
-
Instruments, MFD's, warning lights etc.. on LCD screen
londo-cat replied to -Bazong-'s topic in Home Cockpits
DCS is supposed to put out the PCIP (Peripheral Control Interface Program) for pit builders. From what I have gotten so far from the DCS forum here, the PCIP will allow the pit builders to be able to utilize data from instruments and associated lights (LED's) inside the simulation to be mapped to external USB boards that can run servo's and LED's. Not sure when the PCIP will come out though... -
What make/model are the switches?
-
Perfect! Thanks! Once again I see Lars is hard at work!!!
-
Well, wasn't satisfied with the left and right back panels, so I pulled the right one and then modified it so it looked more like the virtual one.

-
One of the items I need to create for my pit is the collective, but I'm having a hard time coming up with suitable dimensions. I've seen others that have done this, so if anyone has the length, width and height it would be very much appreciated! :smilewink:
-
Nice shop!
-
Added left and right rear panels
-
This is the new fire extinguisher buttons. How do you think they turned out? :thumbup:
-
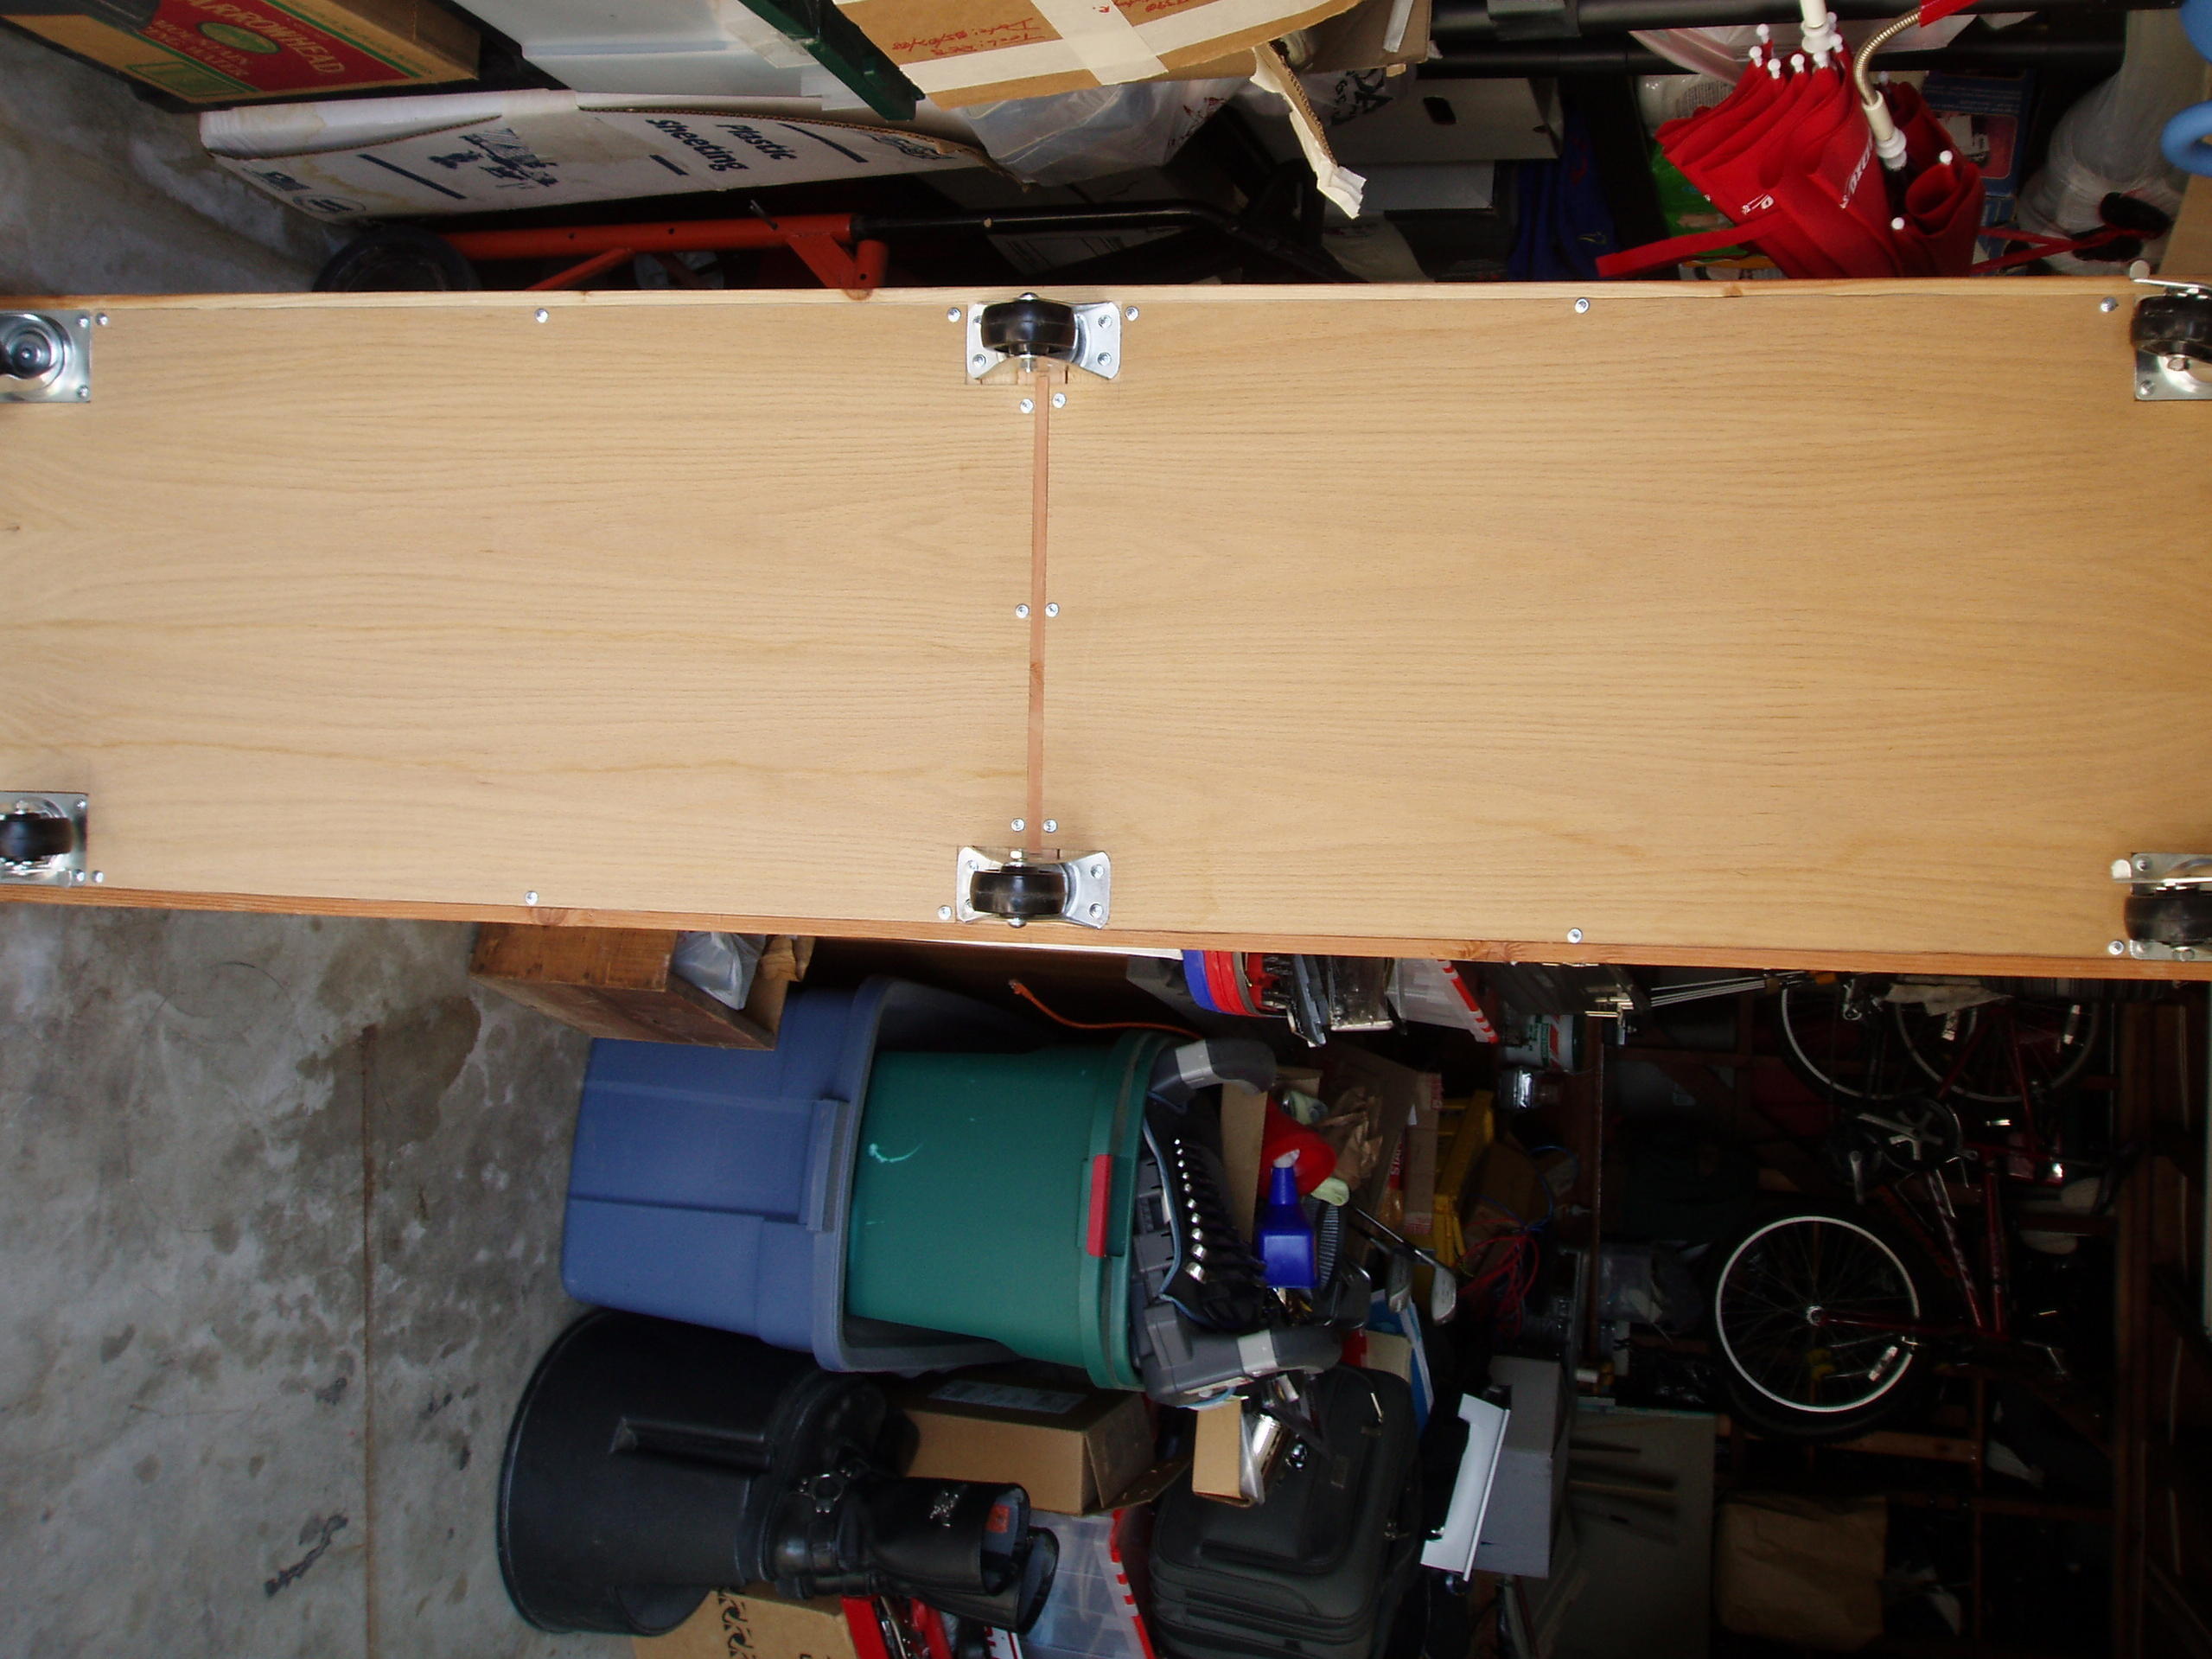
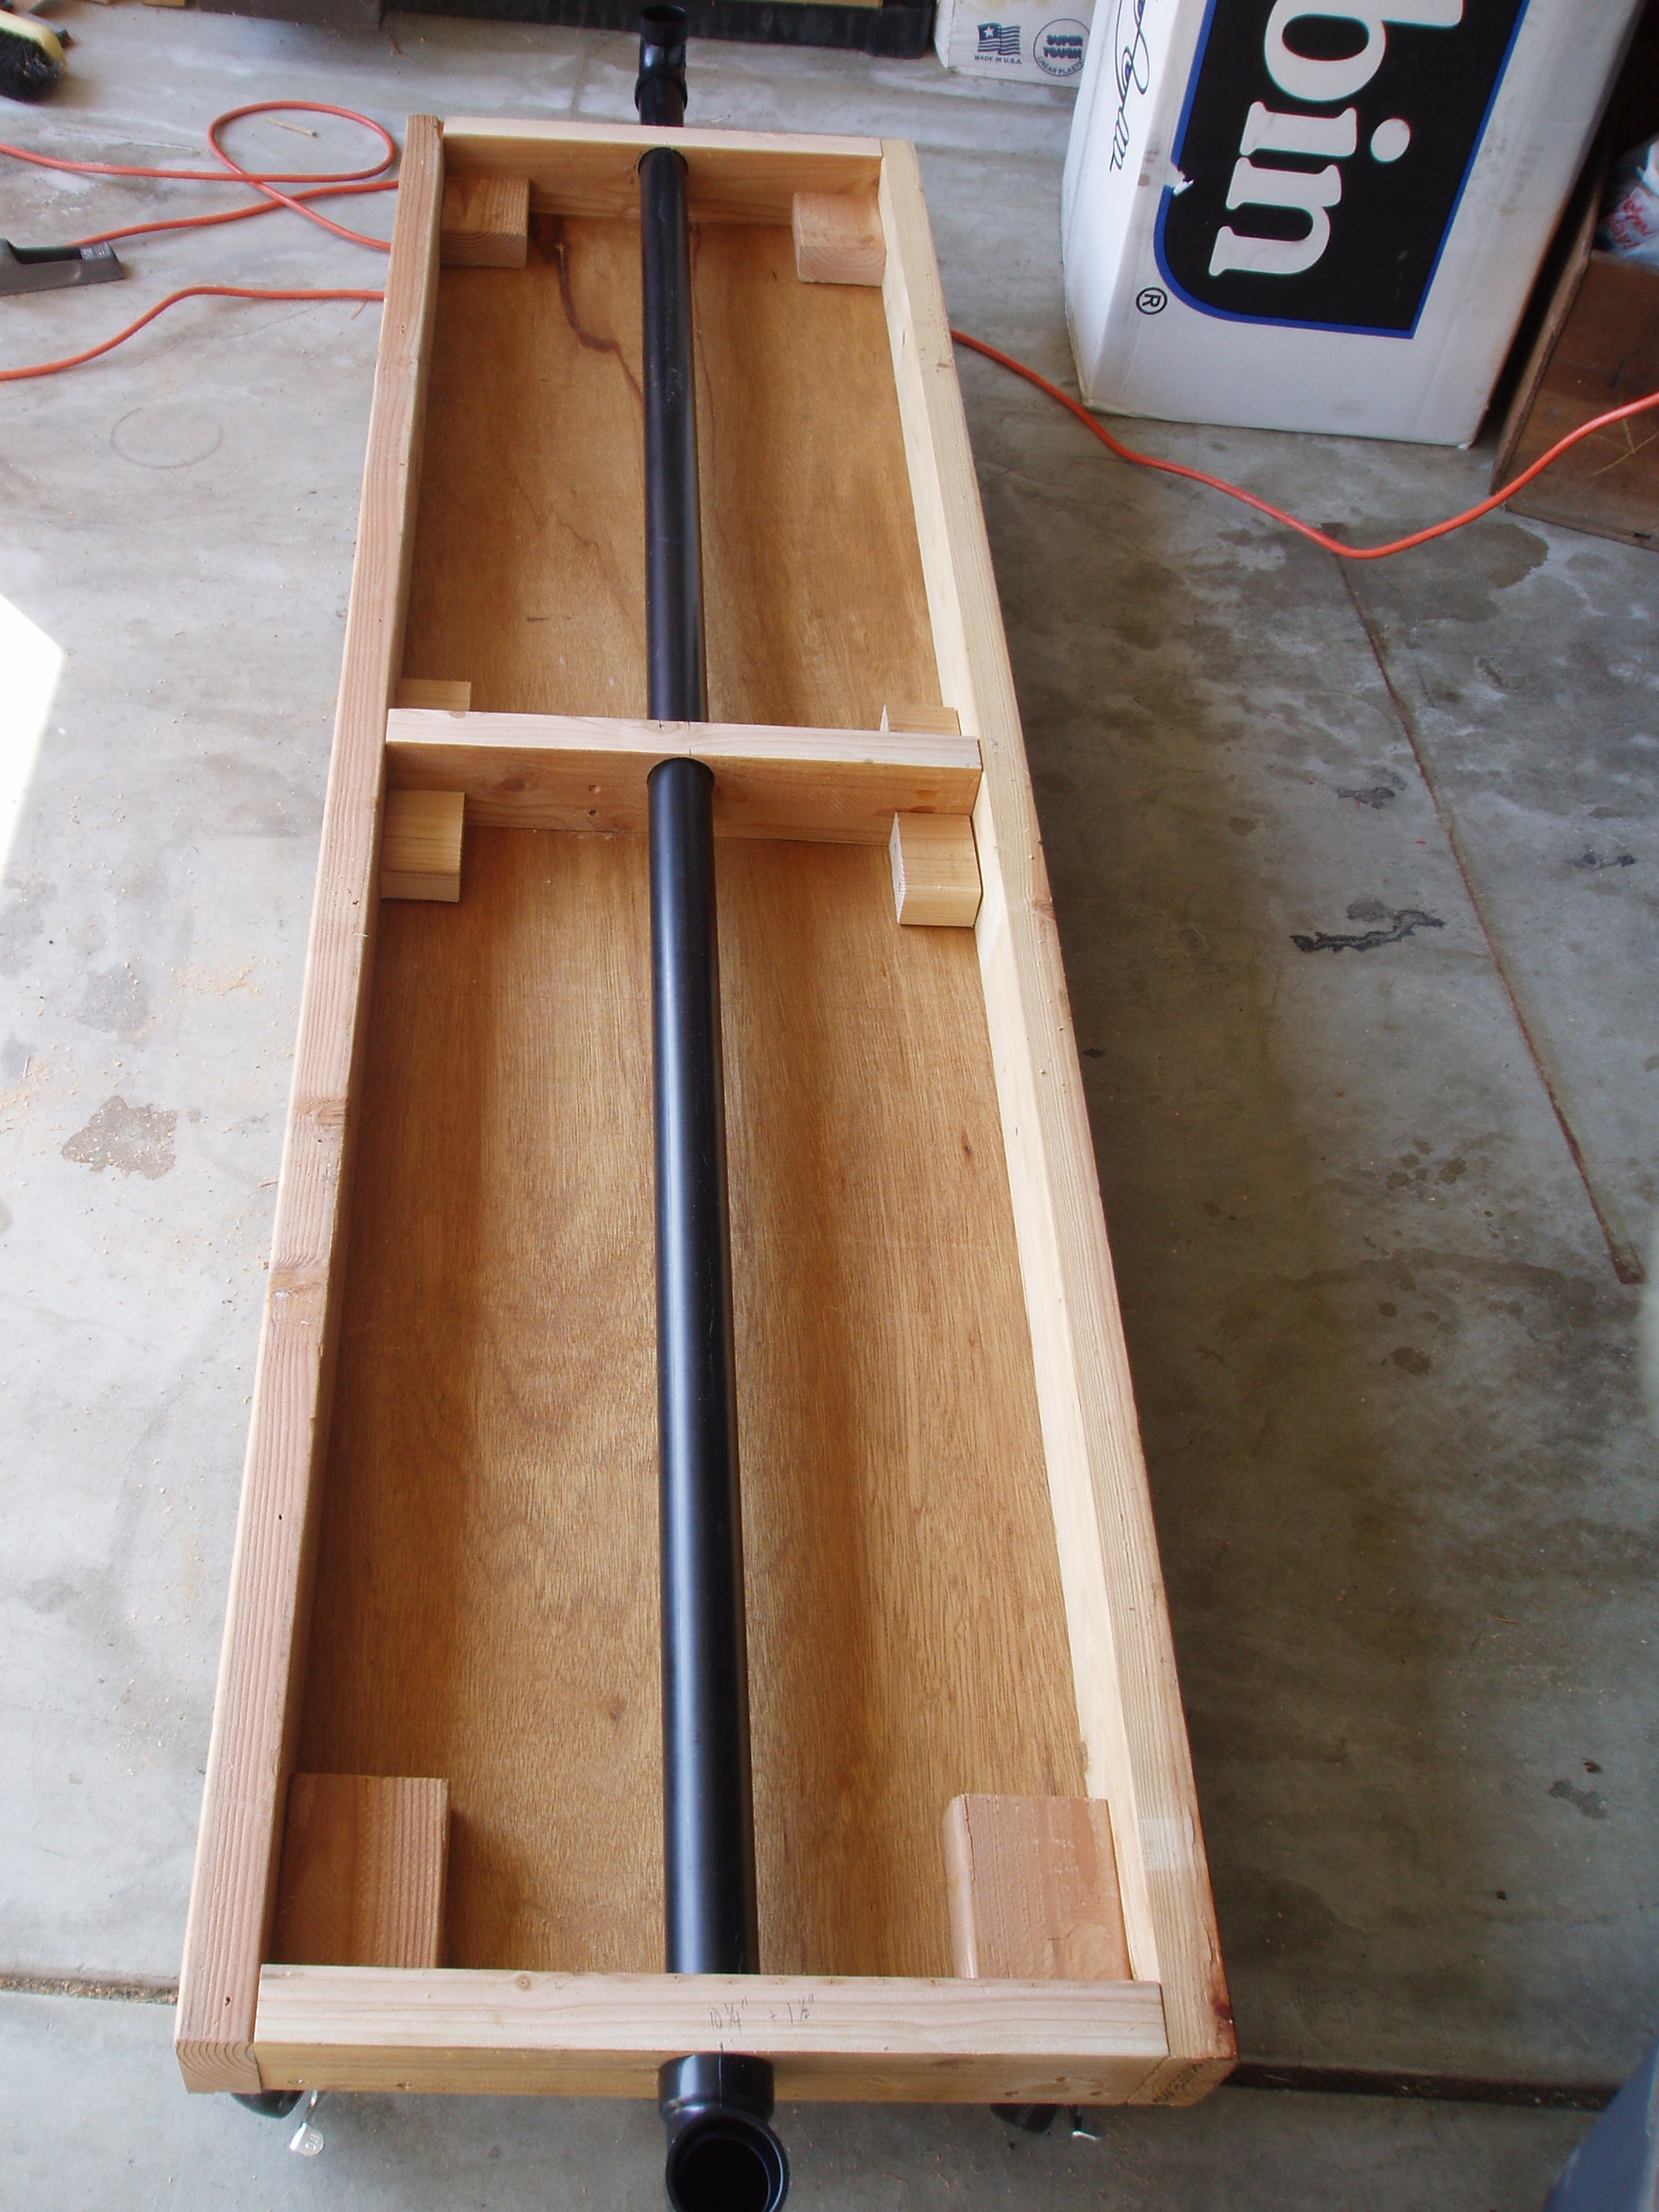
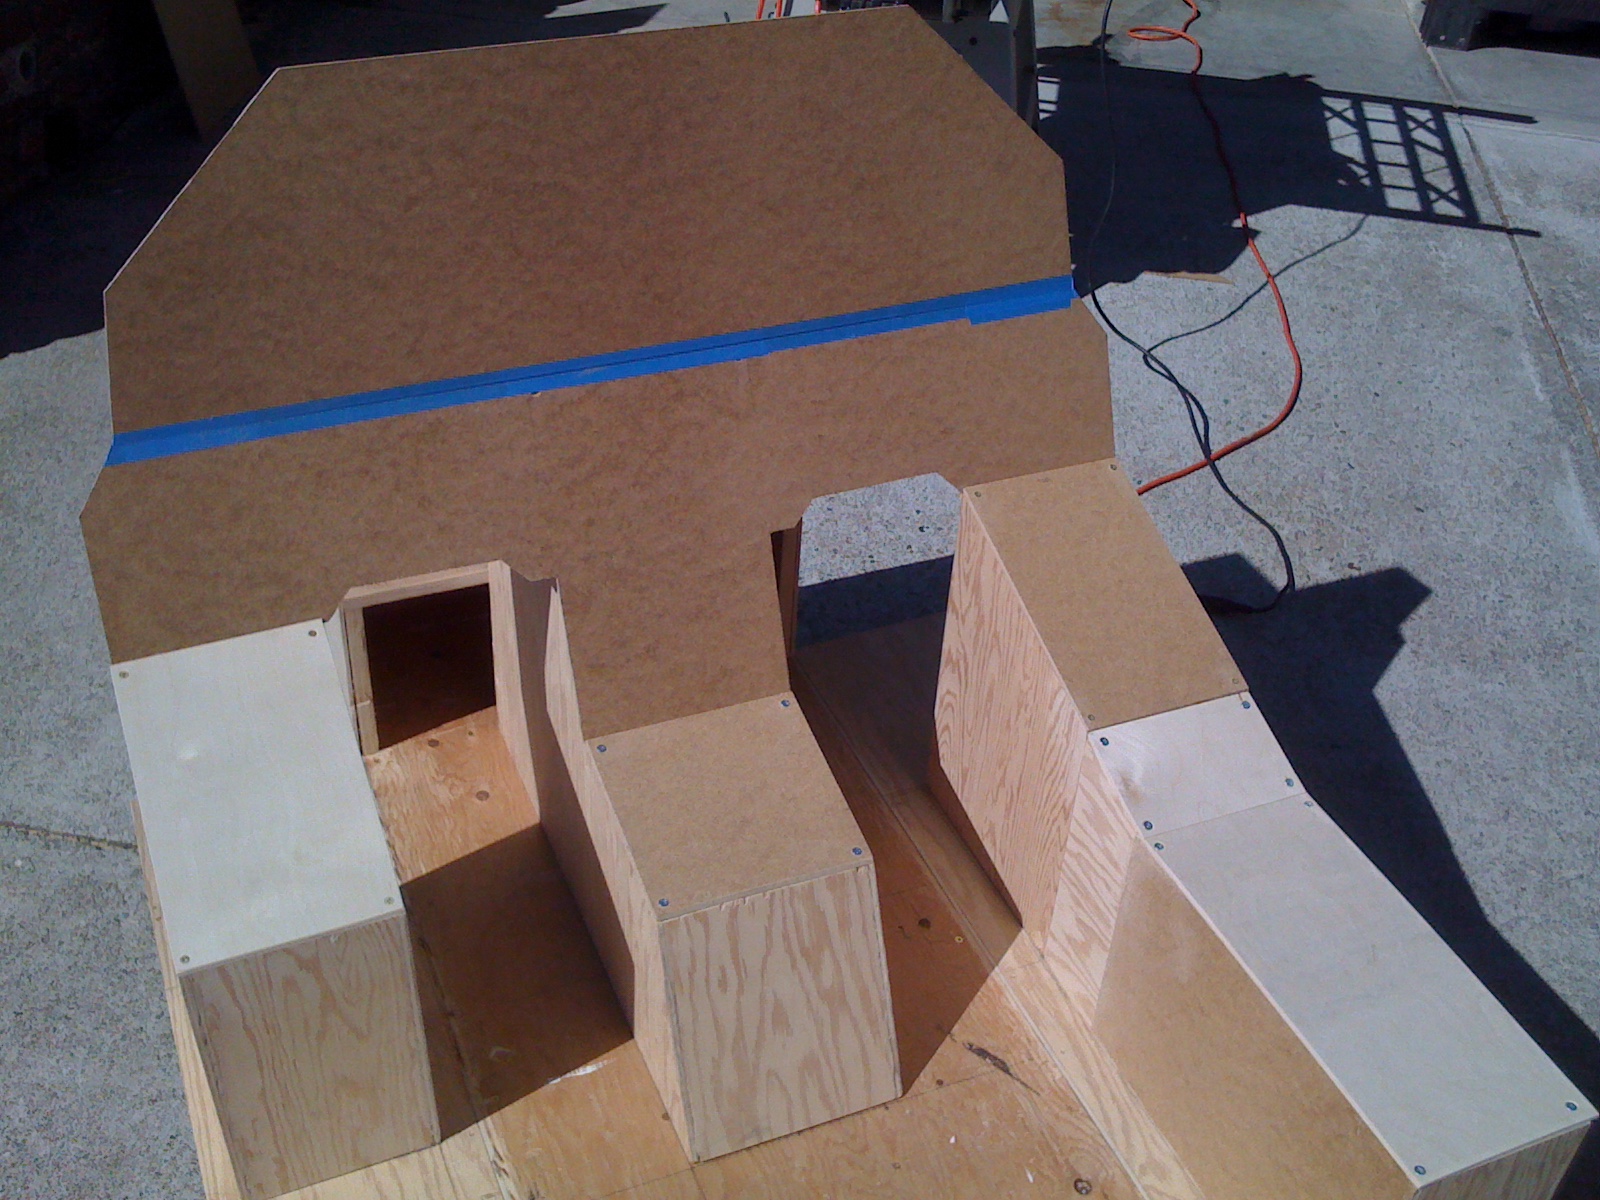
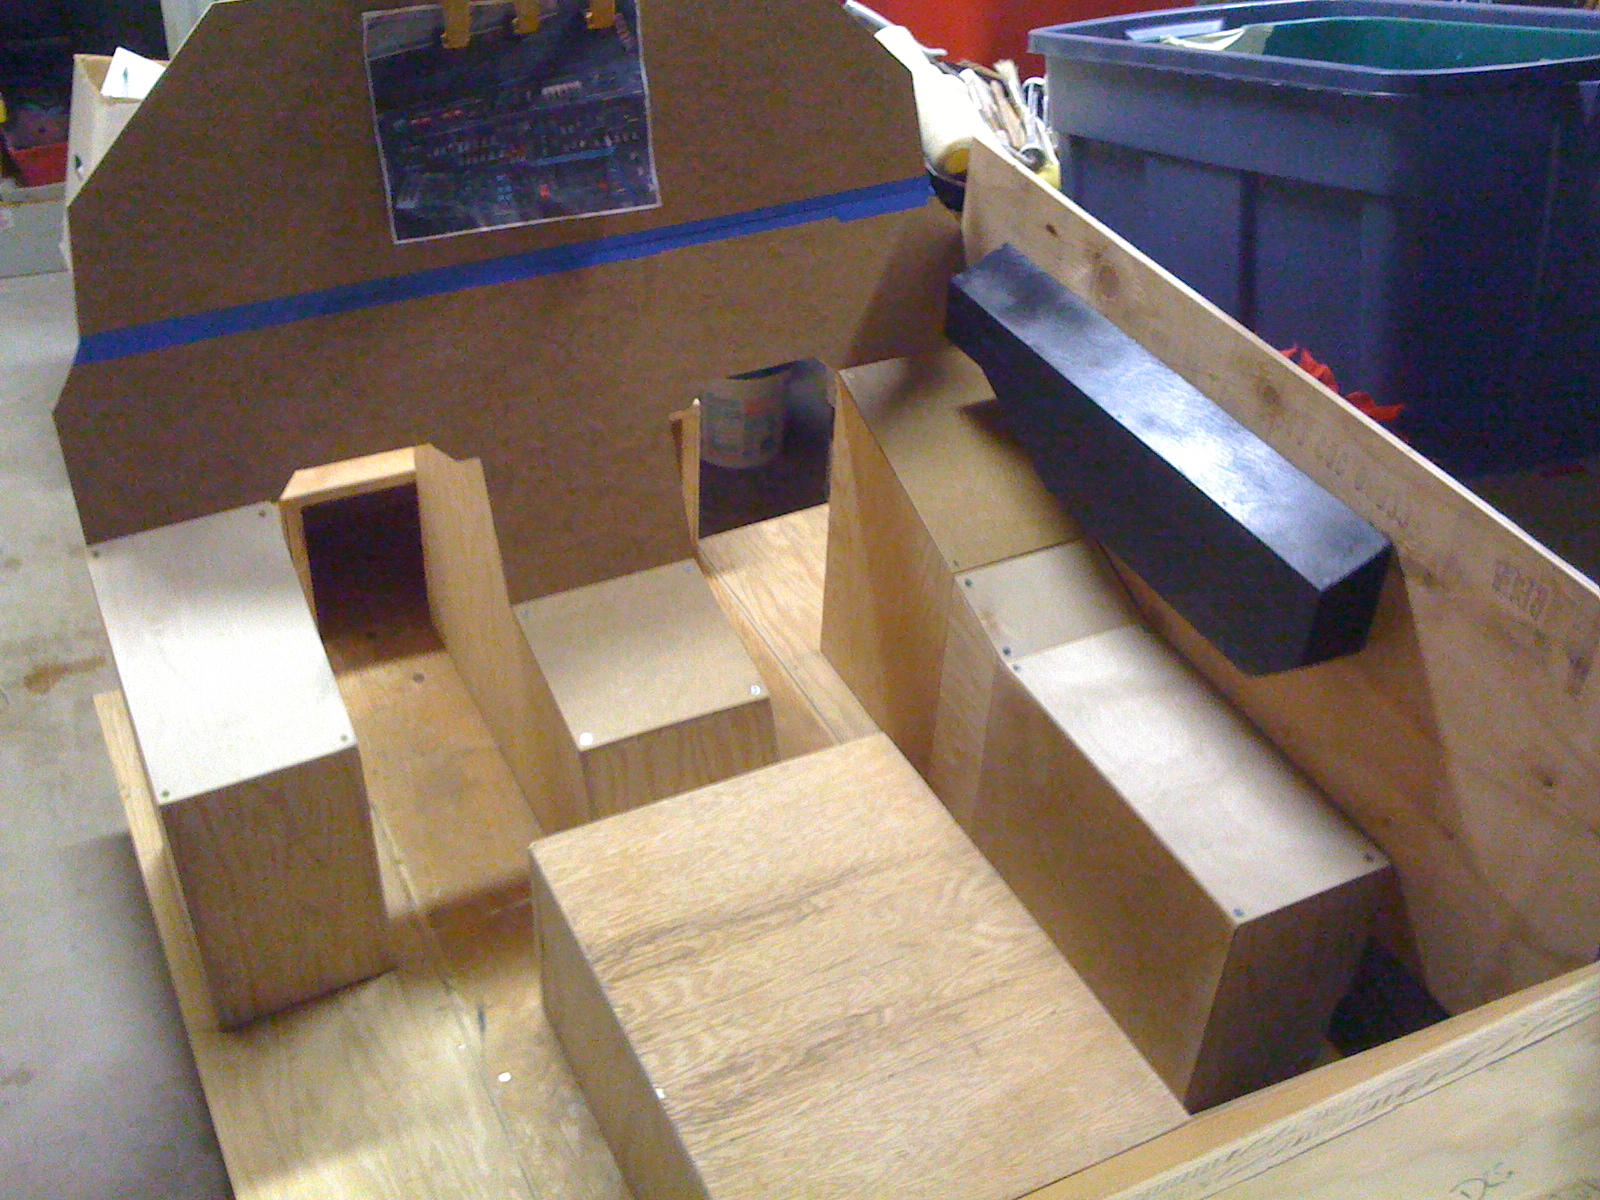
Well, as you can see here, the base of the pit was made specifically to roll around, so I could pull it out of the garage and roll it back in when I was done. The frame of the pit allows me to also channel the wiring from the front to the back (see the ABS pipe that extends from front to back). I wanted to be able to create a way to allow me to actually route my wires *UNDERNEATH* the pit, so instead of most people wiring along the sides of the pit, I could *HIDE* my wires more easily. I then added some wheels on the back, so when I had to do wire management, I could flip the pit onto it's back and then wire stuff up and remove the panels on the bottom (I made sure I could remove the panels just for that very purpose). The whole pit was supposed to be more "wire management" friendly. My first pit experience taught me that the ability to take all those wires from the toggle switches, buttons, etc, would have been REAL nice if I had a place to put them where they wouldn't be hanging around all over. So thats why the bottom is hollowed out, to allow me the ability to take that stuff and redirect it to where I want it to go. THEN - I thought "Hey, the back of this pit would be a GREAT place to put all those controller boards that connect to the switches" and so I built open as well. In a few weeks, you will probably see the back-end board in place for me to mount the control boards on.
-
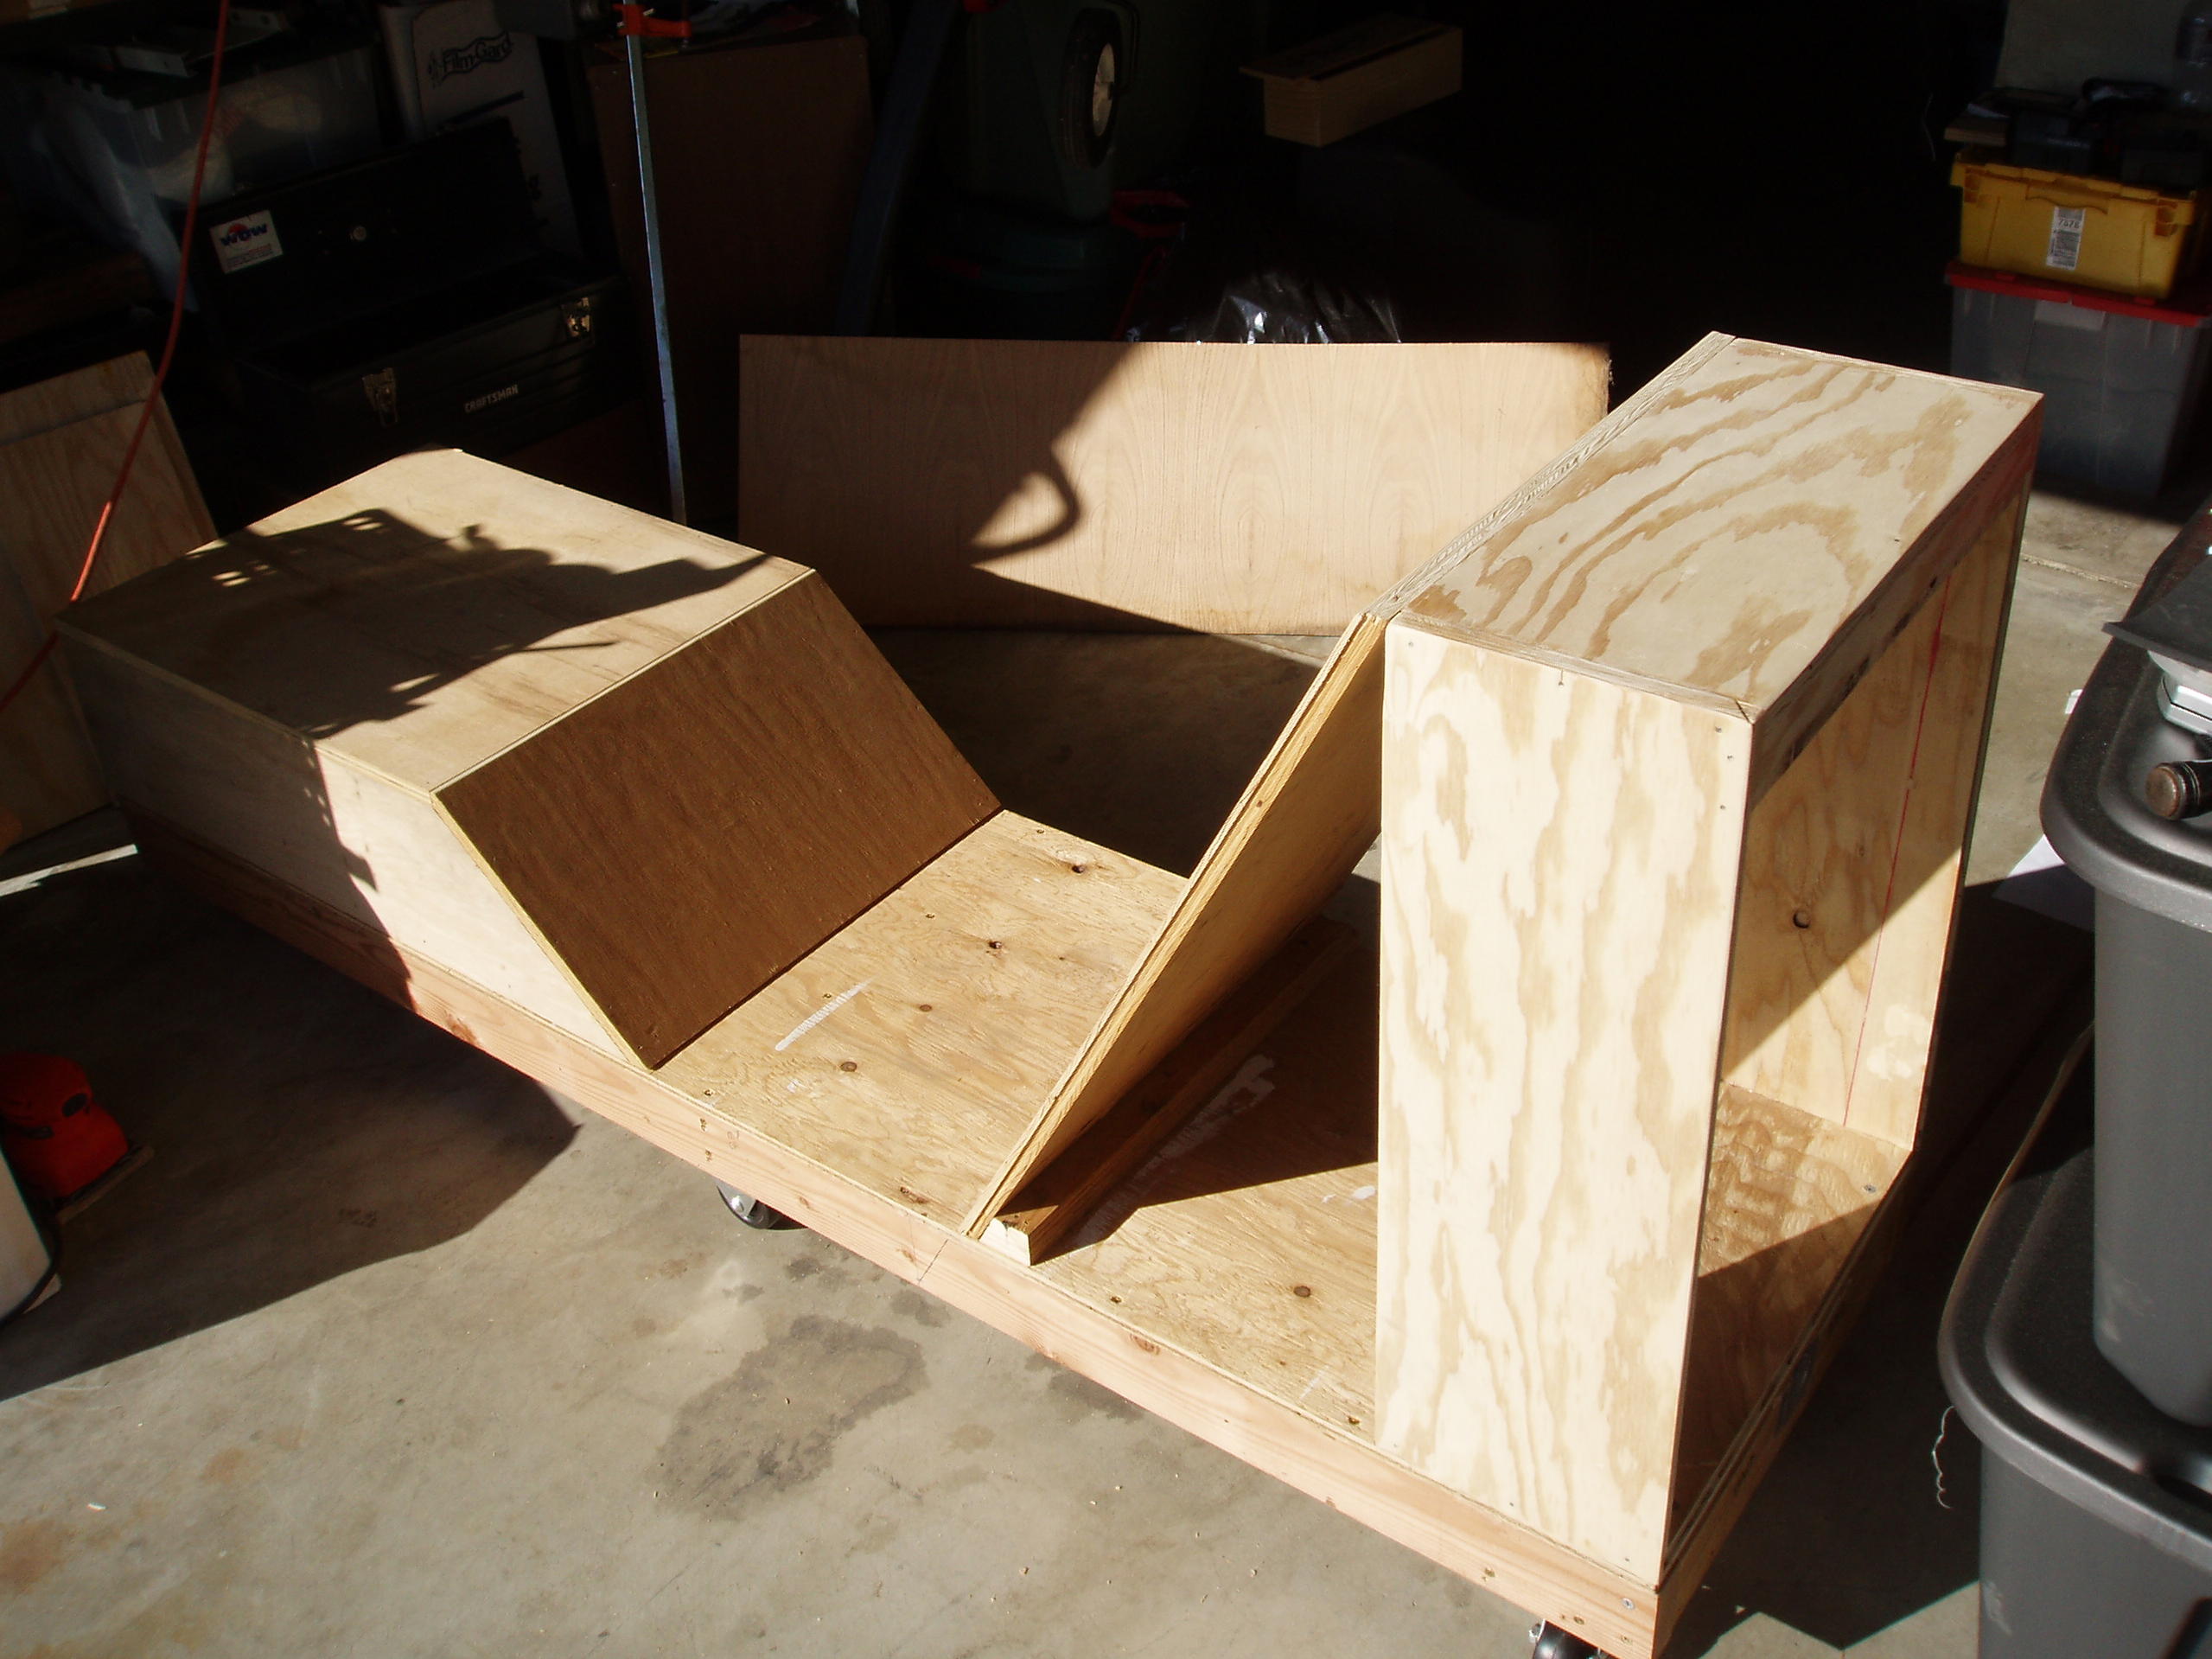
Well, yeah - but not exactly. More like a re-purposed F-16 cockpit, which was made via the 'Wombat' style. It's meant to be moved around, hence the wheels. I don't think the Wombat Style was meant to really be used for the KA-50 so it's taken some really interesting woodworking skills to get it close to being used for the KA-50 pit. Thankfully I only had to extend the side-boards out, and as you can see, it works fine (for now). I still have to create the back panels and then tie it all together with some kind of external shell of sorts. So pretty much winging it along, although I have gotten a lot of my inspiration (not to mention critical dimensions) from TriggerHappy69's work. IF NOT for him, I don't think I would have *EVER* gotten this far. :music_whistling:
-
Uuuuaaaah..! I have started building now..!
londo-cat replied to Triggerhappy69's topic in Home Cockpits
Well, Windows 7 hasn't been completely released yet - and *while* you might like it, it's still a little under-cooked. Things like drivers for joysticks and rudders will take a while, at *LEAST* six months for good _stable_ drivers for those kinds of peripherals. I've been in I.T. for 20 years now, mucking around with PC's since 1981 - so believe me, if you are having issues with Windows 7 now, it will take a while for these things to be resolved. Talk to your manufacturer to see if they have some beta device drivers for Windows 7. -
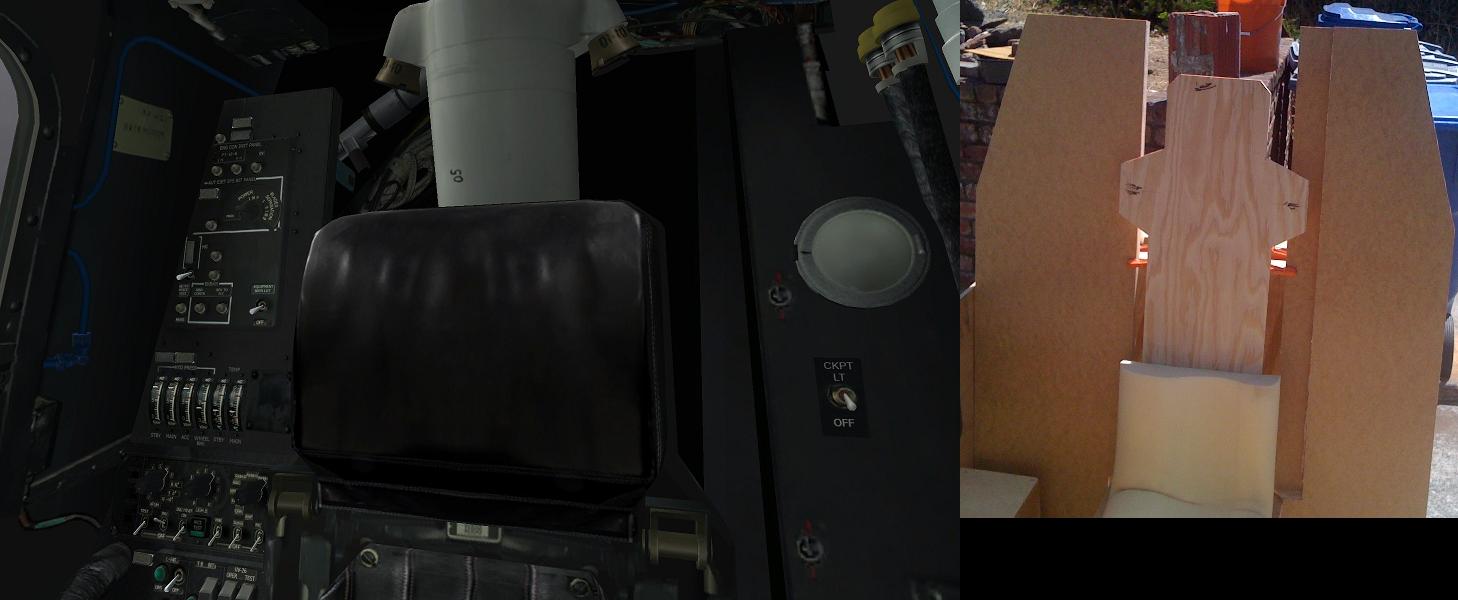
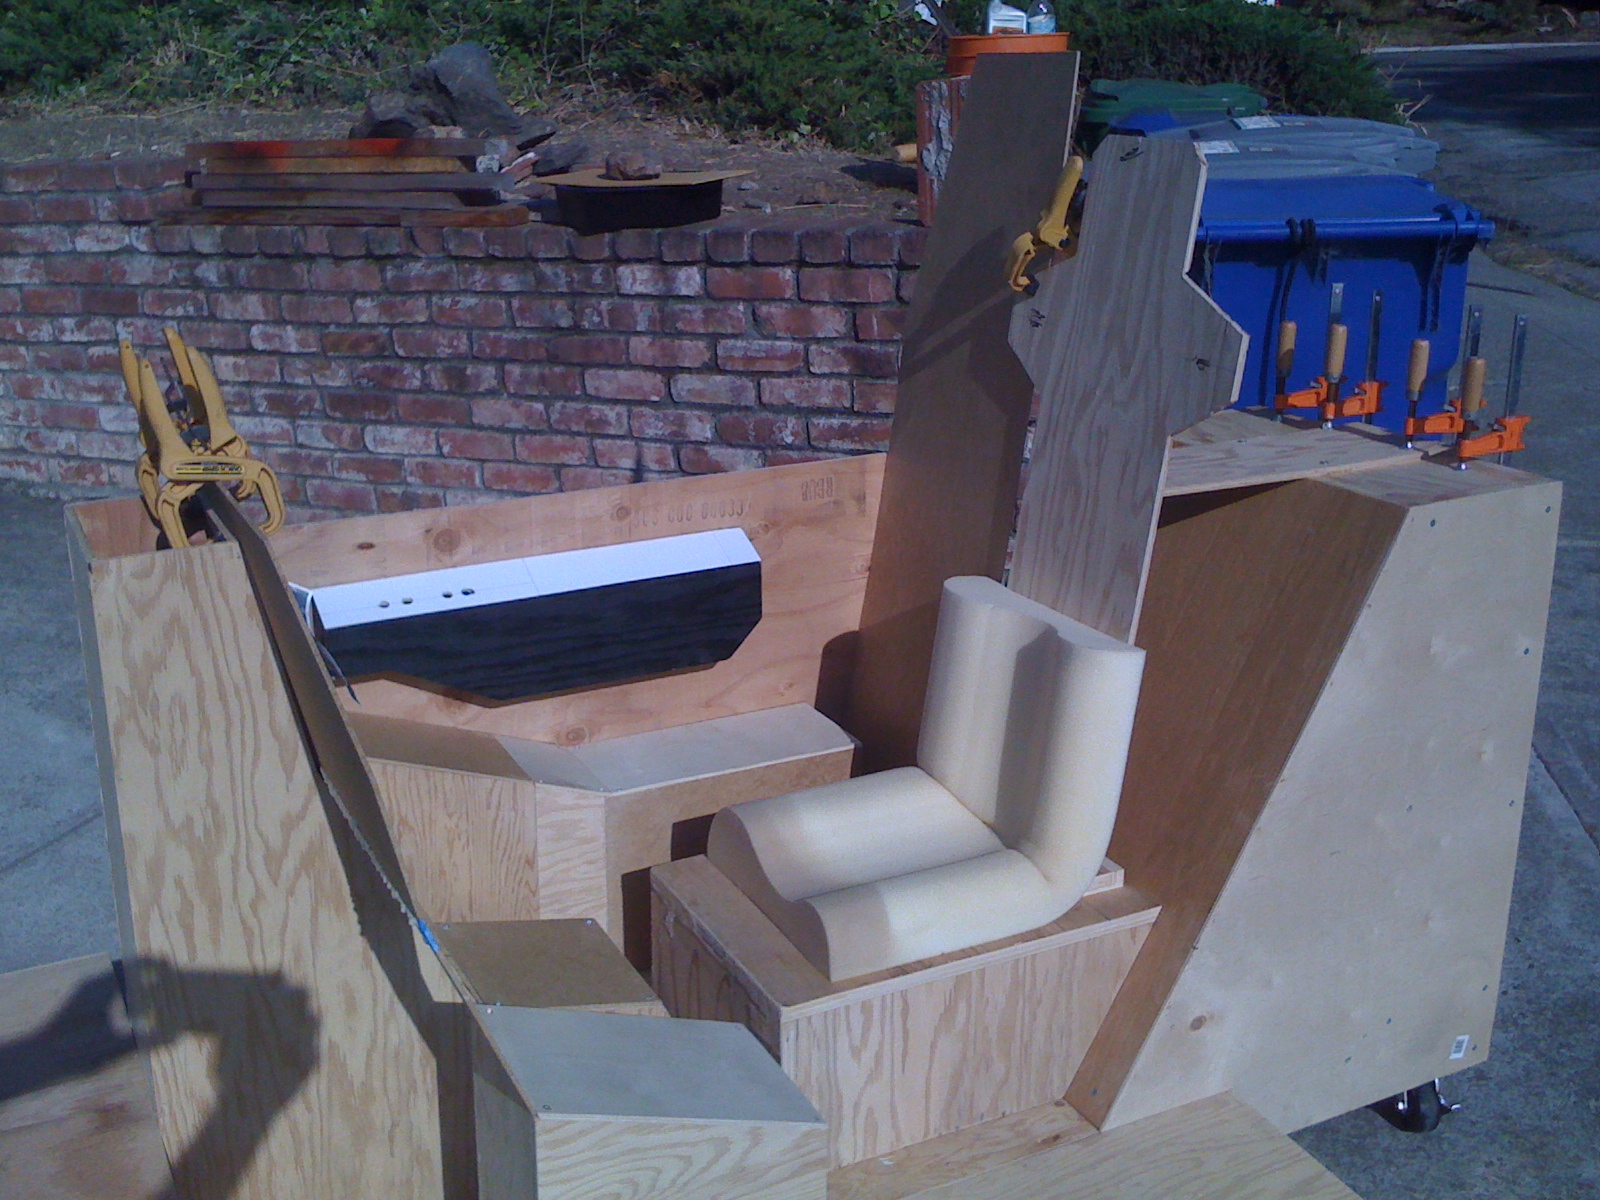
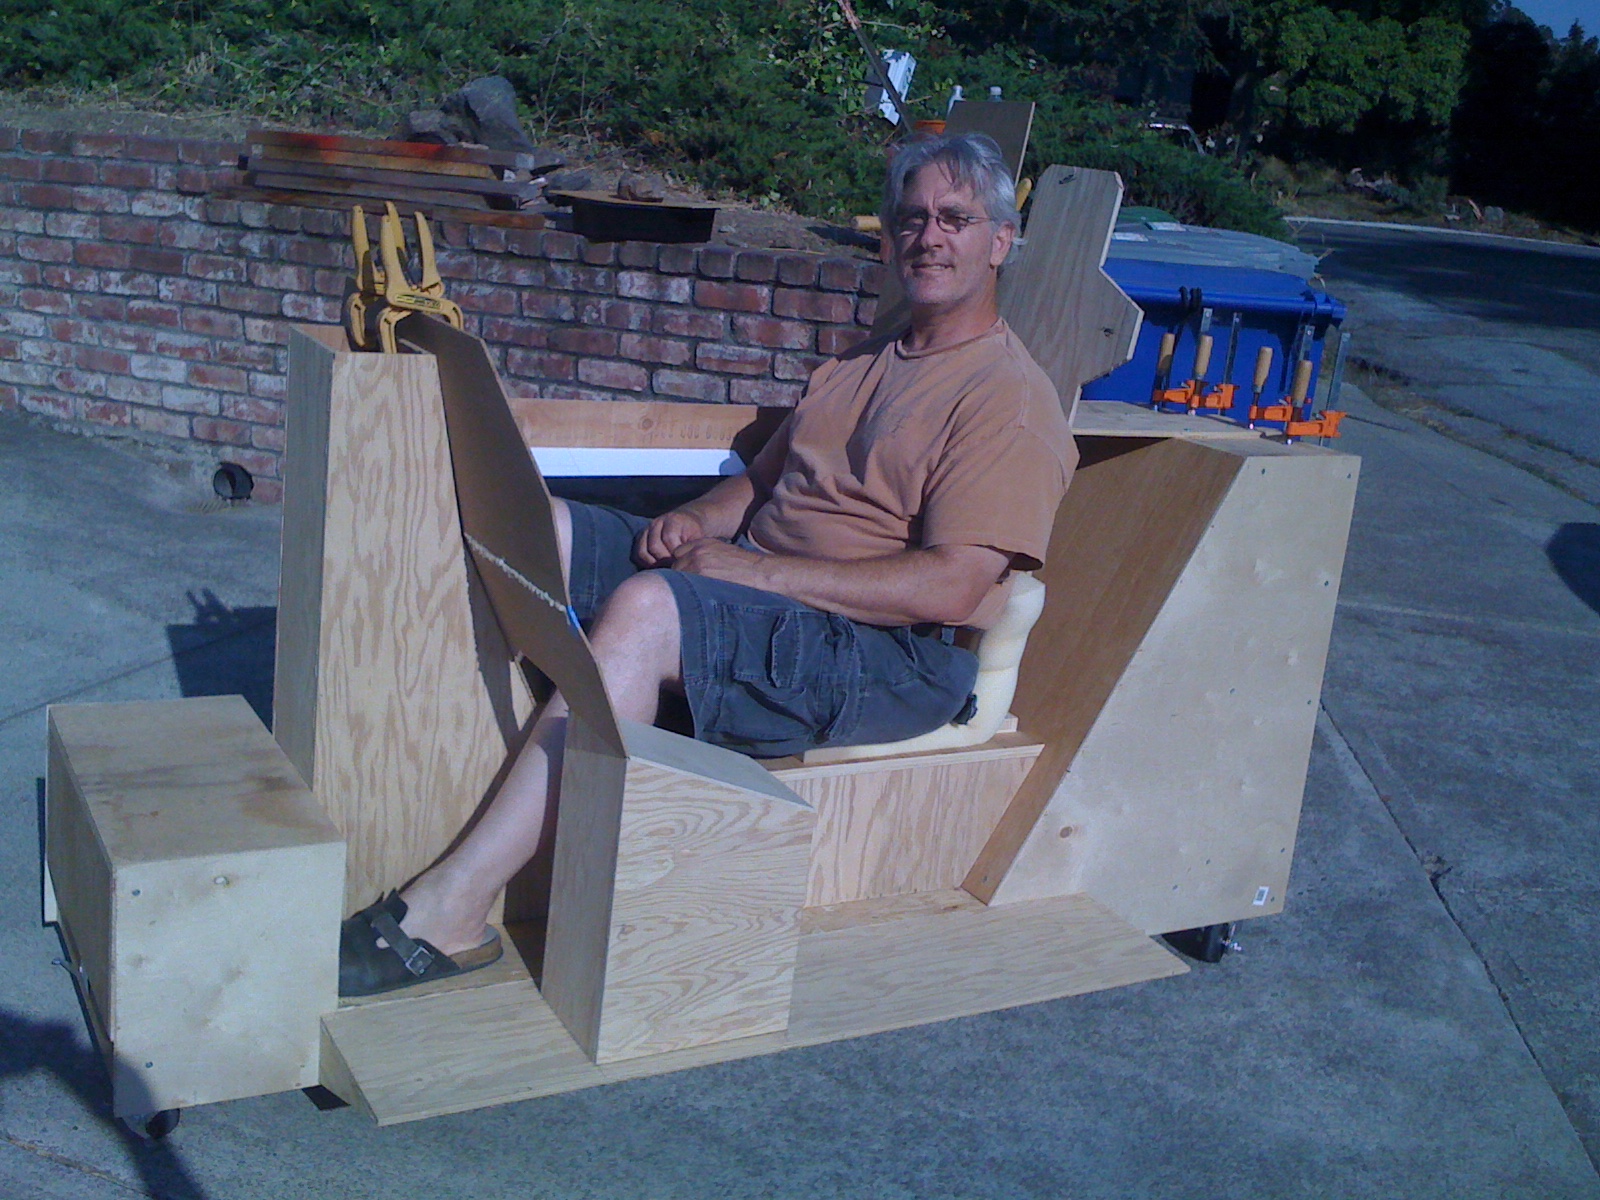
Added the seat backrest. Yes - I am *entirely* aware it's not accurate and too scale. What I was more concerned with was it being to *scale* with *ME*! Hence the black marks where my shoulders and head would be (with seat cushions and pads added!). I did a seat test, and then used a black marker to position my shoulders and then used this determine the optimal size for the head and shoulder belt locations. May not be perfect, but hey - its never going to really fly either! :megalol: This will now allow me to fabricate the rear wall panels and then attach them to the sides of the pit. This is the next phase, including the rear power management and collective stick controlls that will extend from the left rear panel. Stay tuned!
-
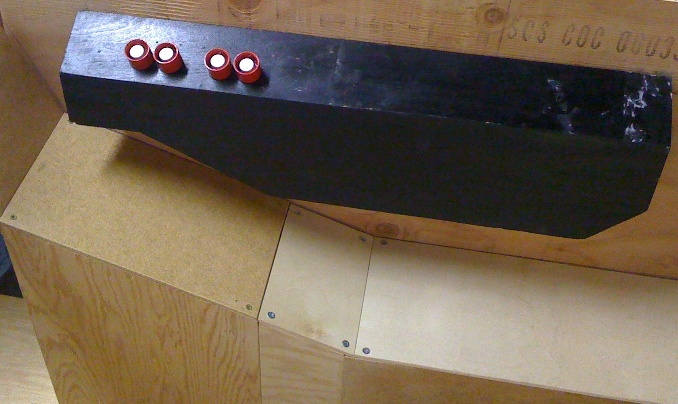
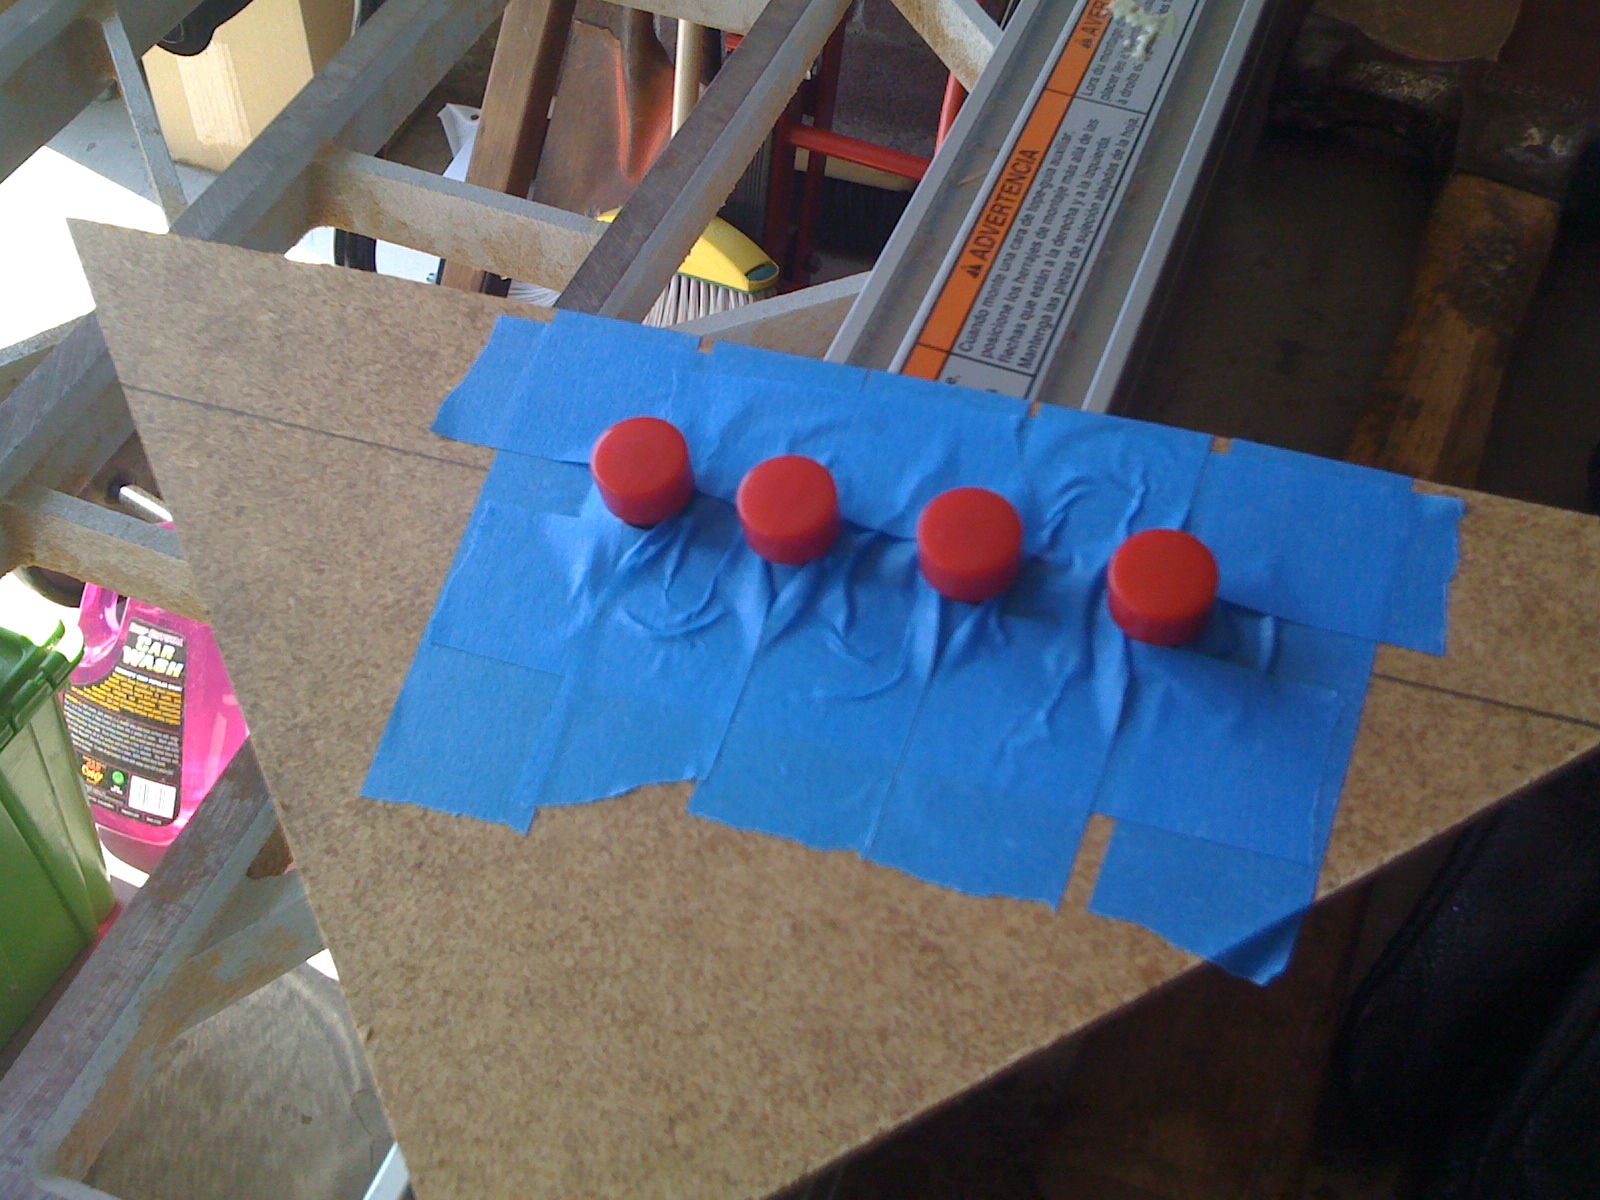
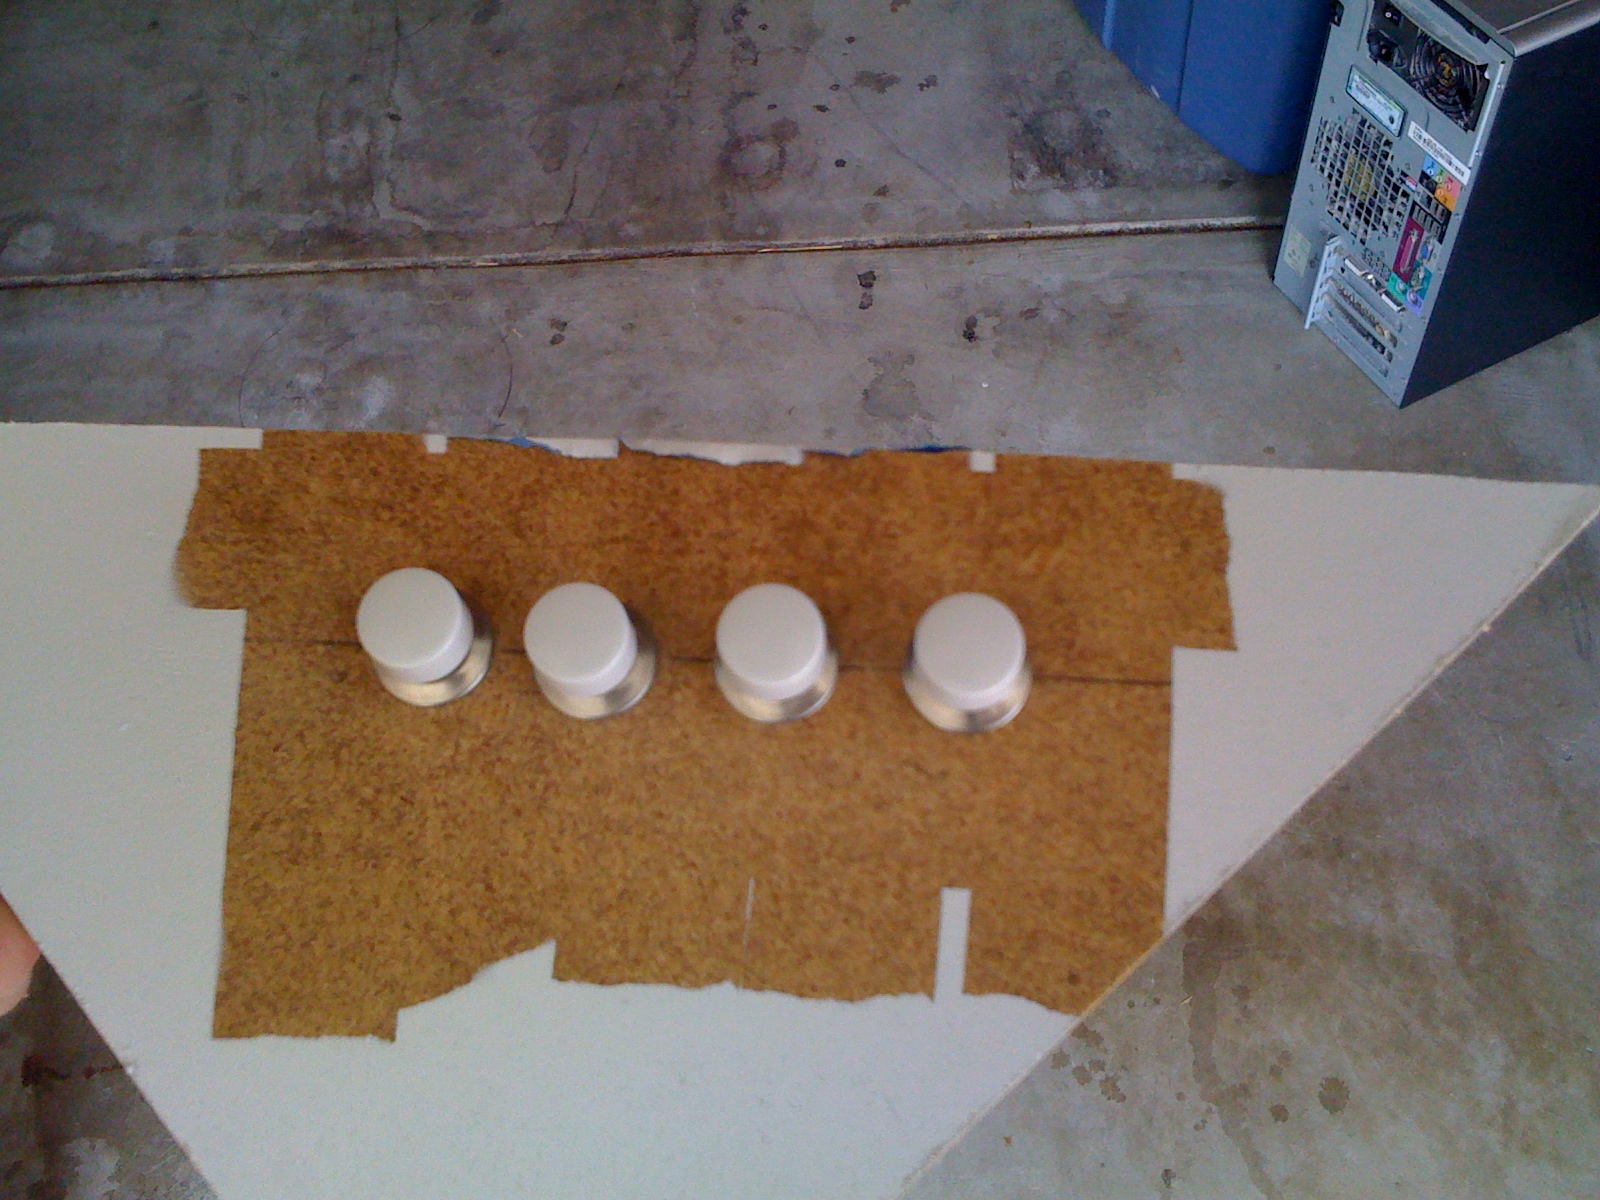
Now - once the buttons were painted white. I needed to find a suitable plastic container that would mimic the ones in the KA-50. I used two different kinds of plastic bottles to create this affect. I posted two pictures. The first one shows two red button guards side by side (for comparison and size) The one on the left, is painted red, and is made from a 2oz plastic bottle, I cut the bottom off it and then spray painted it red. The one to the right of it is a OneTouch Ultra test strip container. It's a bit thicker and smaller than the 2oz bottle, but I think it looks better than the 2oz bottle. You be the judge. I'll go ahead and create 4 of each and see how they look, but for now here are the results. The next picture shows it on the KA-50 pit. I moved the more accurate button guard to the right and moved the smaller button guard made from the OneTouch container to the left. While I think the button guard made from the 2oz bottle might be more accurate in size relation to the push button, I think it's too large for the panel. However - the smaller OneTouch container looks sturdier and does fit the size specifications for the panel, but it makes the button look bigger. Both will accompish the goal - but I am leaning more towards the OneTouch containers rather than the 2oz bottles. What do you think?
-
So today's task was to create the Fire Extinguisher Buttons. So went to my local Fry's electronics and picked up 6 (normally off) push buttons. Problem was - they were red. So... picked up a can of automotive white for plastic parts and then painted the red push buttons white.
-
Interesting! Well, I have 3 quadrants as well, so was thinking of actually using one of them for my pit too. I initially tested it, but was unsuccessful in getting the quadrant levers to map to an axis. However - when I mapped it using the reverse thrusters on the quadrant - it worked fine. In this case - I do *like* the shape of the Saitek Quadrant so I am really just taking the size of it and creating my own fuel shutoff levers though. Since I can easily map a on-on Bat toggle switch to the fuel shutoff valves, as well as the rotor brake, this makes a replicant of the unit only (3) Toggle switches.
-
Cool - so how did you map the quadrant in DCS? Are you using the reverse Thruster on each lever?? Because when I tried to map them - only the reverse thrusters would work because it requires a key-press, not an axis control.
-
The new KA-50 Blackshark.... Harley... Not to be confused with the KA-50 I am building, right next to it is my Blackshark Twin-Cam Harley Softail.
-
More Updates... I've added on the seat and the right panel. While it might not be completely to specs that TriggerHappy put out there, but I had to factor in my longer body frame - so... to that I expected it to be a little out of proportion to fit me as I am 6'2".
-
Uuuuaaaah..! I have started building now..!
londo-cat replied to Triggerhappy69's topic in Home Cockpits
I thought the Collective had 2 hat switches on it? -
Well I was wondering how you got the Shkval+ABRIS to show on one monitor. Because in the DCS config, it allows for Shkval+Camera but not Shkval+ABRIS. Per the DCS Manual: MONITORS. DCS allows you to output the video to one, two, or three seperate monitors. Options include: 1 Camera. All video will be displayed on a single monitor (default) 3 Cameras. Video will be equally spread between three separate monitors. Shkval+Camera+ABRIS. This option allows the Shkval image to be displayed on the left monitor, the default camera on the center monitor, and the ABRIS display on the right monitor. Shkval+Camera. This is a two monitor setup that allows the Shkval video image to be displayed on the left monitor and the default camera to be displayed on the right monitor.
-
:megalol: