Leaderboard
Popular Content
Showing content with the highest reputation on 08/20/08 in Posts
-
Chicken LOL.. http://forums.eagle.ru/member.php?u=3730 :music_whistling:2 points
-
Mig 21 :)2 points
-
Разработчики тоже. :megalol:2 points
-
Happy birthday man! :pilotfly:1 point
-
I thought it would be nice to take-off with a discussion about real advanced (not only flight) simulations not for the games market. Never seen such a thread on the forum. Also I could find only pieces of information about them elsewhere. Maybe you could share some pictures, links, datas about them here. It could become a very interesting thread, what do you think? Me first about Formula One simulators for the F1 drivers. Did you know which F1 team has the best one? McLaren. However, things can change aftera while. Ferrari deputed Moog company to build a new dynamic simulator wich should be a big step forward in developing virtual tests and should give a feeling of real enviroemnt to the drivers. Read about the company and then think about newest computing stations and their abilities :yes:. PC most advanced racing sim like iRacing with laser scanned tracks and complex simulation of tire and suspension work should be not a competion - not even close. Links: Moog Home Page Moog Aircraft Group Article about Moog motion simulations iRacing Home Page BMW Sauber F1 drivers trainer - Lap of Hockenheim without narration BMW Sauber F1 drivers trainer - Lap of Silverstone 20081 point
-
As I put my own version together I see it’s already been done never mind just another version I suppose. Here is a few steps for setting the ILS and navigation. First you need the details of your destination airport, those are radio frequencies, local barometric pressure, runway heading, runway elevation. To tune to control tower (CT) you need to obtain the frequency from the flight planner for example: EGKK CT 124.225Mhz press C to select the decimals of the COM1 radio, the numbers 124 before the (.) can be changed with the mouse wheel or ( + - ) keys press C again and you can change 225. The same principle works with other radios. For COM2 press C+2. for NAV1 press N. NAV2 N+2. For ADF and DME it’s A and D respectively (I think). Ok so for navigation you use NAV1 NAV2 ADF (automatic navigation finder). DME (distance measuring equipment) COM1 and COM2 speaks for it’s self. Transponder code (squawk code) is for ATC controllers VOR DME stations and ILS are the high frequency emitters they can be tuned on NAV1 NAV2 DME radios and NDB (non directional beacon) low frequency station can be tuned on ADF radio. So to make ILS approach you tune NAV1 to ILS frequency and intercept the glide path on Boeing 737 MFD the two little pink blobs will appear, on King Air 350 there is only one pink dot will appear for vertical path only and that’s where you’d have to turn OBS or course selection needle to match the runway heading to get horizontal path reference. To get the correct altitude indication you’d have to turn the barometric pressure knob and to get the barometric pressure value tune to ATIS frequency of the airport using COM1 or COM2 radios for example: EGKK ATIS 136.525Mhz the number you need will look some thing like this 1004Q. In the flight planer the nav log is provided the nav log tells you the frequencies of the stations used for navigation to get to point B or C or D and their heading for example there is a VOR station at point B and heading 280 to get to it, you would tune the NAV1 standby frequency of that VOR and flip-flop switch it to make it active than you can tune the standby frequency again for point C so to make it ready. Next step is to turn the course selector needle or OBS to match the heading of the selected point which in this case 280. The next step is to set the autopilot if required and to do that you’d press the autopilot master switch ( note there’re 2 navigation modes one is GPS and the other is NAV in this case we are using NAV mode) and now press the NAV hold button, it will fly you to point B and your heading approach to that point would be 280 degrees. Set the required altitude and climb rate press alt hold, set the required speed. The approach hold works for ILS in the same way like it does in Lock On. There’re NDB approaches for the runways with no ILS but that’s another story I think.1 point
-
I don't have Acceleration so I can't help you out specifically with the F18. BUT, I've been using FS for years and also fly for real. When changing the frequencies you don't need to worry about . Personally I just use the mouse and change the frequencies that way. LORAN I've never used, nor seen in FS but then I tend not to pay that much attention to it.... I'm guessing you are using the built-in flight planner? If you are then your GPS will automatically load that flight plan. If you are flying something a little more complicated with an FMS then usually there is an option in the FMS to load the FS Flight Plan. Once you've checked the flight plan is in your FMS/GPS you need to make sure that the autopilot is looking at the GPS/FMS for its NAV instructions. Usually you will find a switch that is marked NAV/GPS. You need to make sure this is set to GPS, and then with the autopilot on you select the NAV submode. While every autopilot is different there should be a NAV mode. Now if you're using an FMS it can build you an altitude profile. But generally the altitude management is your problem if you are using GPS. You can set up the Garmin's to give you cues for vertical navigation. I'd suggest for that information you go to Garmin's website - www.garmin.com and download the GNS4xx training devices. The GNS in FS is very close to the real thing. Now forgive me if I'm teaching you to suck eggs, but with the ILS I'll start from the beginning. We'll use the ILS at Southend Airport [EGMC]. We know the frequency for the ILS there is 111.35 and the Ident is I ND. We have also found out that the runway heading for the ILS is 237. In you NAV radio you need to dial in 111.35 (again just use the nobs on the radio and a mousewheel to scroll through them. That's the easiest way and its the way it's done for real!). Make sure that it is the active frequency. Now depending on which aircraft you are in... Depends on what instruments you have. If you have only VOR receivers you need to turn the dial so it reads 237. If you are flying something a little more modern you will probabyl find that on the autopilot panel next to the heading selector (or sometimes the same button) you'll see something to set your course. Course needs to be 237. Now in the real world you listen to the NAV frequency for the morse code ident, in this case we'd be listening for IND... If you can hear it, then you're picking it up. That is all you should need to do to set up your aircraft to fly an ILS approach. Don't forget that you either need to fly a procedure in, self-position or get vectors to the ILS. If you are using the Garmin GPS on FSX you can use the Approaches in there. Just load up the approach interface and select an ILS24 approach for EGMC and then you'll get a couple of options for how you want to get there. Ideally you want to be interceptiing the localiser (the vertical bar on the HSI/VOR/FD that gives you your position relative to the centreline) by no more than 30 degrees. If you are going to use the autopilot to fly the ILS for you, generally it isn't switched to APR (approach) mode until you have intercepted the glideslope. Once you get the glideslop, you can let the autopilot fly the apporach if you so wish... Just hit the APR button, depends on the aircraft thought. I can't take screenshots because my harddrive for Games went bang and I haven't replaced it yet. But if you are still stuck and confused, PM me. And if possible include a screenshot/s of the cockpit you're using and I can highlight from there.1 point
-
What Cozmo said back on page two - Su-33, MiG-29K and F/A-18C :) .1 point
-
Nothing easier than this: Go, search your "Ubisoft\Eagle Dynamics\Lock On\Config\View" folder, open the "Labels.lua" and look for these files: copy this and replace your current files with this. (Dont forget Backup!!) Now with Labels on, you should see only weapon labels! In my beginning days of Lock On, i have started with this settings, it was useful to learn how to evade missiles. Today with TrackIR and a lot of practice, i dont need this anymore. And one day you will find out, its a lot more Fun with labels off, totally.1 point
-
Happy Birthday! :drink:1 point
-
Ka-50 is not an aircraft... It's a chopper baby. :D But it sounds good to me also.1 point
-
Select the button/ HAT position you want, right click it/"new advanced command" and see what comes up. I think it will give you options to program and they should be relatively self-explanatory.1 point
-
Happy Birthday M8 :)1 point
-
Never watched it in english, so im just translating.1 point
-
DCS: Black Shark testing is in progress now, so it's early to talk about number of players handled in MP game.1 point
-
Quick we'll have to send the Neurotically Attacking Terrorist's Order in!1 point
-
HAPPY BIRTHDAY !!! :holiday::cheer3nc::clown_2::juggle::yay:1 point
-
Ka-50 Pitbuild Update 19. august 2008 - Wiring up the Collective Stick 2 I can't belive it actually takes 32 wires to connect all the switches in the Collective Box..? But it is starting to look like something now? All the red plastic will be replaced or painted like the real thing.. I'll also have to add some "fake" wires to make the wire-bundle look a bit fuller.. I can't wait to test it out..! Some details of the springloading and dampener:1 point
-
All I have to say to the DCS devs is simple: Thanks! Knowing full well the potential the sim has to offer I'm willing to wait as long as it takes. Its going to be a one of kind product in a niche market and the fact that a company knowing those facts will still take on a project like this is appreciated by myself and many others in our sim community. They could very well change gears and make a load of money off some arcade shooter or arcade flight game but stick to the real deal becuase they have a passion for high fidelity sims. Thats pretty rare nowadays. Take your time ED I know you'll release it when ready.1 point
-
Mine contains porn.. so no xD! :D1 point
-
I could start a thread on this forum about what my favorite type of cheese is and by page 10 we'd be discussing something involving radar azimuth or parasitic drag.1 point
-
The Enemy will be GRAVITY!:lol:[sorry I couldn't help my self]1 point
-
MiG-29UB cockpit1 point
-
Спасибо! Ссылка с фотками по турецкому броневику, выдерните если интересно: http://krig42.livejournal.com/1 point
-
These threads are like a bone to a dog for me .. I just have to chase it no matter how many times this question is asked .. :D:D F18a/b/c/d/e/f/g/h/i/j/k... etc( I dont care which model), Su33, Mig29K.1 point
-
I spotted one blank weapons picture. Its for the German tornado. When you load up with the AGM-88, it would automatically load the ECM pod on the opposite pylon of the aircraft. And the ECM pod doesn't have a picture.1 point
-
I'll check those out. I believe that if the original image size (256x256) is streatched to the size that it would fill at 1680x1050, then the images should display correctly. That however would require a completely new set of images to be made for that resolution... personally, I use the UI at the 1024x768 in windowed mode, and then switch to 1920x1200 in Full screen for the simulation to stop the UI looking ugly, but I may consider doing images that match 1680 x 1050 if somebody makes a UI to fit that resolution too. Edit : I've checked this out, and by tweaking the image size to 420 x 350, they fit perfectly into a 1680x1050 UI screen with no distortion: I may look into this as another pack, but can't give any timescales, and I would ONLY make 1680x1050 as the alternate resolution. I've just tested it, and I can say that it's fully compatible with the Crimean Air Wars packs.1 point
-
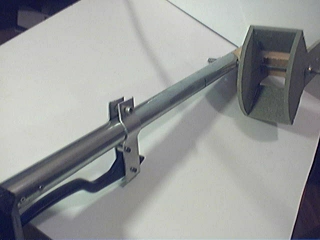
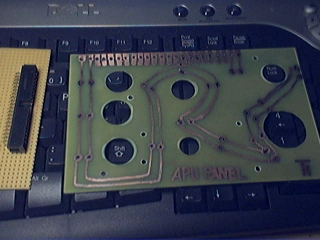
Pitbuilding Update Collective Stick and PCB making Finally got some time to work on the Left Rear wall and Collective stick today. I had to figure out how long the stick handle was going to be, and for that I had to first finish the Front Panel and attach it to the Front Pedestal. Then I could place the Left Lower Panel and Ejectionseat and the Left Rear Wall with collective Stick. Phuuh.!:music_whistling: Naturally I got so carried away while doing this I forgot to take pictures of (half) the pit assembled, but I promise to do so within the next few days... After finding the correct lengt for the collective handle I fixed the Collective switch box and just got started making the attachment for the collective break handle before bedtime arrived.. Collective Stick with the (un-finished) collective break handle. As you probaly can see from the pictures I have still got to file the ends round on the handle attaching plates. The Collective Stick "business end".! Here you see the axel that it pivots arround in the Left Rear Wall, and the box that will hold the Rotor Governor Control Handles) My first self made PCB..! This is just a rough test board that will connect all the LED's for backlighting the APU Panel. And also all the wires from the switches and rotaries. But now that I know how easy it is to etch PCB's I'll design a new one that also holds the 4-way switch and it's mechanics. OooH..! I have forgotten to tell you all..! I found a way to make the 4-way switch that actually is simple, feels right and WORKS..! Was going to keep it a secret untill I cuold show you pics of a working example, but now the secret is out..! DAMN ME..!:cry: I unsoldered some 39 pin IDE connectors from a broken computer mainboard I had. And after sweating and swearing over it for an hour or so, I finally found that the ONLY way to unsolder all 39 pins at once is with a industrial heat-gun (basicly a blow dryer on steroids). You will most likely need quite a few of these if your building a pit. Just to avoid having to un-screw hundreds of individual connections to do simple repairs or upgrades in the future.! So my advice is: Get one of those heat-guns, or buy them from an electronics suplier..! This board gathers all the wires from all switches, LED's, rotaries and so to a common place in the Left lower Panel. And I'll use standard IDE ribbon cable to route everything to the IOCards. Also it holds the resistors for the different LED's and relays to toggle the Backlight on and off.. Well that's all for now folks.. :pilotfly:
 1 point


.jpg.f1f6deaee4924c1ebb0330d969b39589.jpg)
-
Recently Browsing 0 members
- No registered users viewing this page.