Leaderboard
Popular Content
Showing content with the highest reputation on 04/06/12 in Posts
-
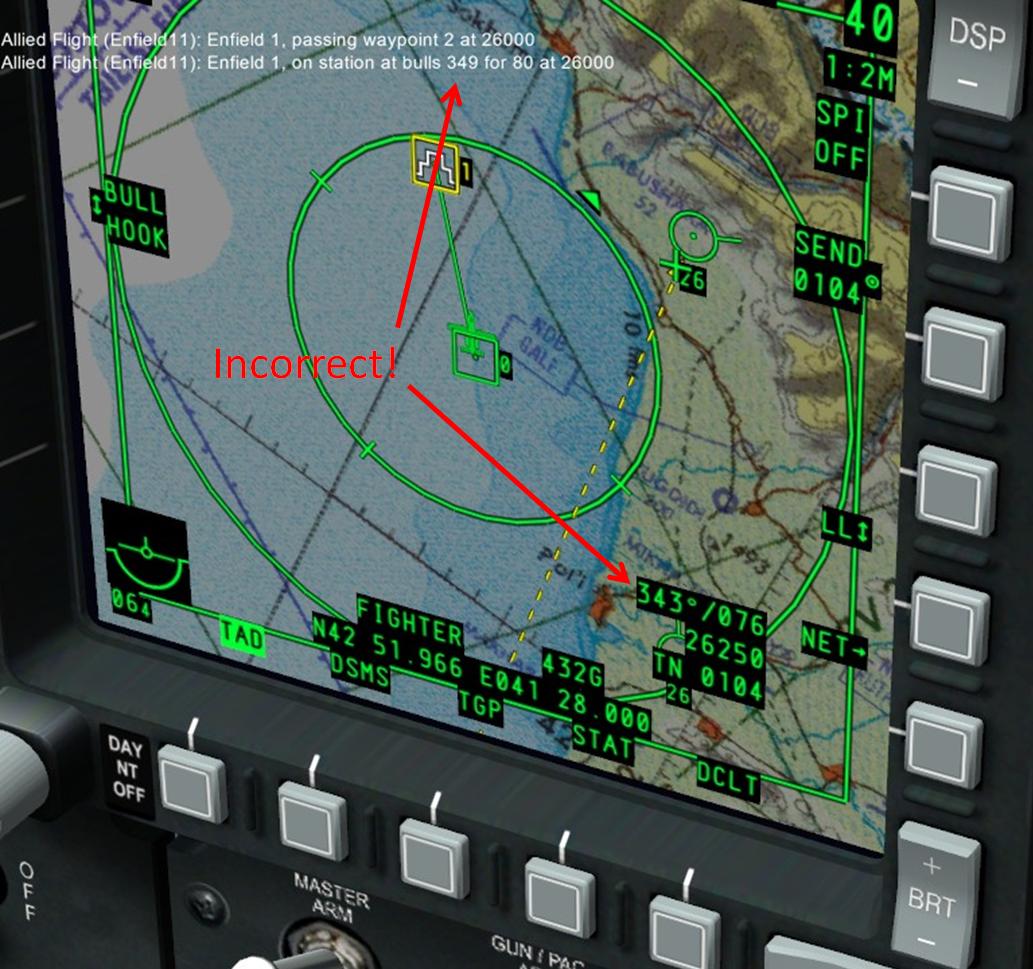
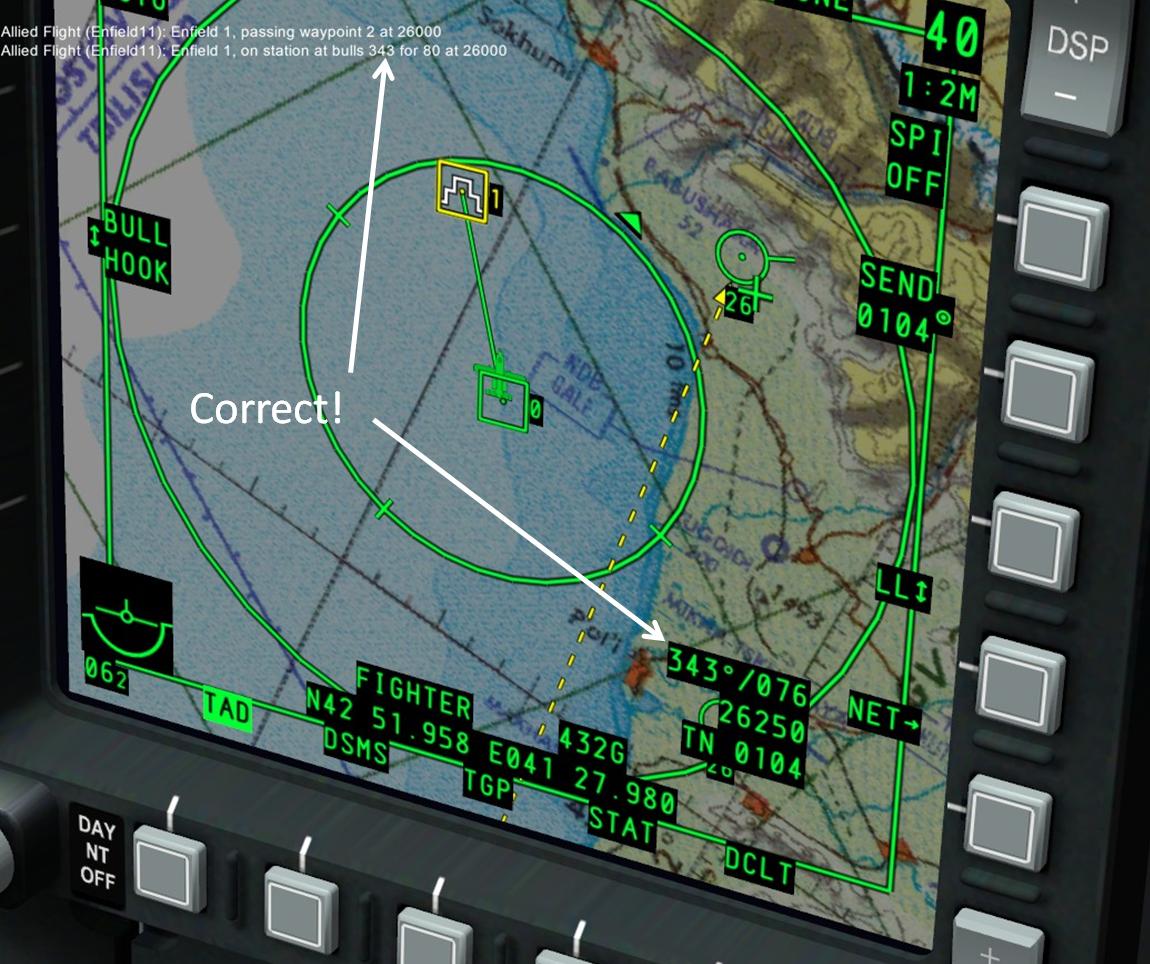
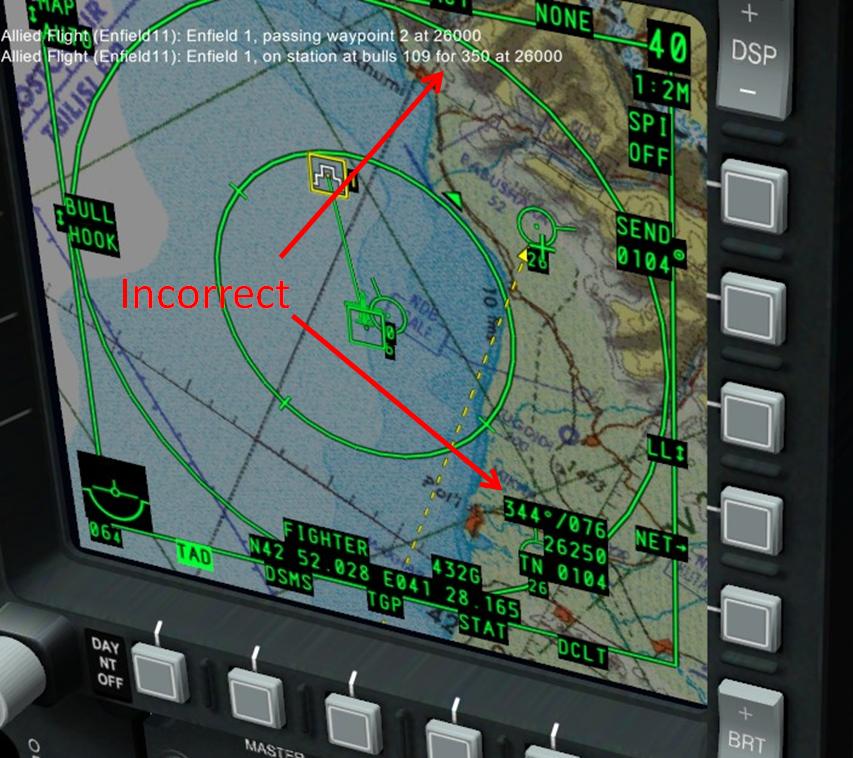
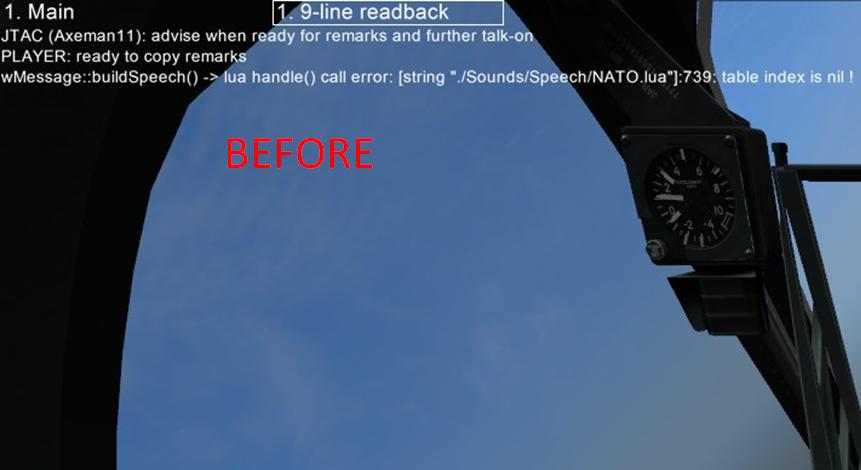
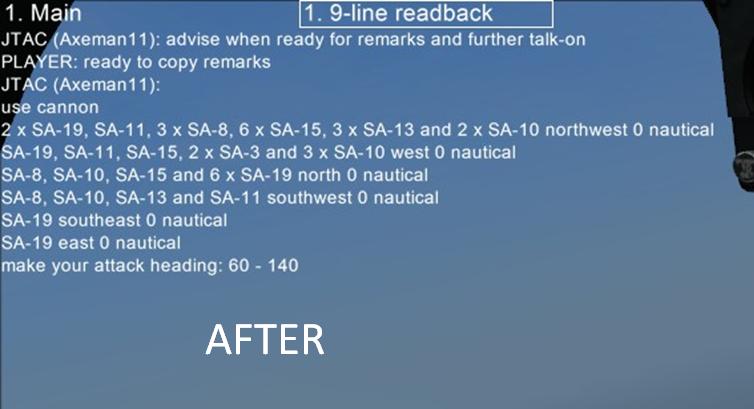
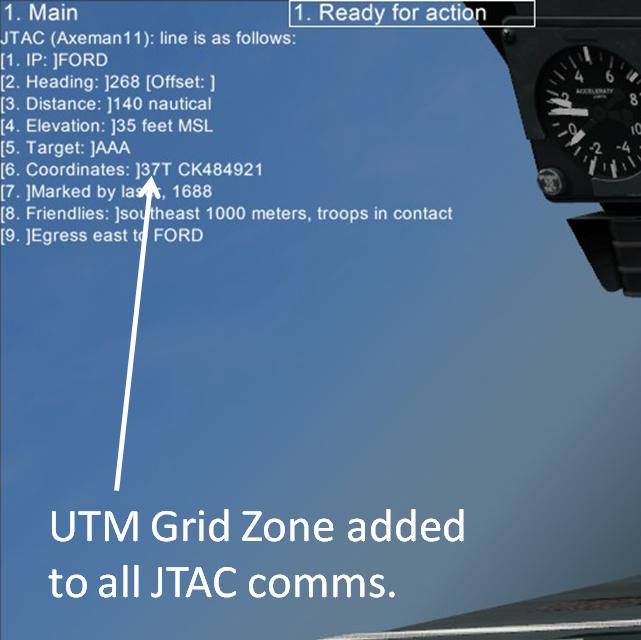
This mod is a small conglomeration of a few radio fixes I have made. Azimuthal error removed from bullseye radio calls: Radio calls by default reference the map x axis as being north. However, the geographic projection used in DCS, gnomonic projection, causes the x-axis to differ from the gnomonic north at all locations except the central longitude (33 degrees E). Your aircraft's instruments use gnomonic projection to determine true north, however. This means that radio calls will be several degrees off when giving azimuth directions. This mod fixes this problem, for bullseye radio calls only as can be seen below. BEFORE MOD INSTALLATION: AFTER MOD INSTALLATION: Bullseye calls now work for multiplayer clients: Bullseye calls currently do not work for multiplayer clients in unmodded DCS v1.1.1.1. When you are a client, the Lua function that is supposed to return the bullseye location returns {x = 0, y = 0, z = 0}. This causes the bullseye to be over the Crimean Peninsula if you are a multiplayer client. This mod provides a temporary fix to the problem by modifying the debriefing module to make it create a table containing bullseye locations in the main simulation Lua environment. This table is accessed by the BullseyeCoords.make function should it receive a bullseye location of {x = 0, y = 0, z = 0} from the normal function. BEFORE MOD INSTALLATION: AFTER MOD INSTALLATION: JTAC Remarks "table index is nil" Lua error fixed. When a JTAC is near a SAM search radar (and possibly other situations), asking for remarks will give you a Lua error, saying "table index is nil". This mod fixes this problem by adding additional logic to prevent the Lua error from ever occuring, and also adding a few SAM search radars to the relevant Lua table. BEFORE MOD INSTALLATION: AFTER MOD INSTALLATION: ("USE CANNON"?! :doh: Alright, I guess that WAS all I was carrying, lol) UTM grid zone added to JTAC radio comms. This mod also contains a previous mod I made, a mod that added UTM grid zone to JTAC comms. The JTAC will speak the grid zone id, and also give a slight pause between the grid zone and MGRS digraph. This is the "variety 1" of my previous mod. AFTER MOD INSTALLATION: INSTALLATION INSTRUCTIONS: Manual installation (for BS2 and A-10C): 0) Download this file: http://forums.eagle.ru/attachment.php?attachmentid=64523&stc=1&d=1333677715 1) Open up your DCS install directory. 2) Rename the file "debriefing.lua" in ./Scripts/UI to "debriefing_original.lua". 3) Paste the "debriefing.lua" file included with this mod into ./Scripts/UI 4) Now open up ./Sounds/Speech in your DCS directory. Rename "NATO.lua" to "NATO_original.lua" and "common.lua" to "common_original.lua" 5) Paste the "NATO.lua" and "common.lua" files included with this mod into ./Sounds/Speech. 6) Paste the "delimeter-begin.wav" and "delimeter-continue.wav" files into ./Sounds/Speech/Sound/ENG/Common/JTAC/Alphabet, AND ALSO PASTE THEM INTO ./Sounds/Speech/Sound/ENG/DCS A-10C/Player/Alphabet if you are installing into A-10C, and/or ./Sounds/Speech/Sound/ENG/DCS Ka-50/Player/Alphabet if you are installing into BS2. 7) Done! EDIT: Made slight changes to install instructions. I think you need to add delimiter-begin.wav and delimiter-continue.wav to ./Sounds/Speech/Sound/ENG/DCS Ka-50/Player/Alphabet if you are installing into BS2. It wouldn't hurt to add both of them to ./Sounds/Speech/Sound/ENG/DCS Ka-50/Player/Alphabet AND ./Sounds/Speech/Sound/ENG/DCS A-10C/Player/Alphabet. MODMAN installation (for A-10C ONLY): 0) Download this file: http://forums.eagle.ru/attachment.php?attachmentid=64513&stc=1&d=1333674647 1) Install in A-10C as normal. Question: Is there a patch for MODMAN to make it work for BS2? Anyway, thanks Moa for providing the information that DCS uses gnomonic projection, and a Java function that uses it, and to the members of the 1st VFW for helping me test. Also, thanks ronht, who, as far as I know, first reported the JTAC remarks bug (in this thread: http://forums.eagle.ru/showthread.php?t=81444). Please let me know if you guys have any issues/bugs! Radio Patch for DCS A-10C v1.1.1.1 v1 MODMAN PACK.zip Radio Patch for DCS v1.1.1.1 v1 MANUAL INSTALL.zip
 6 points
 -
2 points
-
Forgot to add, this is NOT a server mod like Slmod, you need to install it on your flying machine. Also, this is for the English versions of DCS, not sure what would happen if you installed it on a non-English version.2 points
-
Sharing data This document covers the sharing of data in the Kamov Ka-50 with a focus on the transmission and reception from the A-10C. It has been originally written for internal use, but then made public. I want to thank the entire Fighter Combat Sims group and especially Alberto "Brontolo" for helping me in testing. A special thanks goes to EinsteinEP for his essential help developing the chapter “Bearing and distance” and in the correction and review phase. Summary 1. Introduction • Preparing the ABRIS • Different bearing types • PRTz Datalink • Locking a target 2. Sharing data: Ka-50 to Ka-50 • Saving a target with the PRTz • Sharing data between Ka-50s • Automatic ingress to target 3. Sharing data: Ka-50 to A-10 • Getting coordinates with the ABRIS • Getting coordinates with the PVI-800 • Receiving coordinates 4. Bearing and distance • Nine-Line - Nine-Line example • FCS “K-Line” - Transmission example 5. Final considerations 1. Introduction Ka-50s and A-10s are very different aircrafts. Just think that the Ka-50 is Russian and uses the metrical measurement system and the A-10 is American and uses the Imperial system. Knowing that, there should be no surprise when I tell you that there isn’t a way for sending and receiving data between these two aircraft directly. Therefore we have to find a measurement system supported by both of them. The short paragraphs below are just a small reprise of concepts that you may have already learned. To deepen your understanding, read through the ED manuals. Preparing the ABRIS One of the instruments we are going to employ is the ABRIS, but first of all we have to match A-10’s unit of measurement. The ABRIS can represent lat/long coordinates in one of two ways: • XXX°YY'ZZ" (degrees, minutes and seconds - ABRIS default) • XXX°YY.YY' (degrees, minutes and decimals - PVI-800 default) A-10s use the second representation mode hence we have to set the correct unit of measurement. To do this, go to the ABRIS setup, select the UNITS FSK, and change the setting (see the Black Shark manual, page 7-26). Different bearing types Ka-50s and A-10s represent bearings in two different methods: Ka-50 uses True Bearings while A-10 uses the Magnetic bearings. Toggle the ABRIS between each methods can be done in the Options menu, entry “Track/heading”. PRTz Datalink The PRTz is a very important part of a Ka-50’s avionics. This device allows sharing data directly to each Ka-50 in your flight. It is composed of three rows of buttons, from top to bottom: • target type: Armor, SAM/AAA, Other, and Ingress point; • recipient: select who will receive your data, from #1 to #4 or the whole flight; • functions: erase the selected target from the memory, perform the automatic ingress to target, send or receive data. Locking a target First of all we have to spot a target in order to lock it. This task can be performed in many ways, exempli gratia: • Put laser on STAND-BY position; • Activate the HSM and position it over the target; • Uncage the Shkval; • Adjust the gate around the target; • Press the Lock button. 2. Sharing data: Ka-50 to Ka-50 A Ka-50 flight is composed of up to four aircrafts. Each pilot is assigned a unique ID number from 1 to 4. You can see your wingmen (or your leader) and recognize them on the ABRIS by this number. Assuming that you have already locked a target, you can now save it for your use or send its data to the rest of your flight. Saving a target with the PRTz Saving a target and making it appear on your ABRIS is very easy. Just select the correct target type button in the PRTz’s first row and press SEND/MEM. E.g. if we have locked an enemy T-80, we will first select the armor target type, then press SEND/MEM. A diamond with a number (#1 for the first target) written into will appear in the ABRIS. This number is incremental, if you save another armoured target with the PRTz, it will appear as a diamond with a #2 in the middle. This target representation will be later used to get its coordinates and send it to others (A-10s, for example). But we will delve into this aspect later. Sharing data between Ka-50s In order to send data about target you must select the recipient (from #1 to #4, or the whole flight), cycle between your saved targets by the corresponding target type button and then press “SEND/MEM”. The selected recipients will receive your data. Now let’s see what happens if you are one of those recipients: some buttons on the PRTz will begin to flash (letting you understand who and what type of target you are about the receive), Betty will warn inviting you to take a look at the EKRAN and it will finally tell you that you have just received some data (“RECEIVE DL TARGET”). Press “SEND/MEM” to save, and the target will appear on your ABRIS. Quite easy, isn’t it? Last important thing: the number written into target’s symbol couldn’t always be the same for the whole flight. E.g. if we have already saved an armoured target (target type #1, a diamond on the ABRIS) and your wingman will send you data about another one, you will see two diamonds on your ABRIS. The one we have saved before is the #1, and the one just received is the #2. But your wingman could have just one armoured target in his ABRIS, and it is identified by the #1. This means that our #2 is his #1 and vice-versa, and you don’t know that. So pay attention and try to avoid confusion! Automatic ingress to target This is a very useful function. It allows to release the Shkval directly on a target received or saved with the PRTz. • select a saved or received target by its corresponding target type button; • enable the AUTO TURN function (not mandatory but useful); • put laser on STAND-BY; • uncage the Shkval. And your aircraft will magically turn and lock the target. 3. Sharing data: Ka-50 to A-10 There are two possible ways to get a target’s coordinates: with the ABRIS or the PVI-800. The first one is more precise (~20m), the second one is far less precise (~200m) but it’s faster. Getting coordinates with the ABRIS Before using this method you need to lock a target and save it into your PRTz, so it will appear in your ABRIS. To get the coordinates of a target we will use the ABRIS in ERBL mode. To enter this mode, cycle with the 5th FSK, entering the NAV mode. Pressing this FSK enable the ERBL mode: a cross will appear and, below the map, you will find coordinates of the position under the cross as well as other data, like bearing and distance. As you have already imaged, you can now move the cross over the symbol of a target acquired with the PRTz and read its coordinates. To move the cross use the right knob on the ABRIS. Press it to toggle from vertical and horizontal slew and vice-versa. To obtain the best result, use the Zoom in FSK. This procedure is not very fast and requires a lot of attention, therefore it’s not a bad idea to recon a Battlefield Area, save your targets in the PRTz, move into a safe and covered position and only then communicate the coordinates. Getting coordinates with the PVI-800 We’re now going to see how to save a target position and get its coordinates. This method is faster than the one which uses the ABRIS, but it’s less accurate. First of all, we have to prepare the PVI-800: • set the PVI mode in ‘EDIT’ with the PVI Master Mode knob; • set the switch next to the PVI Master Mode knob (‘INU/UPDATE’) to the ‘INU’ position (“I-251V Shkval – Fly over INU update” - see the Black Shark manual, page 6-65); • select the ‘NAV TGT’ button on the PVI-800. A number will appear on the PVI-800. This number represents how many NAV TGT points are stored inside PVI-800’s memory. Now select a number, press the Shkval designate key (with the laser in STAND-BY position) and the coordinates of the position pointed by the Shkval will appear on the PVI-800. Now you can save this data by pressing the ‘ENTER’ key. NAV TGT points saved with the PVI-800 are represented in the ABRIS by a rectangle with a number written into. Each number corresponds to the number assigned to each NAV TGT point saved. A NAV TGT point can be assigned directly to a PRTz target, just select a target type (first row on the PRTz) and press ‘SEND/MEM’. Just remember to restore the PVI-800 to previous settings, turning the PVI Master Mode knob on ‘OPER’ position, and the switch next to it in ‘UPDATE’ position. Receiving coordinates As you can read coordinates with the PVI-800, so you can enter coordinates with it. The procedure is quite similar to the one used to get coordinates of a target locked with the Shkval: • set the PVI mode in ‘EDIT’ with the PVI Master Mode knob; • select the ‘NAV TGT’ button on the PVI-800; • select a number, which will identify this NAV TGT point. Now you can enter the coordinates. Remember to use the button 0 (zero) for North and Eest, and button 1 for South and West. When you have finished, press ‘ENTER’ to save. Again, restore the PVI Master Mode knob to its previous position. NAV TGT points are represented by a squadre with a number in the middle (this number identifies the NAV TGT point). Therefore, pressing a number in the PVI-800 while in NAV TGT mode will select the corresponding point. Selected points will flash on the ABRIS.1 point
-
F-35 Night Refueling1 point
-
Let's just hope noone got hurt. Jets are replaceable, human lives are not.1 point
-
Spammer :D wait... wohoo 90001 point
-
CCIP CR allows for shallower dive angles when carrying out a delivery, that's it. If your dive angle is such that you have a solid PBIL (the point of impact is within the HUD FOV) then CR mode is irrelevant and not used. CCIP CR only comes into play it situations where the point of impact is below the HUD FOV therefore giving you a dashed PBIL. Without CCIP CR enabled a dashed PBIL would preclude weapon release, CCIP CR simply allows you to use the CCIP Pipper to designate the point you want the weapons to impact (by pressing and holding the pickle button) when the CCIP Pipper (held at the bottom of the HUD when CCIP CR is in use) is over the desired point of aim. Essentially the system switches from CCIP to CCRP when a point is designated. A straight CCIP delivery is always preferable when practical as it's the most accurate method of delivering unguided munitions (there is no aiming error, the bombs will hit where the IFFCC says they will). Next in line is CCIP 5 mil. In CCIP 5 mil the IFFCC will allow weapon release with up to 5 Mils of aiming error from the designated target. CCIP CR 3/9 is potentially the least accurate of the CCIP deliveries as the IFFCC will allow weapon release even if the aircraft attitude/heading is such that the weapons will miss the designated target point by a large distance. CCRP is the least accurate method of delivering dumb munitions as it combines the error margins of CCIP CR 5 Mil & 3/9 (depending on the weapon released), greater wind drift (due to the longer weapon Time of Flight caused by a level or loft delivery) and a higher potential for aiming error and inaccurate target designation. NB: Accurate as used above is a relative term, all the above methods can put weapons right on target when used correctly and with the proper planning.1 point
-
1 point
-
Офтоп конечно, но меня забанили без всяких предъяв попрошайничества треков и сткринов. Просто не смог зайти следующий раз после удачного боя. А на Сибири нормально все без проблем. Там ИМХО более адекватные люди.1 point
-
Ты и тут на форуме скоро по шапке схлопочешь, например за такое (это я как модератор говорю):1 point
-
Статью прочитал, компактно всё так, без воды и по делу! :thumbup: А то я половины не знал, а вторую на половину забыл, а тут оживило. :D1 point
-
Did you got the engines yet? By the look of it you're building a plane not a cockpit... :) Em I right? On the serious note now, looks great! Can't wait to see the project finished! Good luck!1 point
-
Fantastic guide, and many thanks! You can also edit the appropriate ABRIS .lua file to default you into degrees/decimal minutes rather than degree/minute/second units, so you don't have to swap them every time you start up. A quick edit will see the job done. :) The file is: X:\..\DCS Black Shark 2\Scripts\Aircrafts\Ka-50\Cockpit\ABRIS\Options.lua The relevant bits start at line 454 in the file, and by default look like this: opt.Options.measurements.latitude = { data = { {"%02.f°%02.f\'%.s%02.f\""..LOCALIZE("C")," __°__\'__\""..LOCALIZE("C/Ю")}, {"%02.f°%02.f.%s\'" ..LOCALIZE("C")," __°__.__\'" ..LOCALIZE("C/Ю")}, } } opt.Options.measurements.longitude = { data = { {"%03.f°%02.f\'%.s%02.f\""..LOCALIZE("В"),"___°__\'__\""..LOCALIZE("В/З")}, {"%03.f°%02.f.%s\'" ..LOCALIZE("В"),"___°__.__\'" ..LOCALIZE("В/З")}, } } Replace lines 454 through 467 with the following: opt.Options.measurements.latitude = { data = { {"%02.f°%02.f.%s\'" ..LOCALIZE("C")," __°__.__\'" ..LOCALIZE("C/Ю")}, {"%02.f°%02.f\'%.s%02.f\""..LOCALIZE("C")," __°__\'__\""..LOCALIZE("C/Ю")}, } } opt.Options.measurements.longitude = { data = { {"%03.f°%02.f.%s\'" ..LOCALIZE("В"),"___°__.__\'" ..LOCALIZE("В/З")}, {"%03.f°%02.f\'%.s%02.f\""..LOCALIZE("В"),"___°__\'__\""..LOCALIZE("В/З")}, } } All we've done is swapped lines 457 and 458 with each other, and swapped lines 464 and 465 with each other. Viola! Now your ABRIS will by default use the same units as your PVI and those big ugly jets circling above you!1 point
-
Here's how I do it and I'm noobcake. Obviously in your Weapons Management Screen Select Mavs (AGM65) and make sure your Mavs are warmed up. MSL > EO On . (It takes a couple of minutes.) Make your left MFCD display (TGP) Make it the Sensor of Interest (SOI) (By clicking the TGP Button again on the Left MFCD) (MFCD is the Multi Function Color Display) Make your right MFCD display the (MAV) camera (Again by clicking MAV button on the right MFCD screen. If its warmed up you get a picture. (IT will be (NOT SOI) for now). Move the TGP cursor around until its over your target, tank or whatever (It will say AREA) TMS forward short (Changes it to Point) move box around until it grabs the tank or whatever. Then TMS Forward LOOOONG to lock it. NOW Press and hold V on the Keyboard and watch the MAV screen it should swing to where the target is (unless you fly over it and the Mav camera can't move its neck that far and it will say GIMBELL LIMIT). (NOTE: The picture on the MAV camera is not as clear as the TGP thats why we use the TGP). This is called slaving the MAV to the TGP OK you're almost there. NOW Click MAV button on the right MFCD this makes MAV SOI (Sensor of interest) . Then Finally TMS Forward Short !!! this will lock the MAV on the target (Usually you'll see the cross hairs close). THEN FIRE and FORGET IT. You can watch on your TGP Screen or Press F6 to follow the missile. Make the TGP SOI Again and Rinse and Repeat. Remember once the missile is away the MAV takes care of the rest. You can actually start hunting for a new target on the TGP before the MAV hits the 1st target. (When you read Forward Short .. that means flick the TMS button forward and release) (When you read Forward Long .. that means push the TMS button forward, hold it for a second or two and release) PS: If you're only using keyboard commands and not flight stick then TMS Forward is (Left Ctrl Key + Up Arrow) on the Keyboard. Same applies (Short) means Hold down Left Control and Tap Up Arrow and then release both keys. (Long) means Hold Left Control Key Down then Press and Hold Up Arrow for a second or two and then release both keys. Also you could try slowing things down using active Pause . Where you can stop flying but still do all the commands (Left Shift Key + Left Windows Key + Pause Key)1 point


-
Recently Browsing 0 members
- No registered users viewing this page.