pitbldr
-
Posts
538 -
Joined
-
Last visited
Content Type
Profiles
Forums
Events
Everything posted by pitbldr
-
Yeah.... that was a typo that I didn't catch until after I'd engraved the first panel. :doh: It's been corrected.
-
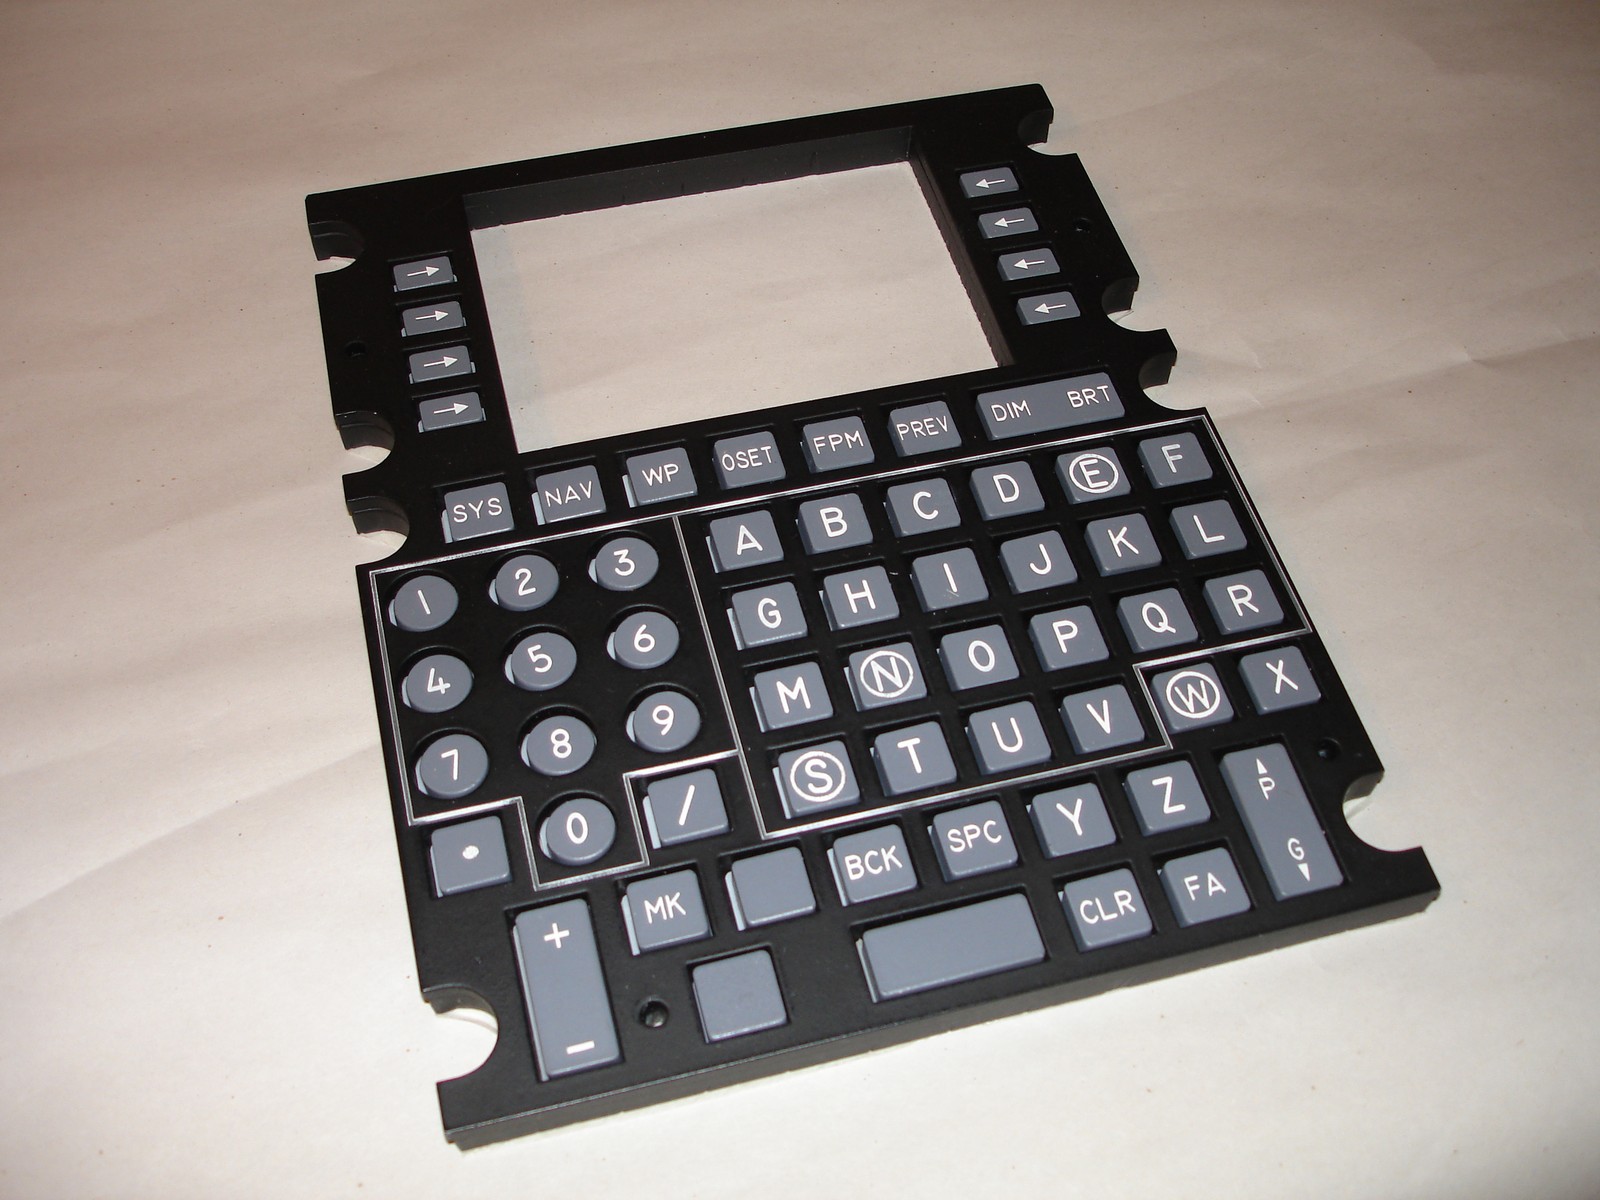
I have one CDU panel. This is the first CDU I made that was completely "assembled" (in other words, everything fit! :D). I consider it a prototype and I won't be using as I've change the size of the monitor cutout to accomodate a smaller display. I'll let this go for only $100 plus shipping since it's a prototype. If I make any more CDU's for sale, I expect they'll go around $150.

-
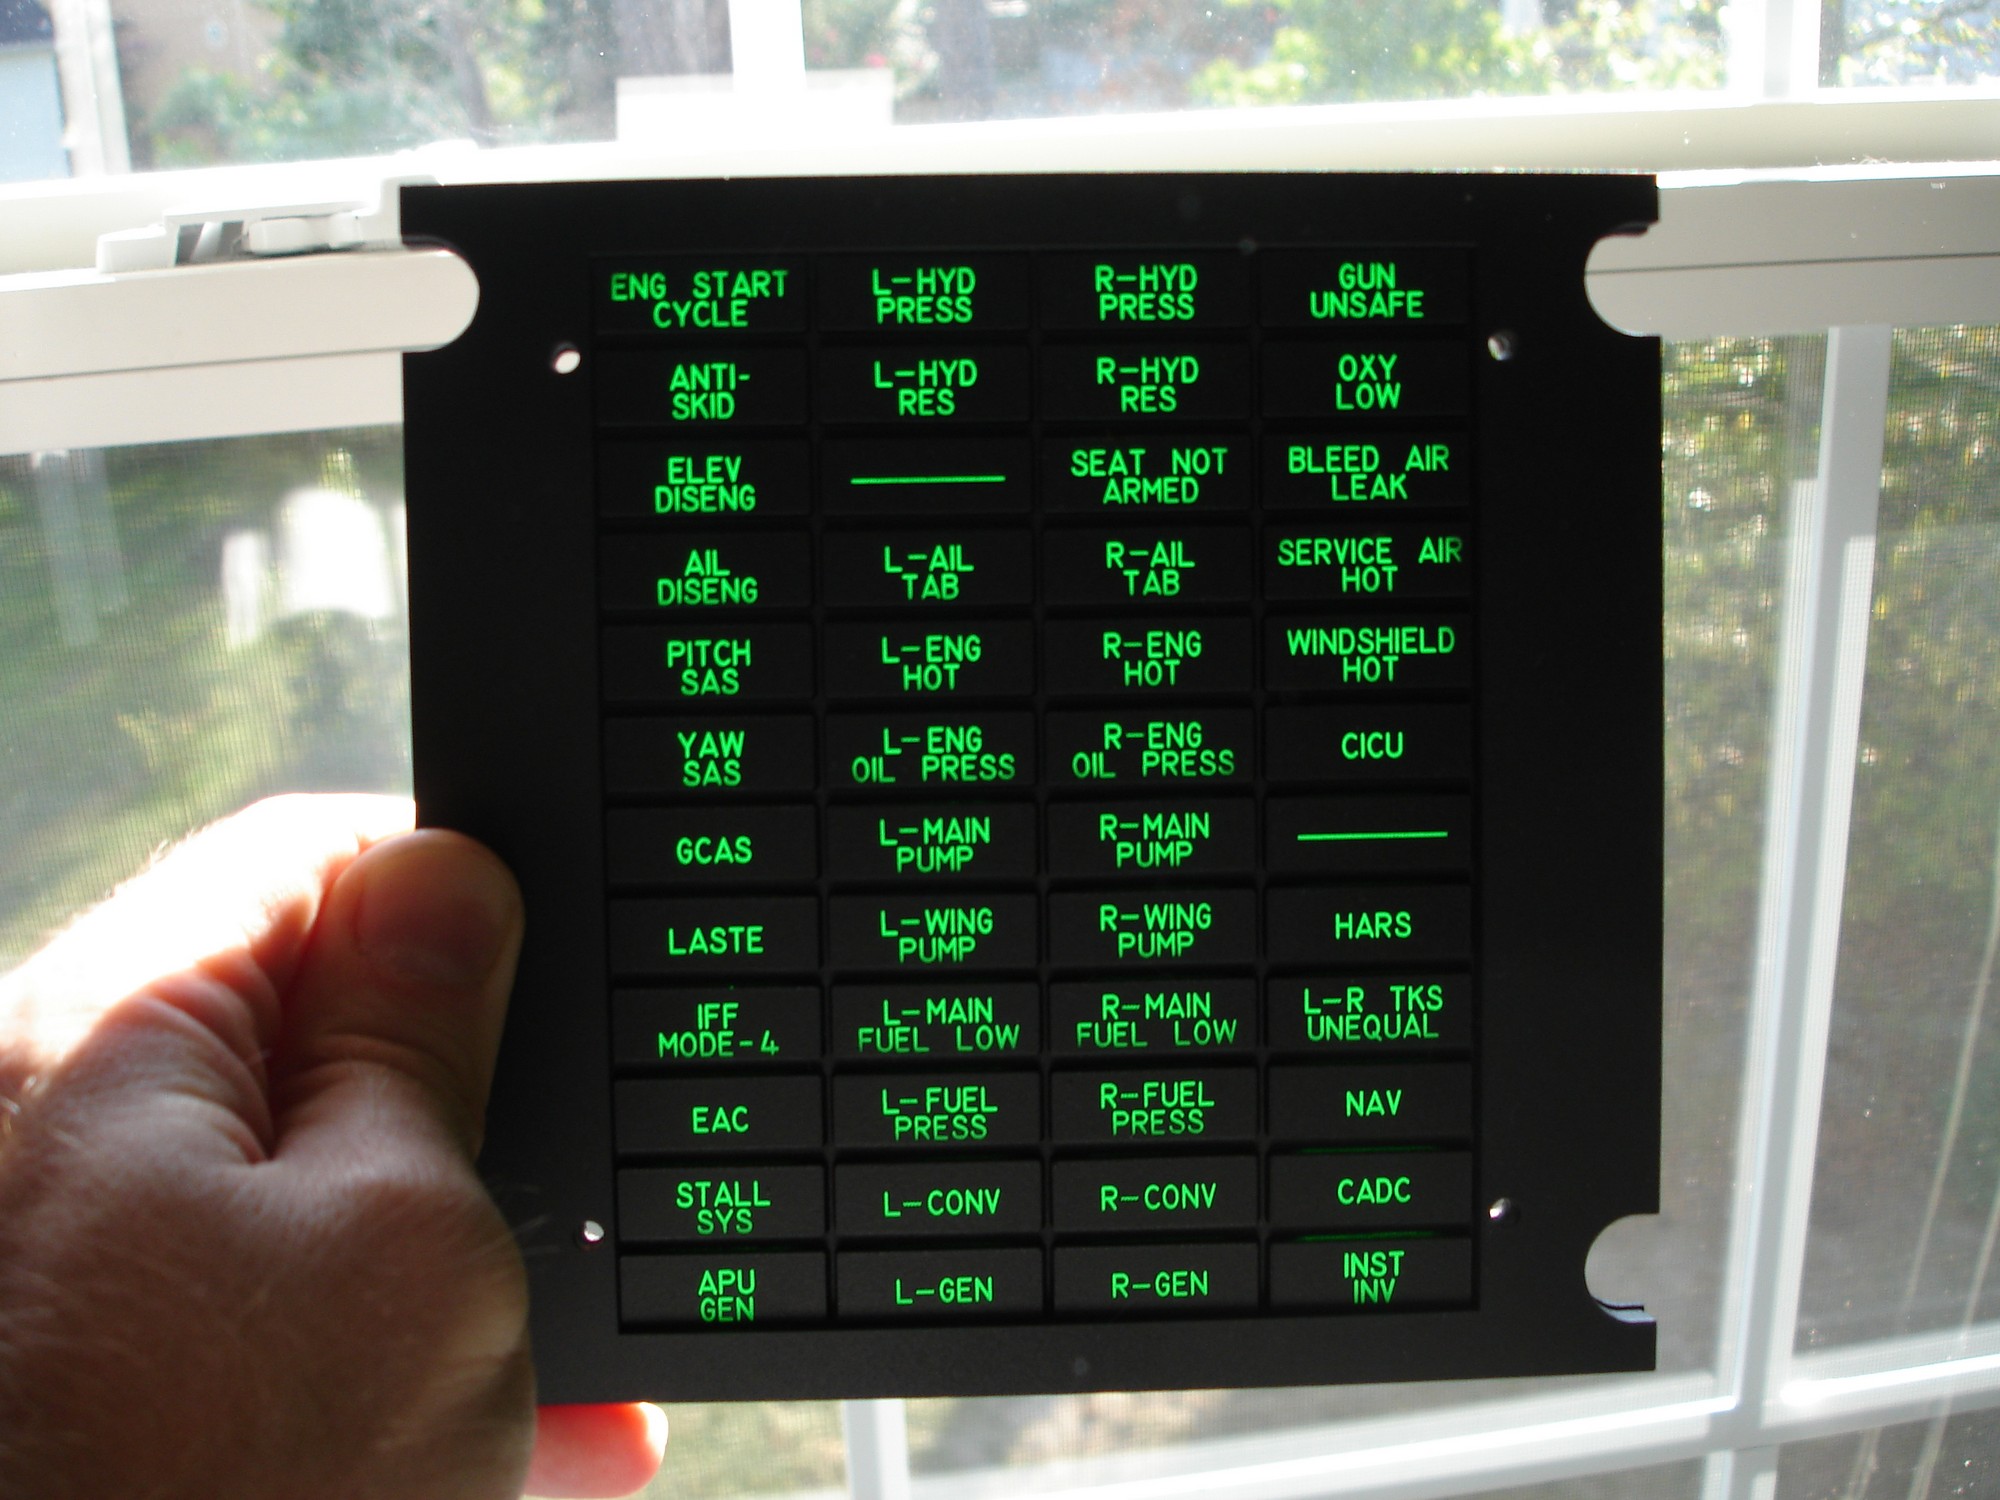
I've got three caution panels ready to ship. Cost is $140 plus shipping. See the following thread for some details. http://forums.eagle.ru/showthread.php?t=78487
-
I've shipped to the UK and Australia already using USPS Priority International and it was around $50. I am using their flat rate boxes and so as long as I keep weight under 20lbs, it shouldn't cost more unless I need to add some additional insurance.
-
Hi all, I am going to use this thread to offer up panels for sale as I am able to make them. If you want anything I list, please reply to the post with the word "SOLD" to claim it and so that others will know an item is spoken for. If I list more than one item, be sure to list the item(s) you're claiming. Then AFTER you've done that, PM me and we'll work out the details. I'll honor the order in the thread, not who's PM I received first - so post first, PM second. :D If you want to stay on top of new posts, I suggest suscribing to this thread and turning on instant email notifications. Please don't use this thread to request any panels, PM me instead. Should have a couple items to post tonight or tomorrow.
-
Well, not free... donation ware. You don't have to pay for it, but you should, as these guys put a lot of work into it. :)
-
Well, I have been accused of being a perfectionist before and never feel the stuff I am building is as good as it could be.... maybe I need some professional help!! :lol:
-
:megalol: Well, since I don't have kids and my car is paid off, I'll have think of something else to use it for! :D
-
You're welcome! :) I expect to have a couple CP's ready by next week and will open a thread in the For Sale forum to offer them up when they're ready.
-
Responding to a couple inquires... I've attached a drawing with several panel lightplates and backplates to show how they would fit together. The backplates are in red and the panel lightplates are black. You can see that the backplates are slighting larger than the panels. I did this on my project to add a little more surface area and strength for mounting them to the console rails. If I were able to make the backplates from aluminum, they'd be closer to the size of the panel. I really want to be as clear as possible, that my designs are not exact copies of the real panels. Hope this helps clarify it. :D left_inner.pdf
-
Thanks! :) Yeah, I need to try the flat tops. I actually have some, but they came pre-wired with a resistor attached, so I need to get some without the resistor.
-
Here's a pic with it held up to sunlight. It shows that everything will light up well, but you're right in that two LED"S would provide more even illumination. Another alternative is more diffusion under the panel. Right now I just have the diffusion plate made from 1/16" white acrylic. I've also read that you can flatten tops of LED's to create more dispersion. I'll play around with the design this weekend.
-
Forgot to ask if you saw this: http://forums.eagle.ru/showthread.php?t=77939 That's the first panel I made and used clear acrylic that I painted black. More bleed through. The panels with black acrylic are much better. :) Those could work and the price isn't more than if you used two LED's per indicator (92 in all). I guess is all depends on your budget really.
-
There is no light bleeding through the baseplate - it's made of black acrylic. There is a very small amount that may bleed through the sides of the indicators and that is just a result of it being more difficult to get a good coat of paint on the 1/8" sides and not overcoat the tops in the process. I'll try to get a couple good photos of it light up.
-
Thinking about this some more and I believe it would work. With the phidgets board, you don't have to worry about resistors, you just attach the LED's and go. You can set the current to 20ma, 40ma, 60ma, or 80ma. I am not electronics wiz, but I would think if one LED needs 20ma and you wire 2 in series, the phidgets board could be set to 40ma and it would work. However, the cost of a 2 LED panel would probably end up being around $175. Then you'd need double the number of LED's and still need an interface solution ($125 if you go with a phidgets). I think the total cost would fall around $350.
-
I thought about trying two LED's that way as that is how the real caution panel works. I decided against it because it would 1) double the number of LED's needed for the board and 2) use two Phidgets LED boards. I don't know if I could run two LED's in series off a single output from the Phidgets.... would reduce over all brightness but might work. May have to test that. Afraid I can't help with the OC stuff. Don't have that. Have you looked at HELIOS though? It was extremely simple to use this with the Phidgets board.
-
Awesome work Colin! :) I missed vid... ;) How's that panel holding up?
-
I felt you implied that by asking why I was not designing them to be interchangeable with the real panels. For that to happen, I think my designs would need to be 100% accurate. That was intentional since, as I mentioned, I designed these to worth with my project. I wanted a little "wiggle room" for switches and other devices that I may mount under the panels. If others can use and want my panels as designed, I am glad to help out. As time goes by and if I acquire more real panels/dimensions, I'll probably update my designs. I mean if I waited to get all the real data before I made my panels and built my own pit, I'd never get to fly the sim! :D
-
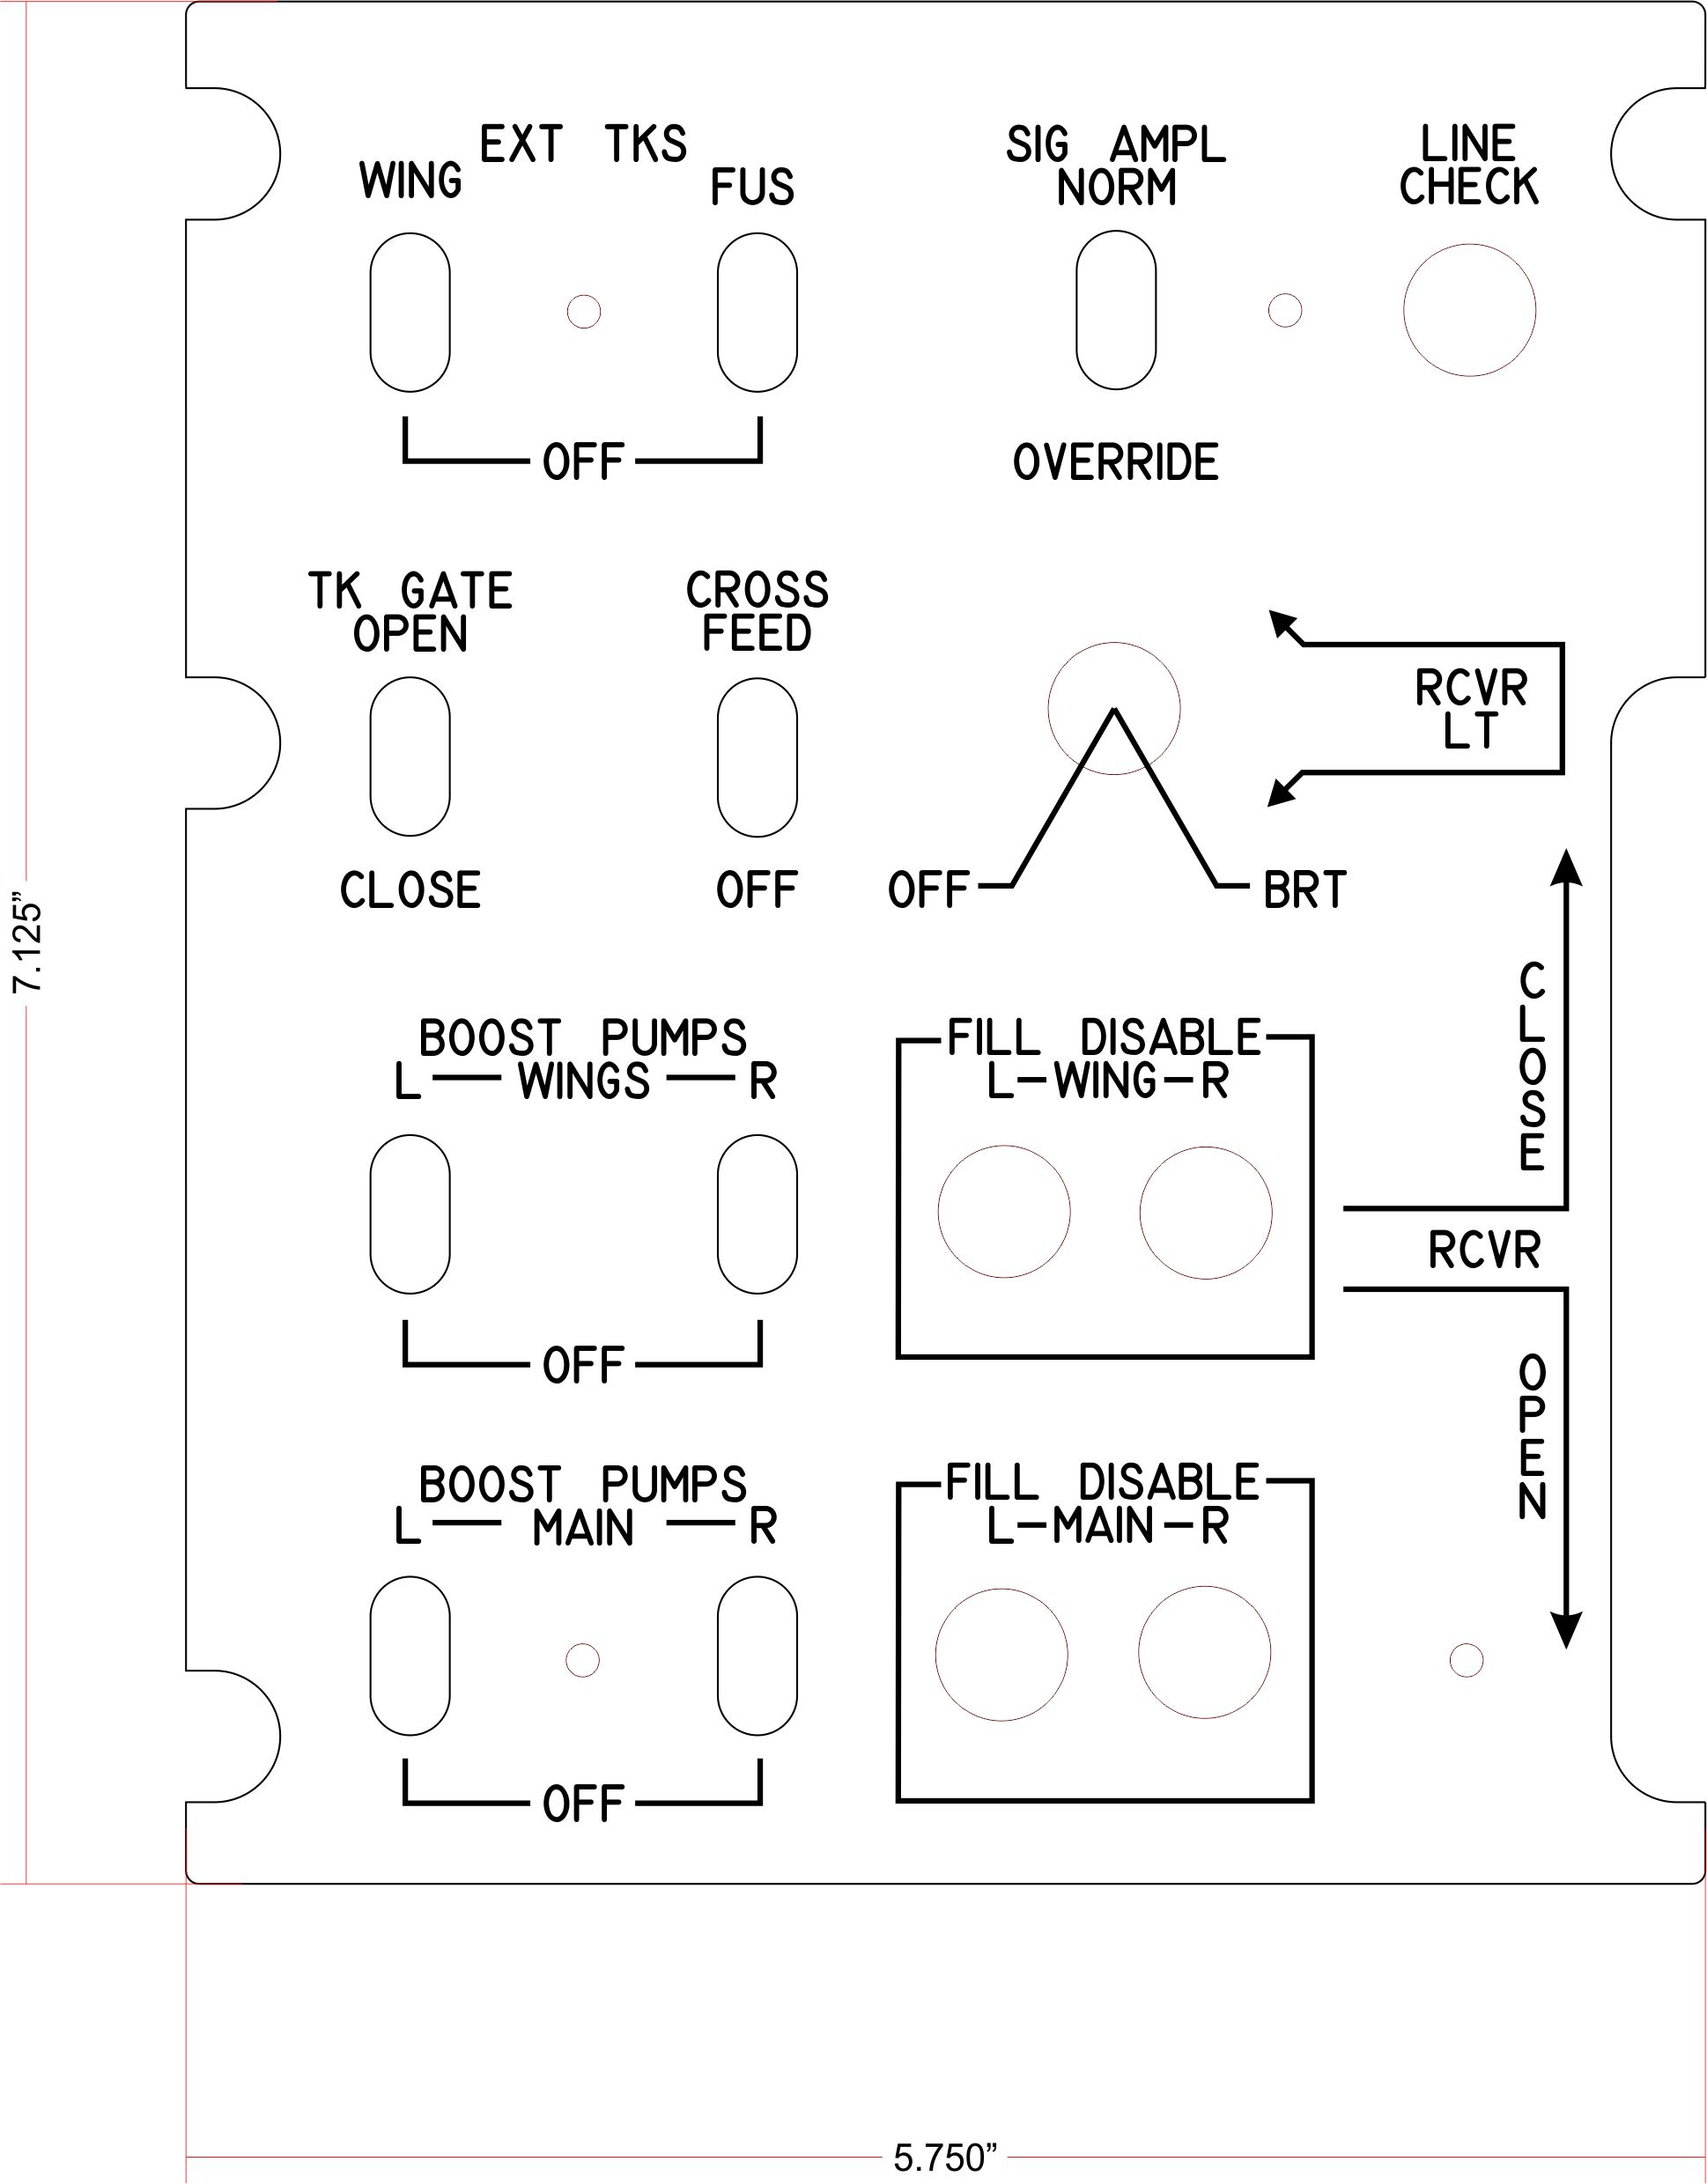
The panels themselves are 5.75", these are only the backplates I am using with my pit. Also, since I don't have access to accurate dimensions for every single panel (I only have 5 real panels), I can't design them to that level of detail. I think most people are not going for 100% accuracy either, so it doesn't make sense for me to spend my *limited* time designing panels that are 100% accurate. That would increase the cost quite a bit I imagine and only help a very few going for that level of accuracy. My goal from the start was to make a pit for myself. Then I saw that others might be interested in panels and since I have the equipment, I decided to offer them. My vision is to create parts that closely resemble the real thing but I wasn't (and can't at this time) going for mil-spec tolerances. If I ever have a full set of real panels or someone sends me dimensions for them, then I'll certainly adjust my designs. Without that information though, I have to do as best I can. Here's my design for fuel system panel. I didn't have the real panel to base this from, so I used pictures and information that you and others have provided to come up with this. Is it 100% accurate? Nope, but for me and most others (I think :D), it is close enough.
-
Sure thing! :D
-
The attached file contains PDF's with the basic dimensions for the panels I am designing. Several people have asked about the dimensions and whether they would work with Dimebug's pit plans. I think they will, but here they are for those who'd like to verify. If you print these out 1:1, you can use them as guides for laying out any panels you get from me. The drawings in the PDF's are for the panel backplate (or switchplate). These would mount to the consoles and the lightplates would then mount to these. They are slighting oversized from the lightplates to allow some flexibility in mounting. The cutouts for switches and displays are based on the switches I have, so I've not included dimensions on all of those, but did throw in few. Also, a few panels like the UHF and VHF don't have display cutouts at present since I don't have a potential solution for those yet. DISCLAIMER - these are not 100% accurate designs. They would most likely not mount onto DZUS rails. My goal is to reproduce the panels on a level that is close to the real thing, not exact copies. Making exact replicas would increase the time and cost of making these. basic_panel_dims.zip
-
Very cool!!:thumbup:
-
Actually, everything I am selling is minus the electronics. Or are you saying you'd buy MY panels that I've already assembled for my pit?? :D
-
It takes about 75 minutes to do all the cutting/engraving for one complete panel. Painting and assembly take about 60 minutes worth of work... but it's not all done at once obviously. I have to cut the parts, glue some of them, wait for the glue to set, then put on a coat of paint, wait for that to dry, put on another coat, wait, then put on a clear coat. So it's 5-10 here and there for assembly and painting. So from the first cut to the final assembly, it can take up to 4 hours from start to finish. That's why I try to do 2 or 3 at one time... more time efficient.
-
Thanks guys! The indicators are .975"x.35". They are very close to the real indicators which I measured.