pitbldr
-
Posts
538 -
Joined
-
Last visited
Content Type
Profiles
Forums
Events
Everything posted by pitbldr
-
Yeah, the insulation is really thick on these for some reason. Being VERY new to electronics, the fact that I could daisy chain the ground wires did not hit me until after I was done! :doh: When I wire up the rest of my panels, I'll definitely be daisy chaining to reduce the amount wiring.
-
Great work!! :thumbup:
-
Sounds cool! Can't wait to see what you do with it! :)
-
Work is settling down, so I've actually been able to spend some time on these. I have 6 plates cut and painted. Need to cut and paint 6 more, then I'll be ready to engrave. Getting there! :)
-
:lol: Nah, I had a spool of 22 wire from Radio Shack lying around so I used that. When I do my other panels, I'll definitely be using a smaller guage wire.
-
Autocad (.dxf or .dwg) should work... anything that I can import into Coreldraw.
-
Not yet, I ran into a small issue with those and needed to work on them some more. Then work got crazy and I've had practically no time to spend on the pit building projects. I can see a light at the end of the tunnel at work now though, so I should be getting back to the important stuff soon. :D
-
Hey Froglips, Sure, I can get a price list put together. I do need to finish up the designs on a few panels, but I'll list what I have at preset. If it's feasible for me to offer a couple options on assembly I will do so, I just need to explore that a little more and I've had no time lately. At this point, I expect I could offer 2 options... Option 1) Fully assembled light plate (made of two .125" pieces glued together), painted and engraved. Option 2) Separate light plate (not glued), with only the top part painted and engraved. The bottom part could be painted by the buyer. With either option, I could supply a switch plate cut from .125" acrylic. I may explore options for making switch plates from aluminum, but that won't happen soon. I don't have any drawings for the KA-50, but there's no reason I couldn't do those as well. If someone could provide panel drawings, I could offer them sooner as I don't expect to have any time to do them myself for the next couple of months. Busy making several UFC kits for several members.
-
LOL - love that idea!! :thumbup:
-
Hey, try the MS33558 font or the "Techni Bold" font. I think both are very close to the actual font used in the A-10. You can find the MS33558 font here: http://www.simpits.org/fileproc/showfiles.php I don't have a link for the other font.
-
Hey Colin, I've seen your replies and appreciate the feedback. I've not had much time to sit down and think about all this yet. What you describe is what I am currently doing. The top two layers together make up the light plate. The 3rd layer would be the switch plate. That closely resembles real panels and has been my plan all along.
-
Yeah, I set up a photobucket account so that I could start putting my pictures there. I was using my CNC originally and then after getting my laser, I started using that. Oddly enough, I did not purchase the CNC or the laser for my project, but they certainly help! :D
-
I actually put on two coats of white and light comes through fine. Some people are using white acrylic and that works well too. If you get a nice even coat of black, then one coat of that should do the trick. My panels are done completely on the laser. I cut them and then engrave with it. The panels themselves have two layers and how I label them is by calling the top plate (with the text engraved on it) the "text plate" and the bottom plate the "light plate". Then you have the "back plate" or "switch plate" as I call them which all the switches are mounted in. Sorry the pictures aren't there. I was running out of space and had to remove them to free some up.
-
For those of you using Arduino boards, how do they "talk" to the sim? I saw on the Arduino site that you have to code what you want it to do (called sketches I believe). Does that code allow you to send commands directly to the sim or is something else involved?
-
I cut the acrylic with a laser. However, acrylic could be cut with some basic tools if needed (at least basic shapes could be done without too much trouble). I believe there are saw blades made especially for acrylic. I used krylon spray paint - couples coats of white, then one nice, even coat of black. I also put on a couple clear coats after the panels are engraved.
-
one cheap way is to just print out the "panels" and then cover it with clear laminate sheets. The kind that are used as page protectors. You could then just attach those to plywood or plastic sheets that you cut to the size needed. Check out this site for some ideas - http://www.mikesflightdeck.com/default.html There's some really good info there. This nice thing about pit building is you can make it anything you want. Some go for extreme accuracy and others aren't concerned with it being like the real aircraft. Just because you're on a tight budget doesn't mean you can't have a complete pit, you've just got to make some compromises is all.
-
There's no aluminum in this kit. I have cut aluminum before with my CNC, but this is made entirely from acrylic. Yes, I painted the text plate white before painting it black. You can also use 7328 acrylic which is white, but can still allow light to pass through. The contrast is not as good as when painting the acrylic, but less work is involved and it's definitely usable. spessures?? not sure what you meant here. If you're asking about the acrylic thickness, I used .125" for everything except the "light plate". That's made from .25".
-
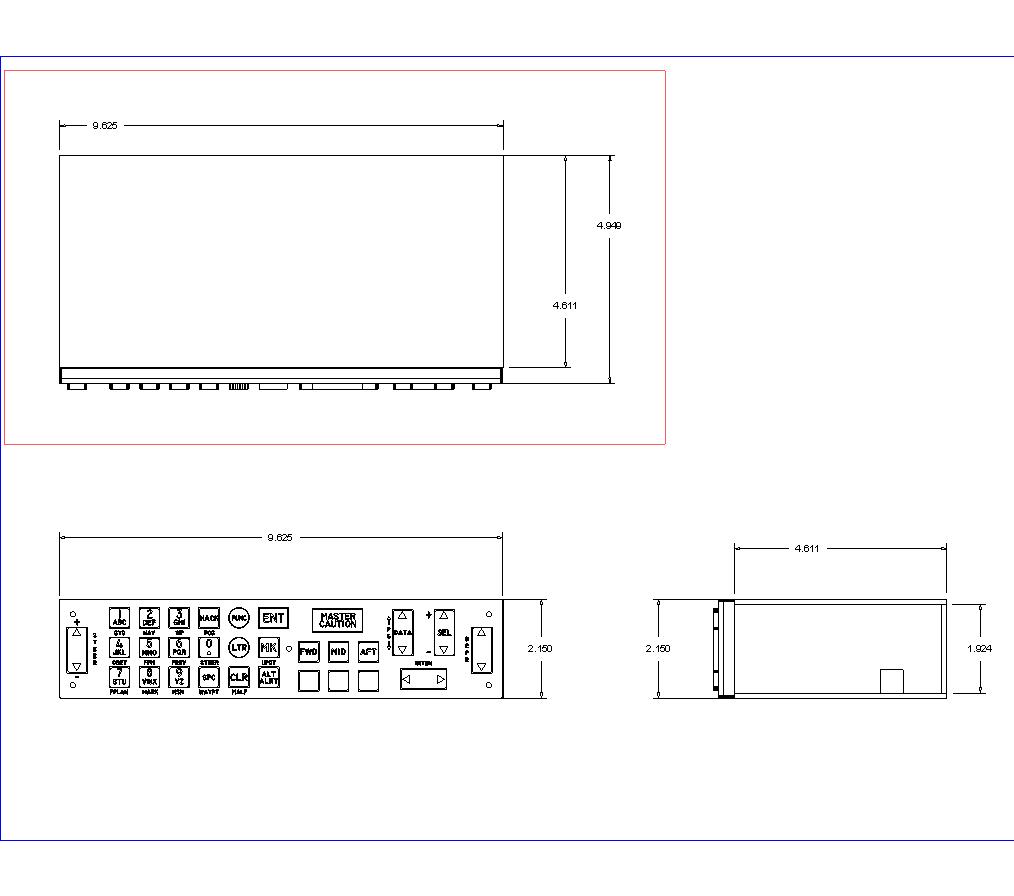
UFC kit dimensions A few people have asked for the dimensions of my UFC, so I wanted to post for everyone to see. You may have to open the image outside of the forum or download it for it to be readable.

-
Hey Ice! I honestly can't say right now. My real job is taking up all my time at the moment. I do expect things to return to normal after the middle of May, so hopefully I'll have the CDU done by the end of the month. Sorry for the delays on that.
-
Hi! The only price I can quote at this time is the UFC. I am still finalizing the CDU design. I've not worked up an AAP panel yet, but will post back as soon as I have. PM me if you want to get in on the current UFC batch.
-
Yes, I will be starting on a batch soon and can add you to the list if you want. Price for the full kit is $120 + shipping. That includes the panel, buttons, and the parts to make the "case". I can also provide an 1/8" acrylic "switch plate" that would be cut to size, but you'd need to drill holes for pushbuttons or you could use it as a template to cut out a perf board if you wanted to use PCB board components. PM me if you're still interested.
-
Hey Ice - I plan on using an X-keys (initially at least) for my CDU and MFCD's. It has room for 128 inputs, but it is on a matrix. http://www.piengineering.com/custom/xkmatrix.php
-
You don't have to buy it any longer, it's now "donationware". I strongly encourage you to donate though as it's a great piece of software and we want them to continue to develop it. :) You can get it from here: http://www.scsimulations.com/downloads.php?do=file&id=50
-
Couples pics of the actual UFC, minus the Master Caution button (waiting on an illuminated pushbutton for that one).
-
That's true and if I were doing it more "full time" the price would be higher, but I'm just hoping to help out a few builders who don't have access to the equipment to make their own. I don't expect I'll do more than 10 of these. Plus I still have my CDU and MFCD's to finish! :) I'm determining my price by calculating the time the laser is running to cut and engrave all the parts. Then I am adding in the cost of materials (acrylic, paint, etc.) plus $10 per panel for my time. Also, being able to do them in batches of 5, cuts down on the time needed to complete them, so that helps cut cost. Thanks Flim! I'll be in touch.