sedenion
-
Posts
1722 -
Joined
-
Last visited
-
Days Won
9
Content Type
Profiles
Forums
Events
Everything posted by sedenion
-
Nop... just watched... it is a totaly network based mod manager, with an online platform, right ?... This is on my "Maybe TODO list"... i had the same thought than you, i have the same usage of the C: disk... but i was waiting for somebody to ask me for that feature :D I will considere it, since hopefully i prepared the groud with by-game custom backup path...
-
Maybe, but i never really touched any network code in my life, so i have to learn before... maybe it's in fact simple, but i don't know...
-
The exact same name as the mod sub-folder name with .txt, and zip archive name, see just more up here : http://forums.eagle.ru/showpost.php?p=2867769&postcount=5 ;)
-
Argh... network code is totaly other... paire de manches... The backup simply copy original files in the application home directory, in a game dedicated sub-folder. The backup data is unique by game (one game, one backup data tree) so to say: all mods shares the same backed files for the same game (this prevent some backup corruption when mods have files that overlaps). if you want more details ask me. The backed game files are stored in a "root" named sub-folder in the game sub-folders within the OvGME application home directory indicated by your system. Usually "<User>\AppData\Roaming\OvGME\<game sub-folder>\backups\root" My first apporach was to zip all backup data to reduce weight, but 1 - zip compression / decompression take time a lot of time (zip don't like 20Mbs DDS textures files... ). 2 - backup archive can become quickly very large (with textures). 3 - there is no efficient way to remove a file from a zip archive except by re-creating the entire archive (read the full archive, modify, then WRITE the full archive again). 1 + 2 + 3 = the backup process becomes quickly horribly slow... So i decided to keep a simple file to file copy, this take more space, but it is incomparably faster.
-
I think it's because your zip is not recognized as valid mod. Zip archive structure must follow some rules to be identified as a valid mod, this to keep a working standard: ( i copy past the help ) Mod archive (Zip) So to say, the mod archive is only a zipped version of a directory mod. However, to be recognized as a valid mod archive by OvGME, it must follow some simple rules - The archive must be compressed in ZIP format OvGME does not support rar, 7z, gz or any other compression format. - The archive must contain the properly named mod directory at its root. The zipped archive root must contain the mod root directory (and not directly the mod files). Also this mod directory must have the same name as the archive itself but without the .zip extension. For example, if you have a mod archive named "My Super Mod.zip", it must contain the folder named "My Super Mod" where mod files are stored, like in the uncompressed version. - The archive can contain a description text OvGME automatically checks if a .txt file is in the archive root. If this .txt file has the same exact name as the mod directory, OvGME will take it as the mod description. For example, if you have a mod archive with mod directory named "My Super Mod", the description file must be named "My Super Mod.txt". For example, if the game file tree is the following: ....Textures ........Landscape ............picture1.dds ............picture2.dds ........Vehicles ............picture1.dds ............picture2.dds And if your mod consist of changing some .dds texture files in "MyGame\Textures\Vehicles" your mod archive should be structured as follow: MyGame { ....MyTextureModV1.0.txt ....MyTextureModV1.0 ............Textures ................Vehicles ....................picture1.dds ....................picture2.dds } MyTextureModV1.0.zip
-
OvGME is no longer supported nor updated, I encourae you to move to my newer Mod Manager software: Old post: OvGME is a Mod manager based on the idea and concept of JSGME, it take the GME acronym from JSGME which stands for Generic Mod Enabler. The main purpose of OvGME is to provide an easy way to import and enable mods for games then restore original files when disabling mods. OvGME works by comparing the destination folder file tree with the given mod file tree, then identifies what files to replace, create and save as backup. OvGME implements the following key features: Support for multiple destination folder (game, software, etc.) through the main GUI. Custom mods and backup folder for each configuration. Destination folder file tree snapshot and comparison based on xxHash. Zipped Mods files (Mod-Archives). Mods description (readme.txt). Mods versioning. Mods enabling profile for each destination folder. Mods network repositories. Mods online updating and downloading. Zip Mod-Archive creation tool. XML repository creation tool. Detailed embeded Help. If you already use JSGME: Please read carefully the "OvGME and JSGME" chapter in the embedded help before doing anything.
-
With the DX button based profile, almost all configuration is done in DCS command so you have nothing to save, but if the command list change, you have to change some bind...
-
Ok, i don't know how real radars work and how that should work... i can only tell that it appear simpler to use the "ground occlusion" algorithm to do this (so it should take mountains into account de facto) ... But, real radars actually take reliefs into account in this kind of situation ? Don't they simply use some average "horizon" level to "split" the dectection area (wich should obviously produce some problems near horizon if there is mountains) ?
-
That would be very odd ED don't implemented a ray casting for ground vs target z-sorting, it's some elementary process. As far as i know, a target behind a mountain cannot be detected, so the z-sorting data exists... behind or front of, you choose what to do with that data, occlusion or ground clutter.
-
In fact that made my brain less confused. If i well understand in fact the recieved frequency is sampled through PRF cycles (one sample by "listening" phase, causing aliasing problem), and i thought this frequency was sampled directly during one "listening" phase.
-
I guess it is related to an hardware limitation that cannnot emit at full power instantaneously... or i don't understand why "duty time" could affect power... Here i don't understand what you mean by "doppler frequency" in relation with the PRF... there obviously something i don't understand correctly about Pulse/Listen logic... in my mind the pulse emits a wave with a given frequency (which is not related to PRF), then the radar recieve the echo with a shifted frequency... PRF should not affect this shift detection, except if this detection is not made as i believe.
-
I don't understand all, but i understood the essential i think... High PRF: - Long range detection (high power, why ?). - Good velocity resolution (best for ground clutter rejection) - Bad range resolution (computed on PRF cycle basis) Low PRF: - Short range detection (limited by power, why ?). - Bad velocity resolution (even non existant, ground clutter rejection almost impossible) - Good range resolution (high precision in return time computing) This is a detail (in our context) but what i don't understand is why Low PRF can't use doppler shift to evaluate velocity ?
-
In Mods/aircraft/M-2000C/Cockpit/ : clickabledata.lua give you the full list of virtual cockpit buttons and switchs. To have the correct button Id for input default LUA, you have to add 3000 to each original value, for example: device_commands.Button_235, [b]235[/b], 0, 1)235 => 3235 devices.lua give you the device list with id in comments (at right, after -- )
-
We are speaking about non-toggle commands :) The warthog switchs are two ways without automatic return to center (unlike the X55)... this is why non-toggle commands are precious to map Warthog... To be precise (and to understand exactly what is the problem): Physicaly (without programming) the Warthog switchs are: - Position Up : ButtonX Pressed (keeped ON) - Position Down : ButtonX Released (keeped OFF) (in this case, the "3-Pos. Switch Abstractions" are used) Virtually (if we use programming) this is: - Position Up : Command A (Only Once) - Position Donw : Command B (Only Once) (in this case, the separated X OFF and X ON commands are used) All without return to center, this is Up OR Down... this is why toggle commands are a problem to map with Whartog.
-
Here is for Master Arm and Gun Arm {down = 3234, up = 3234, cockpit_device_id = 6, value_down = 1, name = _('Master Arm On'), category = _('Weapons Management')}, {down = 3234, up = 3234, cockpit_device_id = 6, value_down = 0, name = _('Master Arm Off'), category = _('Weapons Management')}, {down = 3463, up = 3463, cockpit_device_id = 6, value_down = 1, name = _('Gun Arm To Armed'), category = _('Weapons Management')}, {down = 3463, up = 3463, cockpit_device_id = 6, value_down = 0, name = _('Gun Arm To Safe'), category = _('Weapons Management')}, However, for Master Arm i have tested and, if the switch (the 3D model) is actually activated, the program does not take it as "Master Arm" command, it only moves the switch, so unfortunatly, this is perfectly useless... For Gun Arm, i don't have tested... EDIT: I forget that: To enable the Master Arm switch to moves (which is useless i repeat) you must also edit the clickabledata.lua script.. line 500, as this: elements["PTN_234"] = default_2_position_tumb(_("Master Arm Switch"), devices.PCA_PPA, device_commands.Button_234, 234)
-
That's it. H = Haut/Haute = High B = Bas/Basse = Low HFR = Haute Fréquence de Répétition BFR = Basse Fréquence de Répétition And ENT = ENTrelacé = Interleaved Wikipedia precisely say : "Low PRF radar have reduced sensitivity in the presence of low-velocity clutter that interfere with aircraft detection near terrain." Technically, i don't know why, but as i understand, low PRF is only good for weather or terrain.
-
(ENT > Entrelacé > Interleaved... i say it since nobody say it... )
-
All that is pretty confusing... What i understand is that PRF determine the time between each pulse, so to say, the time dedicated to recieve the echos of the previous pulse... This ca influence target detection in two manner: - Target distance: If target is too far, the echo is recieved after the next pulse was emitted, so the radar is confused. - Target closing speed: If closing speed is too low or negative, the recieved echo wavelenght can be to long for the intervale to determine the proper speed of the echo, or even to be detected...
-
https://en.wikipedia.org/wiki/Pulse_repetition_frequency#Low_PRF Sumary: Low PRF : Mostly used as weather radar Med PRF : Good for long range detection, but not very precise High PRF : Best precision, but limited to medium/short range.
-
Hi, I guess people familiar with TARGET Script does not realy need script since they can code their own. however, i share some "modules" i programmed and uses in my own profiles, maybe that can interest some people. Full documentation are in the files as comments, i leave here some descriptions: DX+ Module: Allow to use more than 32 DX button for mapping. (this is a more convenient version than the previous one i posted in this forum) 9 Positions Hat Module: Allow to use a Warthog Hat as a 9 positions hat (4 standard + 4 corners + 1 abstract middle) with IOUMD layer support for mapping. LED Control Module: Allow controlling LED with buttons in paralelle of standard mapping + some shortcut functions. AP Control Module: Allow an advanced handling for Warthog AP buttons and Switch, to mimic a real behavior. Throttle Switch Synchro: This module is hard to describe, it allow to define a trigger button which will force Throttle switches to be pressed again at their current position. So to say, it forces synchronization of switchs with game status. For example, if a switch selects a weapon, the weapon will be forced to be selected (without acting on the switch) when the specified button is pressed. dx+.rar apc.rar sws.rar h9p.rar
-
bkthunder if you are intersted programming warthog in full DX button mapping: http://forums.eagle.ru/showthread.php?t=171098 Just found that this afternoon...
-
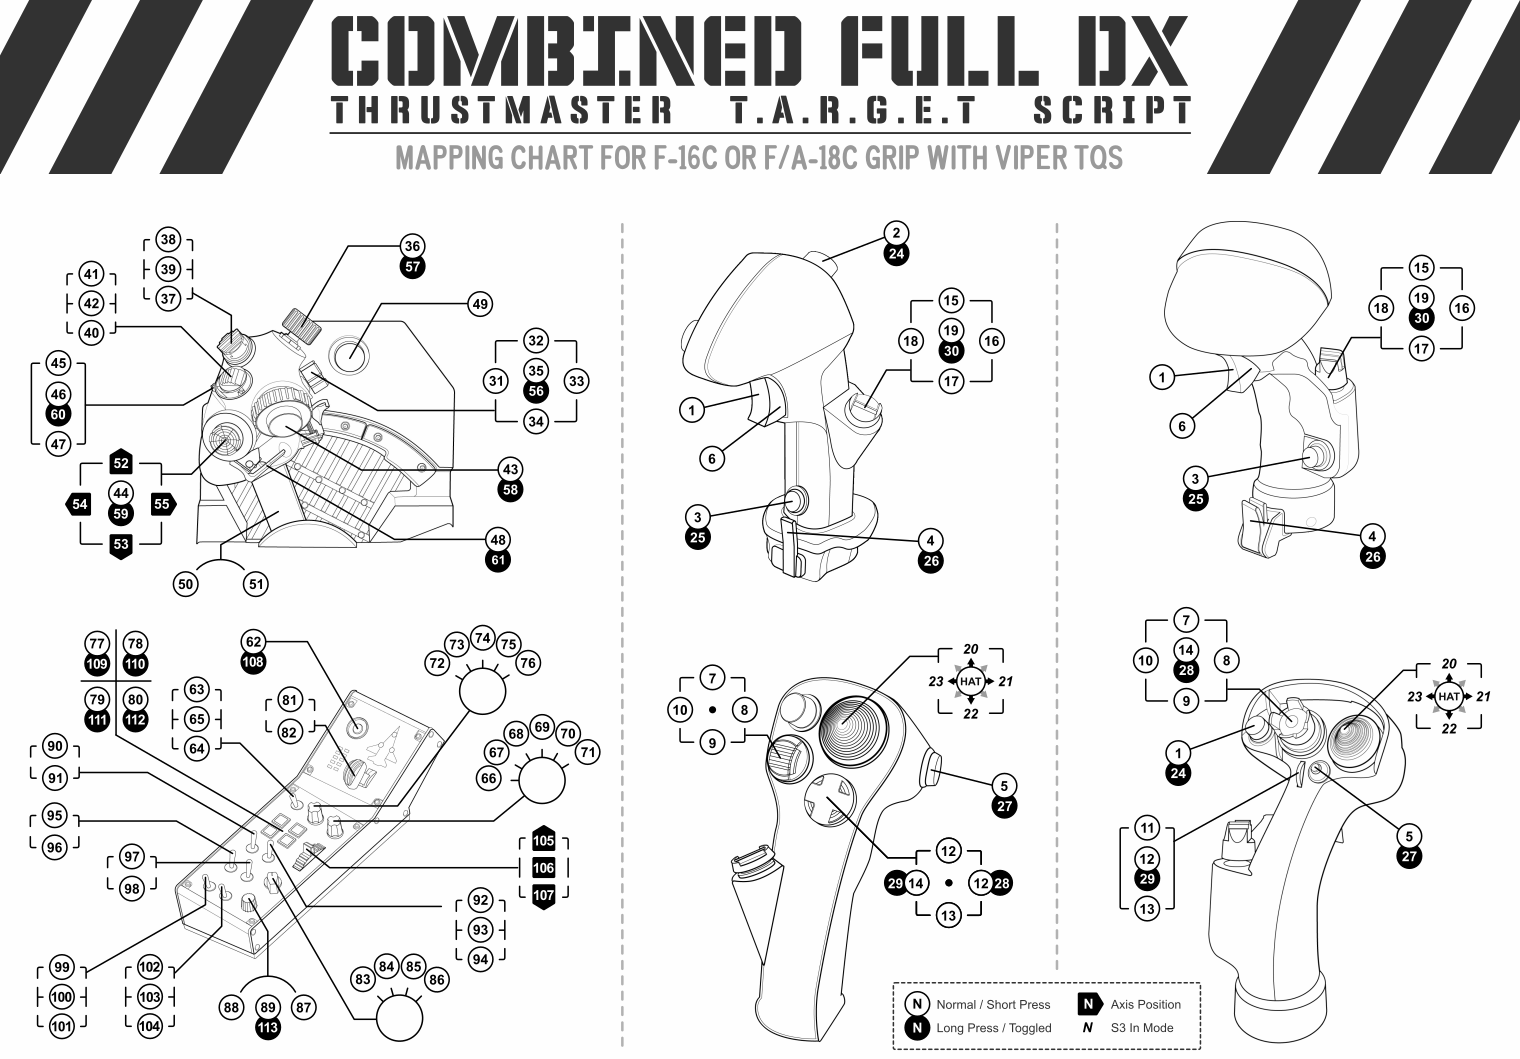
 Hi all, Since I created a new "all in one" profile based on the "DX extension" hack, I decided to use (reuse) this old topic to present it. Presentation Since TARGET 3.0.23.1205_rev1 Thrustmaster finally implemented its "Thustmaster Combined" virtual device with 120 HID buttons (DX buttons) out of the box, making the "Extend DX Module" of this script set de facto obselet on its historical core intent since you can now natively assign up to 120 DX buttons either from TARGET Script Editor or TARGET GUI Combined Full DX is a script suite for Thrustmaster TARGET Script Editor which maps HID buttons (DX buttons) only. Instead of mapping the devices with emulated key strokes - which are all game or simulation module specific - this script only use HID buttons (DX buttons) to emulate a new virtual device with more of assignable buttons. With such approach, there is no more need to load a specific mapping script each time you switch to another game or simulation module, you only need to load this one once for all. Since the combined device is seen as normal joystick/HOTAS (but with a lot of buttons), you can assign each button to the desired command within the game, each game will have its specific mapping for the same combied device. Download & Usage Download the script suit from the DCS files sections : https://www.digitalcombatsimulator.com/fr/files/3318341/ Extract the TM Combined Full DX folder where you usualy store your TARGET profiles files, or anywhere you want. Launch the TARGET Script Editor software (NOT TARGET GUI) In TARGET Script Editor, click the "Menu" button then select Open (Ctrl + O) Browse to find the run_complex.tmc or run_simple.tmc file within the TM Combined Full DX folder. Click the RUN button (big green triangle icon) Download Page Presets There are three .tmc script files corresponding to three mapping presets, "simple", "hybrid" and "complex" to be used according your preferences. A fourth "custom" .tmc files is avaible to let you create your own custom preset. See the "CUSTOMIZATION" section below for more information about customization. The "Simple" Preset: Only translate hardware buttons with Middle and Off switches positions The "Complex" Preset: Enable S3 I/O mode for Hat1, Digital Axes buttons, Long-Press buttons and advanced AP button and LASTES switch behavior. The "Curstom" Preset: Is here to allow you to create your own custom setup by editing its content, you also can duplicate this file to create several custom setups. Graphical Charts Notice that you will find high resolution printable version of these charts within the script suite folder. FAQ The script compile but crash with "Runtime Error: Symbol not found: DX33 [...]" This is because you run the Script on an outdated version of TARGET Script Editor, you need to install the latest version (3.0.23 or above) to properly run the script: https://support.thrustmaster.com/en/product/hotaswarthog-en/ I have compile error related to A320 device when I try to run the script Same as above. How is it possible to have more than 32 DX buttons ? On the paper, Thrustmaster TARGET allow to emulate only up to 32 DX buttons. This limit is inherited from the old DirectInput API, however it does not reflect a true software or hardware limit anymore. Fortunately Thrustmaster does not took this old convension too seriously and developpers implemented the TARGET driver to allow to emulate a game device with up to 120 buttons and a 8-positions HAT. By bypassing the proper initialization function within the script, we are able to create a virtual device with the desired amount of HID buttons (up to 120). Then, by completing the defined DX## macros list with the proper integer values, we can assign an extended list of DX buttons within the mapping functions. Is this harmful for devices or system ? Definitely not. The bigger risk is a BSOD in the case you try to use a virtual device with more than 120 buttons. In this case, due to an hard-coded array size within the driver the script will reach for an out of bound index which instantly crash the driver. Even in this case, the only consequence is a need for system reboot. Is this script can be used with other devices than HOTAS Warthog ? As long as the devices are recognized by TARGET Script Editor, Yes. Currently only HOTAS Warthog mapping is done, but any other TARGET compatible combination can be made with the proper mapping functions. See the "Customization" section for more details. Customization The script is intented to be modular, so people can edit, add or remove the devices mapping of their choice to adapt the basis with their own devices. Custom Preset The file "run_custom.tmc" is intended to be modified to create your own specific preset if the three existing ones does not fit your needs. Each ".tmc" file declares general mapping options to enable or disable features and special behaviors such as buttons long-press, S3 I/O mode, Digital Axes, etc.. The file has comments (in green) that describe each parameter and will help you to edit features as your needs. Custom Mapping (Advanced) The mapping for devices are implemented within a dedicated per-device mapping function defined in Mapping Header *.tmh files located within the mapping folder of the script suite. You can edit the existing mapping functions ore create your own new mapping function for a device following instructions in the 'mapping\MapExample.tmh' file, then integrating it in the script set by following instructions and editing the 'headers\CommonInit.tmh' file. "Hack" details Since TARGET 3.0.23.1205_rev1 Thrustmaster finally implemented its "Thustmaster Combined" virtual device with 120 HID buttons (DX buttons) out of the box, making this "hack" de facto obselet since you can now natively assign up to 120 DX buttons either from TARGET Script Editor or TARGET GUI. You will find below the historical explanation as it were 'implemented' before the release of TARGET 3.0.23.1205_rev1 . The "hack" is pretty straightforward to do for anybody have some coding experience. To create the "virtual device" (Thrustmaster Combined) the native init() function defined within the target.tmh call another function, PlugGame(), which take two arguments, the first is a stGameCfg structure that describe the virtual device to create, the second is the name of the device to create. The hack consist on editing or replacing the parameteres of this stGameCfg structure. Here is how the structure is defined within the hid.tmh file ( at line 307 ) : struct stGameCfg { byte ButtonsNumber; byte HatPresent; //hat present or not [1/0] byte AxisX; //axis present or not [1/0] byte AxisY; byte AxisZ; byte AxisRx; byte AxisRy; byte AxisRz; byte AxisThrottle; byte AxisSlider1; byte AxisSlider2; byte AxisSlider3; byte AxisSlider4; } As you can see, the first member is a byte that define the count of buttons. This is precisely what wa have to edit. Now here is where the structure is defined within the target.tmh file (at line 180): stGameCfg virtualj = { 32, 1, 1, 1, 1, 1, 1, 1, 1, 1, 0, 0, 0}; You can see the virtualj object (which is of stGameCfg type) is defined once and for all with 32 buttons. Now look at the Init() function you will find the call to PlugGame() function (at line 197): if(cfg & CREATE_JOYSTICK) PlugGame(&virtualj, "Thrustmaster Combined"); // create a Virtual device Now, to extend the count of button of the virtual device to be created, you simply have to modify the virtualj object before the initial call to the Init() function within your mapping script. One solution is to directly edit the target.tmh file, by replacing the "32" by any number but this is not a good practice. Notice: DO NOT try a value greater than 120. I tested for you, it seem there is an hard-coded limit, a value greater than 120 crash the driver resulting in a BSOD. You can instead simply modify the virtualj first member value juste before the call to the Init() function within your main() function: int main() { virtualj.ButtonsNumber = 120; //< Change virtual device param if(Init(&EventHandle, CREATE_JOYSTICK)) return 1; // code continue here... That was the first stage. Now that you have a virtual device with 120 buttons, you want to be able to map it, however, the default TARGET header declares only 32 DX buttons. Fortunately, this declaration is open source within the defines.tmh (begining at line 763) and very easy to extend: define DX1 3000 define DX2 3001 define DX3 3002 // [...] define DX29 3028 define DX30 3029 define DX31 3030 define DX32 3031 // guess what come after 3031... So you simply have to declare new macros (in C sens) named how you want (for example DX32 to DX120), with values from 3031 to 3119. Again, you can add the declarations within the defines.tmh file but it is better to declare them in one of your own mapping script to avoid alterating Thrustmaster original files. define DX33 3032 define DX34 3033 define DX35 3034 define DX36 3035 define DX37 3036 // ... define DX118 3117 define DX119 3118 define DX120 3119
- 321 replies
-
- 10
-

-

-
I well understand, you can customize my profile, just look at the main.tmc file... hard-coded keystrokes can be easly customised (for DX assignation you have to go deeper in the code) I agree
-
I found a workaround by creating an hybrid TARGET mapping... One part is "hardcoded" keystrokes, but the main part emulate DX buttons, so you can map those directly in DCS without keyboard binding http://forums.eagle.ru/attachment.php?attachmentid=144276&d=1468612928
-
Added "Yellow" version for who love it.