Search the Community
Showing results for tags 'doorgun'.
Found 2 results
-
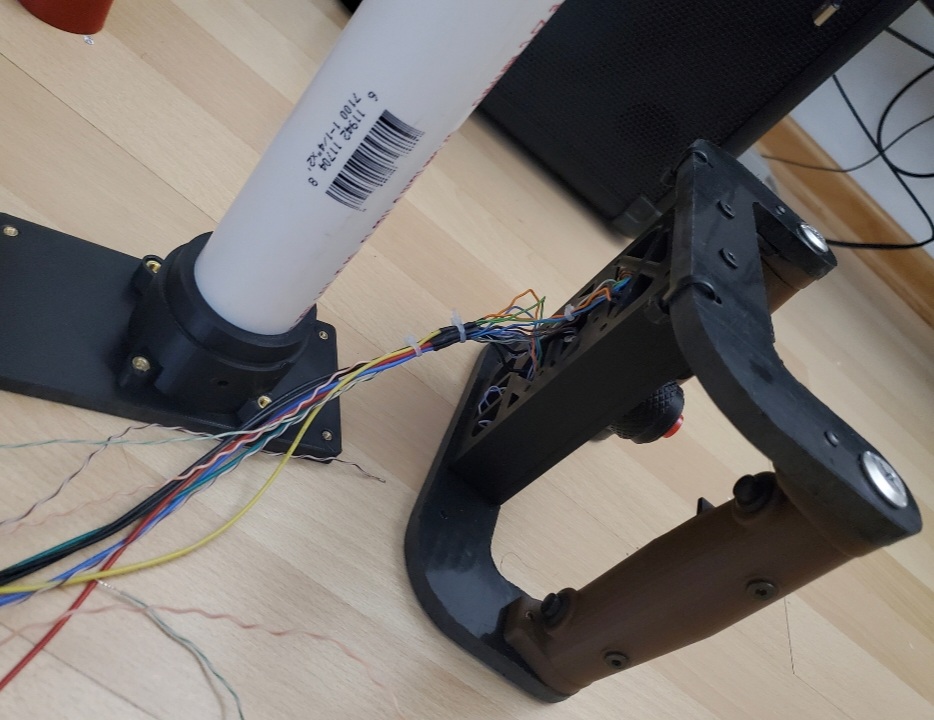
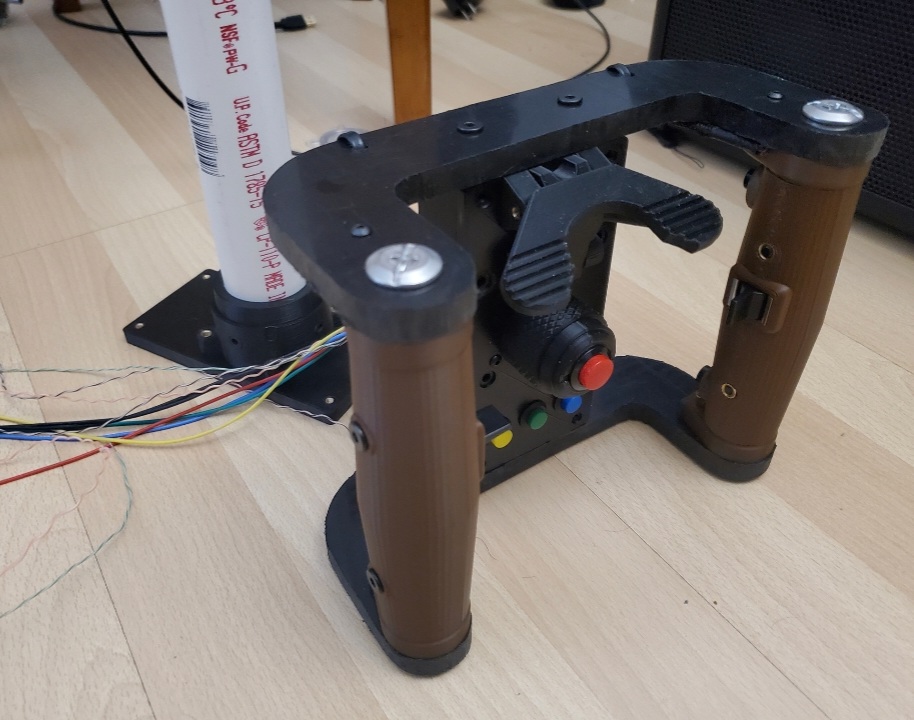
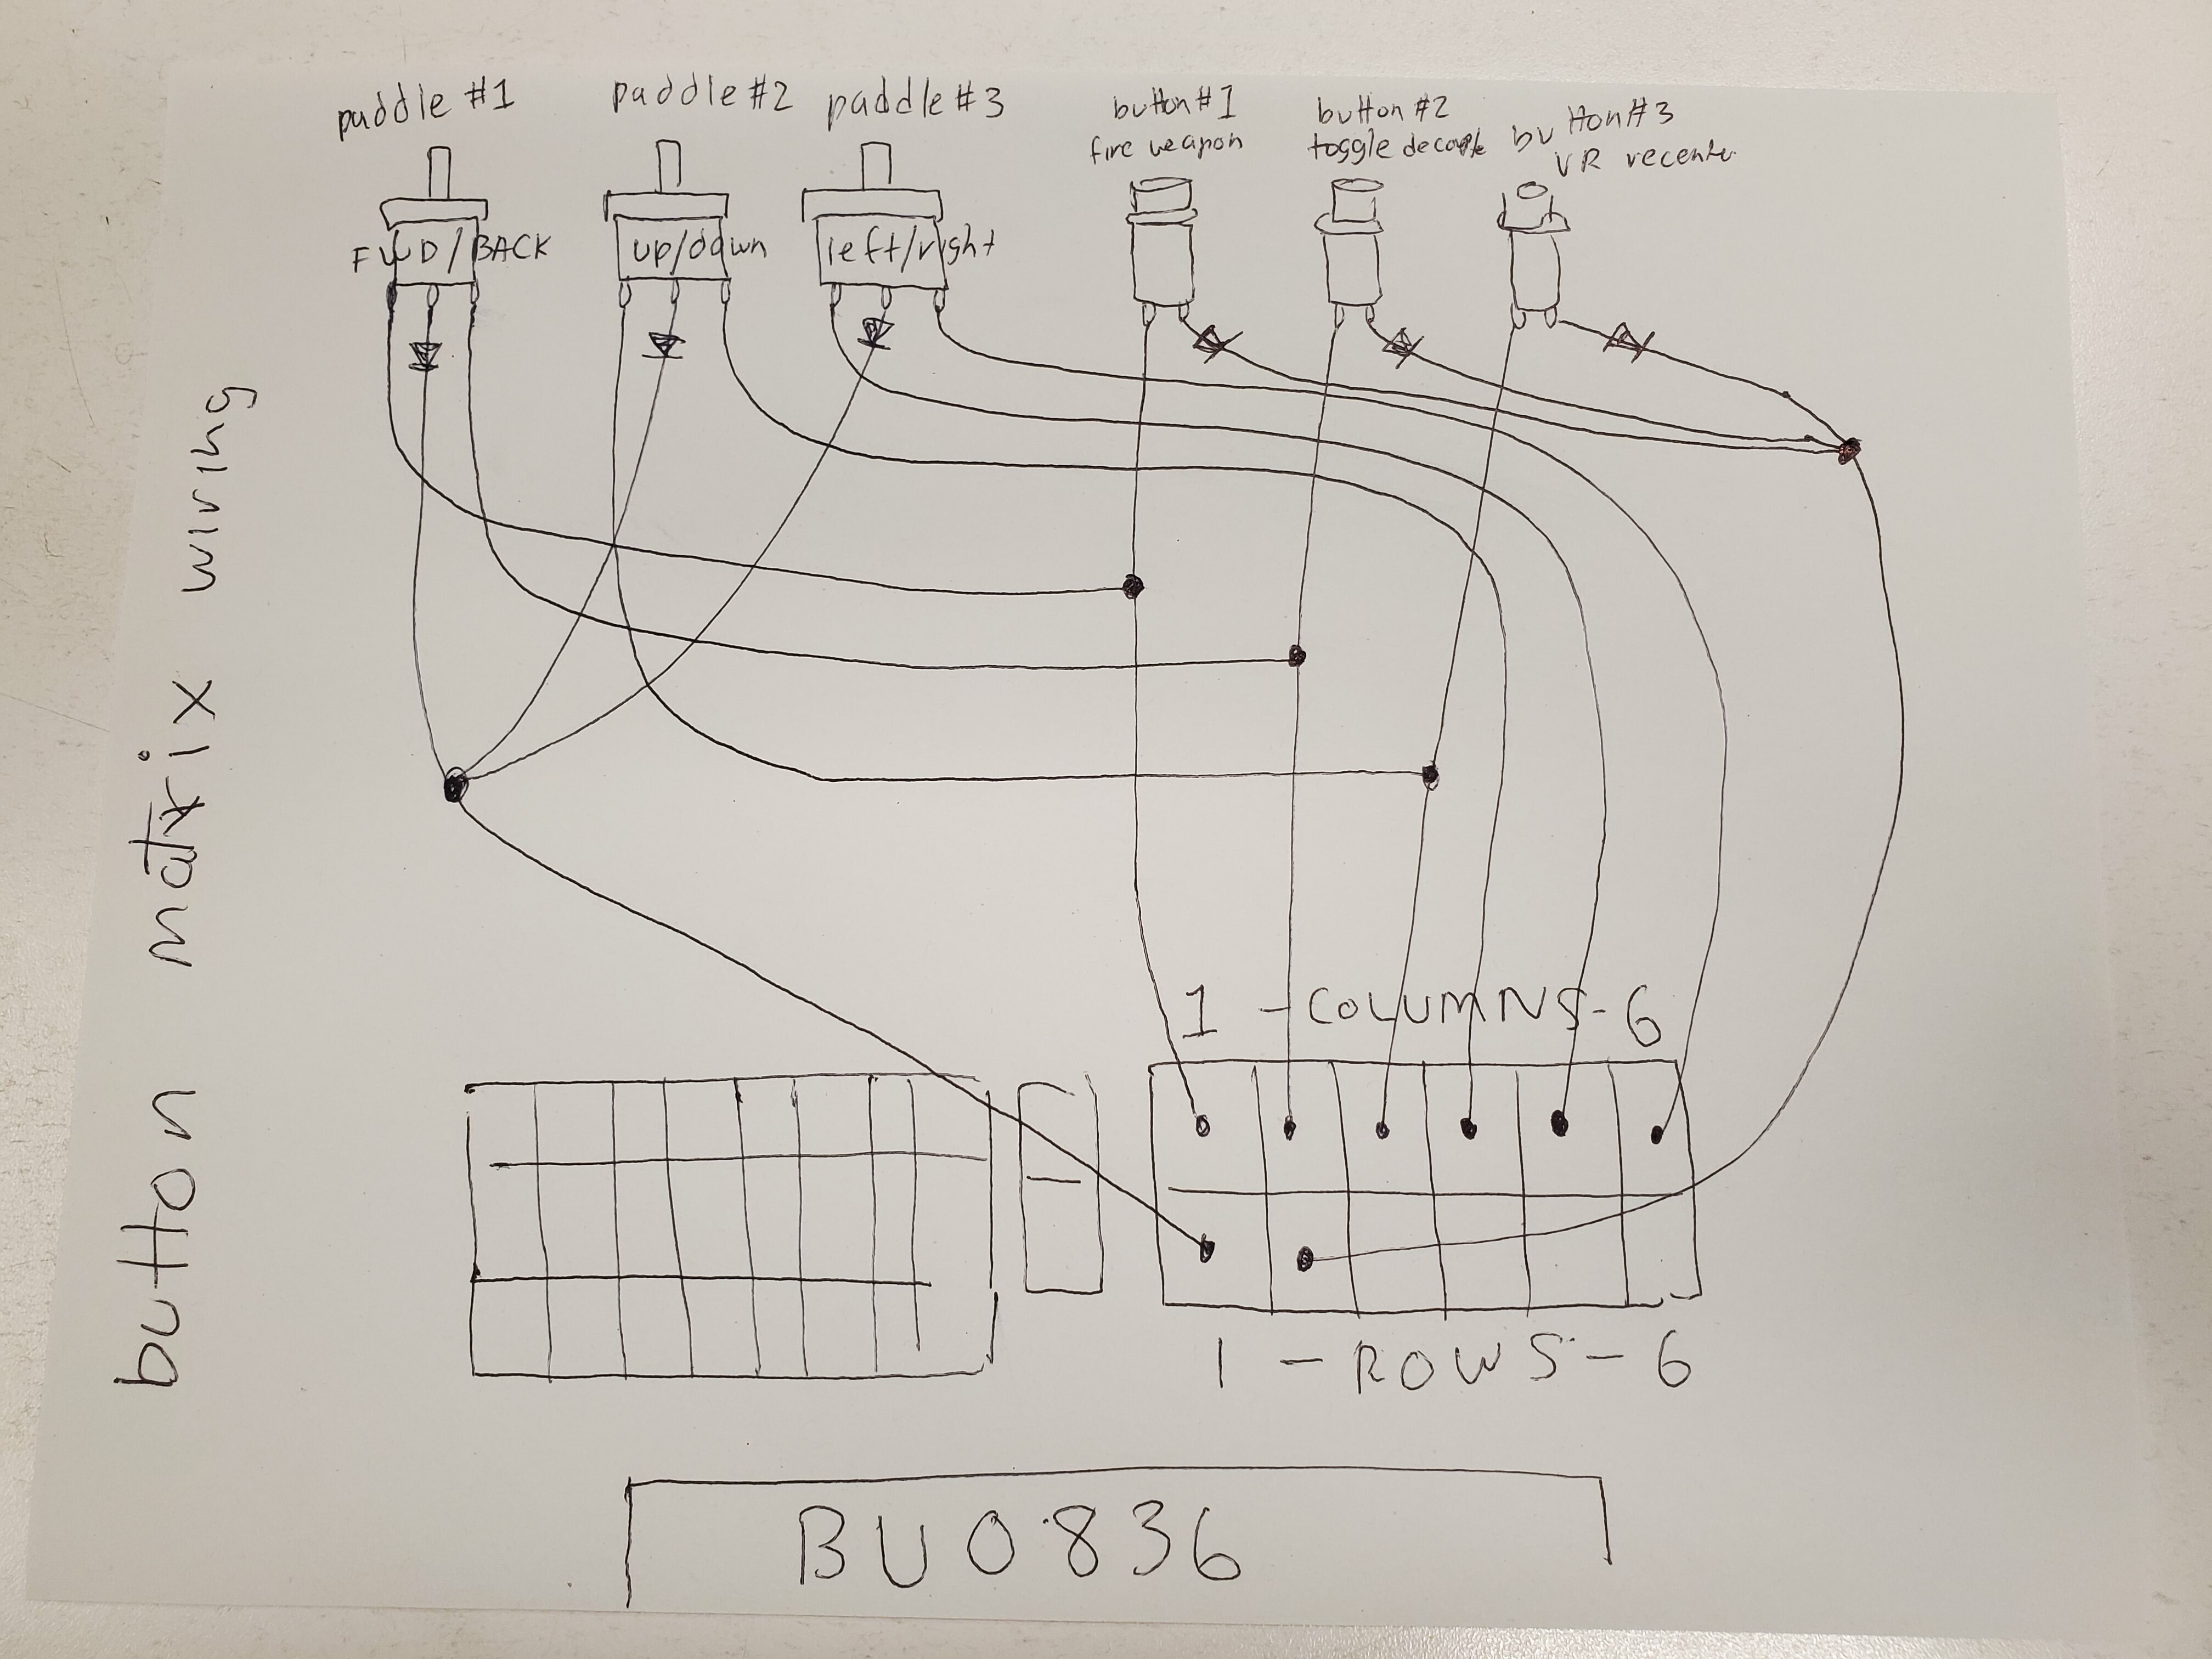
Been watching alot of videos on the M2 Browning Ma' Deuce, now inspired to make a wanna be controller, that will be functional for the UH-1H and Mi24P doorgun position. (hoping it will work for SA342 minigun variant and ch47 Chinook in future) **UPDATE** 07.26.2023 Eagle Dynamics added joystick binds to the Mi24P doorgun, so this build is working The minigun build is a blast to use, but agony to build. Trying to make this a fun project! ***NOTE**** if you plan to incorporate a bass shaker, you should add a relay to the trigger circuit, else any butt kicker out put will go to the shaker regardless if you are pulling the trigger our not, butt kicker wiring diagram TBA LINK TO STL FILES Spade Grip assembly https://www.thingiverse.com/thing:5863116 Top Gimbal Section https://www.thingiverse.com/thing:5927492 Gimbal Base Section https://www.thingiverse.com/thing:5932560 DCS Axis Controls and Button Assignments mappings: axis doorgun slew LEFT/RIGHT, axis doorgun slew UP/DOWN VR Re-center Fire Weapon Move Camera View Right Move Camera View Left Move Camera View Up, Move Camera View Down Move Camera View Forward Move Camera View Back Radio PTT List Parts (so far) : 2x M3-20mm screw (switch housing) 4x 1/4-20 x 3/4" bolt and nylock nut (mounting grips to c-bar) https://www.amazon.com/gp/product/B0BLKSYV3M/ref=ppx_yo_dt_b_asin_title_o04_s00?ie=UTF8&psc=1 1-1/4 in. x 2 ft. PVC DWV Sch. 40 Pip https://www.homedepot.com/p/Charlotte-Pipe-1-1-4-in-x-2-ft-PVC-DWV-Sch-40-Pipe-PVC-07100-0200/202018045 1x Cytron Arduino Pro Micro Compatible w/ Pre-soldered Headers (to be used with mmjoy2 to be programmed as windows controller) https://www.robotshop.com/products/cytron-arduino-pro-micro-compatible-w-pre-soldered-headers?srsltid=Ad5pg_FU8fbJVsHuWKCVgksU0nf4NqHeFxScMWDMW16LZgnUgTfwnzaJa0w if you do know how to program arduino use leo bodnar Bu0386 http://www.leobodnar.com/shop/index.php?main_page=product_info&cPath=94&products_id=204 or Leo Bodbar USB controller board http://www.leobodnar.com/shop/index.php?main_page=product_info&cPath=94&products_id=204 ***corrected part***, 40 x 52 x 7 bearings https://www.amazon.com/gp/aw/d/B09VL3YV4R 12mm Momentary Push Button SPST https://www.amazon.com/gp/product/B07YDGVZ9B/ref=ppx_od_dt_b_asin_title_s00?ie=UTF8&psc=1 HDPE Sheet (to make the grip brackets..) https://www.ebay.com/itm/144548391463 2x paddle switches (to adjust the VR player view) https://www.ebay.com/itm/182340027352 1x limit switch (very snappy) https://www.ebay.com/itm/372481343091 Brown filament (to print grips) https://www.amazon.com/gp/aw/d/B0B2NZM21Z?ref=ppx_pt2_mob_b_prod_image brass inserts M3, M4, M5 (you will need a solder iron to install these) https://www.amazon.com/Hilitchi-Threaded-Embedment-Assortment-Projects/dp/B07VFZWWXY 13mm Momentary Push Button https://www.amazon.com/gp/product/B08B1P43XY 65mm bearing for gimble base https://www.amazon.com/dp/B082PWXCX9?psc=1&smid=A1THAZDOWP300U&ref_=chk_typ_quicklook_titleToDp Diodes (to eliminate ghosting inputs) https://www.amazon.com/Projects-1N914-Diode-General-Purpose/dp/B08MDGGCL5 STEP ONE (PREPARE GRIP ASSEMBLY) 1) print grips and grip covers 2) use a solder iron and mount brass threaded inserts ( M5 insert for the grip covers, M3 inserts for the grip tops) 3) print switch housing, then install the temco limit switch and connect the two halves of the switch housing together. use M3 x 20mm screw to keep the housing together 4) mount brass inserts M4 size for the switch housing 5) print Front panel and trigger lever. mount M3 insert to one side of the front panel where trigger lever will go 6) add compression spring (size 9.52 x 19.05) to trigger lever and screw down to the front panel 7) install 2x 1/4-20 nylock nuts to ends of the grips on the inside, for both grips. 8 mount grips on to the C-bar ***note: grips will have a through hole on the top- purpose to channel wires through. And there are two C-bars, with different size holes at the middle, pay attention when installing the grips, if incorrect, the housing will be upside down 9 install M5 nylock nuts inside the body frame. 10 Mount body frame to the c-bars with 4x M5 x20mm screws 11 solder 4x 12mm buttons with diode and wires. Also solder diode to toggle switches. Attach buttons and toggle switches to grip. 12 run wires through holes at top of the switch. And then channel wires through housing body. Leave slack / extra wire to later connect to gimbal 13 connect pvc pipe to housing back plate with M4 screws.

-
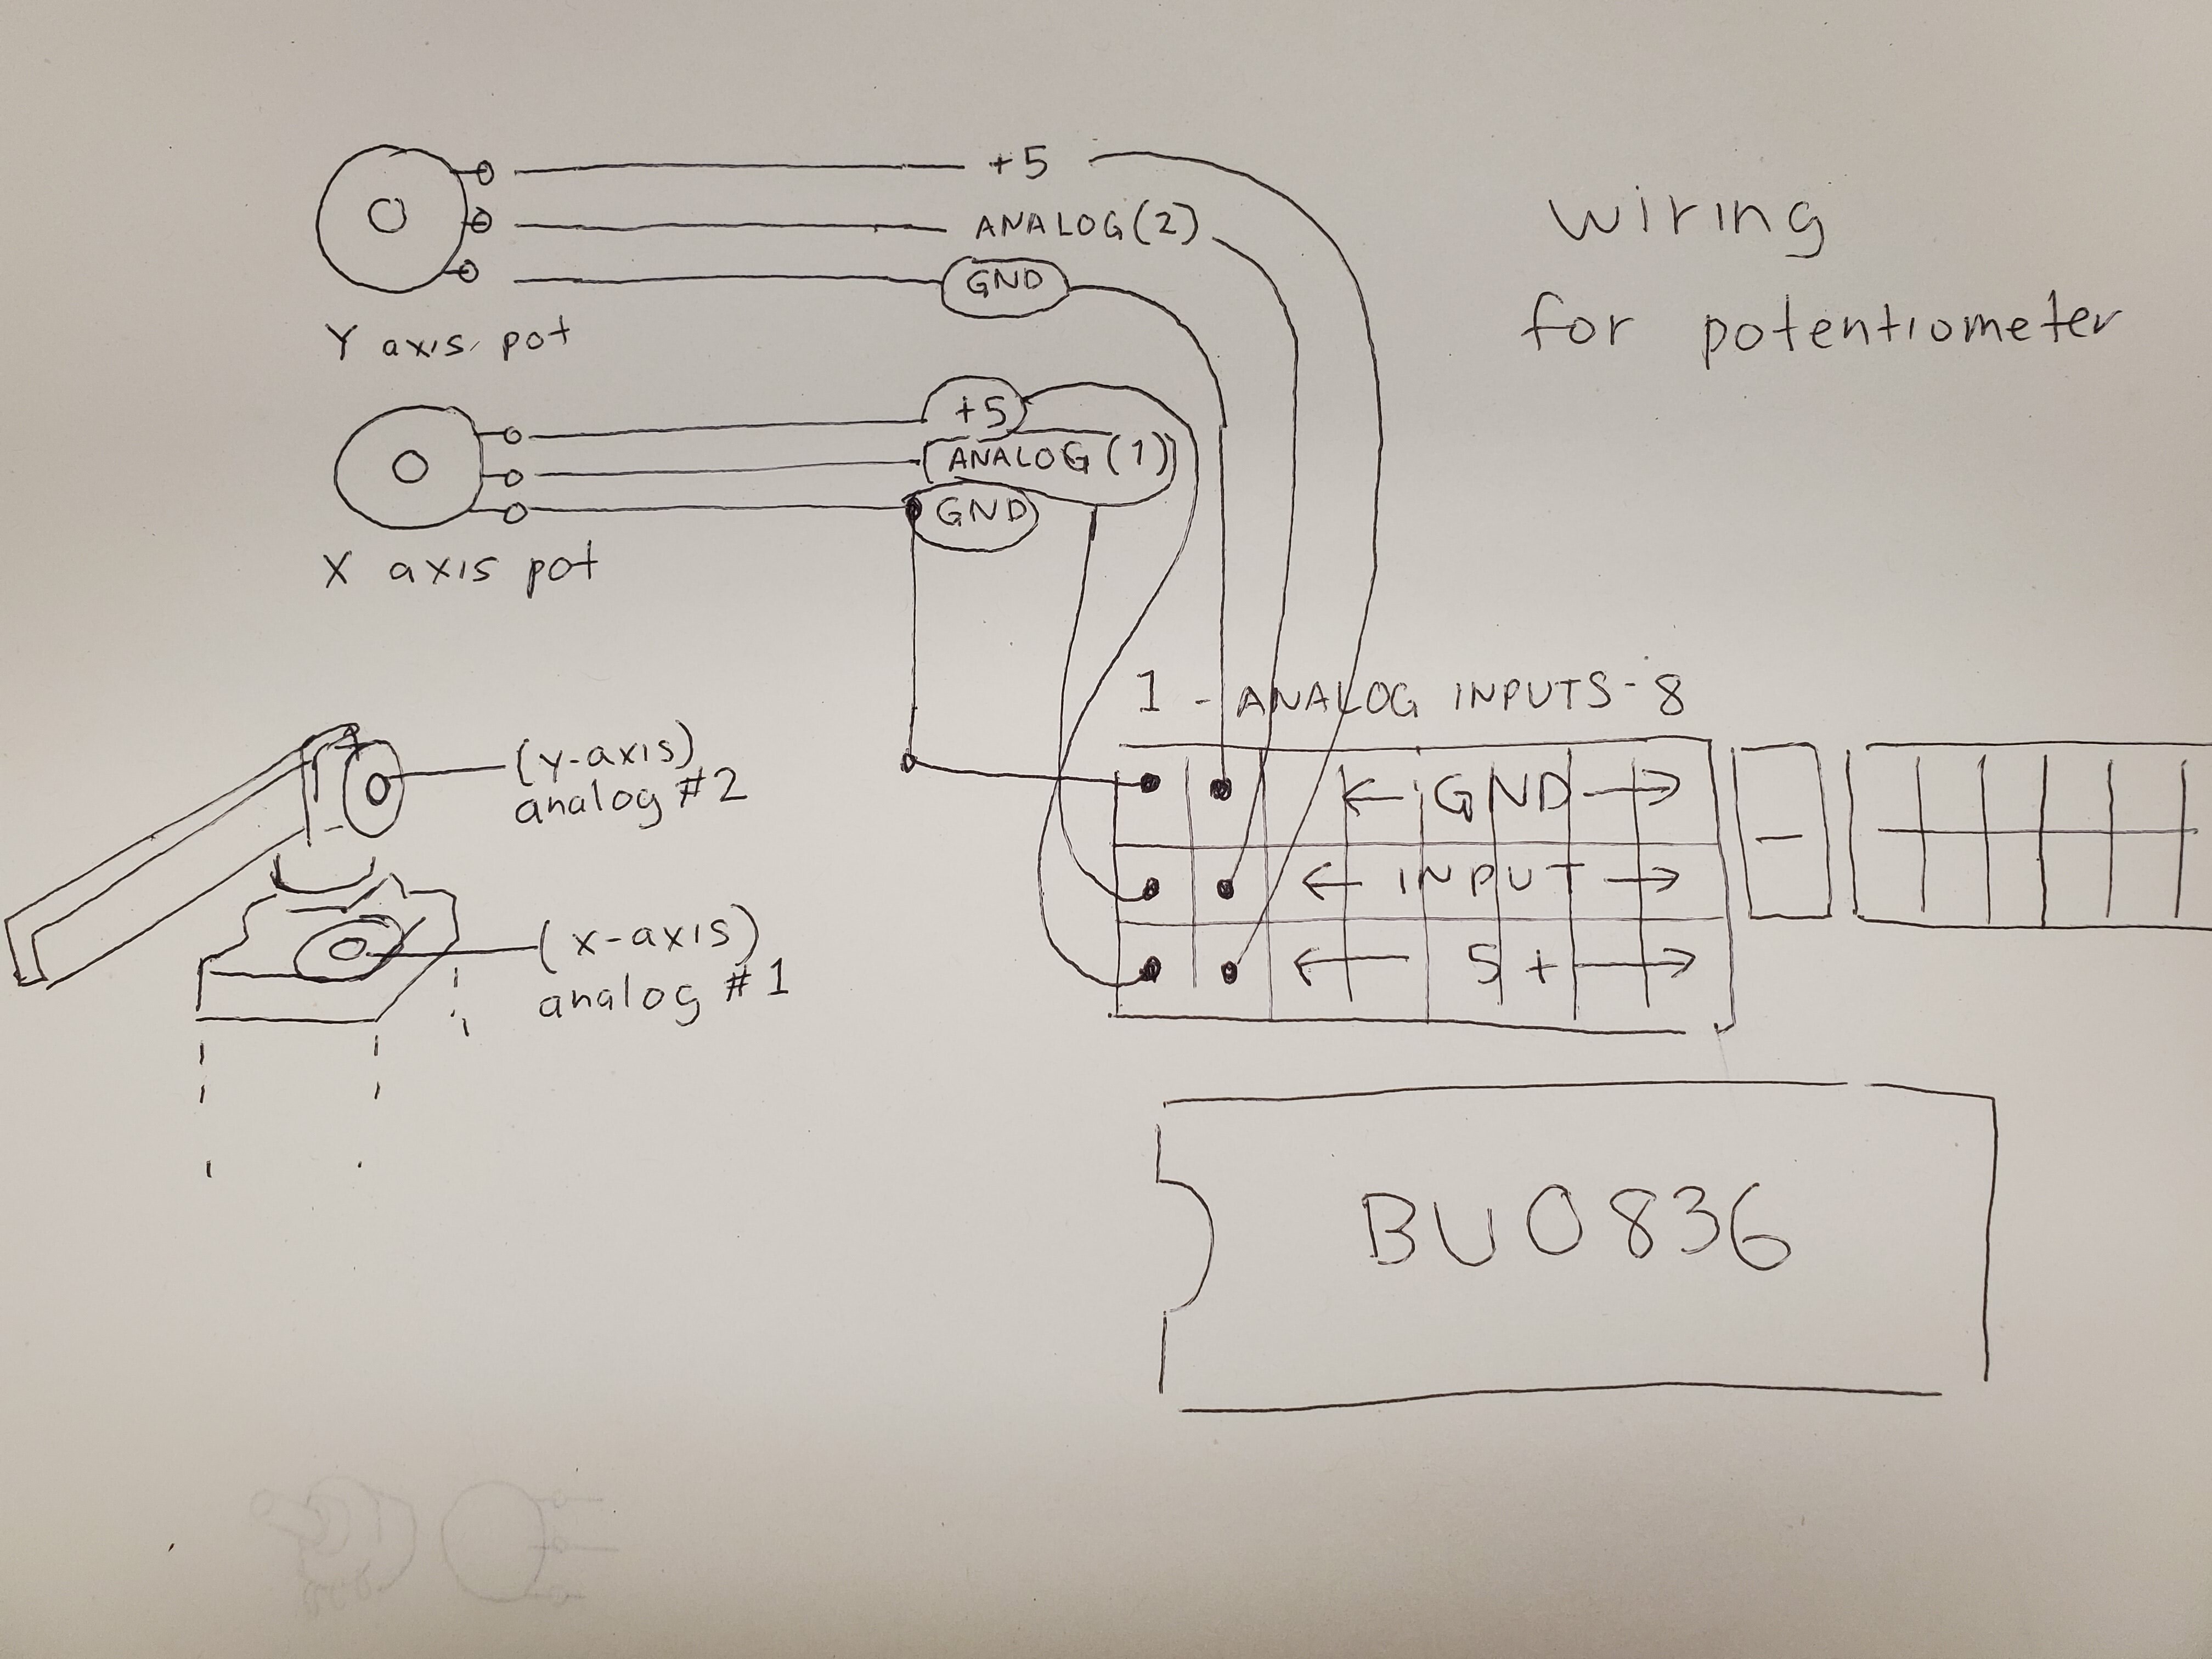
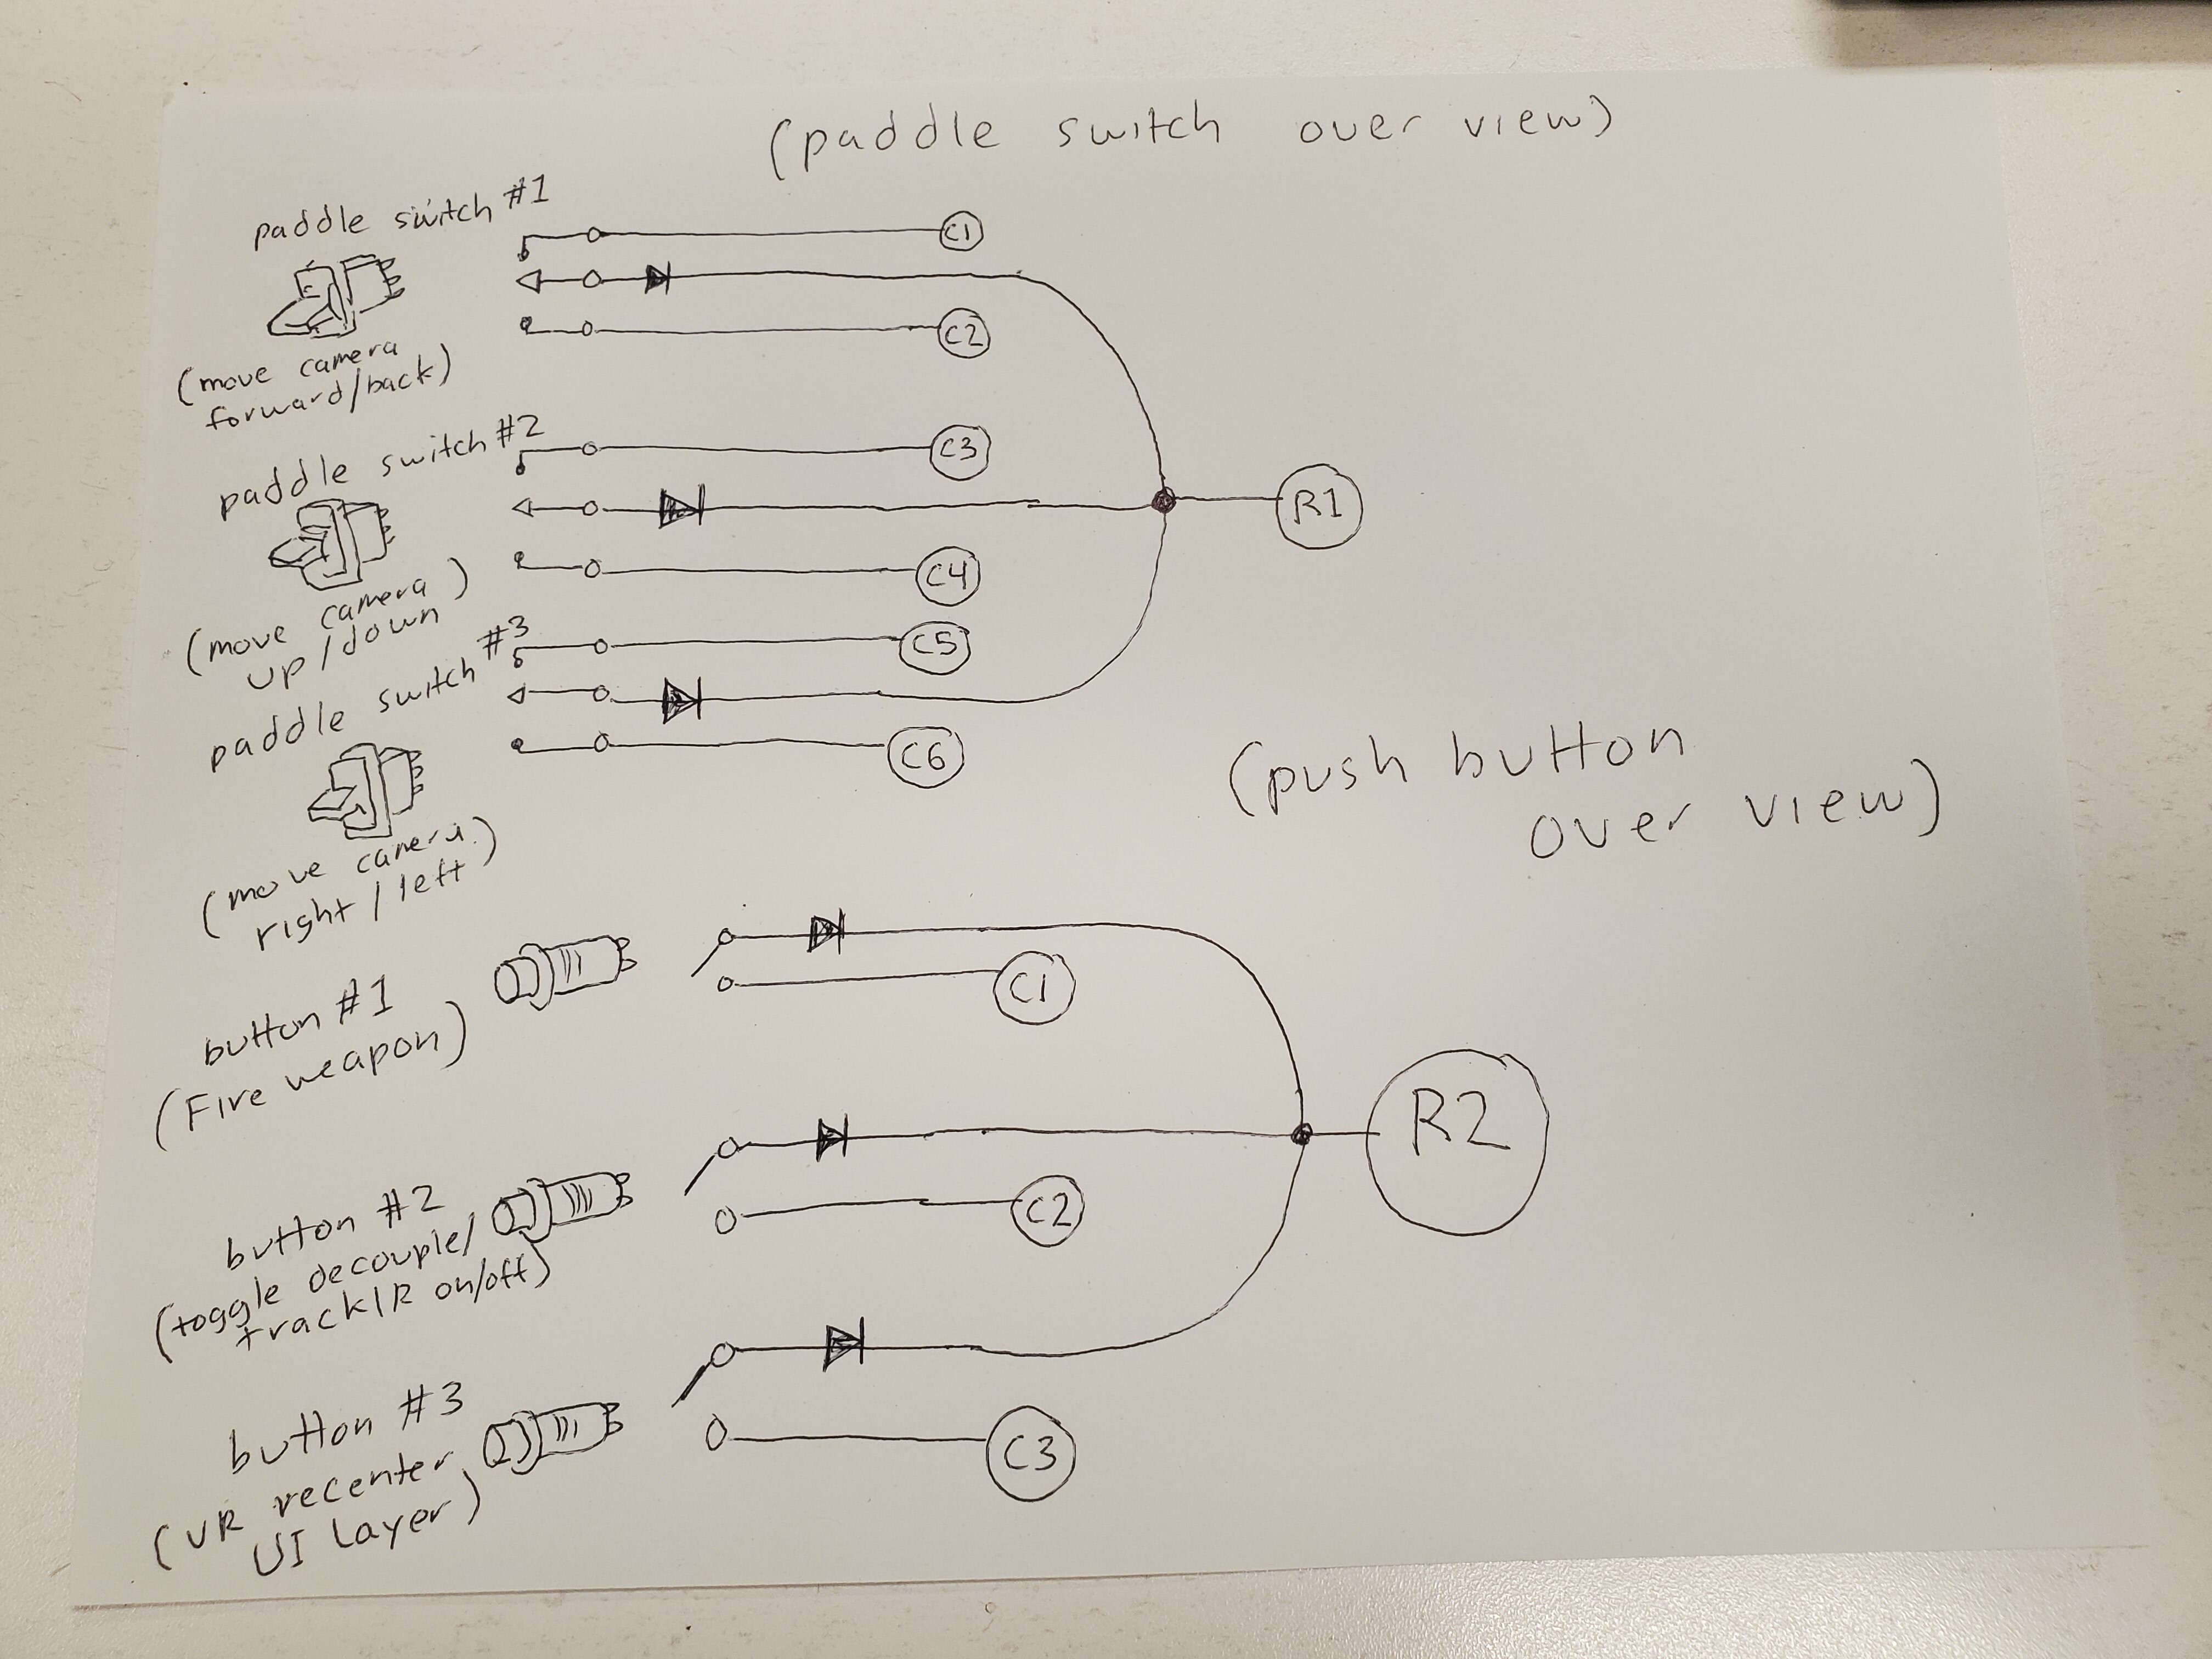
 I will be looking at designing a super simple easy build of a joystick device in anticipation for Mi8 (and future CH47) doorgun joystick support functionality, after the heels of amazing joystick support for doorguns on the UH1H and Mi24P. My first design goal achieved a controller that resembled the M134 minigun. The Second design attempted to find a smaller form and to resemble the M2 browning, but unfortunately it was still too big to mount on a motion platform. My third design goal achieved a smaller form to successfully mount on my motion platform. after hearing news that Mi8 will at some point have joystick support for the doorguns, it has now inspired me to try to design a super easy 3d build for a joystick that will control the doorguns. i hope the design will be something that people would be able to make, so that it not only brings some additional immersion to the DCS virtual reality doorgun experience, but maybe push future modules to support the feature and experience! Although mouse works great for Mi8, SA342, Mi24P and UH1H doorguns, its not as immersive and sometimes you just get that "Window out of focus" message DCS + VR headset + controllers is truly amazing. More news to come here. Thank you ED Team! Notes: Minimum DCS Axis Controls and Button Assignments mappings for DIY doorgun controller: axis doorgun slew LEFT/RIGHT, axis doorgun slew UP/DOWN VR Re-center (under UiLAYER control drop down) Fire Weapon Move Camera View Right Move Camera View Left Move Camera View Up, Move Camera View Down Move Camera View Forward Move Camera View Back Toggle decouple | trackIR on/off STL files shared on thingiverse https://www.thingiverse.com/thing:6243235 Required Parts (2) 10k Ohm Knurled Shaft 3Pins 10K Ohm Potentiometer https://www.amazon.com/GUMIFA-Single-Joint-Potentiometer-10K-Resistors/dp/B0BGLBL1Q2/ref=sr_1_18?crid=13383W3HJGQX1 (3) SH R8016A-P14 3Pin Momentary MOM-OFF-MOM SPDT Mini Paddle Toggle Switch https://www.ebay.com/itm/182340027352 (3) 12mm Momentary Push Button SPST https://www.amazon.com/Twidec-AC250V-Momentary-Pre-soldered-R13-507-5C-X/dp/B08JHVLK84 (6) 1N914 Switching Diodes https://www.amazon.com/gp/product/B079KJ8V7D (1) USB Micro controller (BU0836A 12-bit joystick interface https://www.leobodnar.com/shop/index.php?main_page=product_info&products_id=204 OR Arduino Pro Micro (4) M2 pan head screws M2 x 6mm and (2) M2 pan head screws M2 x 12mm https://www.amazon.com/dp/B01NBOD98K (6) #4-20 Thread Size, 5/8 Thread Rolling Screw for Plastic https://www.amazon.com/dp/B00GDYYMD8 wires with dupont connectors https://www.amazon.com/HiLetgo-Breadboard-Prototype-Assortment-Raspberry/dp/B077X7MKHN For joystick calibration to windows and DCS, follow this video https://www.youtube.com/watch?v=qDZze4OxaIg STL FILES HERE ALSO! DG Arm 90mm.stl DG Arm Pot Base.stl DG Base Cover.stl DG Base Housing.stl DG Riser.stl DG Arm Pot Cap.stl
- 20 replies
-
- 2
-

-
- doorgunner
- doorgun
- (and 3 more)