pitbldr
-
Posts
538 -
Joined
-
Last visited
Content Type
Profiles
Forums
Events
Everything posted by pitbldr
-
Very nice start! :thumbup: By the way, I'll need to charge you royalties for using the following statement... I really need that in my signature. :D
-
Sounds like a plan!! Thanks! :thumbup: What areas/regions specifically can you "service"?
-
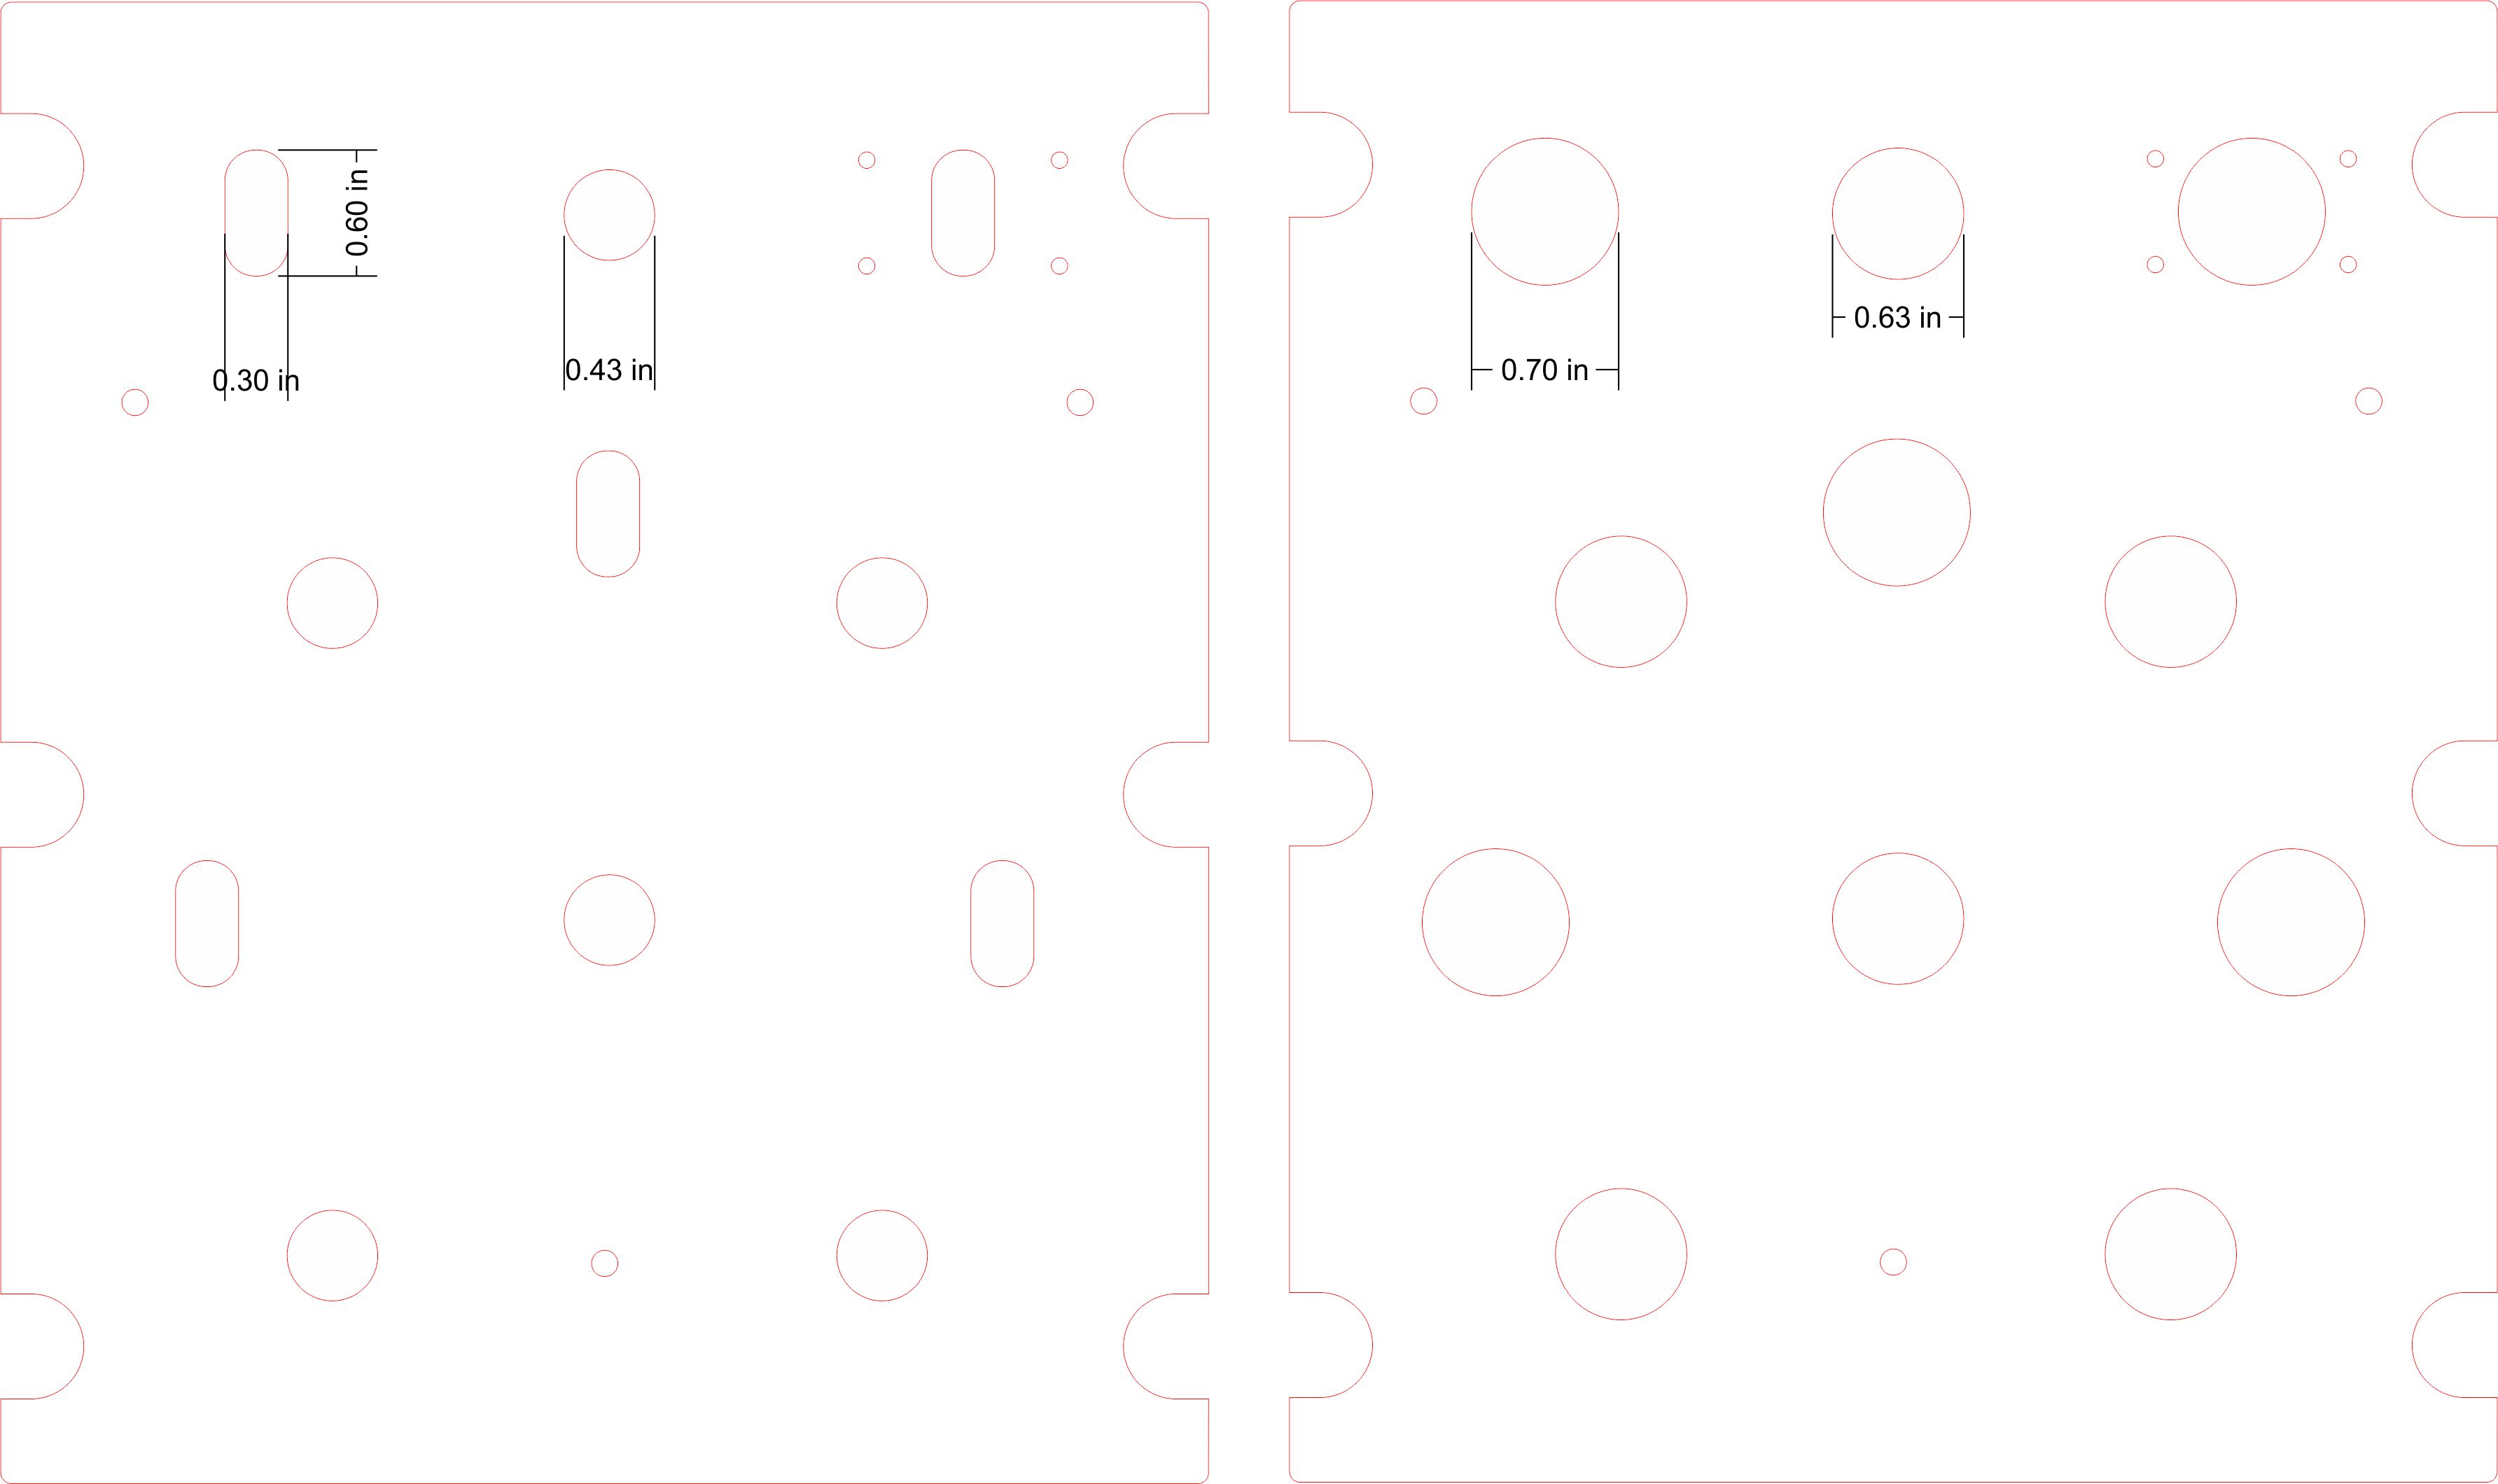
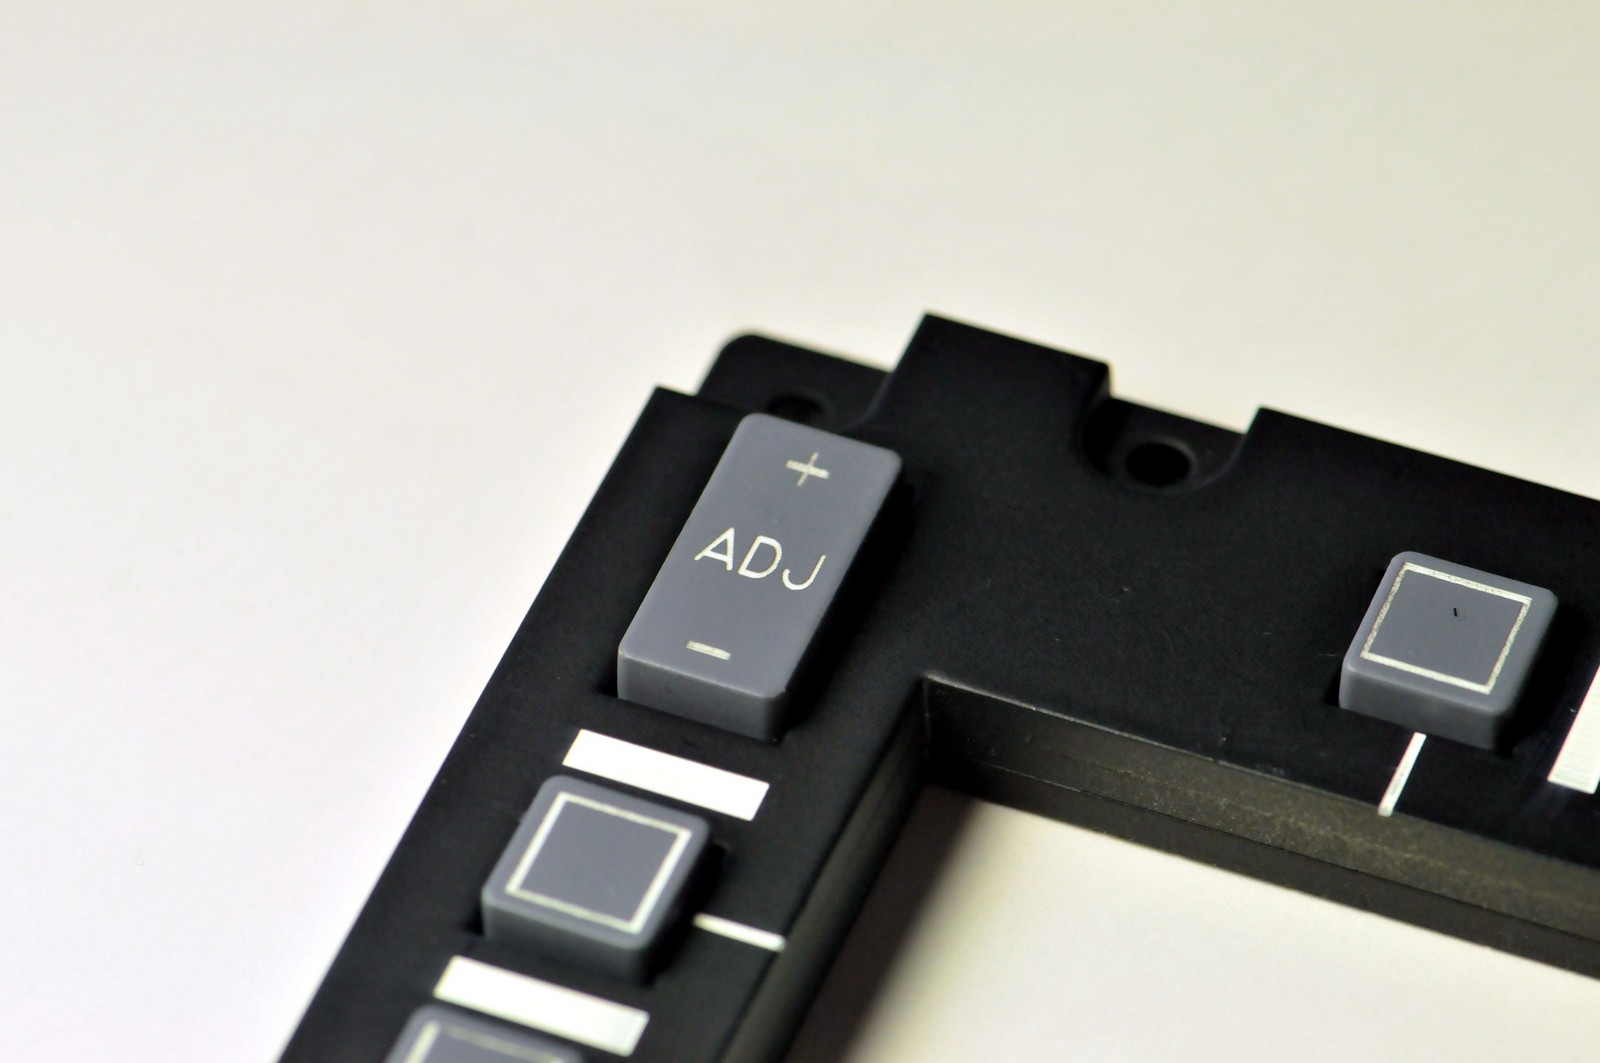
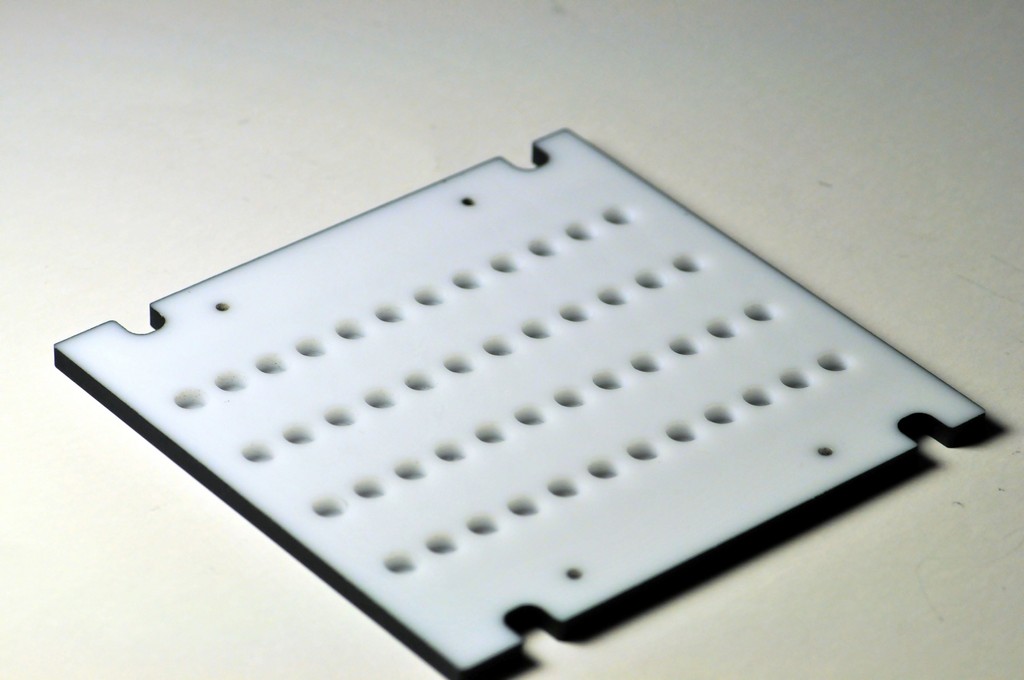
Thanks! :) Yes, they are two layers that are "welded" together. It's glue specific for acrylic. Separate would definitely be easier for me! :D I can make them either way. Yes again. The bottom layer of the panel has holes that are about .2" larger than the top layer. I used the switches I had (most from actual military aircraft) as the basis for my measurements. I've attached the drawing for the Lighting Control panel to show the difference. On the left is the top plate and the bottom on the right. You're thinking exactly what I was thinking. Since I am offering these out to others, there's no way I can plan for every mounting possibility, but being acrylic, they can easily be drilled or even cut if needed.

-
Thanks for linking those pics! I knew the CDU had to be thicker than the other light plates, but had not seen anything that gave a good view of just how much. Most of my panels are about .225", but the CDU and UFC are .355" to allow for more room underneath the buttons (hopefully for electronics).
-
Thanks! :thumbup:
-
Adding to the price list... Stall warning panel - $17.15 Electrical Power panel - $22.09 Environment system - $47.16 MFCD -$121.12 for two CMSP - $24.29 UHF - $23.41 (currently no cut outs for displays)
-
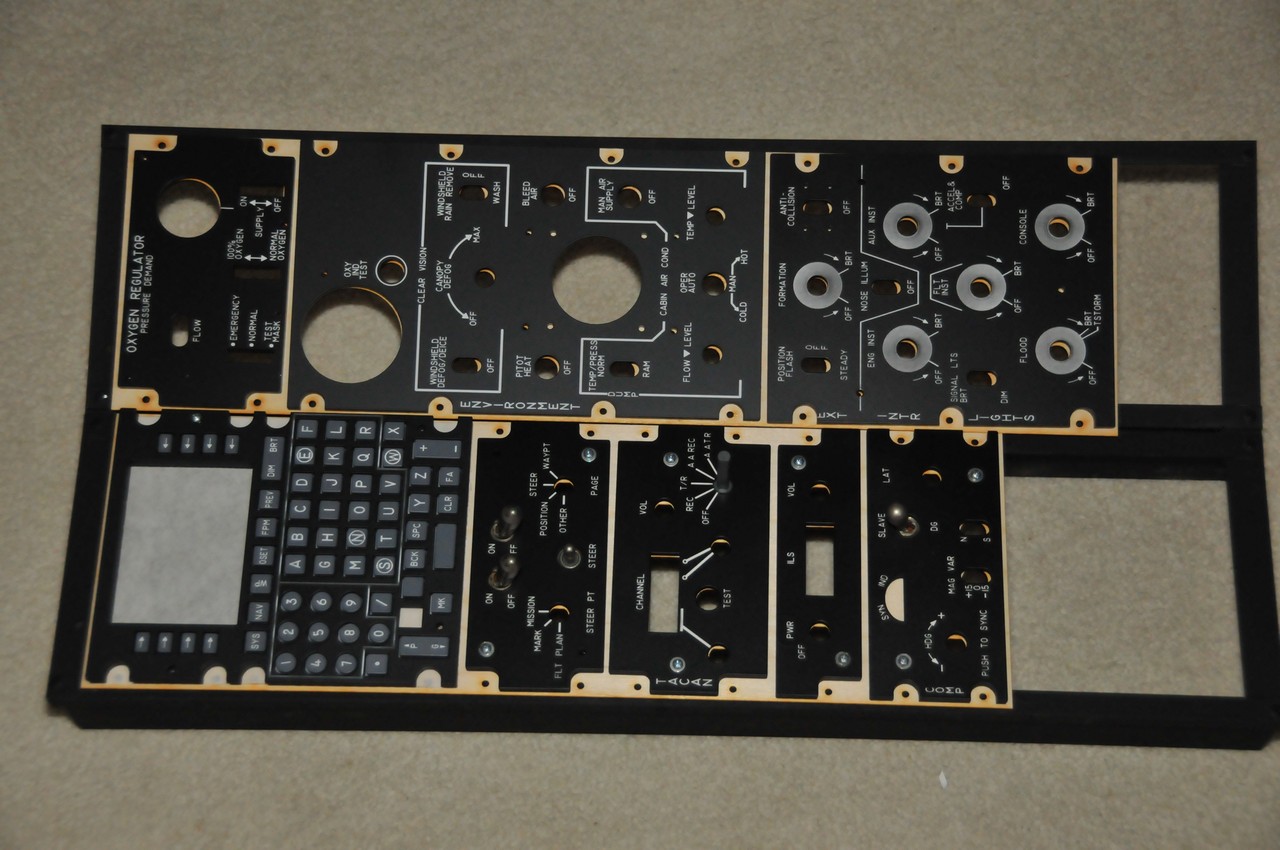
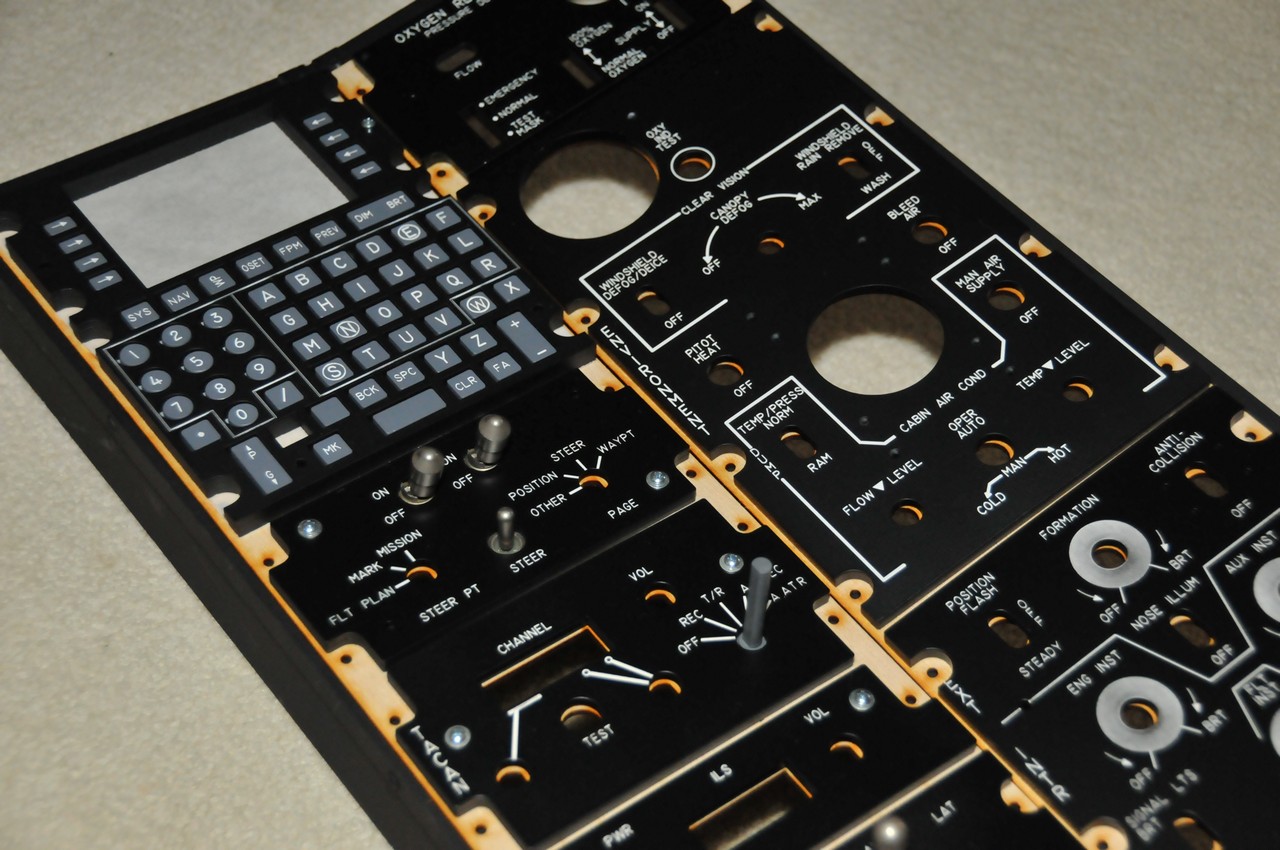
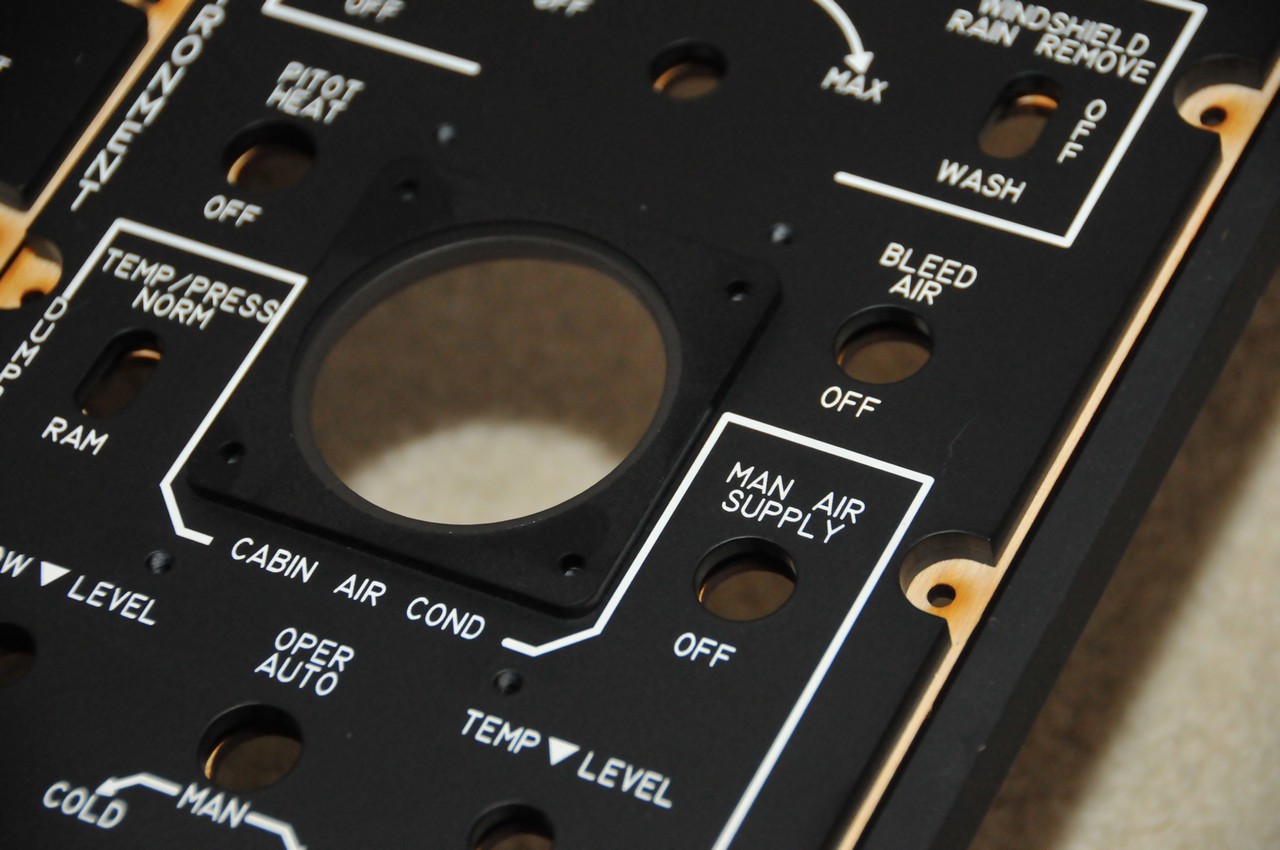
Just finished the environment panel which was the last one I needed for the right console! :D Couple pics...
-
Just to clarify, those panels I've listed above as being for sale are not 100% perfect, they each have a few small flaws. Didn't want anyone to think these were final. :)
-
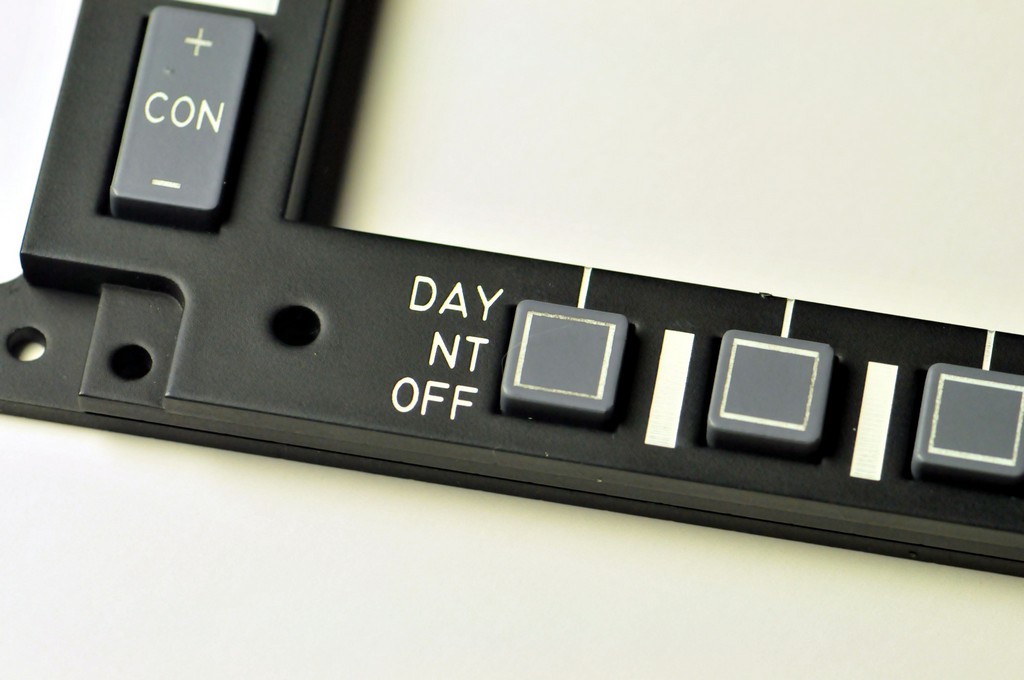
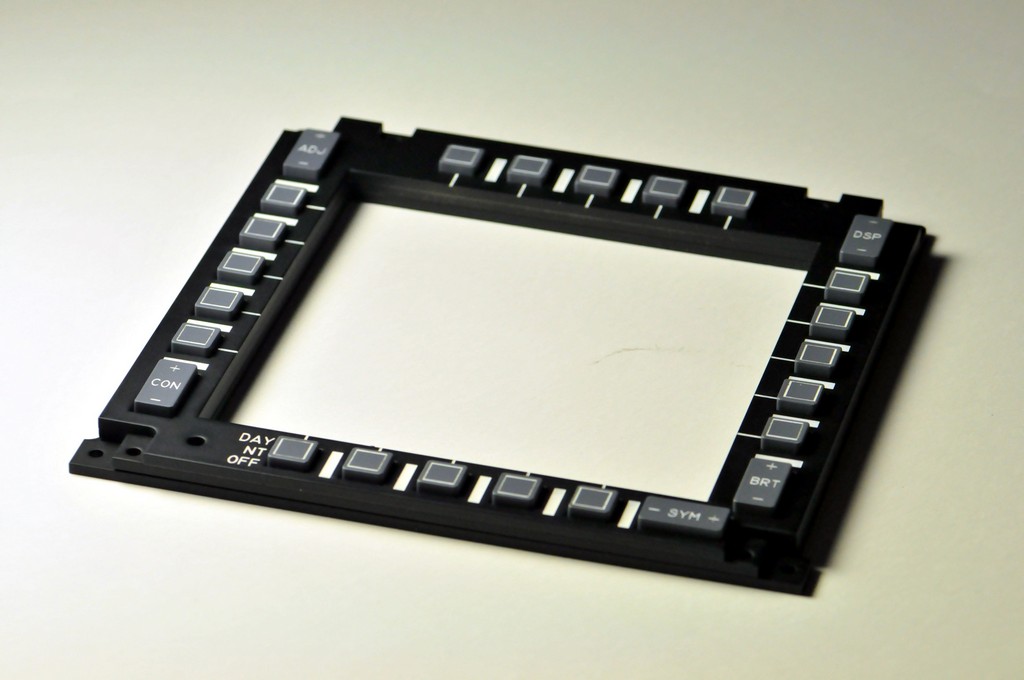
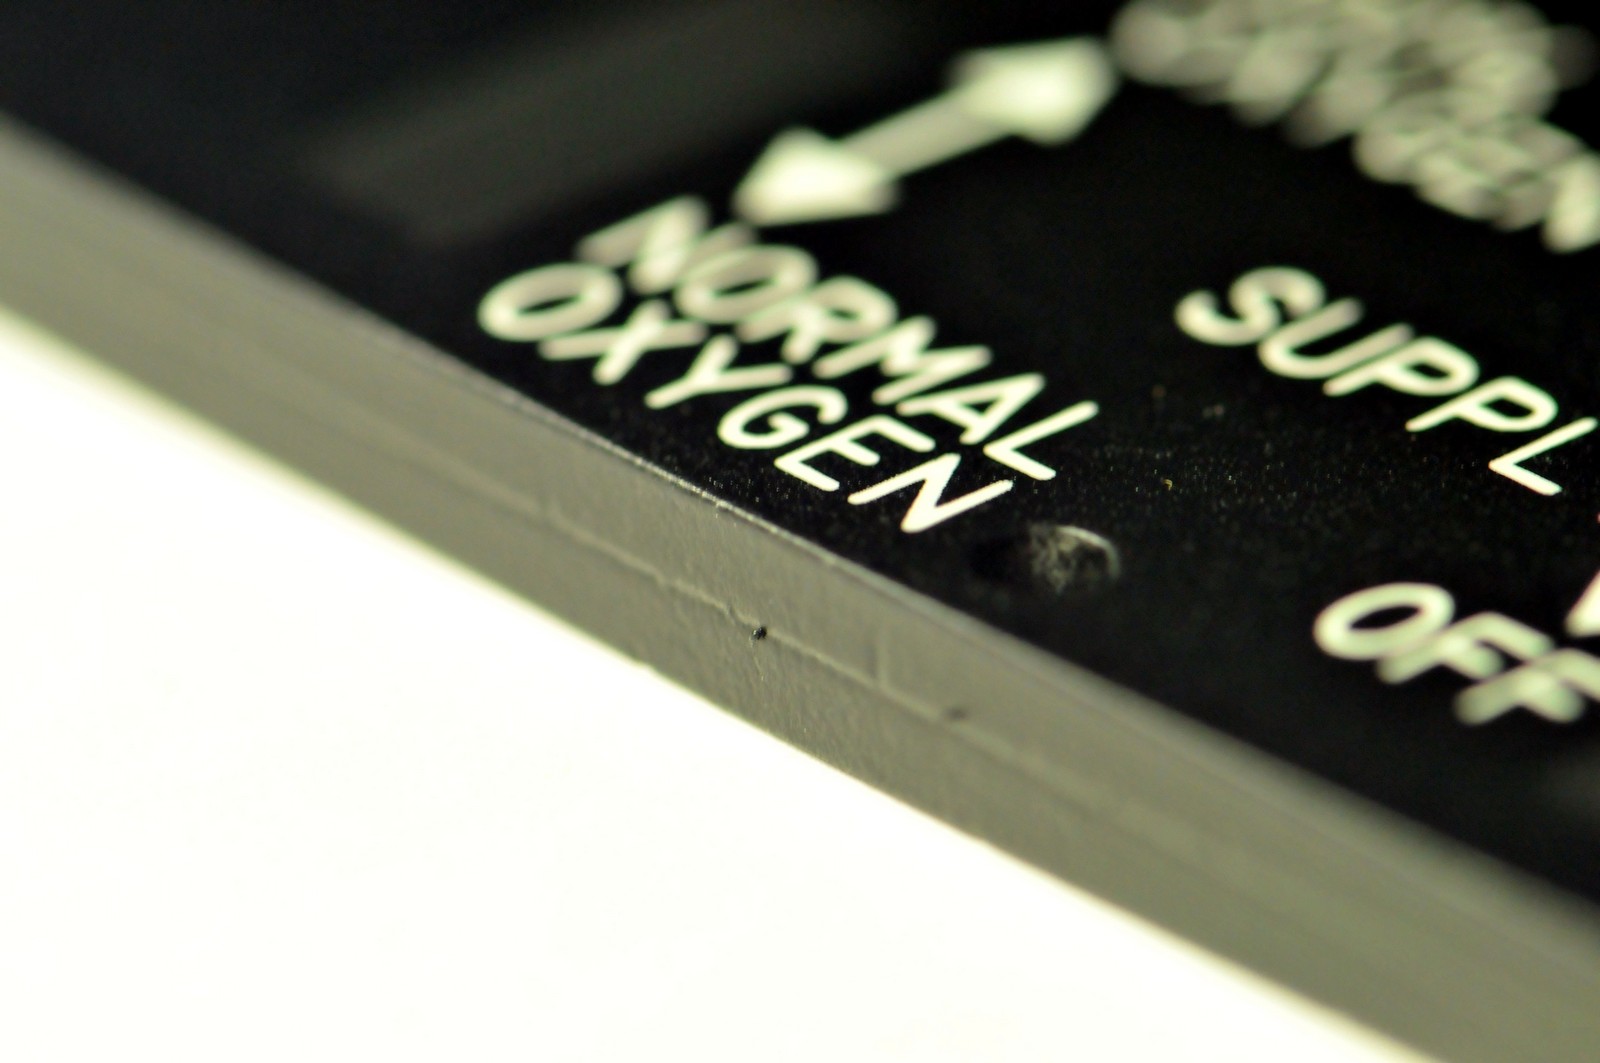
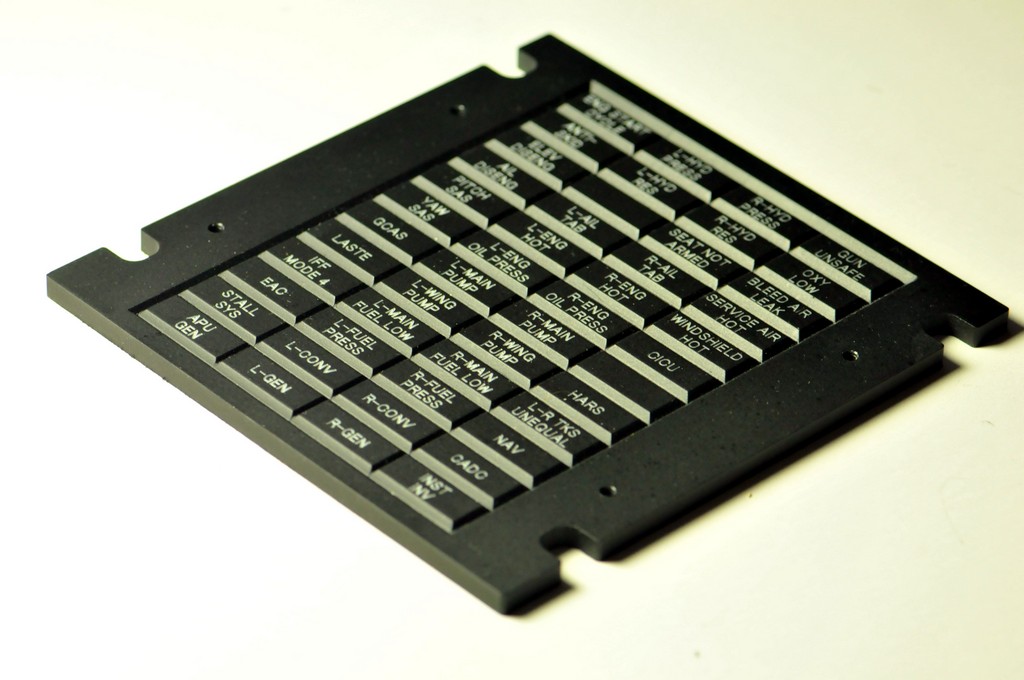
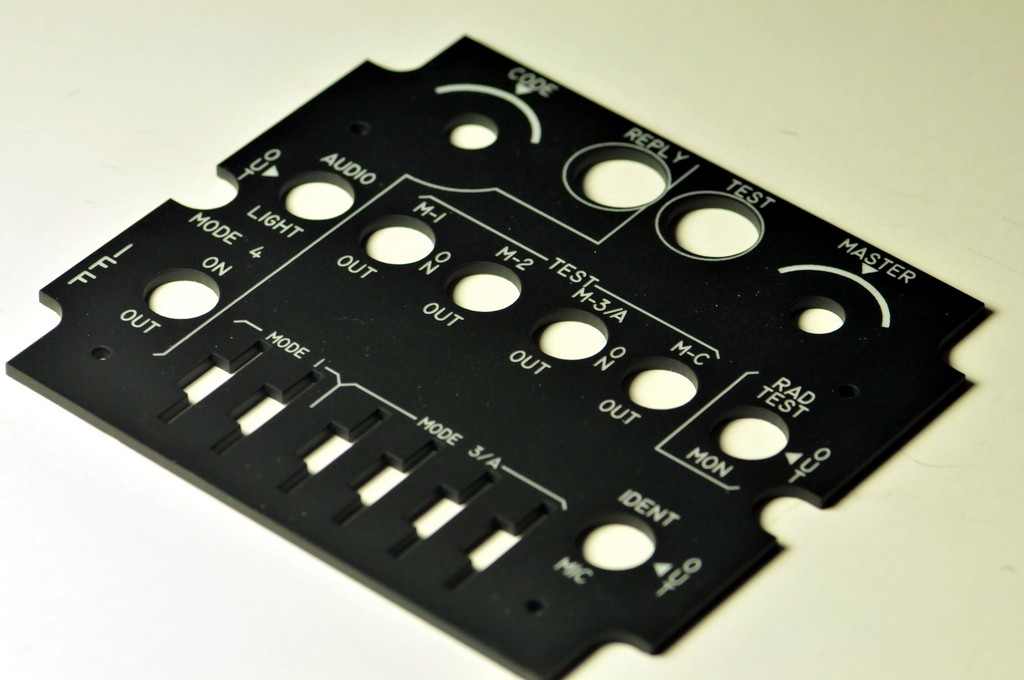
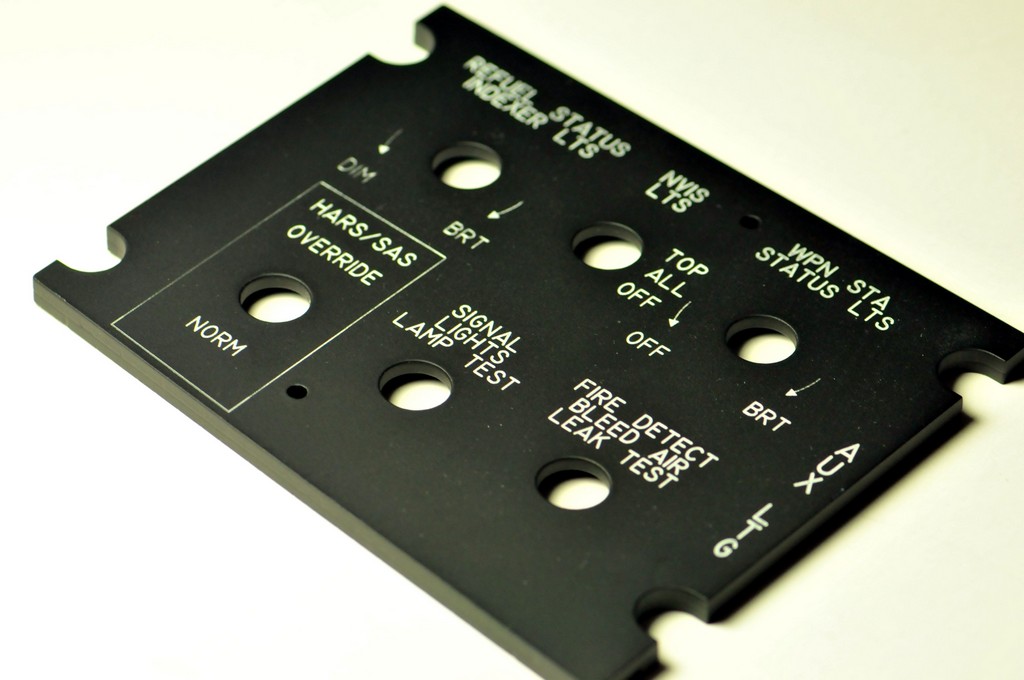
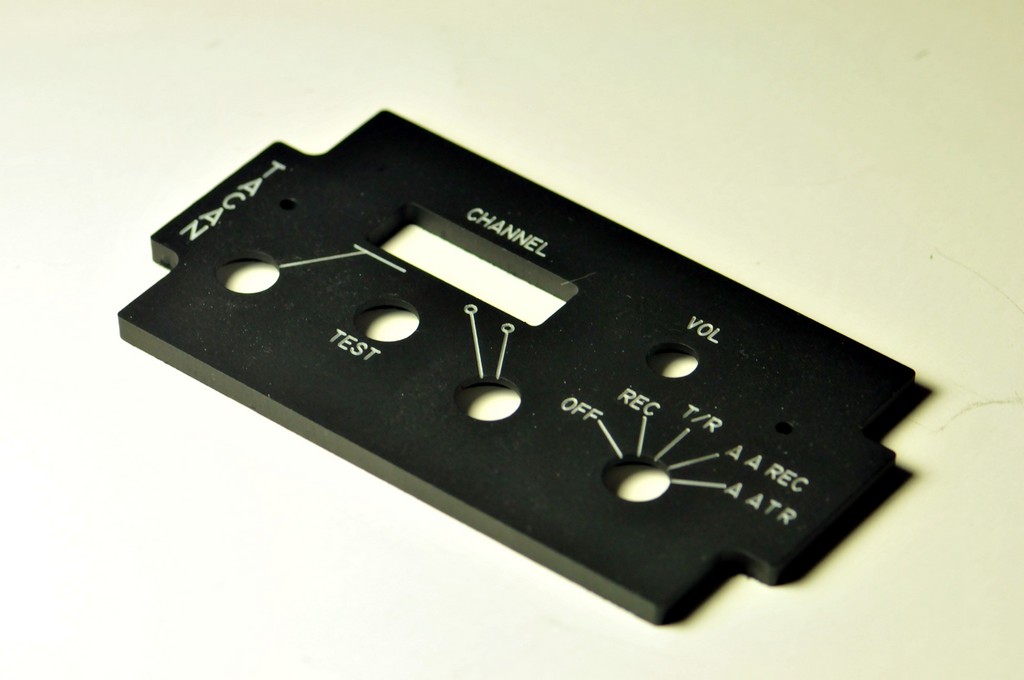
Here's a few pics showing some of the prototype panels up for grabs. Sorry for my poor photography skills. :music_whistling: Image number 3520 - Fuel panel (single .25" piece white acrylic) 3521 - Caution panel (single .25" piece white acrylic) 3522 - back of caution panel 3523 - IFF panel (single .125" white acrylic) 3525 - Aux lighting panel (two layers .125" acrylic, clear I think. One of first panels I painted then engraved, but I engraved too deep) 3526 - TACAN (single .25" white acrylic) 3527 - electrical power panel (again 2 .125" layers painted, but engraved too deep 3530 - CMSP (single .25" white acrylic) 3531 - back of CMSP Actual .25 thicknesses vary a bit, but most are closer to .225". Now a few other pics. 3507 is the *almost* final version of my MFCD. 3505 & 3506 - closeups. 3509 - oxygen regulator 3510 - closeup showing the "seam" on the two layer panels. I thought about sanding the edges, but that would add to the cost. 3511 & 3513 - comparison of a single layer and dual layer panel 3515 - comparison of two dual layer panels, one the left clear acrylic painted white, one the right white acrylic not painted, just engraved. All the panels from 3520-3530 for up for sale at $10 each plus shipping. Also, the lighting control panel on the right in 3511 (single layer) and the one on the right in 3515 are up for grabs too.
-
Sounds like a good plan. Be sure to post some pics! I am toying with the idea of having each section of my consoles on piano hinges. NOT realistic at all I know, but that way, I can flip up an entire section and work on it from above. This will also help me maximize the space in my office which is severely cramped already! :D By the way, I'll provide the outline drawings for my panels for people like you who will be cutting their own backplates. This will help you locate the cutouts for the switches and such.
-
Just the light panels, not the backplates. Personally (for my pit), I am making one large backplate to hold each set of panels (outer left, inner left, inner right, and outer right). Been in touch with someone who may be able to provide aluminum backplates that will match my panels, but that will be something he provides separately.
-
Forgot to mention that I may also an "economy" version of the panels. These would be a single layer of white acrylic (approx .125" thick) and would have holes large enough to fit 'around' the mounting nuts for switches. The standard version that I've listed prices for above are two layers of clear acrylic (approx .25" thick) that are first painted white, then black. These resemble mil spec panels more closely in appearance. I'll post some pics later showing the differences.
-
I have one of the xkeys boards that I'll be using initially but eventually want to move to something that will allow output as well. :) Ok, here's some pricing info based on what I am calling "version 1" of my panels. Please note these may change as (if) changes are needed. Also, note that no switches/electronics are included and price does not include shipping. Fuel panel - $34.56 Oxygen Regulator panel - $20.24 Lighting Control panel - $38.43 Auxiliary Avionics panel - $18.74 Emergency Flight control - $30.34 (this price does not include yellow hashed border - I am working on adding this, but it will definitely add a bit to this panel) Pictures and more info to follow in the next couple of days. I'm very close to having the numbers nailed down for the UFC and CDU as well. Just need to cut, paint, and engrave the buttons for each to determine cost. Also, I have a few "prototype" panels I think I'll offer up for $10 a pop + shipping. These are panels I've made during the development but had to be redone. They're too nice to trash, but I can't ask full price for them either. They have issues like uneven text engraving or being made from white acrylic instead of clear or other minor issues. I'll try to post some pics tonight of these.
-
Thanks all! :D I know what you mean Gadroc, I had a week where I had no time to work on the pit. RL has tendency of getting in the way. I'm guessing that I am still a few months out before I can interface it with the sim, but would love to do a vid when I reach that point. :)
-
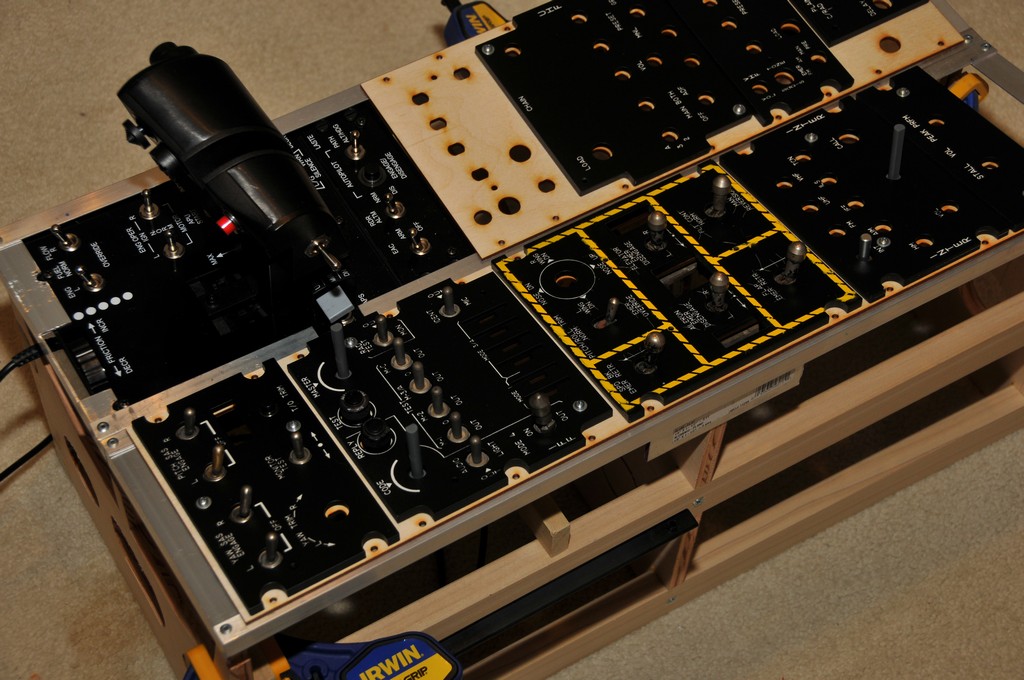
Little update on my pit. Left console about 95% there, not including the wiring/electronics - that will come when all the panels are finished and the switches are in place. Couple panels need to be redone due to painting issues and still need another VHF panel, but everything else is good to go. As you can see, I've mounted my throttle in the console. To do this, I removed the bottom plates and side plates - it's light as a feather now! It was worth it though to have it integrated into the console. Still need to paint the aluminum frame and skin the console - again after everything is wired up. I've also included a shot of the inner right console and yes I know that the WP button on the CDU is turned. :) I taped the back to keep the buttons in place and noticed afterward I had put it in wrong. Lastly, you'll notice that some of the panels with readouts like the UHF don't have holes cut for those yet. I decided to wait until I know what I will do there before I cut out the spot for any display.
-
How many inputs can one of these handle? Any outputs? I am just reaching the electronics part of my project. Would love to test one of these out for you. I'll shoot you a PM with my address and you can give me the price with shipping.
-
What he said. :D
-
What are we seeing here exactly? Is this a board you're offering, just software for the board or both? I could find anything on a USI 16 board. It looks very promising. More info please. :)
-
Hey, if you have not seen these, you can get the panel drawings here: http://www.scsimulations.com/forums/downloads.php?do=cat&id=6 Then you can use something like Screen Calipers to take a known dimension to determine the other dimensions. For example, the MFD screen is 5x5, so you could calibrate the Caliper to that dimension and measure the entire front dash. From the drawing on my screen 229 pixels is the width of the MFD, so I calibrated the calipers to 5 units for 229 pixels. Then if I measure the AHCP panel, I get a width measurement of 4.21, which is pretty close to the real thing. To fully use all features of the Screen Calipers, you will need to purchase it, but it's only $30. You won't end up with 100% accurate dimensions, but it may get you what you need. You can find that app here http://www.iconico.com/caliper/ but there are others out there and you might find a free one.
-
Very true. I had forgotten about the hat switch. Don't want anyone to think I've said it can't work, it can, it will just limit the number of inputs per card is all. :)
-
Along these lines, it would be a nice feature if you could contact ATC and request 'touch and go' landings and those be recorded as such. :)
-
Starting at page 486 in the manual covers the approach types and landing patterns and it mentions 2000 AGL for all but the TACAN which states that ATC will assign an altitude for this type of approach. Regarding the number of landings, did you come to a complete stop or just throttle back up? For a landing, you generally need to exit the runway, otherwise it's a "touch and go". Technically speaking, you've landed in both cases, but the sim may only log a landing event if either the wheels stop moving and/or you exit the runway.
-
Nope, not saying that. Leo's boards will work well for anything that is just sending a keystroke to the PC. However, his boards only allow up to 32 inputs and the UFC needs 34 inputs. So you'd need three or four for a CDU/UFC setup - more if you're also using custom MFD's like I'll be doing. And each one uses a USB port - you can't daisy chain them that I know of. Each Opencockpits master card can accept 72 inputs, but also allows for 64 outputs. Plus you can get the USB expansion card and hook up 4 master cards to it (that's like 288 inputs). All of this on one USB port. Here's a link to the OC site: http://www.opencockpits.com/index.php?newlang=english
-
Looks fantastic!! Really looking forward to seeing your pit when you're done building it (not the mention all progress pics)! :)
-
I'll be using something like Opencockpits cards to interface with the computer, but what I am looking into is a breakout board that would go with my panels. Basically, a PCB with pushbutton switches that mounts to the back of my panels and then interfaces with the opencockpit hardware, xkeys, or some other IO solution. I have one of Leo's board already and I may use it, but it is a little more limited in the number of inputs it can accept, meaning I'd need several of his boards if I went that route.