pitbldr
-
Posts
538 -
Joined
-
Last visited
Content Type
Profiles
Forums
Events
Everything posted by pitbldr
-
And just to be clear, these are the dimensions on the panels, not what would be on the back plate. Those dimensions could vary a little in size.
-
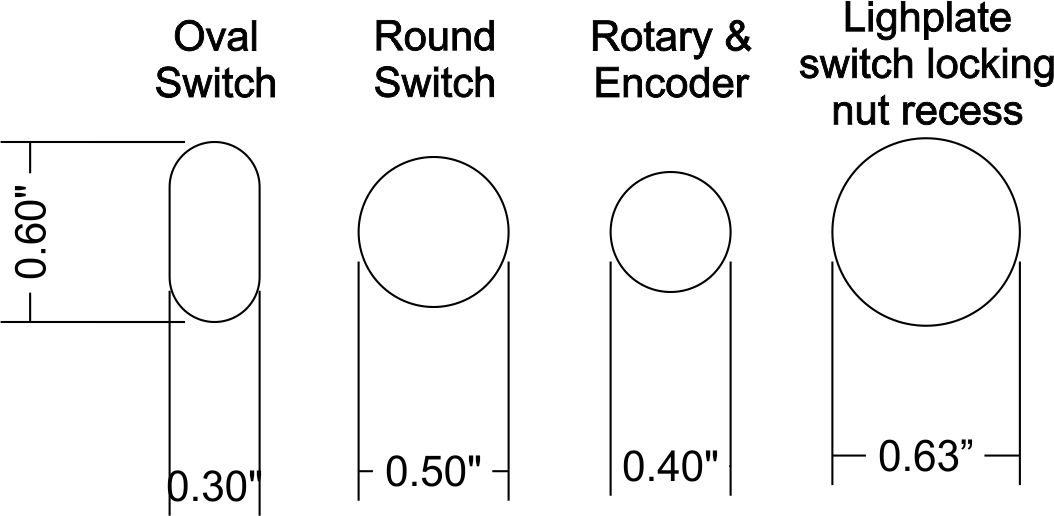
Sure. See the attached image. The real panels are about .23" thick. My replicas should be very close that. However, I am thinking I will also offer a thinner panel that will only be about 1/8" and will have the holes for the switches large enough to fit around the switch locking nuts. These would be cheaper and could be used by anyone that is just looking for a panel to drop over a switch panel they've made (similar to what you're doing in your flight controller build thread). That make sense? The switches and rotaries I have fit these dimensions and I think that's pretty standard, but it's possible some may need larger or smaller dimensions. I hope this helps!

-
Very true and a good idea! I toyed with doing that but have too much on my plate with everything else I'm doing. :D Great! I'd love to hear about your results.
-
EL sheet would be nice, but it's pricey. I've been playing with LED's with a PWM and I think those could work. Trick is to get even dispersion of light with only a few LED's. The real Lighting Control panel light plate has 12 lamps on it - I don't think putting 12 LED's, or more, in these replicas is feasible for power reasons. Then again, electronics is not my strong point! :) I even considered EL string, but not sure it has the brightness needed. More work/thought/testing is needed. :) Thanks Tigershark! :D I am not aware of any one site, but I think a few threads discuss some dimensions - just don't think there's a "all in one" source for that. Someone elighten me if I am wrong. I am using a combination of real panels, the A-10 ops manual, and the DCS sim as references for my panels. They won't be 100% accurate, but I think they'll be close. And yes, once I finalize all of my panel designs, I'll be glad to share the dimensions for what I have. I hope it will benefit everyone, but especially anyone who might want to pick up some of my panels. I anticipate another couple weeks before I will have everything ready.
-
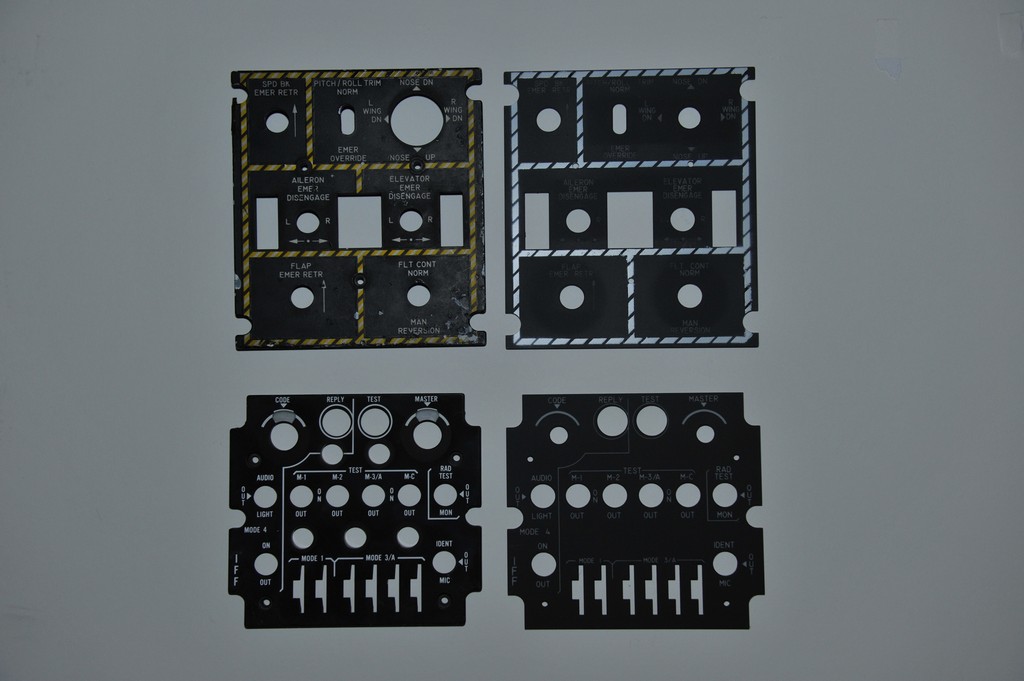
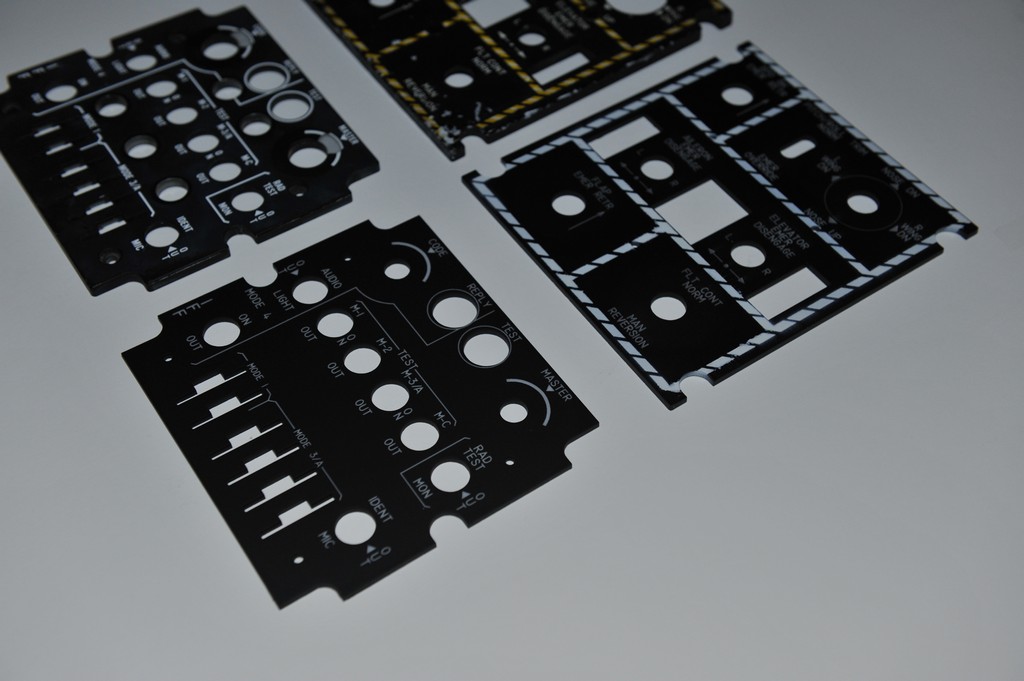
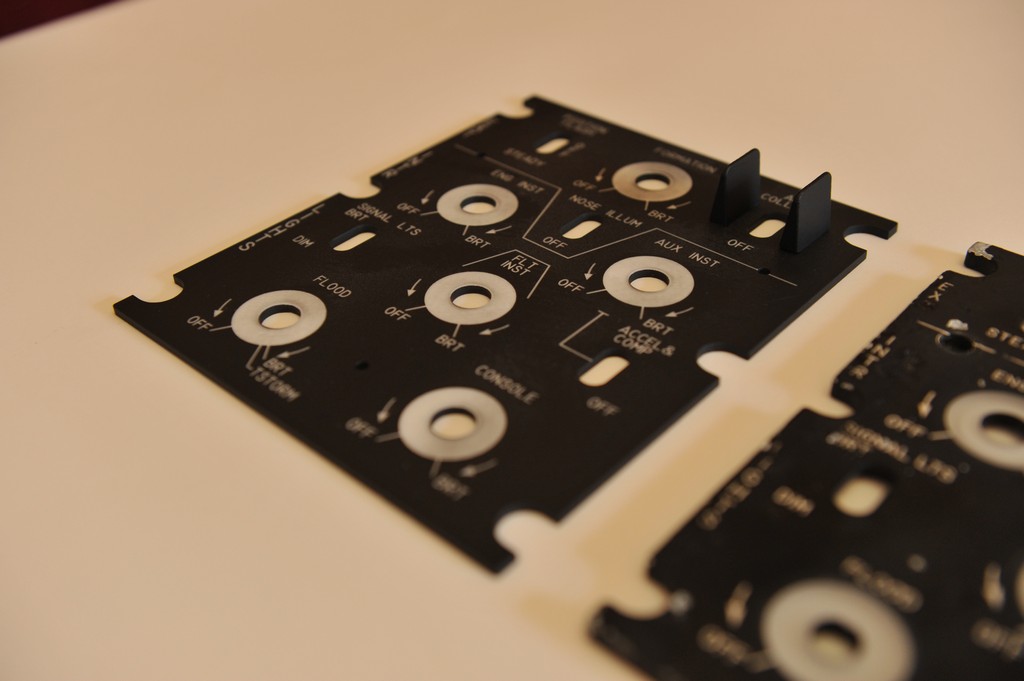
Turned out a couple more panels last night - the EFCP and IFF. Please note that all panels so far are prototypes to test size, fit, etc. The final versions will have the text painted to increase contrast and in the case of the EFCP panel, yellow hash marks (didn't have any yellow to test with). :) In the pics, real panels on the left.
-
Yes, the panels can be backlit. I am using white translucent acrylic so EL sheet or LED lighting could used. Real mil spec panels have small lamps embedded in them and I have been playing around with trying to replicate that too. It's not been simple, but I hope I'll come up with something for down the road. I cast them from the tabs on the actual panel. :)
-
Also, you planning on selling just the center pedestal? I don't really have the room for the seat, but that pedestal is very tempting! :D
-
Very nice!! :thumbup: Where'd you get that master arm switch? Is that a mil spec locking toggle or something you fabricated yourself?
-
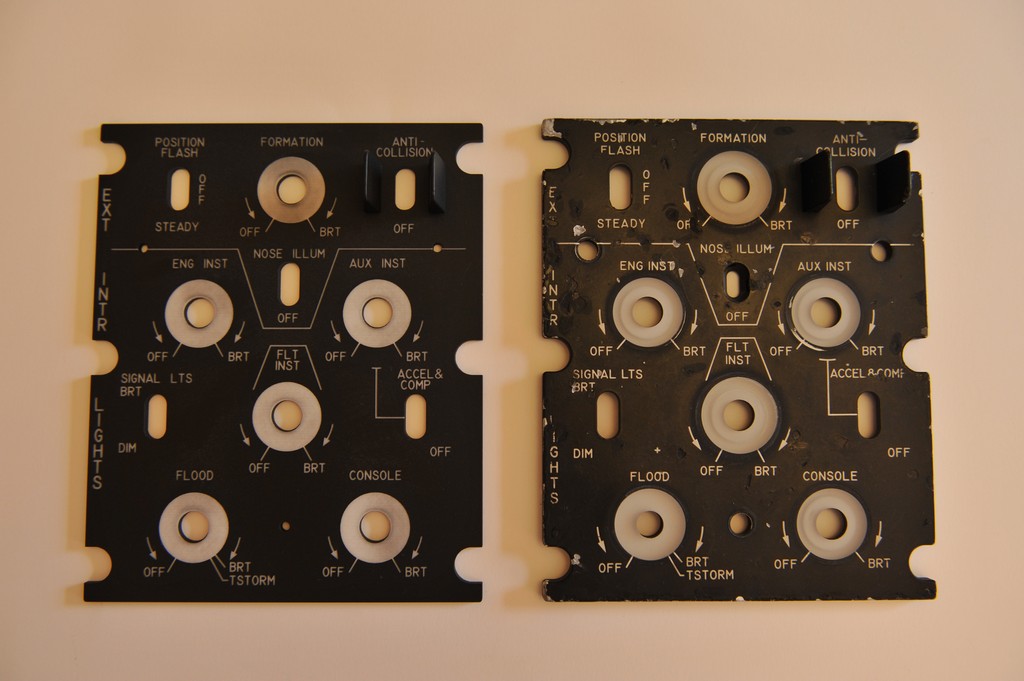
Here's lighting control panel. Real panel on the right and replica on the left.
-
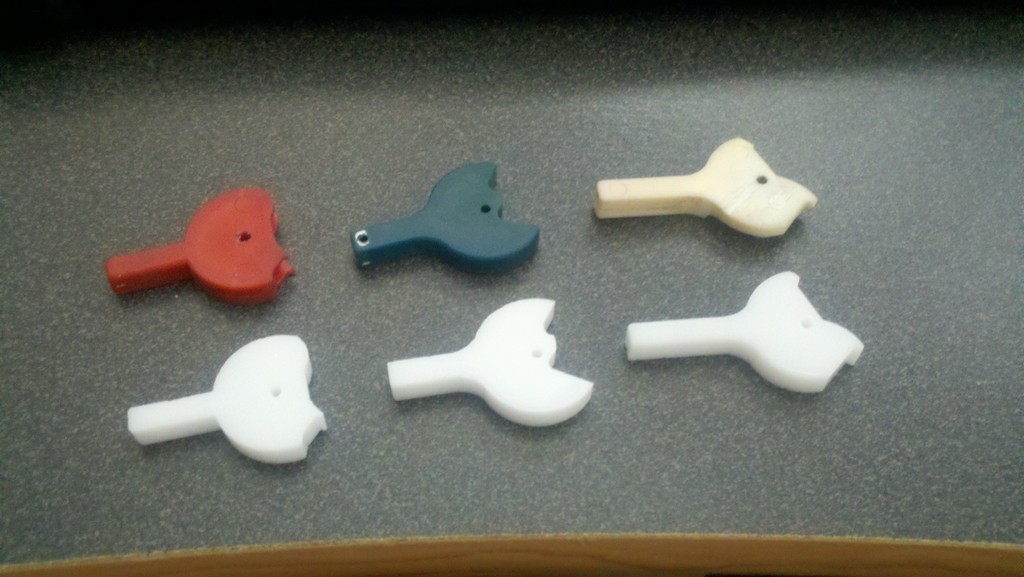
Small update... anyone guess what these are?? :) Just cut them out and need to find a good match on paint.
-
Thanks guys! Glad I'll be able to help out! :) I was thinking this morning that I may develop two styles of panel - what I'll call 'economy' and 'standard' for now. The economy panels would be a single layer, from 1/8" up to 1/4", that will have larger holes for switches (approx. .625" to .75"). This would allow using these panels with any type of switch plate and would be cheaper. The standard panels will consist of two layers of acrylic - one 1/8" clear and one 1/8" white. The clear layer will have larger holes to fit around the locking nuts on switches and the white layer will have .5" holes for switches and .4" holes for rotaries and encoders. This style will be more like the actual panels and will cost more than the economy style. Opinions?? Ice - regarding the interfacing, browse through the forums. This is one area I am lacking in and will myself be seeking help when I reach that point in my build. There's a lot of smart talented people here that can help out. I *MAY* also offer the aluminum switchplates if anyone is interested. I've cut several test plates on my CNC and they came out nice, but it's a slow and messy process (aluminum chips everywhere! :(). Still, I may consider these, but that will be a ways off. Anyone interested can PM me with your name and email and I'll add you to my spreadsheet and be able to track what your interests are. Thanks!
-
Oh, forgot to mention that you'll even be able to choose between a lighter gray color and darker gray, unless and until I can find the gray that actually matches the real knobs. Everything I've tried so far has not quite matched. I'll post some more (better) pics soon.
-
Thank you Feed! :) I hope to have the bulk of the knobs ready and the price fixed within the next couple of weeks. Still need to get ahold of a few more knobs or fabricate clones myself. Right now I have complete sets for the lighting panel, UHF, IFF, Fuel, SAS, Aux lighting, stall warning, CMSP, and ILS. The intercom and VHF panels have several basic knobs, which I think I have a suitable duplicate for. The large, unique knobs on the intercom and environment panels will take some work to replicate if I can't find orignals, but it should be doable. Here's hoping that work doesn't get in the way and slow me down! :)
-
I have not nailed the costs down just yet, but it'll be very reasonable. The equipment I have (the CNC and laser engraver) were purchased for my business and the pit building is a side benefit. I won't be trying to earn a living from the pit related sales. :) I expect a complete set of knobs to be around $40 and the panels to range from $15 on some of the smaller panels, to maybe $50 for the larger more complex panels (like the Environment). In the end the cost will be determined by the materials needed and the equipment time to manufacture the parts (dollar amount per time - say $1 a minute or something like that). I am in the process now of determining how long each panel will take to cut, prepare, paint, and engrave. The UFC and CDU will be above $50 I expect due to the complexity of those with all the buttons. I'll also offer custom services since some people may not want to have every panel or may just want 5 panels with the more common functions. The custom stuff will obviously cost a little more but should still be very reasonable - especially if I'm supplied with the drawings for the panel(s). It's my hope that I'll be able to produce these in batches as that will help keep the cost down. Ultimately, I just want contribute to the community as I am able, because once I get to the electronic and programming aspects, I'll be looking for help from everyone else. :D
-
Hey all, Just a quick post with a link to some pics of recent work. All the parts shown have been laser engraved and I plan to offer parts for sale in the coming weeks. Sorry for the bad lighting, took these with my phone. The knobs are replicas of actual knobs from some actual warhhog panels. I have a couple more styles of knob to reproduce, but expect to be able to offer all the knobs in the pit (or worst case, 90% of them:)) Pics here More to come... :)
-
No problem - glad it made sense. :) I think a 90 degree is the right choice. I just know from my own attempts that it's not an exact science since you're trying to engrave something in the hundreth's of an inch range. If your bed is off just a hair, it'll show up on the panel. Looks like you're really getting the hang of the CNC though! :)
-
What bit (type) are you using? Also, little tip I learned. Use the mounting holes on your panels to help align it for the text. Here's how... Step 1 (once panel is painted and ready to engrave) - run a drill profile on a piece of wood and drill the mounting holes just deep enough to mark them in the wood. About .125 is enough. Step 2 - use wood screws to attach the panel to the wood fixture. Step 3- run your engraving profile. This works really well since it doesn't matter where on your bed zero for X and Y is. Once you run the drill profile, it is perfectly aligned for the next step. :) Hope all that makes sense, but if not, let me know and I'll try to clarify.
-
Very nice work Feed!! :thumbup:
-
You can find that actual mil spec switches on ebay. Some can be found individually, but I think you may save some cash if you can find a complete panel. You just have to be willing to scour through a lot of listings and check back often. Another source would be surplus suppliers. One I know of is http://www.bpbsurplus.com. They have switches and panels, but it can get expensive depending on what you're looking for. Be aware that some of the switches that are used in the real aircraft can cost over $100 each when they are new, so even when you find them used, some may cost as much as $20 a piece. Good hunting! :)
-
Great job! CNC's are cool aren't they?!!? :thumbup: I liked mine so much I decided to order a laser version! :D:D
-
Great set up! Can you show off/explain your stick more? I'd like to see and know how you modified it for center placement.
-
Well.... you don't have to bid. :music_whistling:
-
Thanks for the heads-up! I wonder how much these will cost me?? :greedy:
-
Eve'ning gents, After getting my hands on some of these, I thought I'd post the part numbers of the on-off-(on) switches that are on the IFF panel. I pulled these from the panel that Deadman linked to on ebay. I was fortunate enough to get that - thanks Deadman for the heads up!! MS25201-5 8860K5 There are actually some of these available on ebay currently for $10 each, which is better than the $66 or so they sell for new. :) http://cgi.ebay.com/Mil-EATON-Toggle-Center-Off-Switch-8860K5-MS25201-5-/350349949653?pt=LH_DefaultDomain_0&hash=item51927bfad5
-
Hi, I'd be interested. I plan on getting some OpenCockpit cards, but since I already have an Xkeys card, I plan on using that as well.