Triggerhappy69
-
Posts
932 -
Joined
-
Last visited
-
Days Won
1
Content Type
Profiles
Forums
Events
Everything posted by Triggerhappy69
-
I AGREE..! But I hope they are just to busy working on this project to update.. Please let me be right.. please please please!:smilewink:
-
I actually had to read Wags post twice to belive it..! This is more or less exactly what we wished for a year ago..! Good news.. REALLY good news..!
-

Something in the works :)
Triggerhappy69 replied to Glowing_Amraam's topic in Screenshots and Videos
Now THERE'S a site I'm looking forwards to roaming through..! You 'tha man GA..! Keep those Vidz coming..! I always look forwards to them.. I hope you're occupation has something to do with the gift you've been given on this. Timing, music the timeline build-up and ending.. You always seem to hit spot on.! REP inbound.. -
Uuuuaaaah..! I have started building now..!
Triggerhappy69 replied to Triggerhappy69's topic in Home Cockpits
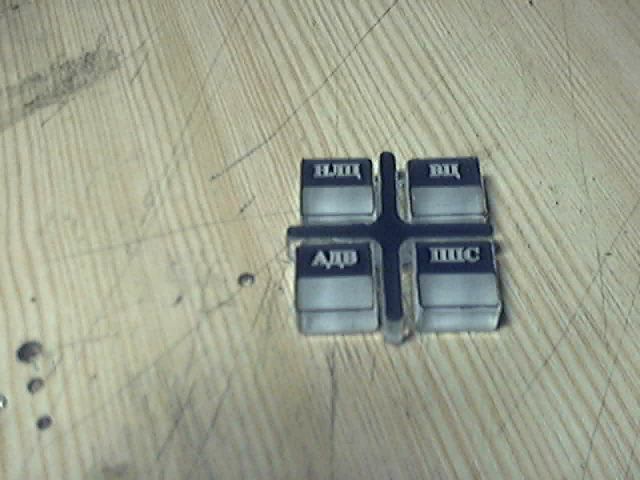
Update Pics WSCP Panel assembling This was my final drawing of the assembly before I started makng it! Exploded view: Cutting the Panel front and push-buttons in a Laser CnC machine: It came out all right ? Don't you agree? Even the small details.. Started measuring up and drilling the 1mm Aluminum fixing plate. Since the push-buttons are so small (15mmX15mm) and they hold three 3mm LED's (one for backlight, and two to shine up the green space not yet painted). I had to make a simple drill Jig. Actually using drill.jigs are the easyest way to make sure you get uniform mistakes all over.. LoL:music_whistling: Center holde that will have a 1,5mm bolt with a spring. The bolt-head push on the tactile switch. And the holes for the LED's! I make a threader by just using a hacksaw and making a groove in the 40mm spacers for the PCB. It actually works just perfect in plexiglass.. See.. It works.. No nuts needed..! Well.I'm of to bed now.. More tomorrow.. I have finished the collective brake mechanics. AND IT WORKS.! Pics drawings and a short explenation tomorrow..! Cya!:joystick: -
DCS: Black Shark - Dev Updates - 09 July 2008
Triggerhappy69 replied to Wags's topic in DCS: Ka-50 Black Shark
Oh My God..! Now I'm torn between fast movers and whirly birds..! -
Usefull hardware / software links.
Triggerhappy69 replied to Groove's topic in PC Hardware and Related Software
(looking nervously arround me..) Errrrmmm..? eeeeeehh.? DAMMIT...! Why did no one mention that before? -
Usefull hardware / software links.
Triggerhappy69 replied to Groove's topic in PC Hardware and Related Software
Usefull links? Here are all my links to sites conserning everything from How to make joystick extensions to building your own force feedback stick or how to use soft tripleheadtogo or.....well you get the point:pilotfly: There are about 300 links in the file... [ATTACH]18179[/ATTACH] -
questions on support for pitbuilders
Triggerhappy69 replied to ruprecht's topic in DCS: Ka-50 Black Shark
You mean something like this: http://G:\Hobby Files\IOCards Files\LOSIOC\LOSIOC Tutorial.mht LeCreole have been working on this for quite some time now.. I have translated the old LOSIOC program from french to english. Send me your e-mail adress and I'll send you the old one.. The new one I think they are working on translating to both english and spanish as we speak..! More on the 3rd Wing's developer forum. http://www.3rd-wing.net/index.php?showforum=72 The guys in the 3rd Wing squadron does some pretty damn impressive work on both pitbuilding and add-on software developing! I salute them!:thumbup: -
Uuuuaaaah..! I have started building now..!
Triggerhappy69 replied to Triggerhappy69's topic in Home Cockpits
Update on Proxxon Kt-150 CnC Conversion (& My new kite) Got some more work done on the Cnc Roter today after work.. This is what I had remember.. And this is what I got done today..! The cradle for the mill motor: The main rails for the Z-Axis. And I got my new toy.. A HUGE kite for kitesurfing when the wind is low..! 'Cause that's only time the weather is good around here! Check out the size of the damn thing. It's 17.3 square meters! Ps. No, that's not my girl.. It's my neighbors girlfriend.. I can't wait to take it out for a spin.. THE KITE..! Aaaaargh.. you've got a dirty mind..! LoL.! -
Uuuuaaaah..! I have started building now..!
Triggerhappy69 replied to Triggerhappy69's topic in Home Cockpits
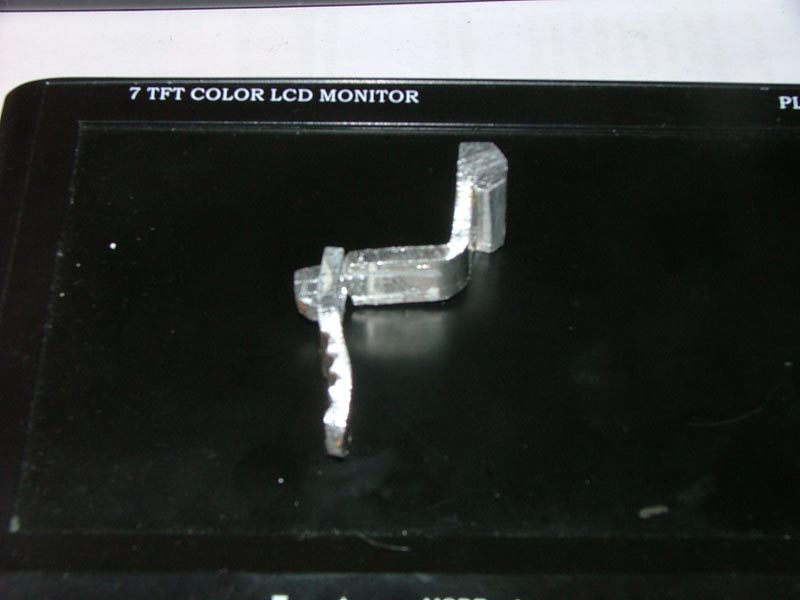
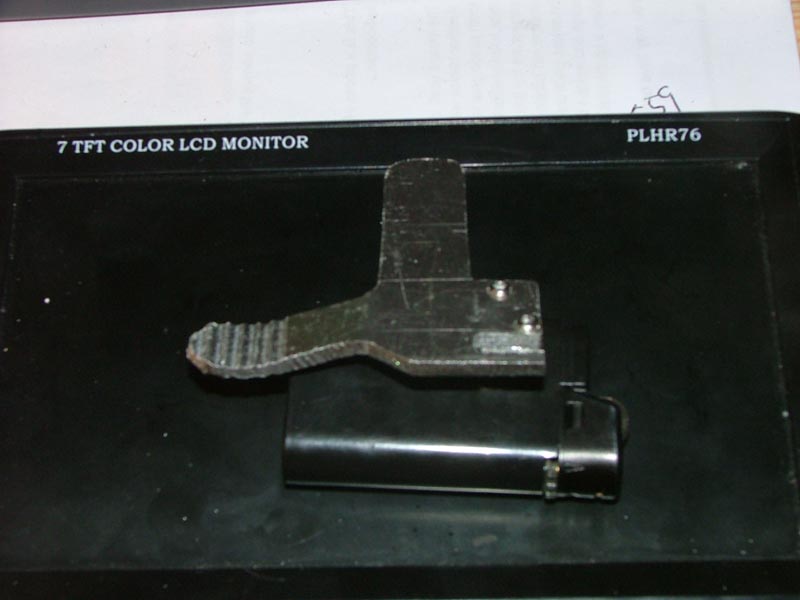
Thanx Sulan.. CNC Site Only thing now is that the APU Panel has to be made in the same way (.. eventually).. About the buildyourcnc site..! If I only knew how many times I have stared at those How-to's till my eyes were wet, drooling and dreaming.. It's really one of the best sites for us who want an easy introduction to a complex build.. Brilliant layout, and many simple steps compared to other sites that has ONE instruction video showing the whole build in 15 seconds..! Triggermech Q&A Well.. I wish I knew mate..! One is the cannon trigger and the other is for payloads. I really don't know before I read the manual.. Here's a quick picture series where I try to explain: As far as what trigger is for what function.. We'll just have to be patient and wait and see what ED says.. I will be using a Microswitch with an exension and a spring for the right trigger. But since the left trigger has to be able to stay in it's "up" position, I'll glue a 10mm round disk neodyme magnet (They are REALLY STRONG) into the trigger. And glue a steel nut on the backside that it will stick to. BEHIND the nut I'll place a REED-Switch that is activated when the magnet is in it's upper position. Reed switches are simple devices. Basicly it's two pieces of metal almost touching in a vacuum tube. And one of them is non magnetic. So when you hold a magnet to it (with the right polarity towards the reed switch) It will pull the metal plates together, or rather the one that is magnetic is pulled into the non-magnetic one. And this forms an electric contact. They are about 30x4x4 millimeters in size. And should fit nicely inside my Cyclic stick box behind the front wall. Also since the rest of the trigger mechanism is made in aluminum (non-magnetic) it will not have an effect before it's flipped up to the "up" position..! -
Uuuuaaaah..! I have started building now..!
Triggerhappy69 replied to Triggerhappy69's topic in Home Cockpits
... and the same to you mate..! About the KT-150 XY table.. It's normally a part of a milling kit with the stand and all. BUT If you check out this webpage: http://www.proxxon.com.au/cgi-bin/WMS.exe?WMS=item&page=products&cntr=69&title=PROXXON&search=Brands&type=0 And ask for a price on "ITEM 20150 KT 150 COMPOUND TABLE" that would be the KT-150. I chose it for it's 150x150mm WORK area..! As far as future panel making that shouold cover just about every panel I will make for the pit.. The other alternative has only 134x46mm work area.. -
Forming pit building group in CA for BS
Triggerhappy69 replied to rocketeer's topic in Home Cockpits
SU-27 Pit Akers Barnes MOD.. Good to finally see you here Rup! I have been following your blog since I found a link on SimHQ I think. And that was AGES ago..! I completely agree with you on the Akers Barnes Pit thoughts.. An example is a pit idea I brainstormed together with Specnaz from 3rd Wing about. It CAN be made simple and yet look both authentic and good: I think the CAD drawings I have is was made by Specnaz, but I might be wrong... As far as the Ka-50 goes It must be possible to do something in the same genre? Ideas guys?
-
Uuuuaaaah..! I have started building now..!
Triggerhappy69 replied to Triggerhappy69's topic in Home Cockpits
.... sigh ....! You are so right Groovie.:cry: And coming from you who actually know me a bit that should hurt.. But since it is the truth I have agree..! :thumbup: On the other hand, I'm having so much fun with this I can llive with it..LMAO! Z-AXIS FOR THE PROXXON KT-150 XY-TABLE Nothing fancy on this project. I just want it to WORK..! No work drawings or fancy Soliworks pics. It's made on the "that looks as it might work" principle.. I'll take some pics with the table and stuff so you can get a clearer image of how it (hopefully) will work..! -
Uuuuaaaah..! I have started building now..!
Triggerhappy69 replied to Triggerhappy69's topic in Home Cockpits
Yup..! It does! That's the beauty of this design.. I have mentioned it before, but again I'll say that the design if this mechanism is just a stroke of genious!!! :thumbup: I think I'll make the right trigger again though (multi prototyping like RU designers LoL). I need to make it exact so there's hardly any play in it. But still enough to have the spring loading work! Today I had a good idea! I got myself a XY table from Proxxon recently. And I have been wanting to make a bench top CnC router for quite some time now. But have'nt gotten arround to it for some reason? Well I found a site that sell Stepper controller/driver kits for 79$..! http://www.hobbycnc.com/products/hobbycnc-pro-chopper-driver-board-kits/ So I bought one.. And then I found myself short of three stepper motors.. Bummer..! Well where can I find small Stepper motors for next-to-nothing..? Old photocopy machines off course..! So of I went to the nearest repairshop for those kind of things. And after some explaining and showing them this thread so they knew what it was for I was given the go ahed to just take whatever I wanted from the machines that was outdated.. Can you belive my luck..!? Naturally I went berzerk and removed the three first steppers I found.. And then They mentioned why I didn't use magnetic clutches for the collective brake and Rudder Pedal Force trim.. So I got three of those as well.. http://www.reell.com/catalog/index.php?main_page=product_info&products_id=36&zenid=e666a9767d7feafc3917c3aedaf58854 They are quite cool actually.. When you switch on the 12/24 Volt current they LOCK UP completly..! So now I don't need all the springs and stuff on my collective anymore.. Just two micro switches (one for the magnetic brake and one connected to the IO Card to reset autopilot zeropoint).. I can't wayt to test them.. But naturally I didn't have a 24V powersupply at home. So it will have to wait..! I'll post some pics on the Z-axis setup as soon as I can. But tonight I have to prioritize differently.. Because tomorrow my dream girl is coming to visit. And she outranks pitbuilding..! Ps. Ja Ingvild.. den va te deg..! :music_whistling: -
Uuuuaaaah..! I have started building now..!
Triggerhappy69 replied to Triggerhappy69's topic in Home Cockpits
...I know..! !!!! I don't know if it' s just me being stubborn and not able to say "this I can't do..", Og they joy of having to aquire all these fun new skills to make it, or even just the fact that now I have an "obligation" to follow through with the project to you guys..! But I dare say that EVERYONE whose into flightsimming should try some level of building.. Just because it brings on a completely new level to the hobby..! And you get to talk to some really interesting people..! But I still use my trusty old Cougar (ss495A1 Hall effects modded), with a 20cm stick extention and DIY Pedals only for LockON FC gaming.. AND TarckIr With the track-LED thingy.. And it does keep me busy and happy for hours..! And then came Freetrack along..! Risking getting Naturalpoint Inc on my back I say that EVERYONE should try making a led tracker for freetrack..! I use Naturalpoints TrackIR on my main computer running LO. But I have Freetrack on the "instructors" Pc (that I'm forced to use whenever someone want's to try flying LO at my house). And it works just fine..! Not as Plug-And-Play and consistent as TrackIR, but that could be the cheap webcam I use for it! And it's virtually free..! AND fun..! http://www.free-track.net/english/ (go get yourselves a soldring iron and blow some fuses.. ):thumbup: -
Uuuuaaaah..! I have started building now..!
Triggerhappy69 replied to Triggerhappy69's topic in Home Cockpits
Pitbuilding Update 05. june 2008 - Trigger mechanism and R-800 Backlight TRIGGER MECHANISM A picture say more than 1000 words... R-800 PANEL WITH BACKLIGHT: ... I might actually have to make the APU Panel front in the same way now..! And maybe tone down the light from the Backlight LEDs a little.. -
Uuuuaaaah..! I have started building now..!
Triggerhappy69 replied to Triggerhappy69's topic in Home Cockpits
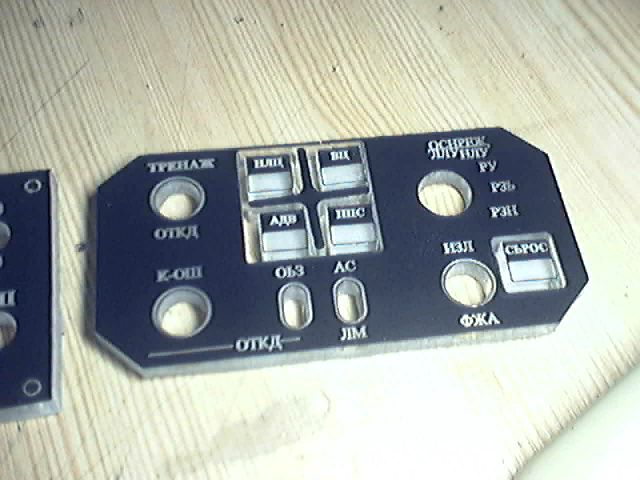
Update: Finished building Collective Brake and Panel update Got the machanics for the Collective Brake done today! Basicly it works by a metal pushrod attached o the brakehandle pushing two springloaded aluminum squarebars apart! Between them there's a alu strip that's connetcted via a slider to the floor (slider is not made yet though). This should give a collective brake system that feels real (and not so "plastic"), and is virtually slop free... i hope! The pushrod has not beenfittet in this image. Here you see the pushrod is routed through a hole in the front fixing for the spring. It just bypass the stopping-block, and just push the springloaded pivot-bar open. Simple,and it really make the collective lock into position without any chanse of it moving by accident wilte oushing buttons or coolie hat..!:thumbup: As you see I did a test to see how it lock the collective stick. And BOY did it lock it! Also this show the general idea of how it will work,, PANEL FINISHING FOR LEFT LOWER PANEL Since the panels were cut out from one bug acryllic sheet, I had to repaint the sides and holes with another coat of white, and then black.. And being of the not so bright I spent hours self-debating how to do it.. I know...! It should have been obvious to me, but it's not nice to bully the rederded.. So just leave the subject alone.. It happened! It was a sobering momrnt for me! And I hope I never have to feel that stupid again:cry: After just masking of the front with .... eeeeehhh.... masking tape? (I can't belive that it took me hours to come to that pretty obvious sollution? I mean..? It even called MASKING TAPE..!?) These beauties were what I was left with: And the R-800 Panel to: I can hardly wayt to see what they look like with internal backlight.. -
Uuuuaaaah..! I have started building now..!
Triggerhappy69 replied to Triggerhappy69's topic in Home Cockpits
Just got mine back today And the wires for the R-800 panel is soldered on
-
Uuuuaaaah..! I have started building now..!
Triggerhappy69 replied to Triggerhappy69's topic in Home Cockpits
I have found a place here in town where they will LaserCut all my panels from now..! I'll get the first two tomorrow with backlit lettering and all..! Can't wayt..! -
Uuuuaaaah..! I have started building now..!
Triggerhappy69 replied to Triggerhappy69's topic in Home Cockpits
Just a quick update on the trigger mechanism building: Got the rough shape of the trigger mechanism doe now! A bit of fine adjusting, and some springs and switches, and it will be fine (I hope) I got me one of these to help. Cannon trigger Lower Cannon trigger Launch Trigger And I also finished the slider switch for the collective box: I've got lost more , but my space here is full, and being a MORON I uploaded a bunch of files (approx 100 of them) to my MySpace (aaaargh! I still hate saying that!). And now I have to wait for a MONTH or find another place to upload pics.. I'll look inti it later. Now It's bedtime.. Up early to KiteSurf tomorrow.! YAHOO.!:pilotfly:
-
Photos/Videos (NO DISCUSSION)
Triggerhappy69 replied to EvilBivol-1's topic in Military and Aviation
LOVE the An-2 picture..! I have such fine memories from that machine..1 Used to skydive from one here in Norway of all things.. And I tried the stick a couple of times.. You have to be a MAN to fly that beast. It was like driving a truck with no power stearing.! -
LMAO..! :megalol: I must be to naive..! I actually didn't even think of that..! But it wouldn't have helped them.. Secrets have no use if I give them out...right..?:smartass:
-
It actually warms my .... oh my god..! I was THIS CLOSE to becoming all "girlie" there..! Well what I ment was that it's just cool to see everytime we manage to help eachother out.. I mean...? I've had those docs like ... forever..? You guys could have just asked me for them..? (laughing ... really laughing..!) No seriously.. I'm just glad to help..! Shaman? Did you get the file I sent you om e-mail..?
-
PM me your e-mail adress. I was collecting info on the Su-27 for ages before falling in love with the Frog... I think I might even have the "Aker-Barnes go Flanker" CAD drawings I made somewhere arround here..? And I wasn't the only one playing with the dream of an Su-27 Pit and needing info...!? Specnaz from the check Six Forum sullpied me with a lot of good info. And Wasserfall, HPO and the gang have buildt the "Flanker-Porn", (....drooling...) Stick and Front Panel allready. I would maybe ask Wasserfall nicely . . . . ? (this one's from Specnaz thread on Check-Six site made by Nicegame..? I have tried to upøoad some of the pics I have to my MySpace. (Spupid name for a popular site..! Makes you say things like "my my space" ..? And that sounds dumb if you ask me.. good site otherwise though..!). . I tried posting it on another forum the other day, and I resigned out of boredom posting one and one picture.. I could Zip it I hear you say...? Well it's still to big for here, and my myspace (dammit). And I have no idea how those sites you can upload big files work. MSN's shared folder does though..? My Myspace (dammit) is at: http://enok1969.spaces.live.com/photos/cns!58AB92E8FFE73BBB!745/ And take a look at the 3rd Wing's website. I pass the stick to Marauder, Specnaz, Wasserfall, HPO and Marauder and ... well you know hwo you are...? Here are the sites: 3rd Wing Site:http://www.3rd-wing.net/ Specnaz Thread on check Six Forum: http://www.checksix-forums.com/showthread.php?t=111644&highlight=specnaz&page=22 Wolfairs beautill Pit.. Wolfairs Site: http://pagesperso-orange.fr/gilvas/pres/pres.htm
-
Uuuuaaaah..! I have started building now..!
Triggerhappy69 replied to Triggerhappy69's topic in Home Cockpits
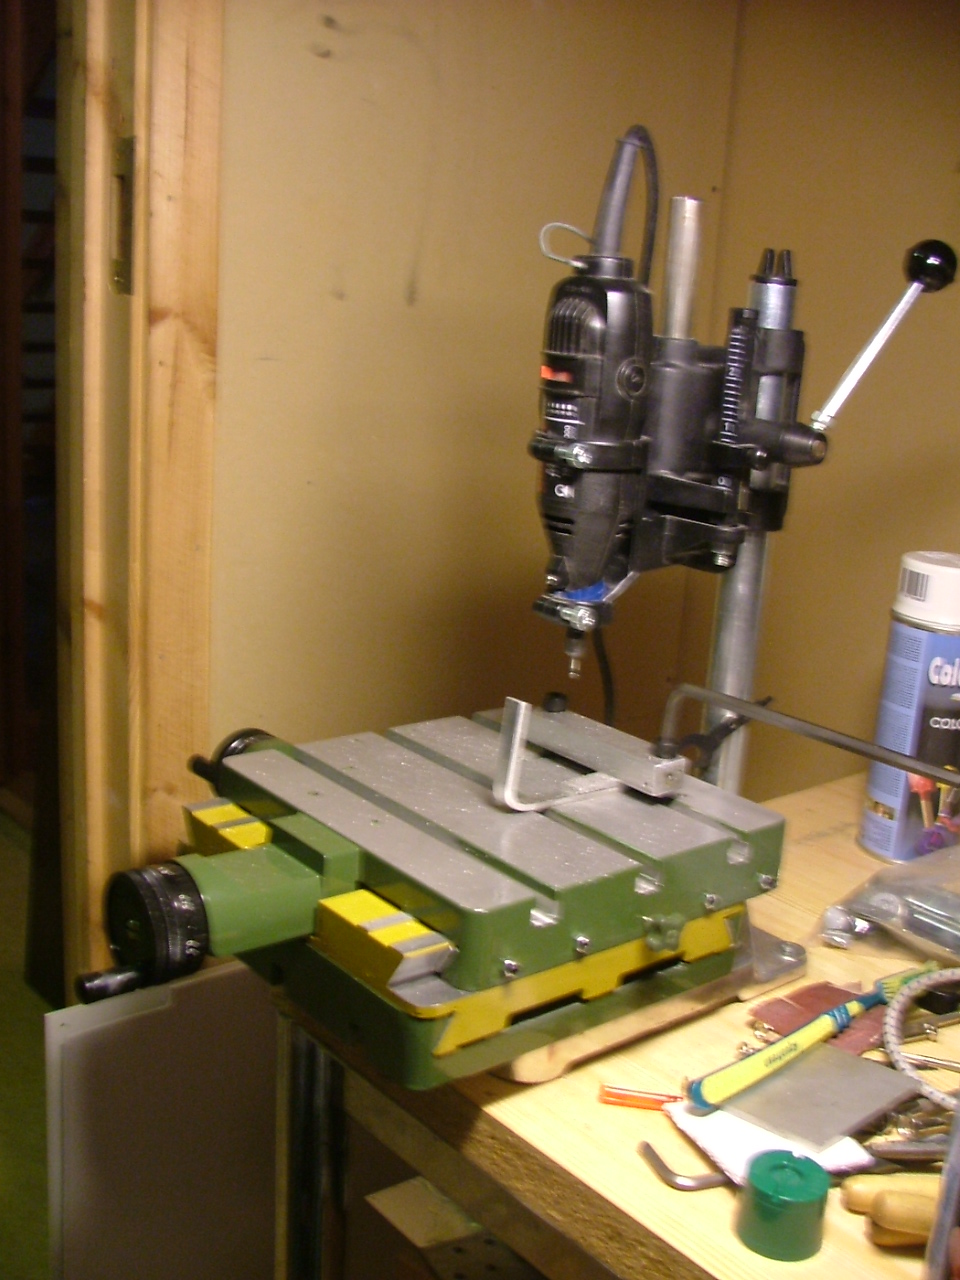
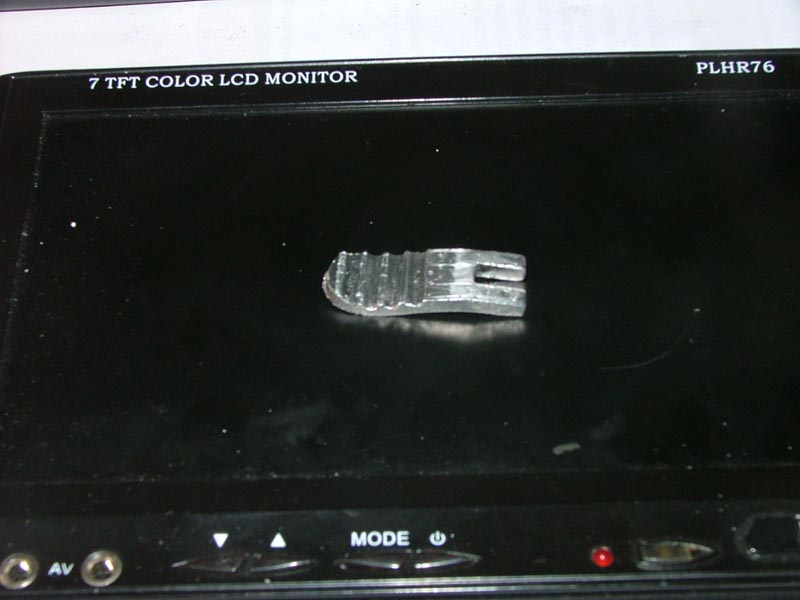
Update Building the Ka-50 Trigger Mechanism 19, June 2008 Got the parts cut out from 4mm Aluminium the other day. Here's the backplate that will be fixed to the Cyclic stick front, and hold the switches and magnets. (more on the magnets later) And the drawing of the part.. I just LOVE Solidworks..! It makes constructing something from the ground up so much easier..! The Launch Trigger: And the How it will look after some "work" done on it! And Naturally the Cannon Triggers upper and Lower Parts: Lower Part: So Now I am going to install my brand spanking nes XY table to my DREM Stand and mill out the grroves and make sure the corners fit.. I'll post more on that later..! Cya..!:D


.jpg.0edb4f737fd65dcc512d26c5c29b39de.jpg)

.JPG.629be00698b37345fb60db00fc58d897.JPG)