Viper1970
-
Posts
2290 -
Joined
-
Last visited
Content Type
Profiles
Forums
Events
Everything posted by Viper1970
-

Universal military aircraft homecockpit project
Viper1970 replied to Viper1970's topic in Home Cockpits
Since I want to use the TM TWCS electronics for my AV-8B, MV-22B and the F-16C throttle (Cougar standalone convertion) and there are more than enough axes available (including the ones of an attachable TFRP), but not enough button inputs, I was looking for a solution to turn axes into a 3way switch. I know all could be done with other electronics, like Arduino, MMJoy or anything else, but I want to have all my HOTAS fully TARGET compatible. The TWCS has enough functions for the grips of all those controls, but not enough to make a few additional inputs in the base, like eg. the Warthog throttle has it. My idea was to find a solution to use the unused axis for a 3way switch function to be able to add some base switches and program their "axis" with TARGET. Now I find a solution for this, which someone in an RC forum has made to turn a pot into a 3way switch on his transmitter and it works very well. So it should also do the trick with the TWCS electronics. This would give me another three or four 3way switches (belongs to how many axis the control already needs) for each HOTAS using only the TWCS electronics and the rudder inputs (there is no electronic electronic in the TFRP - its only a wiring to the pots with a central PCB) directly connected. The values of the potentiometers are of course not correct in the drawing and must be adjusted according to the TWCS. But since it is only a voltage divider, the TWCS does not really care whether a 5K or a 100K poti is connected. It can still be calibrated without problems, I have already tried it myself with other pots than the original.
-
Universal military aircraft homecockpit project
Viper1970 replied to Viper1970's topic in Home Cockpits
I just found a program that works offline and is very similar to TinkerCAD. It's actually a slicer, but can also do simple 3D design and is the closest alternative to TinkerCAD I've ever found. It's called MatterControl. It is almost as simple to use as TC and can also import all my HOTAS parts without any problems. You can then edit or rebuild things without further ado. It also doesn't seem to be as limited in polygon count as TC is. If you want to import an object into TinkerCAD to modify it, it must not have more than 300,000 polygons. Even then, it will be simplified again during import, so that the previously smooth surface becomes uneven again. This means that you have to create a smooth surface again in Meshmixer after each change, which again is at the expense of the details. This can be very annoying sometimes, because you have to rework again and again. MatterControl does not seem to have this disadvantage, because the STL's still look as smooth after a change and the subsequent export as before the change. Thus, subsequent changes such as adding missing breakthroughs, etc. are no longer such a big problem yet and the program is also suitable for CAD noobs like me. The interface is self-explanatory and there is even more is possible than in TC. -
Universal military aircraft homecockpit project
Viper1970 replied to Viper1970's topic in Home Cockpits
Just sliced all the rest of the parts I still have to print. The most time consuming part I ever will print (I hope so ) is the left, back chassis part of my C-130 yoke. It takes 51 hours and 11 minutes according to Cura. This is with 0.12mm layer height and 60% cubic infill as all my HOTAS parts are. -
Universal military aircraft homecockpit project
Viper1970 replied to Viper1970's topic in Home Cockpits
In P3D. It's not DCS but the only way to fly those big birds at the moment in a relative "realistic" way. For me it's better than nothing, but I know the 150% realism fans wouldn't be excited. There is a small utility to enhance the helo-flight model slightly. Not perfect, but really the only way to fly those big military transport aircraft at the moment (and I think certainly still quite a while), cause even the other alternative flight simulations still do not offer such a variety of military aircraft as the P3DV4 and the old FSX still do. -
Universal military aircraft homecockpit project
Viper1970 replied to Viper1970's topic in Home Cockpits
I just saw that the space for the wires going from the POV's and buttons in the head of the handle down into the body is too tight in some places. This is the case with some grips. In 3D things sometimes look different as they are in reality. Especially the size is sometimes deceiving. The models in 3D seem to be bigger as they are when they are printed. I'll probably have to rework some of the triggers to make them smaller on the inside part, to have more room for the cables to pass. Or I just do it the hard way with a Dremel. At the handle of the MV-22B I have totally forgotten the feed-through. I've just seen that I had made a note about, that I have to make a passtrough, but then missed it in the following week during the further construction. What a fool I am! But this will now definitely be done with the Dremel, cause I really have no desire to print this thing another over 30 hours again. -
Universal military aircraft homecockpit project
Viper1970 replied to Viper1970's topic in Home Cockpits
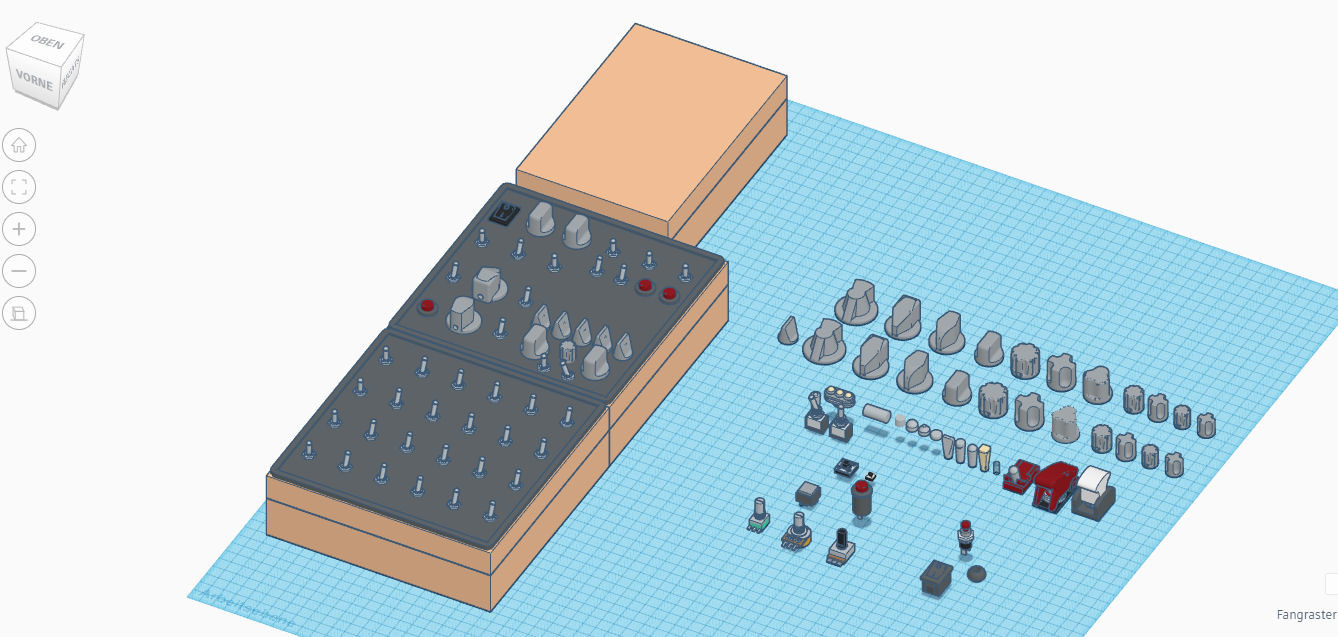
Left console 3D layout is done. At least for the moment. It's always possible that some things still can change.
-
Universal military aircraft homecockpit project
Viper1970 replied to Viper1970's topic in Home Cockpits
Found some photos of the AH-6I helicopter HOCAS. The latest export versions of the AH-6 seem to use the same cyclic as the AH-64D does. The AH-6I at the photos has a cyclic grip that looks very similar to the AH-64A Apache, but I think I will stay with the one on the concept drawings which seems like the latest versions now maybe use. So no need for a new cyclic, I can use the already printed Apache cyclic and only have to do another collective head for my twist throttle collective. Don't know if the AH-6M also uses this HOCAS, but I wasn't able to find any photos of the US Little Bird. The photos I will make the collective after are shown on this webpage - https://thaimilitaryandasianregion.wordpress.com/2015/10/21/ah-6-light-attack-reconnaissance-helicopter/. It's the export version of the AH-6 light attack helicopter. This will be the last HOTAS/HOCAS part I make for now. I still have some other projects in mind, like an A-4 grip, a throttle from Mason, which is used in many trainers and smaller jets and is in two identical versions in shape available, one single and one dual engine version (I will do the dual engine and use it for single engine also), maybe an F-4E phantom throttle, a CH-47F Chinook collective and the last is the collective of the CH-53E Super Stallion. But those are future plans after the whole cockpit is fully functional and running. Only the controls of the Little Bird are somehow still missing in my collection and it's only a small, relative simple head that has to be done. Unfortunately, the AH-6 won't be available as a modul in DCS anytime soon (except for the mod, of course), but there's another military sim that for sure doesn't have the realistic flight model and weapon system like DCS, but it's although fun to chase helicopters through the woods and over the hills there. P.S: If anyone wonders what type of aircraft I choose for my HOTAS I absolutely want to have, this has to do something with the beginning of my hobby. Those days back I had all the simulations from Microprose, like Gunship 2000, Fleet Defender, Strike Eagle III, Harrier Jump Jet, F-117A Nighthawk, Falcon Gold (Spectrum Holobyte)... and always want to be able to fly all those birds from the past again with the right controls in a modern, more realistic simulation. Now this dream comes more and more to reality with DCS . -
Universal military aircraft homecockpit project
Viper1970 replied to Viper1970's topic in Home Cockpits
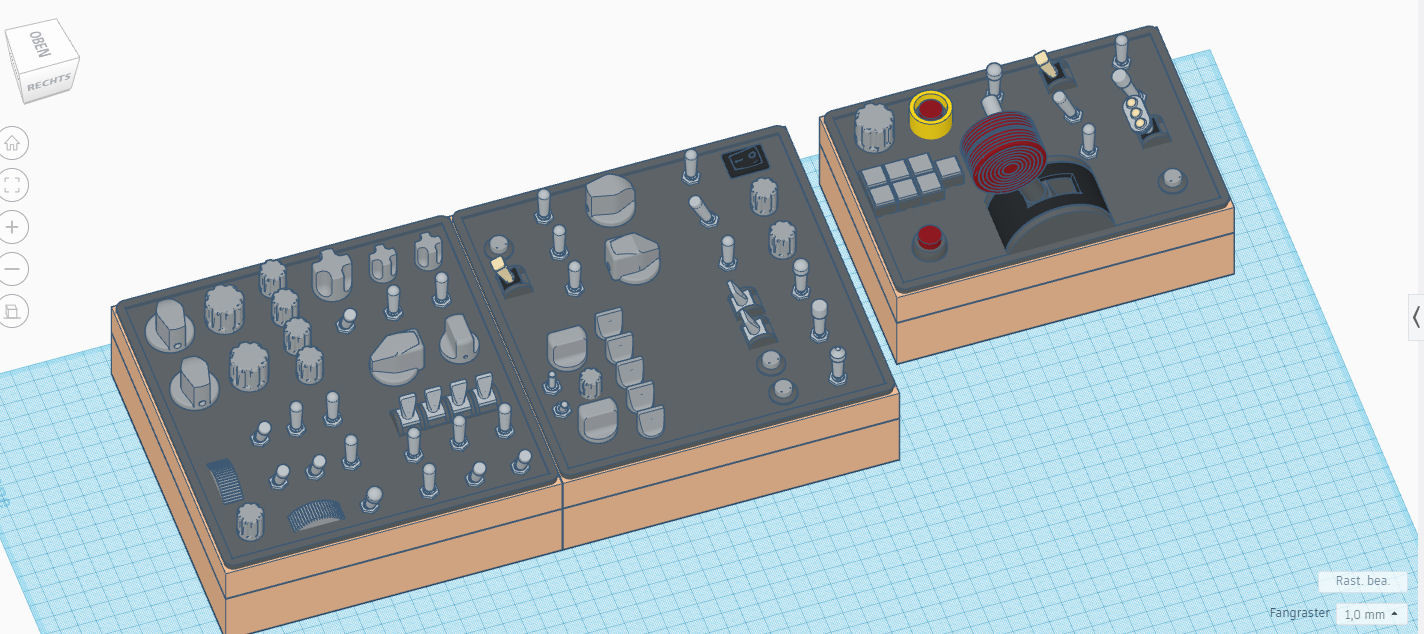
And the first experimental layout of the front button box of my left console. The backwards one has only template switches attached. I did this at the beginning, to see how much space is available in approx. In the first box I want tho have the ext. lights, the autopilot, fuel & tank and the UHF panel. All is only rudimantary and should be as "universal" as possible in the end. All things that do not fit good enough for universal use with a specific module, will be controlled via the mouse inside the games cockpit, either in VR or in pancake mode with Track IR. The smaller box in front will slightly angled up towards the front panel and will be the "gear-panel" with things like launch bar switch, horn silencer, taxi light etc. I must make it slightly smaller as the other boxes, cause there must be also enough room for the collective heads to bypass, if I use the pit in "helo-mode". Nothing is ready yet and there will be different caps also added on top of the switches (the different parts of them can be seen in the picture also). The first box will be in front of the throttle, the other two behind.
-
Universal military aircraft homecockpit project
Viper1970 replied to Viper1970's topic in Home Cockpits
I have already started to print the MV-22B Osprey controls now. After this the C-130 yoke will be the last part of the big parts which should be spray painted, I hope. I have really no clue, it's just too much to catch on. -
Universal military aircraft homecockpit project
Viper1970 replied to Viper1970's topic in Home Cockpits
AH-1F/W & UH-1H/N collective head also printed after 38 hours. As said this is done after the collective of the UH-1N model and I added the NVG box that the AH-1W has at it's collective. The collective heads of the AH-1F, AH-1W and the UH-1N are very similar, so I decided to go this way and make a one fits all solution. The UH-1H has a different head in shape, but most of the functions of the UH-1N are also relative similar, so I will use this collective for the H-model also.
-
Universal military aircraft homecockpit project
Viper1970 replied to Viper1970's topic in Home Cockpits
Found some pics of the AH-6C cockpit, which seems to have a very similar cyclic like the Apache A models had. But it's only a C model. There are no good pics of the later models to find. The collective also seems relatively simple to do, but better photos would be nice. I know there is the AH-6J mod for DCS and also other 3D models of the cockpit in other military simulations (even an AH-6M version), but I always prefer photos of the real thing over 3D models for rebuilding a HOTAS/HOCAS. I would do a changeable collective head for my twist throttle collective again, like I did it with the collectives for the AH-1Z/UH-1Y, OH-58D and UH-1H/N. But the HOCAS should at least be similar to the ones used in the AH-6J. A version of the AH-6M (MELB) would be a dream, but I don't think that there are any pics to find at the web. -
Universal military aircraft homecockpit project
Viper1970 replied to Viper1970's topic in Home Cockpits
Does anyone has a link to a relative good picture of the AH/MH-6J Little Bird cockpit or even the AH/MH-6M pit? I eventually will also try to make Little Bird controls, but couldn't find good photos where you can see the cyclic and the collective a bit more detailed. I know they are hard to find cause they are used by special operation teams and so not much of interior photos exist. But I don't want to built secrect things, only simple control inputs. It looks like the newer versions could have the same cyclic as the AH-64D, at least the export versions do so, but I haven't found a picture of the collective yet. If they use the same cyclic, this would make things a lot easier, cause only the collective would be missing. I use Android GRBL controller (the free version) and it runs like a charme with it. -
Universal military aircraft homecockpit project
Viper1970 replied to Viper1970's topic in Home Cockpits
I have a similar problem here with FSRadioPanel. Sadly the program isn't useable anymore with Android 4.4 KitCat as it was before. There is nothing much that really changed and it should still run with such an old tablet, of course, but you couldn't download it anymore if your Android does not meat the minimum requirements. Welcome to the new "all bought stuff is only online available or/and registrationable world". I hate it! But it raises the sales of hardware, as you can see. That's the reason I have decided to use this old tablet on my CNC now and buy a new cheap one for the cockpit. I have also tried to upgrade the firmware of the old one, but the most advanced I was able to get was an Android 5.0 and although it was running perfectly, it had problems with the WiFi connection. So I stepped back to 4.4 and connected it as an offline controller to my CNC, at which is still useful and also prevents it from the trash. Even Android 5 has not brought much improvement, cause even the simplest, tiniest apps now want to have minimum Android 9. And it's really difficult to get 7'' tablets now, with an actual Android version. Most are already 8'', which is slightly to big to fit at only one of my button boxes. I want also to have at least Android 10 or 11 (maybe a GO Version - I hope it's although compatible with those cockpit interface apps) to be ready for those interface apps the common two to three years. And it should not cost more than 100€, cause I really use this thing only for this purpose. I'm absolutely no smartphone, tablet or console fan. For me a computer has to have a keyboard and the option to change parts of the hardware the way I want it. All other new "computer hardware", where you are not even able to change the battery when it is broken, is only trash in my eyes! I really wonder how so much people can spent so much money on such a crap, sometimes. But it's the way it is. Welcome to the new world. What was that about conserving resources? -
Universal military aircraft homecockpit project
Viper1970 replied to Viper1970's topic in Home Cockpits
Hi no1sonuk, For P3D there is an app called FSRadioPanels, for DCS there are some different apps at the Google Play Store. Just search for DCS CDU or something similar. Many of them are even for free. I had no time to test them until now, but I think there will be at least one, that will fit. The FSRadioPanel works perfectly. I will use it for the big birds, like the C-130, C-17 or the CH-46, CH-47, CH-53 helicopters I want to fly in P3D. I have also thought about single lettering-plates before, but I think it's to time consuming to change every lettering on it's own. There is also the problem to get them really good fixed in an upside down position like on my overhead panel. The time to change from one airframe to another should be done within 20-30 minutes max, including changing the HOTAS systems, the panel and console layout, and reprogramming the pit with preprepared configs, downloaded in the Thrustmaster boards, I use for my HOTAS electronics, and inside of the Pokeys cards which control the rest of the pit. So I came up with this idea of making one complete overlay for every button box and fixing them with strong magnets. -
Universal military aircraft homecockpit project
Viper1970 replied to Viper1970's topic in Home Cockpits
I'm now working at my cockpit's panel and console layout. As I want to be universal, my consoles and panels will be universal also. They are button boxes, which are 18,5x18,5x4cm in dimension each. There are two of these boxes on each of the plain surfaces of my side consoles, arranged in a row behind the throttle at the left and the sidestick place at the right console. Another box is placed on each side, in front of the throttle left and in front of the sidestick right, angled up 45-60° (have still to look what fits best). Here will be placed such things like eg. the gear lever to the right or the arrestor hook in the left console and so on. At the overhead there are placed three of this boxes also and the main front panel is changeable mounted and can be replaced regarding which kind of aircraft you are still flying. This panel is sitting in front of a TFT and so its possible to have real working instruments and MFD's. It will also contain a real working UFC/ICP. The CDU/FMC will be made out of a new 7'' tablet and placed on the right sides first console box behind the sidestick. Here I will run Android programs, which connect to the PC, simulating a CDU or FMC in DCS or Prepar 3D. The consoles lettering will be made with simple inkjet photo paper cardboard and can be dropped over the buttons and switches in the consoles, fixed to the boxes surface with the use of 5 neodym magnets. Those magnets will connect to five screws, screwed into the boxes surface at the corners and one in the center. Those little 6x3mm round magnets will be covered with a 3D printed fake panel screw hat. This way it's possible to have always different lettering, exactly matching to the used aircraft with a clean shape look and at very cheap costs. Those different panel layouts can also be stored easily for a huge kind of differnt aircraft types in a box somewhere in the cabinet. All my controls are also changeable and can be adjusted to the kind of aircraft you are just flying. There will never be unused HOTAS in the pit, means if you fly an aircraft with a center stick, there will be no sidestick in the pit and vice versa. Same goes for the different throttles, collectives or perhaps also for the yoke. P.S: The illumination of the panels should be done with a mix of white-, green- and UV-LED stripes mounted in the cockpits sidewalls making the lettering appear somewhat luminous. That's the only problem I still have, cause I want to be able to open up the lids of my button boxes at anytime, to be able to reach the Pokeys cards and the rest of the electronics, without the need of dismounting the sidewalls. This sounds very easy, but it isn't, cause of the design of my pit at the moment. -
Universal military aircraft homecockpit project
Viper1970 replied to Viper1970's topic in Home Cockpits
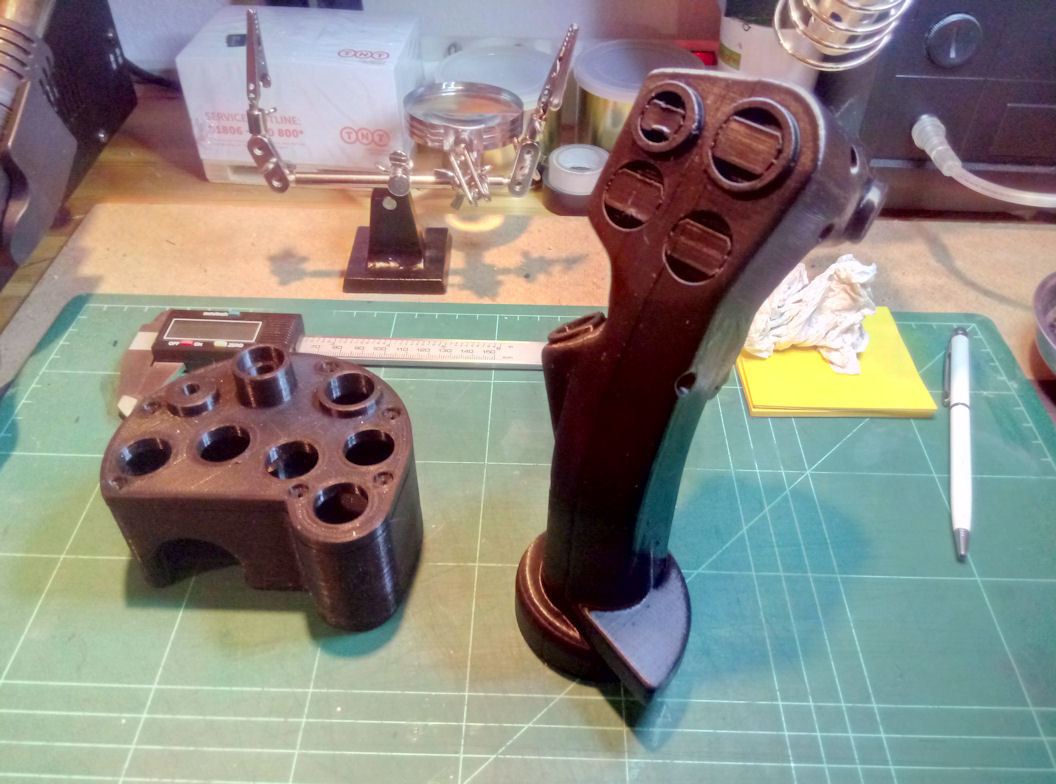
The printed AH-1F TOW-Cobra cyclic. It's a bit different in shape and the inputs are also different from the B8-two-button-version (this is a modified TM X-Fighter for the UH-60). It has two "triggers" which are arranged on top of each other. Sadly I was not able to make the texture on the grip. Maybe I will do a new version somewhere in future, when I have learned to use a better, more professional CAD program. This is one of the photos from which I built my model (this is the gunner's cyclic, but the one from the pilot is identical): https://commons.wikimedia.org/wiki/File:JGSDF_AH-1S(73455)_cyclic_stick_%26_right_side_console(fwd)_at_Asia_and_The_Pacific_Ocean_Trade_Center_March_10,_2013.jpg P.S: And I hope we will also get the years ago already announced Cobra in DCS somewhere in future. That was still from Belsimtek back then and as far as I know it was supposed to be an F(S) model. The "Cold War" TOW Cobra has always been my favorite attack helicopter, just like the F-14 Tomcat has always been my favorite fighter and it would perfectly fit with the UH-1H Huey, we already have. I would always prefer the F over the W, as I like it better than the Super Cobra with it's more aggressive design, created by the flat cockpit windows.
-
Universal military aircraft homecockpit project
Viper1970 replied to Viper1970's topic in Home Cockpits
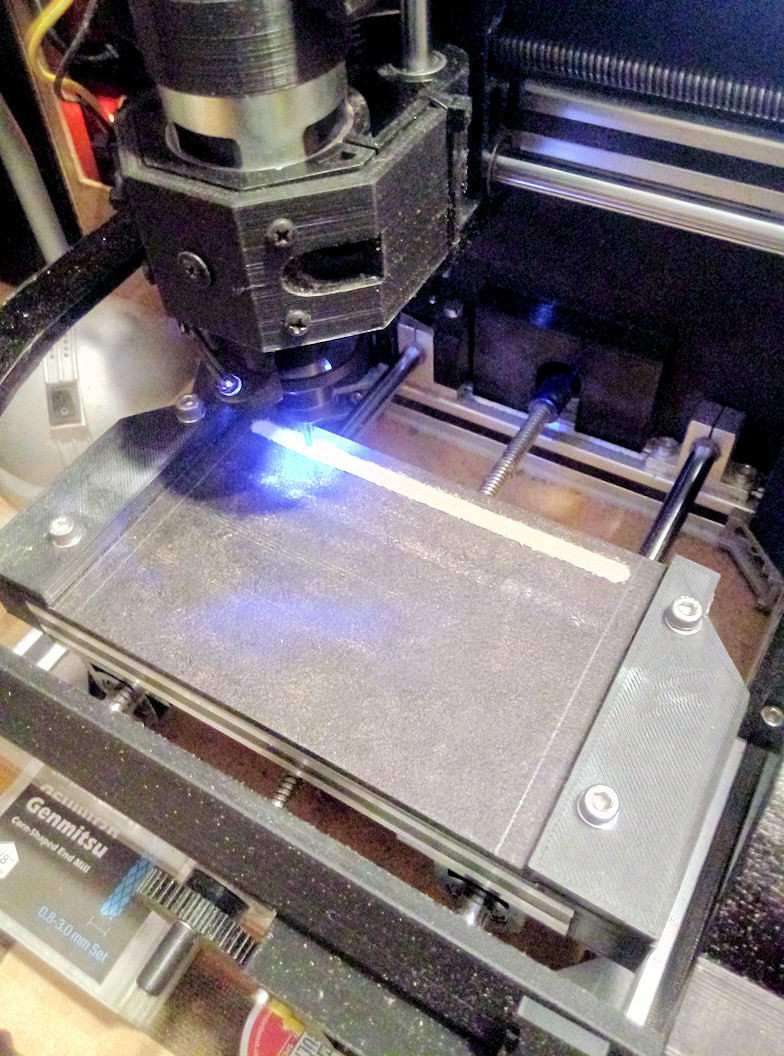
Have just revised my small model milling machine. I wanted to do this a long time ago, but never had the time for it. I have the dividing attachment now for some time, but never integrated it properly. Now I have cut threads in the milling base to attach it properly and the coordinate table is attached on top of the dividing head. The dividing attachment is aligned exactly with the centering of the milling spindle and the coordinate table is aligned with the center of the dividing head. I can now mill precisely in all angle directions and even different circles are possible. This should also be sufficient enough for smaller parts made of aluminum, so it should be possible to make things like eg. a DIY gimbal system for a HOTAS or anything similar if needed. The springs at the mill compansate the slackness in it's z-axis. It's not the finest and most precise tool made by Rotwerk. P.S: Now I mill the notches in my spoil board to be able to use holders there again in the guides of the milling bed underneath. I will only mill 1mm deep here to have an exact contour and then mill out the rest with the "big" mill. The small China CNC works perfectly, but you have to choose very small cutting depths and also the feed rate is quite slow for large parts with a maximum of 160mm/min (that seems to me to be the still "healthy" maximum). Therefore, I do the rest manually on the other mill. It's a lot faster and less noisy! Overall, I'm really excited about the little CNC and can recommend it reservation los (or a 2418 or 3018 who has the space for it). If you're careful with it, don't push the machine to the limits and expect too much (it's actually an engraver and not a real mill), the tiny mill works perfectly. I find it a great addition to the 3D printer for our hobby and those CNC's are not very expensive also. The spoil board is no spoil board anymore now. It's more a kind of leveling-board cause it's exactly parallel to the mill-head. I will use another smaller spoil board on top of that spoil board.
-
Universal military aircraft homecockpit project
Viper1970 replied to Viper1970's topic in Home Cockpits
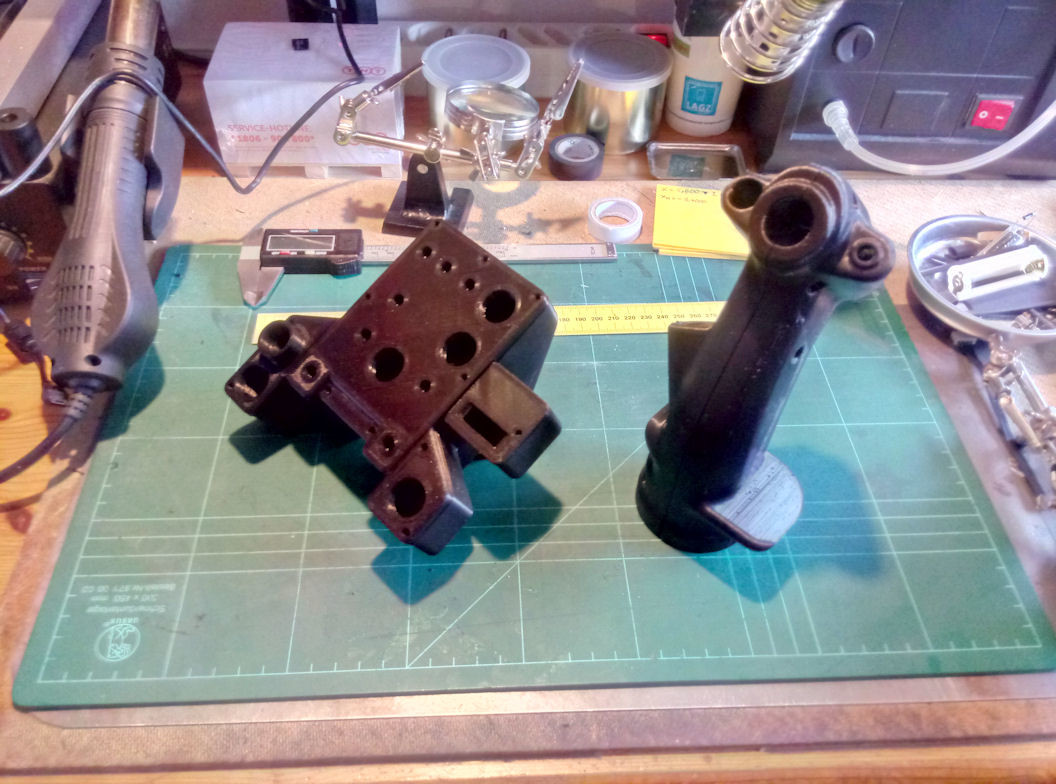
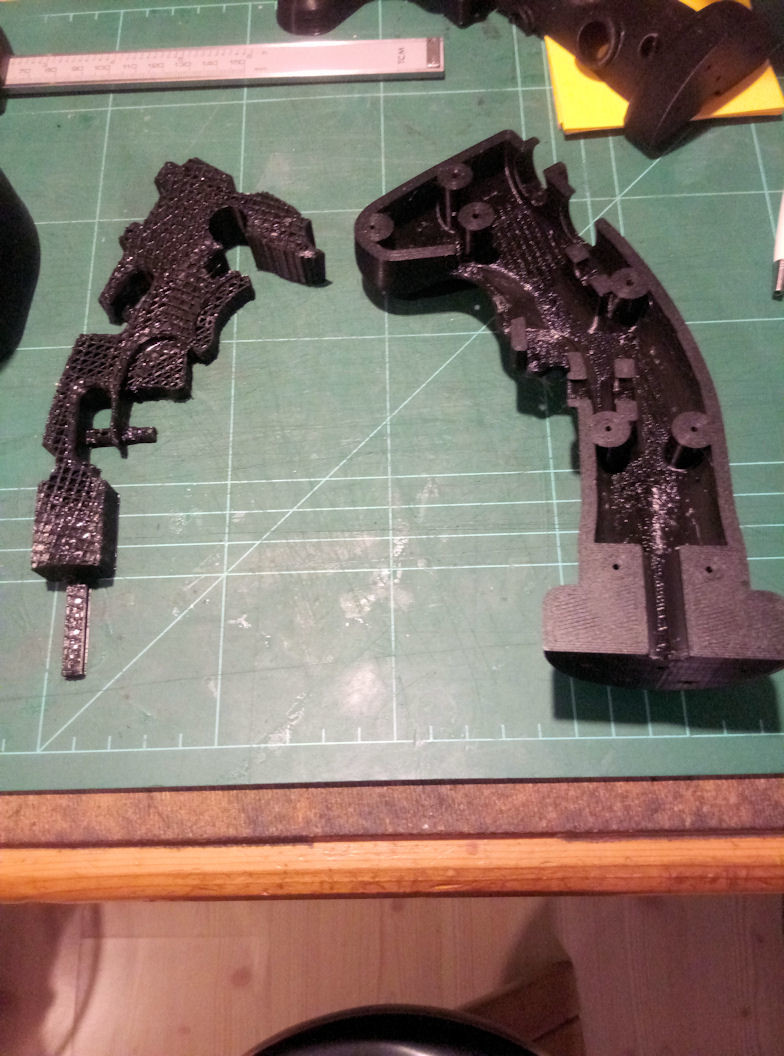
Okay, for the right part, the support is easy to remove. The left one still has a stubborn part in it. Tomorrow I will chop it up with a Dremel. We'll see who wears the pants here. If there are no cross holes or overhangs blocking the support, removal is quite simple. Since I print at quite high temperatures, the PLA is very hard and not very flexible. When removing the support, this is an advantage because the interlayer between the support and the part breaks instead of giving way. Simply go into a gap with the screwdriver and loosen the support piece by piece at various points with light, steady twisting movements. Do not lever while the support is still tight, otherwise something may break on the component. If parts do not come out so easily, I carefully cut them in suitable places with a Dremel. You really have to be careful not to cut too deep, so as not to damage the component itself. For the separated parts, I then proceed exactly as described above. I rarely use a cutter knife. At most, I use a pair of flat-nose pliers to carefully pull out a stubborn part.
-
Looks amazing! I have also problems with warping if I try to print some bigger parts with my Anycubic Photon. And the Photon even has a really small build space. I was not able to fix it until now, but I must admit that I'm not so often use my resin printer. I have thought about a bigger resin printer also, but have decided to make my grips with FDM, cause for me it's much easier to do. I want to spray filler and paint the HOTAS parts anyway, so it should not make so much difference if finished. But the resin printer is much faster in printing bigger parts. The time it takes to finish only one half of a grip is actually the only thing that really bothers me about FDM.
-
Universal military aircraft homecockpit project
Viper1970 replied to Viper1970's topic in Home Cockpits
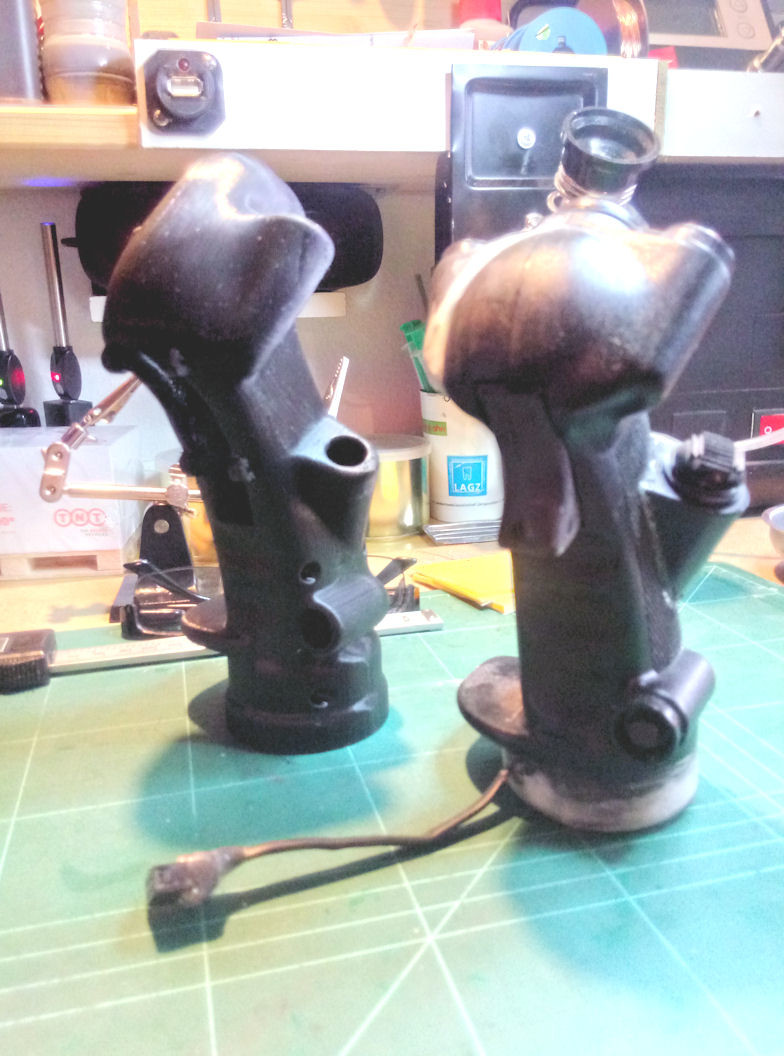
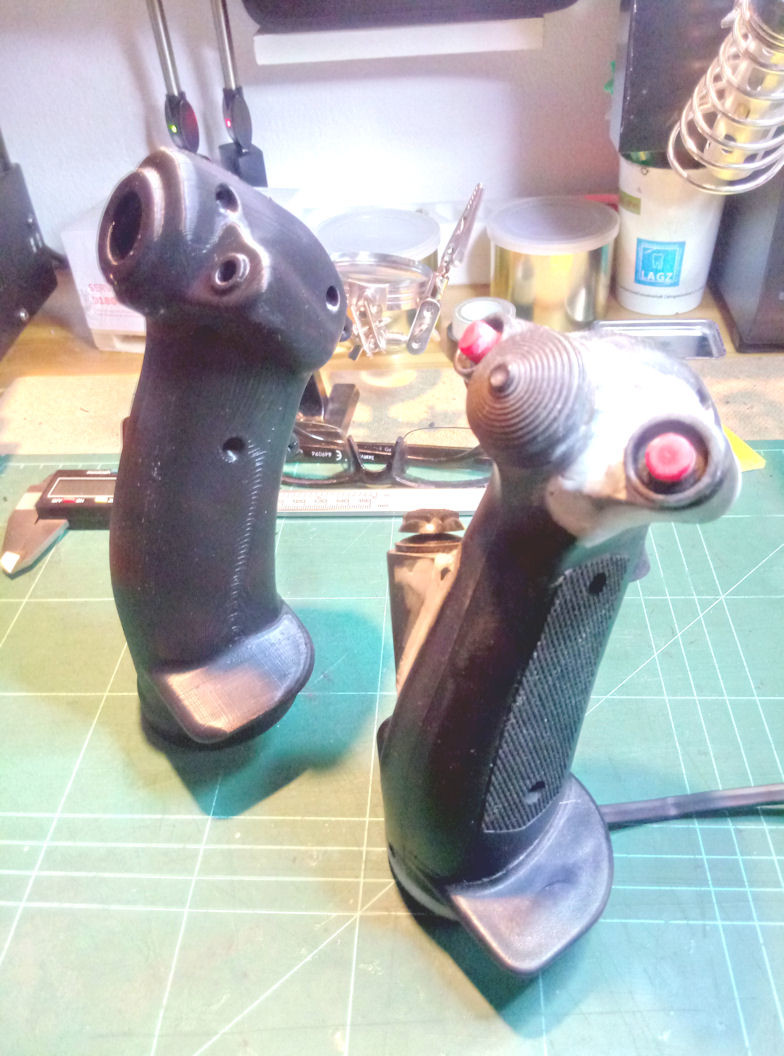
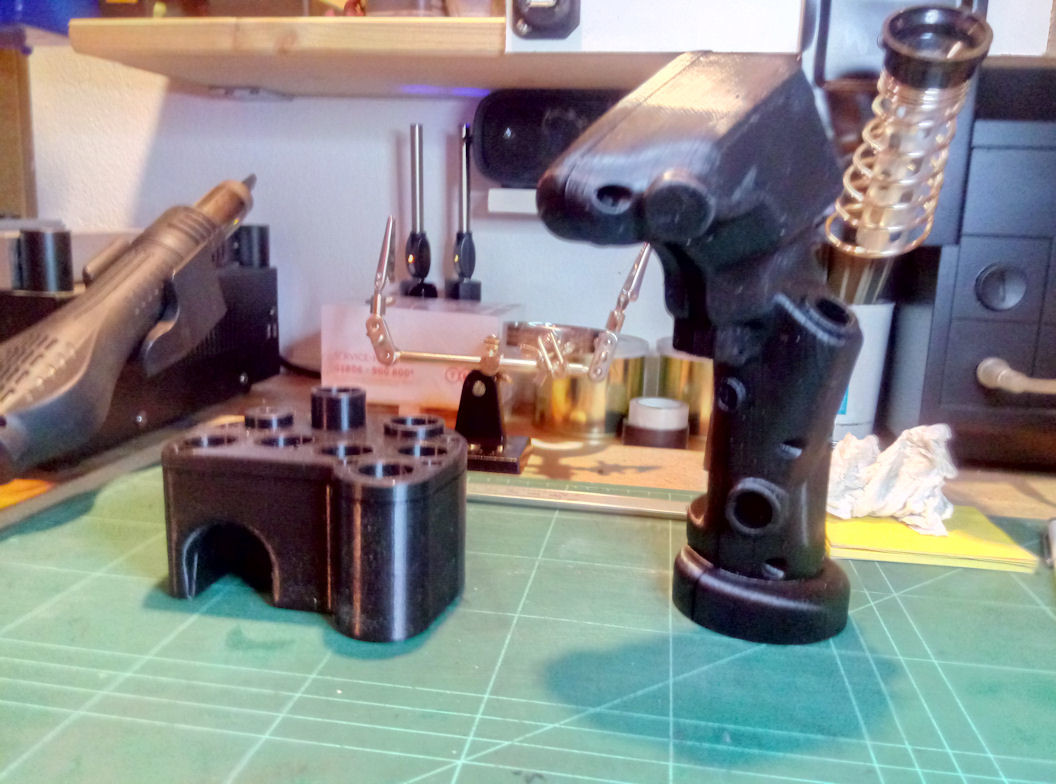
AH-1Z/UH-1Y controlls also printed. As always, they look like they came just out of the printer. The support is not completely removed yet, cause I need a Dremel at some sections to do this. I will make it tomorrow. The cyclic looks very similar to an A-10C or a F-16 grip, but it isn't. It has a totally different trigger system, with two triggers placed on top of each other and the shape itself is also slightly different. The next print is the AH-1F cyclic and the UH-1N collective head. I will also use this collective for the AH-1F/W models and of course also for the UH-1H (which has slightly less functions and a different shape). The "N"-collective head is also very similar to the one used in the Whiskey Cobra and can also be used for the F-Cobra. For the cyclic of the UH-1H I will use an original TM X-Fighter (standard B8), same goes for the Whiskey Cobra and for the UH-1N a slightly modified X-Fighter with a thumb switch at the left side and a button on the right.
-
Universal military aircraft homecockpit project
Viper1970 replied to Viper1970's topic in Home Cockpits
AH-1Z/UH-1Y collective head is ready printed. At the moment the left shell of the cyclic is printing. It's at 97%, but still will take nearly an hour to finish. I hope I can survive as long. It's 4 o'clock in the morning now. I have already slept a little before, to wait for the end of the printing. I want to be able to start the right half right away. Since I want to have all the versions of aircraft I want to fly in a simulation, also as 1/72 models on the wall mounted on 3D printed stands in my cockpit room and I am still missing a few, I have been looking for kits for the AH-1Z and the UH-1Y to shorten the wait for the end of printing. But these two models are hardly available here in Germany as a kit and if so, then only at really horrendous prices. I can still remember that the 1/72 kits used to be available for pocket money as I was a young boy, today they often did cost much more than the big 1/32 did back those days, if they aren't on sale. -
Universal military aircraft homecockpit project
Viper1970 replied to Viper1970's topic in Home Cockpits
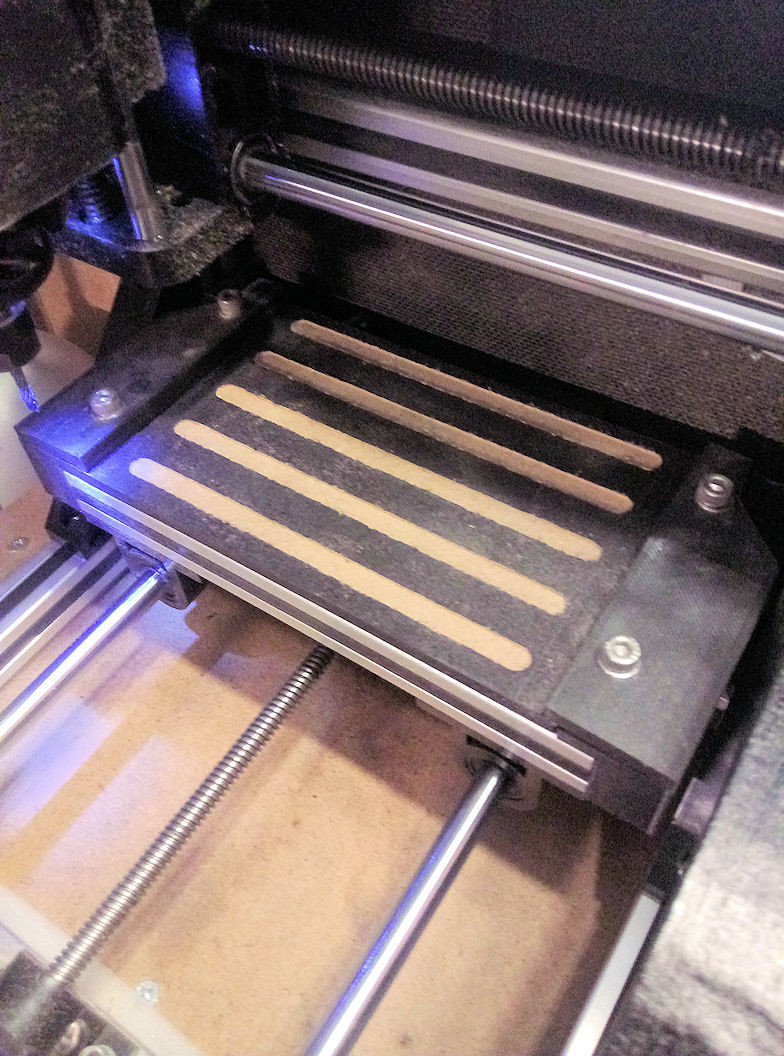
The CNC with my tablet mounted now and the spoil board I made yesterday. At the last run I tuned the feedrate up in slow steps until it reached 160mm/min. No problem at least with this material. The offline controller at the front is pretty useless, but I have no desire to remove it again. If I had known beforehand what kind of crap this is, I could have saved myself the work of housing it and routing the cables to the board. It has trouble to run even the simplest G-code, which doesn't make any problems while using it with the Android GRBL controller on the tablet or with Candle running at Windows.
-
Universal military aircraft homecockpit project
Viper1970 replied to Viper1970's topic in Home Cockpits
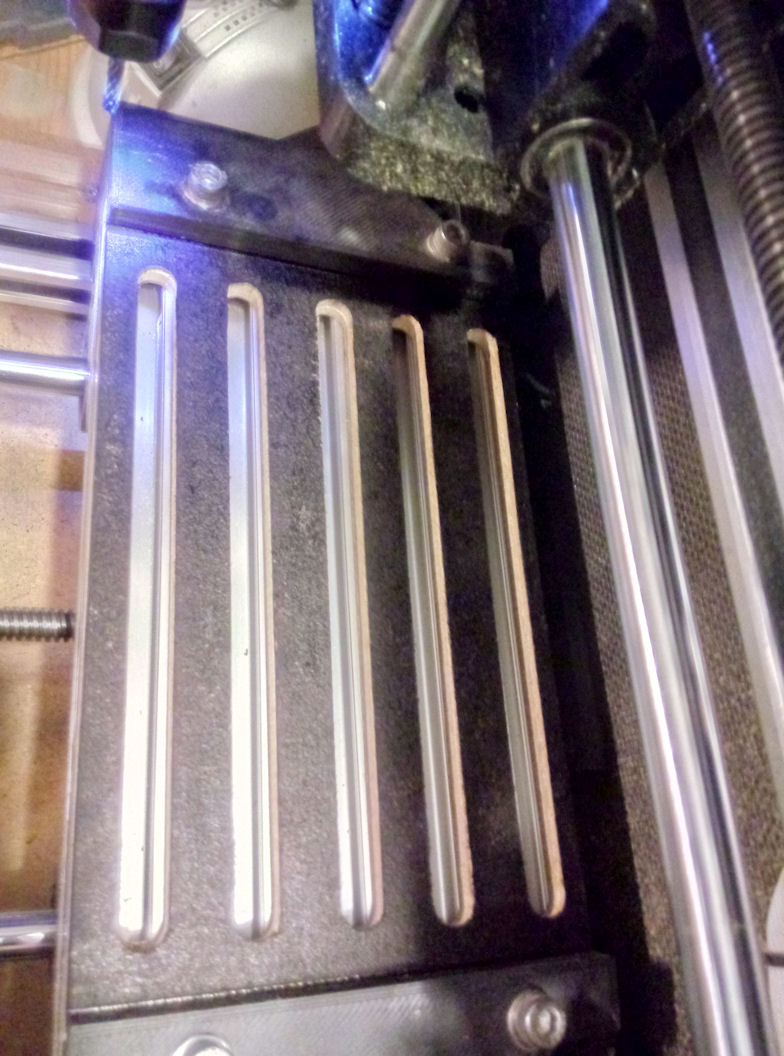
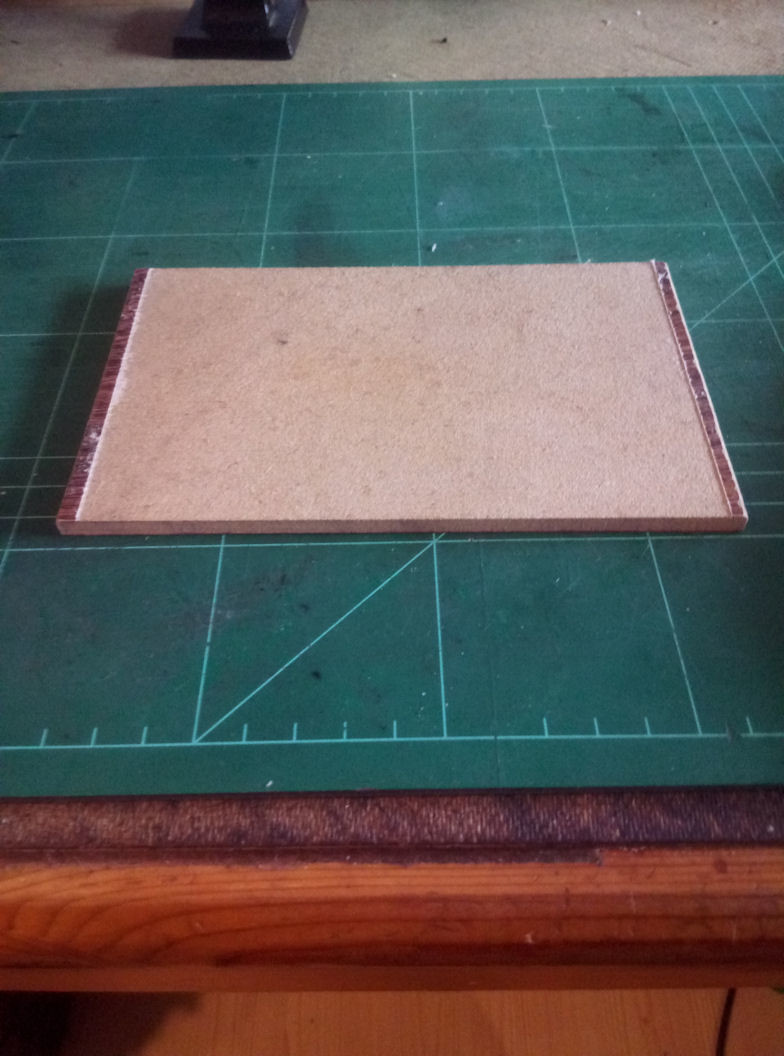
So, second pass approved by the government. I only took 0.2mm off the spoil board, as that was the first real pass I've done with the machine so far. Everything else was just G-code sequence tests without the spindle being turned on. But the 0.2mm was too little. The piece I used for my spoil board is a piece from a floor parquet system. Apparently it's not as flat as I thought after all. So now I'm having another 0.2mm removed and hope that the surface has then been removed in all places to really have an even skin, with a 100% flat surface. P.S: The second pass seems to be a lot less noisy, cause the top coating of the parquet is already removed at most places. I run with 80mm/min feedrate only, to not overload this little machine. Maybe there is more possible, but I have to find out the limits slowly. -
Universal military aircraft homecockpit project
Viper1970 replied to Viper1970's topic in Home Cockpits
The problem is that my smartphone controls the CNC at the moment, so I can't make a video or photo of it. I will do a video and photos of further jobs when the tablet is conneted to the machine. I'm at 1 hour 57 minutes now and it's arround 60-70% finshed. Thank god I'm alone today, my wife would probably go up the walls at the noise over three hours at a time. P.S: And just as I was writing the lines my wife comes in the door. Well, there's still about an hour to go before the machine should be done with the flatening of the spoil board. And a second pass would also not be bad, but I think I can forget that for today. She was not very enthusiastic about the noise level. -
Universal military aircraft homecockpit project
Viper1970 replied to Viper1970's topic in Home Cockpits
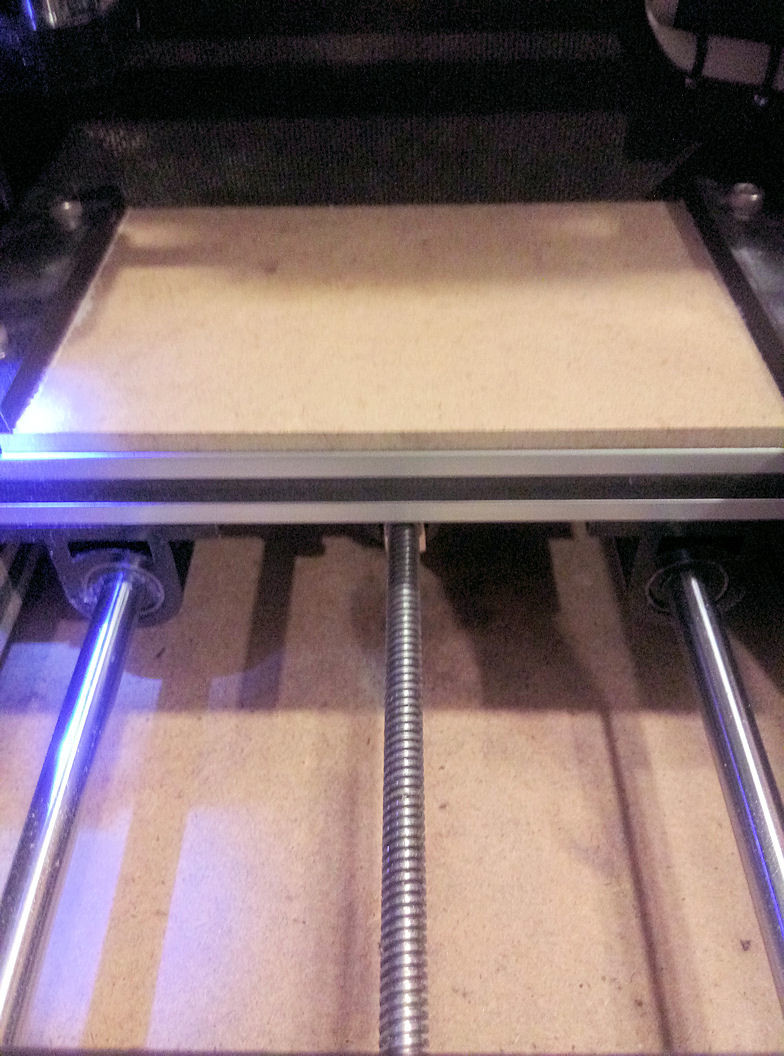
Just flattening the spoil board of my CNC. The job is at arround 33% now and all looks good. The face of the spoil board becomes 100% flat, but it takes ages with a 3mm cutter. I hope my smartphones battery lasts this long to finish the job. At the moment I'm printing the mount for the tablet and when this is done, there is no more fear of a job that couldn't be finished cause of the battery. The tablet will always be charged during the milling work. The spindle is really running balanced, nevertheless the little thing makes a hell of a noise. Milling is nothing you can do during the night. Maybe with just a small cutter or an engraver, I will use for the PCB's the noise is a little more tolerable.