Viper1970
-
Posts
2290 -
Joined
-
Last visited
Content Type
Profiles
Forums
Events
Everything posted by Viper1970
-
Also Huey ohne "Forunate Son" oder "Green River" von CCR geht ja mal gar nicht! Da hab ich bei mir schon vorgesorgt. Musik beim Fliegen is Pflicht!
-

Universal military aircraft homecockpit project
Viper1970 replied to Viper1970's topic in Home Cockpits
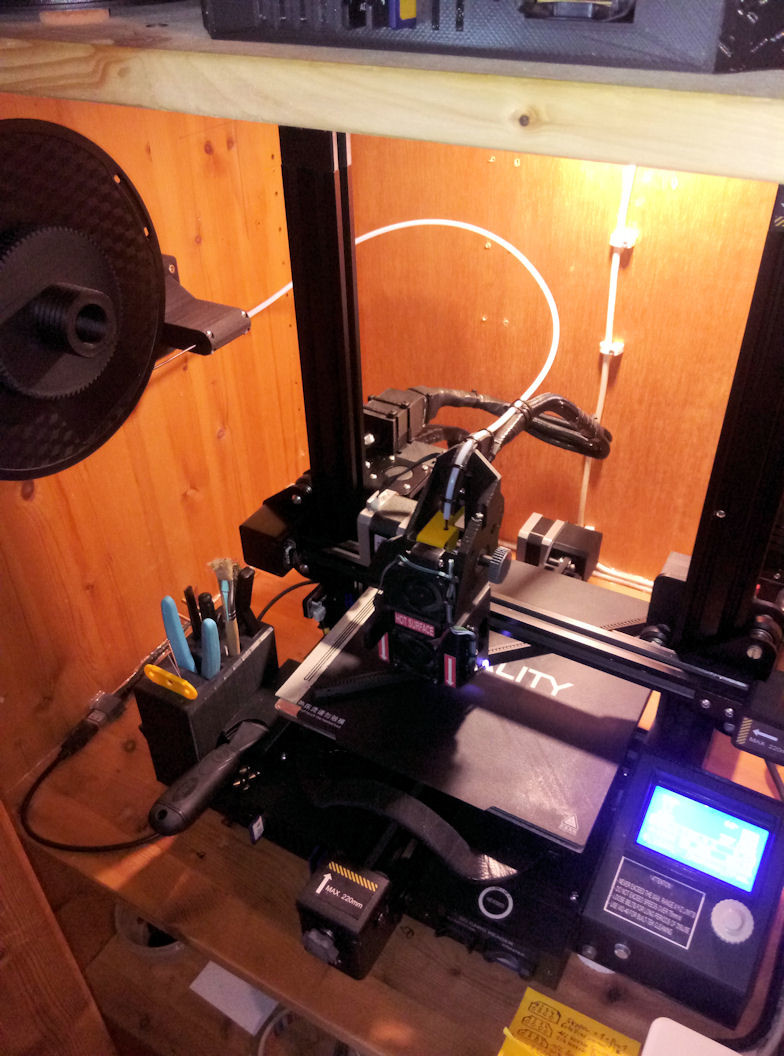
Second part of my Apache top grip of the collective. The first part I did back a few weeks with the old bowden system. This time I need no more brim arround, thanks to my convertion to direct drive and a few other optimations I have made. This saves the annoying remove of a brim and the deburring of the parts after the print. Since my rework I never had to use a brim anymore, even at larger parts, cause I can use higher nozzle temps as with the normal drive without drops or any kind of stringing, also if a part has very long travels at some points of the print. Nonetheless I think about buying a bigger resin printer. I really prever FDM, cause of the greater effort printing with resin makes and the horrible smell it produces, but the print-times with FDM are sometimes ridiculous for the HOTAS parts. This part alone needs 26 hours to get finished with a 0.12mm layer heigth and the quality settings I want to have. Only thing that keeps me away from it at the moment is the cost of a new resin printer (my original Anycubic Photon is much too small for this) and the cost of resin compared to FDM filament. The results aren't bad with my FDM now and I want to have all my HOTAS spraypainted anyway, so after printing with 0.12mm layer height and the paintwork there isn't anything to see of the FDM production process the parts was made with, but the time is really a big deal for so much parts I want to make. With resin this part would only take 12 hours and I even could do two parts at once without expanding the printing time, cause for a resin printer it makes no difference how wide or deep the part you print is, only thing that really counts is the z-height (ok not quite but almost). I could for sure print also a second part with my FDM in parallel but this nearly doubles the time as oppossed to the same if you do it on a resin printer. That's really the only reason I want to have a second resin printer now. The quality of resin is nicer, but if you rework a FDM part and paint the part after the print anyway it makes no more difference. 3 and a half hours later. And I already increased the print speed to 125% on my Ender now. But this is really the max speed I can run. Must be arround 70mm/s. 6 hours later 16 hours later
-
Cool sound I used to hear while working at my little CNC . The track at 39:00 is my absolute favorite one .
-
Universal military aircraft homecockpit project
Viper1970 replied to Viper1970's topic in Home Cockpits
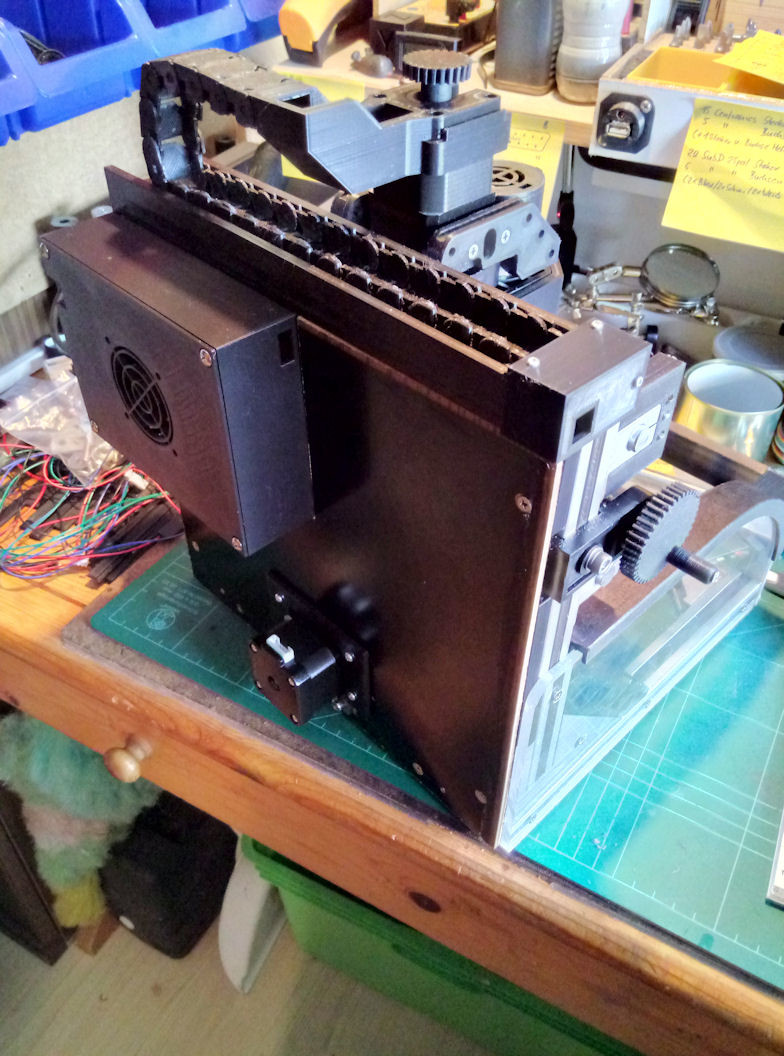
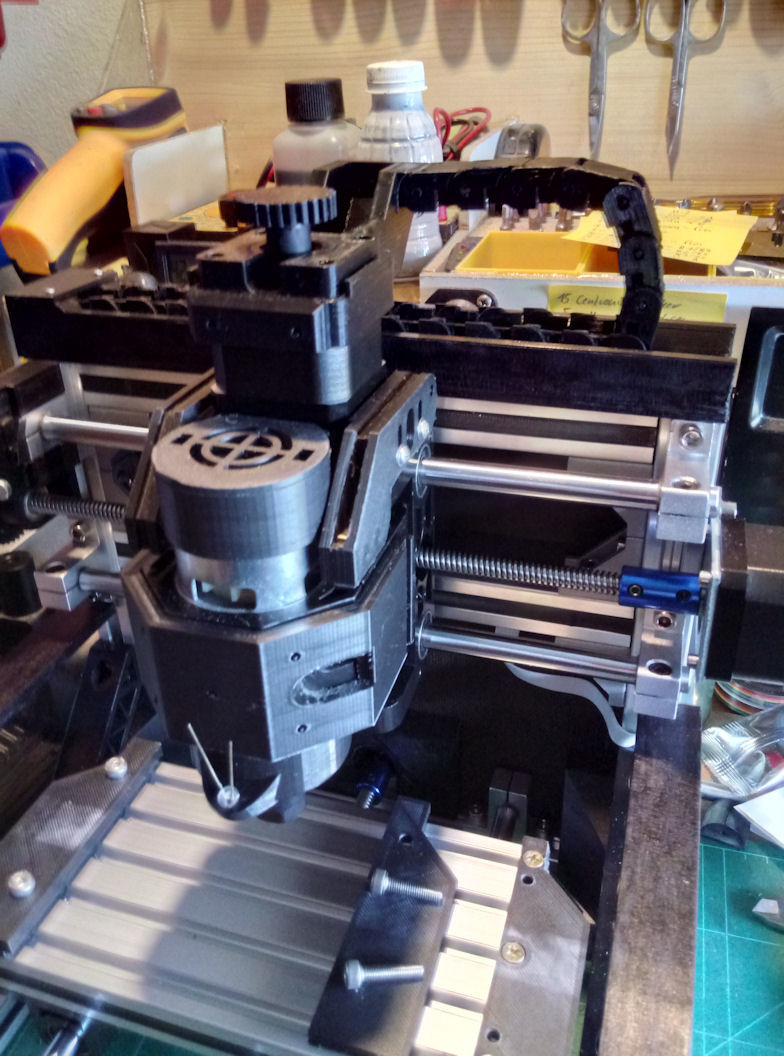
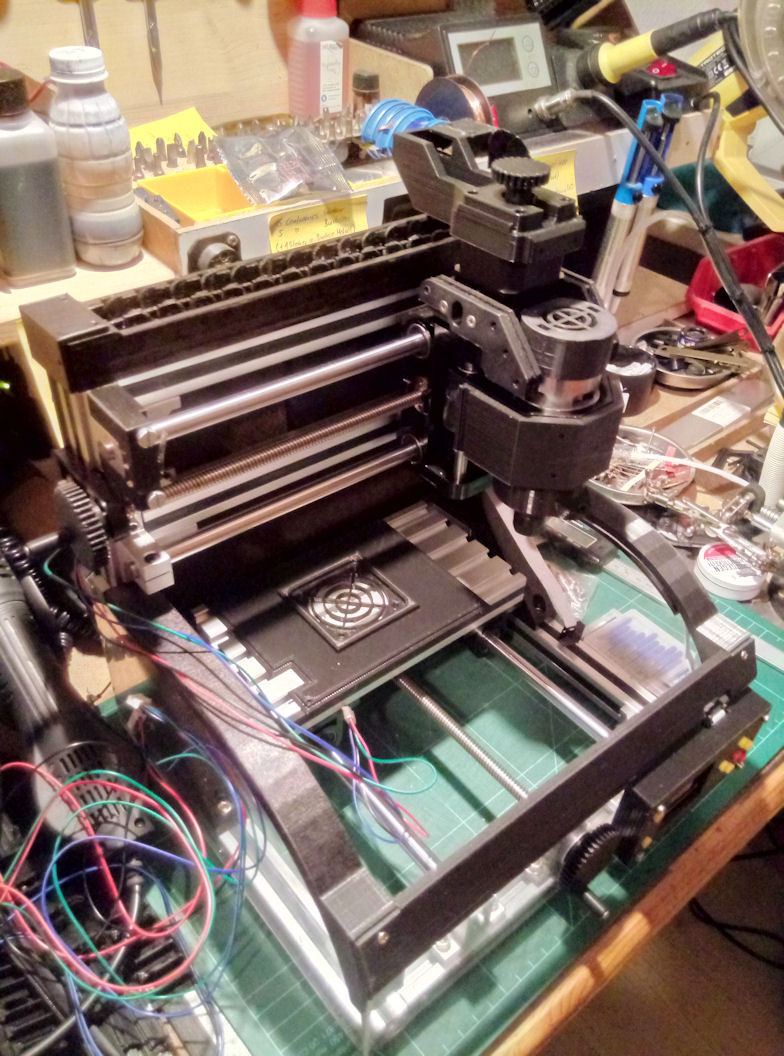
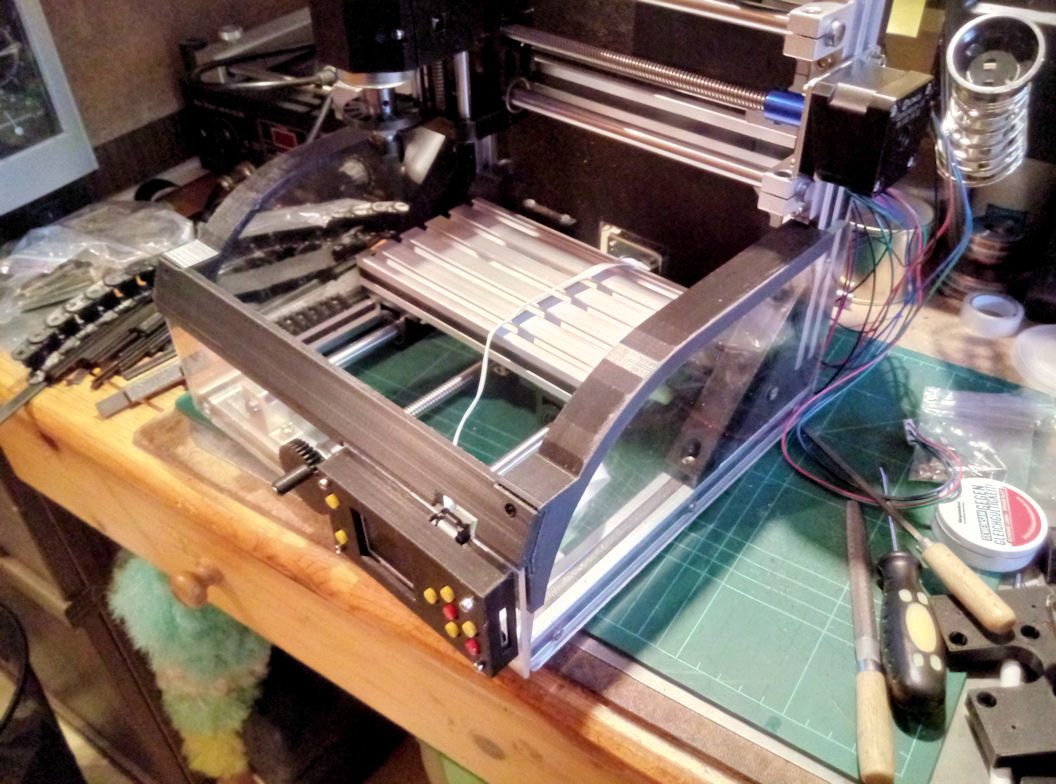
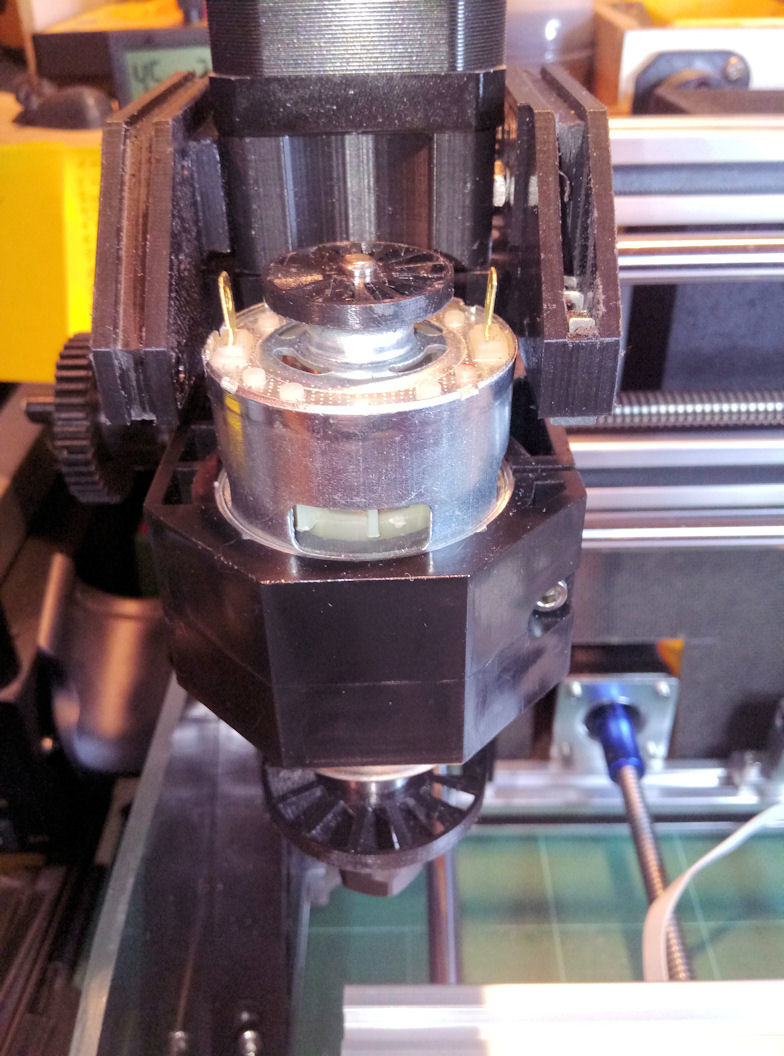
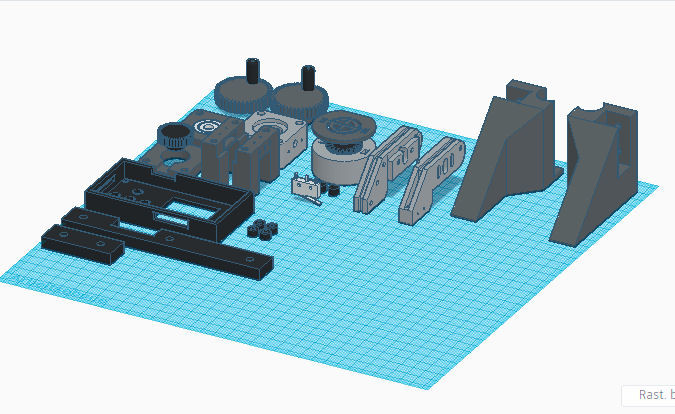
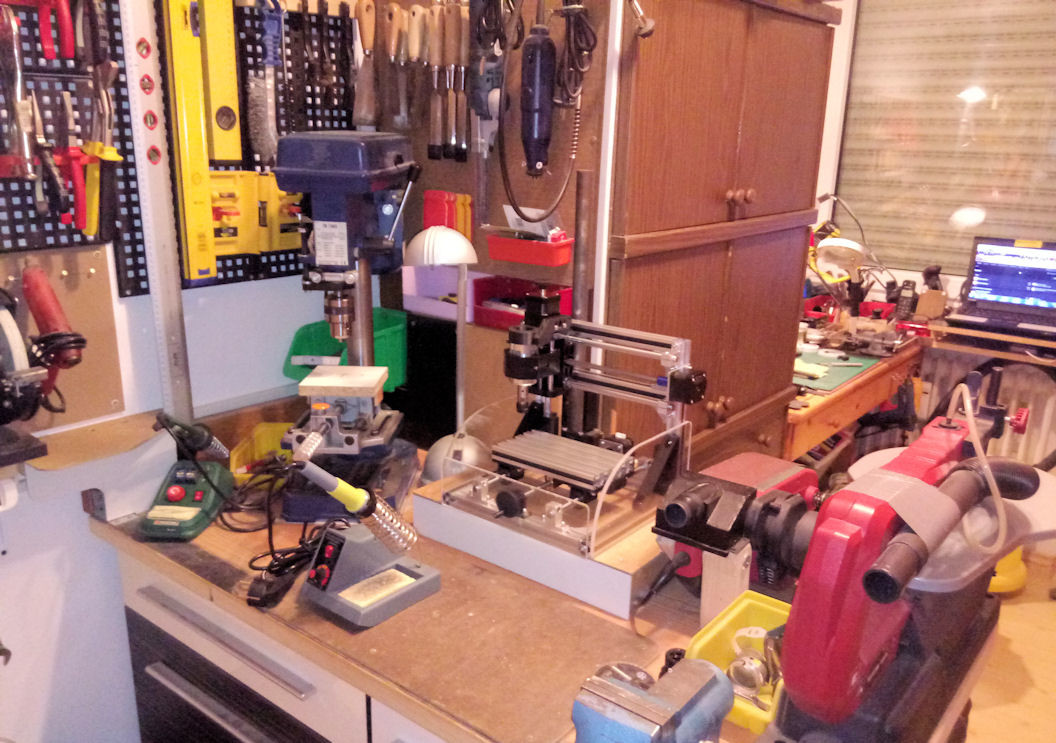
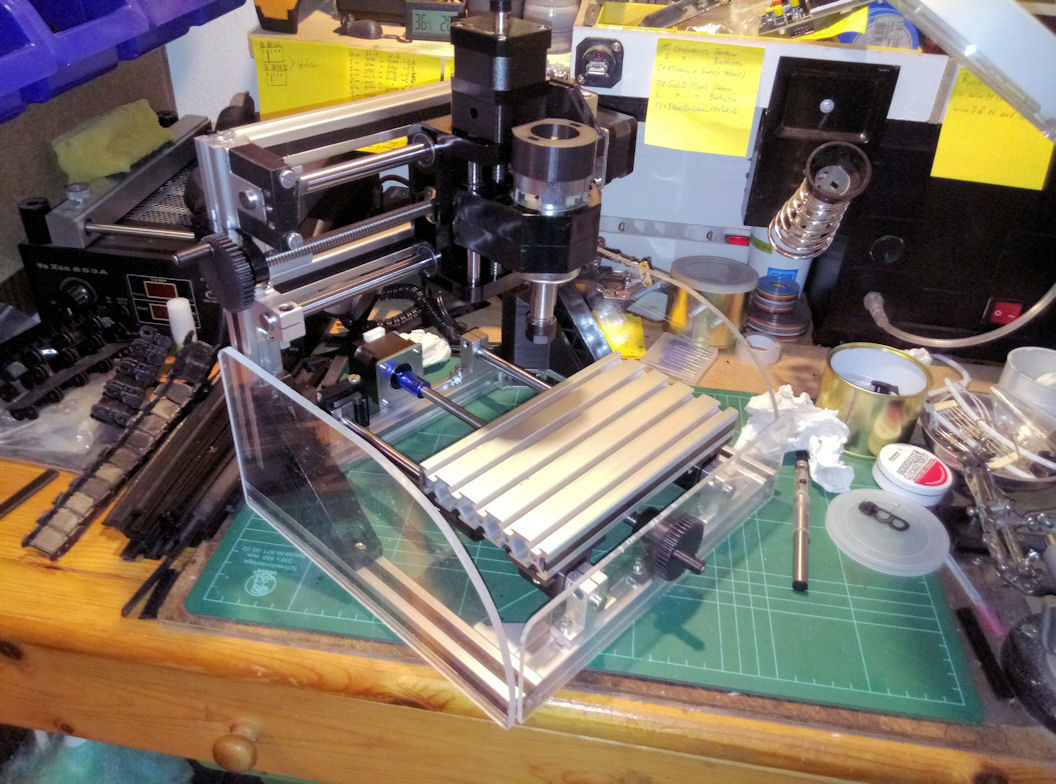
All parts for the little CNC are done now. I added a holding device for a "victim plate", which then gets holes for the profile nuts and bolts to clamp things on the bed. I made it to the sides of the bed to be able to really use the full size of the bed for working and not to waste space for holding down this "victim plate". The nuts are made in a way that they could put from the top inside the furrow, so there is no need to slip them in from the sides. I will also make some holding frames which can be screwed to this side mounts for fixing the blank pcb's I want to use. I also added an extra frame arround the original motor mount which my fan duct with the two super white LED's is mounted to. I wanted to have something similar at my mill as I have it on my printers head to be able to exactly see what happend at the cutters head. If all works like it should the second fan in the duct blows away the chips from the milling process and you can exactly see the progress in the process, cause of those two LED's. All parts except the drag chain itself are constructed by myself with the use of TinkerCAD. The big front-lid which should prevent chips from blowing out to the front is still missing and I'm not sure if I will mount it, cause it's a nother big part for printing and I want to see if it's necesarry at all. There is also a second fan inside the upper duct on top of the motor. Both fans should cool down the motor sucking air through it. The cable that goes from the front mounted display is misplaced inside the right frame on top of the Plexiglas plate. It has a special tunnel for this. To prevent the cable from slipping out, I put ducted tape on it an painted it black. To have both sides similar and let the hole machine look a bit better I made the same at the other side and on the cable chain guide also. The back plate of the machine ( a rest piece of a cabinet back wall I had lying arround) has still to be painted in satin black. The complete electrical parts has still to be done, but I can now use my printer to start printing all my HOTAS parts.
-
That's really perfect work!!! It looks so good, I wanna have it! Every little detail is there, wow. How many hours did you spent in making it?
-
Universal military aircraft homecockpit project
Viper1970 replied to Viper1970's topic in Home Cockpits
The little CNC so far. All parts are printed with FDM and they are really dimensionally stable and very strong. You need a lot of force to break them. The trick is to print at very high temperatures. I used 245° for the first layer and 70° bed temp and for the rest 230° and 60° bedtemp. All those parts are only printed with a 0.2mm layer height. I also never have any problems with the first layer if I use such high temperatures. The adhesion is perfect. The first layer is printed with only 20mm/s and after this layer is perfect the rest can go up to 65mm/s without any problems. More is not really advisable, cause of the weight of my direct drive. I also never have any problems with stringing or blops anymore, since I have changed to a direct drive. I print on ordinary magnetical built tek mats. I also have a magnetical FR4 print bed and another one out of spring steel, but I really prefer the built tek. The FR4 tends to have a bimetal effect at higher bed temps, even it is only 0.6mm thick and the spring metall hasn't that adhesion as the built tek has. The drag chain was printed before the direct drive and is not the nicest part, but the rest is really good. And this is by far not the best quality thats possible. Those are only mechanical parts for the CNC. The HOTAS should look much better than, with the reduced layer height to 0.12mm. Only thing that is resin printed on the CNC at the moment is the little wheel on top of the Z-axis stepper, cause I wanted to test some parts after I made the "odor-filter" .
-
Universal military aircraft homecockpit project
Viper1970 replied to Viper1970's topic in Home Cockpits
I use water washable resin from Eleegoo or Eryone, but both do really smell very bad. Not in the bottle, but as soon as I start the printer it begins to smell like hell and after arround 10 minutes later you really can't stay in the workshop anymore, even with the window opened. I have just started to build a simple filter for the inner fan (the one in the print chamber). I only used ordinary foam for it, cause the activated carbon filters you can get are to expensive over a long time period in my opinion. And it really works! It's not perfect and probably not as good as those carbon filters, but the odor is drastically reduced, compared to the original state. Probably the reason is reduced airflow at the fan due to the foam rather than actual filtration, but I don't care about that for now. It works and so it is ok for me . Some guys deactivate this inner fan but the foam trick is also not bad, I think. I don't want to use any kind of filter at the back fan, cause here are the electronics placed, which need cooling inside the printers housing. The print chamber fan is the one that sucks the odor out of the print chamber and makes the printer smell like hell, so no need to block the other fans. I don't think this fan is really needed to prevent anything from overheating and the "vacuum" effect that is needed for the print results, some guys at print-forums have mentioned, is also very questionable with this little 40mm fan . I could not notice any difference in print quality so far. As I want to start printing my HOTAS parts now, I really need the resin printer for all those small parts like the replica POV's and their mechanics, or buttons and switches you did not get anywhere. I have printed some of them with FDM and the results were really good, but for those small parts a resin printer is much quicker and makes nicer parts. -
Universal military aircraft homecockpit project
Viper1970 replied to Viper1970's topic in Home Cockpits
They really tried to help and recreated the project, but it still could not be loaded. I took the rest of what I was able to find somewhere in the nirvana of my HD and started again. At the end this was the quicker way as to wait if the project could be really restored. Now all parts are ready. I just have to put all together. I used my resin printer for a second set of turbine wheels (the one that cool the mills motor and blow chips away) to have some more detail here and also more balancing, but uhh, this little machines makes fumes . I'm really a tough guy if it comes to solvent vapors, cause I worked for years in a restoration workshop for italian and british classic cars and old VW beetles, but this resin is really brutal. I couldn't stay even 5 minutes in my workshop while printing with resin, without getting headache. Unfortunately, I have nowhere else to put the printer in the workshop where I could make an outlet out of the window. Another reason besides the complex cleaning of resin parts and the printer, why I don't like resin printing that much. Of course the parts are really smoother, but since my rework the FDM makes also really good prints. If I use 0.12mm layer heigth they aren't so far away from what my resin printer does, but they cost much less and I will anyway spray paint my HOTAS. So the difference is only a layer more of filler . -
Universal military aircraft homecockpit project
Viper1970 replied to Viper1970's topic in Home Cockpits
The work on the CNC continues after my project for it on TinkerCAD get lost . It was the first time a project was really completely lost. Never had that before. It was still in my catalog of projects, but if I want to open it nothing happens, but an endless loading screen. As it's only the CNC I did not made a backup of all the parts before, like I did for all my HOTAS parts. And bingo, the most worst case happened. I should have known it . I was able to restore some earlier designs out of my recycler and with a programm that searches the HD for deleted files, so that I don't have to do all the work from scratch again. Now all needed parts are back again and the last missing ones I'm still printing. After this I will print all my HOTAS parts finally and nothing else! Have already lost a lot of time with all those troubles with my printer and now this BS again. I hope I'm able to print all HOTAS until the summer arrives, so I can do the paintwork. -
Alternatives to using an endless amount of Leo Bodnar boards?
Viper1970 replied to obious's topic in Home Cockpits
I'm using Pokeys 57U for all my cockpit electronics (my HOTAS use canabilzed TM electronics to be fully TARGET compatible). In my opinion the best card you can get for such a project. It can be programmed with DX buttons or keyboard macros. The programming can be stored as a file, so that different programmings are possible. It has 55 inputs, supports 6 pots, rotary encoders, switches, buttons and so on. I can make different functions for keypress or release and also has a support for a 128er matrix if 55 functions aren't enough. You can even program the axis of the pots with additional functions. No code fidelling, firmware built or anything else. There is simple GUI to adjust all you want. Here is the manual of it for further details. I always use the one without terminals, cause I don't like small wires screwed in terminals. A loose connection is preprogrammed (even with connectors). Mostly I only solder the board once to the part I want to built and never remove it. The ones without terminals are also a little cheaper . https://www.poscope.com/wp-content/uploads/downloads/Pokeys/Manuals/PoKeys user manual (19.8.2017).pdf -
Universal military aircraft homecockpit project
Viper1970 replied to Viper1970's topic in Home Cockpits
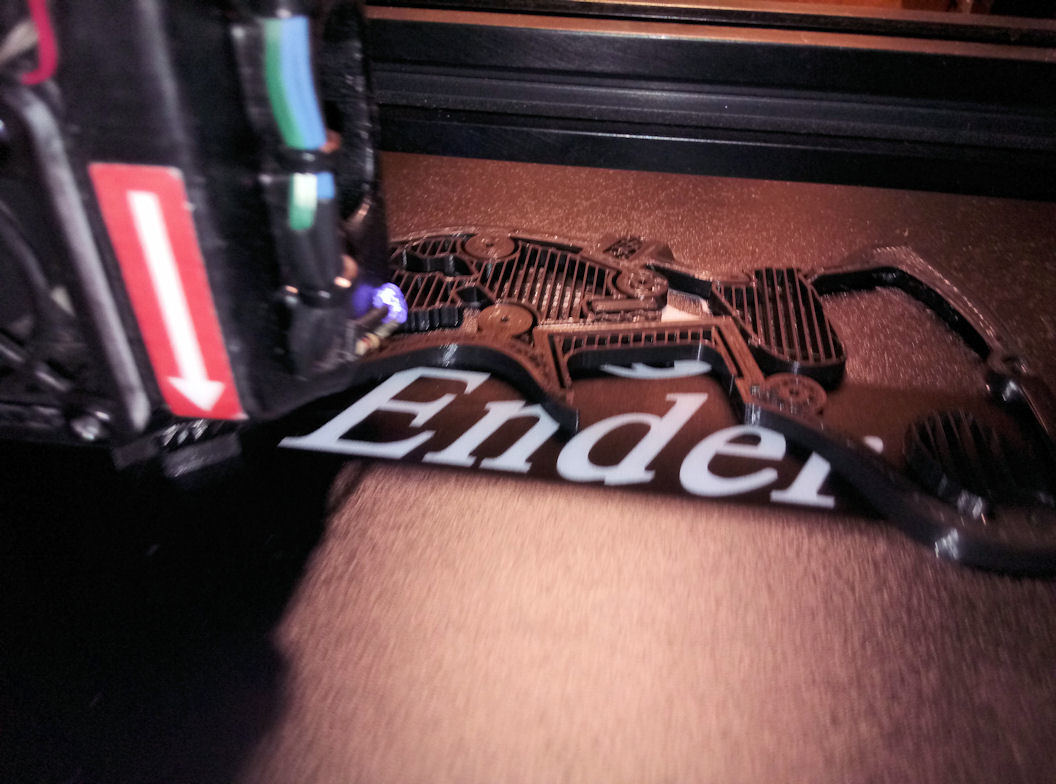
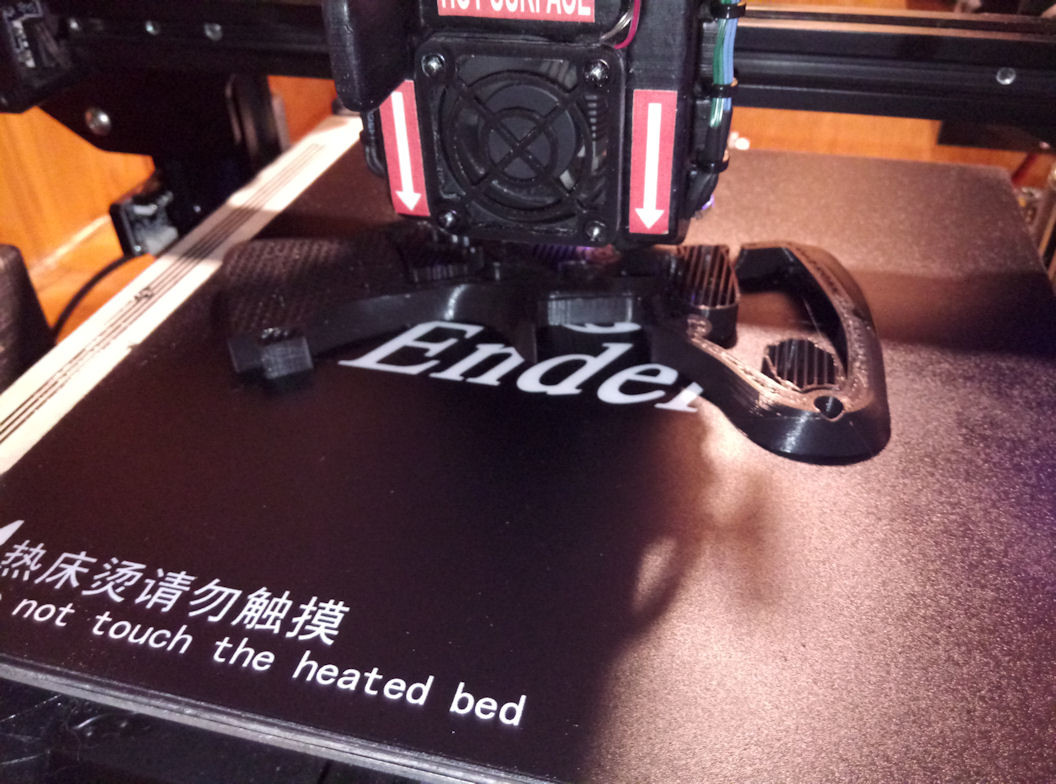
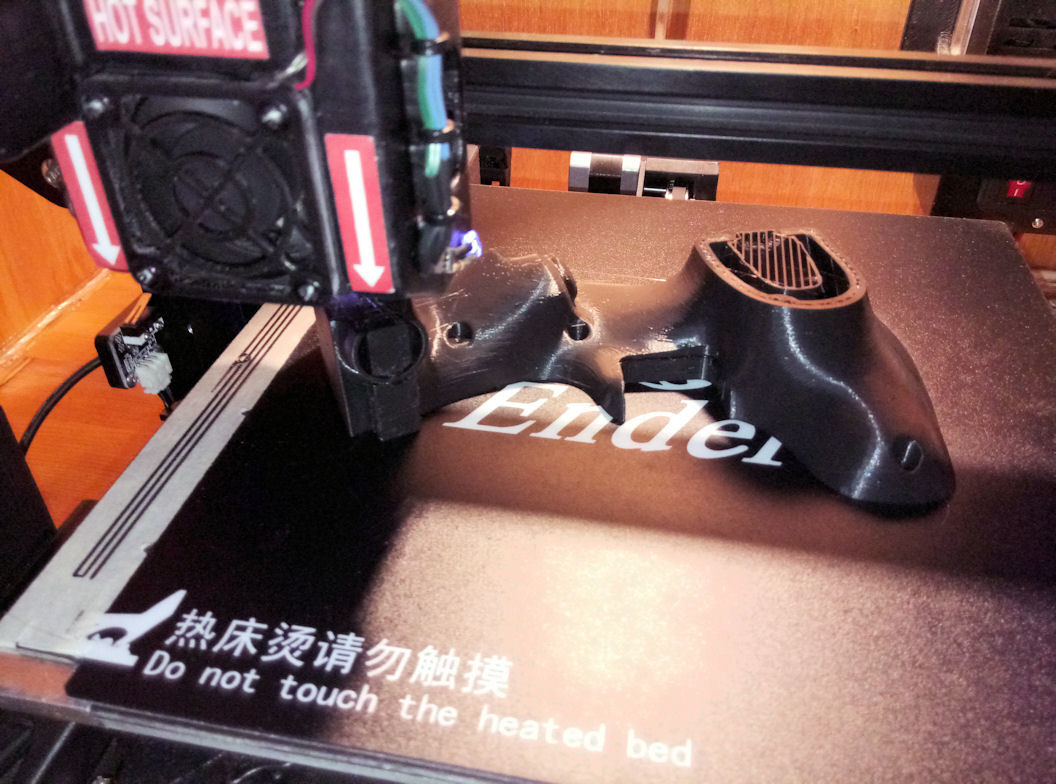
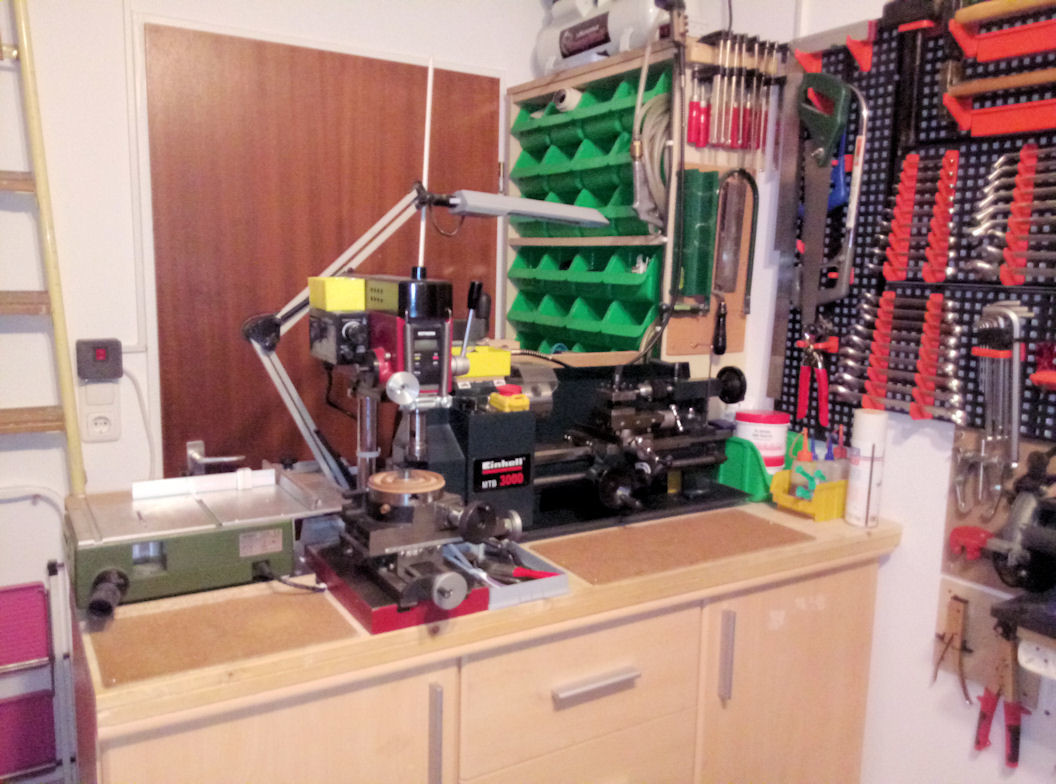
Had some trouble with the 3D-printer, respectively with broken cables again. Now I've had enough and changed every single wire, even the ones for the sensor and the stepper, to 230V flexible electric wires . There are 12 wire which go to my head, and as 1.5mm² wires are a bit bigger as the original ones, I splitted them in three sets of four wires each at the bend radius. Now I hope the constant cable breaks are history. I also added a 12pol plug a while ago to be able to easily remove the head from the printer. I did the same for the print bed cables with a 4pol plug. Now the work at the little CNC continues. I'm just making the housing for the mill-bed with an closable lid. This should prevent all those chips from flying arround all over my workspace while milling PCB's. After this the drag-chain system has to be done. Then the mill is also ready and I can finally do my HOTAS parts, I hope . While the HOTAS parts are printing, I will do some learning in CNC milling and how to use the software for it. I want to make all my further circuits for the HOTAS with "self-milled" PCB's . P.S: I'm also able to print with my favorite high temperatures for PLA again. I had to adjust many settings to be able to get good results after I switched to a new hotend and the direct drive. But now everything works fine again with the high temperature. I'm printing ordinary PLA with a temp of 235°. This way the parts, respectively their layers look much cleaner and the parts are also much stronger. The first layer is also much better to do with 235° nozzle temp and a bed temp of 60°, cause the filament applicates perfect to the print bed.
-
Hi, danke! Ja genau so hatte ich das auch vor mit dem Kleber. Und ne Lupenlampe hab ich am Tisch. Anders geht sowas bei mir auch gar nicht mehr. Muss sogar die Arme irgendwo voll auflegen, um nicht zu stark zu zittern, leider.
-
Könnte man das nicht auch regelbar machen? Wieviel Saft läuft da eigentlich drüber? Wäre doch elegant, wenn man die FFB-Stärke auch hardwaretechnisch noch nachregeln könnte. Untergrenze 0.5 Ohm oder so (was halt noch vertretbar ist).
-
Doch, aber sehr unruhige Hände . Leider! Jo Huckepack würde auch gehen, ist aber irgendwie nicht so elegant. Aber was solls, kommt ja auf die Funktion an. Werde das glaub ich auch so machen. Nach dem dritten Kabelbruch heute am Drucker, hab ich nen Anfall gekriegt, alles rausgerissen und wollte einen komplett neuen Kabelstrang verlegen. Geplant, neue Kabel aus dem Bestand geholt und wollte meine Stecker wieder anlöten (damit man den Kopf easy abmontieren kann ohne den ganzen Strang bis runter zum Mainboard abbauen zu müssen), dann ging die Lötstation in Rauch auf. Heizelement durch! Ich krieg nen Koller hier .
-
Ne, ich hab nur kurz im Netz mal nachgeschaut und dort eben das mit dem Widerstand tauschen um mehr Power auf dem Motor zu haben gesehen. Momentan hab ich noch so viele andere Baustellen, dass ich mich damit jetzt noch nicht wirklich auseinandergesetzt habe. Und dann kommt noch ständig neuer BS hinzu, wie eben gerade ein Kabelbruch am Hotendlüfterkabel vom Drucker. Ist ja nicht gerade alles erneuert worden mit hochflexiblen Kabeln und ja keine Knickstellen, damit das Ding auch zuverlässig läuft . Will ja eigentlich meine ganzen HOTAS Sachen jetzt in einer 24/7 Mega-Session über mehrere Wochen drucken. Aber SMD-Löten liebe ich! Bin leider nicht mehr so ruhig mit den Händen. Das wird ein Spaß werden! Werde da wieder den alten auslöten und den neuen mit nem Tropfen Kleber fixieren, bevor ich löte, sonst beiß ich nämlich in die Werkbank bei dem Gefrickel. Aber jetzt darf ich erstmal wieder den Drucker reparieren. Die Kabel sind natürlich alle schon ordentlich in Gewebeschlauch verlegt, den ich jetzt wieder aufreißen kann, weil ich ihn nicht weit genug zurückschieben kann.
-
Jetzt ist er da! Hab ihn von einem ganz, ganz netten Kollegen hier im Forum bekommen, der sich so über meine Apache Controls gefreut hat, dass er mir den Stick geschenkt und extra aus Schweden hier her geschickt hat! Ein Gegengewicht wird bei mir leider nicht gehen, da ich dafür trotz Pit bei der momentanen Auslegung keinen Platz hab. Bleibt also nur die Sache mit dem Widerstand, oder noch nen zweiten besorgen und ne "Doppeltraktion" basteln. Hab aber schon soviel am laufen, dass ich da jetzt nicht auch noch anfangen wollte. Ist schon genug Arbeit noch ne Centerbase zu entwerfen, damit ich den FFB2 für die Helis nutzen kann. Das mit den zwei Mechaniken in einem sieht schon nochmal wesentlich komplexer und aufwändiger aus. Haben aber einige teils wirklich absolut perfekt und ausgeklügelt zusammen gebastelt. Toll wärs schon .
-
Universal military aircraft homecockpit project
Viper1970 replied to Viper1970's topic in Home Cockpits
A little further today. I mounted two printed turbine wheels on the motor to cool the engine better and to blow away the chips from the milling process. I reworked the turbines a bit on my lathe to have a clean rotation without any vibrations. There will also be added a turbine shell at the bottom one.
-
Universal military aircraft homecockpit project
Viper1970 replied to Viper1970's topic in Home Cockpits
The small CNC is again such an eternal construction site that keeps me from the actual project. But without suitable tools or machines, such a project is also difficult to realize, unless you can just buy everything. But I don't have the financial means for that and even my newer machines (the two 3D-printers and the CNC - the mill and the lathe I've bought many years ago) didn't cost half of an Apache HOCAS, if you would buy it. But I hope that part is finished soon now and things are running, so I can use them for the real project. But who knows what will happen again. Those cheap machines have always their little problems and professional tools do cost so much, that you can really buy already finished HOTAS systems.
-
Universal military aircraft homecockpit project
Viper1970 replied to Viper1970's topic in Home Cockpits
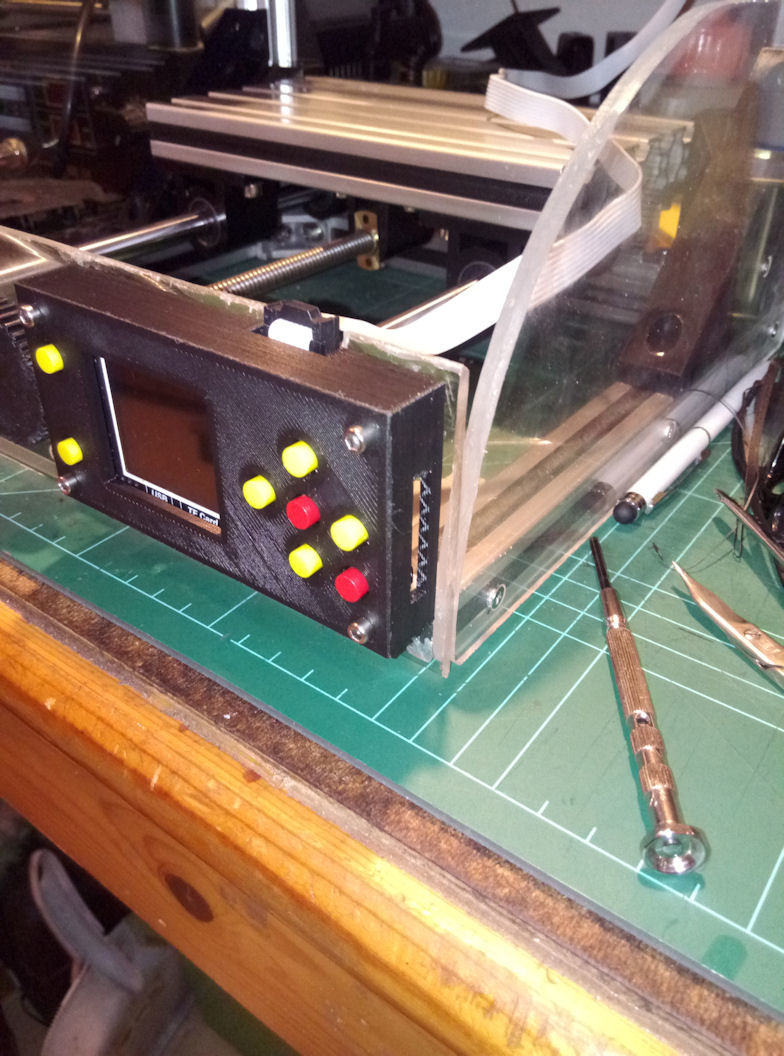
Not much happened today. I made a case for the display unit of the CNC and printed it. It's screwed with M3 screws into the Plexiglas. I have cutted four threads into it for the mount. I also screwed all the Plexiglas parts to the machine using very tiny Spax drilled into the printed inlays of the aluminium profiles. There is still alot missing I'm just printing, like a drag chain for the mills head, an LED lightning also at the head, the rear wall with the power unit and so on.
-
Universal military aircraft homecockpit project
Viper1970 replied to Viper1970's topic in Home Cockpits
Thanks . But there is really very little space in it. Sometimes while I'm working the whole floor is also full with material . -
Universal military aircraft homecockpit project
Viper1970 replied to Viper1970's topic in Home Cockpits
The last free space in my small 10m² workshop is reserved for the little chinese CNC if it's finished . Now there is really no more place for anything else .
-
Ich bekomme jetzt dann auch endlich einen der sagenumwobenen Microsoft Force Feedback 2. Werde dann wahrscheinlich ein eigenes Gehäuse dafür bauen und die Mechanik verändern. Dann hab ich auch einen brauchbaren Heli-Stick. Aber ich muss mir das Ding erstmal genauer ansehen und schauen was da machbar ist. Hab schon ein paar Projekte im Netz recherchiert und da sind echt coole Ideen dabei. Die Mechanik mit zwei MFF2 ist der Hammer, aber bei mir wirds wohl bei einem bleiben . Hat schon jemand den Umbau mittels anderem Widerstand ausprobiert, um die Motorleistung zu erhöhen? Hält der das auch länger durch oder geht da irgendwann der Rauch auf ?
-
Universal military aircraft homecockpit project
Viper1970 replied to Viper1970's topic in Home Cockpits
Very rarely! Even if I go to bed at 3 o'clock in the morning or later, I'm up again at 8 o'clock. I can't sleep very well, due to my illness, but this gives me some more time to plan and construct new things (and forget my health problems - I'm a technical enthusiast since my childhood and this is what I'm living for ). Sometimes I'm really sleepy, but even if this is the case I can not sleep good or even much longer. After a few years, you get used to it and make the most of the time. There's nothing else you can do, so make the best of it. @Rick50 Thank you ! -
Universal military aircraft homecockpit project
Viper1970 replied to Viper1970's topic in Home Cockpits
The little CNC is also a bit further now. I use some oddments of Plexiglas I had lying arround to make a protection against spills flying arround and also extended the range of the z-axis a bit. In its original state even the half of the z-axis movement wasn't useable. I also made my own mounts for the homing-switches, cause I couldn't find anything fitting my needs on Thingiverse. There will be still changed some further things to make a real useable machine out of it.
-
Oh mann, bin ja eigentlich überhaupt kein Mirage Fan, aber die F1 ist ja auch kein Delta-Flügler (die mag ich nämlich nicht ) und das Ding sieht schon extrem gut gemacht aus! Wird wohl etwas viel in nächster Zeit werden was mir taugt. OH-58D, PAH-1, F-15E, F-4E, F-8J ,A-7E, G-91 und jetzt auch noch die Mirage und natürlich irgendwann dann auch die A-6E. Aber lieber gibt's zu viel als zu wenig .