Mongoose556
-
Posts
34 -
Joined
-
Last visited
Content Type
Profiles
Forums
Events
Everything posted by Mongoose556
-
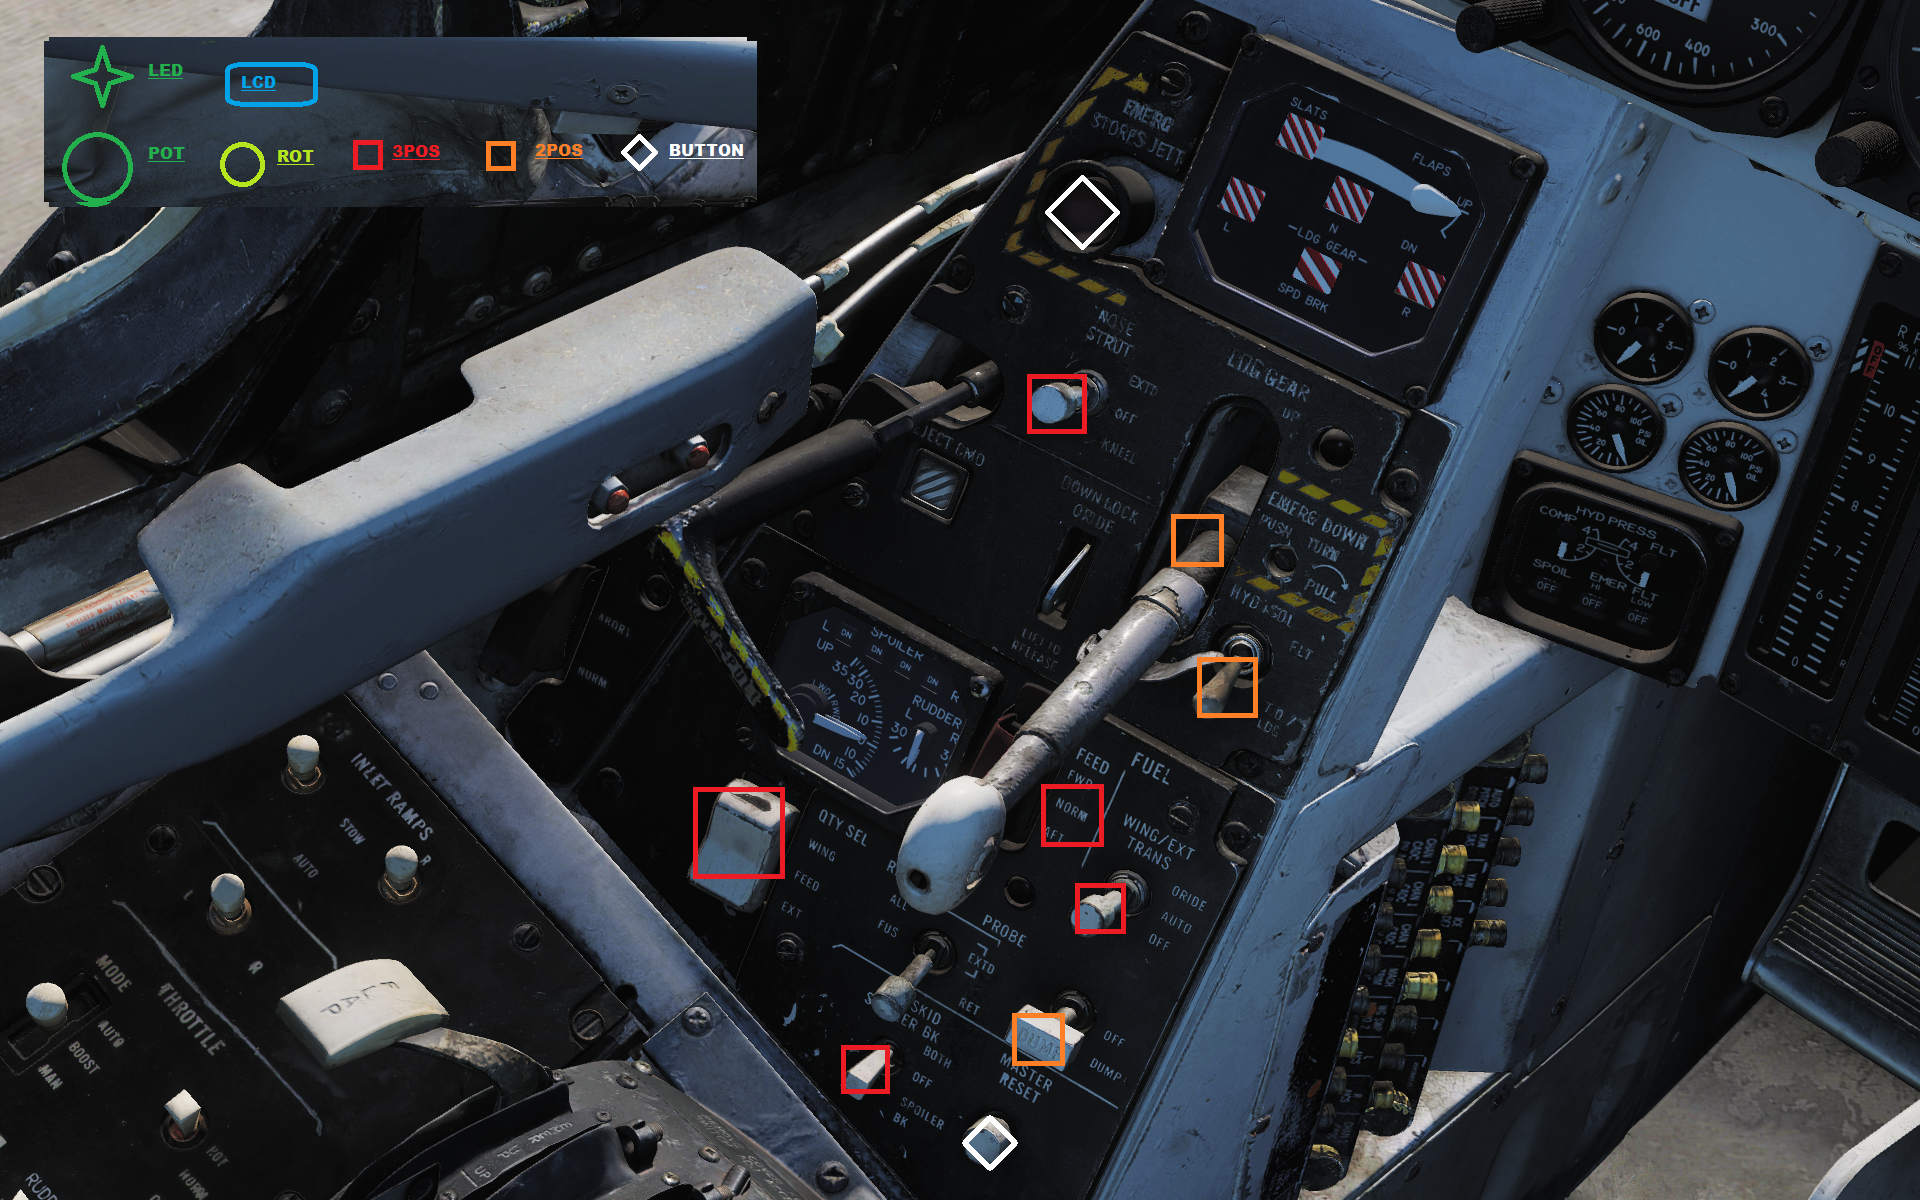
I believe they are electro-mechanical in real life, servo/relay driven switches. I just use 2 position or 3 position toggle switches and it works fine. Heatblur have been nice enough to give us "X On Else X Off" style bindings for a lot of switches, so if you have a 2 pos switch it will as an on/off rather than just on (looking at you ED & RAZBAM!). Mind you I'm not going for full simpit perfect realism, rather functionality. If i turn off/reset the A/P I just manually reset them.
-
If anyone wants measurements I can get you some off my panel. :)

-
The actual Tomcat used solenoid switches. I've just used 2 and 3 position switches. If they're in the wrong place just flick them back and forth til its ok.
-
The Tomcat really comes alive with a human RIO, get someone to fly with, join one of the DCS discords, Hoggit or Spudknocker Wingman Finder. Learn the RIO cockpit and how to use the radar so you can fly both roles when available. The back seat is where the magic happens! I'm primarily a pilot but I started to learn the back seat and it's helped me understand what is happening on the radar. Also practice CCIP bombing and throwing TALD at air defences.
-
Yes External Light Master Switch, search for the Key binding. Someone had to tell me about this too.
-
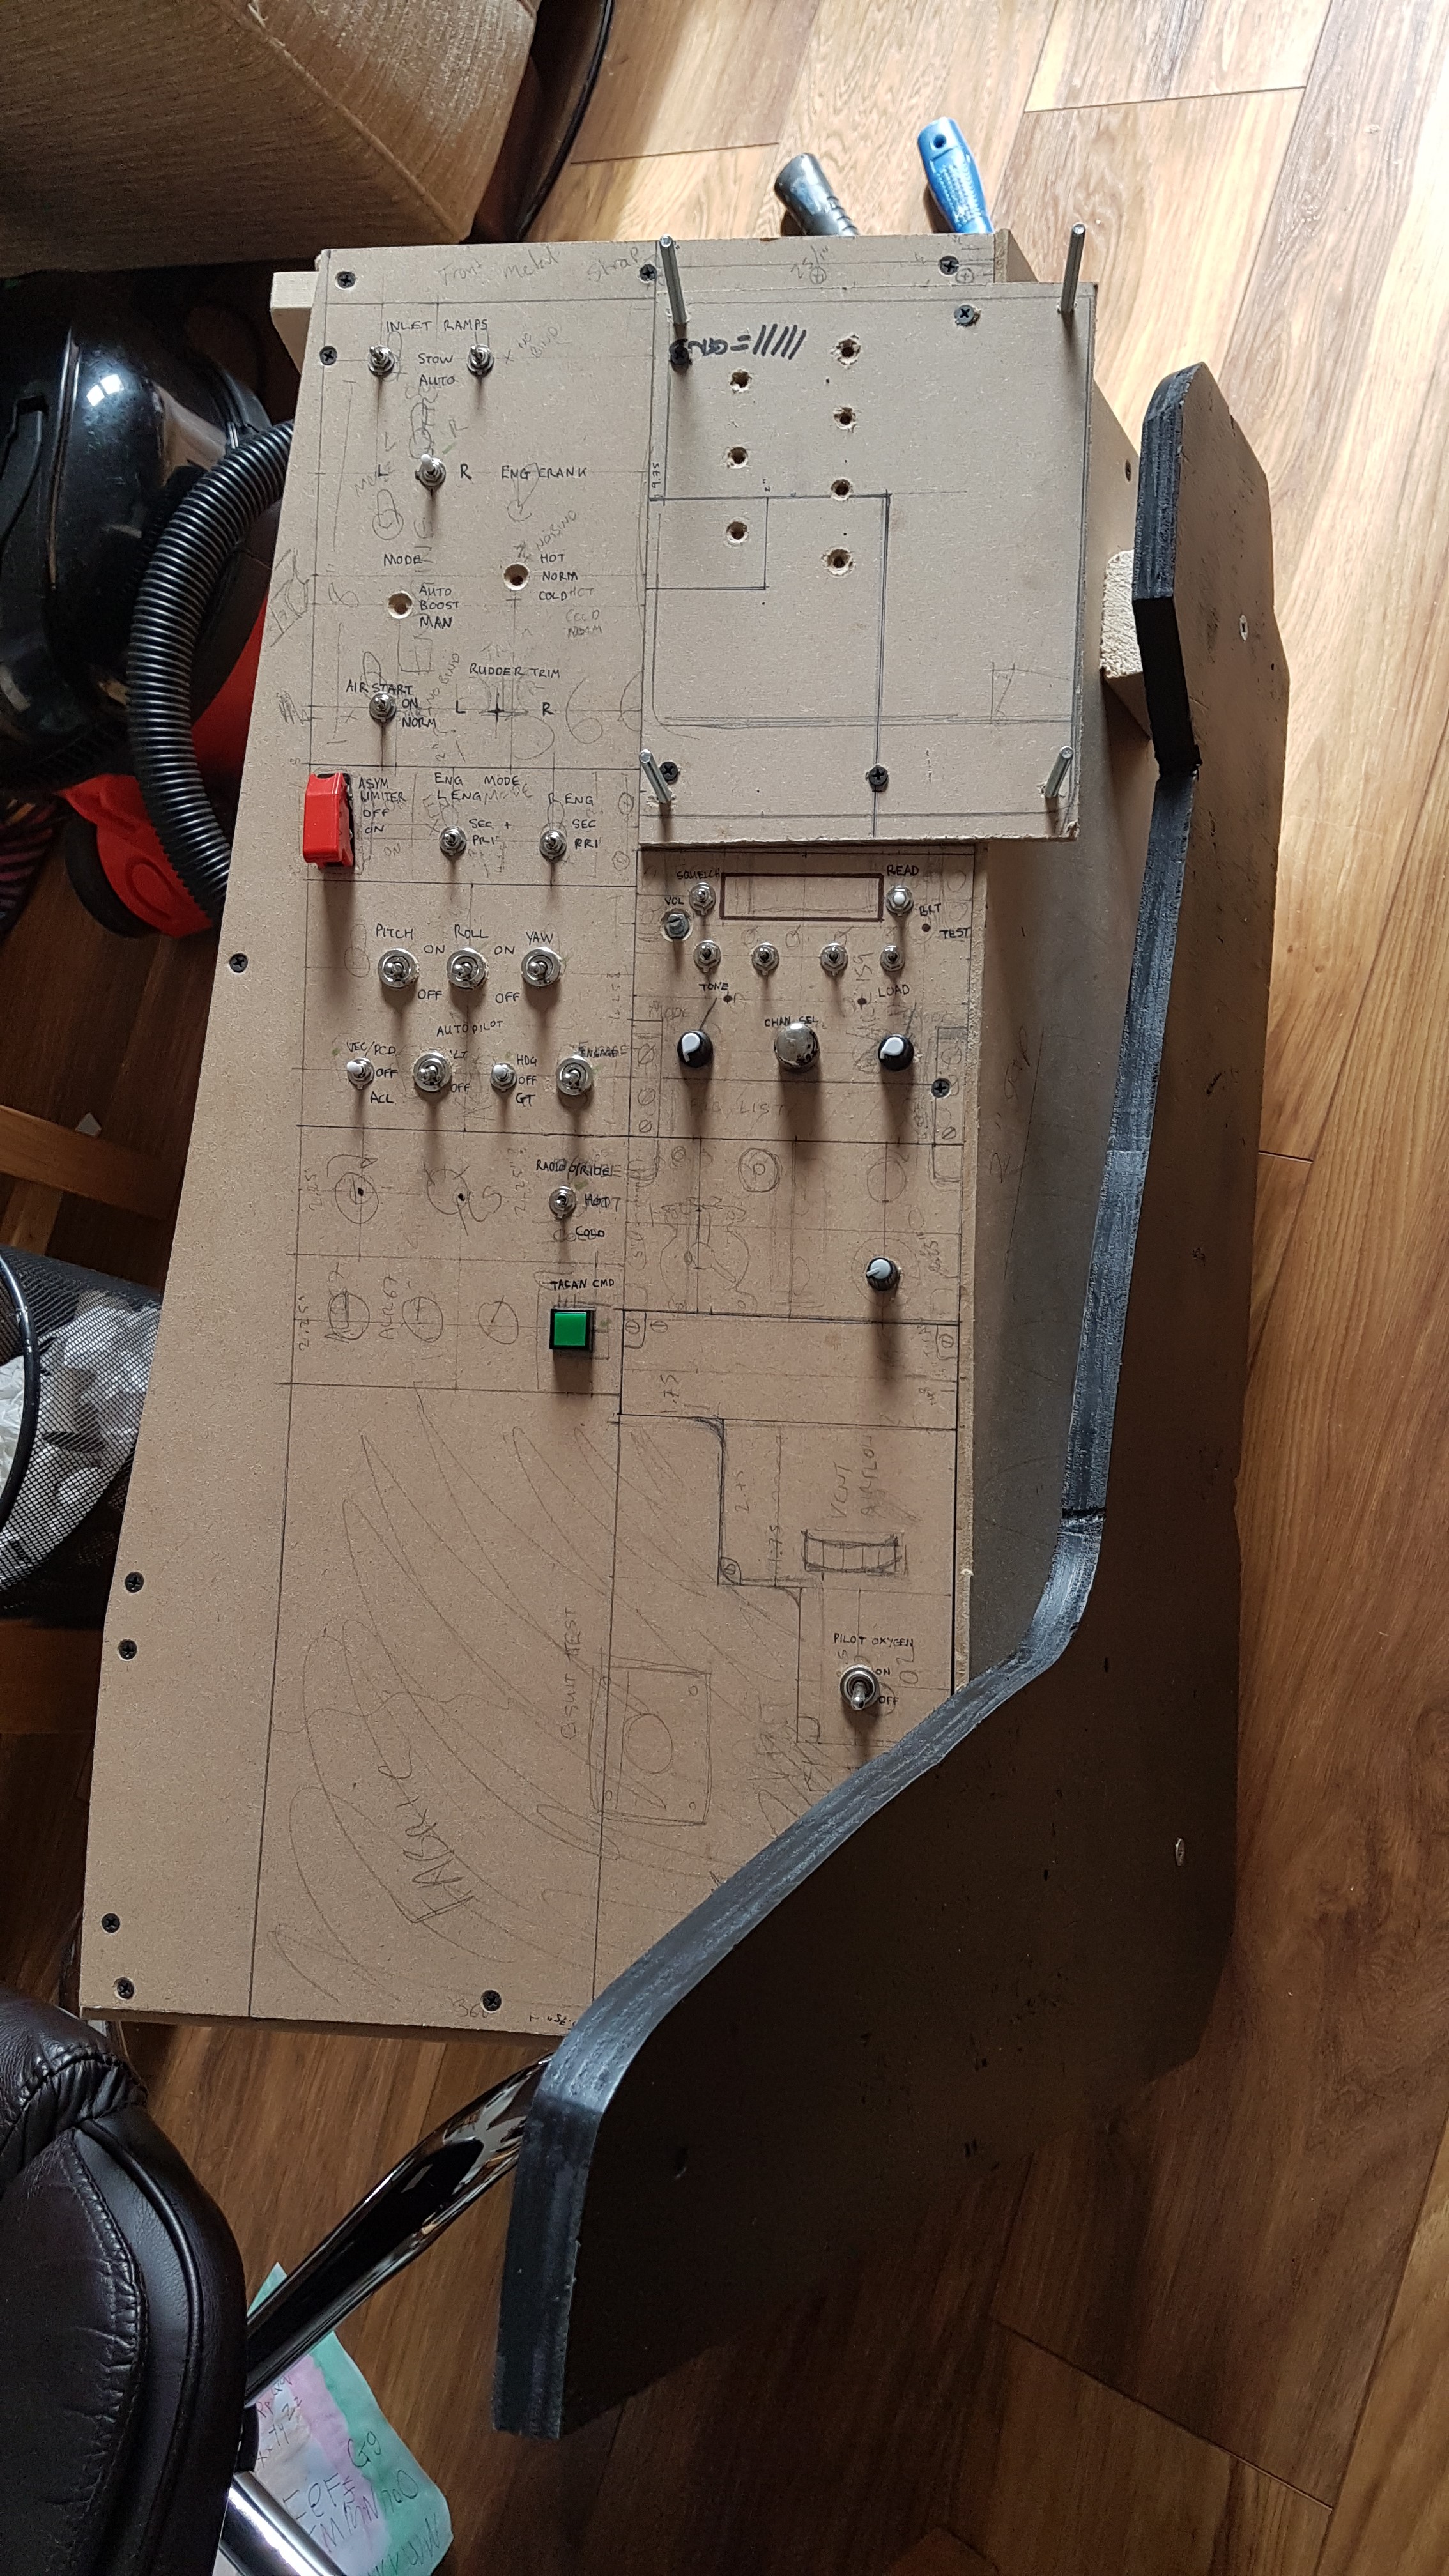
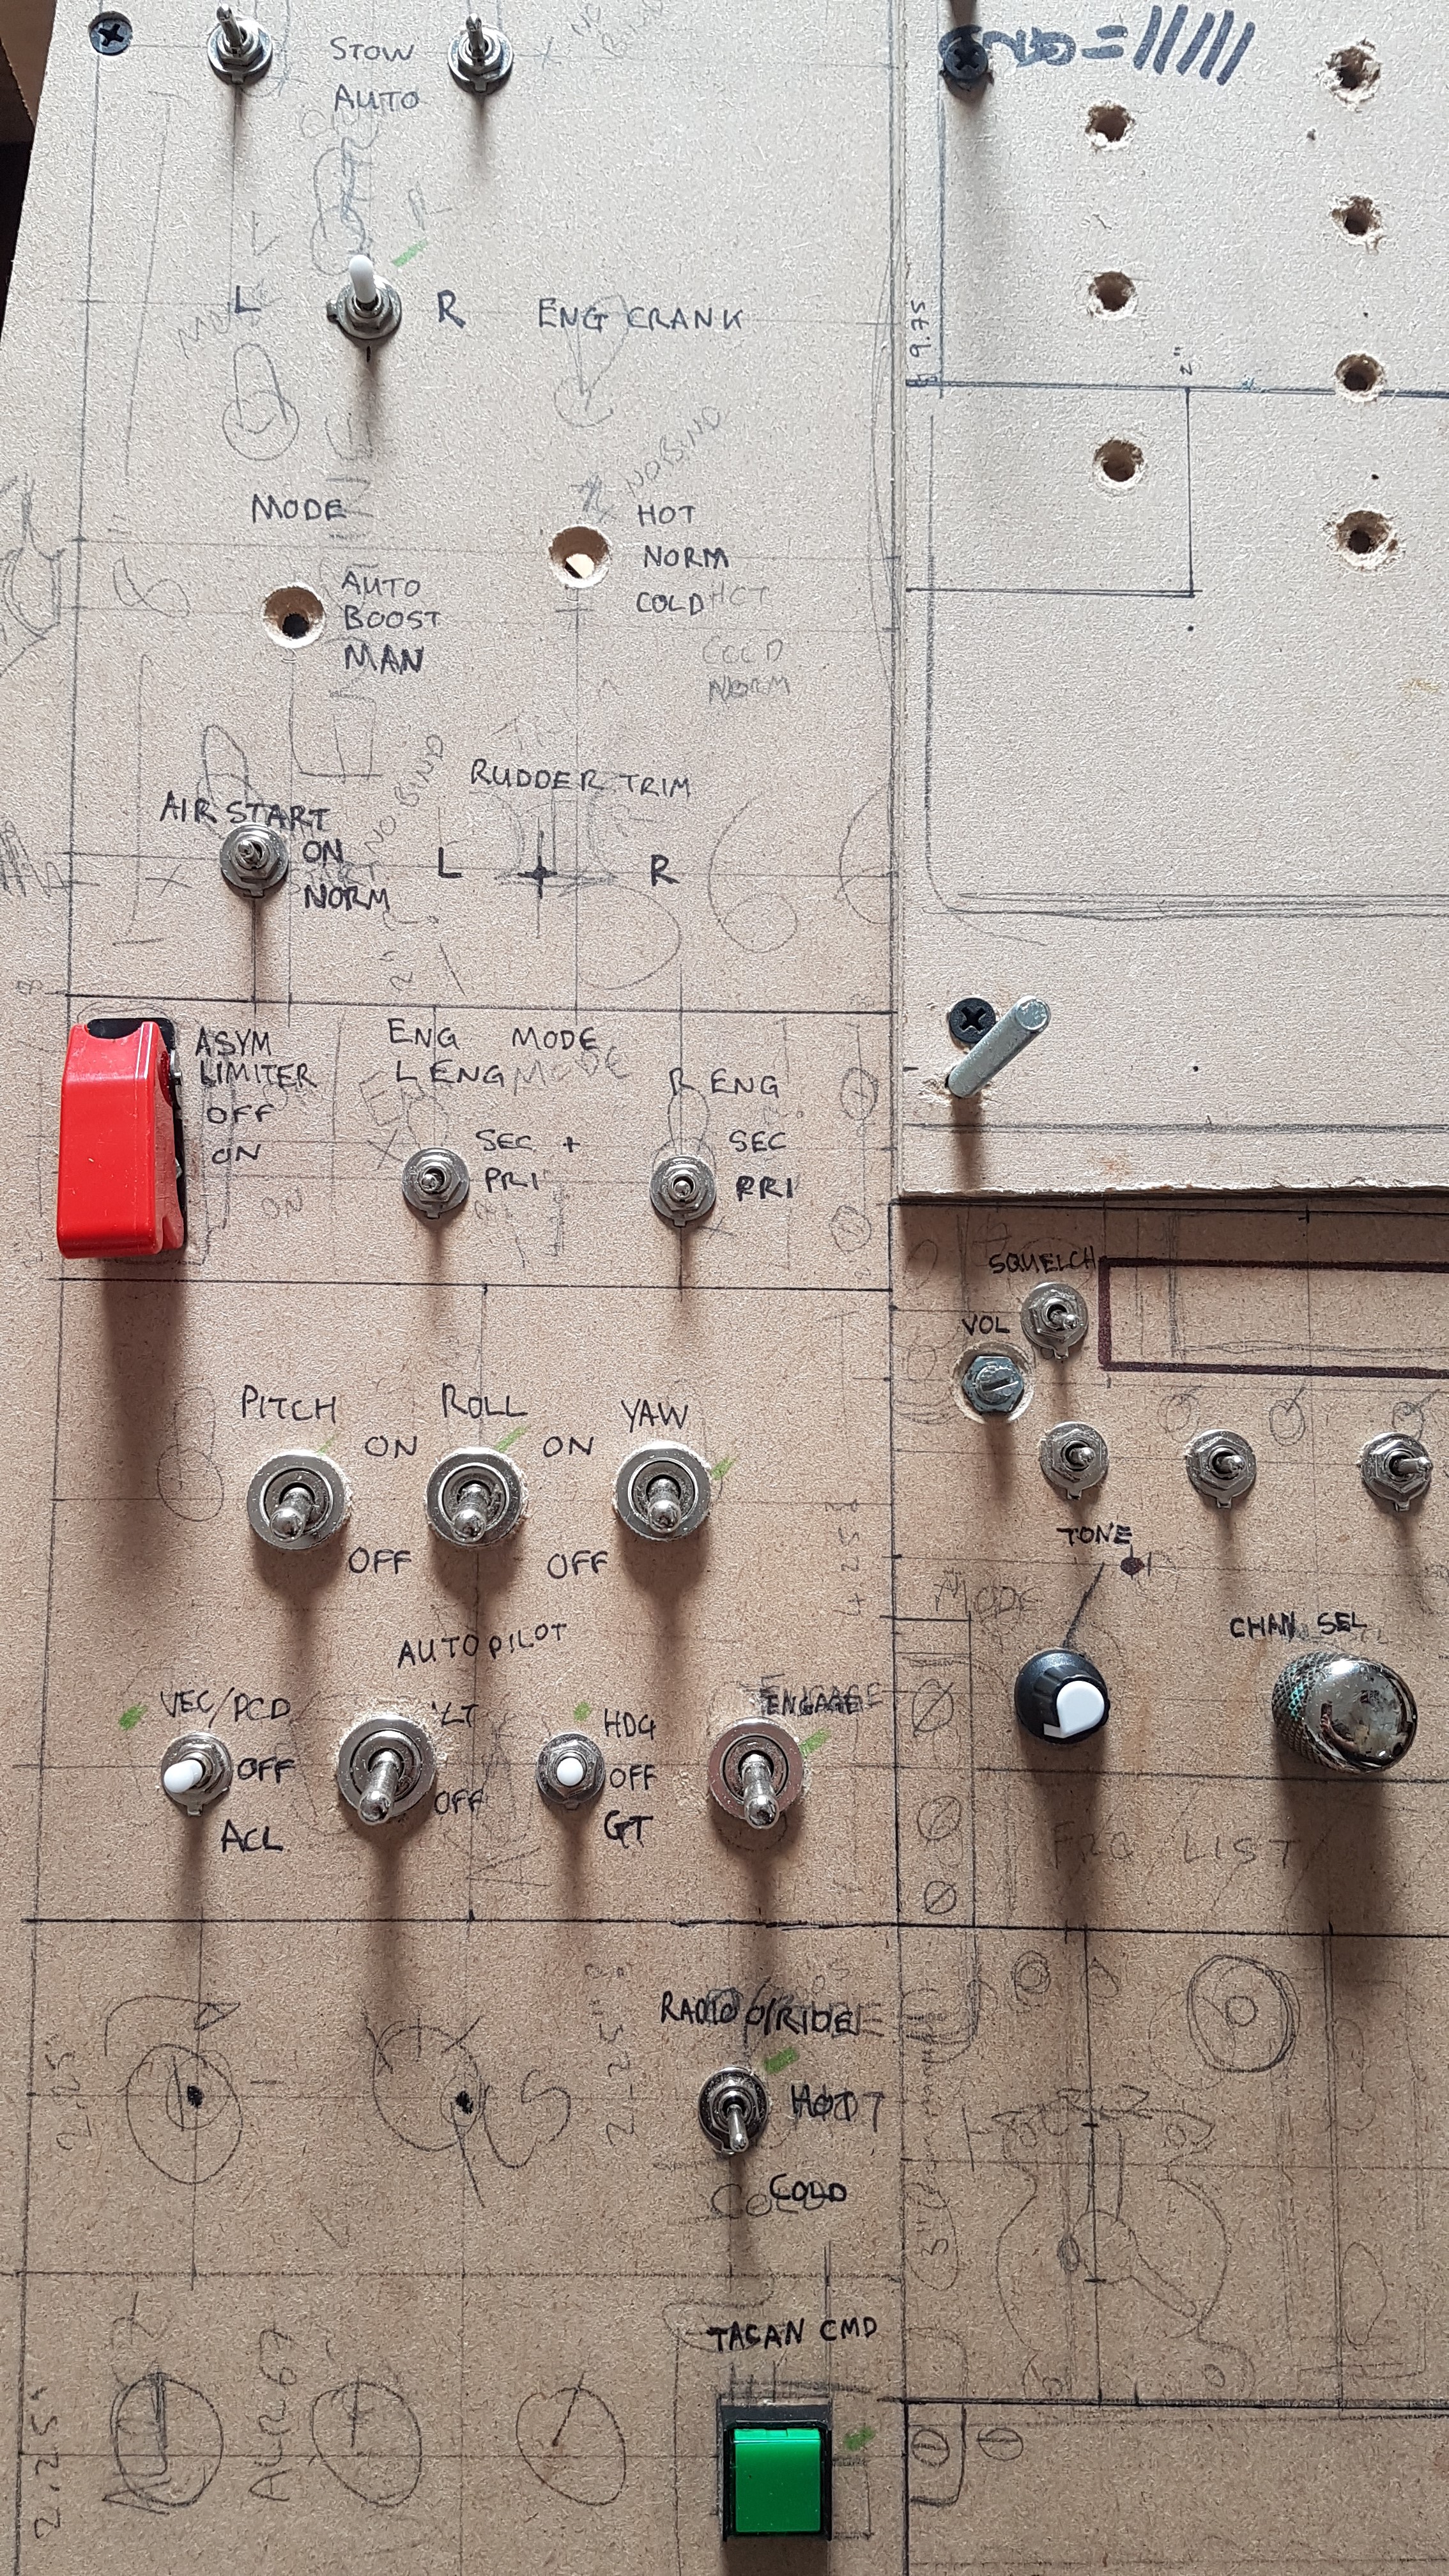
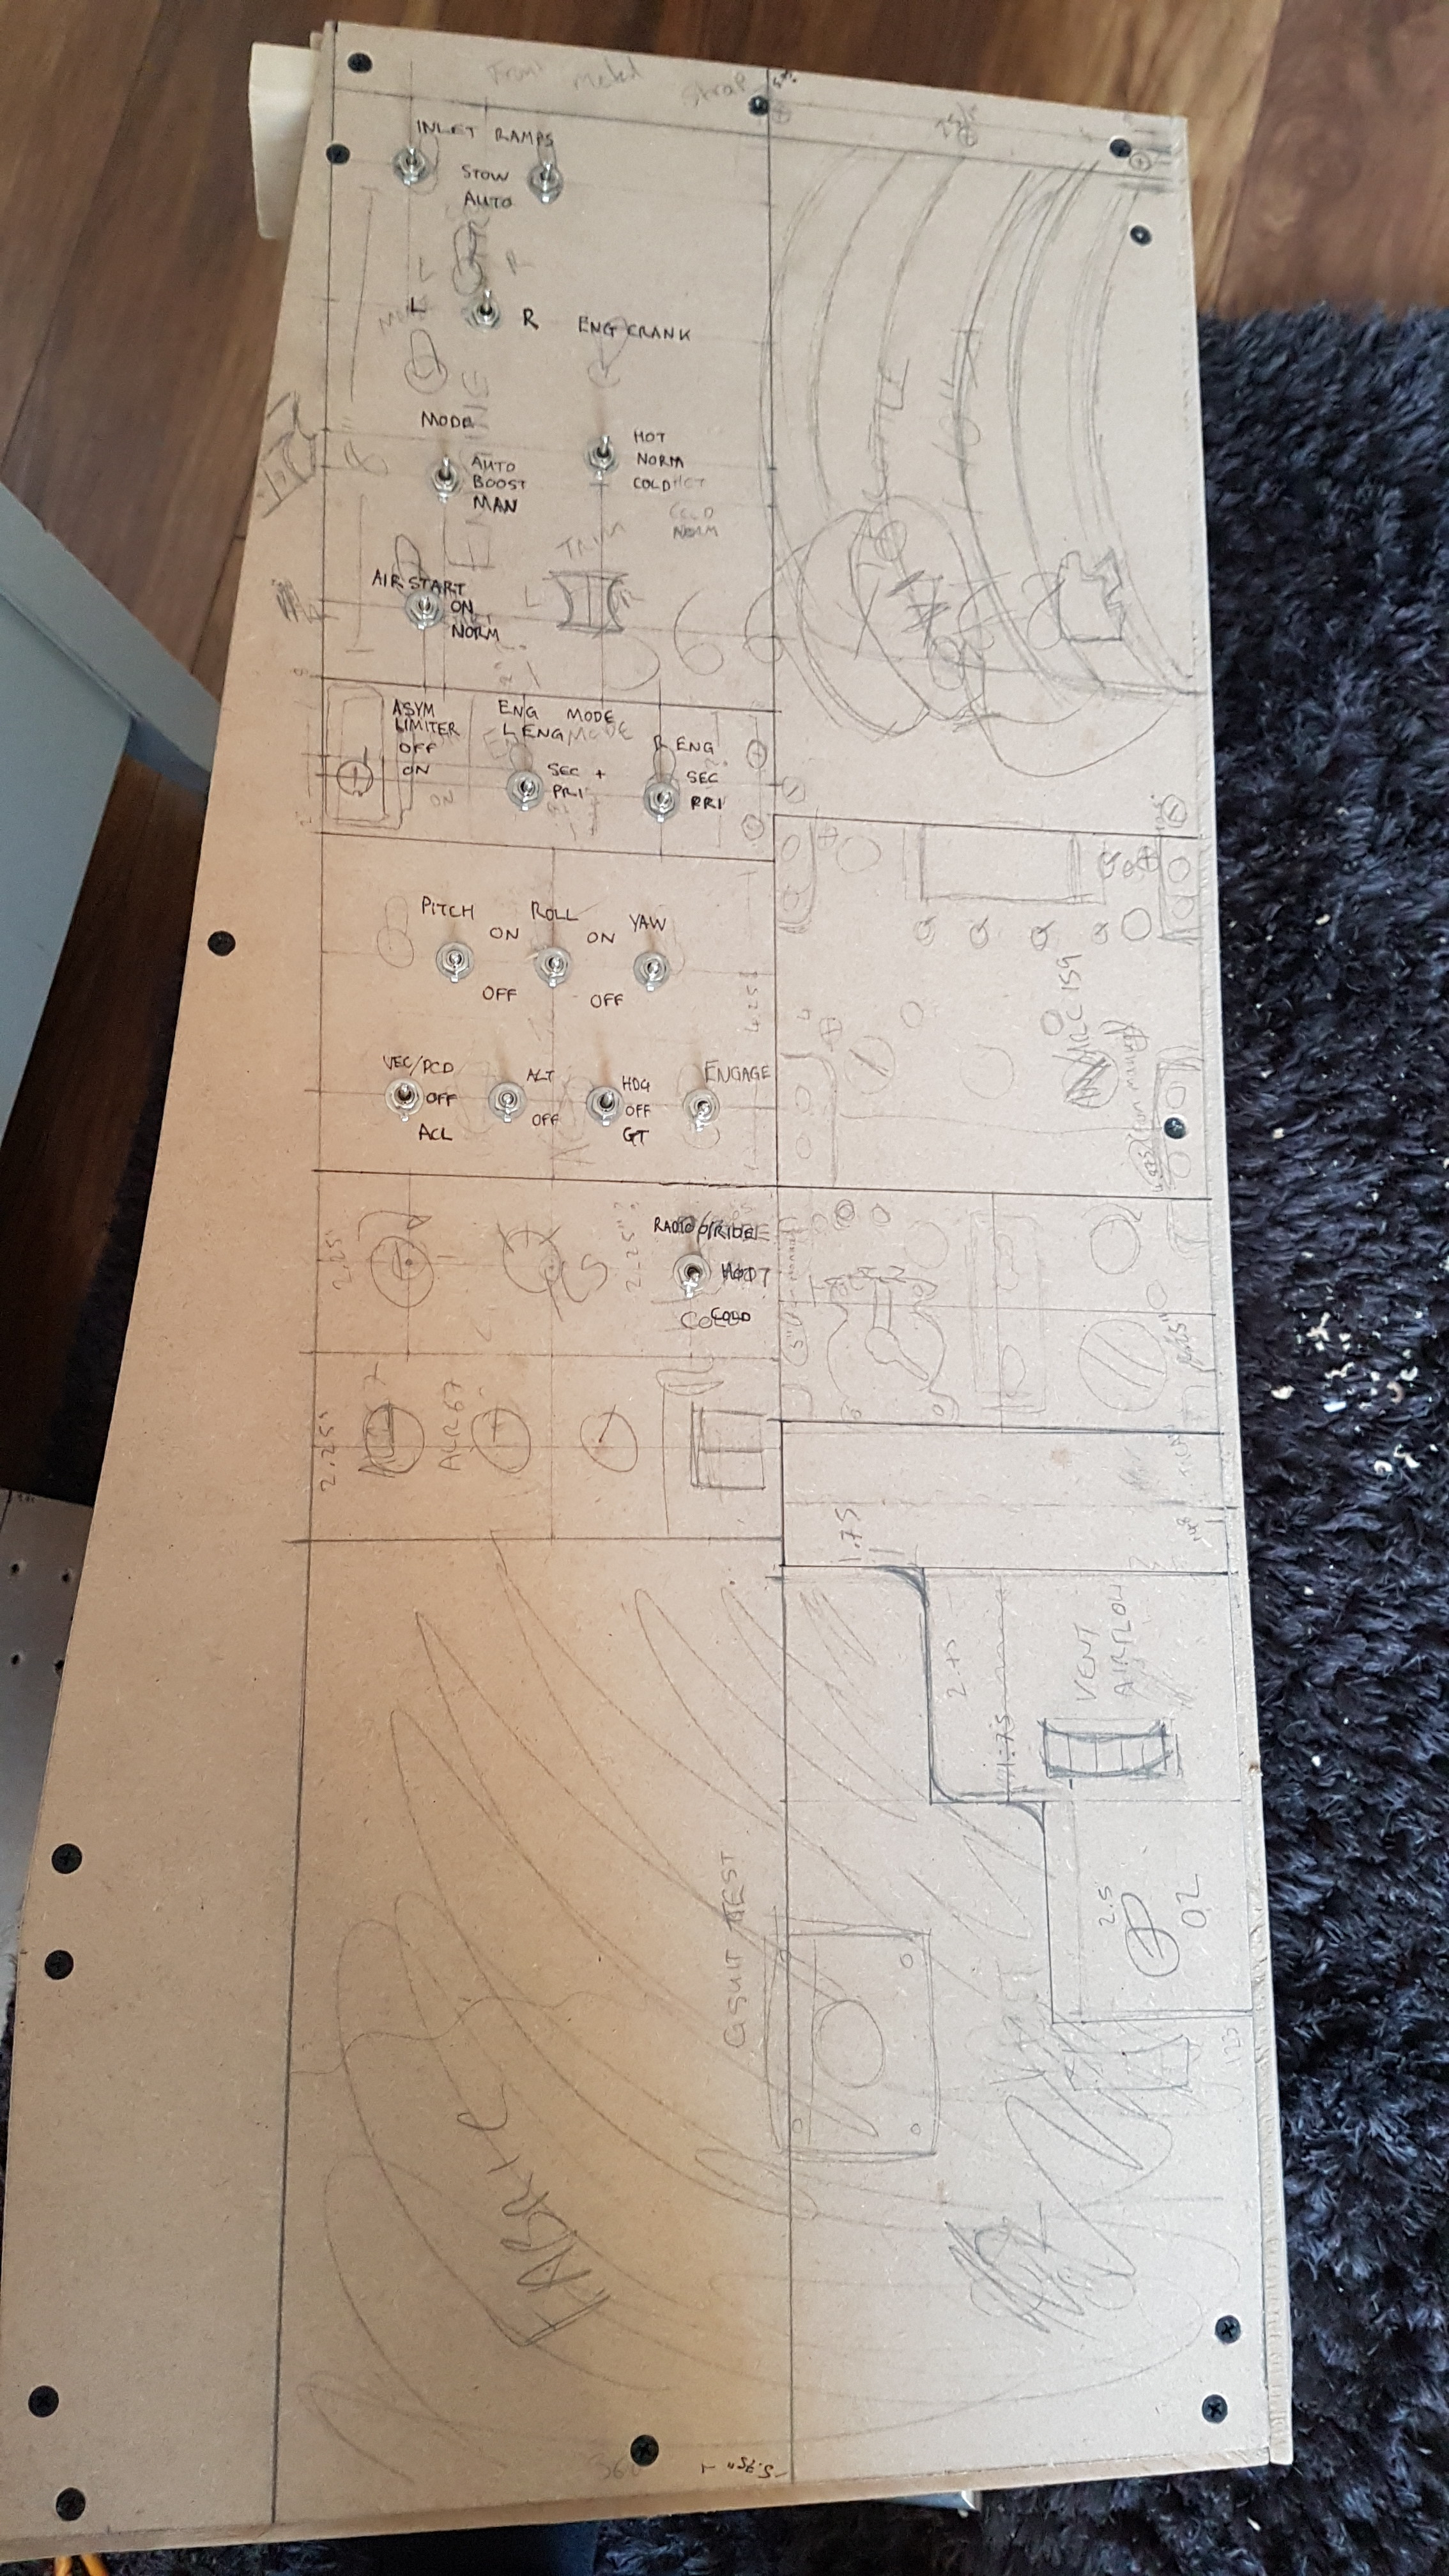
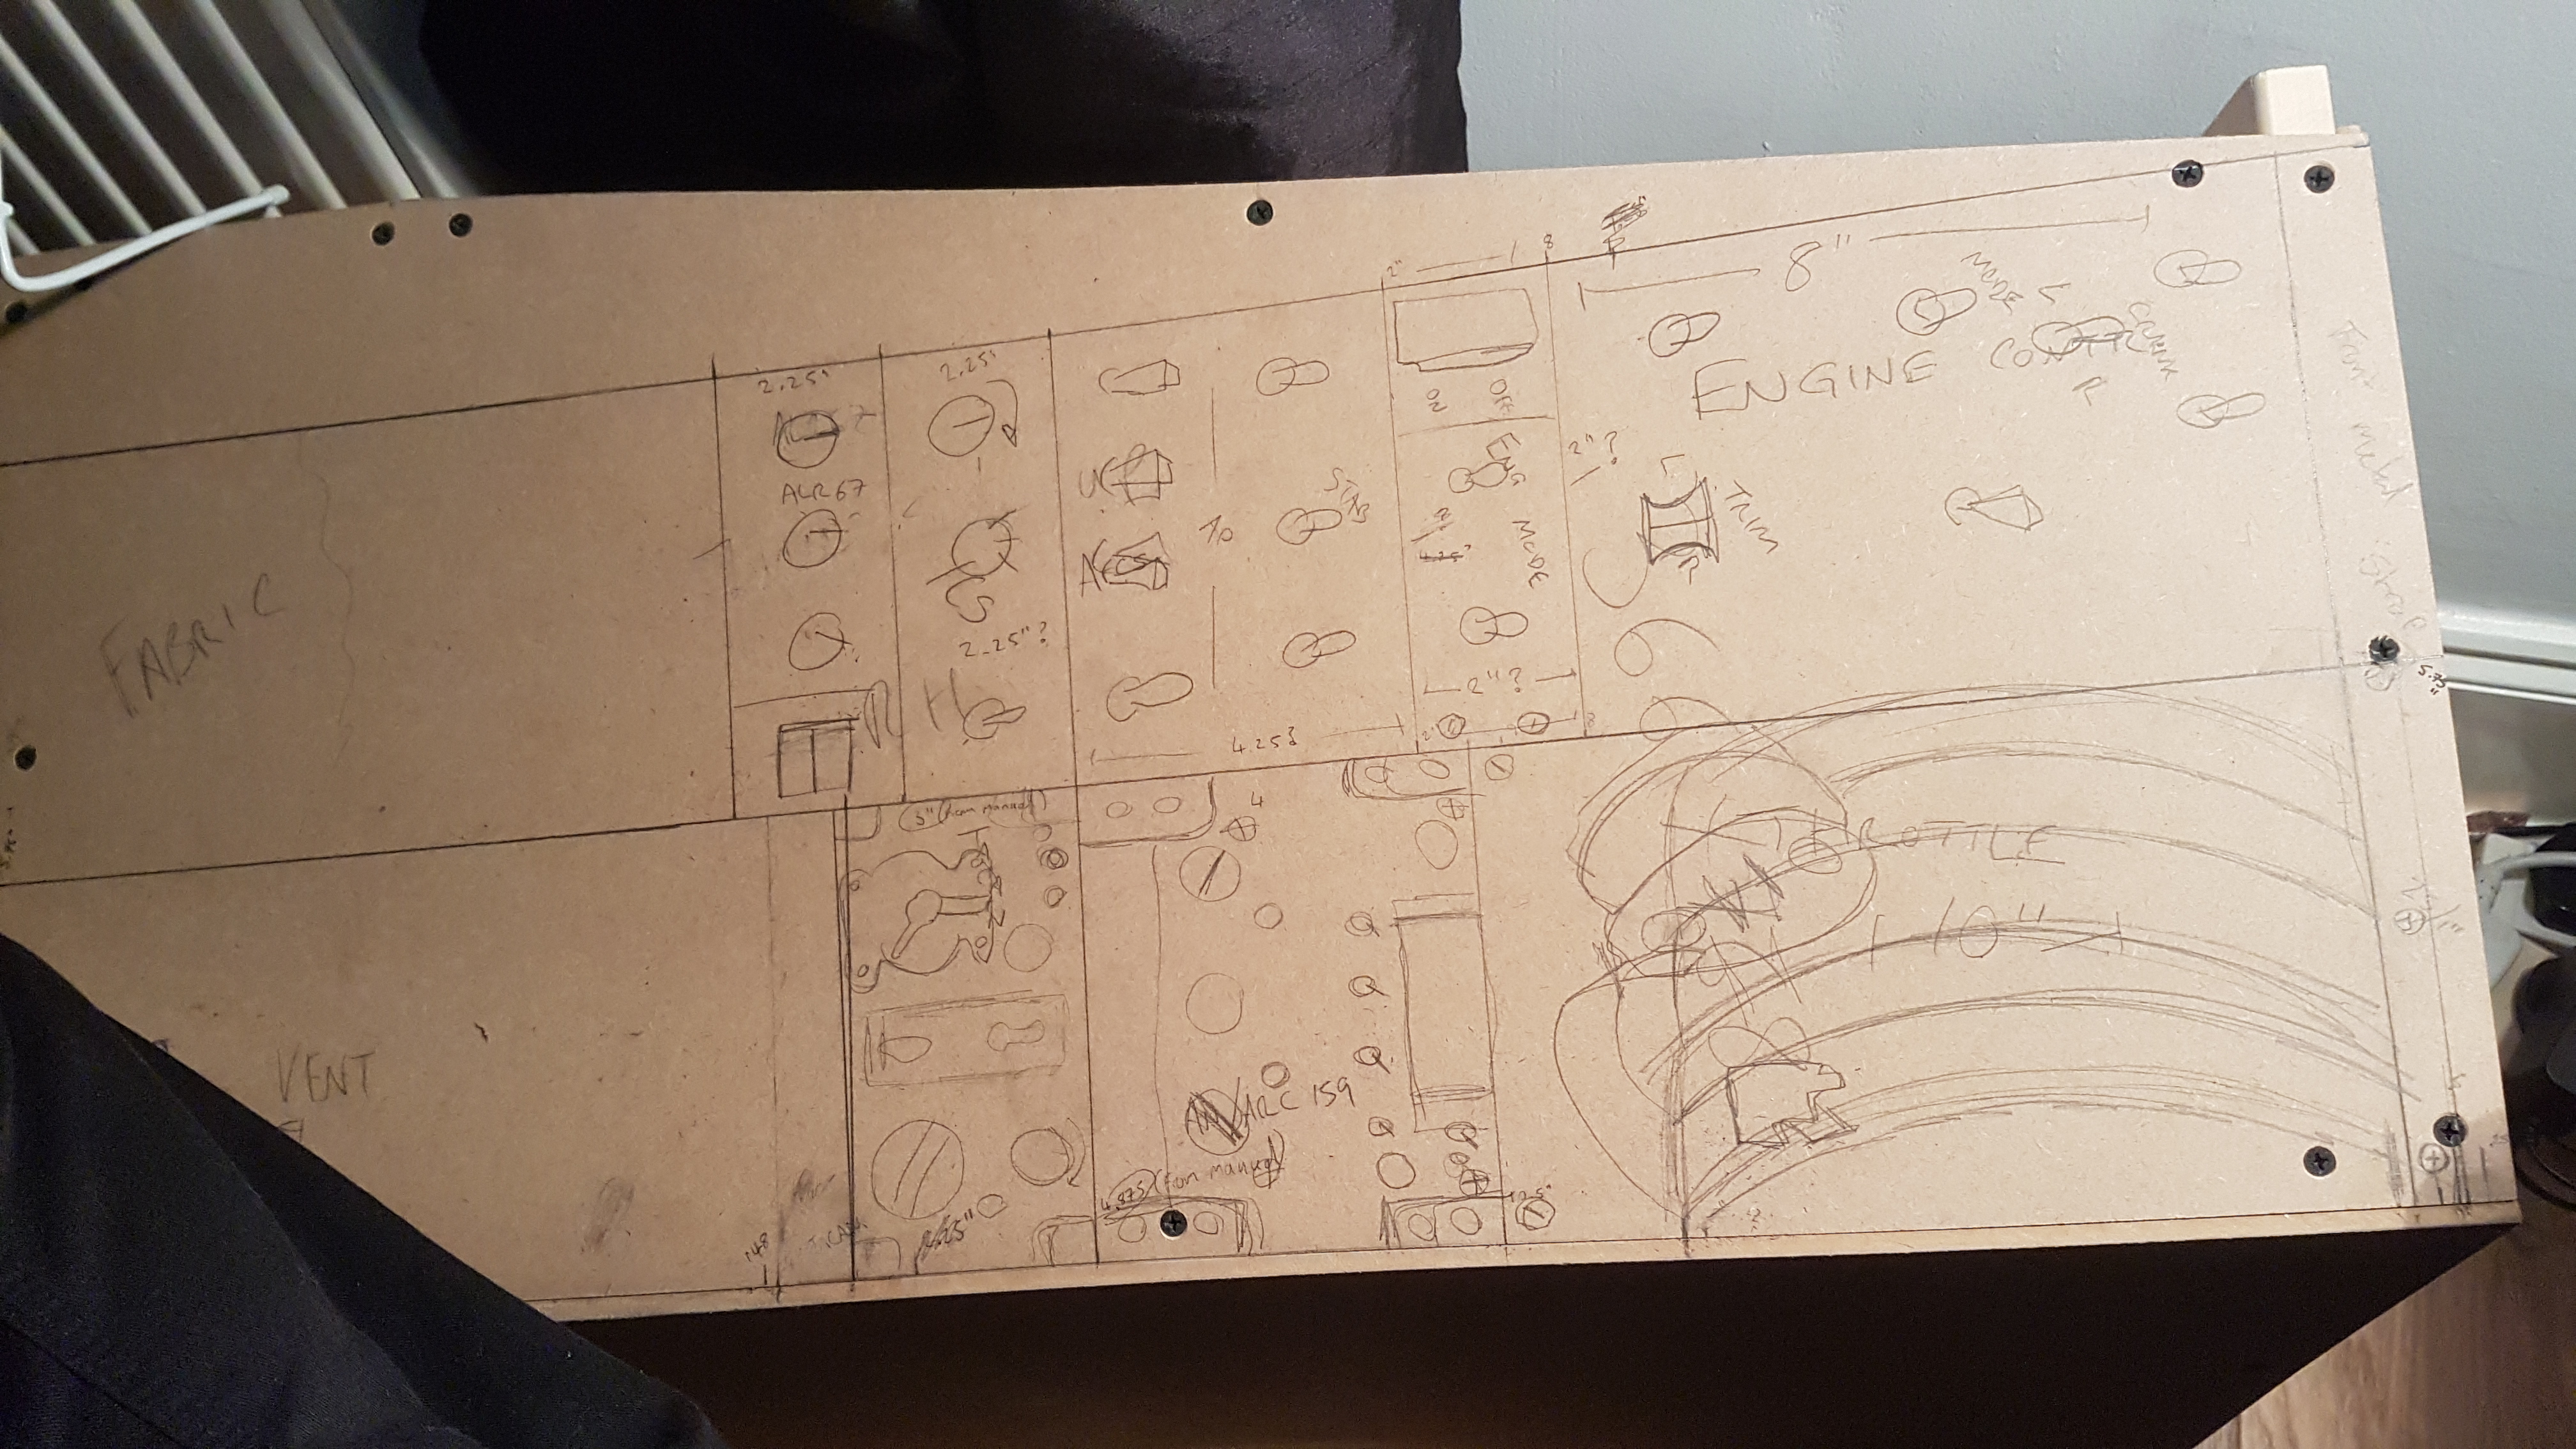
LH Panel coming along. Gonna need a USB hub or 5.
-
Thanks for the reply Nicholas. Also your release of the 3d cockpit model files was very appreciated! :)
-
Hi mate, what I did was scour this thread as recommended... i downloaded all the 3d models people had made in SketchUp and took measurements off those. HERE: https://www.dropbox.com/sh/zcpwd0wslpyhz9n/AABB80XFxD_jBFxvEOXGpGTca?dl=0
-
Lol I'm English too and barely speak Spanish, thought it may be useful in L.A. last year.
-
Hi, Love the module! Great work HB :D Is there any chance of improving the module wallpaper? Of all the pictures of the F14 available, even pre-release screenshots... why that one? :) Personally I change the background after each update (it reverts every time.) Thanks.
-

Heatblur F-14 Tomcat Screenshots and Videos (DISCUSSION allowed)
Mongoose556 replied to Vino's topic in DCS: F-14A & B
2 AI "bugs" and one nice one. Should I leave a note on the AI guys canopy? "FOLD WINGS!!!"
-
"Get him, there he is man, all shiny and chrome!" - Jester with a Mad Max reference.
-
Muchos gracias hermano!
-
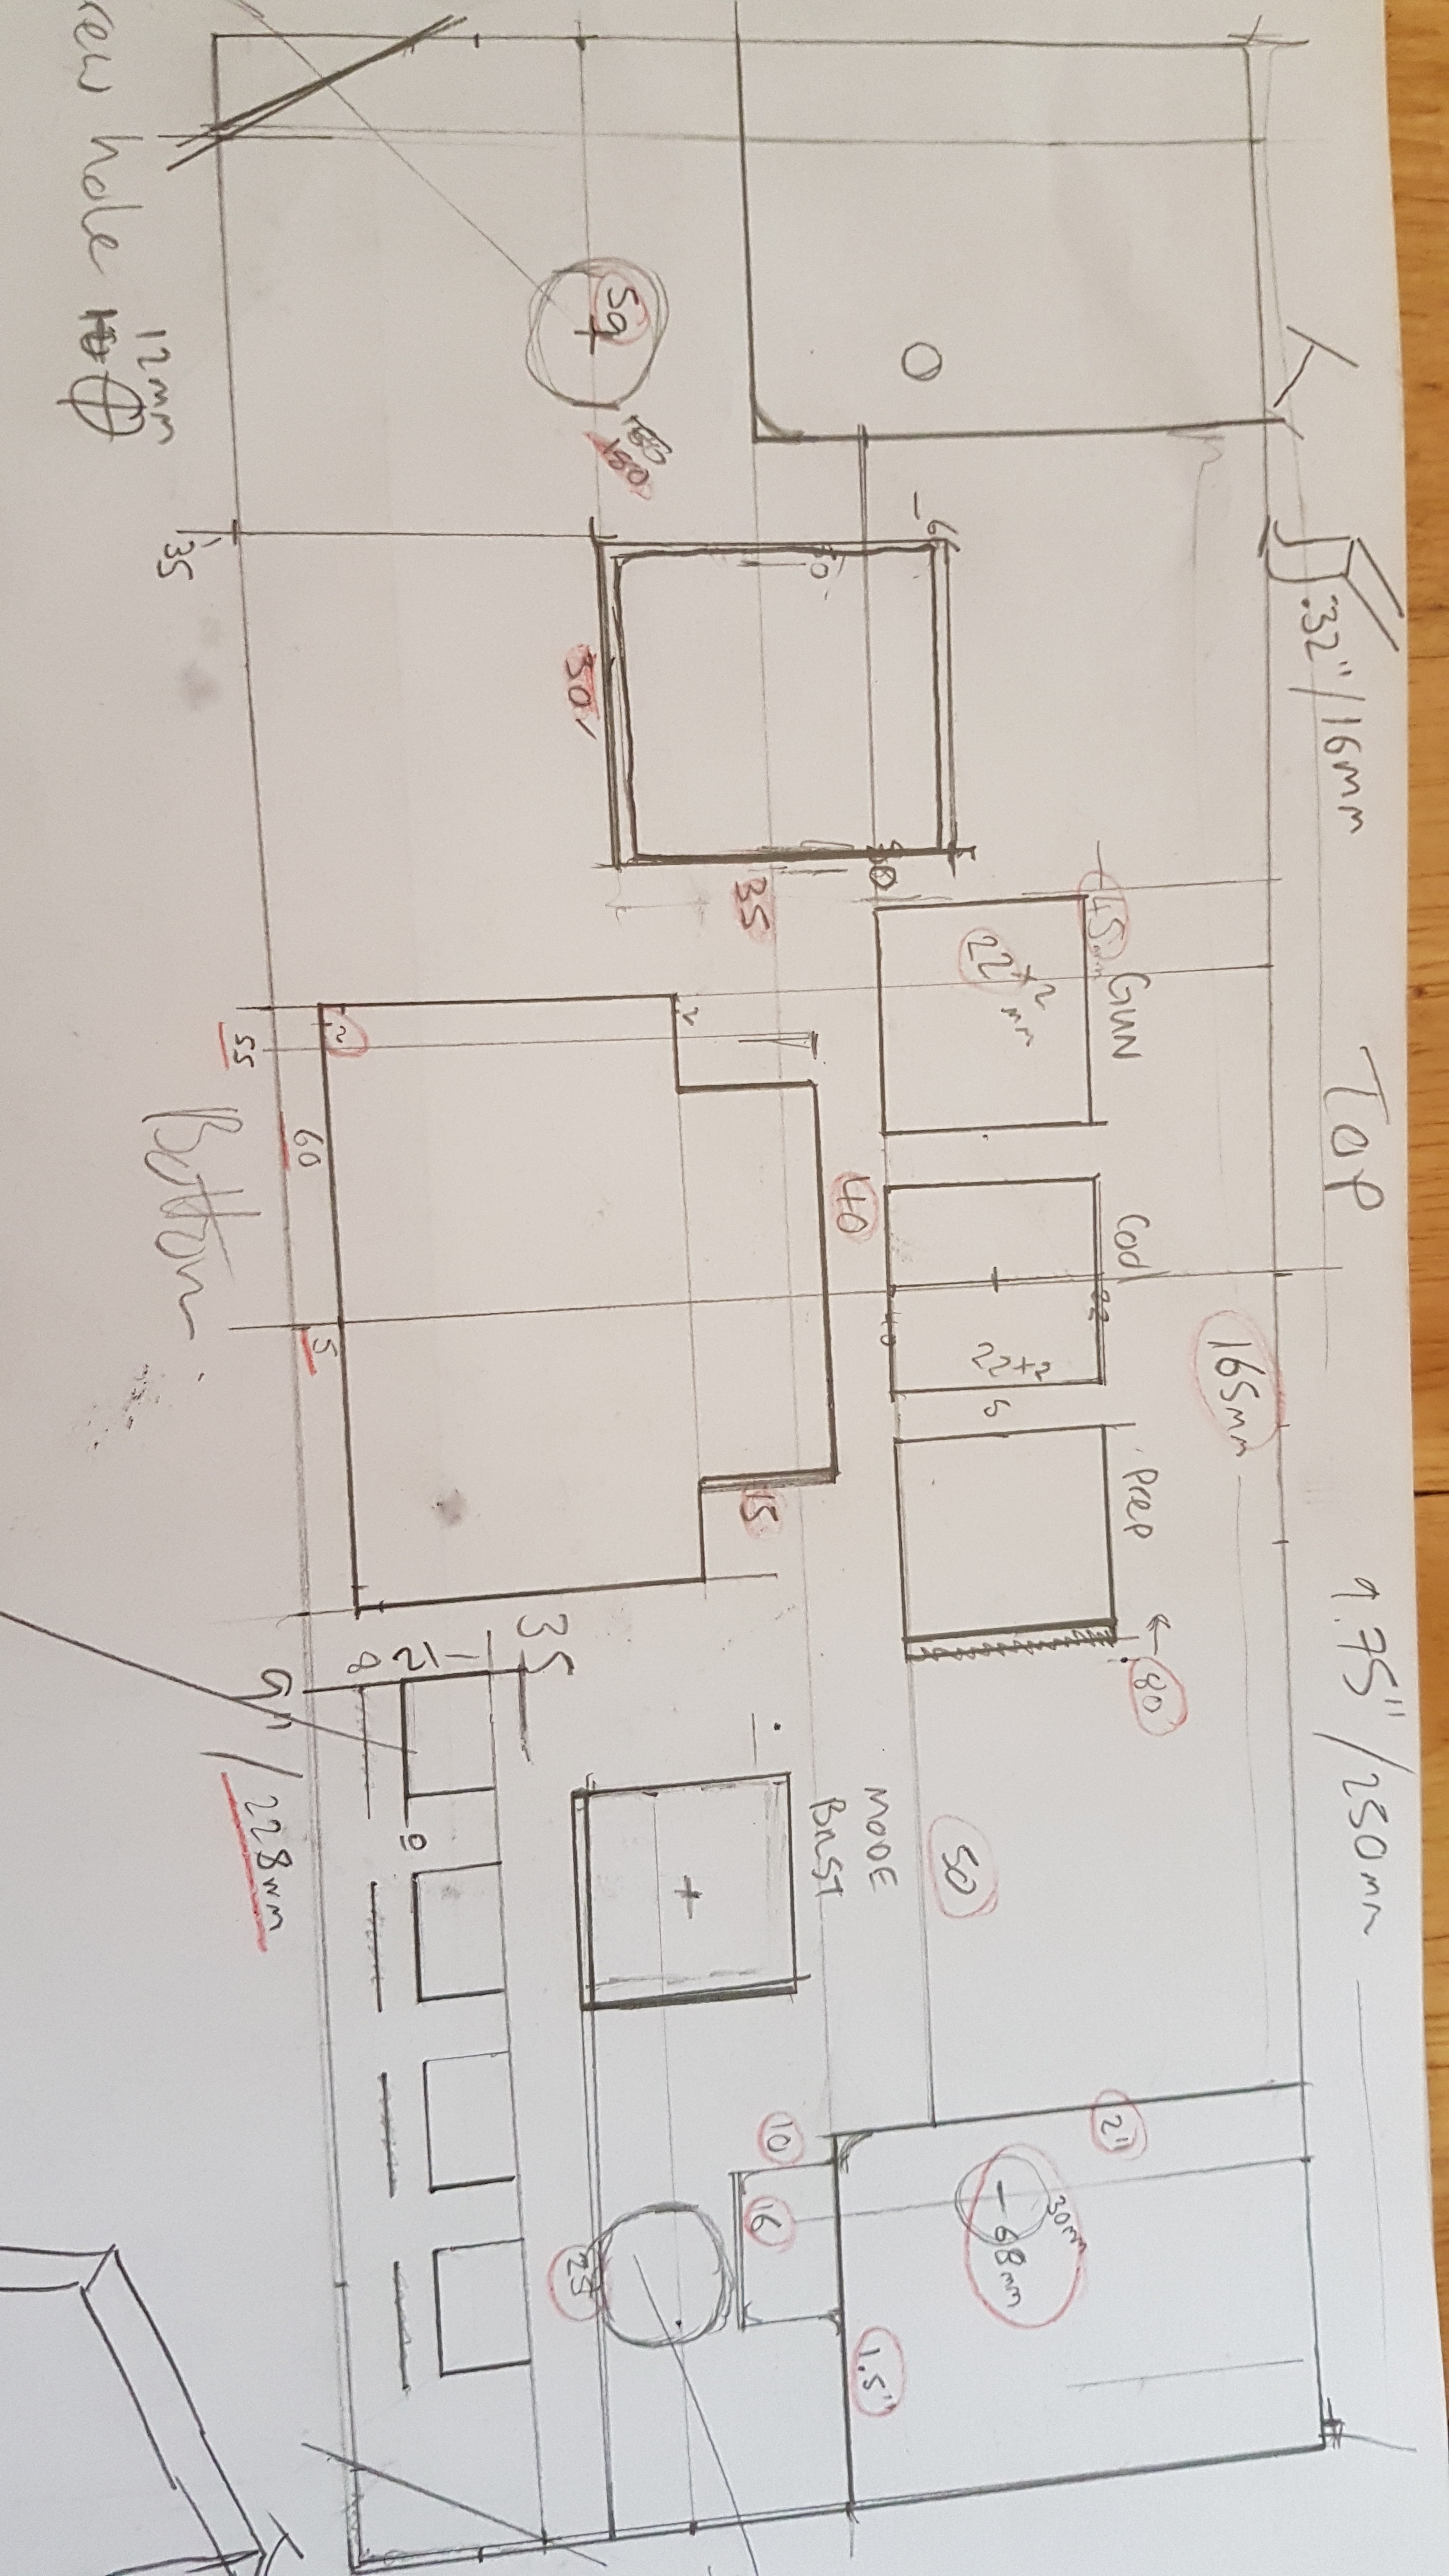
That would be great, thanks. My estimate is 4.25"x 5.75". Funny thing is I took some screenshots from the cockpit, and at a certain zoom they're almost 1:1!
-
"Dear Santa..." That's a lottery win purchase!
-
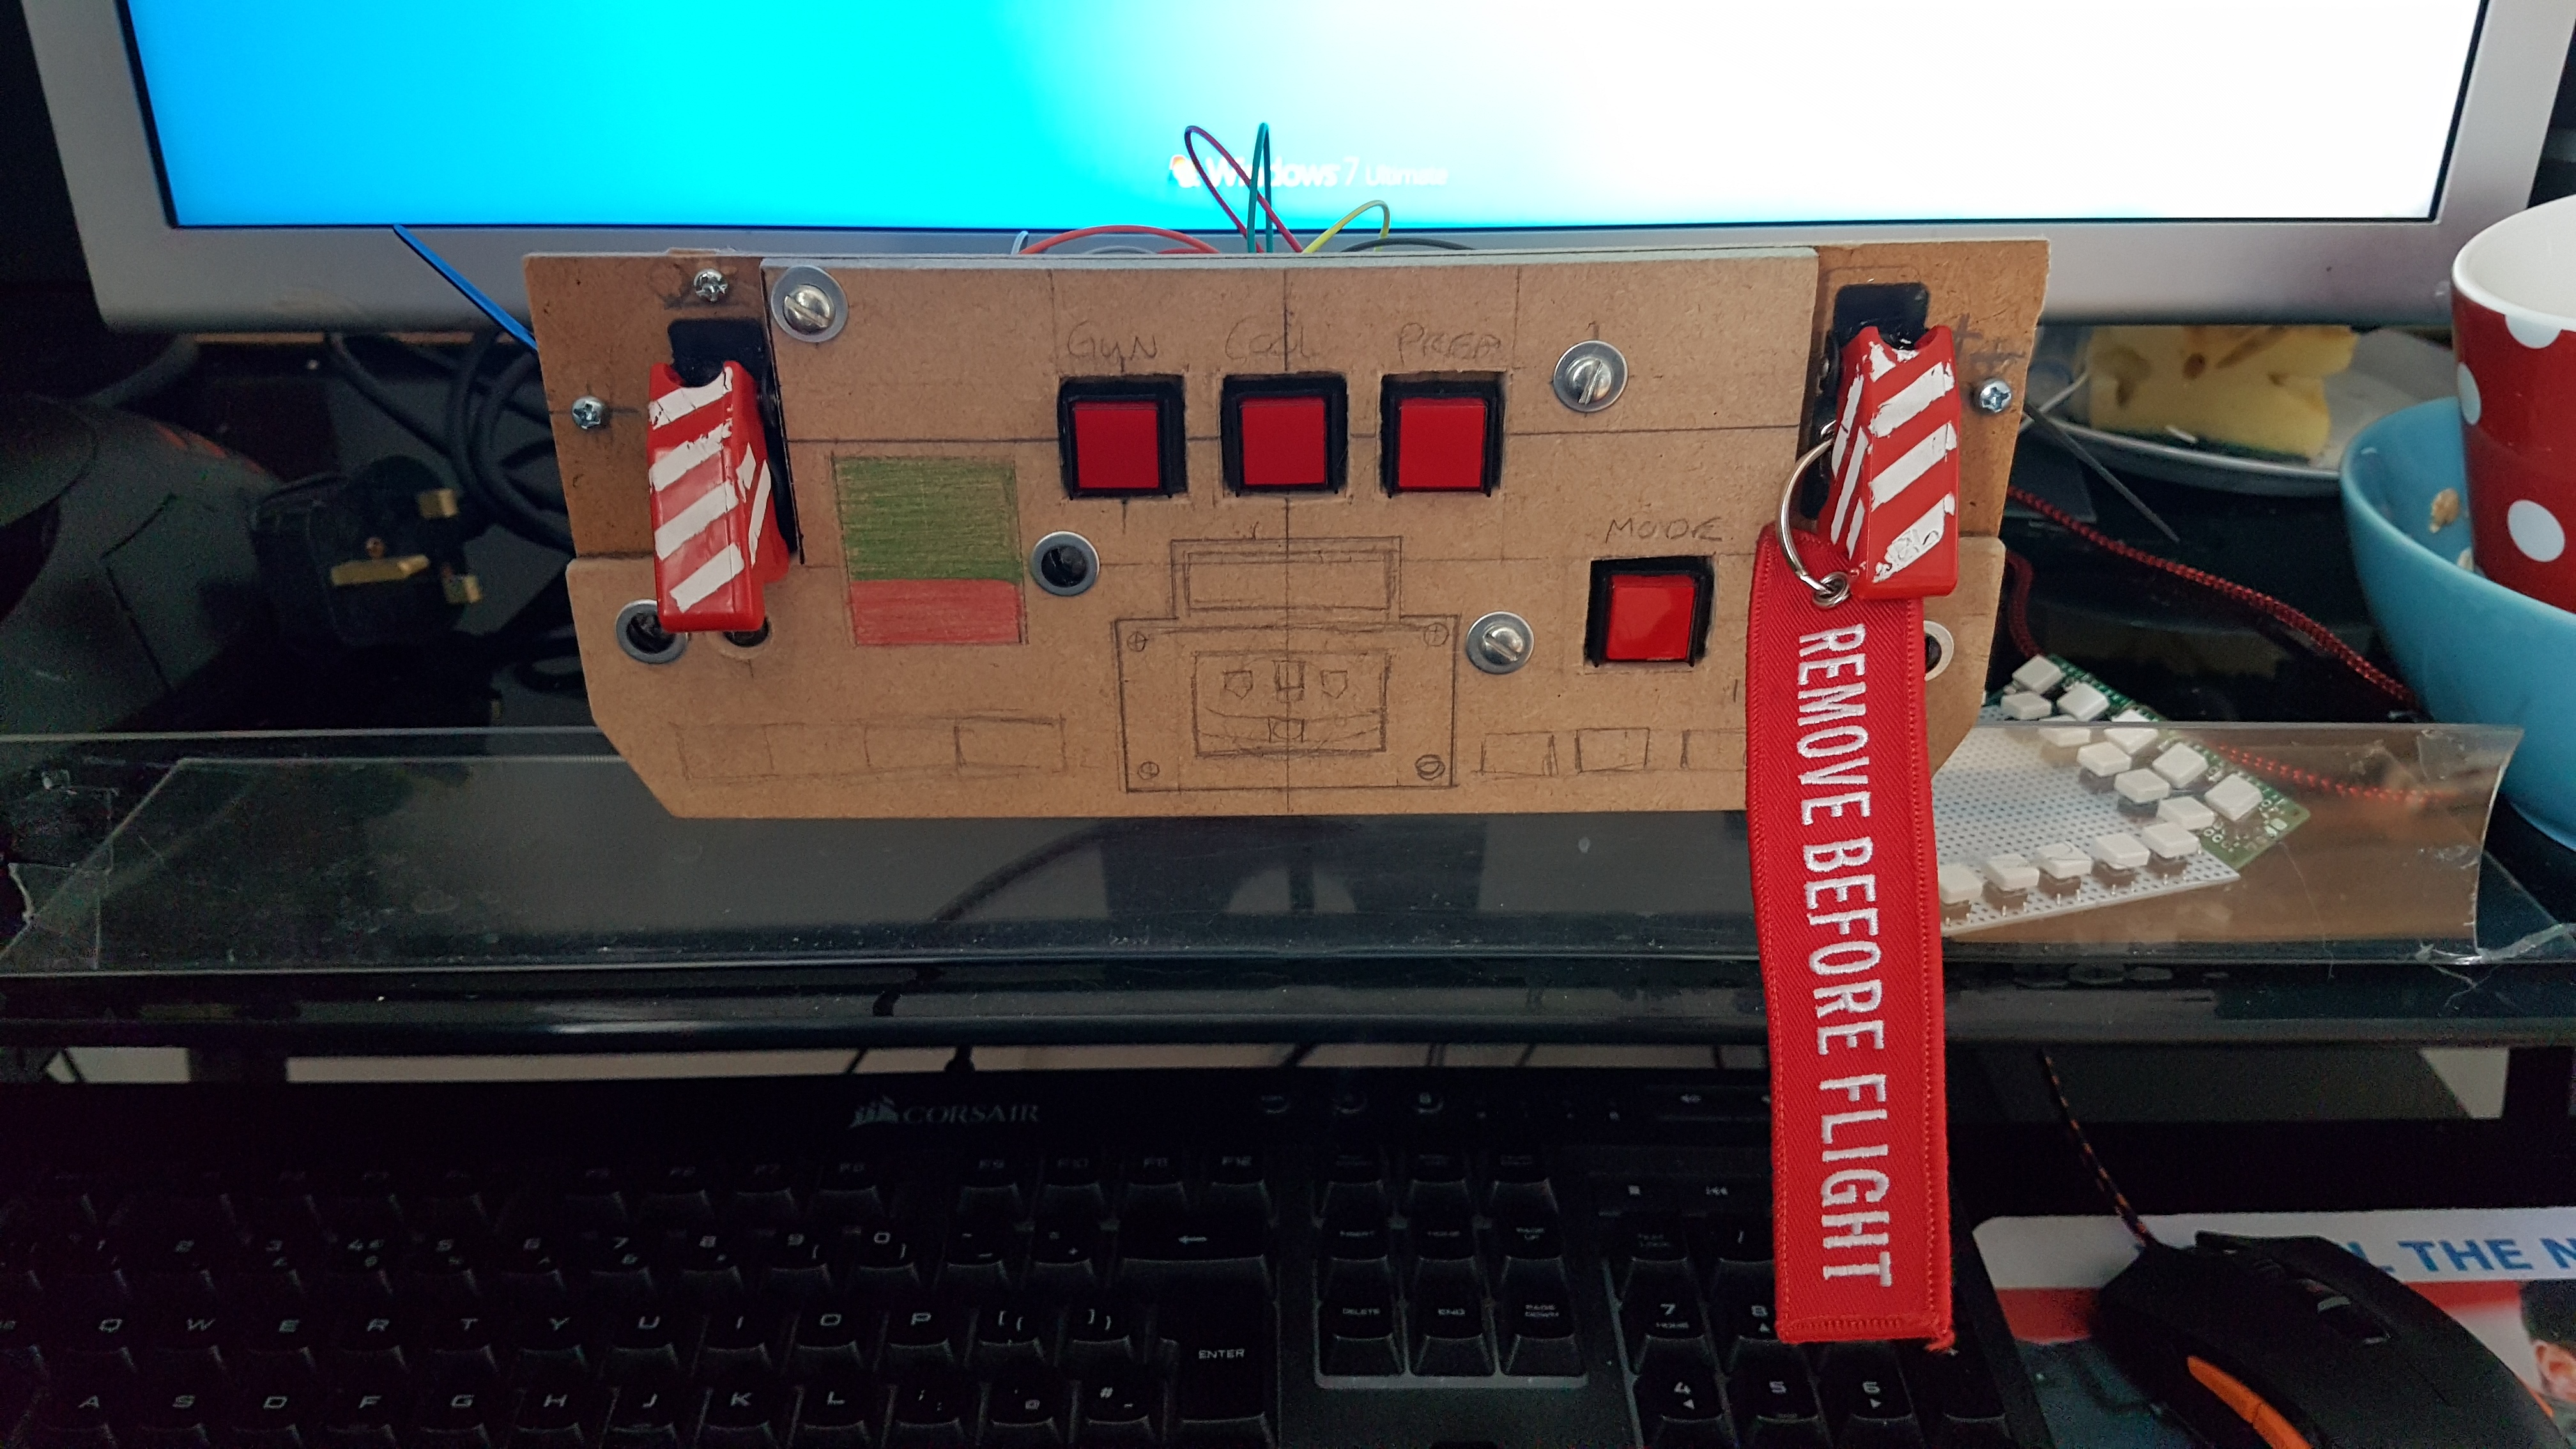
Panel: 9.75 " x 4.00" Bottom of the panel is 9.00". Angles come in at 3.25" from top Cuts for Master arm and ACM switch is 1.5" x 2.0" ~2.75" from left/right edge for Gun/Prep button. Drawing measurements are a mix of mm and inches, sorry!
-
Hi, that looks good :) Any chance I could have the measurements? :) I can give you the ACM panel measurements.
-
Thanks, Wish I did! I'm using hand tools in my dining room lol :) Same if anyone wants my measurements, I'm happy to share.
-
Nice stick work :) Built this today! Used mumbles sketchup plans. Thanks!
-
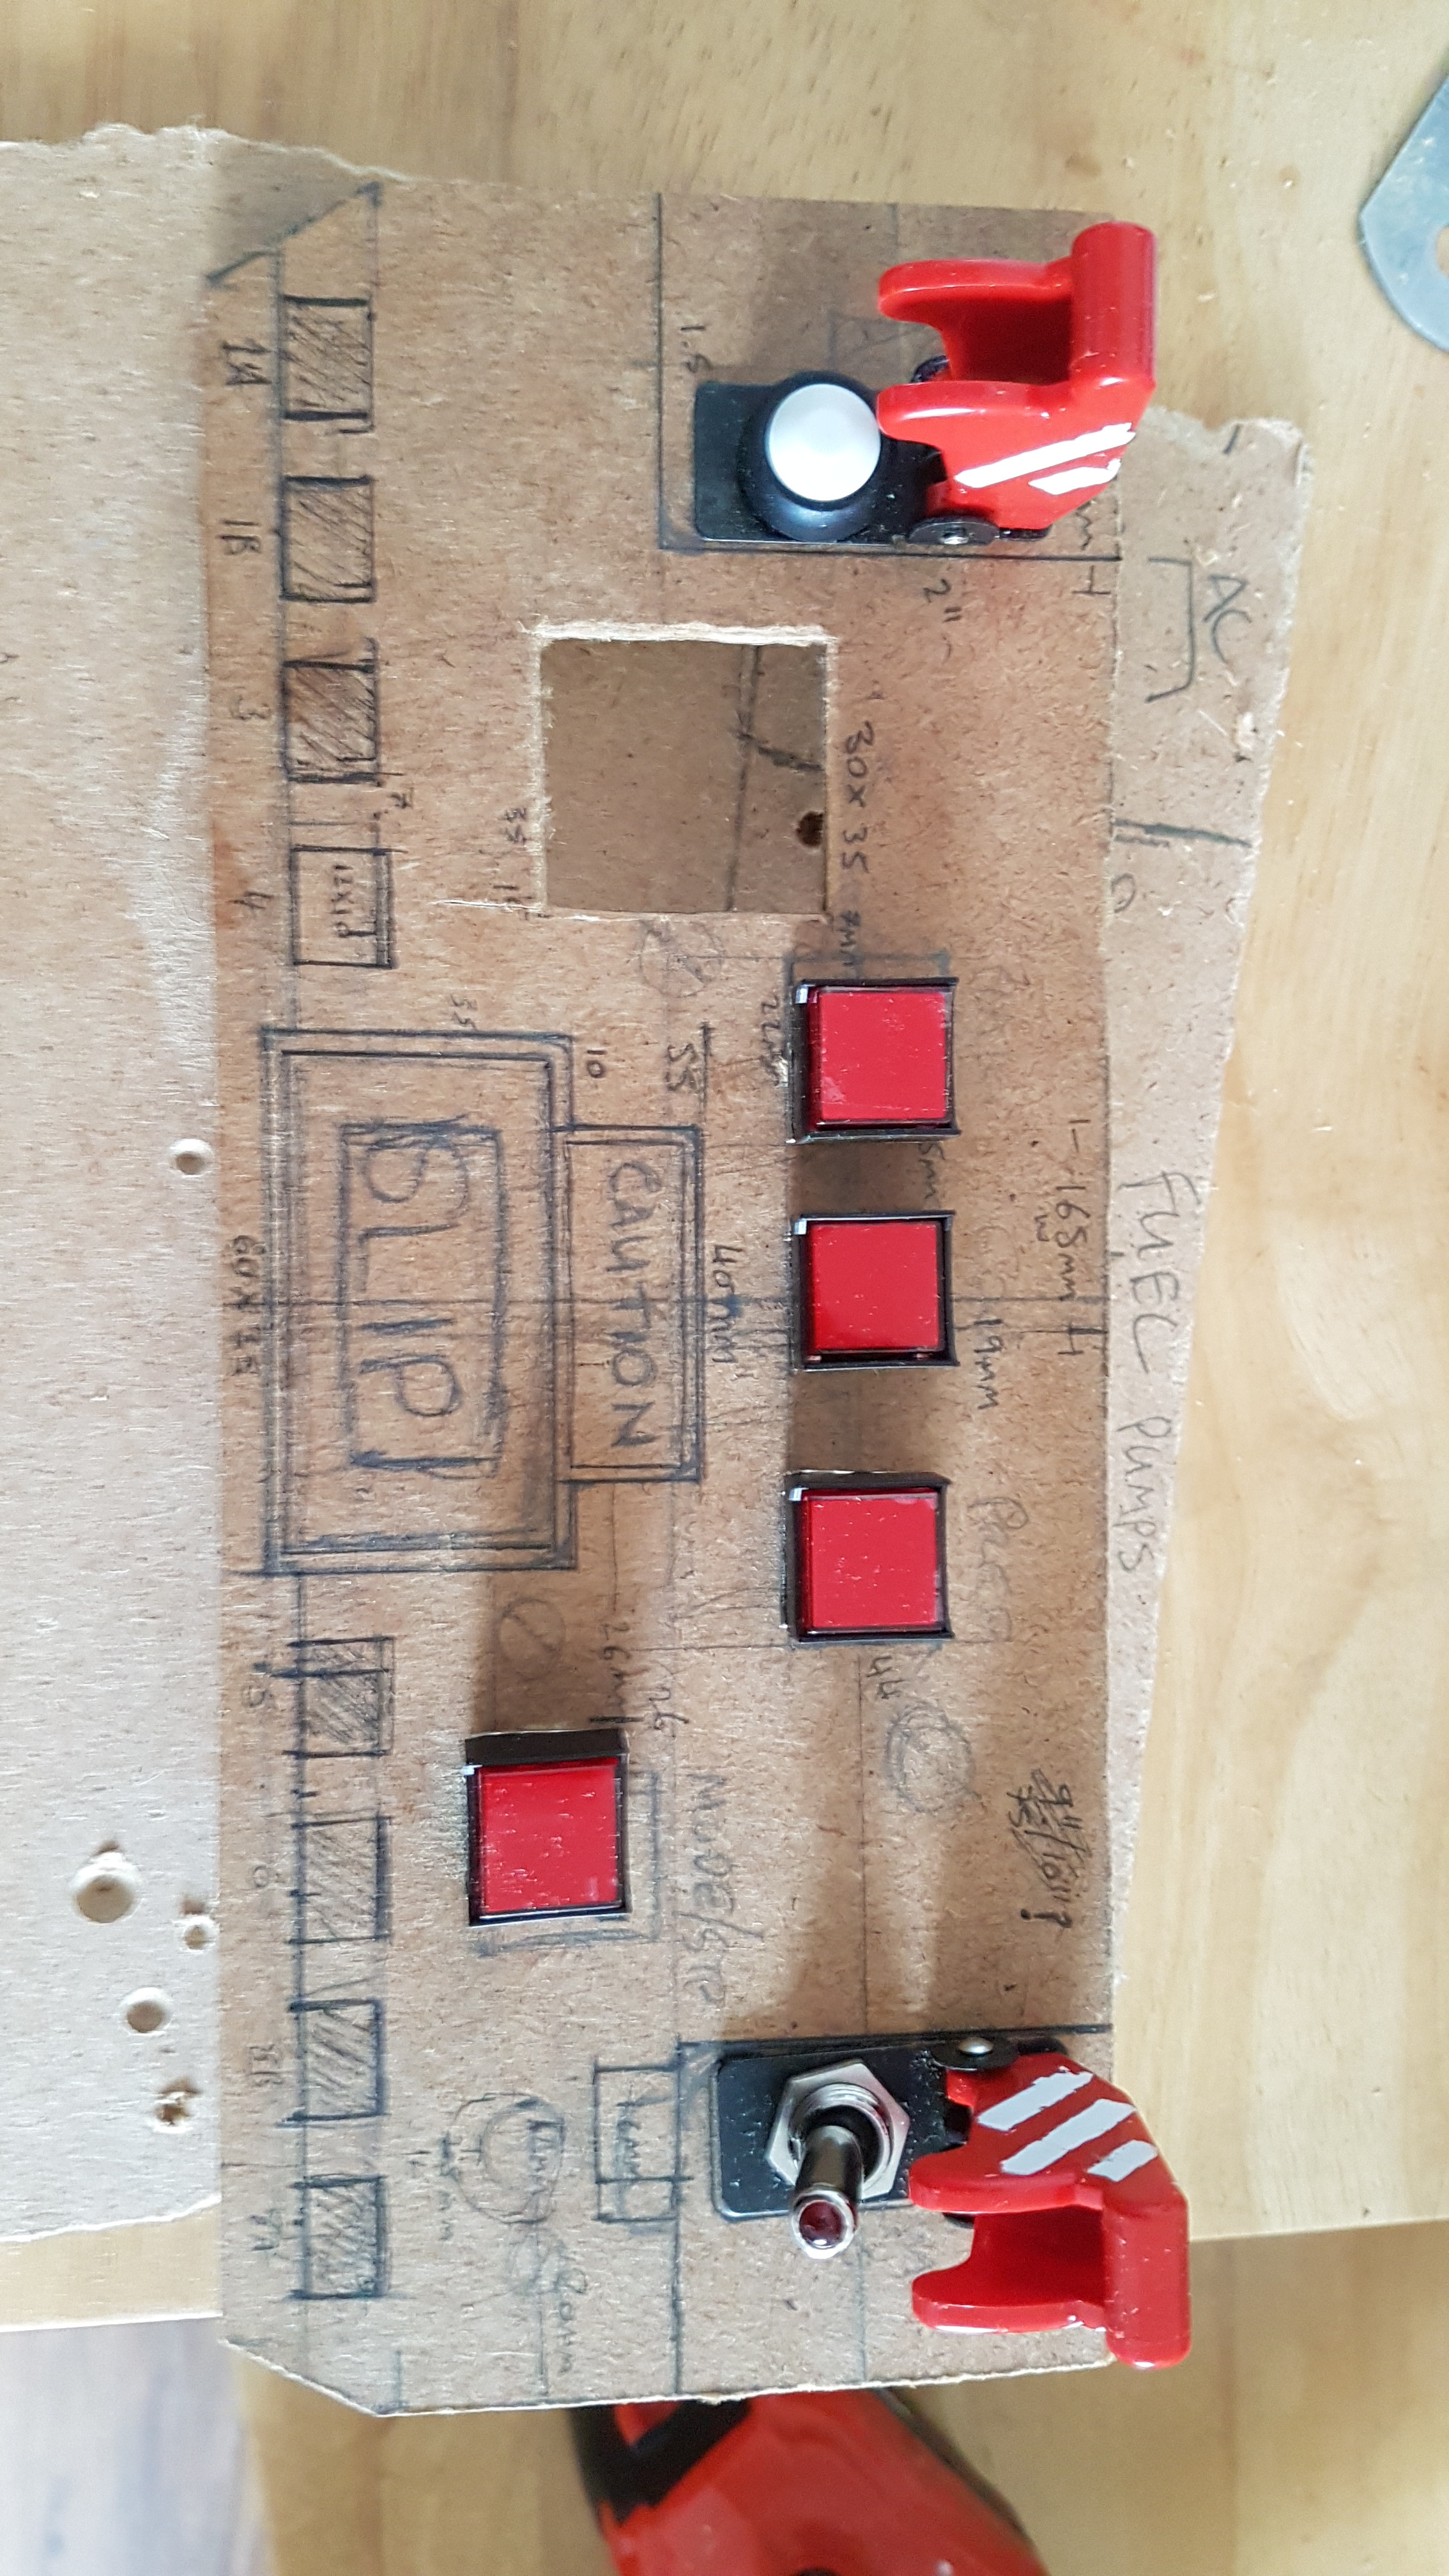
Put ACM mock up panel together today, sketch with some measurements attached. Running through arduino pro micro :)
-
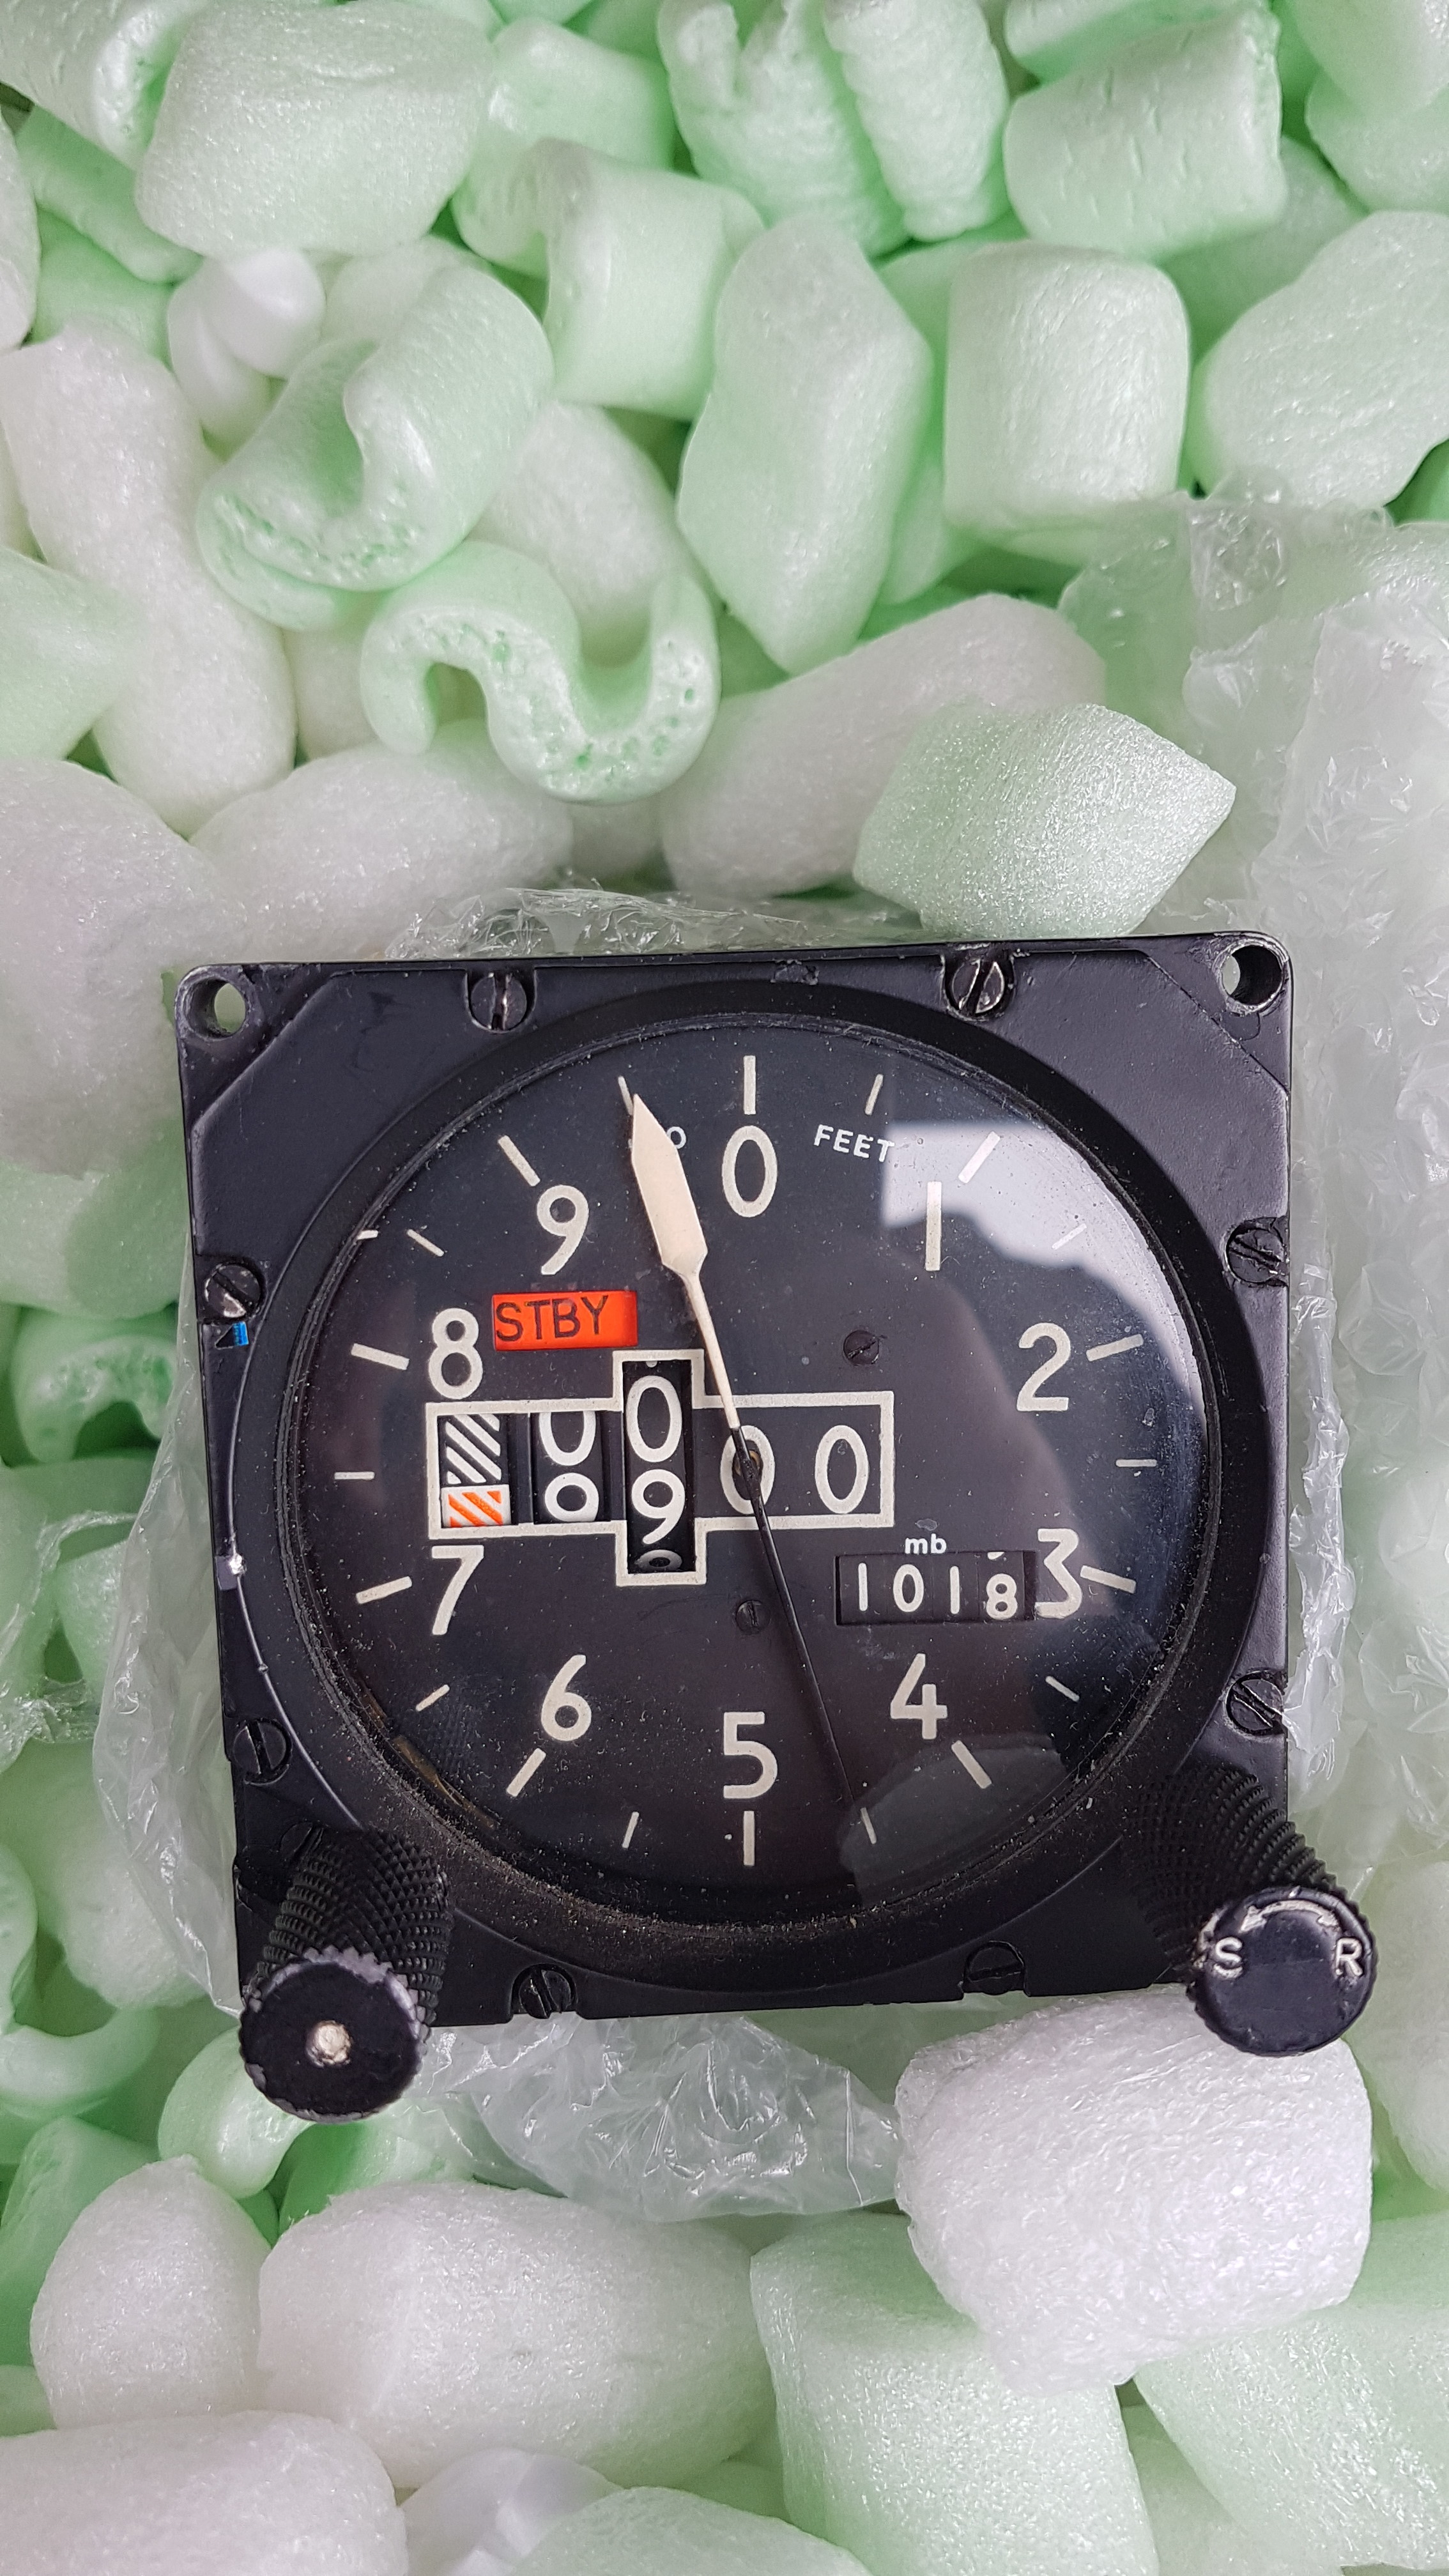
I got this for £50 on eBay, 1974 marked Altimeter, very similar model to the F14A/B :) Might attempt to get it hooked up.. but otherwise its a nice aviation artifact!
-
Thought this might help on choosing components.
-
Thought this might help on choosing components.
-
Can we sticky this to the beginning of the thread?
-
Hi, Great thread guys! I'm planning to do some of this construction for partial panels (save space). Searching eBay for "cockpit avionics" or "cockpit instruments" brings up some things you may be able to use for reference or actual panels. Here's the AN/ARC-159 (UHF radio, left panel) data sheet: http://www.columbiaelectronics.com/an_arc_159_v__uhf_transceiver.htm AN/ARN 84 Data sheet http://www.airco-international.com/PDFs/AN_ARN84AIRCO_Data_Sheet.pdf For the switches and buttons you can use the Arduino joystick library! Use with a Pro Micro. Here's the code... https://github.com/MHeironimus/ArduinoJoystickLibrary // Simple gamepad example that demonstrates how to read five Arduino // digital pins and map them to the Arduino Joystick library. // // The digital pins 2 - 6 are grounded when they are pressed. // Pin 2 = // Pin 3 = // Pin 4 = // Pin 5 = // Pin 6 = // // NOTE: This sketch file is for use with Arduino Leonardo and // Arduino Micro only. // // by Matthew Heironimus / edited 24032019 // 2016-11-24 //-------------------------------------------------------------------- #include <Joystick.h> Joystick_ Joystick(JOYSTICK_DEFAULT_REPORT_ID,JOYSTICK_TYPE_GAMEPAD, 12, 0, // Button Count, Hat Switch Count true, true, false, // NO X and Y, no Z Axis false, false, false, // No Rx, Ry, or Rz true, true, // yes rudder, yes throttle false, false, false); // No accelerator, brake, or steering void setup() { // Initialize Button Pins pinMode(2, INPUT_PULLUP); pinMode(3, INPUT_PULLUP); pinMode(4, INPUT_PULLUP); pinMode(5, INPUT_PULLUP); pinMode(6, INPUT_PULLUP); pinMode(7, INPUT_PULLUP); pinMode(8, INPUT_PULLUP); pinMode(9, INPUT_PULLUP); pinMode(10, INPUT_PULLUP); pinMode(14, INPUT_PULLUP); pinMode(15, INPUT_PULLUP); pinMode(16, INPUT_PULLUP); // Initialize Joystick Library Joystick.begin(); } // Last state of the buttons int lastButtonState[12] = {0,0,0,0,0,0,0,0,0,0,0,0}; // 12 part ARRAY - initialised with int 0 // void loop() { // Read pin values for (int index = 0; index < 12; index++) //define index as int 0, index less than 12, increase index { int currentButtonState = !digitalRead(index + 2); if (currentButtonState != lastButtonState[index]) { switch (index) { case 0: // B12 Joystick.setButton(12, currentButtonState); break; case 1: // B11 Joystick.setButton(11, currentButtonState); break; case 2: // B10 Joystick.setButton(10, currentButtonState); break; case 3: // B9 Joystick.setButton(9, currentButtonState); break; case 4: // B8 Joystick.setButton(8, currentButtonState); break; case 5: // B7 Joystick.setButton(7, currentButtonState); break; case 6: // B6 Joystick.setButton(6, currentButtonState); break; case 7: // B5 Joystick.setButton(5, currentButtonState); break; case 8: // B4 Joystick.setButton(4, currentButtonState); break; case 9: // B3 Joystick.setButton(3, currentButtonState); break; case 10: // B2 Joystick.setButton(2, currentButtonState); break; case 16: // B1 Joystick.setButton(1, currentButtonState); break; case 14: // B1 Joystick.setButton(0, currentButtonState); break; } lastButtonState[index] = currentButtonState; } } delay(10); } Also Here's the AN/ARC-159 (UHF radio, left panel) data sheet: http://www.columbiaelectronics.com/an_arc_159_v__uhf_transceiver.htm AN/ARN 84 Data sheet http://www.airco-international.com/PDFs/AN_ARN84AIRCO_Data_Sheet.pdf