dwpenney
-
Posts
178 -
Joined
-
Last visited
Content Type
Profiles
Forums
Events
Everything posted by dwpenney
-
Has there been any word on the direction ED is taking with this? With stand alone DCS: A-10C I was able to move the comms to my touch screen and use it for comms selection. Now, although the comms still show on that screen, I can not interact with them except via keyboard. Unhappy face: :-(
-

Multi-monitor set-up guide & help (unofficial)
dwpenney replied to MadTommy's topic in Multi-Display Bugs
Update: Realized that I missed the following files that needed to be updated: <DCS_Install>/Scripts/Aircrafts/A-10C/Cockpit/CMSC/indicator/CMSC_init.lua <DCS_Install>/Scripts/Aircrafts/A-10C/Cockpit/CMSP/indicator/CMSP_init.lua <DCS_Install>/Scripts/Aircrafts/A-10C/Cockpit/AN_ALR69V/indicator/AN_ALR69V_init.lua <DCS_Install>/Scripts/Aircrafts/A-10C/Cockpit/DigitalClock/indicator/DIGIT_CLK_init.lua <DCS_Install>/Scripts/Aircrafts/A-10C/Cockpit/UHF_Radio/indicator/freq_status_init.lua <DCS_Install>/Scripts/Aircrafts/A-10C/Cockpit/UHF_Radio/indicator/preset_channel_init.lua <DCS_Install>/Scripts/Aircrafts/A-10C/Cockpit/UHF_Radio/indicator/repeater_init.lua I was able to pull most of my configuration across with no changes ... but ... :-) I was wondering if there were any changes to the Monitor Setup .lua file specs. I had a file that worked with DCS A-10C and it partially works with DCS world. Main display and MFDs work as expected but the export of the RWS, Clock, UHF Radio and Jammer panel (can't remember the official designation of that one) no longer function. I also move my comms menus to the other display but I did not test that before exiting the sim :-( Here is my .lua file for my monitor setup. Any hints? -- Profile for 2 1920x1080 monitors in a vertical orientation with -- the touch screen on the bottom and the MFCDs in the bottom -- left and right. DCS:A-10C shows resolution of 3840x1080 -- hence the screen.width/2 math to keep it 'sane'; meaning that -- screen.width/2 + 200 means 200 left from the top left of the second -- screen; -- _ = function(p) return p; end; name = _('dwpenney Helios-Loz-3840x1080'); Description = '3820 x 1080: Camera on left (1920x1080), MFDs and Helios on right (1920x1080)' Viewports = { Center = { x = 0; y = 0; width = screen.width/2; height = screen.height; viewDx = 0; viewDy = 0; --aspect = screen.aspect; aspect = 1.78; } } LEFT_MFCD = { x = screen.width/2+67; y = 120; width = 445; height = 445; } RIGHT_MFCD = { x = screen.width/2+1406; y = 120; width = 445; height = 445; } CMSC_SCREEN = { x = screen.width/2+866; y = 141; width = 210; height = 49; } CMSP_SCREEN = { x = screen.width/2+1075; y = 190; width = 270; height = 70; } RWR_SCREEN = { x = screen.width/2+600; y = 161; width = 175; height = 175; } DIGIT_CLOCK = { x = screen.width/2+480; y = 830; width = 122; height = 122; } UHF_FREQUENCY_STATUS = { x = screen.width/2+635; y = 565; width = 120; height = 30; } UHF_PRESET_CHANNEL = { x = screen.width/2+748; y = 477; width = 30; height = 30; } UHF_REPEATER = { x = screen.width/2+656; y = 695; width = 110; height = 30; } Gui = { --x = 1920; x = 0; y = 0; --width = 1920; width = 3840; height = 1080; } --UIMainView = Viewports.Center UIMainView = Gui -
Monitor.lua changes with DCS A-10C in DCS World?
dwpenney replied to dwpenney's topic in General Questions
Nevermind. I found the right forum here: http://forums.eagle.ru/forumdisplay.php?f=138 -
Just wondering if there were any changes to the Monitor Setup .lua file specs. I had a file that worked with DCS A-10C and it partially works with DCS world. Main display and MFDs work as expected but the export of the RWS, Clock, UHF Radio and Jammer panel (can't remember the official designation of that one) no longer function. I can post details but I'd like to know if the specs changed and if I am posting in the right sub-forum; not sure which one relates to the monitor setup. Fridge update: here is my older monitor .lua file -- Profile for 2 1920x1080 monitors in a vertical orientation with -- the touch screen on the bottom and the MFCDs in the bottom -- left and right. DCS:A-10C shows resolution of 3840x1080 -- hence the screen.width/2 math to keep it 'sane'; meaning that -- screen.width/2 + 200 means 200 left from the top left of the second -- screen; -- _ = function(p) return p; end; name = _('dwpenney Helios-Loz-3840x1080'); Description = '3820 x 1080: Camera on left (1920x1080), MFDs and Helios on right (1920x1080)' Viewports = { Center = { x = 0; y = 0; width = screen.width/2; height = screen.height; viewDx = 0; viewDy = 0; --aspect = screen.aspect; aspect = 1.78; } } LEFT_MFCD = { x = screen.width/2+67; y = 120; width = 445; height = 445; } RIGHT_MFCD = { x = screen.width/2+1406; y = 120; width = 445; height = 445; } CMSC_SCREEN = { x = screen.width/2+866; y = 141; width = 210; height = 49; } CMSP_SCREEN = { x = screen.width/2+1075; y = 190; width = 270; height = 70; } RWR_SCREEN = { x = screen.width/2+600; y = 161; width = 175; height = 175; } DIGIT_CLOCK = { x = screen.width/2+480; y = 830; width = 122; height = 122; } UHF_FREQUENCY_STATUS = { x = screen.width/2+635; y = 565; width = 120; height = 30; } UHF_PRESET_CHANNEL = { x = screen.width/2+748; y = 477; width = 30; height = 30; } UHF_REPEATER = { x = screen.width/2+656; y = 695; width = 110; height = 30; } Gui = { --x = 1920; x = 0; y = 0; --width = 1920; width = 3840; height = 1080; } --UIMainView = Viewports.Center UIMainView = Gui
-
Track ir is not showing up in game
dwpenney replied to SYN_MrWolf's topic in Controller Profiles and Problems
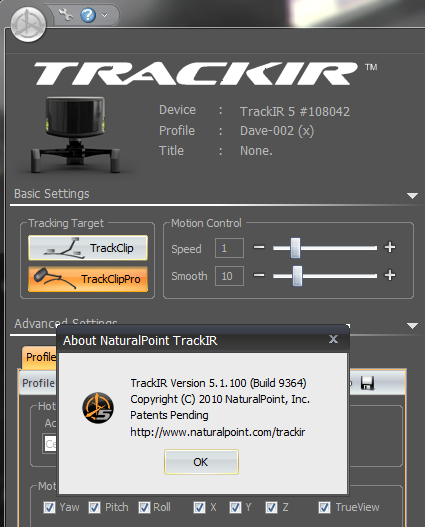
Here is what my TrackIR says in the top left corner (plus the ? button and the About TrackIR dialog). It might help others here if you can confirm your Track IR device and Software versions. With this combo Track IR works for me in DCS: World + DCS: P-51D. It shows up under the Options section of the DCS: World GUI under the Axis Commands portion of the P-51D list. That might not be clear Run DCS: World and go to Options, then Controls (working from memory here). Select the P-51D, then in the drop down to the right, select Axis Commands (or something like that) and see if the Track IR device shows up there.
-
Awesome! I love canuk skins!
-
Lobo's DCS A-10C Normal Checklist & Quick Reference Handbook
dwpenney replied to lobo's topic in DCS: A-10C Warthog
Awesome! I'm in the same boat (not flying the sim daily) so I appreciate the little reminders on process and procedure! Looks good on my Motorola Xoom (Android) using ezPDFReader and Adobe's app. -
Hey guys. Working with Loz's profile on a slightly smaller screen. I can get the menu items to be reduced by changing their font size but I can't seem to get the 'button size' or 'row height' reduced to match the new font size. Can anyone help? UPDATE: Just thinking out loud here but I wonder if it has to do with the fact that I have both of my monitors stacked (vertical instead of horizontal) and that is causing the 768 height to be scaled across 2160 pixels (1920x1080 x 2). That would explain the large vertical size of each row... and I am guessing that there is no way round that ... unless I switch my monitors to a side-by-side config. UPDATE: Yeah. Looking at my setup I think it is related to my vertical stacking of monitors (2x 1920x1080 - one above the other). That ended up scaling badly when the 2160 was divided by 768 - leaving a large row height. Now, with the monitor 'side-by-side' I can get the comms to a decent size in the right area but I have to put the GUI entry in my monitors_setup.lua file to x=1920, y=0, width=1920, height=1080 - to get the comms menu shifted over to the right side monitor. The drawback of this is that Helios is showing the panel on top of the briefing and exit game dialogs.... grrrr.. so close!
-
Awesome Sandman! Those checklists are a great idea! I might have to borrow then (with your permission) for my own profile
-
PDF Version of the Encyclopedia (weapons System)
dwpenney replied to Heater's topic in DCS: A-10C Warthog
And you are doing a fabulous job I just wanted to post the link for the Falcon version from a few years ago. It has a lot more information in it (that is not in the Encyclopedia). It's too bad we couldn't merge the two but that would be an insane task. -
PDF Version of the Encyclopedia (weapons System)
dwpenney replied to Heater's topic in DCS: A-10C Warthog
Here is the older Falcon 4 one I was talking about: http://www.185th.co.uk/Reference%20Material%5CtacRef2_0.pdf Other good manuals: http://www.185th.co.uk/forum/docs.asp?action=showsubcat&id=15 -
PDF Version of the Encyclopedia (weapons System)
dwpenney replied to Heater's topic in DCS: A-10C Warthog
There used to be a huge one that some kind soul had made for Falcon 4. I lost the PDF a long time ago but still have the printed version. The names of a of of weapons were not the same but it is manageable. -
Speaking of which (and this is no commitment to fly online) does anyone know of a EST (Canada/US) flight squadron of 'serious' pilots who will be flying DCS:A-10, IL-2: Cliffs of Dover, etc? I used to fly with JG2 and JG52 in WWII Online (and short stints in IL2:FB) some time ago. I am thinking of getting back into some serious flying online. BTW: Serious here means 'realistic' procedures and action, cooperatively against an AI or player opposing force but not a dogfight server. Also, a group with a little patience for those who are a little slower in the switchology department. :-)
-
Thanks Wags and the ED team. I know you guys must have pushed hard to get this beta out the door for the holidays! Happy Holidays! Fridge
-
I'm taking a look at the F16 MFD1.lua file and the clickabledata.lua file, trying to find a common bridge between them with regard to the Left MFCD configuration but I can not see them talking the same language. It seems that there is no common naming between the two that could allow me to create a custom lua file that would allow me to interface with the UFC through a device (my CH Products MFP to be specific). What I was hoping to see was a common name for the button that would hint at the underlying mechanism in the A-10 code. Am I crazy?
-
It's here: <DCS_Install_Dir>\Scripts\Aircrafts\A-10C\Cockpit I am looking to get the UFC(ICP) and CDU buttons mapped to my CH Products MFP. It looks like it might be a little ... complicated :)
-
Perfect stick for A-10C from Thrustmaster?
dwpenney replied to some1's topic in PC Hardware and Related Software
Products -> PC -> Joysticks -> Page 2 http://www.thrustmaster.com/product.aspx?ProductID=205&PlatformID=5 -
The Mission #6 AAR turned out to be a pretty good tutorial on how I tend to plan and execute the frag order - a 'frag'ment of the Air Tasking Order (ATO) that is broken down into the mission(s) that your flight and others are assigned to complete (this is Falcon 4 bleeding through into FC2 again :-)). It shows how you need to have a plan of action prior to entering the threat area, how to probe that area for AAA/SAM activity (naturally in a game environment rather than real life) and how that execution comes down to control and patience. Mission #6 was also an example where I did not deviate too much from the mission creator vision - the initial flight plan. When I attempted Mission #5 for the first time, and I ended up with the corrupt track, I deviated significantly from the initial approach. Following my standard practice up to this point, I headed in S over the hills and turned N to enter the target area. Now this brings to the foreground the biggest problem with a static mission vs a dynamic campaign: unless the designer of the mission has tons of time to populate the back area with unexpected units and threats, going out of the way to approach a mission you are probably going to step outside the narrative that the designer intended. In a dynamic battlefield (campaign) the entire region is alive with thousands of units and other aircraft executing their own piece of the ATO - and you have no idea when or if those assets are going to come into conflict. That being said there is a huge benefit to the campaigns that the talented people working on DCS, and working within the community, have brought us! I will not go farther into the benefits or drawbacks to each, that's a huge post in an of itself! Back to Mission #5: My second attempt I focused on following the original flight plan given to me by the designer with only a minor change base on my need to get eyes on the target before I get too close to respond; before I get outside my OODA loop, for you fighter pilots and Boyd fans. ---- Mission #5 has our flight tasked with eliminating an armour platoon on the S edge of the enemies FLoT (Forward Line of Troops - or Forward Line of Own Troops). If we can eliminate this threat we can keep them on their heels with the threat to roll up their southern flank. And here is the detailed plan: The recon photo of the area is helpful but other than the river to the S of the target area and the bridge that you can almost see we do not have a whole lot of landmarks to go by. The only change I do to the flight plan is to add a waypoint after waypoint #3 to put myself on a direct W-E heading directly to that bridge. My plan is to use the navigation capabilities of the Hog instead of the landmarks that we had in previous missions. In essence I am going to use the W-E run in to waypoint #4 to get my eyes on that bridge and work my magic from there. The red arrow details the approach vector and the yellow arrow the reset vector. I am pretty confident that there are no enemy SAMs/MANPADs operating to the S of these approach and reset vectors so I have to divide my run in attention between the target area and AAA/SAMs from the N and E. As usual, I expect those SA-11 sites to still be to the north so I'll keep an eye on my altitude and the RWR receiver. I am going to keep the altitude band definitions that I chose for Mission #6, defining low altitude as <1500ft, medium altitude as 1500ft - 2500ft and high altitude as 3000+. I am going to impose a high altitude ceiling at 3000ft and only go above that if I have no choice. Above 3000ft and I expect missiles inbound from the N SA-11 sites. As before I have given both Buster and myself a standoff load out with AGM-65s and Hydra rockets. One other change that I am going to introduce to this AAR will be some overhead maps of the action. I hope that this helps build you Situation Awareness (SA) around the mission as it executes. Wheels up we are on our way. Right from the initial turn onto course I am starting to build my SA. I quickly order my wingman into trail formation. This mission has us _very_ close to the front lines and the flight time to the target area can be measured in about a minute. The time is so short that the turn from waypoint #2 and encountering waypoint #3 is very quick. You gotta keep on your toes for this one!. Lining up on waypoint #4 I am happy to see smoke popped almost right along my flight path. Given the quick turn at waypoint #3 I am a little S of the line I intended to be on, making the smoke pop right in front of me as I head in to waypoint #4. Inset map shows the intended flight path. As I approach the target I am forgetting my search off to the N of the flight. We are so close that I am getting behind in building up my SA, forcing me to focus on the rapidly approaching target area. My immediate need is to look over the target area as fast as possible and prioritize any threats that I might (hopefully, with luck) pull out of the clutter. Ok, take a look at this map and, yeah, I have some extra explaining to do :-) This is an overview of the first half of the mission. I will reference the points on the map as we encounter them. You may want to jump back up here from time to time to reference this map and build your own SA. Note that the shots that are paired with the Points of Interest (PoI) marked on the map will be pointed out but may differ a little in the timing of the shot and the position on the map. I went back to the replay track a second time to grab the map and mark off the points as best I could. PoI:A: Where I started using the AGM-65 camera to survey the target area; PoI:B: Where the break turn was made after launching the MAV; Inset images are a couple captured from the AGM-65 camera as I pan and scan over the area looking for the targets and any obvious AAA/SAM threat. In the bottom inset MFD shot I luck onto the by now familiar Strella silhouette. In the map, if you squint close, around where the A is in A-10 you can see my blue MAV on it's way down field. We get close enough for a SAM launch (about 2nm) but we are already breaking right according to plan and, as per habit, when I turn my belly to the enemy I like to dump chaff and flares. The SAM launcher can not really be seen in the main shot but if you can make out the smoke on the target area and the two groups of trees to the top and right of that smoke, extend a little and she is sitting right there. Continuing the break turn away... PoI:C: Tail end of the break turn; We break back into the target to get the SAM site in view, looking for more smoke trails or to see if we have anything that hooked S to follow us. PoI:D: The turn to get eyes back on the SAM site; We then continue the horizontal S and turn back to the reset point. I jump back to Nav Mode on the HUD and quickly cycle back to waypoint #3. At waypoint #3 we turn back to waypoint #4, back into A2G mode and back to the target hunt. PoI:E: After the reset; First priority is to locate that SAM site and make sure it is burning. As soon as I know it is I vary my wingman control and order Buster to 'Complete Mission and Rejoin'. You have to be careful with this one because Buster tends to go rogue in his overzealous effort to pwn the primaries. We will see that later. PoI:F: Buster launches; Buster launches and I quickly order him to rejoin before he gets too out of hand and becomes an individual instead of a team member. PoI:G: I'm clearing the target area and Buster is lagging; I broke left in this case as Buster occupying the airspace and firing off to my right. I wanted to deconflict (fancy word eh? that's what you get for watching too much Military Channel :-)) with him and pulled N even though we did not adequately clear this area of AAA/SAM threats. It is a risky trade off between becoming a unintentional casualty to/with Buster or some lucky AAA/SAM guy to the N. My luck holds and I pull tight enough (back to Nav mode and waypoint #3) to head to the reset area before getting myself into trouble. Overview Map #2 continuing the action from the previous flight path map: Buster and I rejoin relatively quickly (due to my quick rejoin call after he launched). We reset and head back in to the target area along the waypoint #3/#4 line. Part way in, given the rapid firing of his MAVs from the previous approach, I test my luck again and order Buster to 'Complete Mission and Rejoin'. This time, we are get different results. [n]PoI:H:[/b] Buster executes a left break turn while I keep rolling in on target; In this case Buster seems to have decided that he needs a better angle on the target. I do not know it at the time but he has pulled off N to line up (as shown in the map insert). I keep rolling along looking over the area and holding my weapons for other higher risk threats. As I approach the 2nm mark I again break left. This time I am feeling better about a left turn as we didn't get shot at doing it last time. As I visually scan the area to the N I spot Buster lining up his attack vector and a -23 AAA gun firing from near that village. PoI:I: Buster continues in to target as I am cycling back to the reset point; Buster launches as I order him to rejoin and we get notified that his latest shot has finished off our objective. I, however, have some weapons left and decide that the ZSU-23 that previous fired on Buster is clear enough to be taken out. Any AAA/SAM threat eliminated gives us superiority over the battlefield later. PoI:K: I roll in on the Zeus while Buster rejoins; I spot two hot spots with the MAV and launch on each. PoI:L: Rolling left away from the threat area; I pull left again and reset. I think we've seen this before :-) PoI:M: Rolling back toward the target area; I decide to make one more approach to the target area. Buster has formed back up and I have one missile left. I want to make sure that we have sanitized the area as much as the standoff weapons allow. Seeing as we have completed the objective I am going to hold on to the Hydra rockets and not press my luck. Last Rifle call, Buster is on my wing. Mission accomplished we RTB, staying low to avoid that pesky SA-11 site to the N. Inbound! ---- Situational Awareness (SA) in a mission is the hardest thing to learn and just about the most impossible skill to teach. My time flying with JG-52 in WWII Online taught me a lot as I worked in support of my flight/wing lead. Heck I enjoyed that position more that leading a flight myself! It forced on you the dicipline required of a good wingman and built your SA skills while you supported the team. It's an often overlooked role but a good wingman is priceless in a fight. I have the track for this mission as well so send me a PM with your email and I will send it off. Make sure to tell me which AAR too. Also, I have finally received my new PC so I'll be spending the weekend setting it up and getting my HOTAS and flight software moved over. That means I may not get to Mission #7 until some time late next week but in the mean time I encourage anyone interested to fly these two missions (#5 and #6) on your own. Try to put into practice any of the concepts or points that you feel are useful and, of course, dump any that you feel are not. Hopefully you can get a chance to get a few runs on on Mission #7 before I do - I hate to feel that I am spoiling all the surprises! I might sound like I am giving a lecture, and in a way I am, but I assure you that the reediting of these missions makes them seem so easily executed - the reality is quite different!
-
FC2.0: F15C: Campaign Mission 9 AAR
dwpenney replied to Ven's topic in Lock On: Flaming Cliffs 1 & 2
Nice report! -
Keep getting hit by wingmen's AIM-120s
dwpenney replied to davyt's topic in Lock On: Flaming Cliffs 1 & 2
Try using the formation management communication commands. Spread your flight out a bit more and/or order them to 'Pincer' (I can not remember the exact term in the communication options) which provides an offset up, down left or right. -
FC2:A-10: Campaign Mission 6 AAR - Part 2 of 2
dwpenney replied to dwpenney's topic in Lock On: Flaming Cliffs 1 & 2
OMG. Ah.. OMG. Seriously? OMG. That. Is. Awesome! Fridge -
{Bah! Typo in the title! This is #6} Part #2 (Part 1 here): Turning back around, we head for waypoint #4 again and our second approach to the target area. At this point I change our formation into 'echelon' or 'wedge' formation. My plan is to approach the target to the left of the initial vector. This approach is more along the lines of the waypoint #4/#5 line. Because we were not fired on to the right or left of the initial approach, I am relatively confident that the area we passed over is (relatively) clear. This wedge formation widens our punch-hole but I will offset us to the left of the original approach vector to compenstate for this. The added benefit of this is that it will provide a juicer target for the SAMs that might still be in the threat box and widens our avenue of approach. We are clearing the ground under us of high risk threats and will use this ground to complete our mission. Approach #2 to the target area (yellow box). I have left off the threat box - you should be able to recognize the ground features by now :-) Approaching the target area I perform the same actions as our initial pass. This time I focus more on the target area and the north portion of the threat box. And I get lucky. In the inset pictures, right to left, you can see as I pan along the S edge of Nagomari and off to it's W. In the last inset picture (top left) I happen across a not farmilliar H-on-its-side image (which you can't really make out in the scaled picture). I lock it up and launch. And before we can break away, a launcher in the immediate area returns the favour. At this point I am not sure if I have targetted the same launcher that has fired on us. I have also made a potential mistake by breaking right instead of left. It is a toss up here on which way you should go. Left (and S) takes you diretly over the threat area from the briefing and if we did not get the first launcher, we would be in trouble. Right (N and E) and we are tuning toward that armour group we spotted on the first approach. If they have any siginificant SAM/AAA assets we are going to find out shortly. In reality I guess it comes down to luck. You can spend some more time sanatizing the threat area (which is what my plan was) or get lucky and hope that you can defend against this threat until your weapon finds it's mark. Continuing the break right and diving. Top picture shows my view relative to the threat. O am hooking to the right and leaving a trail of flares/chaff in my wake. Bottom picture shows the view from the missle - on the inside of the blue arrow are the same series of flares/chaff as inside the red arrow. Regrouping towards waypoint #4 (and pretty much flying over the same terrain as approach #1 Buster calls out a bandit. It takes some searching as we cirle from pointing at waypoint #4 off to the W and turning back N (flying, if I rememebr correctly, just over the launch site from the first SAM). Luckily the bandit does not have A2A missles and was high enough to be a sillouette in the sky - it was easier to find him and approach. Splash one! Back on task - resetting over waypoint #4 again I change my wingmans orders. I order him to 'cover me' which frees him up somewhat to attack any threat to my aircraft. Relaxing my control of him at this point makes sense since we have eliminated the SAM threat in the S section of the threat area and I am 50% sure that we have the N section cleared as well. We still have to be careful of MANPADs and AAA guns but the high threat obstacles are looking to be gone and each pass over the threat area reinforces this. Back on target I lock up what I hope is another AAA threat close in but, alas, it is not. My last AGM-65 (and my zoomable TV camera) is now gone. I don't show it here but Buster is working the area over the area to the right, which is where the other armoun group is. He is helpful in taking out AAA guns and such but, in hindsight, I should have used him more directly with the A2G modes. However, I can not fault the 'cover me' approach at the moment or the fact that I wisely chose to only load standoff weapons! Buster calls another bandit - thankfull because I can't seem to pick them out without labels on (and I avoid that if I can). I launch but get a maddog (I think that is what a rogue missle is called). To make things interesting, the fight with the enemy chopper has had us gaine enough altitude to draw the attention of the SA-11 site N of our position. Fortunately the launch was aimed at me and I was at the high end of medium altitude. I dropped some height and both SA-11 missles exploded harmlessly in the distance as the launcher lost LoS. In the background high, Buster splashes the Hind while lower you can see the smoke from the SA-11's self-destructing. Another launch but the hills mask us as Buster rejoins. Turning back to the target area. We are jsut a little to the left of the second approach vector. I have to visually check that my wingman has dumped his munitions when the SA-11's launched. I ask him to rejoin as I don't want him wandering over AAA guns trying to attack a primary target. I'll take that chance myself. For the first time, I actually score hits and make effective use of the Hydra rockets! The rest is cleanup with the Avenger - all for the safety of the area we sanatized south of the target! RTB: Buster and I line up on final. And approach the runway. Fun fact, in turning on my navigation lights I accidentally turned off my left engine. Note my haphazard attitude as I deal with what I thought at the time was strong wind! Helpful hint to not map critical controls next to others but instead group your functions. :-) Next: Either I refly Mission #5 or attempt Mission #7 - I have not decided yet. Fridge PS: I have the track for this. If anyone wants it send me a PM with your and I will see if I can email it to you. _________________________ Things which do you no good in aviation: 1) Altitude above you; 2) Runway behind you; 3) Fuel in the truck; 4) The airspeed you don't have.
-
{Bah! Typo in the title! This is #6} I am going to wait to post the AAR for Mission #5, not through of any sense of drama or action but simply because the track for it was somehow corrupted. I usually take only a few screenshots during the mission and rely on a review of the track to grab what seems the most helpful and revealing. That usually means that my tracks (and the actual mission) suck a lot more than it may seem in the heavily edited AAR :-) For Mission #6 I was focusing not only on succeeding and documenting the mission but in trying to make my wingman reach some level of operational effectiveness - other than his effectively practiced tactic of fertilizing of the countryside. Needless to say, I replayed this mission some number of times before I was able to pull it off. In the end I achieved the goal using him to his 'maximum' while keepling him alive. I must point out that each replay I followed the same strategy as that laid out on my first attempt. Although I obviously learned on each replay where the bad guys were situated, sometimes with minute detail, I always pushed myself to follow the plan and assume that I did not know where or how events might occur. Take that disclaimer any way you want but other than the fact the Buster (my nickname for my wingman in hommage to Mythbusters and the fact that he was being used as an AI crash test dummy) repeatedly died and left me cursing and exiting the mission, each replay had it share of variances and kept me on my toes. Warning: This AAR is also quite long. It covers some 37 screenshots and, probably but the time I am finished, quite a bit of text. My goal is to document both the approach that was taken within the mission parameters, describing decisions and approaches, and the organization and deployment of my wingman 'Buster'. ---- Part #1: Mission #6 has us tasked with destroying a supply depot just outside the city area of Nagomari. SAM and AAA threat is moderate. I expect that twp SA-11 sites that have been harassing me in previous missions still exist N of the ridgeline (N of waypoint #6 and NW of waypoint #7). That is going to keep me under 3000ft. I am going to defing low altitude as <1500ft, medium altitude as 1500ft - 2500ft and high altitude as 3000+. I am going to impose a high altitude ceiling at 3000ft and only go above that if I have no choice. Above 3000ft and I expect missles inbound from the N SA-11 sites. Here you can see 'The Plan'. The objective is located at waypoint #5 along the S outskirts of Nagomari. I have adjusted waypoint #2 to pull me farther S and hopefully keep me protected by the ridgeline. The red arrow shows my plan of attack. Since I am not certain of the SAM/AAA locations I am going to pull in to waypoint #5 on the NE side of the waypoint#4/#5 line and hook right to reset aroung or N of waypoint #4. The idea here is to make a cautious approach to the target area at medium altitude with my wingman in tow hoping to lure and SAMs to give away their positions. I know that there are hostile forces in the yellow box and around the target waypoint and that they have a high probability of having local low/medium altitude SAM systems. I want to expost the most leathal of these threats ASAP so that they can be dealt with before the flight engages the target. This is a typical (so I have read) SEAD tactic. With a human wingman/element pair, you would leave the human eyes circling waypoint #4 and watching the approach of the 'bait'. Once the SAM launchers fire, they roll in while the 'bait' evades. I have also customized our loadout to only include standoff weapons - AGM-65's and Hydra rockets. This is another incentive for Buster to not get his lazy arse directly over any threats. Make sure that you select each unit of the team in turn and then select the loadout. Wheels up - we are on our way! Here we are passing over some friendly self-propelled artillery pieces. Heading in to waypoint #3 I send Buster into trail formation. The goal here is to have us manouver as a team with any SAM/AAA threats split between the two of us. Hopefully I will gather the attention while keeping in mind that my wingman is lagging behind me instead of to the side. Think if us as punching a hole in the SAM/AAA envelope. Instead of having him out to the side where he can draw his own threats, behind me we are focusing on a narrow punch-hole with the threat to the flight directly ahead or on the sides. If he is off to the side, the punch-hole is wider we risk drawing fire that puts one of us (or both) in jeopardy where in trail, we should both draw the same attention along out attack vector. About 1-2k out from waypoint #4 I am looking off to the left to draw that mental map that matches the briefing. Here the heavy yellow box is the immediate threat area, the thin yellow box is the target area and the red arrows show the approach path. Note that although the top red arrow appears to the going right-to-left it is really showing a SE-NW approach (depth of field is hard to represent). Turning in toward waypoint #5 and the target area it starts to make a little more sense. Lined up in trail we are off to the E of the waypoint #4/#5 line. A helpful MLRS volley is highlighting the NW of the target area. On the first pass in I got no hits. Throughout the entire flight in to the target area I am inspecting the area in forward arc area in front of the flight (10-2 positions on the clock) and keeping an eye outside the cockpit area to the left (highest threat area). We detect armour at 1-2 - yellow box area - but nothing launches. This armour was a surprise (not in the briefing) and threatens our right hand hook to reset but we draw no fire. I adapt the plan to fly south of the threat area - in essence flying just N of the waypoint #4/#4 line, E to W. This draws a launch! Now because I am not an uber awesome pilot and I can not rely on my wingman to locate and communicate the launch point I sometimes pause the sim to get a good look. Our flight hooks left and back toward waypoint #4. Somehow the missle loses it's lock and explodes harmlessly below us. {in review it appears that maybe the launcher lost LoS (Line of Sight) to us as it is sitting on the back part of a slope - this could explain why we did not draw attention on the orinigal plan pass as we were 'below' his horizon} Time to setup an adhoc attack plan on that SAM launcher. Red arrow is the path that we were taking after the 'right-hook' on the first pass toward the target area. Yellow arrow is the defensive manouver we performed (turning dive away followed by a climing 'beam' on the launcher), followed by our flight extending away from the threat envelope to organize our attack. I keep Buster in trail for the moment because I want to tightly control how close he gets to the threat area. I need to keep this in mind when I am manouvering. In trail he never gets closer than I do. Turning back toward the laun site. Red arrow in the main area shows the flight path as we turn toward the launch area (yellow box - which exists in the S 1/4 of the threat box I identified during planning). Inset is the lineup to the launch area. I have my boards out (speedbrakes extended) and I am using the autopilot 'attitude hold' to hold the hog steady while I tinker with the MAV camera. I find a hot spot N of the buildings on the S edge of my search box. Lock it up and fire. I am pretty sure that the launch was not there however, so I keep searching in case I miss something. I am very aware of how close I am getting and keep in mind that I need to break away soon. Second hot spot closer to where I expect it. This one (on the higher resolution of my monitor) shows more as an H on its side. That looks more like the body of a vechile with a launcher aparatus on top. Second launch {note: make sure that you have a solid view to the target before launch - if the target is partially obscure, say because of a hill side, your MAV may come up shot}. I break left to 'beam' the launch area in case we are close enough for another launch. Here is a view from the launcher. Note that his position on the side of this incline was what 'protected' us in the initial approach to target. Inset is the first shot finding it's target. Weapon #1 explodes on target with the view from weapon #2 and the flight beaming the target area. Weapon #2 finding it's target. Because I grabbed these screen shots after the action at the time I did not know for sure that I had KO'd the launcher. At this point I am 50% confident that I have sanatized that area but I will remain cautious on the second approach to target. The 'H-on-its'side' target identification has me feeling good. Part #2 Fridge _________________________ Things which do you no good in aviation: 1) Altitude above you; 2) Runway behind you; 3) Fuel in the truck; 4) The airspeed you don't have.
-
n+1th
-
I have spent the last few hours playing through mission 6 of the A-10 campaign, trying to keep my wingman alive and operational and get him to contribute to the mission without dying. That is proving difficult :-) In other missions it was possible to ask him to complete mission and rejoin, let him launch a couple of weapons (1 or 2 depending on the risk facing us in the missions) and have him rejoin. Basically I could interrupt his AI routines before he over committed himself. Mission 6 was particularly difficult to use him effectively given the enveloping nature of the low level SAM threats. My strategy was to approach from the S and slowly coax the SAMs into revealing their positions, then either knocking them out myself or trying to get him to do it (couldn't ground stabilize in a good place to let him free). Once the S SAMs were dealt with, the SAM or two around the target area (truck page/supply depot) were harder to coax into revealing themselves and asking my wingman to attack always ended with him dying. So. Questions :-) 1) How can I get him (if there is a way) to standoff instead of getting in close to kill the trucks (MAVs instead of cluster/dumb bombs)? 2) On RTB he parks instead of sticking with me to rearm - is there a procedure that someone knows for this? 3) Can I get him to orbit at a waypoint (the only request I can see is for him to resume which does not seem to 'work')? 4) A way to order him to attack air defenses and not have him high tail it to the N to KO the SA-11s that will pwn his arse? Suggestions? Help? Fridge