Snakedoc
-
Posts
306 -
Joined
-
Last visited
Content Type
Profiles
Forums
Events
Everything posted by Snakedoc
-
This is a most welcome news! Thank you for making this!
-
In my case I've partially fixed it by reducing the refresh rate of my screen to match the ones I have for the MFDs. I have the main monitor run at 120hz while the MFDs can do max 60hz. Setting the FPS limiter at 59 fixed it.
-
Thanks!! Haven’t quite settled on anything yet but most likely will be an AR setup
-
-

- 605 replies
-
- 12
-

-
@Vinc_Vega PFL = Pilot Fault List is another 5 lines 24 rows display just like the DED that is above the caution panel on the right hand console. it’s shows codes of various faults / BIT test that the pilot can acknowledge/cancel. in DCS at the moment it only displays very few info (I suppose it’s still WIP) but maybe it will be more complete in the future. it looks like it uses the same characters as the DED, so hopefully it will be supported by DCS bios and then it should be as “easy” as changing the snippets codes / addresses for it in your code
-
@Vinc_Vega Success! The display now works with pretty much 0 latency! Thank you very much for your help, greatly appreciate it! PS: you don't know by any chance if there's a way to use this code for the PFL display? I looked into Bort but couldn't find any snippets for that display, only the DED
-
@Dos The multiple-com-port calls for the same batch cmd file (connect-serial-port) so yes, it works I’ve tested it on my setup with no issues
-
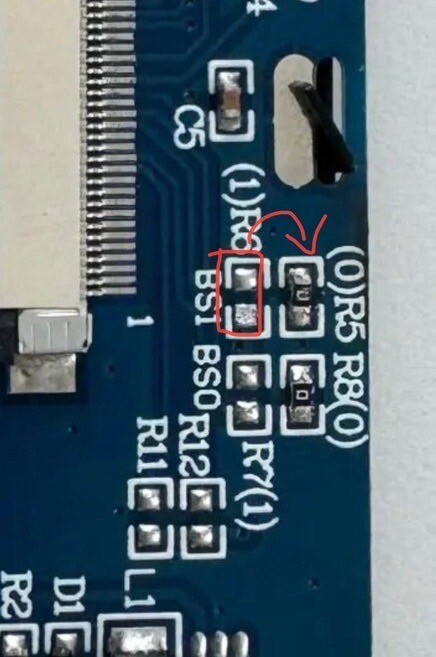
Yes my display arrived with R6+R8, so I changed it to R5+R8. the picture is from after the swap
-
Thank you @Vinc_Vega Looking forward to your findings! the connections are as you’ve indicated but still no output when I change to this driver by the way, maybe you know already but some of these screens don’t come by default as SPI, to make them as such you’ll have to re-solder a small jumper from “R6” to “R5”
-
Thank you Vinc, very kind of you I am still struggling though (screen won't turn on if I change the code as above) Couple of questions: 1. What board do you select in arduino ide to compile & upload the sketch? 2. my screen is an SSD1322, am I correct in setting this line up for the hardware SPI? U8G2_R0 or U8G2_R2? when I change this line and reorganise the connections, screen doesn't turn on Sorry for these noob questions, I am new to arduino & ESP in general regards
-
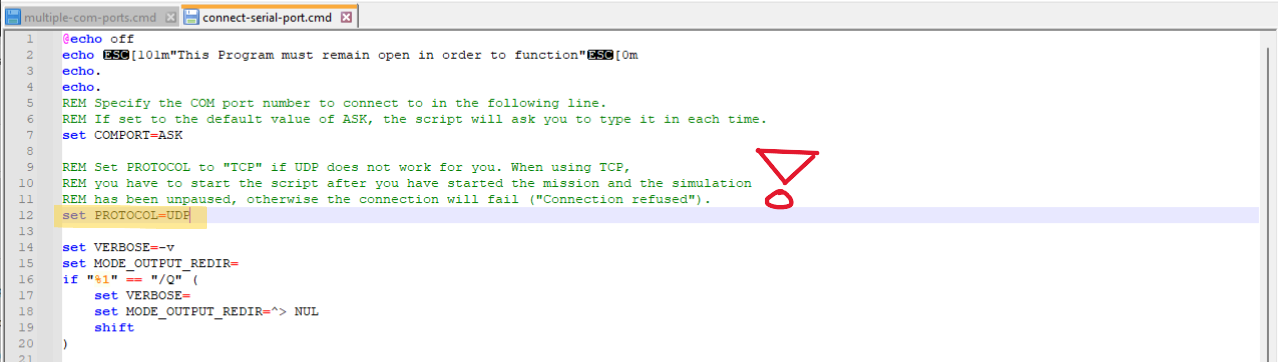
Happy to say that I've managed to have both programs working thanks to an amazing workaround found by @Ares63 (all credits go to him) In order to have both SOCAT & DEDHUB working you'll have to do the following: 1. open the "connect-serial-port.cmd" file found in your /SCRIPTS/PROGRAMS folder with notepad++ or similar 2. change the following line from "set PROTOCOL=UDP" to "set PROTOCOL=TCP" & save 3. as you've now changed the protocol to TCP, you must first launch DCS and be in an un-paused mission before you launch SOCAT! Otherwise you'll get an error 4. Enjoy your arduino panels & Simgears DED
-
I tried but even with those pins there's no change, it's still running very slow. I'll look into another board. Thanks for you help
-
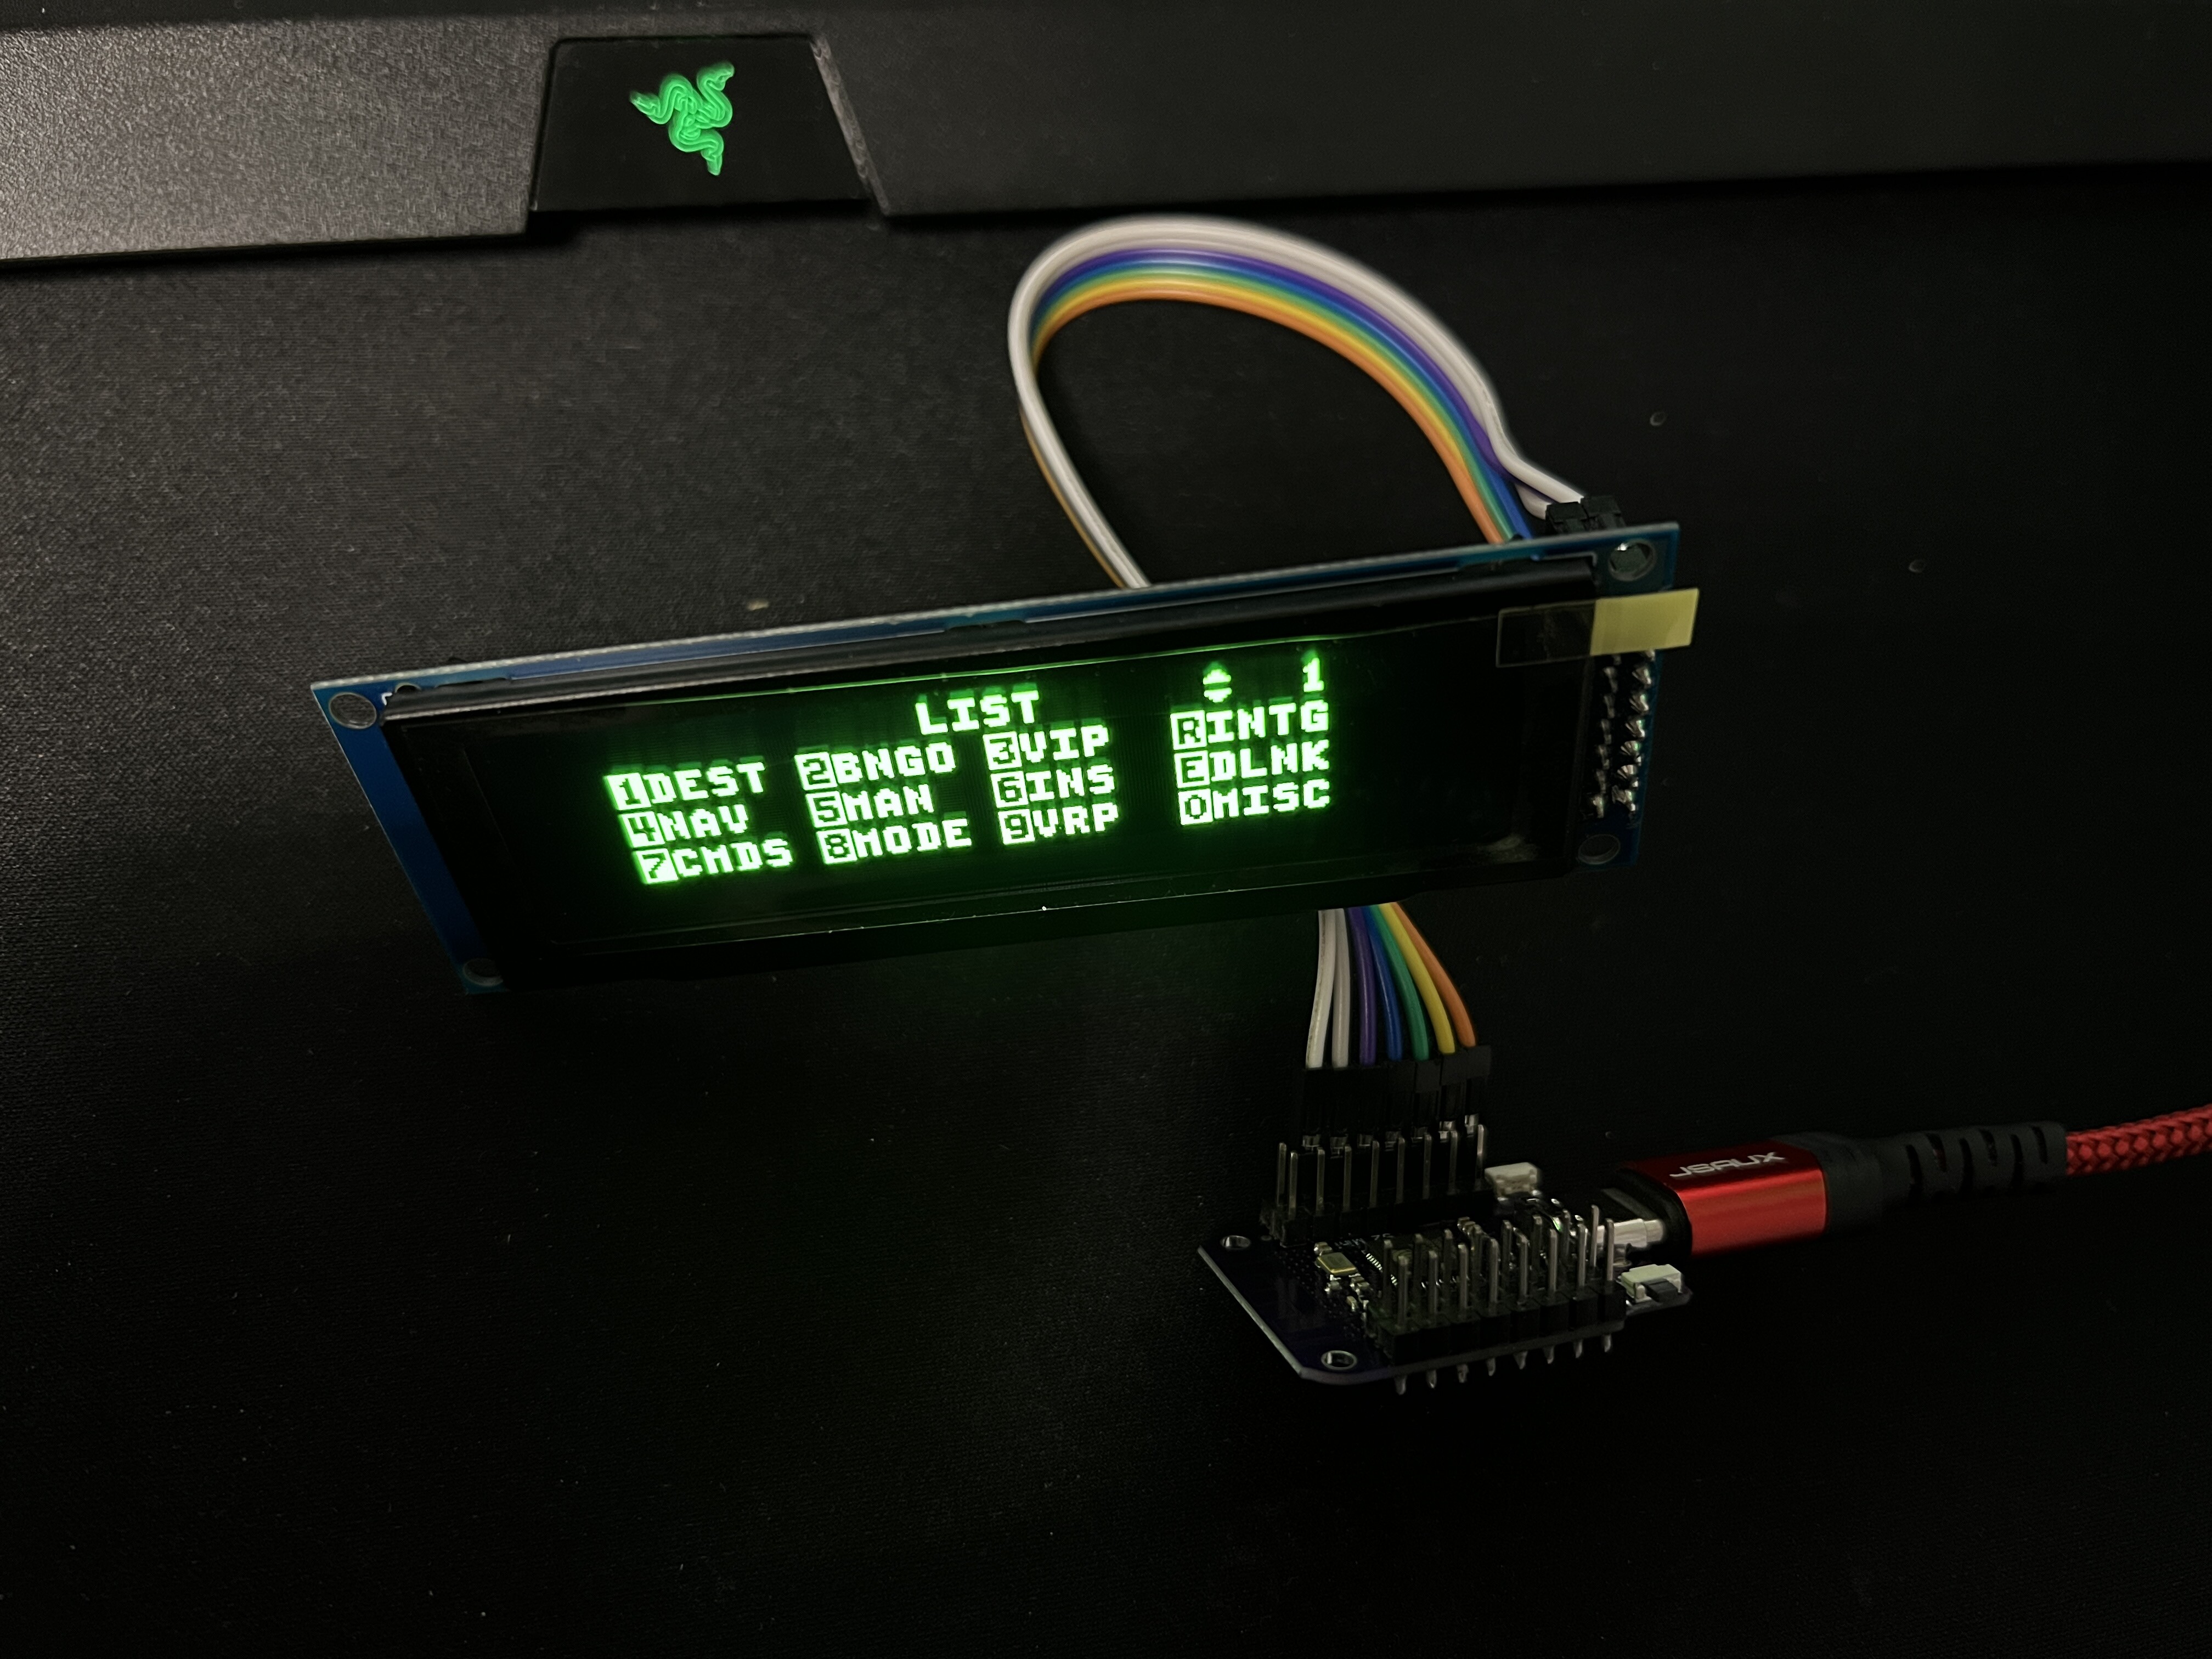
Thanks @Vinc_Vega I did manage to connect it and have it detected, I was using the incorrect board type from arduino ide I successfully uploaded your code and it works!! Had to modify the "chip/screen type" line with the following as I'm using a 4 SPI SSD1322 256x64 oled If anyone wonders here's the pinout for an S2 mini board: Unfortunately the lag is very long, about 10 seconds before each line refreshes. I'm afraid it's asking too much out of the S2 mini Which board would you recommend?
-
Hello @Vinc_Vega thanks for sharing your DED code I'm trying to flash it on an ESP32 board (S2 mini) and I can get it to compile correctly and upload it however afterwards the PC doesn't see the board connected to the PC anymore Here's the process I'm doing: - I'm setting the ESP32S2 in bootloader mode (port changes from COM5 to COM4 in my case) - Uploading the code via Arduino IDE (board ESP32S2 Dev module via COM4) - Unplug the usb and re-plug in the PC but now there's no connection shown to any port If I start DCS with the ESP in bootloader mode there's no display output to the DED and if I reset the board there's no com port I can use because the PC doesn't see it connected to it. Any ideas of what I might be doing wrong? Thank you PS: I also updated the code with the below edit
-
Hi @Jimbo I'm having the same issue with the DED + DCS bios. Have you found a way to make both of them work together? Thanks
-

Need Help for F-16 Caution Panel (Matrix LED wired)
Snakedoc replied to JohnnyChicago's topic in Home Cockpits
@Doc78 @Fusedspine33 Thank you so much for sharing your code! I had been trying to make it work on my end but I was unsuccessful until today. I realised that the address of the LED values in DCS bios are different than the ones written by you guys (with DCS HUB) so the code wasn't working. I think DCS HUB is obsolete now, so if anyone wants to make the code working with the latest DCS bios version (I have currently v0.8.3) here's the new version Simply upload the code to your arduino Nano, connect pins 10, 11, 12 to LOAD/CS, CLK, DATA IN on the MAX7219 board, VCC to 5v and GND to GND and enjoy: -
Any updates on this? Still happening with the latest update for both the viper & hornet
-
Hey there I would avoid MDF for the main structure as it’s very heavy and not so easy to work with. I’ve made mine out of plywood which is much stronger and solid while being lighter. I’m using 3mm MDF for the outer skins and it doesn’t give you much room for errors (for example if you take out a screw pretty much you can’t reuse the same hole). MDF also absorbs humidity/water very easily which could be a problem when painting and/or if your environment is humid. The plans specify the thickness required, just keep in mind that if you deviate with the thickness suggested you either gonna have to modify the plans to account for the difference or you’ll have fitment issues as the clearances are very precise. I’ve found that every CNC shop works differently, in my case a lot of inputs were required from my side to help them cut the pieces as per the plans because none of the ones I’ve contacted used 3D files for the cut but rather only 2D .dxf files.
-
correct as is F16 doesn't taxi straight with asymmetric loadout
Snakedoc replied to Snakedoc's topic in Bugs and Problems
Ok thank you I was testing out a mission which came with a pre-loaded asymmetric loadout and noticed it. thanks for clarifying -
FPS drops and mouse movement causing stutter
Snakedoc replied to ExGreyFox's topic in Game Performance Bugs
yeah I changed it in the Razer Synapse software under performance settings but no noticeable change in game. The biggest difference (for my system) was deactivating Tacview export (that I had done separetly before even my first post on this topic). Thanks anyway for the good tip! Learned something new -
FPS drops and mouse movement causing stutter
Snakedoc replied to ExGreyFox's topic in Game Performance Bugs
Thanks for pointing this out. Polling rate is not DPI. I had missed that. I lowered it in game to 500hz but on my system that made no difference.. I guess the effect I saw before was either the ALT+TAB or placebo