Etten
-
Posts
22 -
Joined
-
Last visited
3 Followers
-
Those are the numerals for the Jordanian livery. You can set them to an empty texture by setting these two lines on the description.lua file to "empty" and true: {"C-101-FUSE_1_7", DECAL ,"empty",true}; {"C-101-FUSE_1_8", DECAL ,"empty",true};
-
The image is now generated as .svg to make the tool faster but it works as it did before. When you load the image as a layer on your template Photoshop (or GIMP) will convert it to a raster image. You can do that by either dragging the image to the template from the file explorer or loading it via the menus. In Photoshop ‘File > Place embedded’ and in GIMP ‘File > Open as layers’. From there you can adjust the blend mode and opacity of the layer to suit your needs.
-
Para hacer una librea tienes que tener las texturas que quieras modificar, el archivo description.lua que define la librea y las carpetas que contienen la librea estructuradas correctamente. Explico por partes: Estructura de la librea Las libreas se guardan en la carpeta de “Liveries” de DCS dentro de “Juegos guardados” en: C:\Users\%USERNAME%\Saved Games\DCS\Liveries La carpeta de DCS puede llamarse “DCS.openbeta” en vez de “DCS”. Dentro de “Liveries” tienes que crear una carpeta, si no la tienes ya, con el nombre de la unidad (avión, barco, etc.) para la que estás haciendo la librea. Esta contiene otra carpeta por cada librea de esa unidad y estas, a su vez, contienen el archivo “description.lua” y las texturas asociadas a la librea. Por ejemplo, una librea para el C-101EB del cuarto prototipo (XE25-04) estaría en: C:\Users\%USERNAME%\Saved Games\DCS\Liveries\C-101EB\XE25-04 Prototype Y en esta carpeta estarían “description.lua” y las texturas que hayan sido modificadas. El nombre de la carpeta de tu librea puede ser cualquiera. El nombre de la carpeta de la unidad es fijo y lo puedes encontrar en los archivos del juego en: \DCSWorld\CoreMods\aircraft\nombredelavión\Liveries \DCSWorld\Bazar\Liveries Nota: Si lees algún tutorial antiguo verás que ponen la librea en la carpeta del juego junto a las libreas oficiales en vez de en la de juegos guardados. Esto no es recomendable en la versión actual de DCS. description.lua Este archivo controla las texturas que DCS aplica al modelo 3D con esa librea, las naciones del editor de misiones que pueden usarla, el nombre con el que aparece en este y las partes del modelo que se puedan controlar por argumentos de animación. Lo puedes conseguir copiando el de otra librea o generándolo desde el ModelViewer. La mayoría de las líneas que lo componen serán de este tipo: {"C-101-FUSE_2_1", 0 ,"C-101-fuse-2_CLAEX_CC_1",false}; Tienen cuatro parámetros que significan lo siguiente. El primero, "C-101-FUSE_2_1", es el material que le corresponde a una parte del modelo. En este caso son las alas del C-101. El segundo indica el tipo de material. En este caso 0, “diffuse”, es el color base. El tercero es el nombre de la textura que utilizará ese material, sin la extensión de archivo. Debe ser el mismo nombre que el de tu textura. El cuarto indica a DCS si debe buscar esa textura en los archivos del juego o en la carpeta de la librea. Si es “true” utilizará la textura por defecto para ese material. Si es “false” utilizará la que esté en la misma carpeta que description.lua. Al hacer una librea tienes que cambiar las líneas del .lua de las texturas que hayas modificado de “true” a “false”. El nombre de tu textura puede ser el mismo que el de la textura original, pero es recomendable que le des un nombre personalizado, sin olvidar de cambiar el tercer parámetro. Los dos primeros parámetros no hay que cambiarlos. Al final de description.lua puedes encontrarte las siguientes líneas: name = "CLAEX Green Camu Skin - Centro Logistico de Armamento y Experimentacion" Indica el nombre de la librea con el que aparecerá en el editor de misiones y la pantalla de rearme. Si no está esta línea el nombre de la librea será el de su carpeta. countries = {"SPN", "BLUE", "RED"} Limita la librea para que sólo puedan usarla las naciones indicadas. Si no está esta línea la librea la puede utilizar cualquier nación. custom_args = { [70] = 0.4, } “custom_args” son argumentos de animación del modelo que permiten cambiar alguna parte del avión para poder representar las diferentes configuraciones de este. Vienen definido por un número, 70 en este caso, y pueden tener un valor entre -1 y 1. Para el C-101 el argumento 70 cambia el tipo de morro y antenas, en este caso 0.4 cambia el morro al tipo redondeado. Puedes ver lo que hace cada valor en el ModelViewer. Solamente deberías modificar los argumentos que aparezcan en las libreas oficiales, el resto controlan animaciones de otras cosas como el tren de aterrizaje, flaps, etc. y no deberían cambiarse. Texturas Las texturas que quieras modificar las puedes sacar de las plantillas que dan los desarrolladores en formato .psd. https://www.digitalcombatsimulator.com/en/downloads/texture_templates/ Algunos aviones tienen plantillas hechas por la comunidad, como el JF-17: https://forums.eagle.ru/topic/256477-the-unofficial-jf-17-paintkit/ Si no hay plantilla tendrás que sacar las texturas base de los archivos del juego en: \DCSWorld\CoreMods\aircraft\nombredelavión\Textures \DCSWorld\Bazar\Textures ModelViewer ModelViewer es un programa de DCS que permite visualizar libreas sin tener que abrir y cerrar el juego cada vez que haces un cambio. Lo puedes encontrar en: \DCSWorld\bin\ModelViewer2.exe Para tu primera librea te recomiendo que descargues una librea ya hecha y la modifiques. Saludos.
-
Desde el día 18 yo tampoco puedo acceder ni a la página web ni a los foros de DCS. Steam, Discord y todas las demás páginas web funcionan correctamente. Por ahora la solución que me ha funcionado es cambiar la dirección de DNS que utiliza Windows de la automática a la de Google. Para ello ve a Configuración de Windows > Red e Internet > Configuración de red avanzada: Cambiar opciones del adaptador. Se abrirá una ventana con las conexiones de Ethernet y Wifi que tengas. Haz click derecho y selecciona “Propiedades” en la que estés usando para conectarte a internet. Selecciona “Protocolo de Internet versión 4 (TCP/IPv4)” y pulsa en “Propiedades”. En la nueva ventana que se abre cambia de “Obtener la dirección del servidor DNS automáticamente” a “Usar las siguientes direcciones de servidor DNS:”. Aquí pon las direcciones del DNS de Google. Servidor preferido 8.8.8.8 y alternativo 8.8.4.4.

-
The UV map is generated from the Model Viewer textures panel, there are instructions on how to do it on the “Exporting the UV map in Model Viewer” section of the GitHub page. You also have to be in DCS 2.7 to see the “UV to file” button, older versions of the Model Viewer can’t generate the UV map.
-
With the release of DCS 2.7 a new feature has been added to the Model Viewer that allows exporting of the UV map of any given texture. This map aids on the creation of liveries for units that don’t have an official texture template, like ground units. This UV map is generated by the Model Viewer as a comma-separated values (.csv) file, a text file containing a set of coordinates. To make it usable for livery making it needs to be converted into an image, this tool does this conversion. Download, installation and usage instructions are available on this GitHub page: https://github.com/Ettenmure/dcs-uv-converter Please note that this initial release is an alpha with limited functionality and bugs are expected. If you do encounter an error, please report it providing the error message and the names of the model and texture that you’re working with.
-
This mod adds to the C-101EB an extended pitot tube on the nose of the aircraft as used by the first prototype, XE25-01. This first release of the mod is intended to be used only with the 1982 Farnborough Airshow blue and white livery, available on the user files page. Link Installation Instructions: To install there are three options, choose one. 1. Open Mod Manager Install and setup OMM if you don’t already have it. Link Download the mod: Prepackaged for OMM Move it, without extracting it, to your library folder and enable it on OMM. (Install to the saved games folder, not the main DCS install.) 2. OVGME Install and setup OVGME if you don’t already have it. Link Download the mod: Prepackaged for OVGME Move it, without extracting it, to your OVGME mods folder and enable it. (Install to the saved games folder, not the main DCS install.) 3. Manual Install (Not recommended, read below.) Download the mod: Manual install Extract it and follow the instructions on the readme file. Using the mod ingame: To use, load the white smoke pod for the C-101EB on the arming screen or mission editor. The pitot tube will be added anytime you load the smoke pod, regardless of the livery you choose. Therefore, is recommended to install this mod using a mod manager to be able to disable it easily. Additional notes: The mod is contained within the saved games folder and doesn’t modify core game files. During testing it didn’t trigger the integrity check, if it does for you please report it in this thread. During the 1978 Farnborough Airshow the pitot tube was fitted with angle of attack an angle of slip vanes (Photo). A model for that livery has not been included in the mod since I have not been able to tie the animation of the vanes to the aircraft movement and would remain static during flight.
- 1 reply
-
- 4
-

-
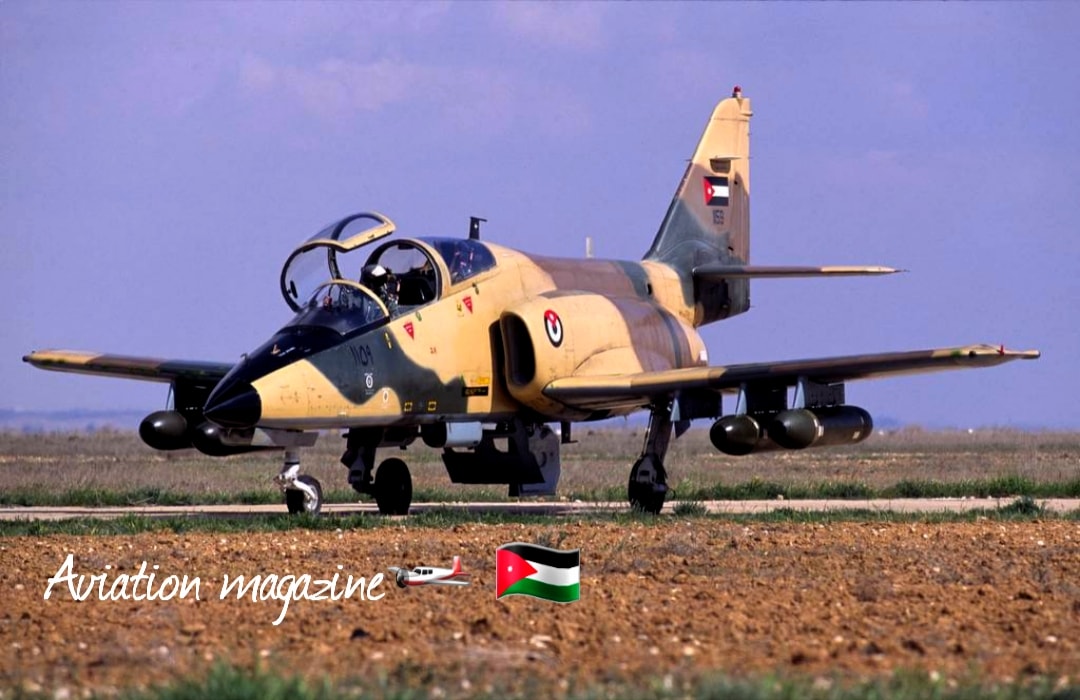
While looking for information on the Jordanian C-101CC I have found some interesting pictures. (Attached at the bottom of the post) The first one shows two C-101 coming out of the hardened shelters at King Hussein Air Base. I have tried to spawn a C-101 in there in DCS but the mission editor won’t let me. Oddly enough the F-5, F-16 and F-18 can spawn inside the shelters, it looks like it’s bugged for the C-101. The second one shows an armed Jordanian C-101CC carrying the dual .50 cal gun pod and four rockets pods, which look like the rocket pods (7 rockets) that we have in DCS but with disposable aerodynamic fairings. It’s worthy of note that there are rocket pods mounted on the external pylons, in DCS we are only allowed to mount air to air missiles on those pylons. The third one shows that the Jordanian C-101CC, like the EB, have also been fitted with a smoke system. The fourth one shows Jordanian C-101, Mirage F1 and F-16 flying in formation. And the last one is a Jordanian C-101 pilot patch.
-
For me lesson 5 doesn’t show up on the training mission menu, but the mission file is there and can be opened from the mission editor.
-
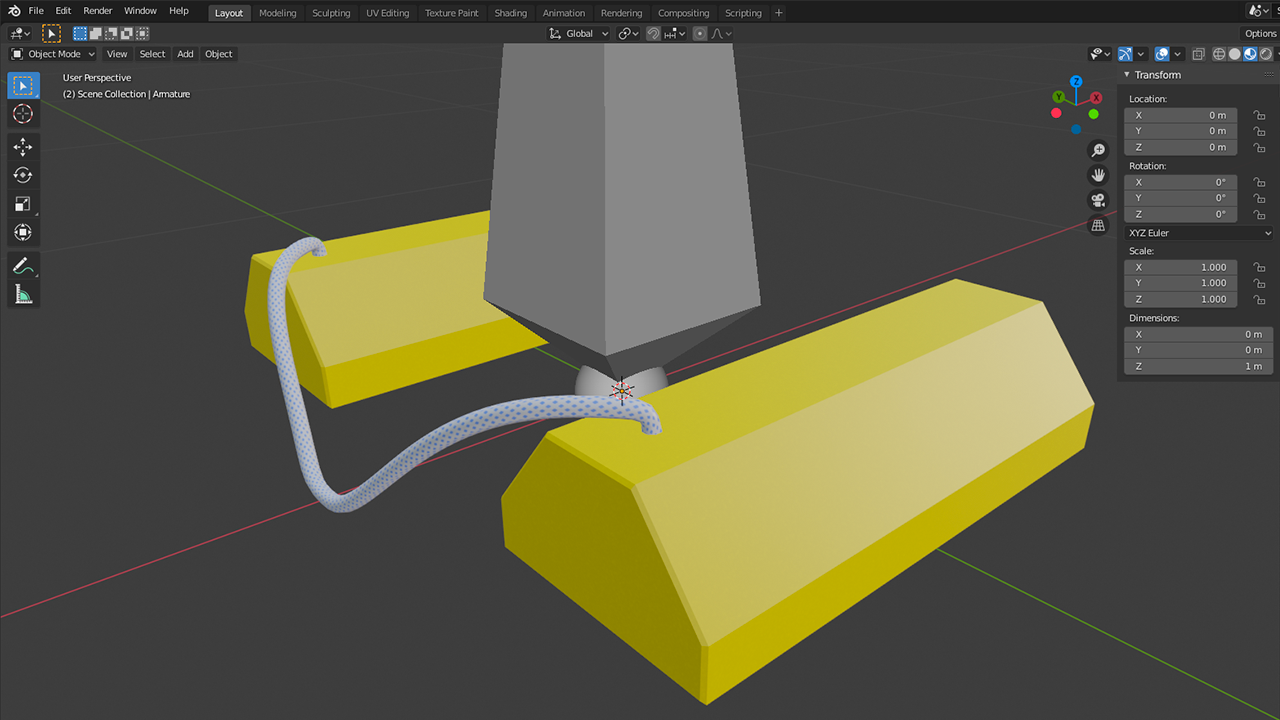
Thanks for your work on the add-on, the EDM material node will be a good feature to have. I have a request for an addition, to be able to set a RenderType for curve objects. I am using paths to model hydraulic hoses and converting them into mesh objects right before exporting to .edm (See attached image). As a path is not possible to set the RenderType and when it gets converted to an object the RenderType is set to “None” by default. It must be then manually set to “RenderNode”. It would be nice to be able to set a RenderType for each path as they are created instead of having to do it for all the paths all at once after they get converted.
-
I tested it in Blender in 2.82 and it exported without issues, images attached. Thank you for the addon Tobi!
-
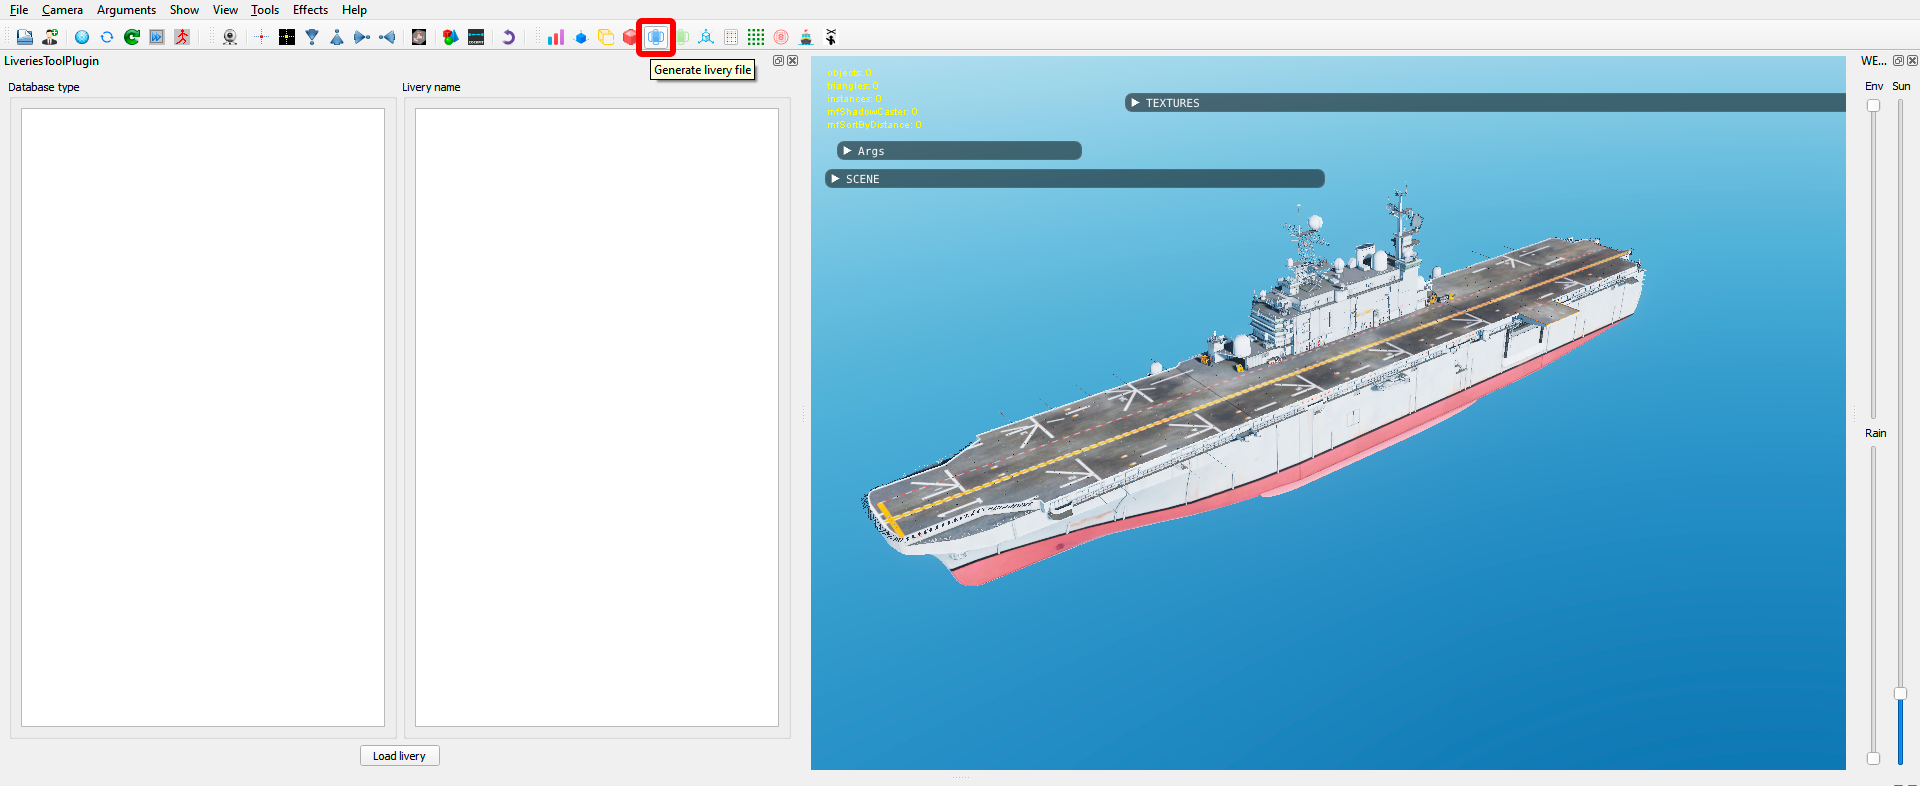
El archivo description.lua del Tarawa (o cualquier otro .edm) lo puedes generar desde el ModelViewer abriendo el modelo (LHA_Tarawa.edm) y pulsando el botón “Generate livery file” en la barra superior, adjunto captura de pantalla. El .edm está en \DCSWorld\CoreMods\aircraft\AV8BNA\Shapes\LHA_Tarawa
-
As Vibora has said the Chilean liveries for the -EB are not part of the module. My liveries that have been included in the module are: For the C-101EB XE25-01 Prototype XE25-01 Prototype 1978 Farnborough Airshow XE25-02 Prototype XE25-02 Prototype 1989 TV Commercial XE25-03 Prototype For the C-101CC Chile Early Agressor Nº410 Chile Early Agressor Nº411 Chile Early Green Nº408 Chile Early Grey Nº413 Any other liveries outside of that might have issues with the RoughMet texture. This weekend I will be updating my user files pages with new .lua files and removing the ones already included in the module to prevent duplicates. For the time being I recommend you delete my liveries and wait to install the updated ones.
-
That’s ok, I will wait for the update to Steam. Thanks!
-
Thanks for looking into it so quickly. Sadly, the missing texture issue persists. For reference, I am on the Steam edition open beta. I tried a repair, but it didn’t fix it. I tried doing a fresh install by uninstalling DCS, deleting the saved games DCS folder and then installing DCS again but it didn’t fix it. When looking at the external model on the model viewer it shows two missing textures that appear to be the culprit, “miragef1-asiento-aa” and “miragef1-asiento-ab”. (Picture attached) I looked on the .zip file that contains the texture files (\Steam\SteamApps\common\DCSWorld\CoreMods\aircraft\C-101\Textures\C-101.zip) and it doesn’t contain those two textures. Hopefully some other player that is on the Steam version can confirm that they are also having this issue.