Gadroc
-
Posts
1060 -
Joined
-
Last visited
-
Days Won
1
Content Type
Profiles
Forums
Events
Everything posted by Gadroc
-
Very nice. I wish I was in a position where I could grab a real trainer/fuselage.
-
I'd be happy to do the integration work with Helios.
-
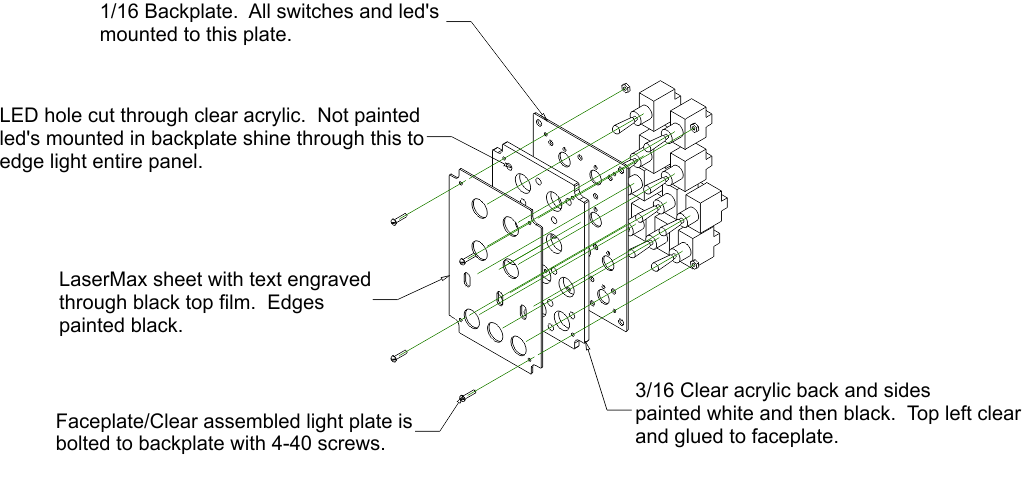
Here is how the panel is constructed.

-
Would you be interested in building this as a Helios plugin? I can share the C# api with you.
-
I'm kind of interested in trying out a TFS3, but from their documentation in order to enable it for DCS World you have to turn off Export.lua. This is an absolute NO GO for anyone with a cockpit. Is this accurate? I have no idea why on earth they require setting of EnableExportScript to false. Also does anyone have dimensions for the seat pad? I'd need to verify it would work on my ACES seat.
-
How to get speed brake and trim position?
Gadroc replied to Sorin's topic in PC Hardware and Related Software
It's not exposed in a way we can get to it, at least not through the export lua functions. -
Very nice! Mind sharing your trick with lighting the needle?
-
That's good news Peter. I didn't realize you could force DCS to turn on force feedback without driver support!
-
Well actually it's not that simple. The primary problem is the trim button has two features in game. First is the force trim. Creating a purely mechanical system for force trim can replace this with out a problem. Second is it sets the heading hold for the auto pilot. Now here is the problem, even with your mechanical force trim you will have to "press the button" in sim or your auto pilot will not work correctly. If your joystick driver does not report force feedback DCS will do the "virtual force trim" and now your mechanical force trim will create problems. This means you'll have to do some driver and/or software hacking potentially to get this mechanism to work. Or potentially specifically use an existing force feedback stick and disable it's motors. Unfortunately driver hacking with current versions of windows requires you to buy a pricey signing certificate. Lastly you'll have to deal with the rudder. In the real system the rudders are part of the force trim, but they always have virtual trim in game as far as I know.
-
Engraving bottom up and making sure you have a layer of dish soap in the white before you start lightly brushing and it will work fine.
-
First is make sure you are engraving from bottom up so that the exhaust fan is not sucking residue over already engraved areas. You do this in laser cad via position relative. I use lower left. Now when you set your origin it will be the bottom left of the engrave instead of the top left. Second cleaning it should be done under running water. I dump a bunch of dish soap on the surface and then use a sponge to lightly remove residue under running water.
-
Here is a short video of the IAS in action, along with a cameo of my landing gear panel. The drum is a little jerky right now. The unipolar driver board I'm using right now will only half step. That along with a canstepper and my first try at gear placement leaves a little play. Once I get my EOS stepper boards done it will be eighth steeping which should smooth out this quite a bit. Also my stepper board can drive the primary needle about 3x faster than this board. I still need to put a coat of paint on the bezel. It's not the right bezel but it's close enough for now. I didn't want to try and fit the glass in a custom bezel, nor deal with embeding the right nuts to be able to fasten the can to it. I just cut some acrylic to surround the existing H-6L bezel and lock it in place.
-
What's the resolution on your controller?
-
If your task bar is semi transparent it is on. There are some config screens where you can check which options are on and off but I'd have to root around a bit to find them.
-
Yep. Just as long as you don't disable aero effects. Telling people to enable the aero theme is the easiest way to explain how to make sure they are enabled.
-
Both motor have unipolar windings and center taps.
-
Thanks. I'm not sure yet. I may leave out the barber pole as it's non functional in game anyways. I do have a model to cut out of my lasermax stuff to see if that will looks good. If that works it would probably be glued in place and non moving. Ironically I think the needles are the hardest part of gauges. Real ones are very thin metal. I don't have access to machinery to cut that kind material with the accuracy I do for thicker materials. 1/16th thick white ones don't always look right.
-
The needle, can and glass for this are salvaged out of a H6L vertical speed gauge. Helios always returns steppers to 0 on stop. So I only need to "reset" zero is on a software crash.
-
I'm almost finished with my AVU-22 build and thought I'd post some quick pictures. This is a two stepper instrument. I have one 400 step nema 17 which will drive the needle and a 48 step can motor to run the drum. I have geared down the drum to be 100 steps. I'm going to try to use my Phidgets stepper driver for this one. I believe it should be able to drive these fast enough for this gauge. I'll get it hooked up and running sometime tomorrow and then finish the bezel.
-
It looks like with the GT750 and native 16:10 you would have to be able to place the projector 7'2" behind each screen to get a 10ft wide image. That means you'd need at least a 25ft x 18ft room (assuming not doing back view) and an 18ft ceiling if you want to do rear projection on the ceiling as well. That will give you a 75" tall image so you'd end up with 45" of non projected surface at the bottom of each wall. If you use 4:3 mode you would need 8' 8" mount distance for the projectors, but would have a 90" tall image resulting in only 30" of unprojected surface. I'm not sure about impact on image quality. I suspect that the projector is going to scale your image and not use optics to make the 1280 wide pixel narrower. According to the manual this is 1066x800 resolution.
-
Awesome. I'm interested! I need to enough to run my ADI (2 synchos) and Alitmeter (1 Synchro) and possibly the HSI I have. I have a couple questions about it it. Ping me on IM next time your on!
-
Helios- Extra Interface Removal
Gadroc replied to 0utLAW's topic in PC Hardware and Related Software
Sorry for delay in response.. easier solution. Select the interface you don't want in profile explore and hit the delete key on your keyboard. -
Everyone probably should realize sim pit building is all about making choices that compromise another aspect of the build. There is no "perfect" build in either visuals or the pit itself. What there usually is a "good build" for your situation. Peter is pointing out a few things that need to be understood, but can be compromised if needed. I'm going to attempt to restate them here and what I think they affect. Eye Position When using the CUBE project supported by DCS there is only one head position where everything looks perfect. That position is the direct center of the cube. In essence this means your normal sitting eye position should be directly in the center of the cube and at half the height of your walls. If you vary from this there will be some distortion when objects move between projection surfaces. How much this annoys someone is something they will have to figure out for themselves. People have varying tolerances for this. Peter obviously wants a perfect image, while some of the rest of us have more flexibility by this. It is a must to understand this before you invest lots of $. Impacts: Seating/Pit Height, Pit Depth Projection Volume & Aspect Ratio You can not have anything standing between your projector and the wall or it will cast a shadow. You can envision this in your mind as a pyramid with it's top placed at the lens of the projector and it's base being parallel to the projector lens(these are the green pyramids in Peter's images). Ideally your wall is parallel like this and the image will be perfectly square, unfortunately this is not usually possible because your seating position is between the projector and the wall. We mount the projectors on the ceiling to project over the viewer. When you do this your image on the wall becomes a trapezoid and use "keystone" correction to make the image square again. Make sure you understand these projection volumes relative to the size of pit. In particular on the A-10 the biggest possible piece for shadows are the canopy rail and pilots head. If you want / need the canopy rail you will need a larger projection room. In addition if you are really tall do some measurements before deciding on a room size. Lastly commercial projectors are not made with a 1:1 aspect ratio, therefore you will not get projection on the full wall. You will be left with several feet at the bottom of each wall with out projection. In addition even you could find/build them that way the projection volume discussed above will case shadows in some areas unless the projector was directly on top of the user. In a way 16:10 helps as it makes less chance of shadow from the pit/pilot. The largest impact by this is the top projection, since it's mounted in front of the pit pointing up. Since your eye position should be half way between the front and back walls and your pit has to leave enough room for this projection volume. For 7.5ft or smaller cubes this doesn't leave a lot of room. You can use the nice calculator at projector central to find the screen size at various projection distances to calculate your projection volume. Impacts: Pit Height, Pilot Height Maximums, Pit Depth, Projector Placement Projector Brightness & Pixel Size This is an aspect that has not been talked about but should. The farther the projector is away from the wall the less bright the image will be. In addition each pixel will appear bigger. This has two effects. First low brightness will cause the projection to appear washed out. You can see an example of this by looking at Flim's first videos projecting directly onto the walls vs his video with the 7ft cube. It's not a completely fair comparison has his 7ft cube as a better projection surface, but even so there is a traumatic difference in perceived quality of the image. The closer the projector is the more forgiving it is to poor quality screens. Flim did not have to use expensive projection screen paint on his 7ft cube, but I suspect he would have had to if he kept projecting onto the room walls. Second is pixel size. In particular the HUD. When the projection surface is farther away the HUD will get bigger and look more blocky. On the flip side of this is focal distance of the images. For everything aside from the HUD having the wall further away enhances the sense of depth, due to the refocus your eye does from the pit itself to the wall. Impacts: Project Surface Quality Requirements, Project Surface Size, Image Quality Ease of Build & Available Space Smaller cubes are easier to build. If your cube is 8ft or under you can buy 4x8 surface sheets and have them cut appropriate at your local home improvement store. You will only have one seam in each wall to tape/mud/sand to make it smooth. Or in the case of a 7ft pit the seam is below your normal line of sight, you may just be able to ignore it. Lastly not everyone has a room with enough space for an 8.5ft or larger projections surface. You may be in a room where you still need to access a closet, or you need enough space so that you can open windows for cooling, etc. You will need to make compromises about the above to do a cube. Rear projection systems solve 90% of the problems above but require about 8 feet more free space out side of each wall. Aka for an 7 foot cube you would need a room that is 23 feet wide and 15 feet high and deep. To mount the projectors 7' behind each wall. Impacts: Required tools, Skill of builder As you can see with all these issues you have conflicting goals. Eye Position, Projection Volume and Depth of Focus want you to have a larger projection surface but brightness, image quality, space and ease of build want smaller. Personally I don't have room for anything larger than 7ft cube, so I'm going to have to compromise. At the end of the day I won't have perfect eye position and run the risk of occasional shadows and I can't have a canopy rail. From talking with Flim the immersion is still worth those trade offs (albeit with $3k of visual equipment and materials).
-
Nicely done!
-
Does Immersive Display Pro have the capability for differing sized monitors? My pit will end up with the following: 1 x Tripple Head 2 Go 3840x800 (3 GT750 projectors) 1 x GT750 Projector 1280x800 2 x 8" 800x600 MFD Monitors 2 x 3.5" RWR/CDU Screens