MBot
-
Posts
3938 -
Joined
-
Last visited
-
Days Won
19
Content Type
Profiles
Forums
Events
Everything posted by MBot
-
Here is an overview of likely NATO air reinforcements for North Norway from 1989. The 4 USAF F-16 squadrons might actually by of any USAF attack type, including F-4, A-7D and A-10A. So it is absolutely plausible that multiple USAF Phantom squadrons would have been deployed to Norway up to 1989 (the earlier the more likely). Considering the 4th TFW flew DMAS jets, I think the 347th TFW would currently be an excellent and likely candidate to use for scenarios on the Kola map. We also have a wonderful Euro One skin for 68th TFS in the game. A Wrap Around SEA skin for the 347th TFW would still be nice

-
Here are a couple of important USAF units that flew the F-4E in the 1980s timeframe. I hope I got most of the major ones. In addition, there are probably also various additional Guard and Reserves units. Also if you include all of the 1970s there will be many more. This is all compiled from wiki, so take it with a grain of salt. West Germany 86th TFW, Ramstein 512 TFS, 1976-1985, to F-16C 526 TFS, 1973-1986, to F-16C 52nd TFW, Spangdahlem (European Wild Weasel Wing) 23 TFS, 1982-1987 (mixed F-4E/F-4G), to F-4G/F-16C 81 TFS, 1984-1988 (mixed F-4E/F-4G), to F-4G/F-16C 480 TFS, 1979-1983, 1983-1987 (mixed F-4E/F-4G), to F-4G/F-16C Iceland 57 FIS, Naval Air Station Keflavik, 1978-1985, to F-15C South Korea 51st TFW, Osan 36 TFS, 1973-1988, to F-16A 497 TFS, 1974-1988 Pilippines 3rd TFW, Clark 3 TFS, 1975-1991 90 TFS, 1977-1991 (mixed F-4E/F-4G), to F-15E USA 21st Composite Wing, Elmendorf AFB, Alaska 18 TFS, 1977-1981, to A-10A 43 TFS, 1970-1982, to F-15A 4th TFW, Seymour Johnson AFB, North Carolina (Rapid Deployment Force) 334 TFS, 1973-1989, to F-15E 335 TFS, 1974-1989, to F-15E 336 TFS, 1974-1988, to F-15E 337 TFS, 1982-1985 347th TFW, Moody AFB, Georgia 68 TFS, 1975-1987, to F-16A 69 TFS, 1983-1989, to F-16A 70 TFS, 1975-1987, to F-16A 339 TFS, 1976-1983
-
I just tried 3 Rockeye drops in DT and they all landed short. I am pretty sure that the drag coefficient for Mk-20 in the Bombing Table is for the canister only. The problem is that when the bomb opens (the time-point being dependent on the fuze setting), the drag coefficient for the bomblets would be much higher. Since this is not considered in DT they land short. On the other hand I get excellent results for Rockeyes in Direct with my own mils value: And scoring hits in Direct is just so much more satisfying But I agree in practice there is little reason not to use DT, at least for slick bombs. There radar lock can usually be done quick enough so that it is doable also in pop-up attacks. Still, nothing beats the pure fun of Direct
-
It is zero (wasteland at edge of map with no elevation).
-
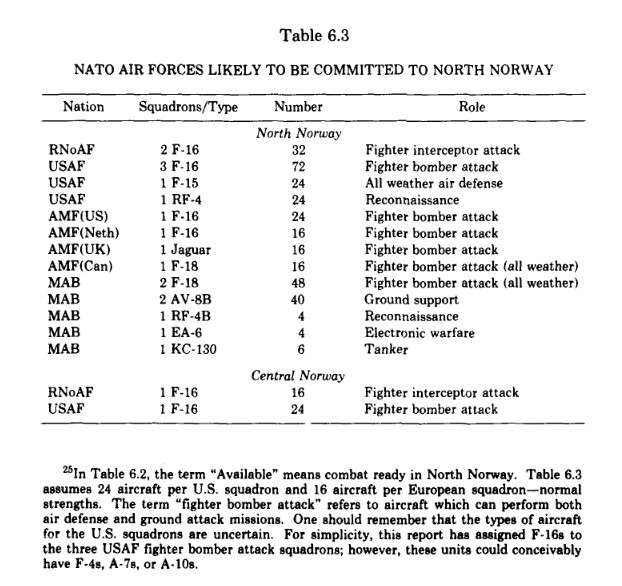
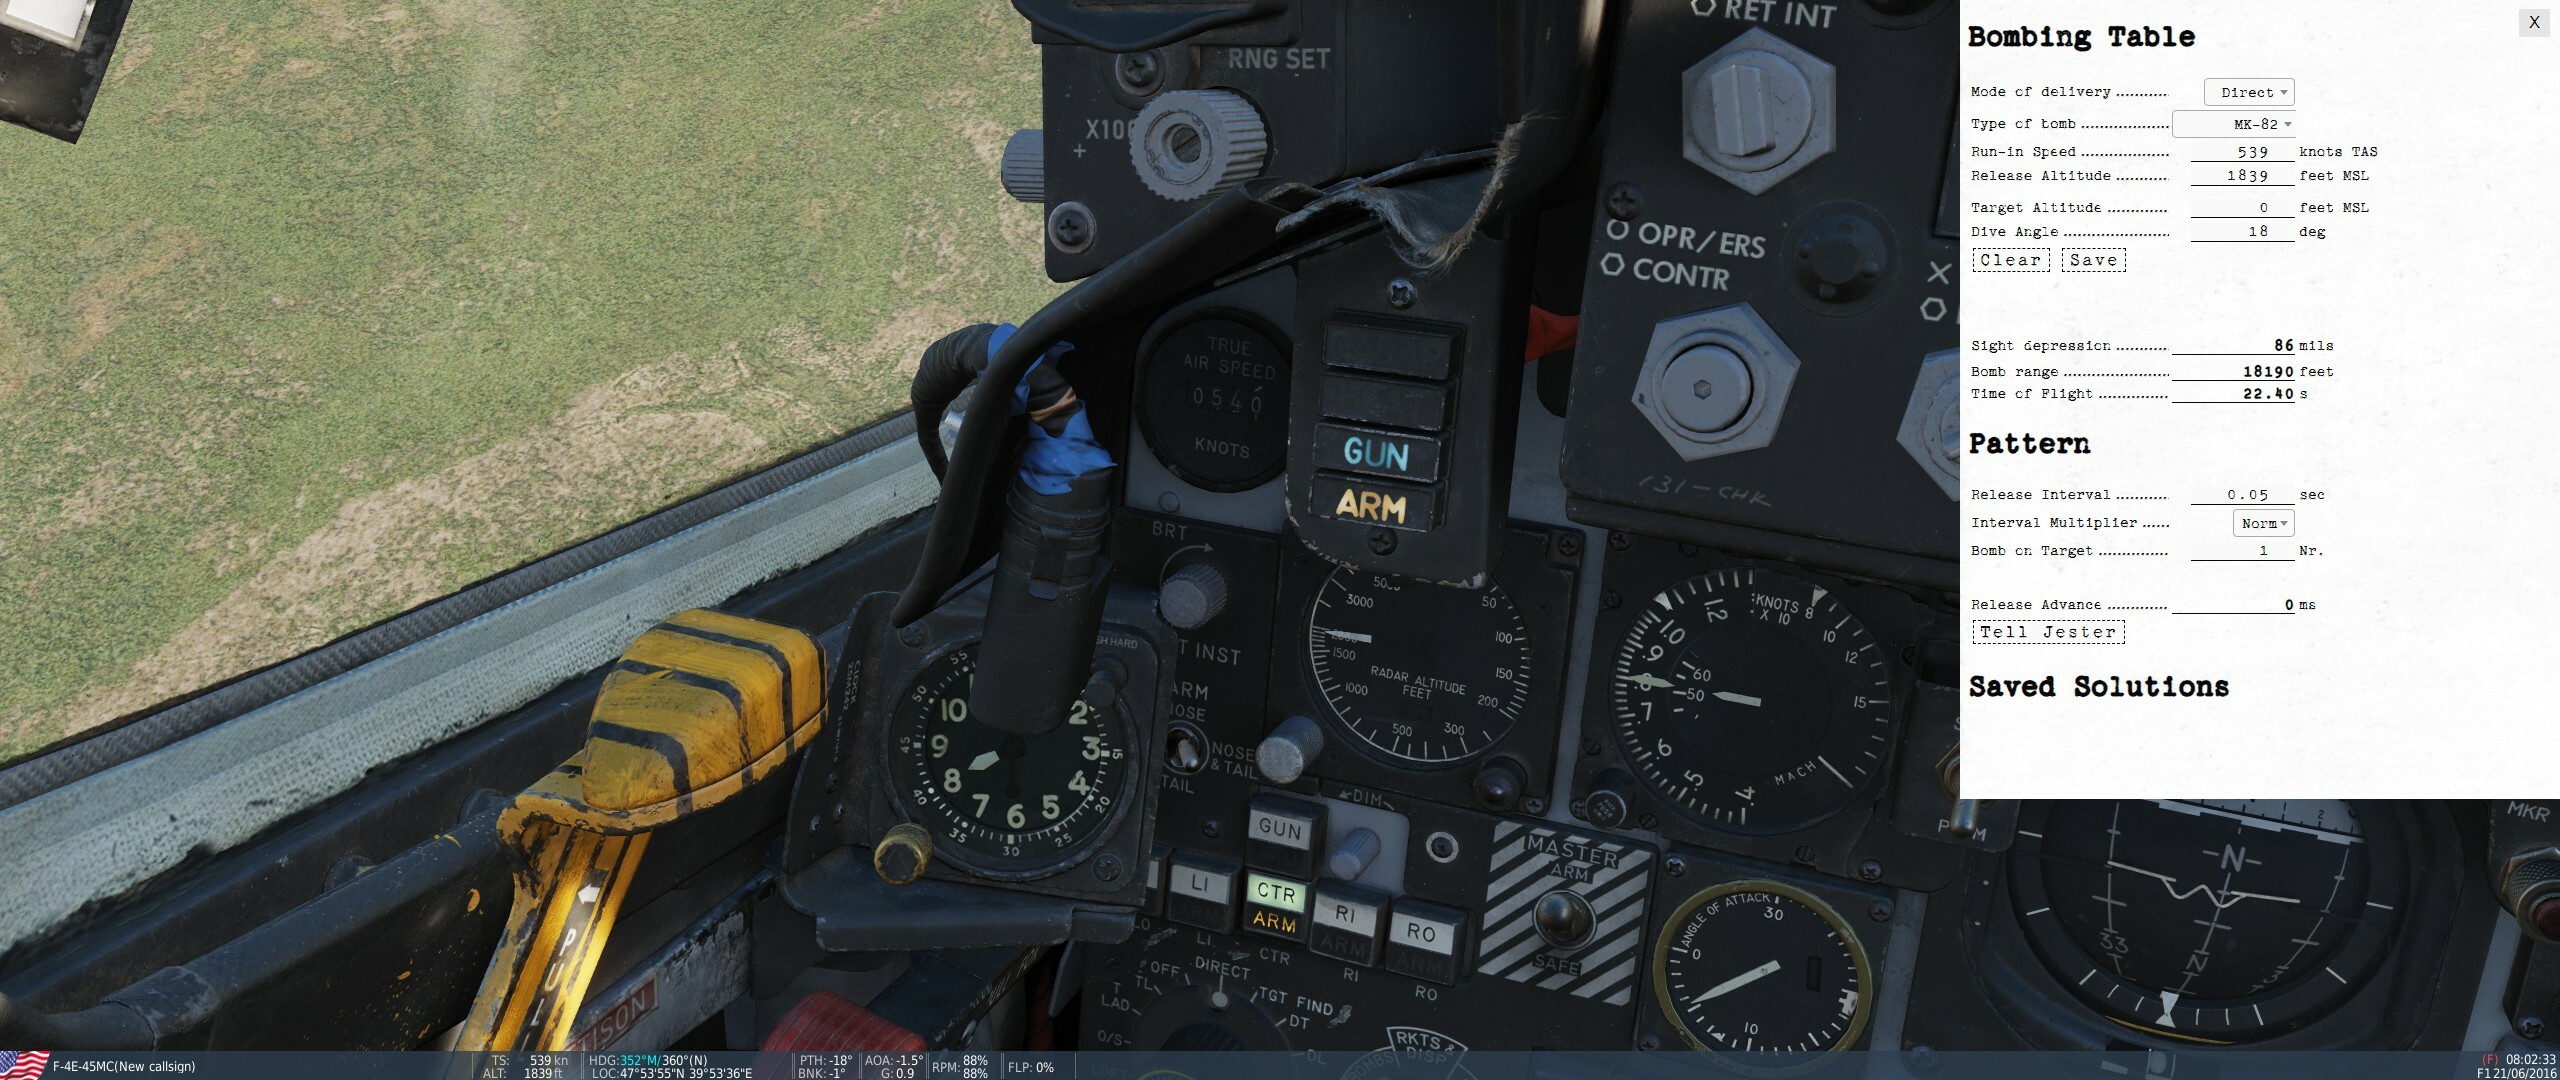
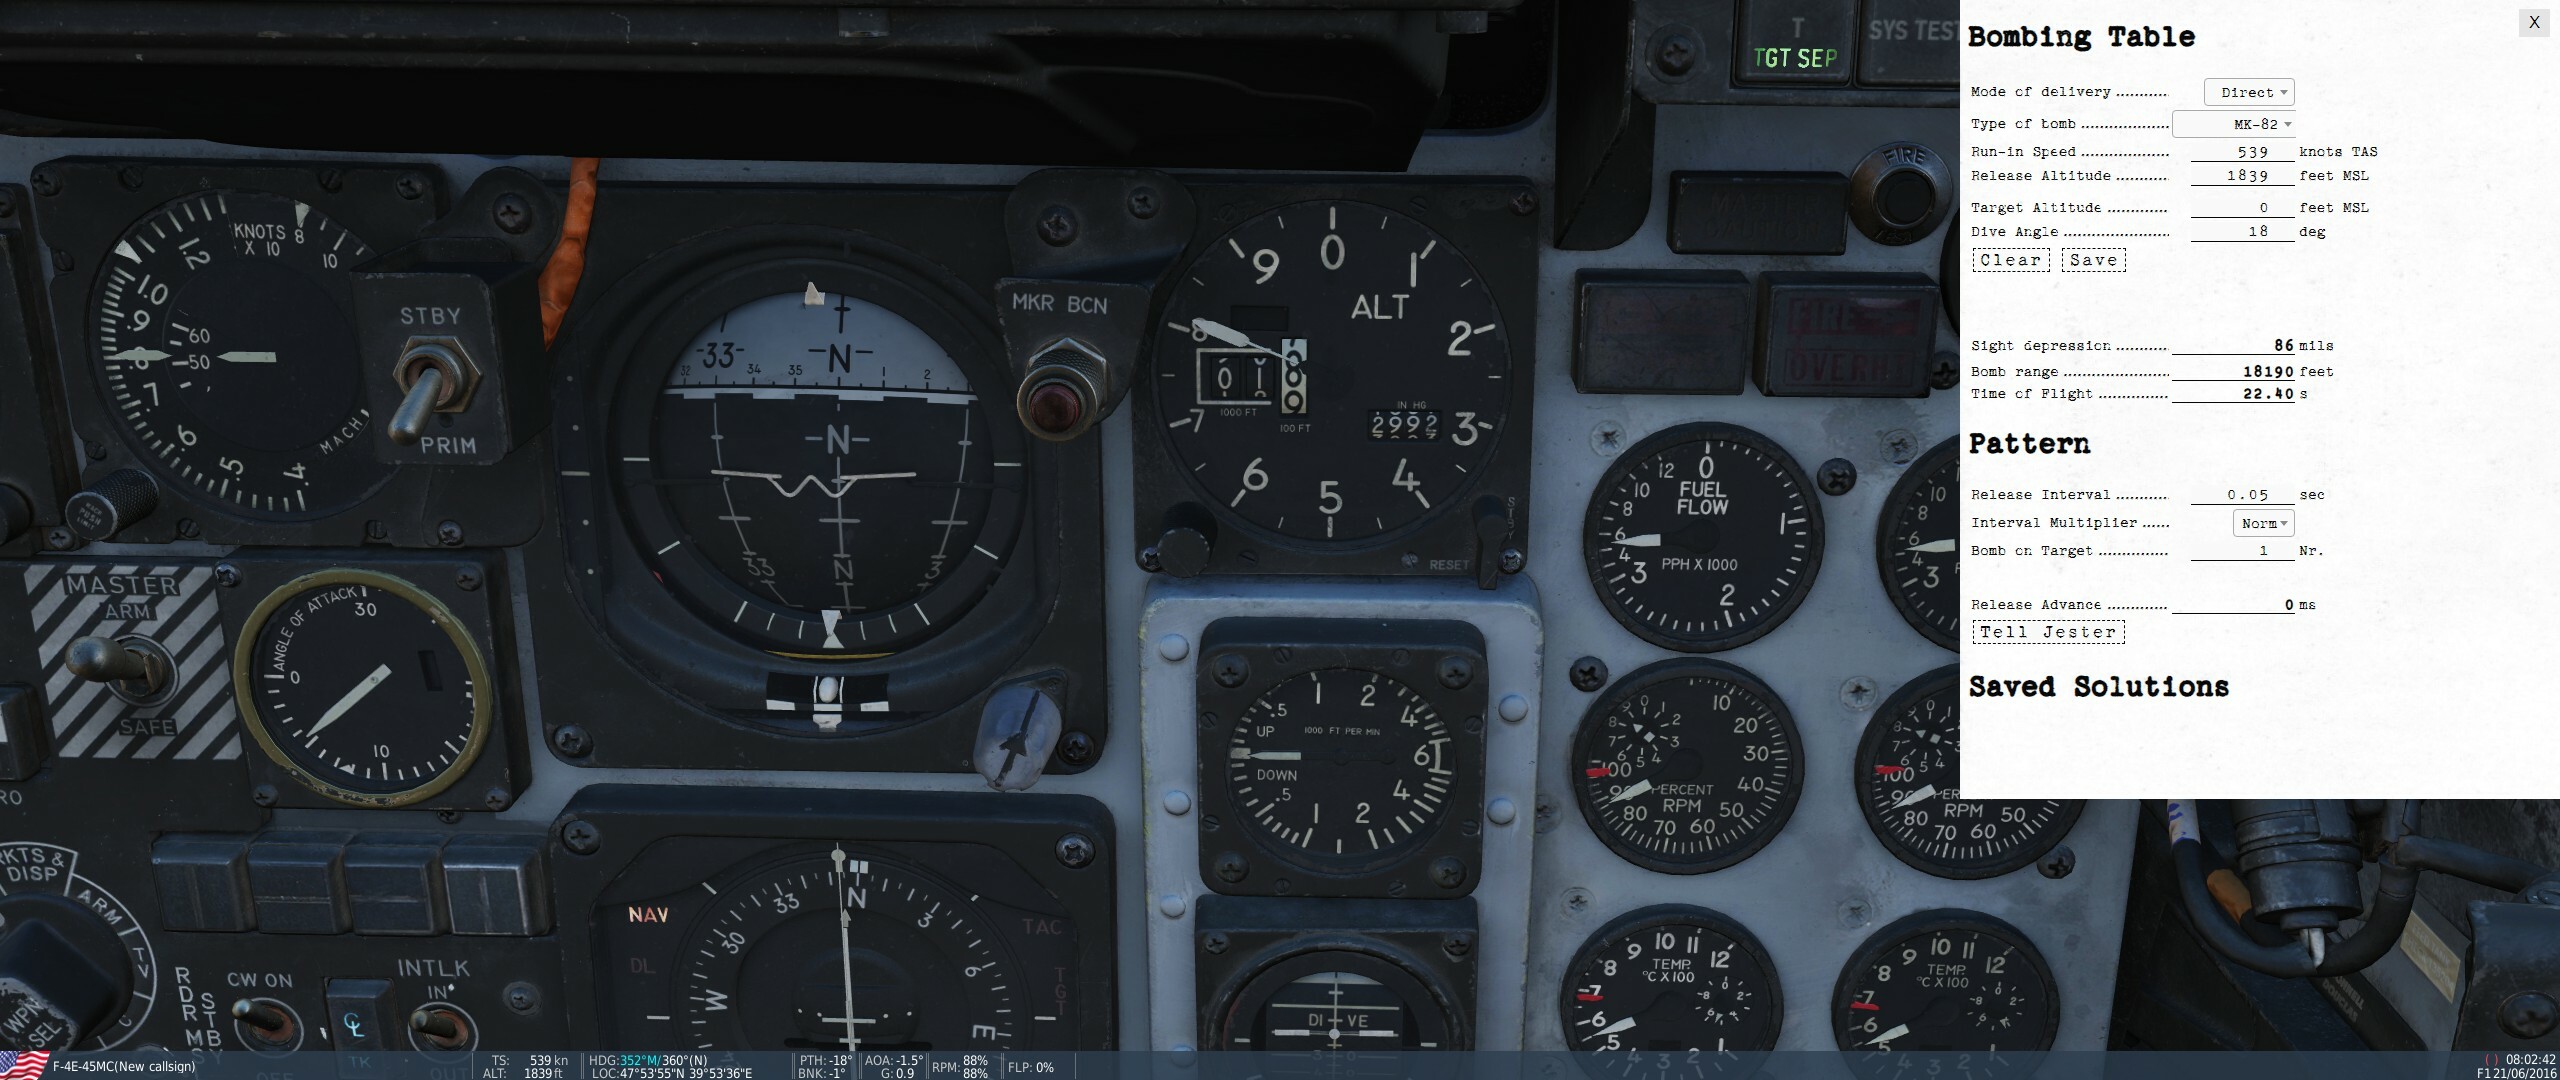
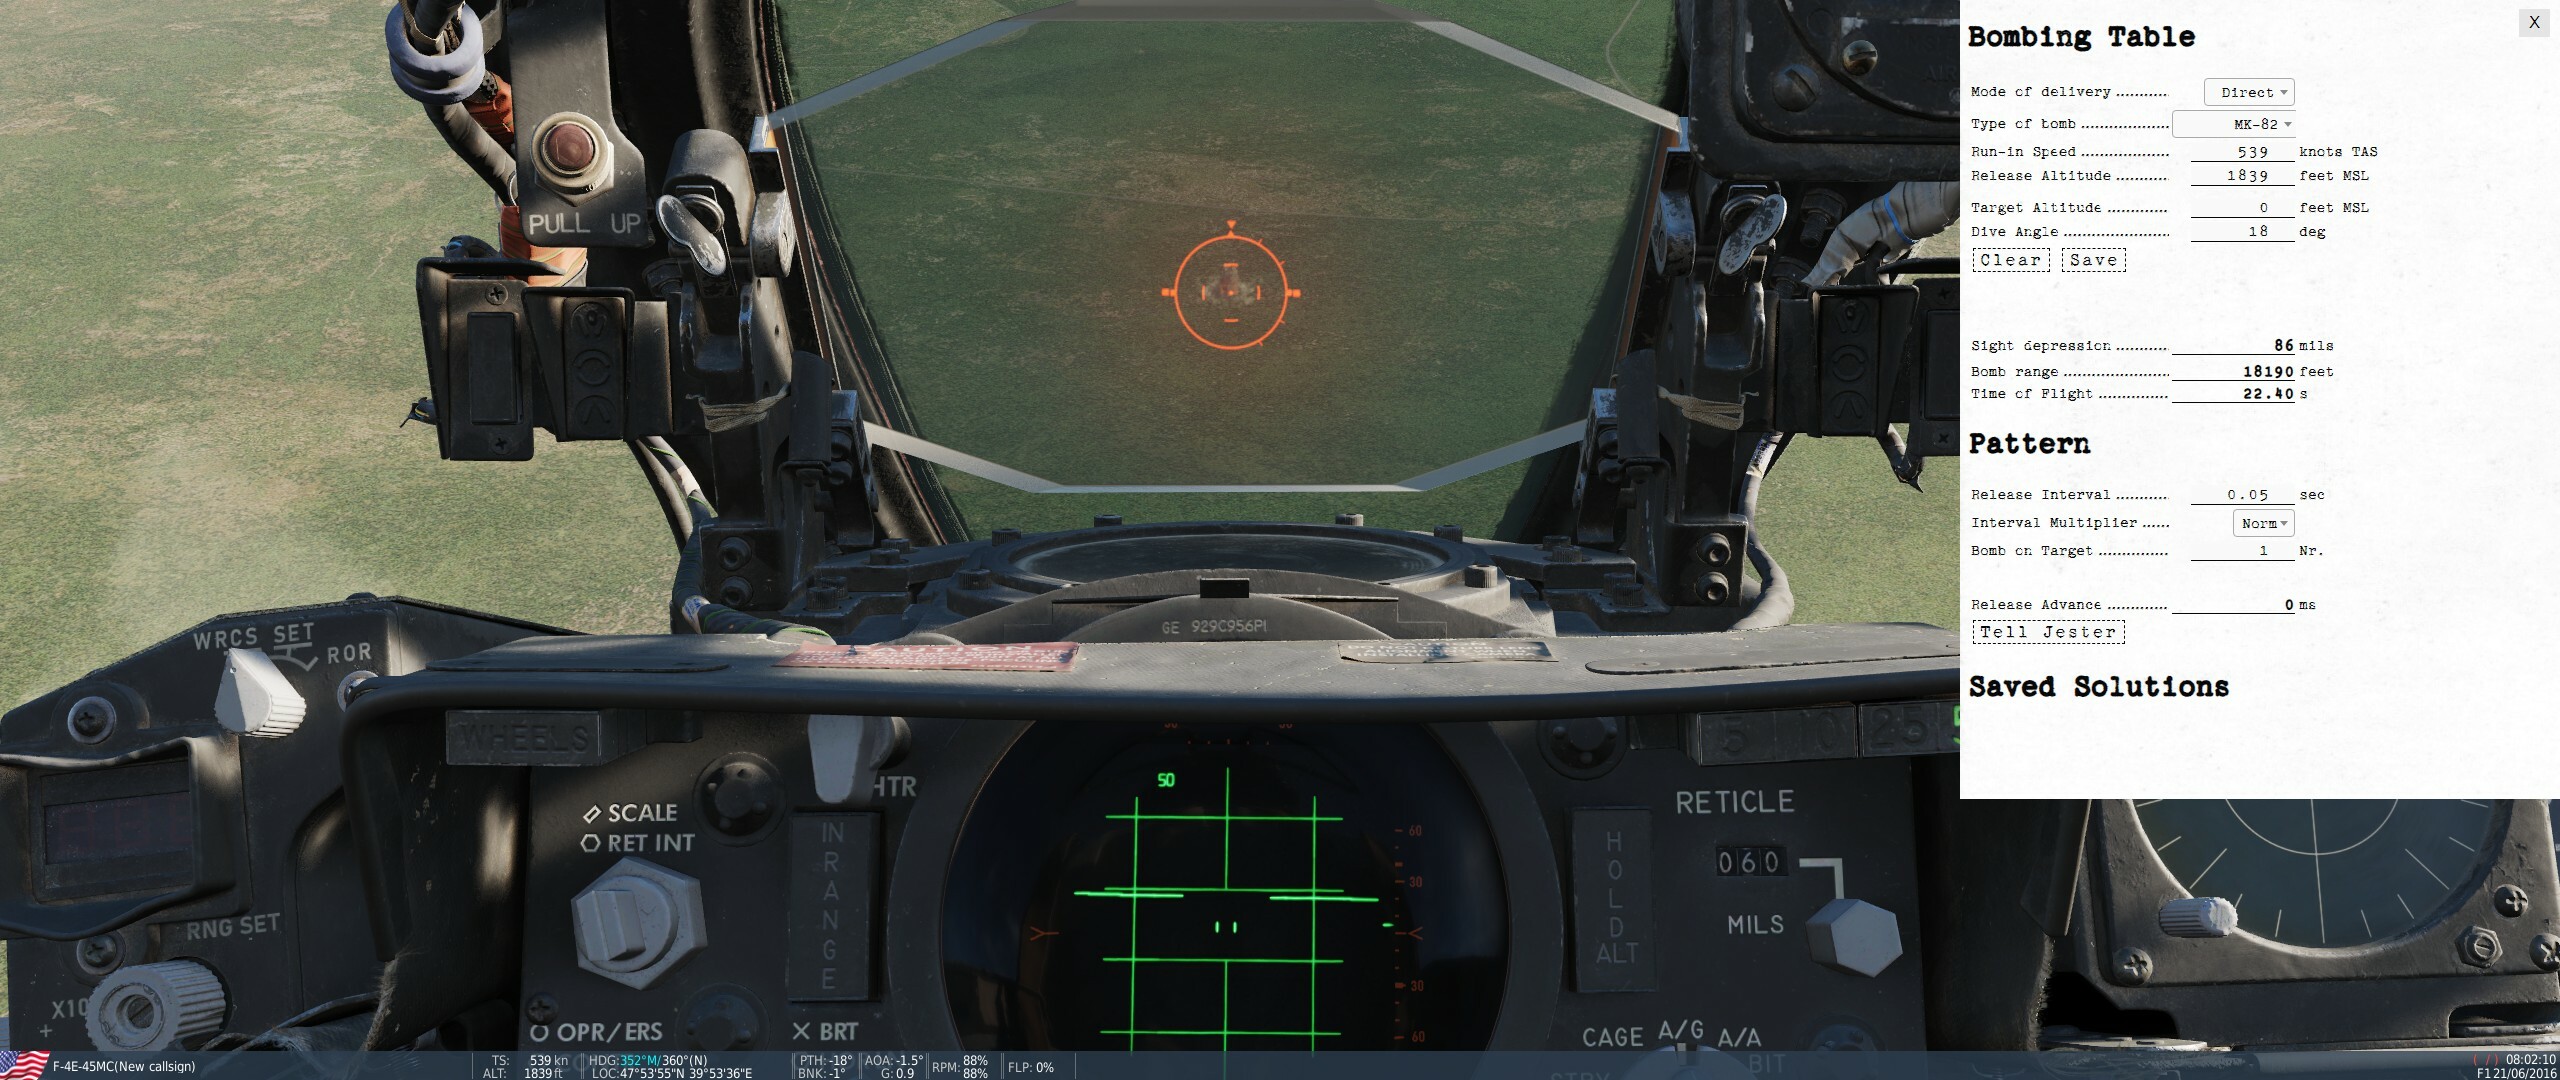
As a side note, Time of Flight in the Bomb Table is also completely off. It gives 22.4 seconds, while measured bomb TOF was 6 seconds.
-
As requested, here is a track:Direct_Mils.trk Airspeed: 540 kts on TAS gauge, 539 kts on info bar Altitude: 1820 ft on altimeter, 1839 ft on info bar Dive angle: 18°-ish on ADI, 18° on info bar The bomb table gives 86 mils: Actual impact at 60 mils. 26 mils error. Everything clear now?
-
Thanks, but are you aware though that the bar can be changed to display "True Speed" (TS)? Which is what I did. The altitute in the bar is your geometric altitude in the game world (Y coordinate in DCS's coordinate system), which is the relevant value for the ballistic calculation. If you go by the cockpit gauge this might introduce altimeter lag or other differences. I chose the bar exactly because I want the true values. I will provide a track this evening to statisfy that requirement.
-
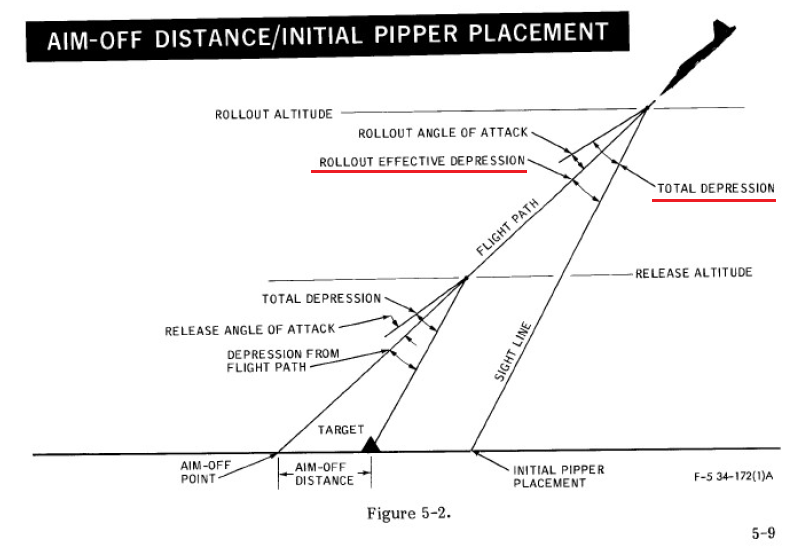
The data in the bar should be the most accurate available in regards to altitude and true air speed, as they represent the true in game state which will be starting point for the actual bomb ballistic trajectory. To which aicraft reference line the PTH value in the bar is measured is questionable indeed. But on the other hand, there is no way to read the plane's ADI with such precision either. You would probable have to make a script to output the actual aircraft flight path to get a high precision dive angle. But in any case it is not too relevant for the issue at hand, because +/- 1° deviation in dive angle will not make a hugh difference in mils (certainly not 20 mils). Please clarify whether the sight depression value in the Bomb Table is calculated in relation to the FRL or the flight path. If it is displayed in relation to flight path, then AOA correction would have to be applied for the mils.
-
Yes I have updated the Bombing Table to calculate things. A track wont help much, since this will not record what I do in the bombing table. To reproduce: Make a random dive at the ground. At a random time press active pause. Note your actual flight parameters (info bar) and insert numbers into Bomb Table. Enter mils value from Bomb Table into sight. Drop bomb. Compare actual impact point to pipper location. If the bombing table is providing mils values measured from flight vector (as the initial vector of the dropped bomb), then the pipper will always be off by the amount of AOA you currently have (and this is pretty significant). Mils from a bombing table always have to be corrected for AOA (which is weight dependant), since any discrepancy between the fuselage reference line and your flight vector will likewise move your pipper. Heavier -> more AOA -> higher pipper than intended.
-
Question to HB: Is the sight depression in the Bombing Table AOA corrected? An AOA of -1.2° (as per bottom bar) would almost perfectly match a 20 mils error.
-
Don't trust the Bombing Table for mils values in Direct, they are not calculated correctly. Better fly the attack profile you intend to use, hit Active Pause when you are in parameters, drop a bomb and dial the sight to the mils where your observe the impact. Use that mils value from then on.
-
fixed internally AI Bomb Armed Ships
MBot replied to MBot's topic in Aircraft AI Bugs (Non-Combined Arms)
Wanted to create an anti-ship mission today with the Phantom and Walleyes. Not surprisingly, this bug has never been fixed. -
Lofting LGBs is also possible solo fairly easily if the threat level allows to keep climbing after release. But you better kill that SAM if you want to egress Better bring along a human WSO so you maneuver after the release.
-
Thanks for the tips. I did some more testing and indeed Target Find seems to be the best mode to loft LGBs. The problem of having to designate the target point at low level before initiation of the loft maneuver is solvable with a shallow climb. As a matter of fact, Pave Spike in TGT FIND it is also an excellent tool to loft unguided bombs:
-
Hey @Kirk66, would you have any tips on low level LGB deliveries? Yesterday a friend and I were testing Pave Spike with multicrew. We had pretty good success with a pop-up dive-toss attack. Low level ingress, pulling 30° offset 5 NM from target, into a 30° climb 3'000 ft above target elevation, then rolling in to make the Pave Spike acquisition and pulling up into a dive-toss delivery (but in Target Find). That worked fairly well, though we had reservations about vulnerability during the designation phase. You get pretty low directly over the target and can't maneuver a lot without throwing off the Pave Spike tracking. We then attempted a LGB delivery in Loft mode, but that didn't work out well. We quickly found out that since Loft is an ARBCS mode you don't get WRCS integration for Pave Spike. So no Memory mode. Which meant that when pulling down from the Loft maneuver and you inevitably temporary mask the pod, Pave Spike lacking the memory function immediately returns to 12-VIS. No WRCS integration seems to be a no-go for this type of maneuver. We then attempted a hand flown loft maneuver in Direct mode (which provides WRCS integration for Pave Spike). Memory mode was available and it was possible in principle to keep the sight on the target(-area), but keeping a steady track was still very difficult due to the inherent post-loft maneuvering. Also the precision of the "Kentucky Windage" loft was pretty dubious. An option might also be straight low angle pop-up at the target to get a better view, then designating it as good as possible and lofting using Target Find mode. Haven't tried that out yet. Any suggestions on how it was done for real would be greatly appreciated. P.S. Fighting Pave Spike to keep it on target in a low altitude ingress is a real struggle (even if you are above the set target elevation). That thing wants to go everywhere but ahead.
-
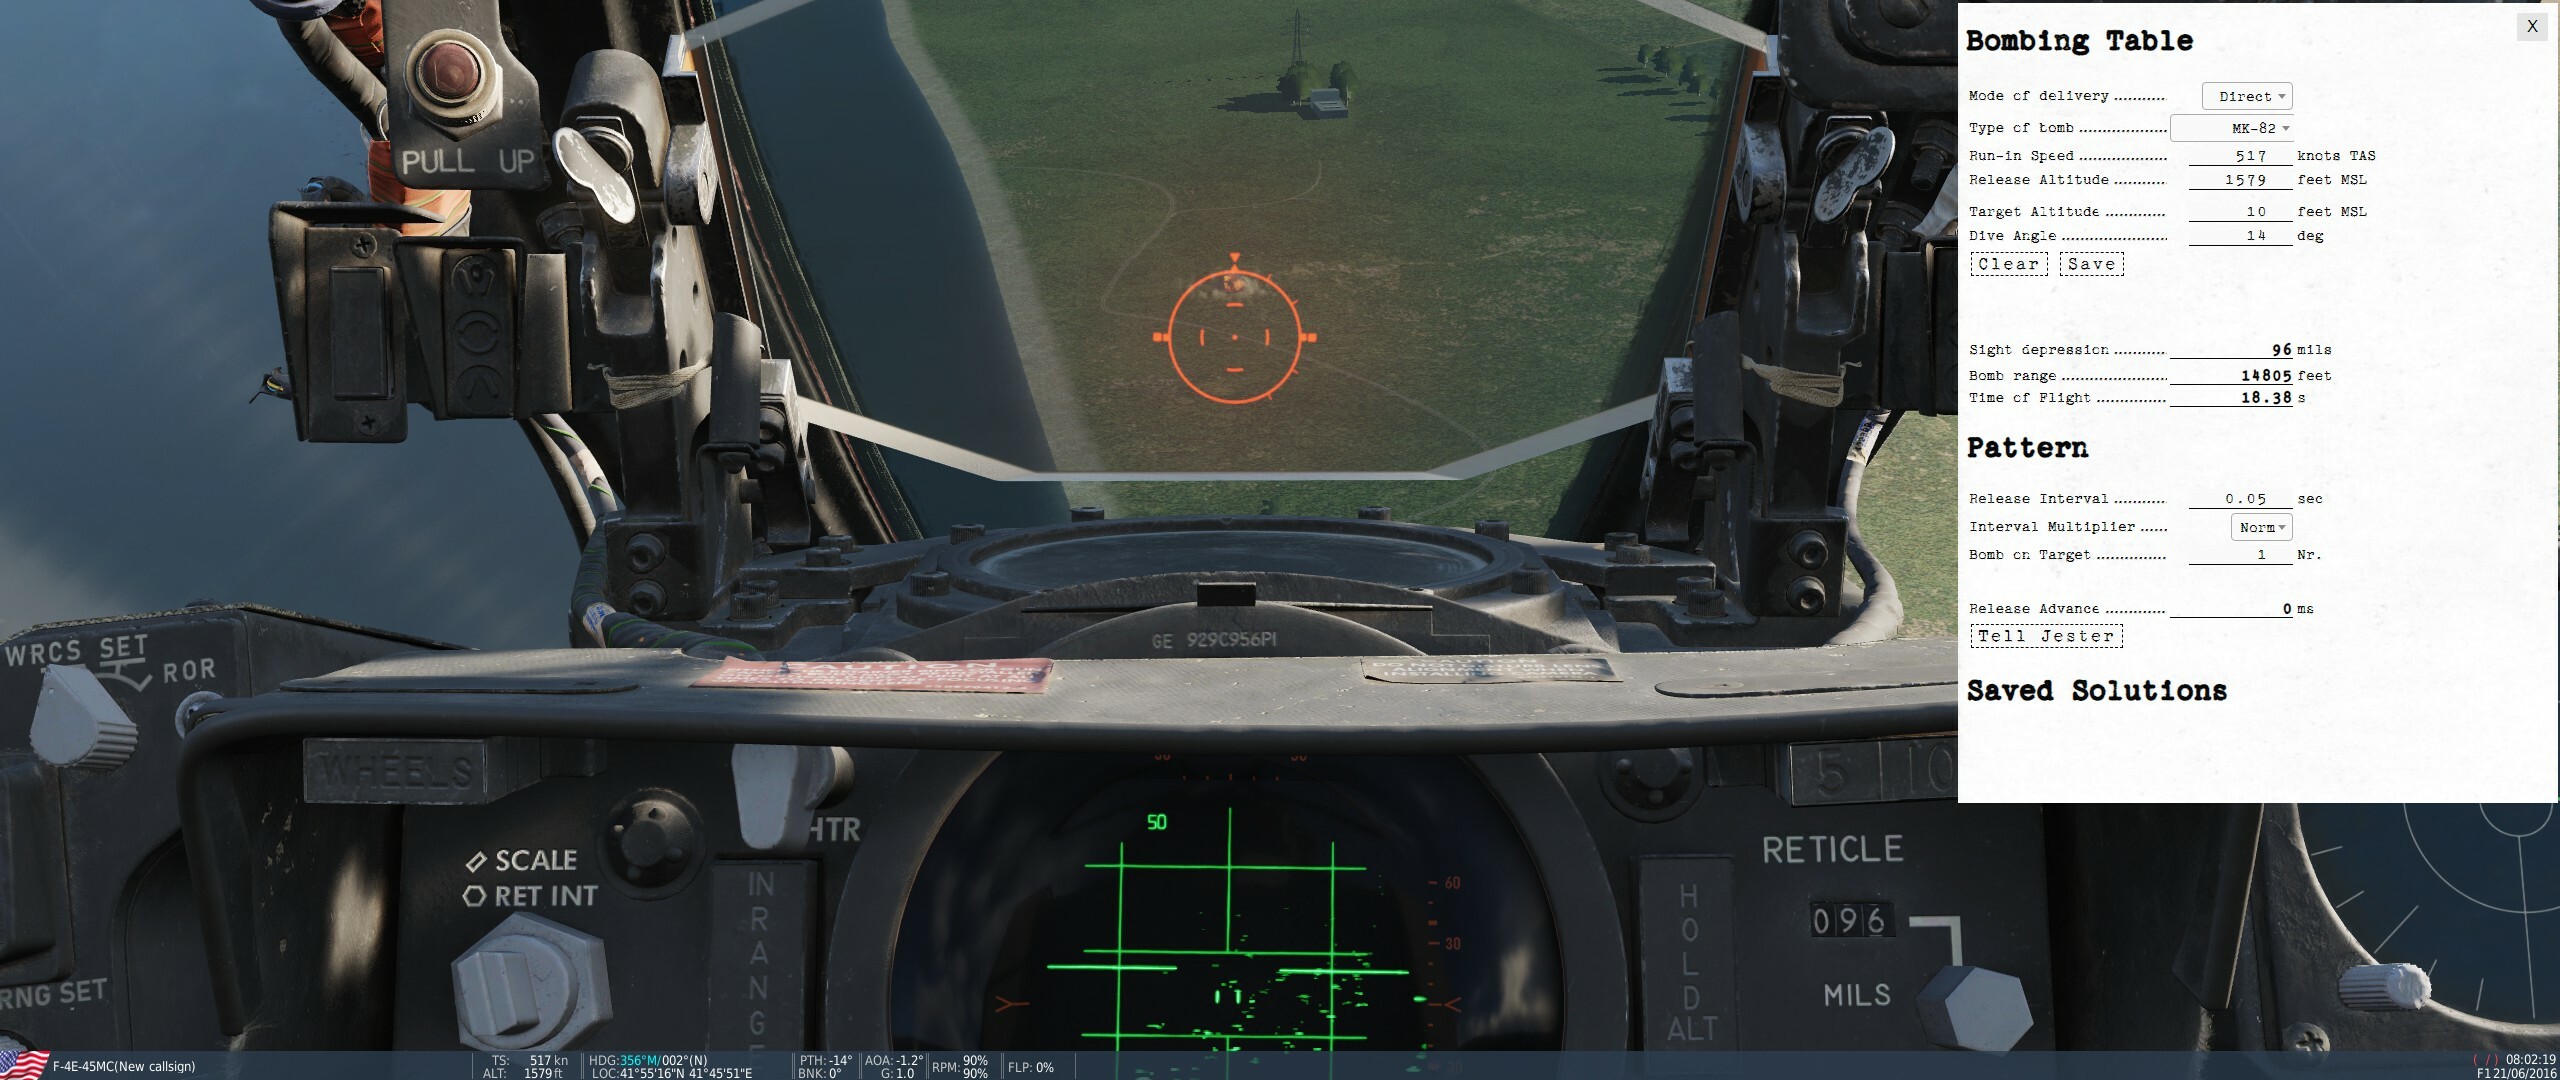
Despite the fix in the latest patch, the mils for Direct in the Bombing Table are wrong. Following screenshot was taken in active pause. Bombing Tables was populated with the actual flight paramteres at this instance. Bomb impact is 20 mils off the value provided by the Bombing Table.
-
AGM-45 Shrike Quick Guide by Klarsnow - updated June 5th 2024
MBot replied to HB_Painter's topic in DCS: F-4E Phantom
An interesting observation I made. Shrike seems only to guide if the target has any missiles left. If the SAM is out of ammo, it will still lock you up but apparently doesn't go all the way for a Shrike to home on to. If the SAM is engaging you with its last missile it will retain the "weapon guidance" lock afterwards (and any Shrike will still home) until you break the SAM TR lock once. Any subsequent lock will then not be sufficient anymore for the Shrike to home. Tested with SA-3 (where there is an audible difference in the Shrike audio between the SAM having any missiles left or not) and SA-6 (where there is no audible difference in the Shrike audio). -
Despite the fix in the patch, doesn't seem to work. 20 mils error in the Bombing Table.
-
Latest patch provided a slight improvement with this: Now the Straight Flush is correctly displayed either in search mode (S) or track mode (6). But the Handoff audio is still the identical ongoing constant tone for both search and track, even though these are two unique radar systems on the same vehicle. Its the same situation with with the SA-8. Interestingly, the audio from the Shrike provides a distinguishable pattern of main and side lobes for rotating search radars. Shouldn't the RWR do the same?
-
My understanding is that the dogfight modes were an afterthought, a mod based on expierience in Vietnam. So they just used the switches that were already there.
-
Nothing, its just a (very cumbersome) way for the pilot to leave the cage mode himself instead of the WSO doing it.
-
I think there might be some confusion because there are two pinkie switches. One on the stick and one on the throttle. The Cage button on the throttle engages the cage mode (radar boresighted, 5 NM range). Once you are in cage mode, pressing the pinkie switch on the stick activates the CAA mode (vertical scan). Once CAA vertical scan mode is engaged, the pinky switch on the throttle (3-way) moves the CAA scan zone left/center/right, in addition to also always switching weapons. Pressing the pinkie switch on the stick after you have achieved a lock with CAA breaks this lock an returns to the CAA vertical scan. Pressing the Cage button on the throttle always returns the radar to the cage mode (boresight, 5 NM range). To leave these dogfight modes completely its best to tell Jester to return to a regular scan by double pressing his action buttonn. You should be able to tell by the radar screen displaying a normal left/right sweep again.
-
In CAA the pinkie switch does both simultaneously, it switches weapons and the scan zone. Therefore it is advisable to switch to Heat until you get the lock, then switch back to the weapon you actually want to use.
-
Heatblur, any idea how your Bombing Table will accommodate the new fuze modeling for CBUs since time/altitude setting has a huge effect on bomb trajectory?