No1sonuk
-
Posts
1603 -
Joined
-
Last visited
Content Type
Profiles
Forums
Events
Everything posted by No1sonuk
-
Something a lot of people don't know about DCS-BIOS is that DCS will ignore commands it doesn't recognise for the aircraft being flown. This means you CAN give DCS-BIOS more than one code line for a single switch. DCS-BIOS will send both (or more) commands to DCS and DCS will ignore the "wrong" ones. e.g.: // A-10C UFC Master Caution Switch DcsBios::Switch2Pos ufcMasterCaution("UFC_MASTER_CAUTION", 2); // Button on pin 2 // F-16 DcsBios::Switch2Pos masterCaution("MASTER_CAUTION", 2); // F/A-18 DcsBios::Switch2Pos masterCautionResetSw("MASTER_CAUTION_RESET_SW", 2); Note the pin number is the same for all three, meaning it uses the same switch. That code will send all 3 Master Caution Reset messages when a single button on pin 2 is pressed. DCS will respond only to one of them, depending on which aircraft you are flying. If the message in quotes (e.g. "MASTER_CAUTION" ) is the same for any other aircraft, that aircraft would also respond to the same line and it doesn't need to be duplicated. e.g. DcsBios::Switch2Pos gearLever("GEAR_LEVER", 3); // F18 AND A10C DcsBios::Switch2Pos gearHandle("GEAR_HANDLE", 3); // F16 The "GEAR_LEVER" message is used by both F18 and A10C, so both would respond to that single line, but the F16 needs "GEAR_HANDLE". Note the USB controller (such as Leo Bodnar board) could give you more flexibility for use with other games, but they're dependent on the game as to how buttons are interpreted. Reading the data for your gauges, etc. for multiple modules is a bit trickier , but it can be done.
-
Just a quick heads-up: Some of the images on this thread, including all in the first post, are "region-locked". I couldn't access them from the UK. I had to switch my VPN to the US.
-
You might find what you need at Open Hornet ( https://openhornet.com/ ) BUT, some of what they've done there is unnecessary over-engineering.
-
The main issue with switching to DCS from, for example MSFS, is the restricted map coverage and need to pay to expand it.
-
3V supply to the pot when it should be 5V?
-
anyone know how to capture cockpit button presses?
No1sonuk replied to rocket302's topic in Home Cockpits
DCS-BIOS can do it, but I think it would be on an individual switch/button basis. i.e. you'd need to program every button/switch in every aircraft individually. That's A LOT of buttons! -
That is the OLD version called "Hub" and is no longer maintained. I DO NOT recommend anyone to use it. IIRC, new modules aren't being added to it. The up-to-date version from the "Skunkworks" GitHub ( https://github.com/DCS-Skunkworks ) has an "older" version number because it was branched off the original DCS-BIOS before "Hub" was made, and hasn't incremented the numbers much. The Skunkworks version, formerly called the "Flightpanels Fork" is actively updated and maintained. Was it really the "old version", or was it the low-numbered Skunkworks version? As for the multiple connections: Tek Creations just today posted in the Skunkworks Discord about some new connection software they say will work with any DCS-BIOS device. I've not tried it, but the link is: https://github.com/tekcreations/TekConnect
-
You'll have to try it. Some things may have changed by updates. Any reason why you don't want to update the DCS-BIOS?
-
I initially thought it was like the P-51 ASI that has a non-linear gauge face, but looking at it, and the gauge script, it IS linear: -- Tachometer TachometerGauge = CreateGauge() TachometerGauge.arg_number = 37 TachometerGauge.input = {0.0, 5000.0} TachometerGauge.output = {0.0, 0.5} TachometerGauge.controller = controllers.TachometerGauge This is how the gauge model reacts to the input number. On the Spitfire gauge above, there is only a start and stop, meaning the whole travel is linear. It SHOULD be 0-65535 is the full travel of the gauge. One thing I did see, though - Remove this, and all the other serial lines: Serial.begin(115200); // Starter seriel monitor It can disrupt the USB communications with DCS. If you want to output data while running a game for testing, use an I2C-connected character LCD or other display that doesn't use the USB connection.
-
Your code is doing exactly what you told it to because you are using the code lines for the BUTTON position, not the light. DcsBios::LED pltGroundOverrideBtn(0x86f4,0x4000, 3); gives you the position of the button, so the light will go on and off when the button is pressed and released. What you need is the ground override INDICATOR: Pilot Ground Override Indicator (green)AH-64D/PLT_GROUND_OVERRIDE_L DcsBios::LED pltGroundOverrideL(AH_64D_PLT_GROUND_OVERRIDE_L_AM, PIN); It's in the "PLT INTERNAL LIGHTS" group. The Master Arm lights are there too...
-
Someone else tried this about 18 months ago. I don't know why he abandoned it. I had a WiFi-connected ESP32/TFT running a CWP program, so it's VERY useful if it works well.
-
Shift registers, in this context, are a means of converting parallel data into serial. They take the parallel data in and "shift" it out one bit at a time, or take 1 bit in at a time and shift it to parallel. They usually have a way of linking between devices so you can make a chain for more parallel connections than one device can provide. The PISO variety take Parallel In and give Serial Out. You can use this to expand the number of inputs an Arduino can take OR you can use it to convey a large number of inputs through only a few wires - IIRC, this is how TM grips transfer their 20+ button data to the base using a 6 pin mini DIN connector.
-
The DCSBIOSBridge mentioned CAN do the job, but many people experience lag when using it. There's currently no dev for it, so it should really only be used for testing if all else fails. Rapti's response is the way to go for normal running.
-
You can see the hidden digits at the edges of the slot in that image. They'd use all 8s - custom 7s would cost too much.
-
From the addresses.h file: #define AH_64D_SEAT_POSITION 0x8750, 0x0100, 8 So if you weren't giving it all 3 of those numbers, it won't work.
-
Did you know this was a thing? I'm also going to look into creating a 2-seat version of the switch function.

-
Are you using blocking diodes in the matrix?
-
Hardcore realistic F-18 ejection seat (NACES SJU-17) replicas
No1sonuk replied to NeoEngress's topic in Home Cockpits
It's possible that's a legal liability thing. -
The old version still works (I use it), but there won't be new modules added. DCS UFC X is a newer pay per module version.
-
Start a separate thread in this forum and we'll see what we can do.
-
What's your hardware setup?
-
It could be electrical noise. Try this: The resistors shown dotted aren't necessary - DCS-BIOS turns on those in the Arduino.
-
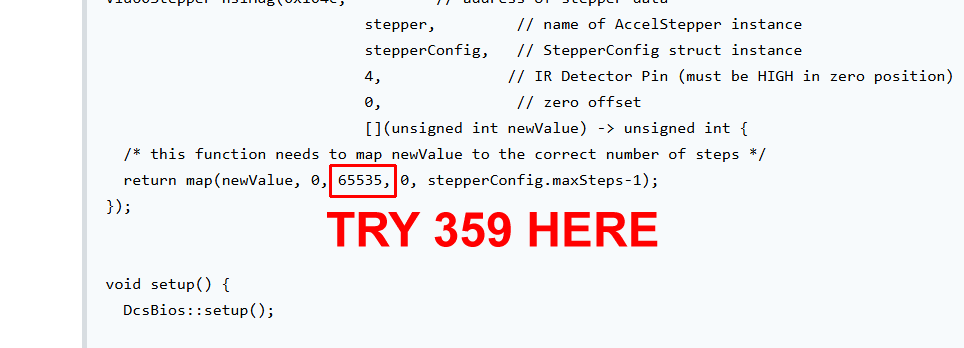
One problem you'll have is that the full rotation of the A-10 HSI is 0-65535, but the common data magnetic is 0-359. It looks like the code you have is designed to work with 0-65535 input. Try changing the value shown below. If that fails, try writing a stepper routine that takes a position number, and send it from a normal DCS-BIOS code block.
-
Build a stand...
-
As mentioned in Discord, which switches are they? It sounds like you were drawing too much current and were lucky not to blow the Arduino's regulator or I/O pins. The "bad burning smell" is the stage just before the smoke escapes!