scoobie
-
Posts
460 -
Joined
-
Last visited
Content Type
Profiles
Forums
Events
Everything posted by scoobie
-
Me English no comprende that, meaning nicht verstehen at all. What does this mean? Don't worry, @Gorn557 - you're not alone! I'm having the same issue in the Tomcat. (Ha! That was very helpful, wasn't it? ) On a good day I can be smooth as butter, approaching the basket sloooow and steady, happy with myself, grinning like a chimp... only to miss the basket by one foot. And I'm always surprised when it happens, I always think I was nicely aligned in the first place. That's what you're talking about here, aren't you? Apparently my (and your) brain thinks the probe is somewhere else than it really is. The charm of pancake simming I guess we just need more practice until you (and I) learn how exactly the basket should "travel" across the screen to find the probe. Some aircraft are pretty straightforward - Hornet, A-4, M-2000 - the probe is where you think it is. (Don't know about the Harrier, though.) In A-4 I can even lean my head forward/right to check where the tip of the probe is, then I say "OK, so it's there", somehow memorize it and then just put the thing in the thing without looking again. Alas, Tomcat is somehow mysterious in this regard (at least for some folks, like us). Personally I never use "tanker picture" for alignment (in the sense like "this part of the tanker should 'touch' the canopy bow" etc.). The tanker is somewhat far away, there are 3 or 4 different types of tankers, all/most have two sides for refuelling and I'm using TrackIR, my head can move etc. "Tanker picture" method may work for some, but doesn't for me. I insist on using the Force, as Jester suggests occasionally. Probably "just more practice" is the answer, maybe there's no magic formula for that?
-
No idea what your goal and schematics are, but BAT54A and C are identical diodes, only placed opposite in the package (common anode vs. common cathode) - that's all. So... while the footprint itself is the same (SOT23), replacing A with C on a PCB is probably a very bad idea, but also seems pointless as they are the same diodes - contrary to what you claim. Check the datasheet of the part.
-
STREAM DECK PROFILES LIBRARY
scoobie replied to ZQuickSilverZ's topic in PC Hardware and Related Software
(I've been away for a couple of days). I'm not sure what you're asking about. I do have NS 430 myself, though frankly I don't use it. Does NS 430 use these "export scripts" for anything? I don't know, but I doubt it, most likely it doesn't. So, if I understand you correctly, the script (in any shape or contents) has no influence on NS 430, neither positive, nor negative, and NS430 should work just fine. BTW, I'm glad that the thing I posted works for you! However, after (and only after) this "radar overhaul update" that Razbam has recently come up with, I noticed a quirk. At least once when I turned the INS mode knob to "CAL" position, one of the top row INS displays on Stream Deck (I think it was the right one) displayed "CAL", while the displays in the cockpit were (properly) showing "0.00.00". Why the discrepancy? No idea. It wasn't the case before the update. Yeah, we don't use "CAL" in DCS, so probably it's no big deal, but I can only hope there are no more quirks introduced with this update -
STREAM DECK PROFILES LIBRARY
scoobie replied to ZQuickSilverZ's topic in PC Hardware and Related Software
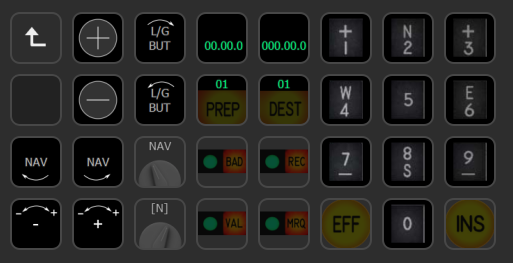
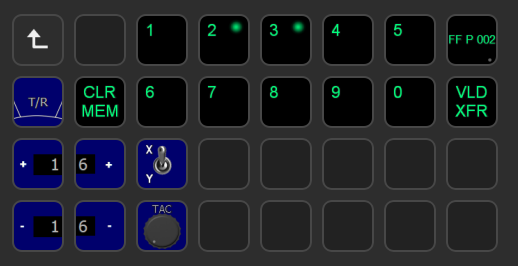
My tentative profile for Mirage M-2000C (bought the birdy the other day). This is what I call "early WIP", but things you see in the screenshots seem to work. A few notes: 1. I used other people's icons wherever I could (posted somewhere on these forums etc.), because other people can draw pretty things. I can't. 2. Dumb ideas to get rid of: a) Autopilot. I found free buttons for A/P and ALT HOLD on my joystick and those green/amber lamps are well visible under the glareshield in the cockpit. b) These INS "main mode" knobs (one "NAV/ALN/etc", the other "[N]/STS"). I think you don't use them in flight, so why waste space on Stream Deck? Silly. 3. With the exception of the variable tables (those numbers with format strings), I emptied the original export script from all the old code (written by someone else) which didn't seem to work with current version of the Mirage. The module must have undergone some substantial rework or something, variable names have changed etc., so I didn't want "dead code" in it. WHICH MEANS you better backup your original script for the Mirage, just in case I removed one/some of those old things tha actually did still work. 4. The V/UHF radio in my profile is mostly static, i.e. the button backlight is static (only the green "LED lamps" for squelch and guard are real). I have little motivation to do it as squelch/guard and other options in this radio don't seem to work in the module. No matter how I set them, they remain "on". If someone wants to do V/UHF dynamic backlight, I put meaningful comments in broken English for these variables in the script (see from var. no. 956). In the original script most of them were described as "?". Be warned, though: they work strange - V/UHF buttons get backlit when their variable is >=0.5 and < 1 (the latter is surprising, so be careful). 5. "Red radio" is not in the profile (yet). 6. The nasty blue background for TACAN controls is my best "artistic" effort to separate different radios visually on a single screen (currently there's only TACAN and V/UHF). Sorry. 7. The PCA panel "TOP | POL | APP | RD | OBL" and so on... I decided to do it "fully automatic", i.e. there's a single icon behind each button and all the text is automatic. Technically you could have - but only for the top row of buttons - green automatic text (LED display) and orange "S" backlight baked in the underlying icon. However, you can't do the same for the bottom row of buttons, because they have THREE backlight states: none, "S", and "SP". You can't have 3 icons in Stream Deck. Hence, I thought I'd do all buttons the same way, automatic text, but the drawback is the buttons are backlit in green, not orange. You may "fix" the top row using separate icons if you like. 8. The PCN (INS) panel seems to work fully, though I've had only a few hours in Mirage total. If anybody wants to elaborate on this profile - please go ahead, but don't forget to share - I'd be very grateful if I could get an improved version of it PREREQUISITES 1. Stream Deck XL 2. ctytler's Stream Deck plugin for DCS 3. The attached export script (BACKUP YOURS FIRST!) 4. The attached Stream Deck profile itself EDIT: M-2000C has been recently updated by Razbam and no longer works with the files I posted here. Therefore I removed them from here. Updated files should be somewhere lower down in this topic.
-
The latter seems possible out of the box. For example "25% brakes else 0%" command (a new binding command you need to put in the ...\input\joystick\default.lua and/or ....\input\keyboard\default.lua): {cockpit_device_id = devices.CONTROLS, down = device_commands.Button_1, up = device_commands.Button_1, value_down = 0.25, value_up = 0, name = _("Input.Yak52.wheel_brakes_slider") .. " 25% else 0%", category = _("Stick")}, Attached is the track file that shows how it works, so you can see if we're talking the same thing. First I was pressing the button bound to this "DIY" command pasted above, then I was just pressing "W" (the default binding for wheel brakes). Rudder centered throught the track. The general rule of thumb is that if something is an axis in DCS, there probably exists a way to "inject" specific values (positions) into such axis with button(s). For example I don't want to squander a potentiometer for formation lights in the Hornet, so I have a hardware toggle switch for that: "formation lights full bright else 0". mossie_quarter_brakes.trk
-
@YoYo, are you sure? That would mean the artificial horizon's gyro self-erection actually works and we were all wrong. You know... there's a secret contest for a bottle of good whiskey: whoever shows a track or video where the horizon actually self-erects, gets the bottle
-
^ This... which means you can't have "fast=strong vs. slow=mild" with a single button, but you can have it the other way round (short=mild, long=strong). However, brakes in the Mossie aren't digital, they are "analog", but simply too fast. In the Spit it takes a second or so of keeping the button depressed for the brakes to go from zero to full. In the Mossie it takes a fifth of a second or so. That's the only difference. Fortunately this has been discussed elsewhere and NineLine reported it here:
-
Or if you want to stick to the very dcs_updater, here's the link to full documentation of this utility: In short: 1. Run command line. 2. Navigate to <DCS dir>\bin\ 3. Type: DCS_Updater.exe install MODULE_ID where MODULE_ID should be typed exactly as given in this table: For example, for Harrier the MODULE_ID is RAZBAM_AV8BNA (as given in the table), so you'd type: DCS_Updater.exe install RAZBAM_AV8BNA 4. Don't forget to uninstall (DCS_Updater.exe uninstall MODULE_ID). You can't fly a plane you don't own, so there's no point in wasting space on SSD/HDD. 5. Last but not least: all manuals for ED modules (and for the Viggen) are readily available straight from their website: https://www.digitalcombatsimulator.com/en/downloads/documentation/
-
Just bought some plums, don't have a cherry, but ED pretty please indeed! A few random emoticons to draw attention: Wheel brakes are more or less binary now (in response to a button press). They go from 0 to full within... like 150 ms or so. Is it possible to simply make a functional copy of what was done in the Spit? In the Spit it works a few times slower. PS. No luck with wheel brakes, @Art-J, I don't know if anything can be done at home. The thing seems to be buried somewhere deeper in the guts of the module The best I can only imagine is possible (hypothetically) is to slow down brakes response to pressing and holding a button, but if you release the button - the brakes will immediately let go, just as they do now. That would be inferior to the Spit and annoying to use. So "ED pretty please" I think is the best way to approach the subject
-
Yep, it's there To change RPM levers movement speed (when they are driven by buttons or keys) do the following: 0. Make sure you know what you're doing, backup first etc. etc. 1. Go to: <DCS dir>\Mods\aircraft\MosquitoFBMkVI\Cockpit\Scripts\clickabledata.lua 2. Find this line (should be around line number 721 for left RPM and 729 for the right RPM, in the current version of the Mossie): elements["PROPELLER_CONTROL_L"] = mcabin_movable_axis( {0}, _("Cockpit.SpitfireLFMkIX.pitch"), devices.ENGINE_CONTROLS, device_commands.Button_36, 22, 0.0, 0.1, true, false, {{SOUND_NOSOUND, SOUND_NOSOUND}}) 3. Change the 7th argument which by default reads 0.1 (as depicted in the code above) to - say - 0.02 Note: 0.02 is very slow, tune the number to your own taste. 4. Repeat for the right lever. The code is a few lines lower down, "PROPELLER_CONTROL_R".
-
Sorry. The solution for elevator trim is untypical and "dirty", I wasn't really expecting it to work and tried it out of despair It turned out to be working, but I've no idea why. Maybe for RPM levers the typical solution will work - the speed may be in clickabledata.lua. That's the normal "go to" file to tweak such things. I haven't tried it in the Mossie, though.
-
Slightly off-topic. No, no... you CAN have it on the joystick:
-
Steering while taxiing: which wheel brake control works best?
scoobie replied to wernst's topic in DCS: Mosquito FB VI
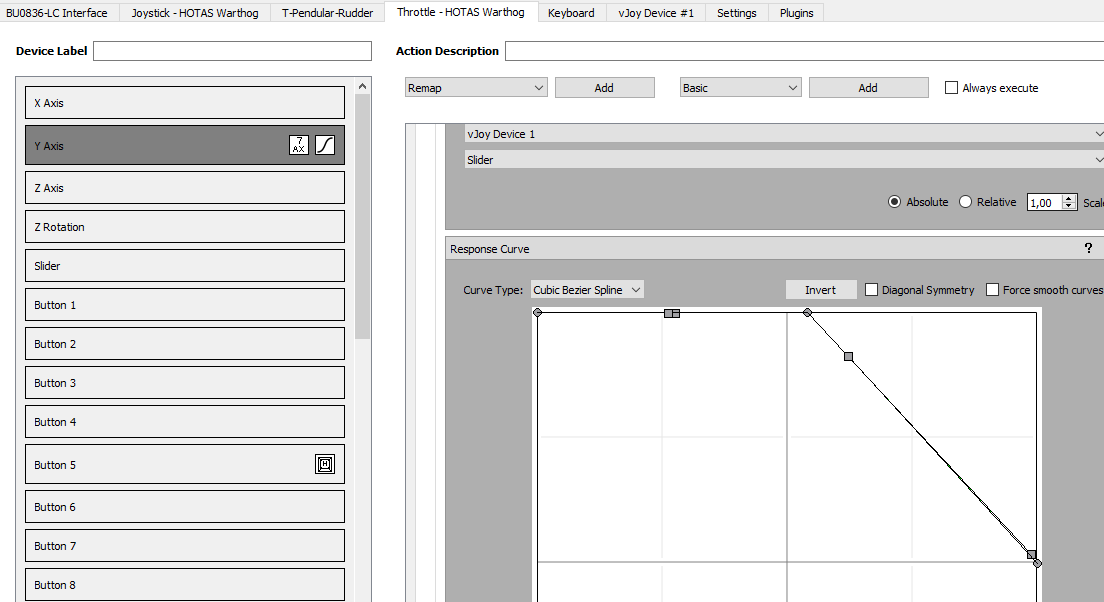
I've been experimenting a little with the slew control (a.k.a. the "mouse nipple") on my TM Hawg throttle for this. Due to the fact that this control is cr*ppy "touchy" and imprecise, I use it like this: - center position = 0% brakes, - full down = 50% brakes. For "normal" 0%/100% brakes I still use the pinky button on the joystick. (The paddle would be nicer for that, but I use it as a modifier.) I've had problems setting an appropriate curve in the "Axis Tune" window in DCS, so instead I used Joystick Gremlin and "Response Curve" - picture attached. I need no curves or special settings in DCS in this case. To be honest, if you have a proper minijoystick, I think it should serve you really well for the common wheel brake axis (center = 0, full down or up = full brakes), but that nipple in TM Warthog... it's better than a button, that's all.
-
Thank you, guys! Special thanks to @MAXsenna for the fantastic tip, I didn't realize this was possible. For any complex A/C I'd very much like to read some about it first, only then try and fly. Those 14 days of Free to Play are on one hand generous and I appreciate it, but on the other they scale (down) according to your job/family/etc. schedule, so it's best to use them mostly for the "try and fly" part, not reading. Now I can (just checked - it works)! Thanks, man!
-
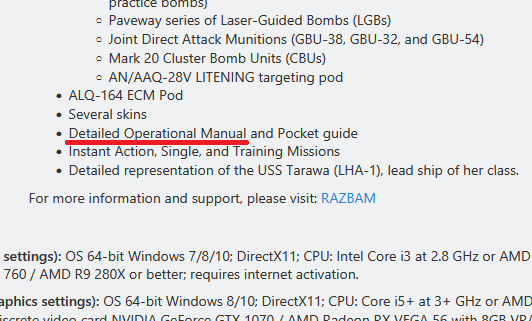
The Harrier is out of EA and it's being advertised as in the topic's title - supposedly it now has the "Detailed Operational Manual". I know that some time ago BD was working on it, but is it finished yet? I don't want to launch "Free to Play Program" (you have only one try every half a year) only to discover the manual (the big one, not the pocket guide) is not there and I have to guess how the aircraft works. Yes, I know, I can download "dash one" or NATOPS or whatever, but then I also need to guess what's modelled in the sim and what is not. That doesn't sound like a lot of fun, especially if the shop tells me I'm getting the manual for the simulated Harrier - that's exactly what I need.
-
Gunsight Reticle Intensity Increase/Decrease Inputs are back to front
scoobie replied to Basco1's topic in Bugs and Problems
I guess they could, but then it would still feel strange to many - you turn the brightness up, it's all good and suddenly... the light (or sight reticle) goes off completely. People would go "WT... Hey, this thing is botched!". I think the main quirk here is not so much the direction, but the fact that "OFF" is next to "MAXIMUM" (instead of "MINIMUM", as people are used to expect). [LATE EDIT] I hid a part of my post below. One can invert or not invert the reposne of these axes in Axis Tune and have Mossie behave like other planes, doh... Living with an idiot is hell, I can tell you. -
Hi, looks quite like the so-called "double binding". Two (or more) controllers control your pitch axis at the same time and "fight" one another. Go to Options -> Controls -> select F-14 Pilot from the drop-down -> click Axis Assign (at the bottom of the window). Find "Pitch" on the list and look carefully which controllers are assigned to pitch axis. Throw away all superfluous bindings. If it's not that, then maybe it's something related to FFB, in which case you need someone else to help you out.
-
Gunsight Reticle Intensity Increase/Decrease Inputs are back to front
scoobie replied to Basco1's topic in Bugs and Problems
The commands you mention work okay, provided that the very gunsight/other rheostats in the Mossie are modelled true to the real thing. In DCS:Mossie nearly all rheostats work sort of in reverse. If you turn a knob in the "increase" direction, from 0 to maximum, you'll get this: OFF...MAXIMUM......MEDIUM......MINIMUM Yep, kinda surprising! So these increase/decrease gunsight reticle brightness commands for keys/buttons follow the same logic. They DO turn the knobs correctly, it's the knobs that work funny. The respective axis command(s) behave the same way. -
missing info Inclinometer needle moves strangely ?
scoobie replied to Anatoli-Kagari9's topic in Bugs and Problems
Wait... so you mean the LOWER needle? I thought inclinometer meant the slip ball or whatever that shows slip. For example: https://www.aircraftspruce.com/menus/in/inclinometer.html ...which seems to be the UPPER needle in the Mossie, while the lower one is the turn indicator. What am I missing? Me English be bad, so I might have been terribly mistaken. I find the lower needle very nervous around the center, very sensitive (but it may be correct as-is, IDK), the other thing I've noticed (and find it surprising) is that it keeps jumping when you shut the Mossie down after the flight. No idea why. IIRC the Jug does the same, I mean its "turn indicator" (or however it is really called, I'm not sure any longer). Is that because the gyro is spooling down and tosses the needle all over the place? Or something of that sort? How long should it take before it settles ("dies")? Can anybody shed some light on that? -
Track included. HEALTH HAZARD: EXTREME BOREDOM! Events in the track file (AH = Artificial Horizon): 1. Cold & dark, but AH is erect (side note: I wonder how ... but we're not talking about this here). 2. Start her up, AH is still erect (OK). 3. Shut her down, AH slowly "collapses" (OK). 4. Start her up again, set boost +7 @ about 2,750 RPM and see what happens next. 5. AH is slowly collapsing even further! (not OK, I assume) 6. Perform a considerably sloppy take-off to present that the gyro in the AH must be spinning, because the AH is basically working - it's just skewed with the error already accumulated, but spinning. Unfortunately in the track file I nose down and crash some 10 seconds after the take-off, which wasn't really the case, but it doesn't matter - before it happens you can see the AH is moving. Anyway, I hereby testify that it doesn't erect in flight either. ah_no_self_erect_mossie.trk
-
(Off-topic) So it does eventually complete! Good to know! If you keep getting this issue (then it's probably the same thing as on my end), you can "test" your post by clicking "Preview" - if the preview shows nothing (whitespace), don't click "Submit Reply", but press F5 instead (refresh page in the browser). Your post is now gone, but don't worry. Click "Reply to this topic" again and your text will reappear. This time "Submit Reply" should work immediately. Basically whenever "Preview" does actually show your post, you're good to click "Submit Reply". Otherwise F5 etc. I don't know why this happens.
-
Why is artificial horizon so badly wrong at times?
scoobie replied to imacken's topic in DCS: Spitfire L.F. Mk. IX
I haven't tested it in all warbirds, but definitely in the Mossie the horizon does not self erect (same goes to the Spit). I found and gathered a few videos and pictures here (with a picture of the horizon used in the Spit): -
How interesting! Those orbit-high-level languages, you never know what's going on under the hood. Or at least I have no idea what's going on, it's never been my cup of tea or a job, I'm kind of scared of such "abstract" languages --------- A little off-topic if I may... Great idea with the github lib! I... don't quite feel like... "in position" to impose my sick ideas on other people, in these export scripts, so I guess I won't contribute there (moreover, I never did anything on Github, don't know how this thing works, I only know standalone Git), but is there a place on the forums here where one could present their sick ideas - more as "desing ideas" than ready to use solutions? A fishing rod, not the fish. It just occurred to me that I have one more odd patent up the sleeve and I'm not sure if anyone came up with it before (maybe, maybe not - these forums are really huge). But I don't want to mess up this thread, it's messed up enough already PS. The idea I'm talking about came to me with the Dora. I have all the gear up/down and flaps down/mid/up annunciator lights (so... 7 lamps) on a single SD button. Doesn't look great, isn't terribly practical (in a Dora at least), but does the job - I'm often absent-minded and this allows me to quickly glimpse and check if she's really set up for landing. PS. Oh, and one more, but maybe it's known already? My ugly "which fuel tank is on + tell me gallons of fuel in them" for the P-51. It looks... ugly (all things I do look ugly, unfortunately). Pictures: Dora with gear down and flaps in "start" position, next picture is gear down and flaps up. And last one is the Pony with 89 gallons (IIRC it's "floored" value, not rounded) in each wing tank, 0 gallons in the center tank and left wing tank is currently selected (square brackets around the number). "LD" and "RD" stand for "left drop" and "right drop", Pony doesn't know how much fuel is there, so no fuel contents is given for them.
-
The track @No1sonuk attached shows it all. Having played with these radios quite a lot today I think this "back tuning" is way more important than it appeared to me at the first glance. It really is. And... yeah... the thing doesn't seem to work. Like at all. ------------- Below is my understanding of the feature (I'm a radio layman) - it's irrelevant for the bug report (or maybe a missing feature report - we don't know), but maybe someone will spot a mistake in my thinking and teach me something, or at least other folks will notice that this radio set wasn't actually as hard to deal with as it seems! It's a pretty fancy bit of kit! Rationale: 1. R.1155 has a beautiful, huge frequency scale and two big*ss luxury knobs - one "coarse", one "fine". Fantastic device! Tuning is very easy and the box is conveniently placed next to the navigator. 2. T.1154 is a whole different story. It's a bit far behind you, you need to reach out with your hand and these "scales" - the aluminium dials around the knobs with scantily marked graduation - they're pretty much cr*p. (If I get it right it's because of several technical reasons, but it's not important now.) Anyway, it's really hard to tune any frequency reasonably quickly and with confidence, especially frequencies in between the graduation marks. Even more so at night if you can't or don't want to turn on this plafond above and behind your head. They knew it and provided this nice solution - the "back tuning": 1. Tune the receiver only, it's easy and convenient. 2. Switch the transmitter to "TUNE". 3. Press and hold your "Morse key". 4. Grab the appropriate oscillator knob (red/blue/yellow) and turn it - but turn it like a monkey, without even looking. Instead look at the magic eye on the receiver. At some point the eye will close, indicating that the receiver is getting a signal... from this very transmitter. So the transmitter is apparently trasmitting on the same frequency, right? Congratulations - you have quickly tuned your transmitter to the same freq. as your receiver. EASY PEASY! (lemon squeezy)
-
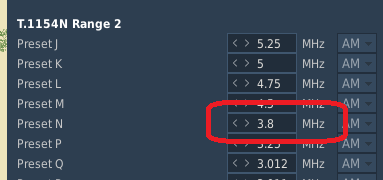
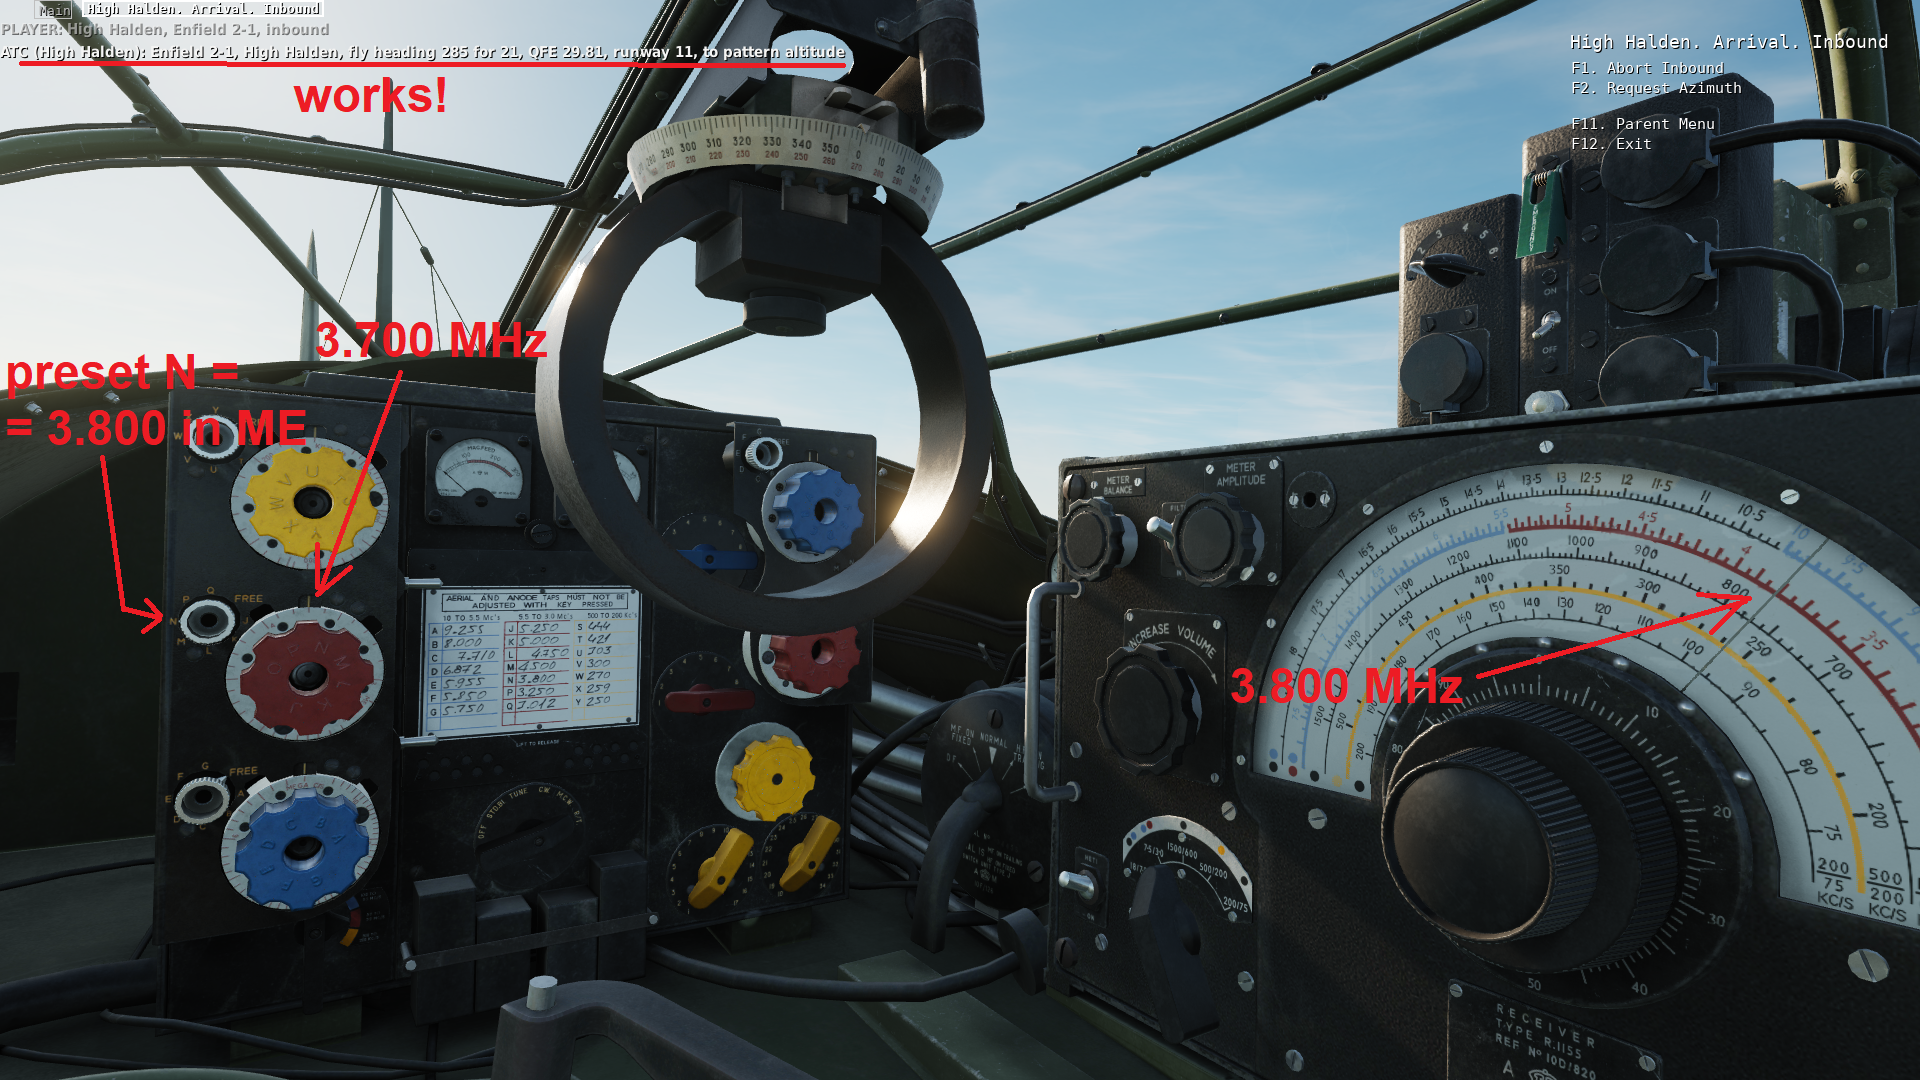
At least the red master oscillator knob on T.1154 is misaligned, i.e. the oscillator will actually produce a different frequency from the frequency suggested on the knob's scale. To make it short: set preset channel N to 3.800 MHz in Mission Editor. Load mission. Select this preset. Move the knob all around and look where it will "click" into the preset position (that's how these presets work). It's gonna be 3.700 MHz as read on the knob's scale. In fact it is 3.800 MHz, you know it because this is the only way you can contact High Halden ATC (the Channel map) who talk on 3.800 MHz. Otherwise, of course, you can't contact them - if you set 3.800 MHz manually, they won't answer, because it's NOT 3.800 MHz. Basically the knob works okay at around 4.000 MHz and NOT okay around 3.800 MHz - that's what I know, because I tested it (English ATC on the Channel map work close to 4.000 and close to 3.800 MHz). The knob may be misaligned also in other "spots" or "ranges" on the scale - haven't tested. Neither do I know if the yellow and blue oscillator knobs are affected as well - haven't tested. Attached are: 1. Very good pictures, which tell more than silly track files. 2. Silly track file to waste time. In the track file I initially slightly mistuned 3.700 and had to correct myself - then I could contact ATC. Later I'm showing where the 3.800 preset ("N") positions the knob. Really, the picture is waaay better. 3. The mission - it's easiest to pick Mossie "Rwy hot" at High Halden. _channel_sightseeing.miz 3700_kHz_equals_3800_kHz.trk