Terry Dactil
-
Posts
475 -
Joined
-
Last visited
Content Type
Profiles
Forums
Events
Everything posted by Terry Dactil
-

Is cockpit updated for deferred shading?
Terry Dactil replied to Charlie-1's topic in DCS: Spitfire L.F. Mk. IX
Thanks for that great mod NAkE350. It is much more realistic now that I don't have to put my nose on the instrument panel to read the gauges :thumbup: -
Heritage Flight Simulation MkIX cockpit
Terry Dactil replied to shreddersa's topic in DCS: Spitfire L.F. Mk. IX
Does aileron deflection match the roll rate? I think probably not. I imagine V squared would be in the equation somewhere. As a pilot I don't care about what aileron displacement I get. I think I would be more interested in stick force vs roll rate being linear. -
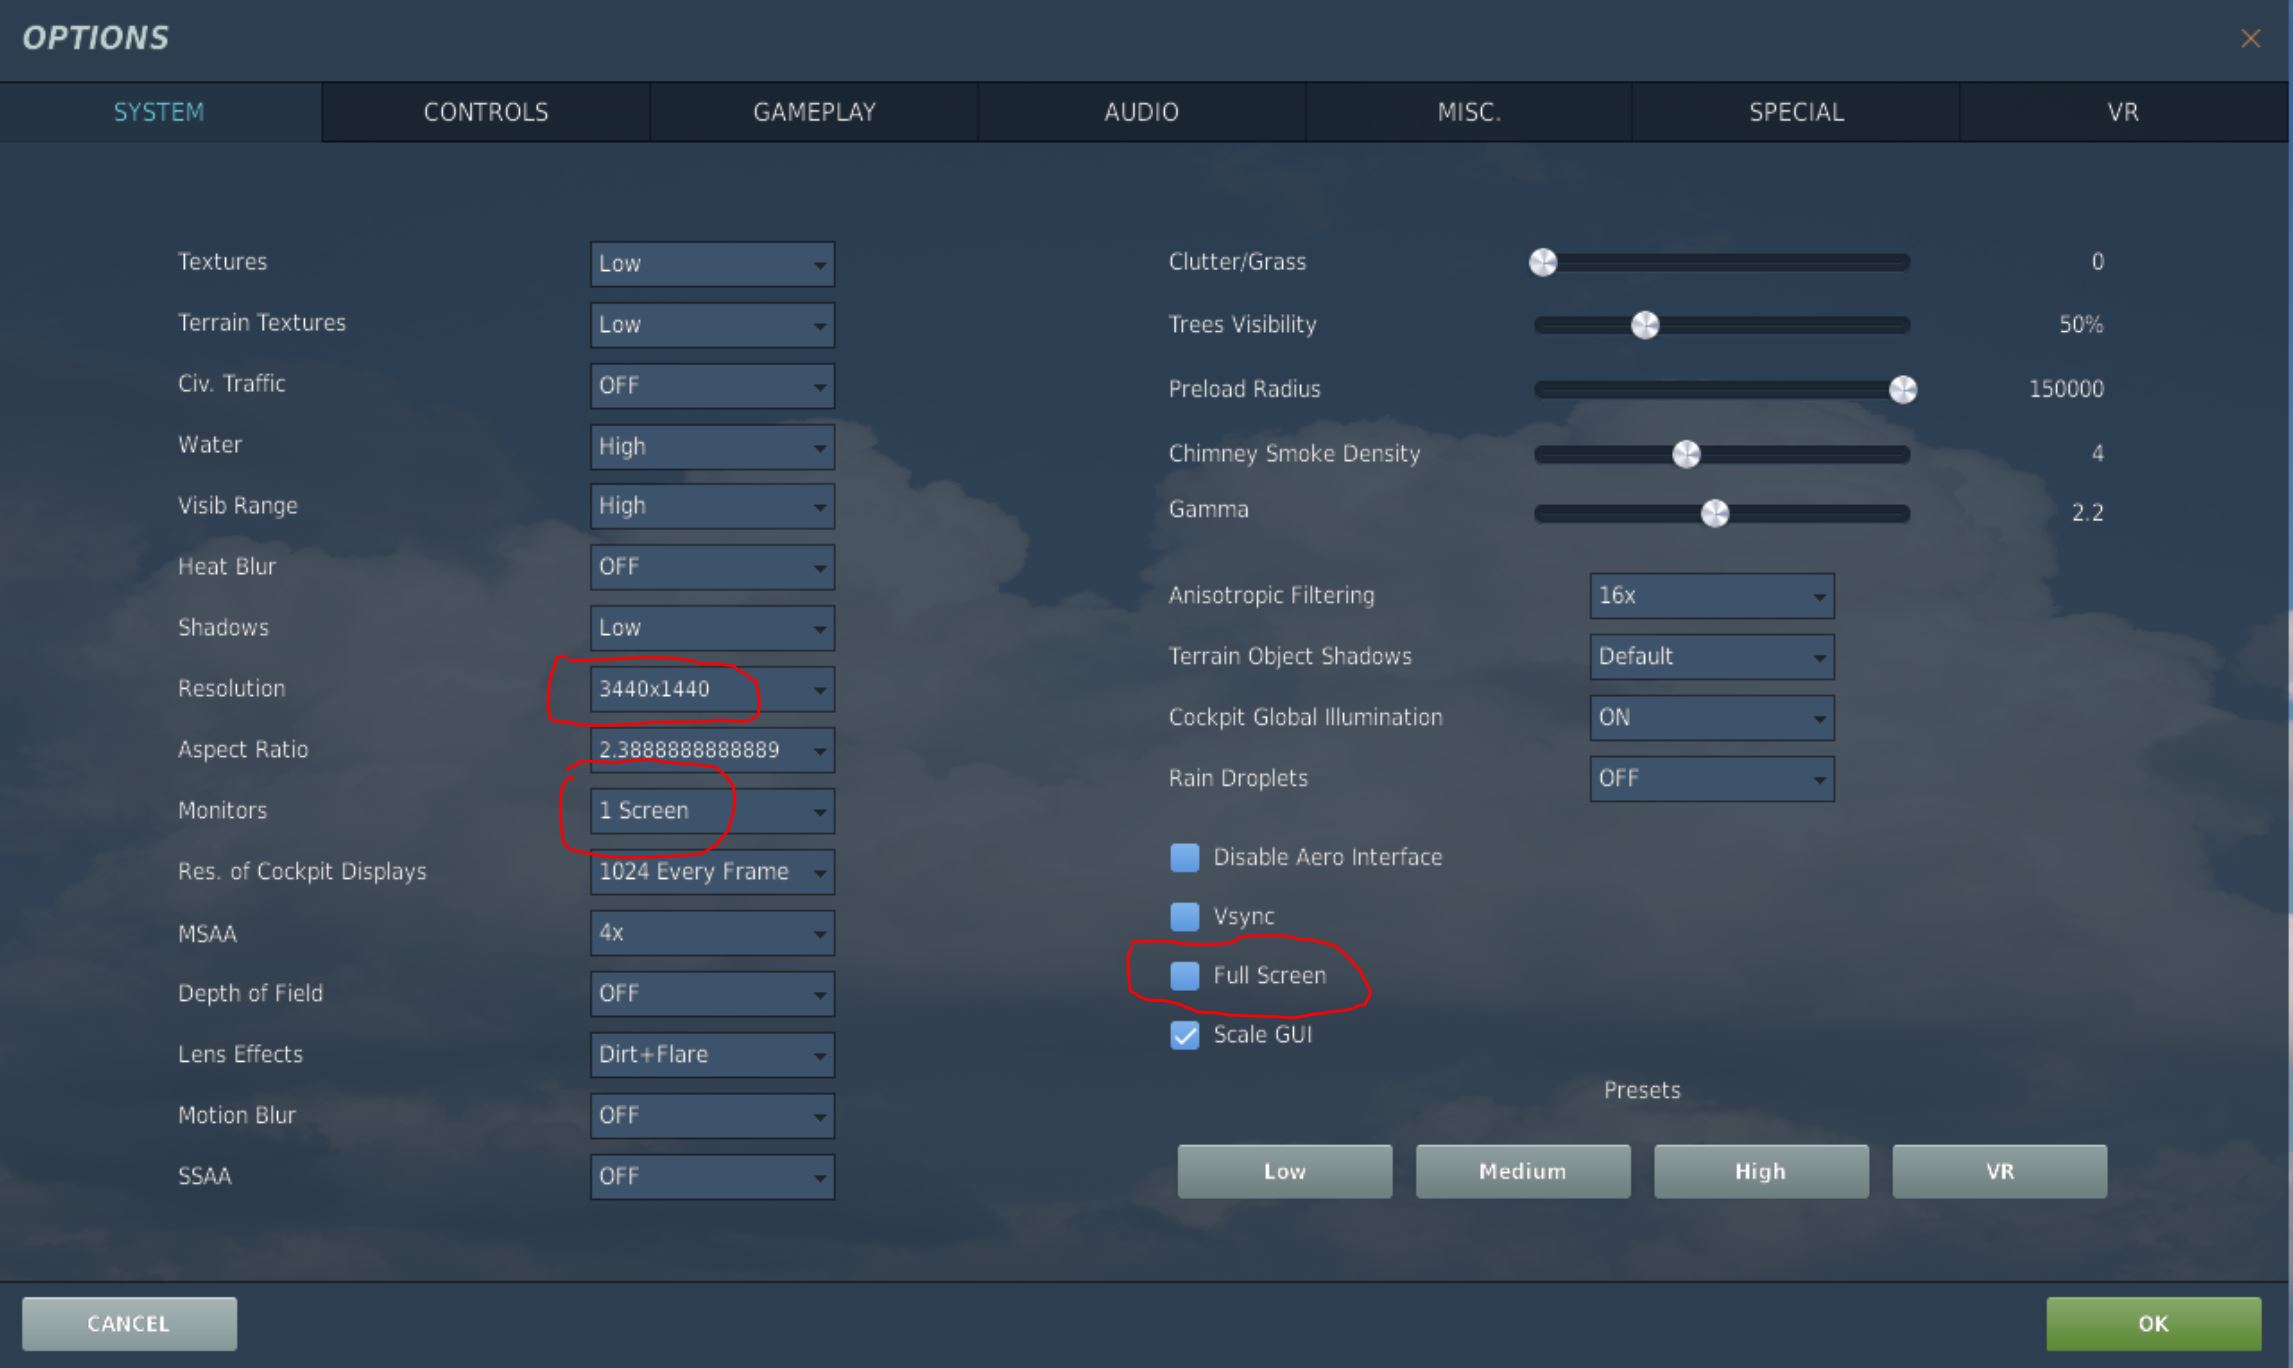
I haven't seen this mentioned before, so I thought this might help anyone with the same problem. I have a 3 screen setup, but use only the larger center screen for DCS. The DCS boot screen starts normally, but with no cursor visible. However the invisible cursor is still active as moving the mouse highlights the various clickable objects on the screen which would react normally to being clicked. I could get normal operation back by moving the mouse to get the cursor over to one of the side screens and clicking there. This restored normal cursor operation on the main screen but was a small annoyance that was bugging me. I finally managed to find the problem which appears to be caused by me specifying the screen size in two places i.e as the full screen resolution and also ticking 'full screen'. Un-ticking 'full screen' restored normal cursor operation on the boot screen. :)

-
Thanks for the kind thought, but that is not necessary. Like you I have been helped a lot by this forum, and I just want to contribute something in return. Also, it is quite satisfying for me to design something , then make it and find out that it actually works. :smilewink:
-
+1 for the Anycubic I3 Mega. I have been using one and I am very happy with its performance.
-
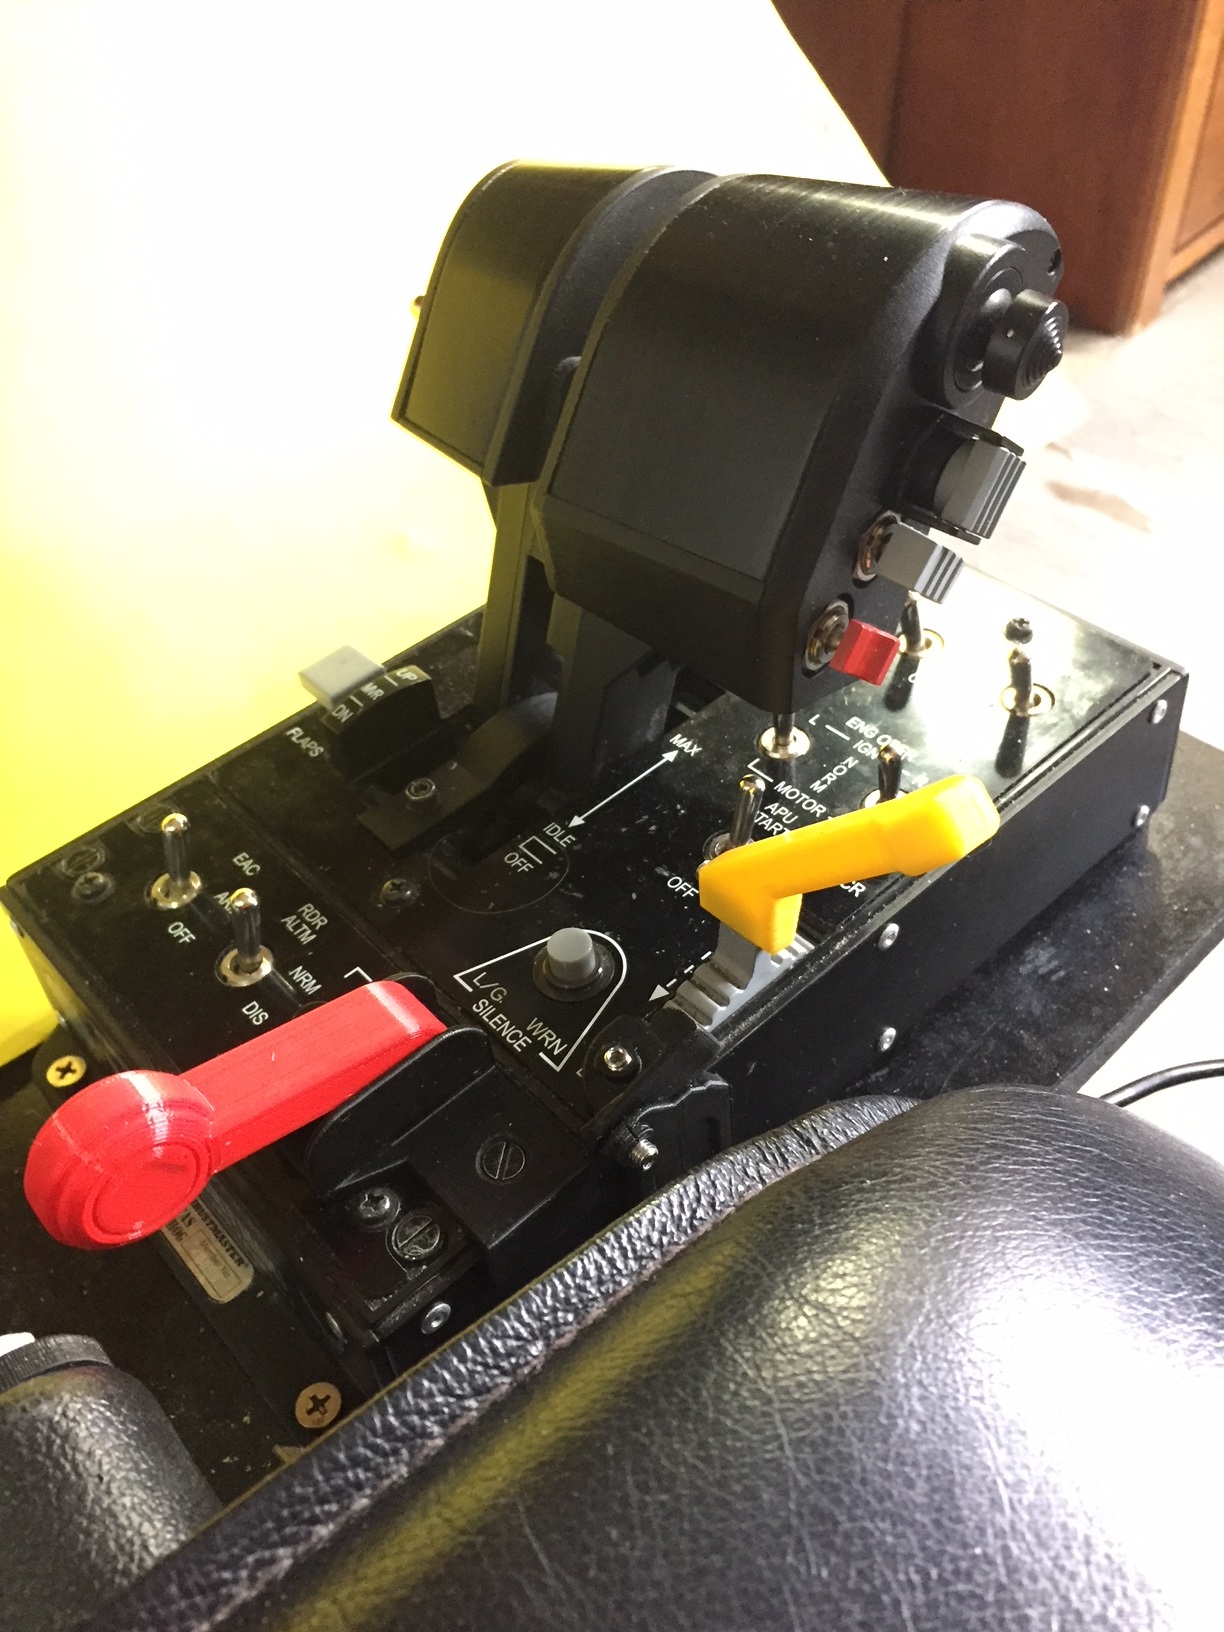
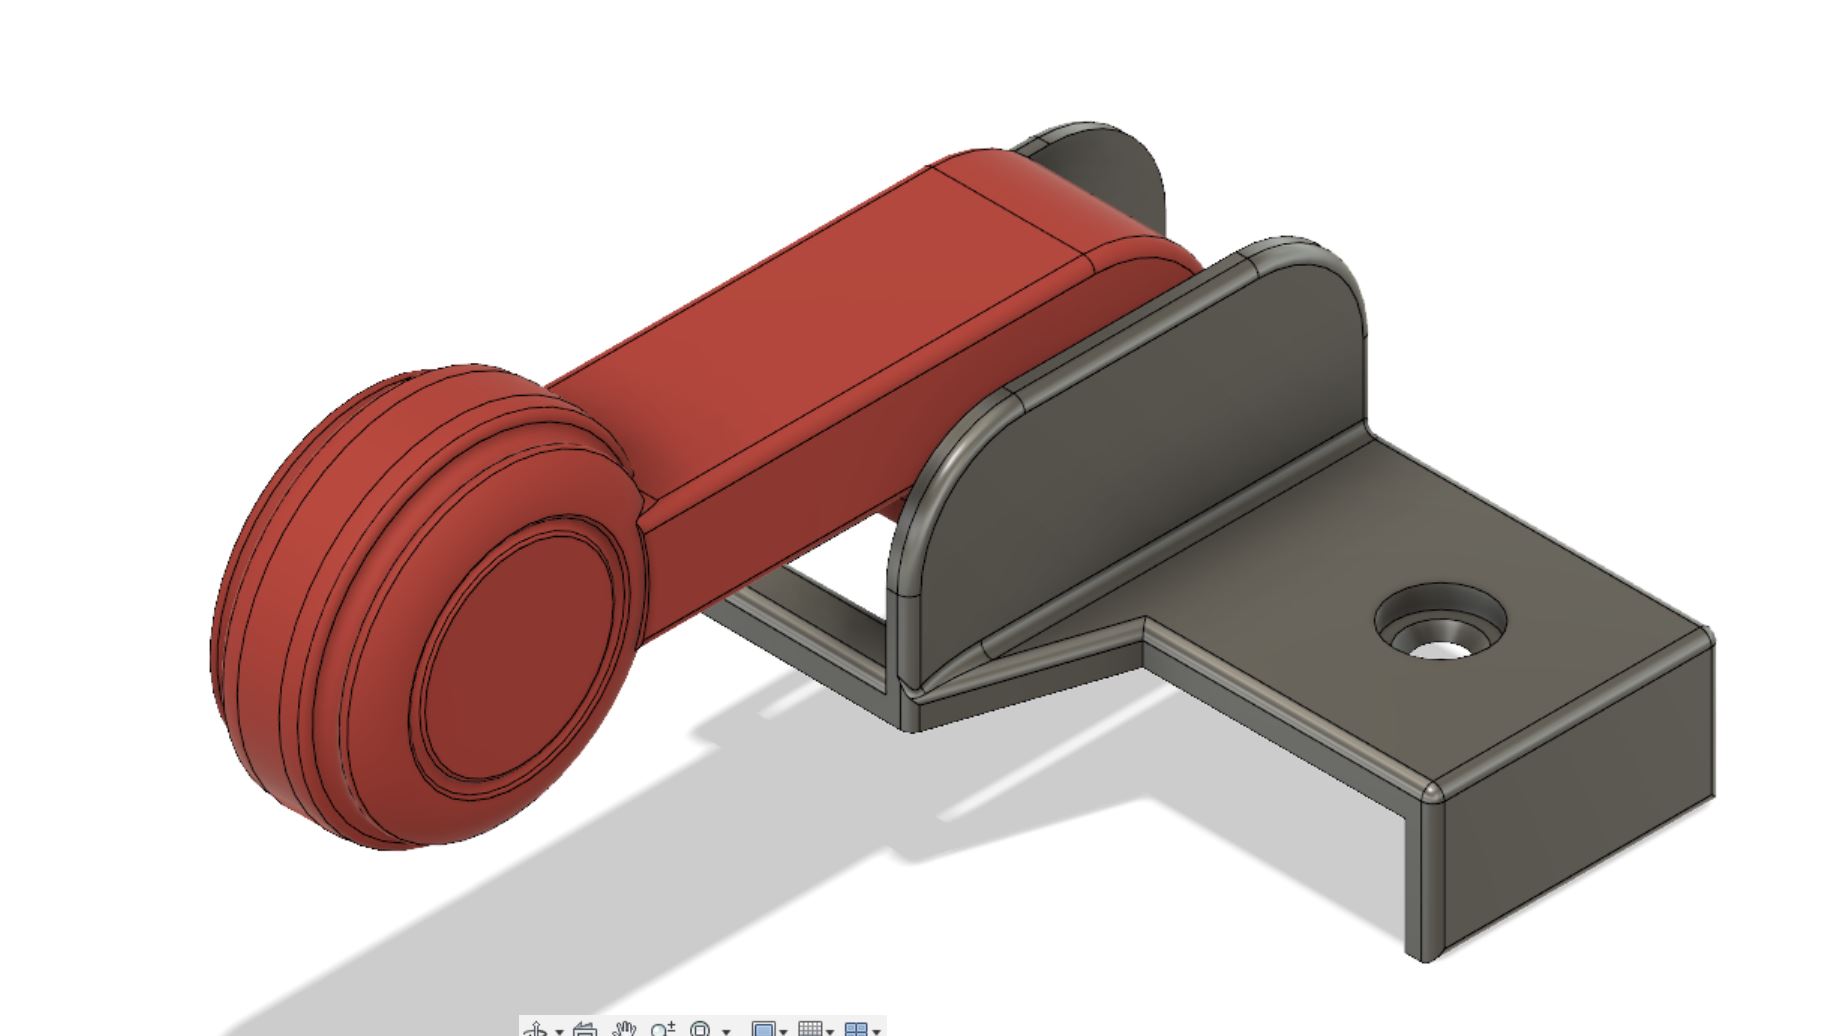
For anyone who does not like the previous version as it looks like a mixture control lever operating their landing gear, here is one with a more standard looking wheel on it. STL files here: Gear Lever - Wheel.zip
-
BlacleyCole: If you are referring to my post above and not to Blue73. Sorry, this is just a hobby for me and I expect the postage from Australia would make it uneconomic for you. However, you are welcome to the STL files if you wish to get them printed yourself. Here are the files for the gear handle Gear lever.zip The files for the Harrier nozzle lever are available in another thread... https://forums.eagle.ru/showthread.php?t=217091 (Apologies to Blue73. I did not intend to hijack your thread)
-
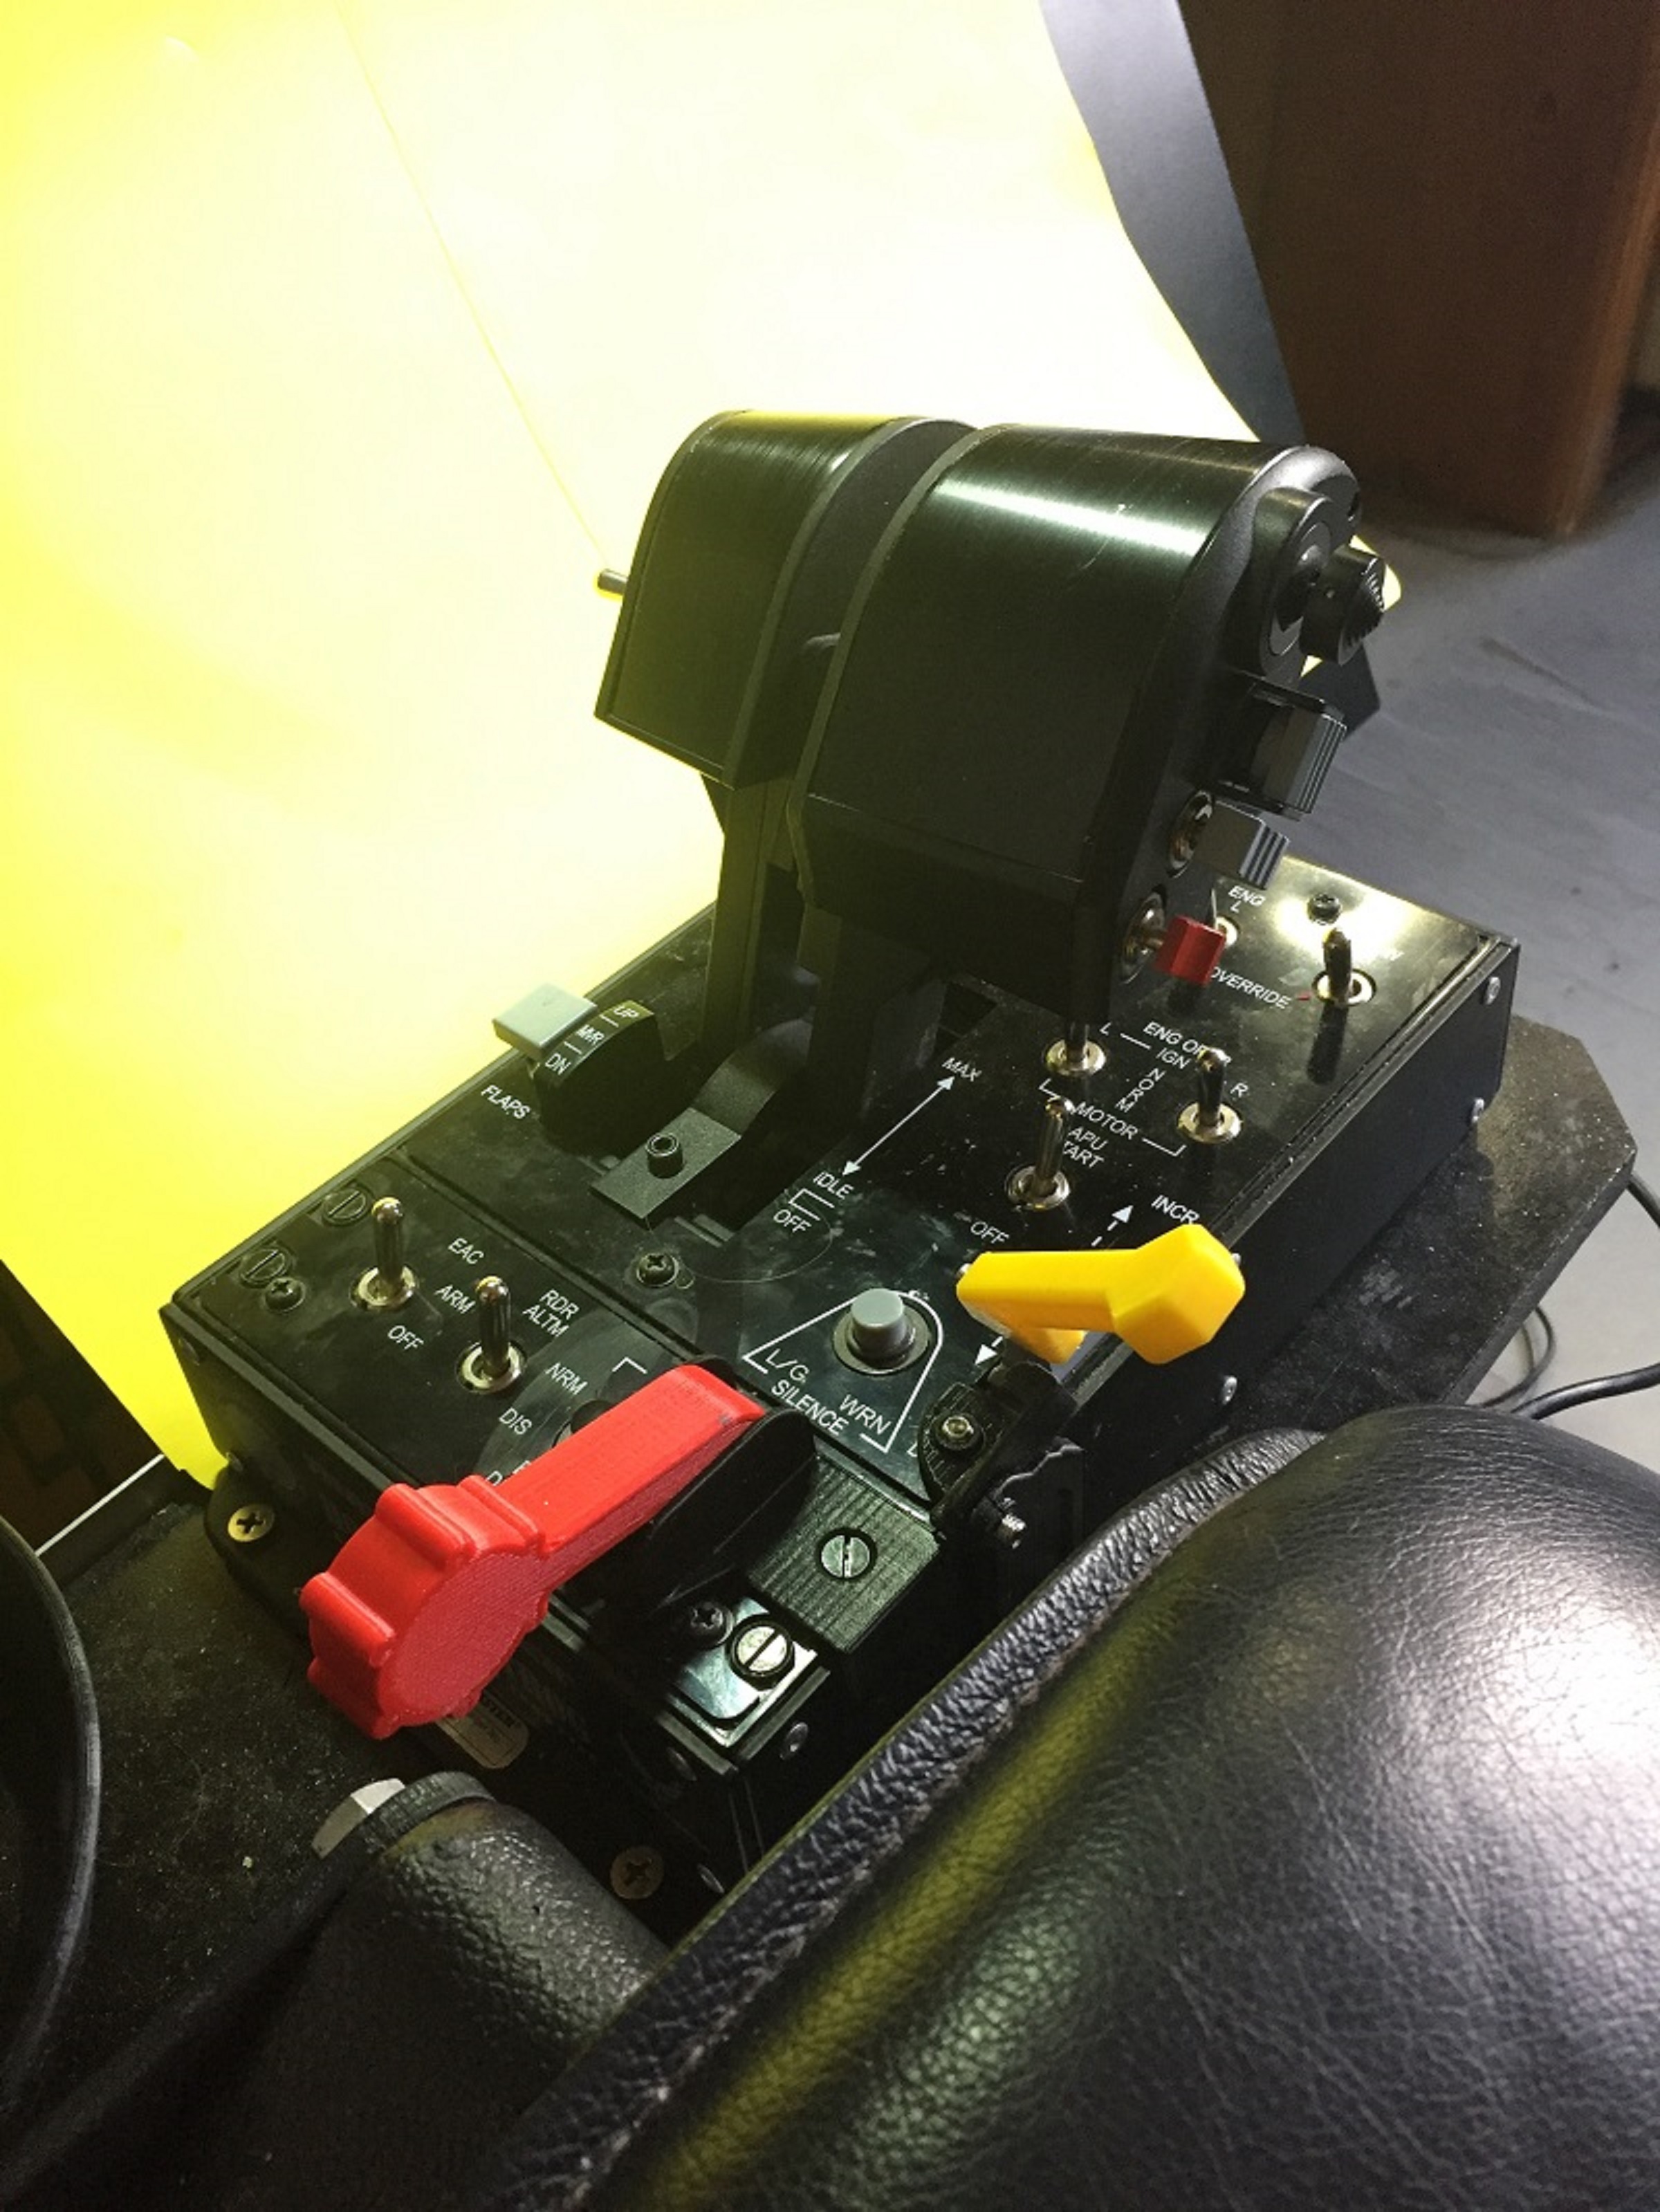
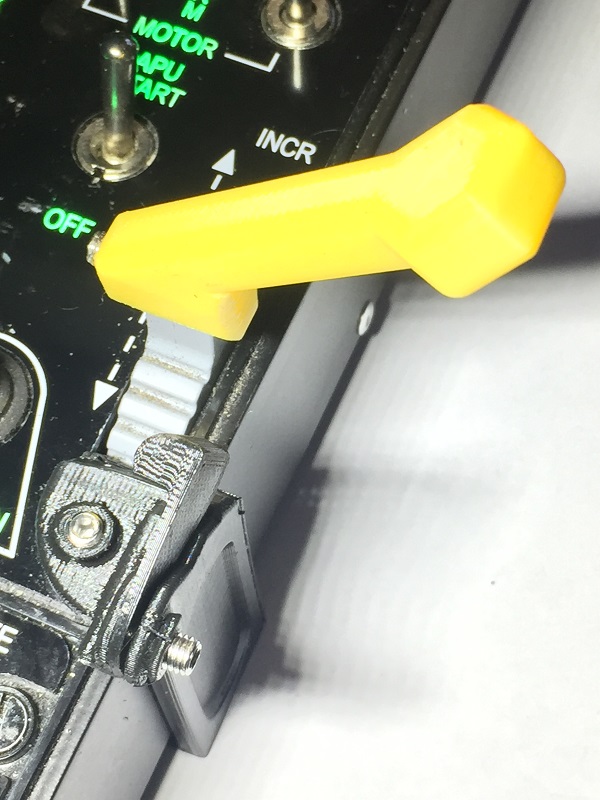
Great minds .... etc. I also came to the conclusion that a bit of 3D printing can improve the VR experience. (The yellow lever is for setting the Harrier's nozzle angle. It has a detent at the 82° hover position).
-
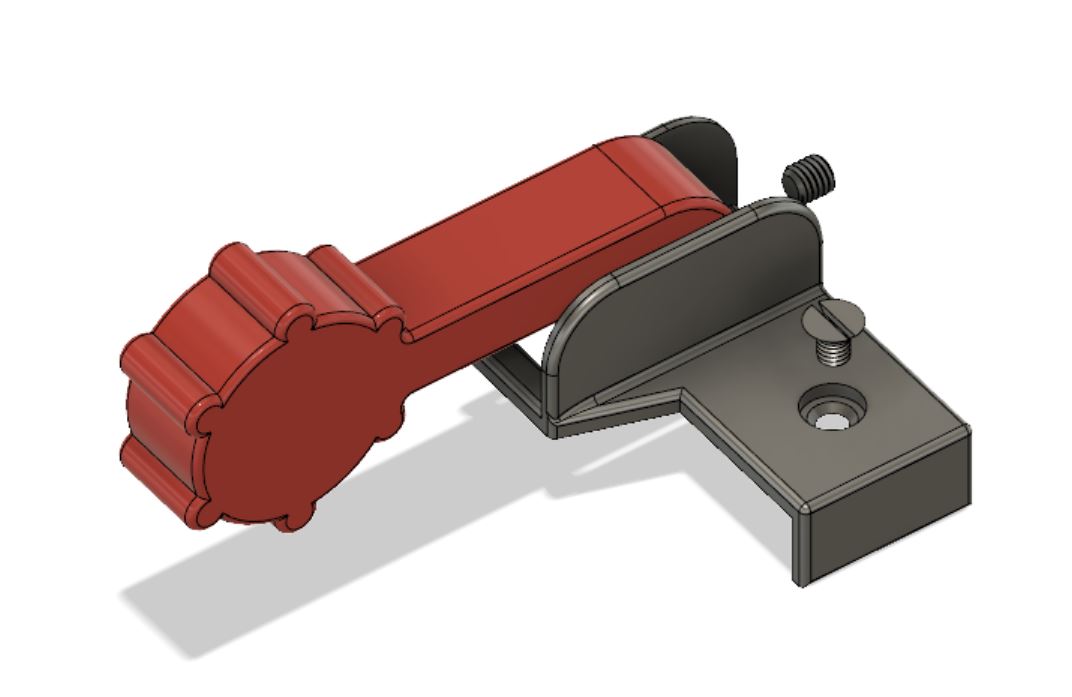
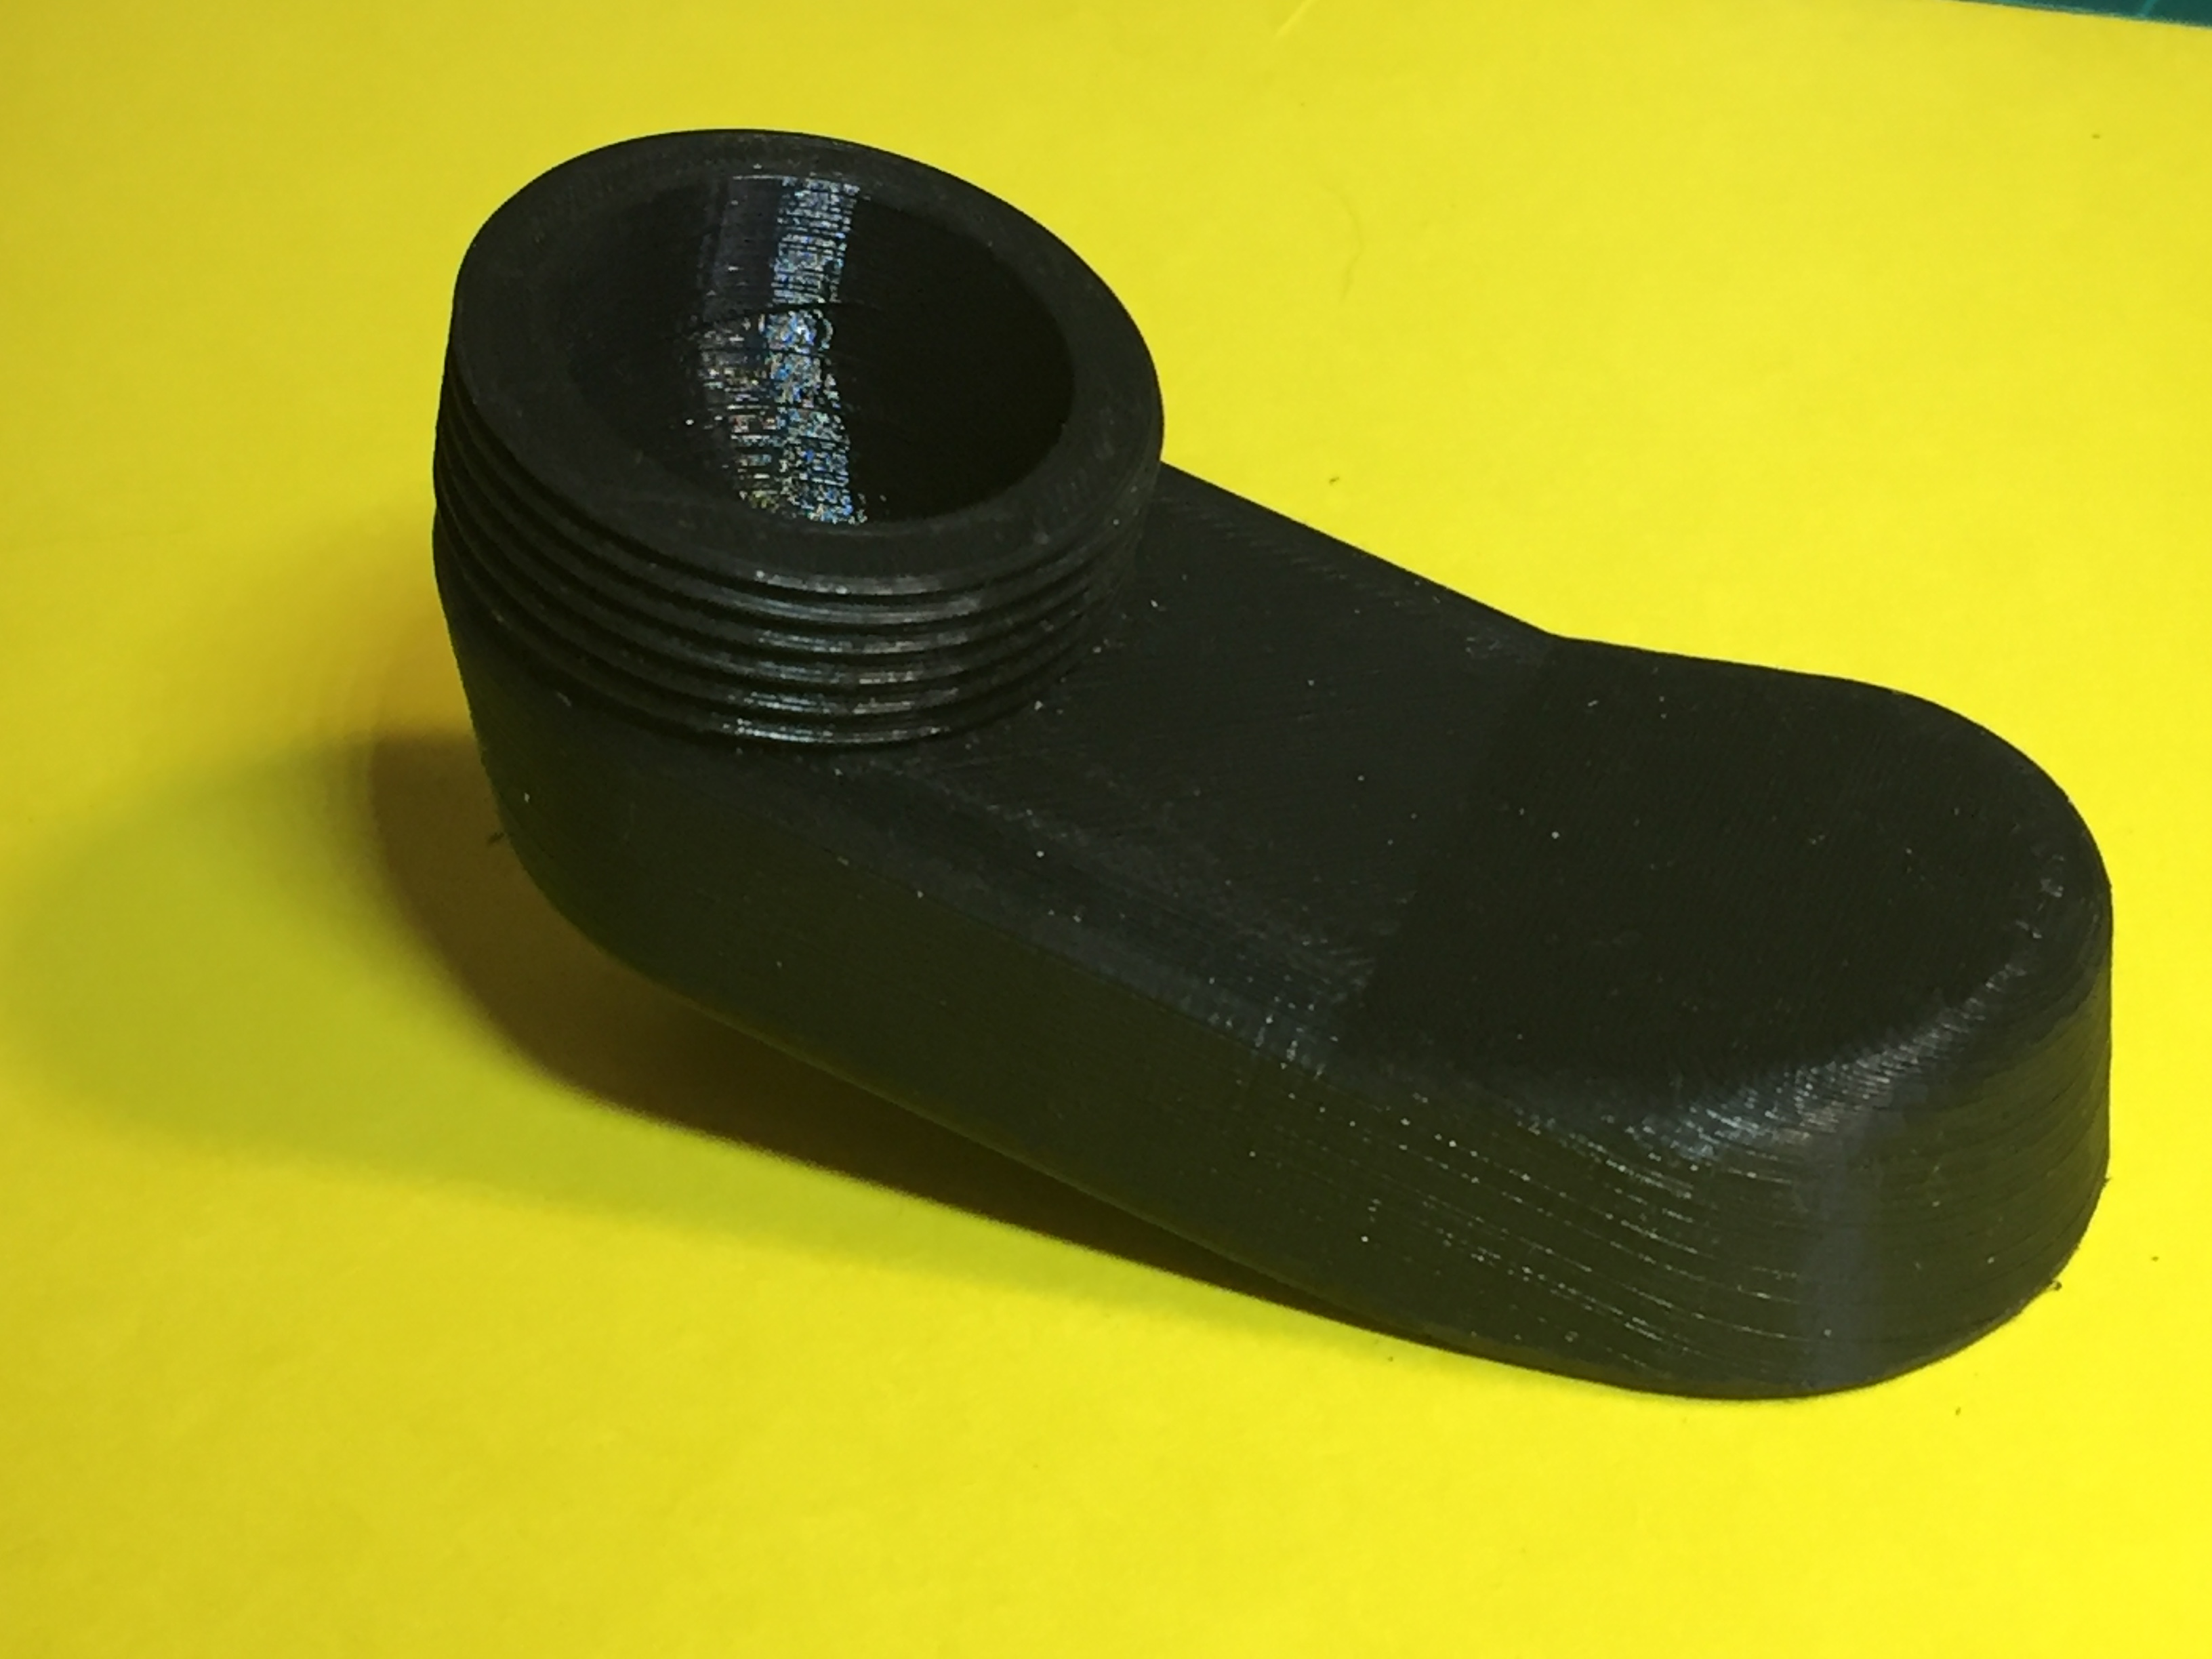
I have been using the Warthog throttle slider to set the Harrier's nozzle angle. Adjusting the axis curve to set the 82° hover setting at the weak detent at 50% travel kinda worked, but gave vastly different sensitivity on each side which I did not like. I wanted a tactile indication to make it easy to set the hover nozzle angle. I considered using one of the throttle levers, but thought it would be too difficult to modify the afterburner detent to work on one side only and accurately set the position, so it was back to using the slider. On my theory that any important control in the cockpit should have a big and important lever, I have made (3D printed) an extension lever and adjustable detent to get a nozzle control more like the real thing. The detent is not really a detent. It just slightly increases the resistance to movement and also causes the lever to wriggle slightly outboard just like the real thing. This makes it easy to feel when at the hover position. The side clamp is accurately positioned by a small projection which engages in the aft end of the slot on the Warthog unit. Nothing on the Warthog throttle unit has been changed in any way. This mod just fits over the existing components and can be removed easily. The 'detent' is adjustable and is clamped in position (as is the lever and clamp body) with M5x0.8 grubscrews just because I had some handy. Some tape or a spot of glue would work just as well. *** Update: *** Noticed that the lever hit the aft stop just before reaching full travel of the pot. This could be easily fixed by adjusting the axis trim, but I wanted to avoid that so I have modified the files so the lever now goes full travel. The images have been updated and the modified STL files are here for anyone who wants to make their own. Nozzle lever.zip
-
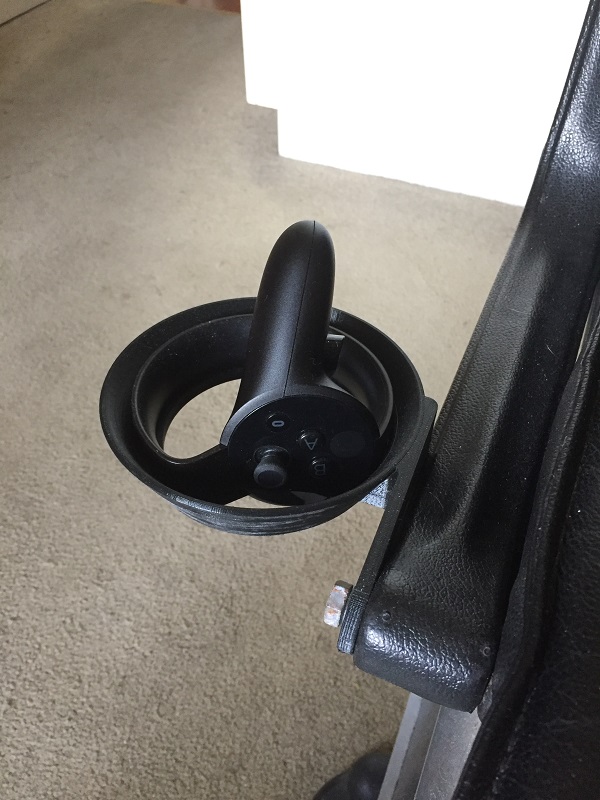
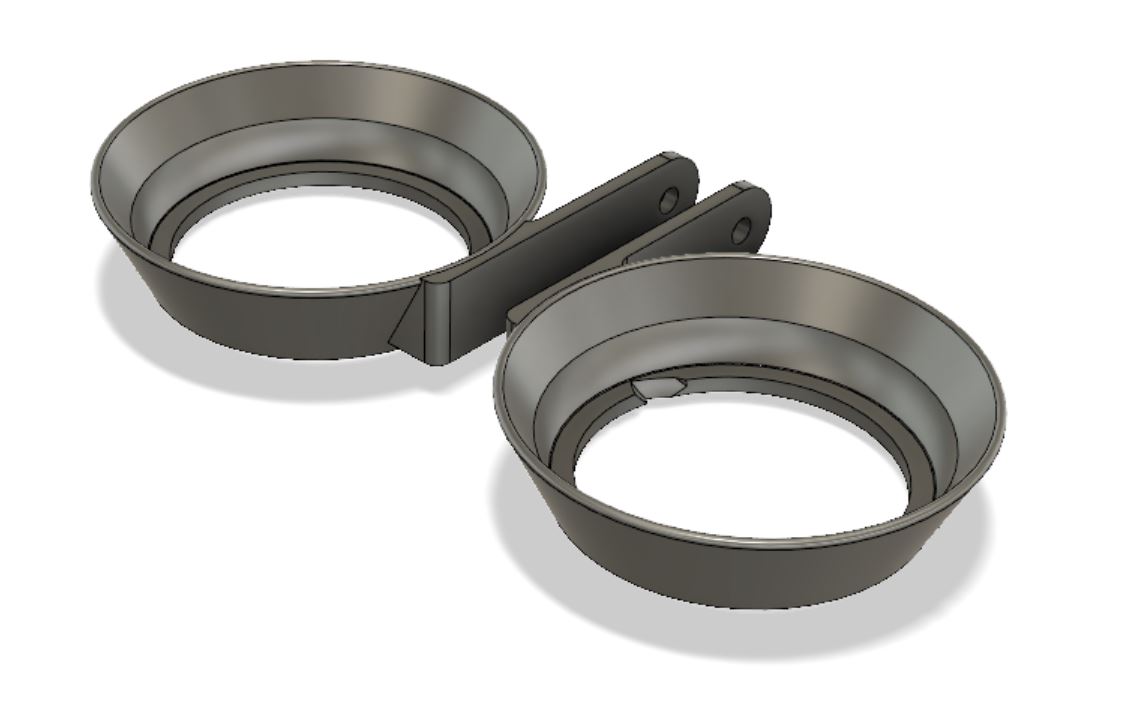
With right-click now working on the touch controllers they are now very useful in the VR cockpit, so I have put holsters on the side of the chair for easy access. Saves a lot of groping around if they are always in the same place. :) The files for 3D printing are in the Input and Output'' thread https://forums.eagle.ru/showthread.php?t=216183
-
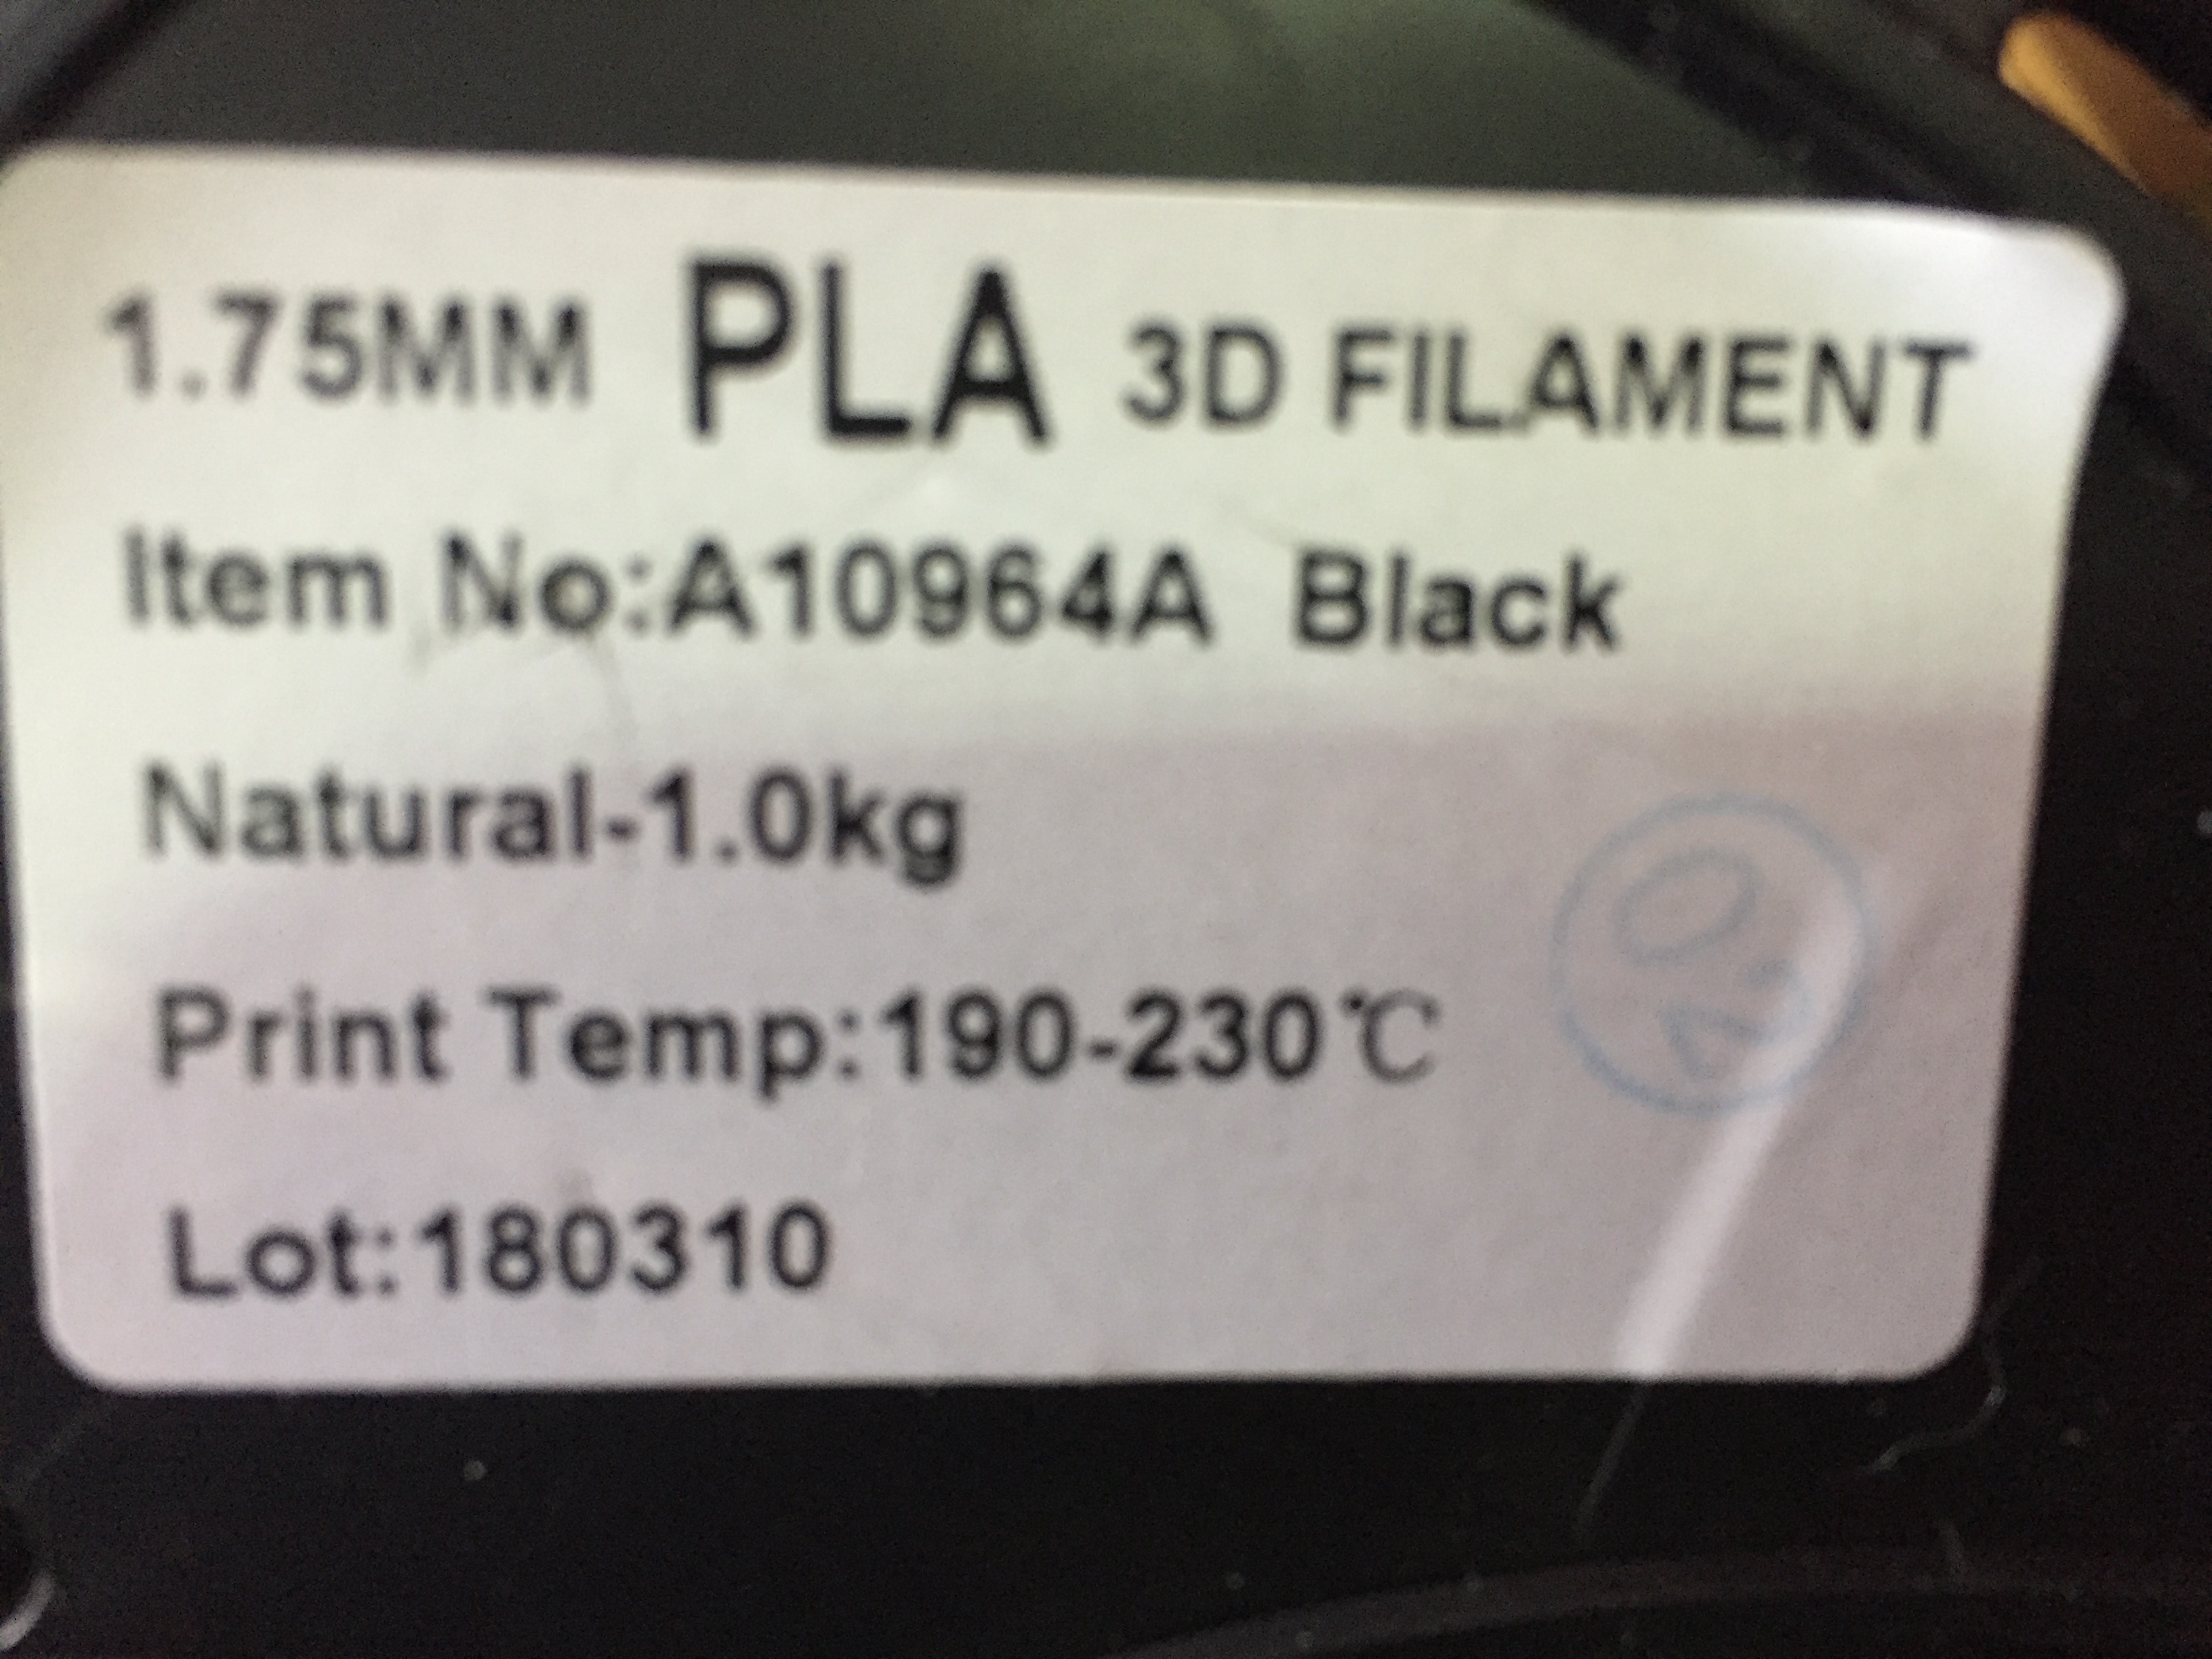
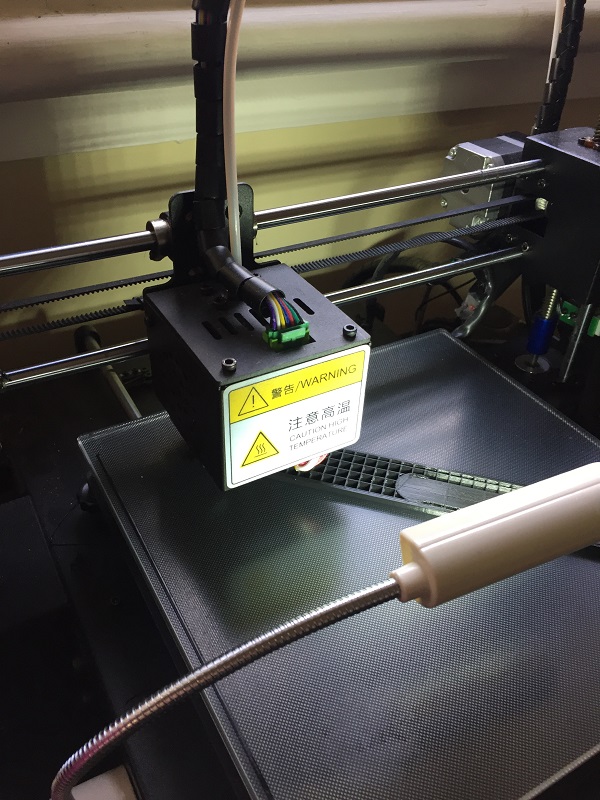
I stay with one brand on the assumption that I won't have to change any settings when I change to different colored filaments. Seems to work. The filament is the Chinese E-DA brand, readily available here on eBay. Not the cheapest, but it is not expensive either. The only small changes I have made to the suggested Cura print settingss were to slightly increase the first layer width and thickness to guarantee good adhesion to the bed and increased the extrusion temperature and retract distance to eliminate stringing and that was it - perfect prints! I have also modified the Cura start code to first run a long line along one side of the base plate to fully prime the extruder and clear any color left over from the previous filament. It also includes the power failure recovery arming code. One great thing about 3D printers is that they can make modifications for themselves. I was not too happy with the original separate filament spool holder. It got in the way of other things, and was easily knocked over. It also made it a pain to move the printer with the filament attached. So I got the printer to print itself a spool holder that attached to its structure. This also required a bracket with a small pulley to direct the filament, and for good measure a nice handle to rotate the filament drive instead of just stuffing the filament in manually. The last thing to add was a LED light with a magnetic base and flexible gooseneck so I could see what was being printed. I reckon I got a great printer for a good price. :)
-
I am using an 'Anycubic I3 Mega'. Costs less than AUD400 now in OZ, and it works flawlessly. I was amazed that I could print male and female threads and they matched perfectly. Close working tolerances are no problem. Amazing stuff.
-
I'm using the free version of Fusion360. It is an incredible program and seems capable of just about anything. I'm way down on the learning curve (I have just got to about 'V1 rotate' in aviation terms :) ) Here are the files in the native f3d format. If these are not suitable there are many other formats available. Just let me know. Tilt Handle 50mm f3d.zip
-
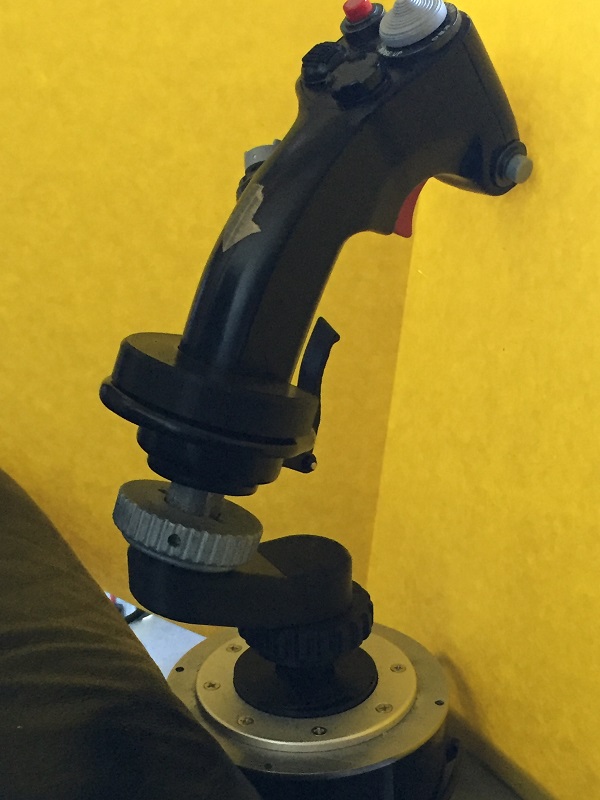
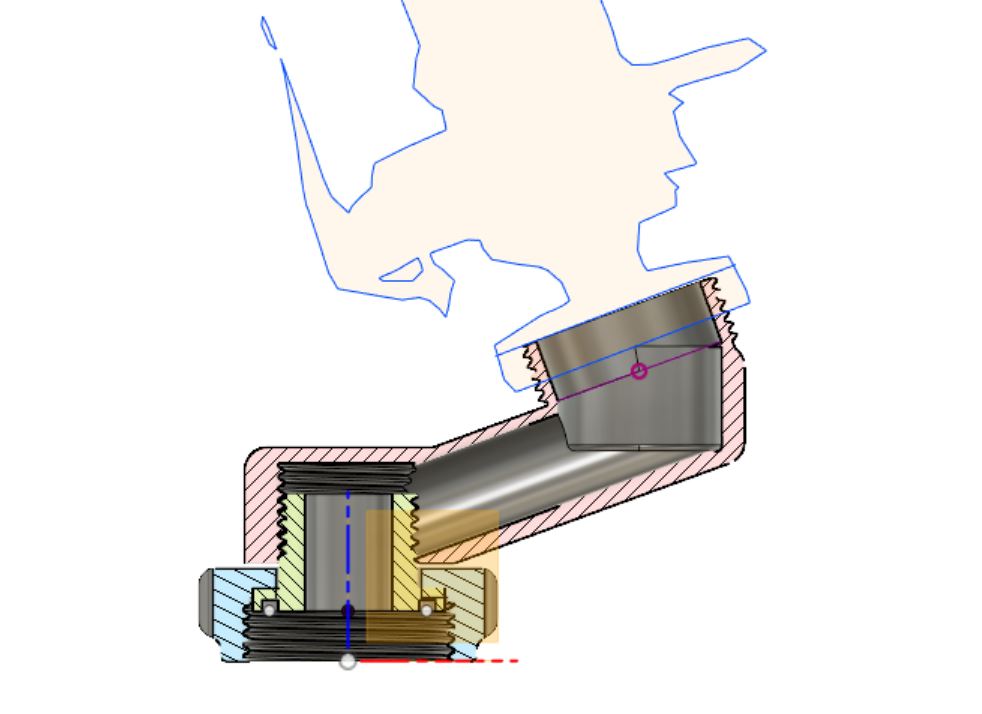
TWC_Alamo: As we are both using Fusion360 the native format should work: Try this then: Hotas extension - curved 100mm f3d.zip (I had to zip it to get this accepted as an attachment). I see that the latest pro (paid) version of Fusion360 has built-in stress analysis where it overlays colors on the components according to how they are stressed by a load that you specify. That would be handy to have. However, I think that it is pretty obvious that the greatest load would be down at a gimbal stop when we use our new longer lever on it! The lower nut and connection is not far away from that and would get a similar high loading. You could almost call it a desirable design feature to have the failure point there at the connector instead of something inside the base unit! :thumbup: No. As you see, it requires more development and testing first. ******** Continues as part 2 of this project at https://forums.eagle.ru/showthread.php?t=216183 *******
-
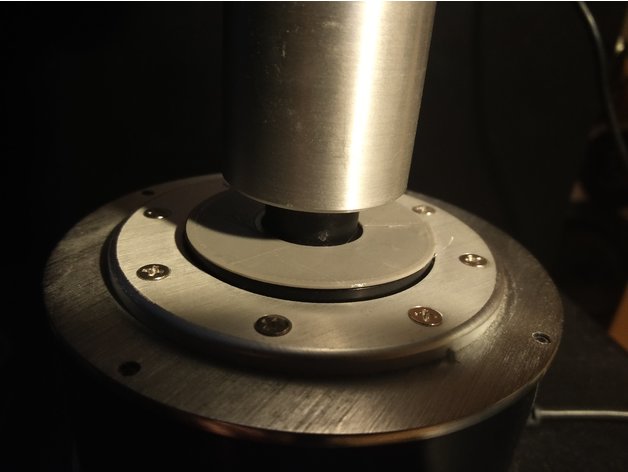
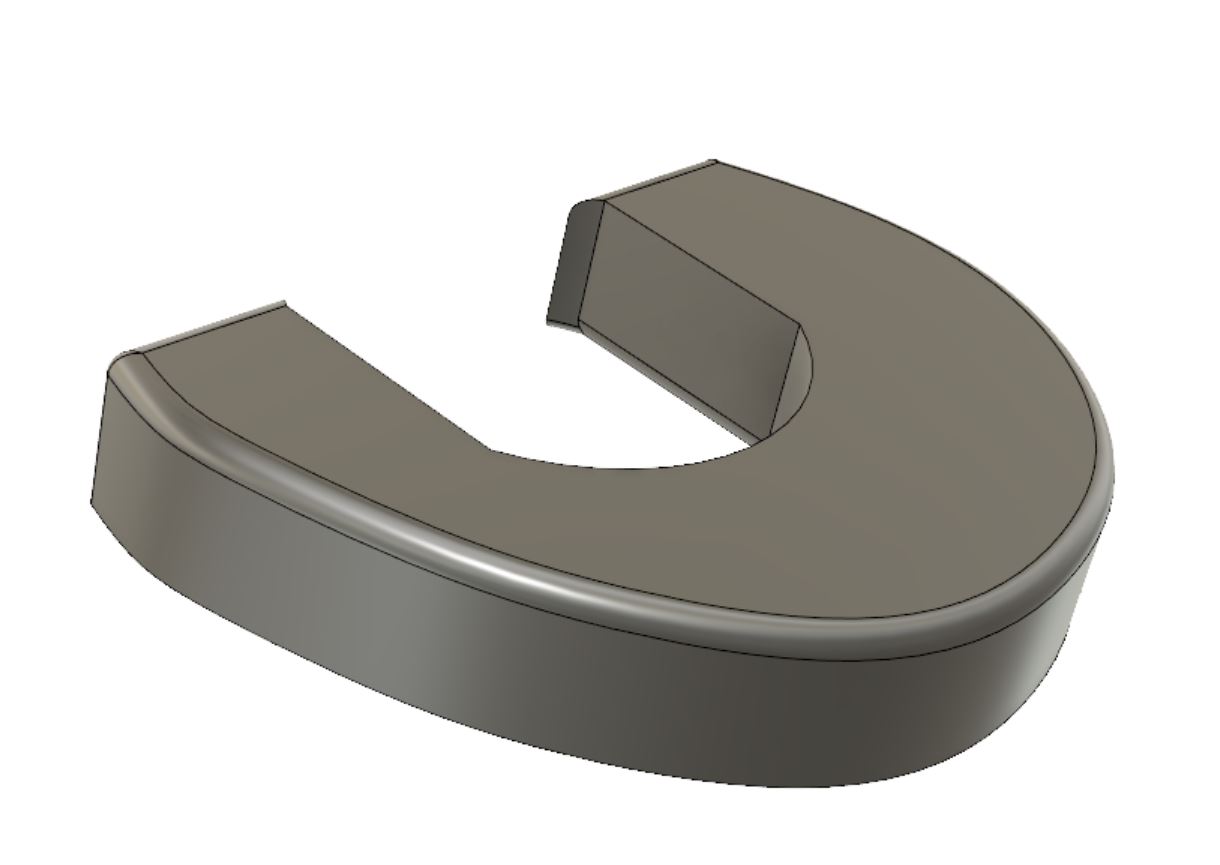
This is version 2 of my 3d printed extension for the Warthog joystick. Because the unit is mounted on a chair, the handle is low down at thigh level. Therefore I want the handle to be tilted forward about 20° to retain a comfortable grip on the handle when it is moved full aft. The handle is quite heavy, so its cg needs to be over the pivot point when centered otherwise the forces will be different moving for and aft. I started with a 100mm extension length, but that made the stick forces too light and the increased leverage when hitting the gimbal stops broke things! The extension length has now been halved from 100mm to 50mm and this works a lot better for me. The connecting cable has to fit in a small space, and all the external bits of the 5 pin mini-din connectors need to be removed for it to fit. I used a ribbon cable and put a blob of hot glue over the soldered contacts to prevent any stress during installation. Creeping elegance has infected this project. I have made a dust cover for the exposed gimbal thingy in the base, and a snap-on plate to raise the wrist support platform 15mm so I don't have to slide my hand up to reach the trim switch. With right-click now working on the touch controllers they are now very useful in the VR cockpit, so I have put holsters on the side of the chair for easy access. I don't think I could live without a 3D printer now! For anyone who wishes to make any of these items, here are the STL files. HOTAS.zip
-
TWC_Alamo: Sorry to see you are having problems. I have only managed to break the one part, which is understandable considering how much force can be applied to it. I have had no trouble with the other bits using PLA filiament at 0.2 layers and printing at 210°C. Never tried using 0.1 layers but maybe that could help. No problem with sharing the CAD files I see my Fusion360 can export in many formats; IGES, SAT, SMT, STEP being the most common. Which would you prefer? I now using a version2 which is only 50mm extension, but retains the tilted handle. I think the control forces are a bit too light with the 100mm extension. Great for helicopters, but too easy to rip the wings off the others. Are you considering stiffening the centering spring in the base unit?
-
Ooops.... :( I have managed to break the lower nut retainer. If you hit the gimbals stops the leverage on that part is pretty fierce. It is also acting along the layers which is the weakest direction. Here is a modification to strengthen the retainer by increasing its thickness. I would also suggest printing it with 100% infill. Revised STL file: Retainer - strengthened.zip Retainer - strengthened.zip
-
If you don't want to modify your original detent to make it 'push through' instead of 'lift over' then here is the file to 3d print a new detent with modified stops. https://www.thingiverse.com/thing:1701150
-
It has been fixed in the latest update :thumbup:
-
TrackIR, although very good, is unrealistic in that you are always moving your eyes in the wrong direction. eg. turn your head to the RIGHT to get a 6 oclock view in the monitor, but then you have to move your eyes back LEFT to see the monitor. You easily get used to that, but I find VR feels vastly more realistic in knowing exactly what direction you are looking as in this case you turn both your head and eyes to the RIGHT as in real life. Also, with the normal range of neck rotation plus peripheral vision, some body rotation is still required to see directly behind. TrackIR is great for simulating an owl or Linda Blair's spinning head. :D
-
I take your point that WEP is a variable setting. You have given me another idea which may be more practical for me in VR. I have made another plastic detent stop slightly modified so the throttles can be pushed through and do not have to be lifted (like the old Cougar throttle, just a bit more resistance at that spot). By adjusting the curves I have set this point at Max Continuous (2650rpm +7psi). It is a bit fiddly to maintain the correct response at low settings also, but I am getting there. This makes it a lot easier to set max continuous power and be kind to the engine. :)
-
Why not make use of the afterburner detent feature in the warthog throttle too. This would give the tactile feedback required and could also be used in VR where the lights cannot be seen.
-
That's seems more like a reasonable price for outsourcing the job. I printed mine in PLA which is not quite as strong or high temperature resistant as ABS, but is still perfectly adequate. Can you specify using PLA? It might be a bit cheaper still.
-
Errr. No. But..... I am using Fusion360 and it saves its stuff in.amf format. Its output normally defaults straight to a 3d printing program. However, I found that can be changed so it outputs a .stl file. Her you go.. 3D files STL format HOTAS extension curved 100mm.zip HOTAS straight 100mm.zip
-
Thanks for the idea. I was not aware of Shapeways before, and I am not trying to make money from this. I am just trying to give something back to this forum that has been so helpful to me in many ways. A quick look at that site shows that I can upload my design files to them and they will print and dispatch the objects to anyone who orders it from their website.. I guess it depends on what their costs markup is whether it is worthwhile or not. I'll set up an account and see how it goes. As I have put the files int the public domain, the best way is to download the files then find a friend with a 3D printer. That will cut out all the middlemen. :) Update: I had a look at Shapeways and opened an account with them. Lots of setting up a shop with shipping addresses and billing accounts etc. No thanks. I'm not interested in starting a business. The killer was they quoted around 66USD just to print the curved extension. To make mine took me about 3 hours to design, 5 hours to print and about $2 worth of plastic filament. I would suggest that as the files are all available here, there must be better and cheaper ways to get the prints made without using Shapeways.