metalnwood
-
Posts
1578 -
Joined
-
Last visited
-
Days Won
2
Content Type
Profiles
Forums
Events
Everything posted by metalnwood
-
If you are doing it with arduino then really any kind of encoder you want. Anything Leo sells will work otherwise places like digikey. e.g. this is probably one Leo has http://www.digikey.co.nz/product-detail/en/288T232R161A2/CT3002-ND/203827 As far as the dual rotary encoders. Leo is the only person I know where you can buy them. Make sure you are only looking at mechanical encoders, not optical.
-

Question for panel makers - engraving.. how do you do it?
metalnwood replied to Devon Custard's topic in Home Cockpits
Certainly does suck through the whole sheet. The MDF on the vacuum table works well as the spoil board, every now and then you resurface it to get it flat again. I use a 5.5KW pump on mine but for smaller areas I see people using cheap vacuum cleaners for good results. -
Question for panel makers - engraving.. how do you do it?
metalnwood replied to Devon Custard's topic in Home Cockpits
No there should not be much variation on the board but for those that might not have a completely flat surface and don't bother preparing it properly then I guess this could work for them. Like Gene says, you should surface the area first which is what the picture I had a page back was showing, a small area surfaced just for the engraving job. I also have a vacuum table and I think I said it's only good for things over a certain size. I never tried it on the small acrylic because I don't engrave on the router but I gave it a quick look and it held down a piece of acrylic ~ 3x3" with enough force to do the engraving as the forces are fairly light. The vacuum was sucking through 3/4" mdf to hold it. Any one of the small vacuum table plans around should be fine to make and use for this. -
Question for panel makers - engraving.. how do you do it?
metalnwood replied to Devon Custard's topic in Home Cockpits
I agree, it was the first time I had seen the auto-level, a user created program to map the height of the pcb at different points to cater for an uneven surface. Very cool idea and def not the standard touch probe routine. -
Question for panel makers - engraving.. how do you do it?
metalnwood replied to Devon Custard's topic in Home Cockpits
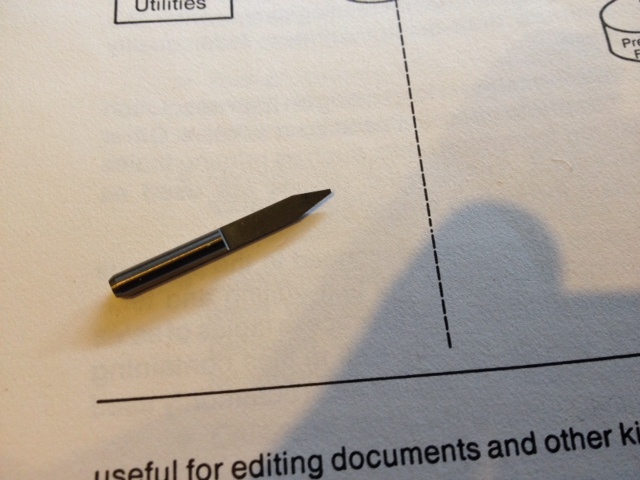
These are the kinds of cheap engraving tools I am using, you can grind/round of the end or also get some with a radius on the end. http://www.ebay.com/itm/10xCarbide-PCB-Engraving-Bit-CNC-Router-Tool-30A-0-3mm-/130422956140?pt=LH_DefaultDomain_0&hash=item1e5dd0606c -
Question for panel makers - engraving.. how do you do it?
metalnwood replied to Devon Custard's topic in Home Cockpits
I used the .02" tip. Which onsrud can you use for engraving? Have you modelled it in cut2d? Even the 0.02" head was too large to get in to do some text so I can't imagine any o-flute doing panel engraving on 4mm high fonts unless they are stick fonts and really fat. -
Question for panel makers - engraving.. how do you do it?
metalnwood replied to Devon Custard's topic in Home Cockpits
Looks ok, just make sure you don't use any foam tapes, they need to be thin. It is quite a small roll though, I would buy it in a much larger roll as you will get through it. $5 is a good way to see if that one works though, then you can get a larger roll. -
Question for panel makers - engraving.. how do you do it?
metalnwood replied to Devon Custard's topic in Home Cockpits
There is nothing for panel building I can think of that you cannot do with cut2d and cut2d is really easy to use. You are using the onsrud cutter for engraving? If you are talking about the o-flute you will need a much smaller one than they make for doing the lettering. One like I posted or some v cutter will get you the best results on small fonts. Are you going to try the engraveable laminate? One sheet for under $100 will do the who cockpit, seems cheap to get the best results after spending so much on a CNC to be able to make them :) -
Question for panel makers - engraving.. how do you do it?
metalnwood replied to Devon Custard's topic in Home Cockpits
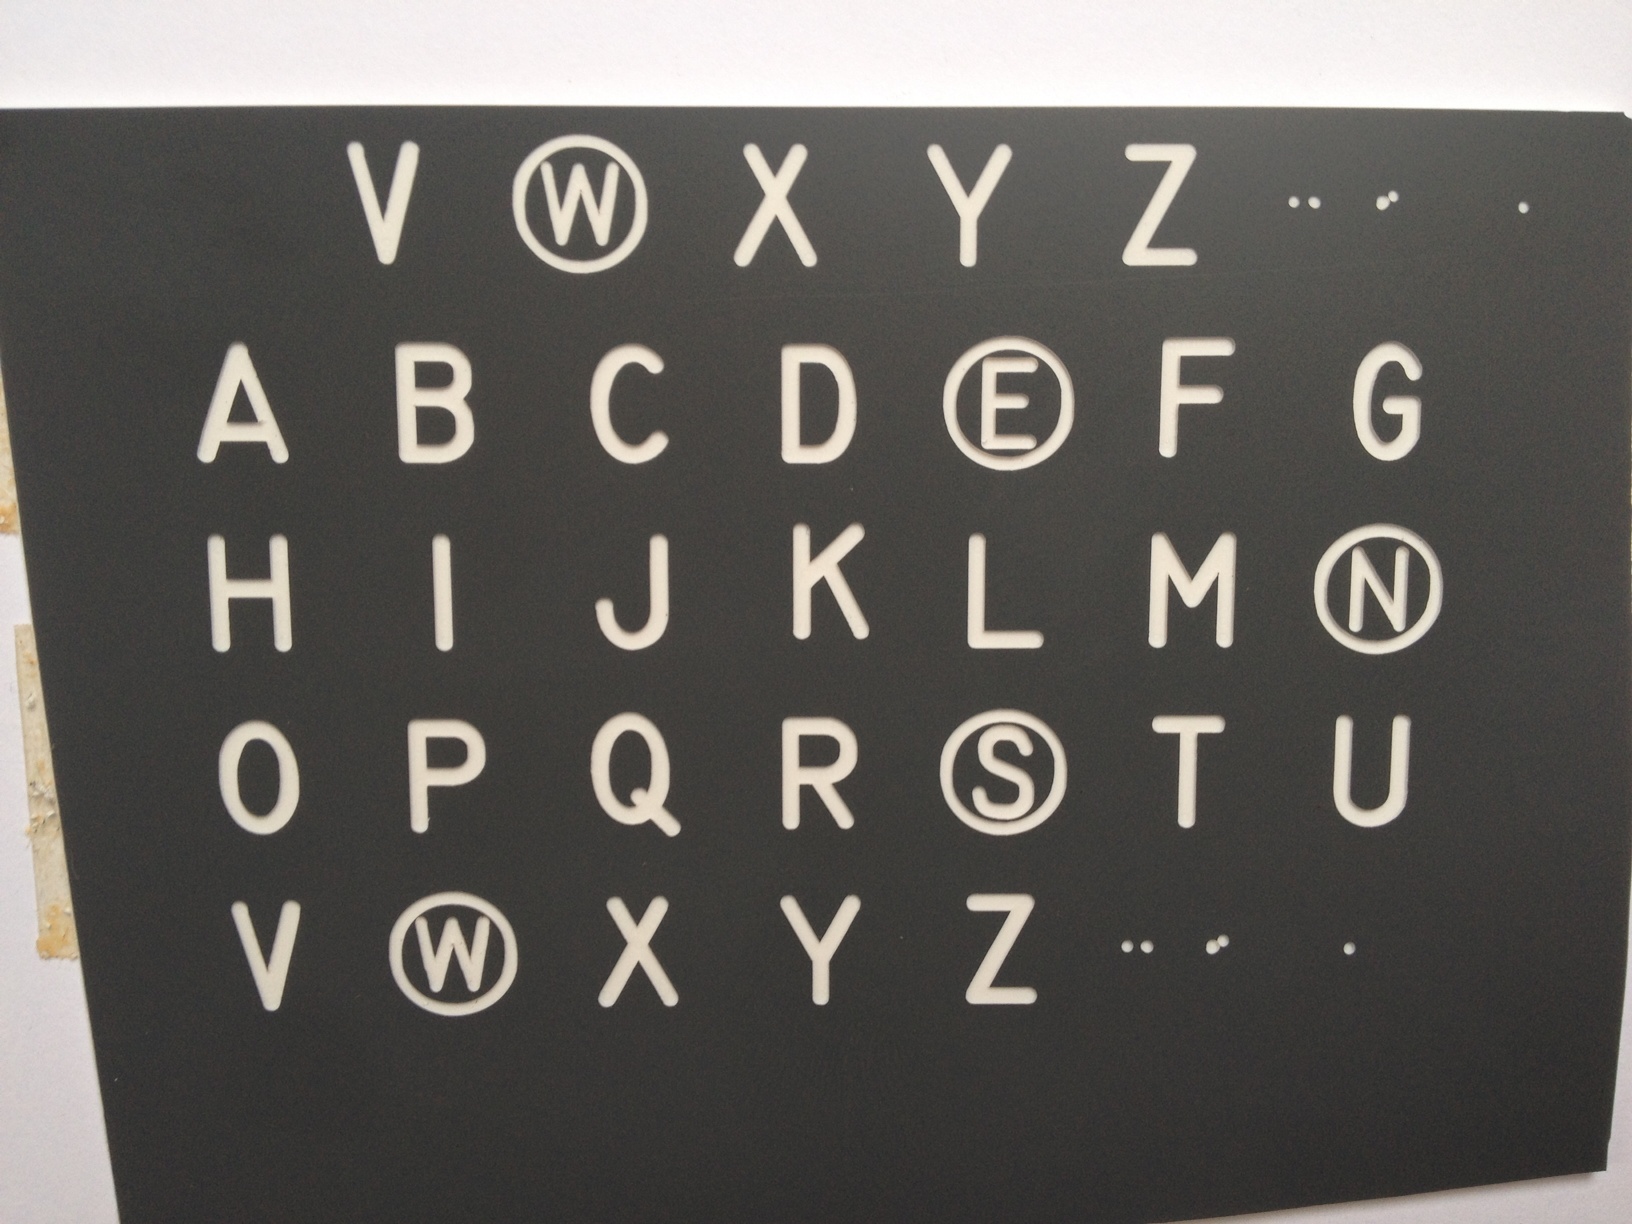
John, that is the MS33558 mil spec truetype font. Because of the small engraving bit I programmed the engraving via pocket operations, at most it was just two passes to fill in the area. Aint double sided tape our best friend :) It pretty much gets use on the router, the lathe, the mill, pretty much anything :) It's excellent stuff for the cnc when you don't want or cannot have something holding the work getting in the way. My router has a vacuum table but if you want to do any reasonable cutting operation the pice has to be at least ~300x300 to hold well enough. It is over a 2500x1300 bed though, in the future I might make a small one to hold things like this as well. -
Question for panel makers - engraving.. how do you do it?
metalnwood replied to Devon Custard's topic in Home Cockpits
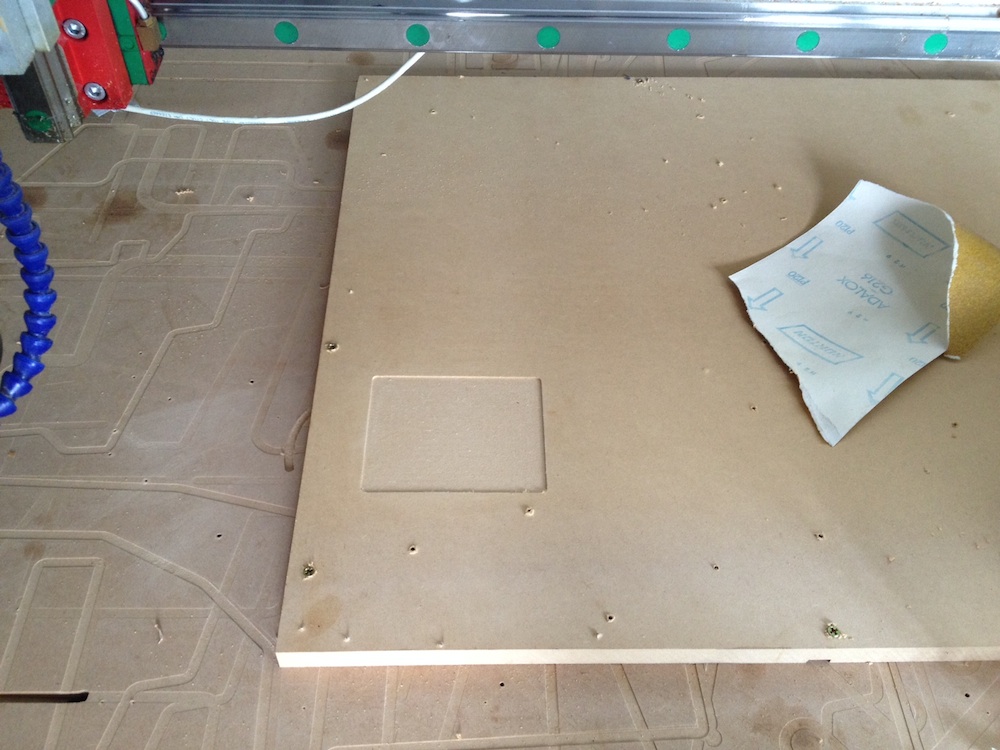
I had a play on one of my machines just now. Here are the results… Against advise I might have said in the past I now don't have any hesitation about doing rotary engraving for panels compared to a laser, once again this is because of the generally small type we are using without large fill in areas. So Steve, here is the output I achieved doing a couple basic steps… One, surface an area so that there is a properly flat pice to put your panel on. Any variation in height can show up as uneven text in the engraving. I just run a small pocket routine and then put some double sided tape down to hold the piece. I used a cheap engraving tool that you would buy in packs of a dozen or so. 1/8th" shank, 0.02" radius on the end. I attached a full size of the result. These are letters for the CDU so they are the actual size of cdu letters, slightly larger than panel text. The bottom three lines are done with a depth of 0.2mm or 0.008", they are a bit too deep for keys because you can feel them. The top line is 0.05mm deep or 0.002" deep. The result is good but you can see the circle around the W is not quite perfect, this is because at this depth I am finding the unevenness of the surface. 0.07mm wold probably do fine without looking like the engraving is deep. So yeah, if you think you can get more from a cnc router then go for it, the engraving should be fine.
-
Question for panel makers - engraving.. how do you do it?
metalnwood replied to Devon Custard's topic in Home Cockpits
Steve, here is a program with a months free trial. As you get familiar with feeds and speeds it will give you an excellent idea of what to use for different cutters on different materials. http://www.cnccookbook.com/CCGWizard.html It can certainly help you save that small bit that run to hard and at the same time let you run that small bit as hard as it will go without breaking it. A lot of people are fairly timid on the speeds they go for after breaking a bit or two but then they never get the idea chip load either. -
Question for panel makers - engraving.. how do you do it?
metalnwood replied to Devon Custard's topic in Home Cockpits
The o-flutes work very well on acrylic, they sell them with a slightly different geometry for aluminium as well and they work nicely too. I find I don't need to use any coolant for acrylic, as Gene says, get the chip load right and you will not have any issues with melting, this is where the o-flute helps with a fast turning spindle. Aluminium is the only thing I mill on a router where I use my mister, not flood coolant, to help keep the cutting edge clean. -
Question for panel makers - engraving.. how do you do it?
metalnwood replied to Devon Custard's topic in Home Cockpits
Yes, I never liked CNC engraving because one the fonts got too large the quality suffered when your engraving tool had to do multiple passes over a wide area. Today I was at a community workshop helping them get a CNC working and one of the guys there was wanting to make panels for a flight sim. When working with small text as usual on a panel, e.g. ~ 5mm high and it was able to be done in single passes the quality was great provided proper rotary engraving material was used, in this case I brought some gravoply. Acrylic would not be my ideal medium for rotary engraving. I would definitely spend the money to get good material for rotary engraving when you want nice crisp lettering. -
Question for panel makers - engraving.. how do you do it?
metalnwood replied to Devon Custard's topic in Home Cockpits
I played with rotary engraving over the last couple days helping someone out on their machine. I now have to say I would have no problems at all using it instead of a laser. This is for the smaller text usually found on panels like we have. A laser is def better when there are larger areas to be cleaned out but what I have just seen I could easily live with it. This machine did have a special attachment for engraving and it would be important on a router to have a dead flat surface to get the results I achieved. It can certainly be done though -
Question for panel makers - engraving.. how do you do it?
metalnwood replied to Devon Custard's topic in Home Cockpits
I can't see what tool you are using, ebay is having a freakout for me. 1mm, or 0.04" is very deep for engraving so that will cause you some grief. This si the kind of bit made for engraving, they are cheap as chips. https://www.google.co.nz/?gfe_rd=cr&ei=C8F_U6eQLIn8mAWRnYDADw#q=cnc+engraving+bit glick on the images to see a page full of them. Edit, here is a youtube of a small router using one for a pcb https://www.youtube.com/watch?v=TYAfNTvgTak at the very end you can see a part next to the track that is 2mm wide for reference. -
Question for panel makers - engraving.. how do you do it?
metalnwood replied to Devon Custard's topic in Home Cockpits
They will not cut stone but they can engrave on to stone, tiles, glass etc. -
Question for panel makers - engraving.. how do you do it?
metalnwood replied to Devon Custard's topic in Home Cockpits
The last pricing I got from them was $2300usd for this http://www.wklaser.com/pro_180.aspx $1800usd for this http://www.wklaser.com/pro_180.aspx $2500 for this http://www.wklaser.com/pro_180.aspx Then there is shipping. It cost me 300USD from china to New Zealand + any other costs on your end. I can't comment on the one you posted above Steve but I can say it looks like it comes with what is required so you should be OK. I would really suggest getting the additional cooler. These lasers need to be plumbed in to a cool water supply that is continuously running and these do a good job of it. What I can't say about it is where it came from or the overall quality of the build. I do know lots of people with the G.Weike and it is right up there with the best chinese lasers for build. You would have to work out if it's cost effective to bring one in. In NZ, bringing one in was the only way because we don't have guys selling them with little markup, more like 100%+ markup. They are easy to look after yourself. There are a few things that can break and they are replaceable. If something is likely to break it will be the tube or the power supply. I also ordered spares for these parts but you can probably get replacement parts close by, e.g. the supplier you listed as they are all basically the same things. -
Question for panel makers - engraving.. how do you do it?
metalnwood replied to Devon Custard's topic in Home Cockpits
I got this one http://www.wklaser.com/pro_195.aspx Have a look at what they offer under laser engravers. I will see if I can dig up some prices I had to give you an idea. -
Question for panel makers - engraving.. how do you do it?
metalnwood replied to Devon Custard's topic in Home Cockpits
Off the top of my head, not sure. $2k is a little below getting a machine that will pretty much run without any coaxing. For any reasonable price you are looking at a chinese laser, not an epilog or similar american/european brand. Whatever you do, do not run off and buy a cheap desktop one off ebay until you fully understand what will be required to make it work. Search back for some posts about lasers and see what it took Gadroc to turn his cheap one in to a properly working one. From memory it cost about the same as the base machine in upgrades. -
Need a little advise on a simple project
metalnwood replied to the_soupdragon's topic in Home Cockpits
Soupdragin, Leo is so close to you though! He has the BBI32 board for 20 pounds but requires soldering. He also has the same one with no soldering required for 32 inputs. You can attach buttons and rotaries to it. If you do not require pots then this is a good board with lots of inputs. A rotary can turn infinitely in either direction end every time you turn it one increment it gives off the same as one button push. This is good for something like tuning a radio where each time you turn it a little you want the game to increment the freq up a notch. The majority of controls are rotary rather than requiring a pot. -
Question for panel makers - engraving.. how do you do it?
metalnwood replied to Devon Custard's topic in Home Cockpits
Gene, I think on the epilog you set the DPI, on these machines the scan gap another way of essentially saying this. It's the gaps between the lines when doing the engraving. E.g. 0.085 is the same as 300 dpi, 0.05 is the same as 500dpi. -
I painted mine so I am not sure how much light would be shown from the white side of the panel but I don't remember ever seeing backlit panels with the inside cuts showing up so for that reason I would paint them.
-
Question for panel makers - engraving.. how do you do it?
metalnwood replied to Devon Custard's topic in Home Cockpits
I never found the scan gap to interfere with things to much. Just set your scan gap and test for power and speed to get you where you want to. Make sure focus is OK first. -
Question for panel makers - engraving.. how do you do it?
metalnwood replied to Devon Custard's topic in Home Cockpits
You shouldn't get melting paint and a bad finish because of it. You should just get vaporised paint and something is not right otherwise. Like Gene said most people I have seen work with paint, professionals, not just hobbyists will only try to remove a layer or two of paint, as little as needed to get to the other colour layer below. Lasers and cnc mills both have pro's and cons. Thats why you need both :) -
Question for panel makers - engraving.. how do you do it?
metalnwood replied to Devon Custard's topic in Home Cockpits
Cut2d will do everything that you need for panels, it's missing the v-carving of vcarve pro but that is something that is usually used for decorative woodworking. cut2d has a demo which is limited but it might give you an idea. Steve, if there is something you want to try using cut2d you can give it to me and I can create the tool paths and geode for you. I will do it from vcarvepro but it will be the same output that cut2d will produce. It's important when doing rotary engraving that you have a flat area so make sure that your table is surfaced properly. It wouldn't be a bad idea to put down a small piece of MDF and surface it then put your panel on top to ensure it is as flat as can be because your engraving bit has a small tip and differences in height can show up as uneven engraving.