
DD_Fenrir
-
Posts
2064 -
Joined
-
Last visited
-
Days Won
3
Content Type
Profiles
Forums
Events
Everything posted by DD_Fenrir
-
Good shots of the old Flying Control Building (and a nod as to when the later example appeared):
-
In reference to my speculation of the location of the Sergeant's Mess at Biggin Hill (North side of A233 opposite the collection of Barack Block Type 'B') it's layout closely resembles that at Duxford, specifically the one identified as Building 106: http://www.ukairfields.org.uk/duxford.html
-
And a view of some of the buildings immediately south of it: https://www.google.co.uk/maps/@51.3291653,0.0247734,3a,22.1y,191.01h,91.5t/data=!3m6!1e1!3m4!1surYZBabHyKXW2vcXdt7rxA!2e0!7i16384!8i8192?hl=en-GB
-
The guardroom: https://www.google.co.uk/maps/@51.3291469,0.0246325,3a,24.9y,207.68h,88.39t/data=!3m6!1e1!3m4!1sia3Abh4-fgfjj3397kEUkw!2e0!7i16384!8i8192?hl=en-GB
-
It should be noted that the Barrack Block Type B, long can be found here on google street view: https://www.google.co.uk/maps/@51.3296032,0.0263579,3a,75y,181.38h,91.64t/data=!3m6!1e1!3m4!1s2KCm_cbs76K_B8NfjuPLDQ!2e0!7i16384!8i8192?hl=en-GB And that the one noted as having a single wing similarly: https://www.google.co.uk/maps/@51.3297528,0.0265215,3a,90y,103.81h,91.75t/data=!3m6!1e1!3m4!1s5nZnt0nwIWTxQhXT-thbeA!2e0!7i16384!8i8192?hl=en-GB Here the north blast entrance to what I have tentatively ID'd as the Decontamination Block (or Ops Room?) and the North side of what I have suggested could be the airmans dining hall. https://www.google.co.uk/maps/@51.3292795,0.0255412,3a,75y,172.39h,90.58t/data=!3m6!1e1!3m4!1sT1dWpzUgnCEIinCdOJm3mQ!2e0!7i16384!8i8192?hl=en-GB
-
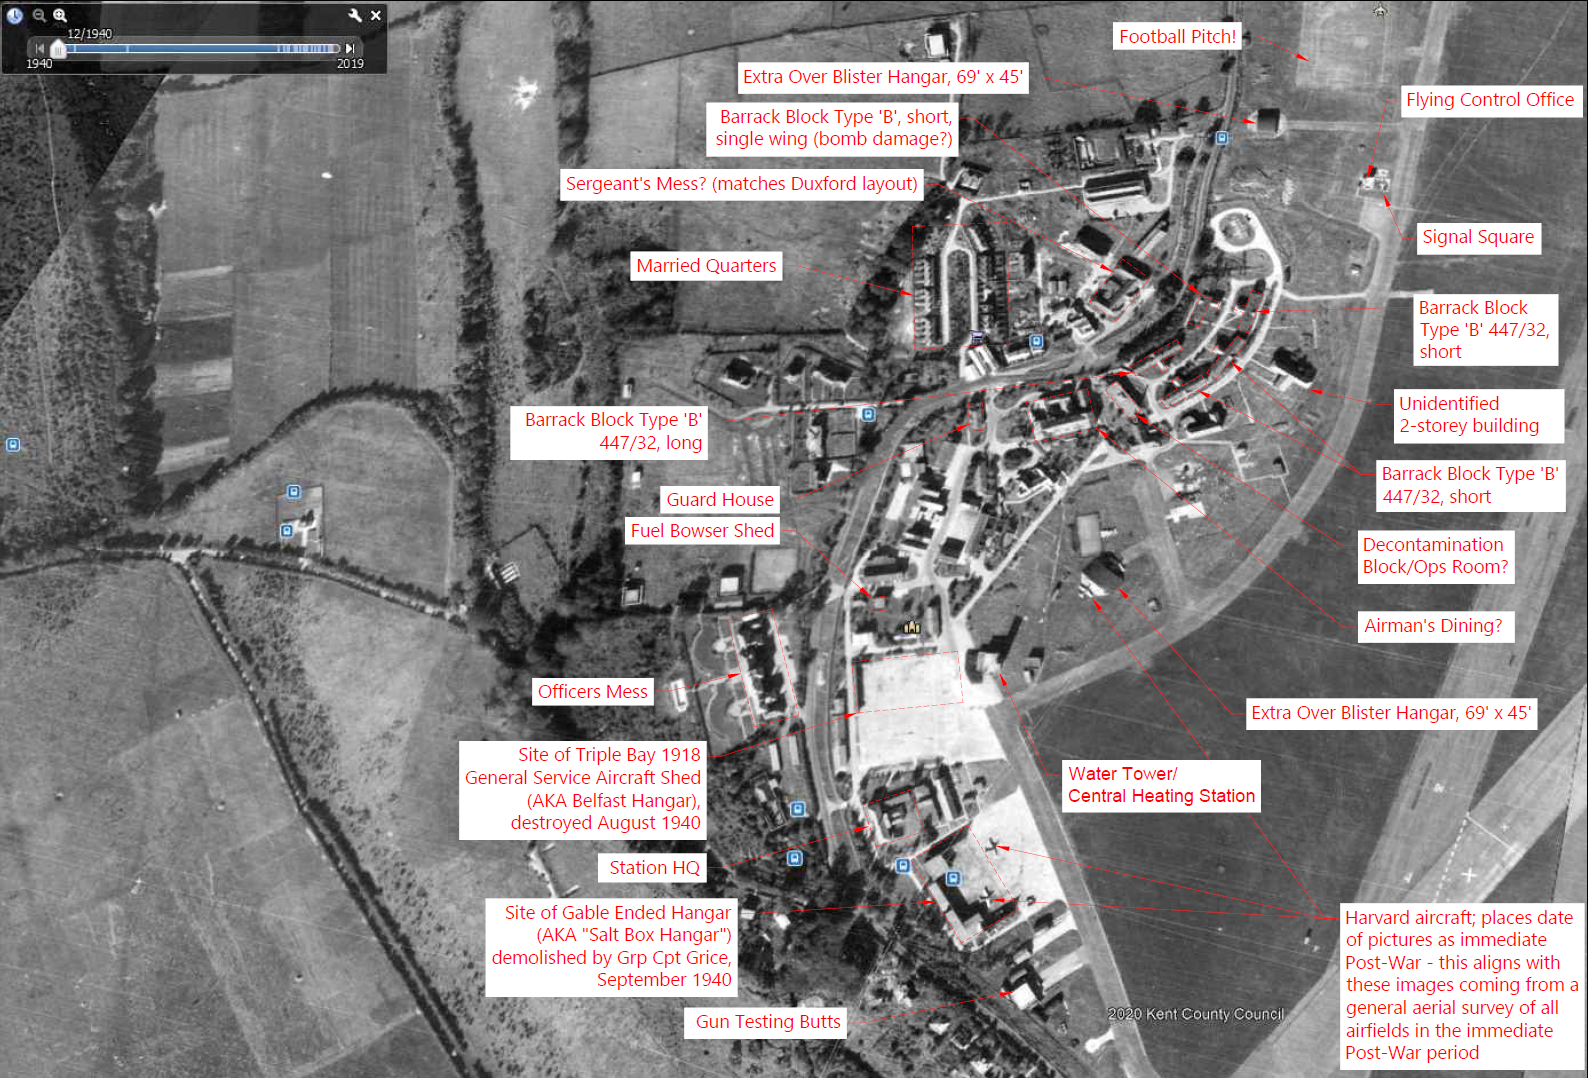
The newer annotated version of the site map plus has been uploaded to the edited post here: https://forums.eagle.ru/showpost.php?p=4491668&postcount=8 with the zoomed in view of North Camp Area attached to this post, with other buildings positively identified and some tentatively suggested.

-
This site is for Duxford but many RAF buildings were built to common designs and given that they share a very similar chronological history, it is likely that nearly identical buildings appeared at Biggin Hill. http://www.ukairfields.org.uk/duxford.html Furthermore, I believe I have been able to identify many buildings on the Google earth "1940" period image that closely correspond to the layouts and formats of some of those identified in the Duxford sites. I will provide a clearer annotated map of the airfield shortly with a zoomed in view of North Camp area detailing some of those similar buildings.
-
Typical Allied dive bombing tactics of WW2 - and you'll need to dive bomb as the only bomb fuses currently available are instantaneous - involved rolling in from 6,000 to 10,000ft in a 45-60 degree dive and releasing somewhere between 2,000 to 4,000 ft. Sounds impossible? Actually with practice you can land bombs reasonably consistently using this method, provided you do three things: 1. Be as consistent as you can with your dive angle - if you make one pass at 36 degrees, the next at 60, and a third at 80 you will struggle with knowing when to pickle the bombs during the pullout because the ballistic arc and time of flight of the bombs will differ in all three cases. If you can make the trajectory of your dive consistent you will start to see your craters falling in specific offset ref the target and can start to adjust your bomb release point to compensate. 2. Rudder rudder rudder RUDDER! Trim is of the essence here; as you dive you build airspeed; as you build airspeed your directional trim changes, requiring increasing left rudder to compensate. If you do not do this the bombs do not fall the direction you are pointing and you miss the target to the left usually. 3. Make your attack run either into or out of wind. It is far easier to make adjustment for longitudinal wind by either delaying or preempting the drop point than trying to make lateral aiming point corrections for wind whilst in the dive.
-

Odd things in Spitfire handling on my sys
DD_Fenrir replied to Finnster's topic in PC Hardware and Related Software
Hi Finnster - depending on your gaming hardware you'll probably find this post of assistance: https://forums.eagle.ru/showthread.php?t=260949 Hope it helps. -
Video taken at Biggin in 1943: I believe this is taken at the E Pen adjacent Old House Farm, as notice the hay shed in the background - also bear in mind the cameraman would have wanted good light from the south, and as this pen is southerly facing that would assist in getting good light on his subjects.
-
Looks like the large building to the left of the picture is a Side-opening Aeroplane Shed: https://www.abct.org.uk/airfield-buildings/hangar-types/
-
Officers Mess (Western side of A233 opposite the site of the 3 bay Belfast hangar destroyed in 1940): https://www.facebook.com/KentsHistoricalSites/photos/officers-mess-at-the-former-raf-biggin-hill/1561098867249517
-
Detail of a dispersal hut at Biggin Hill: http://www.mfryer-architects.com/biggin
-
The second extension to the SSW-NNE (206-26°T) seen on some maps/plans was created in 1957 according to this source: https://www.pastscape.org.uk/hob.aspx?hob_id=1385321
-
I have been attempting to marry some photos showing buildings with their position on the field. I believe this image: is located here:
-
The station HQ and a grainy shot of the Gable ended hangar just prior to Group Captain Grice's decision to demolish it: http://www.bigginhill-history.co.uk/rafhq.htm A good modern shot of the HQ building: https://www.geograph.org.uk/photo/4156308
-
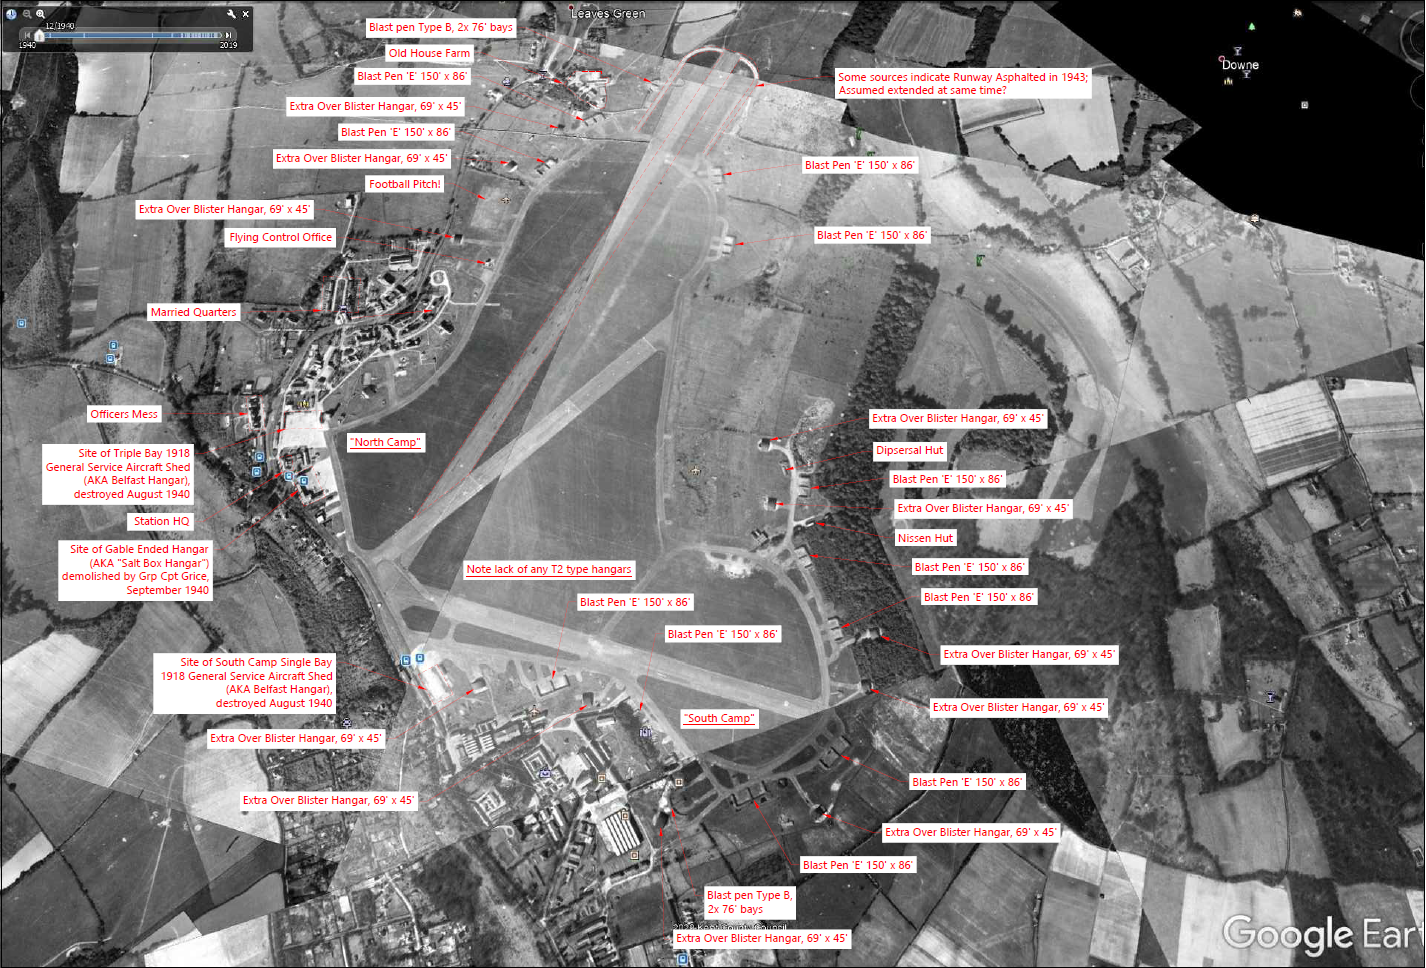
I've been cross referencing as many photos and sources as I can and I believe that Fred901s post here: https://forums.eagle.ru/showpost.php?p=4368766&postcount=3 Contains the most accurate late war layout that we have seen thus far; any later imagery appears to be from the '50s and '60s, with T2 hangars having been erected in multiple locations and a variety of civil & GA aircraft (including a Lockheed Constellation) appearing on the images. I attach an annotated version describing some of what can be seen:
-
Good look at the blister hangar types that predominated at the airfield after the summer of 1940 when the Luftwaffe blew up the Belfast-truss types that it was built with originally: https://www.iwm.org.uk/collections/item/object/205212731 https://www.iwm.org.uk/collections/item/object/205210839
-
Wow. So many of you who've never ever seen the cockpit of a real Hornet let alone been in the position to use a HARM so quick to assume that it's implementation is inaccurate based on a single F-16C video. Well done gents. No, really.
-
Pimicelli is right in principle - though perhaps would be better to rudder trim is useless in all sims not just DCS. This is because we have no air load that can be transmitted through our rudder pedals. The most important thing to understand is that rudder trim has absolutely no effect on the total amount of rudder authority; this is restricted by the size, shape and limits of travel of the rudder. Trim cannot increase this. Trim simply allows you to set a dynamic 0 foot force position for making flight comfortable or in the case of take-off, easing foot load and allowing better control. As such, unless you own force feedback pedals, use of rudder trim would not be that beneficial.
-
I don't think the take-off difficulty is realistic.
DD_Fenrir replied to sandcat's topic in DCS: Bf 109 K-4 Kurfürst
Source? Conditions? Your reaching. Again. No intentional about it. We are discussing takeoff characteristics. In any case you are using an unquantified subjective opinion to support an argument based on your own subjective interpretation. There is no data to compare, ergo it is irrelevant. Let's leave that for an appropriate topic, hmmm? Again, this is not the topic for it, and in any case it could be there is a difference between a G-10 and a K-4 that accounts for this. The MW-50 tank springs to mind for one. I highly doubt that modern restorations fly with this filled. You will have to ask Yo-Yo. I used the G-10 a stand-in in the case of the directional characteristics on takeoff as the vertical tail format is virtually unchanged and horsepower, wing planform and undercarriage geometry are very similar for the two aircraft, and a far closer match than the earlier G variants referenced in your videos. -
I don't think the take-off difficulty is realistic.
DD_Fenrir replied to sandcat's topic in DCS: Bf 109 K-4 Kurfürst
Enough to get on and off the ground without inducing the "FM bugged" hysteria you seem to suffer with. Clue: "Tail is coming up now, and the rudder is becoming effective." Kind of insinuates that it wasn't very effective beforehand, n'est pas? As for roll rate, seems to marry pretty much with what most contemporary pilots describe; faster then the Mustang, similar to the Spit. I get good roll rates (particularly to the left) as long as I coordinate with a good bootful of rudder. This correlates to descriptions by by every pilots notes I have ever referenced regards flying the 109, of any variant - that is that good 109 flying requires good rudder work. This indicates a marginal stability around the normal axis. Which further indicates that Willy made the vertical surfaces as small as he dared and only increased them as a last resort and to the smallest possible area he could get away with. -
I don't think the take-off difficulty is realistic.
DD_Fenrir replied to sandcat's topic in DCS: Bf 109 K-4 Kurfürst
And... the Bf 109 is not a Spitfire. Control surface areas = different Vertical tail area = different Control surface moment arms = different Propellors = different Engine output = different Wing area = different Wing planform = different Tail wheel geometry = different Fuselage geometry = different Ergo, Reaction to torque forces on take-off = ....... Hazard a guess. -
I don't think the take-off difficulty is realistic.
DD_Fenrir replied to sandcat's topic in DCS: Bf 109 K-4 Kurfürst
Bearing in mind these reports come from pilots WHO HAVE ACTUALLY FLOWN REAL late Bf 109 variants. These tally with my experiences of getting the DCS 109 off the ground. In response you provide nothing more than a couple of videos which show competent experienced pilots who know how to take-off safely in the 109 to justify you claims that the 109 is wrong. And yet there are DCS pilots here, who have demonstrably proven that they are able to takeoff in the 109 without the level of drama and inaccuracy that you imply is inherent to the DCS 109. So it boils down to "you are doing it wrong". -
I don't think the take-off difficulty is realistic.
DD_Fenrir replied to sandcat's topic in DCS: Bf 109 K-4 Kurfürst
Further elaboration on a G-4 variant here: https://www.warhistoryonline.com/guest-bloggers/newly-restored-messerschmitt-bf109g-flies-test-pilot-shares-experience.html