
DD_Fenrir
-
Posts
2057 -
Joined
-
Last visited
-
Days Won
3
Content Type
Profiles
Forums
Events
Everything posted by DD_Fenrir
-
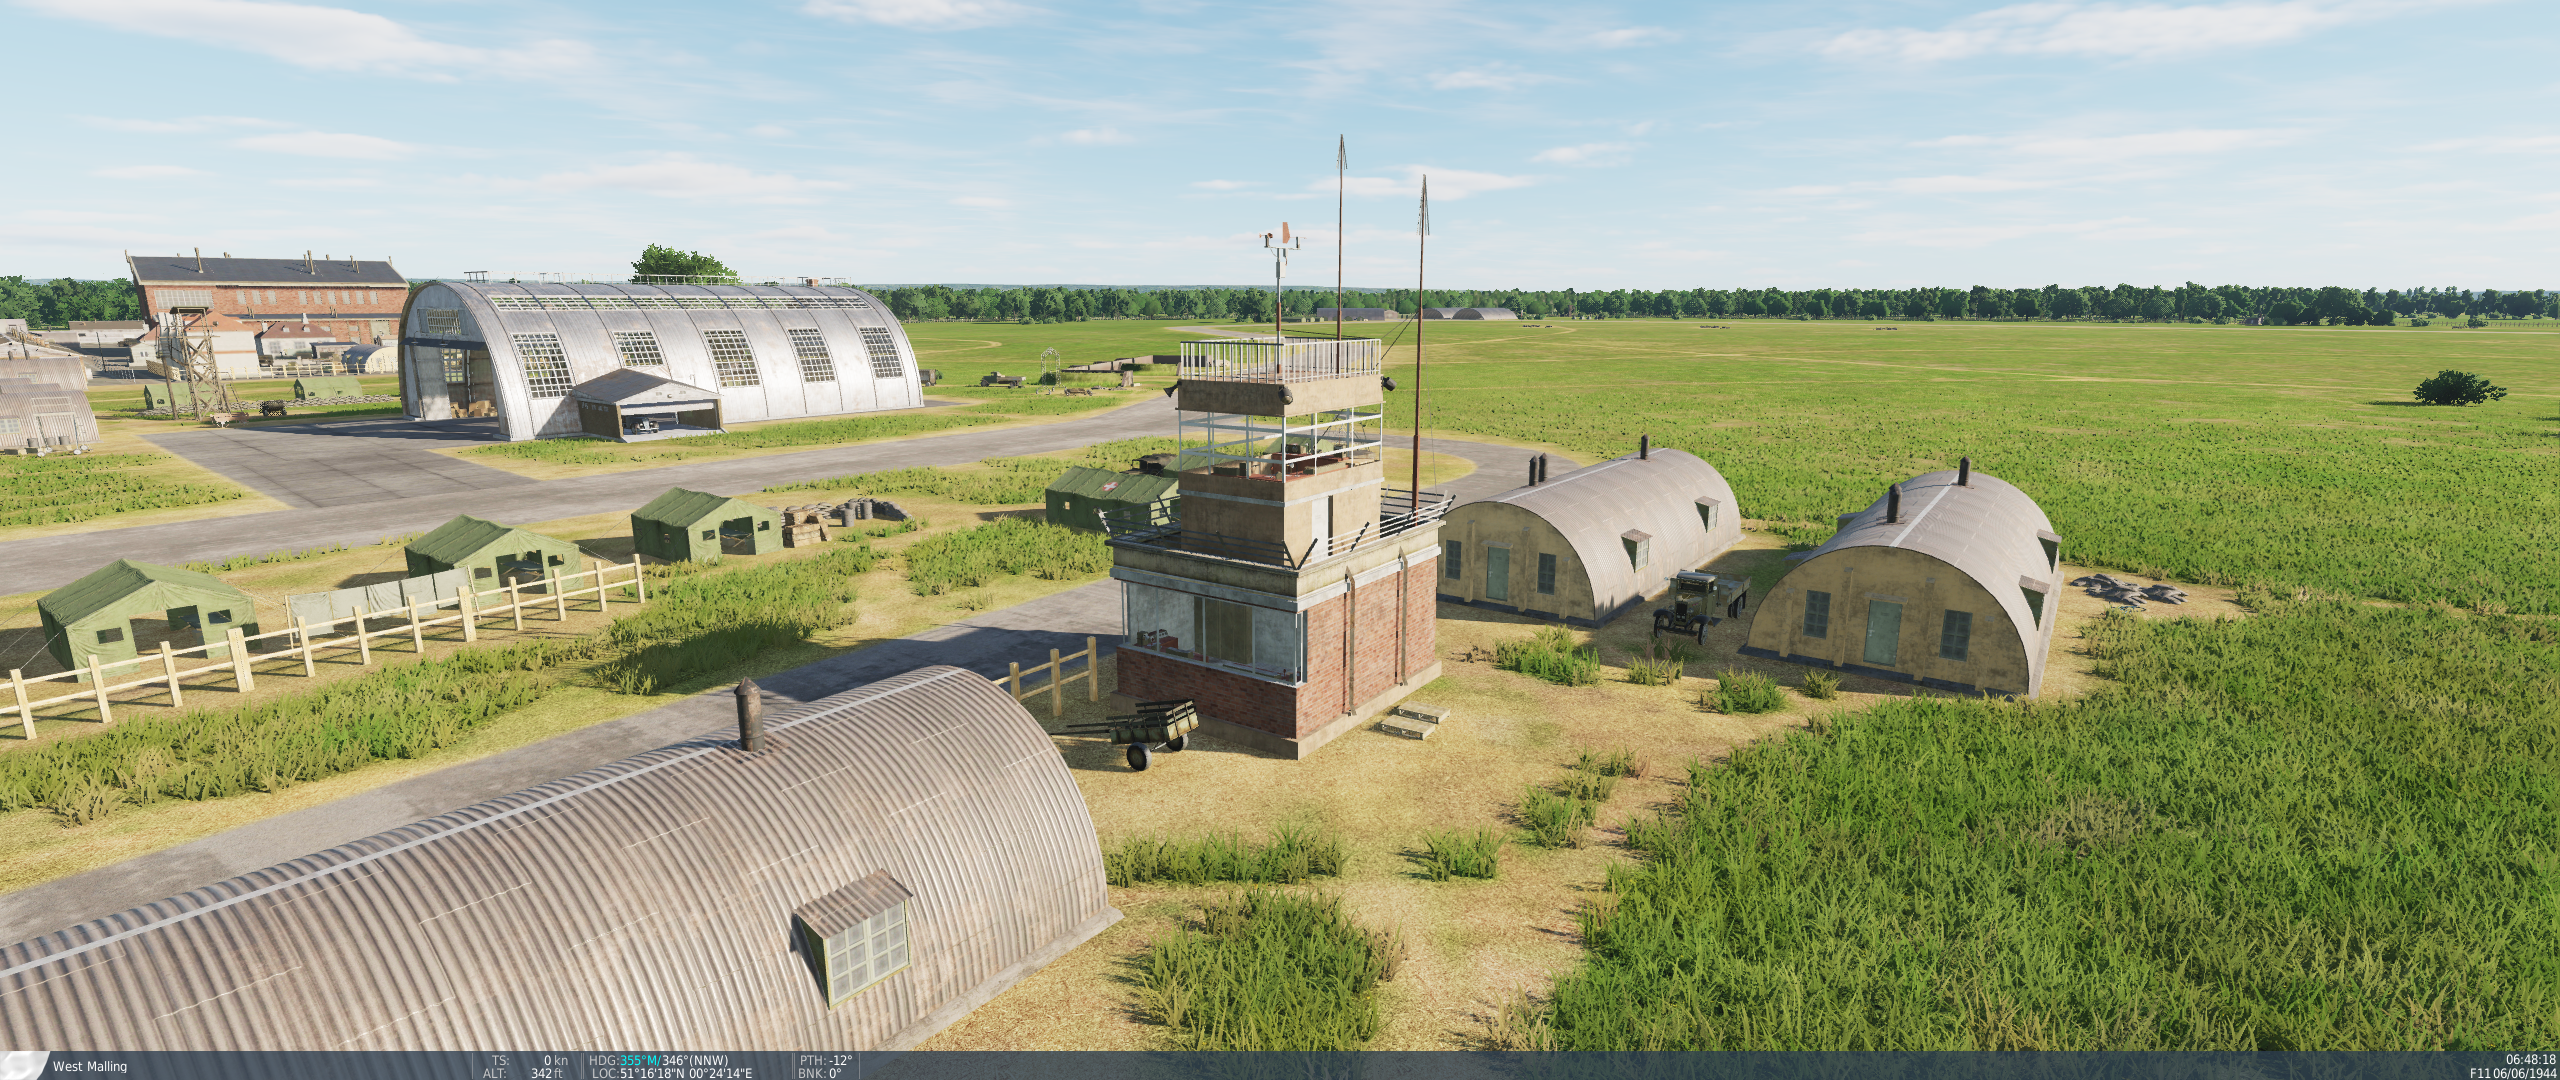
5. The stock permanent airfield control towers are not substantial enough. This is the stock example in DCS Normandy 2.0, shown here at West Malling but used as a generic type throughout the UK permanent airfields on the map: Compare it to these real examples: Elvington: Beaulieu: Molesworth: . Martlesham Heath: The actual West Malling Tower: Now, there are minor variations between these examples, with some having a glazed observation hut on the roof, whilst others do not, and the West Malling example being substantially more stylized with it's Art Deco detail flourishes, but to a building, they are a substantial two storey block with a balcony facing the airside of the field. In comparison: Doesn't this example feel a bit meagre?

-
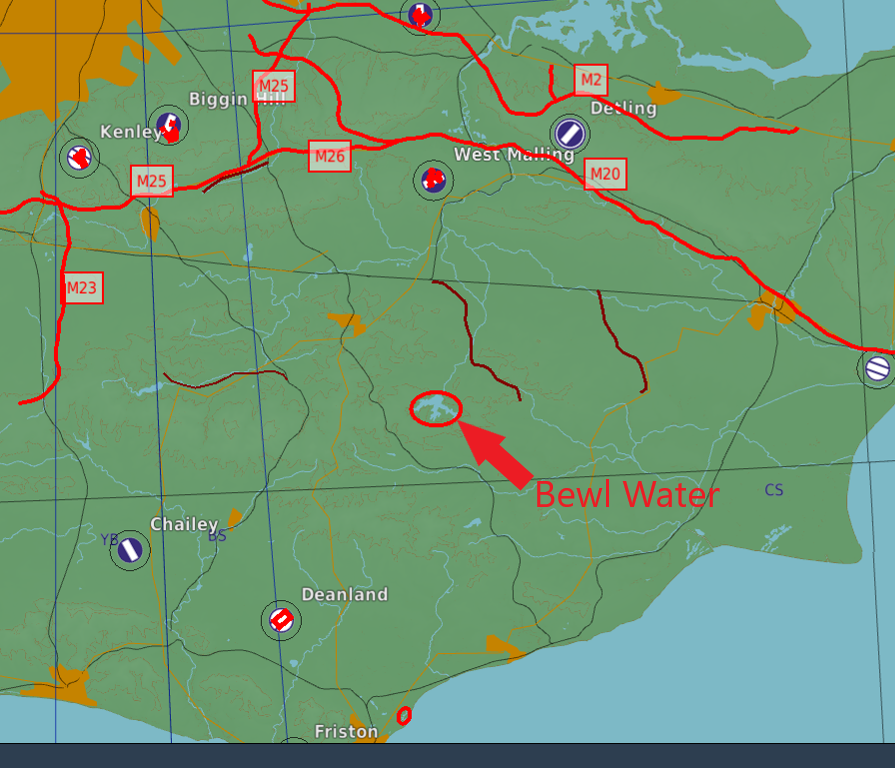
Bewl Water is an artificial reservoir located 10 miles East of Crowborough and 7 miles Southeast of Tunbridge Wells: Bewl Water - Google Maps It was created in 1973. It is however in evidence on the DCS: Normandy 2.0 map. Could we get this feature removed as it is obviously not appropriate for the time scale represented by the map.
-
- 3
-

-
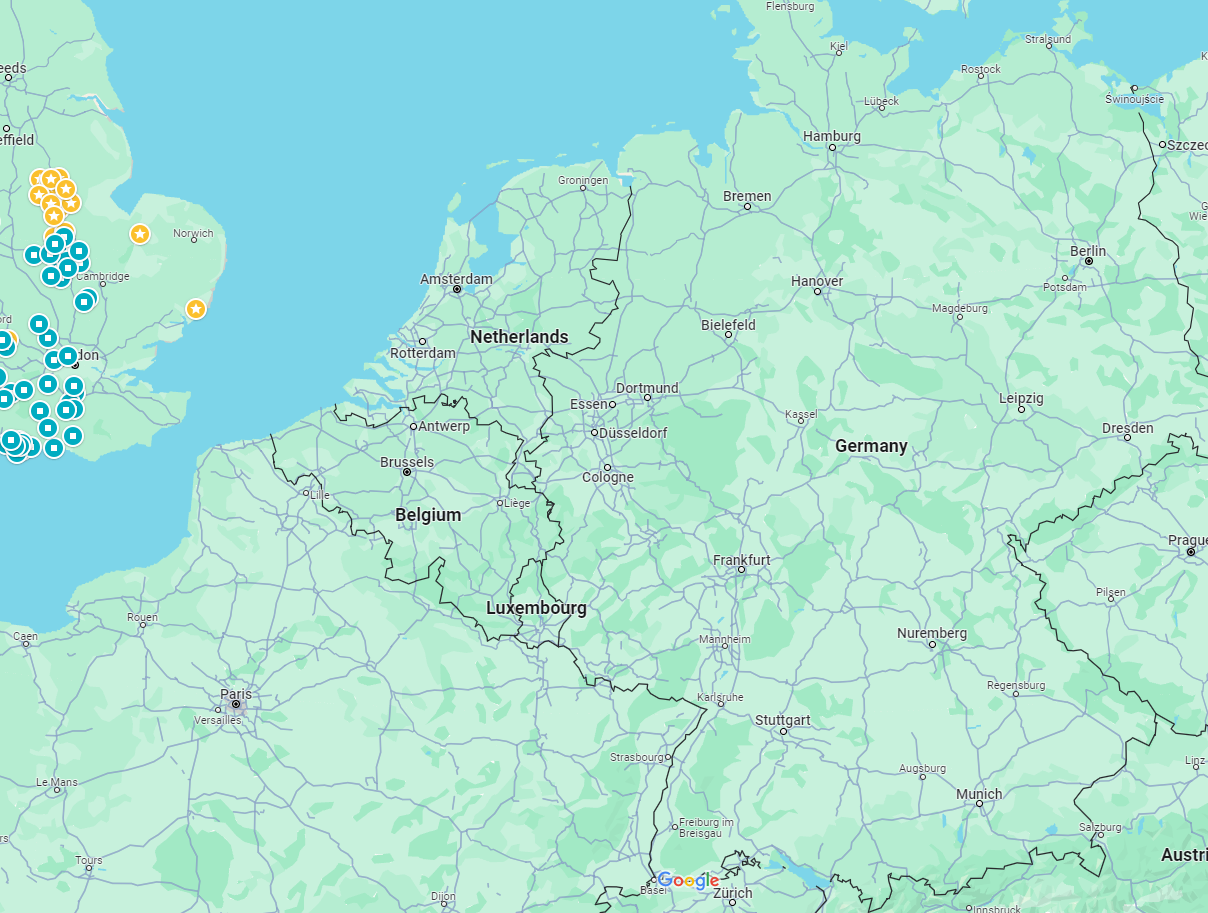
I have noted that the following post-war multi-lane motorways/freeway routes are shown in the DCS Normandy 2.0 map. These modern roadways do not reflect road routes that existed during the time period the map represents: i.e. these are not legacy roadways expanded into motorway/freeway sizes but rather are brand new road routes constructed from the 1950s to the 1990's. I have highlighted the road routes in red in the mission editor and labelled them as their modern equivalent IDs as appropriate. The miz file is attached. Normandy 2.0 Map Issues.miz
- 1 reply
-
- 2
-
-
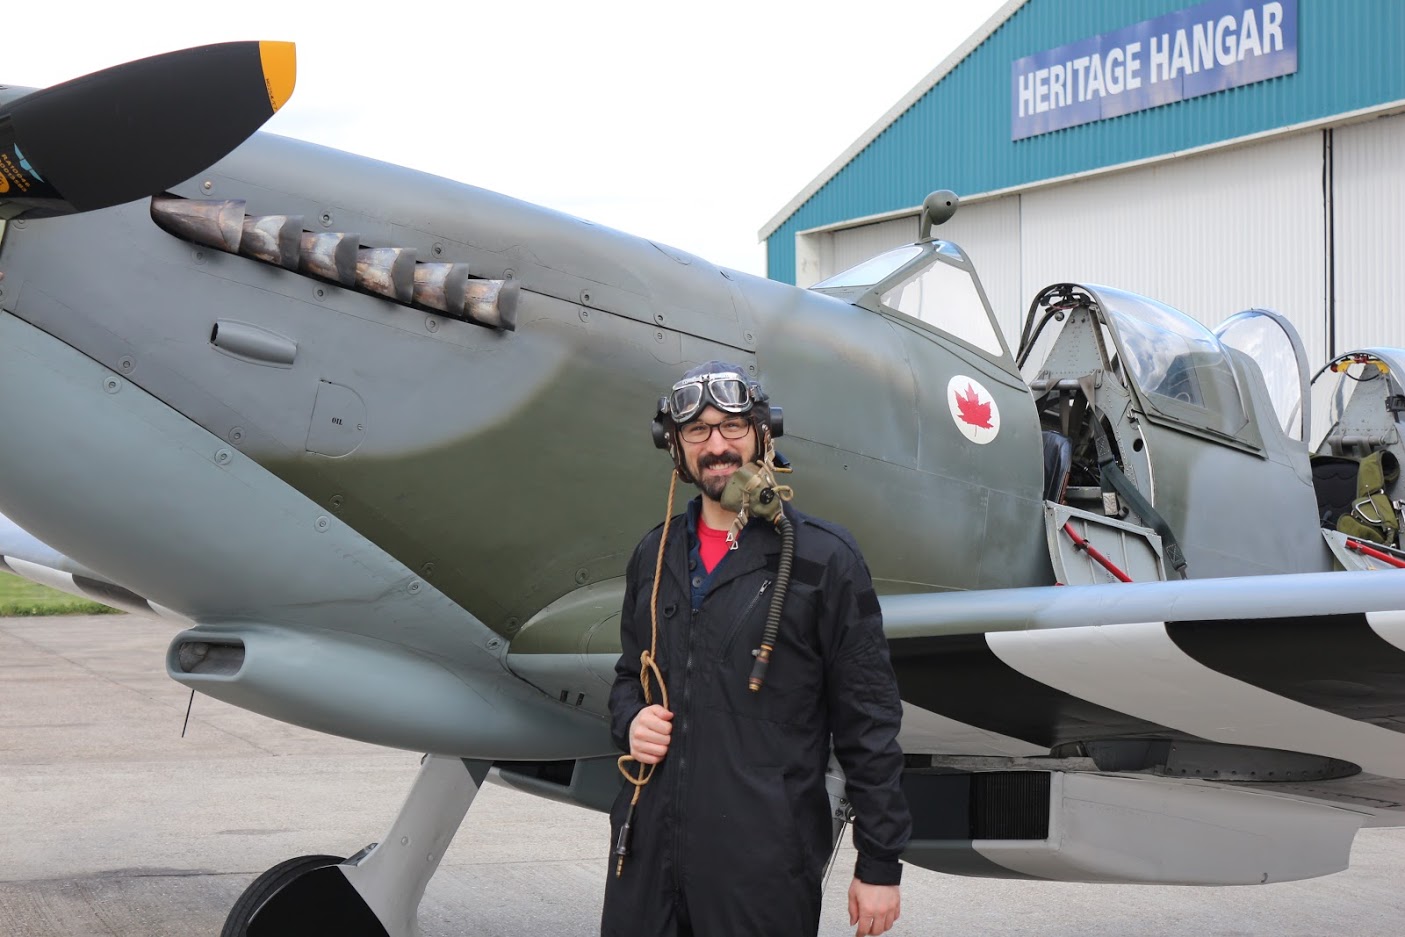
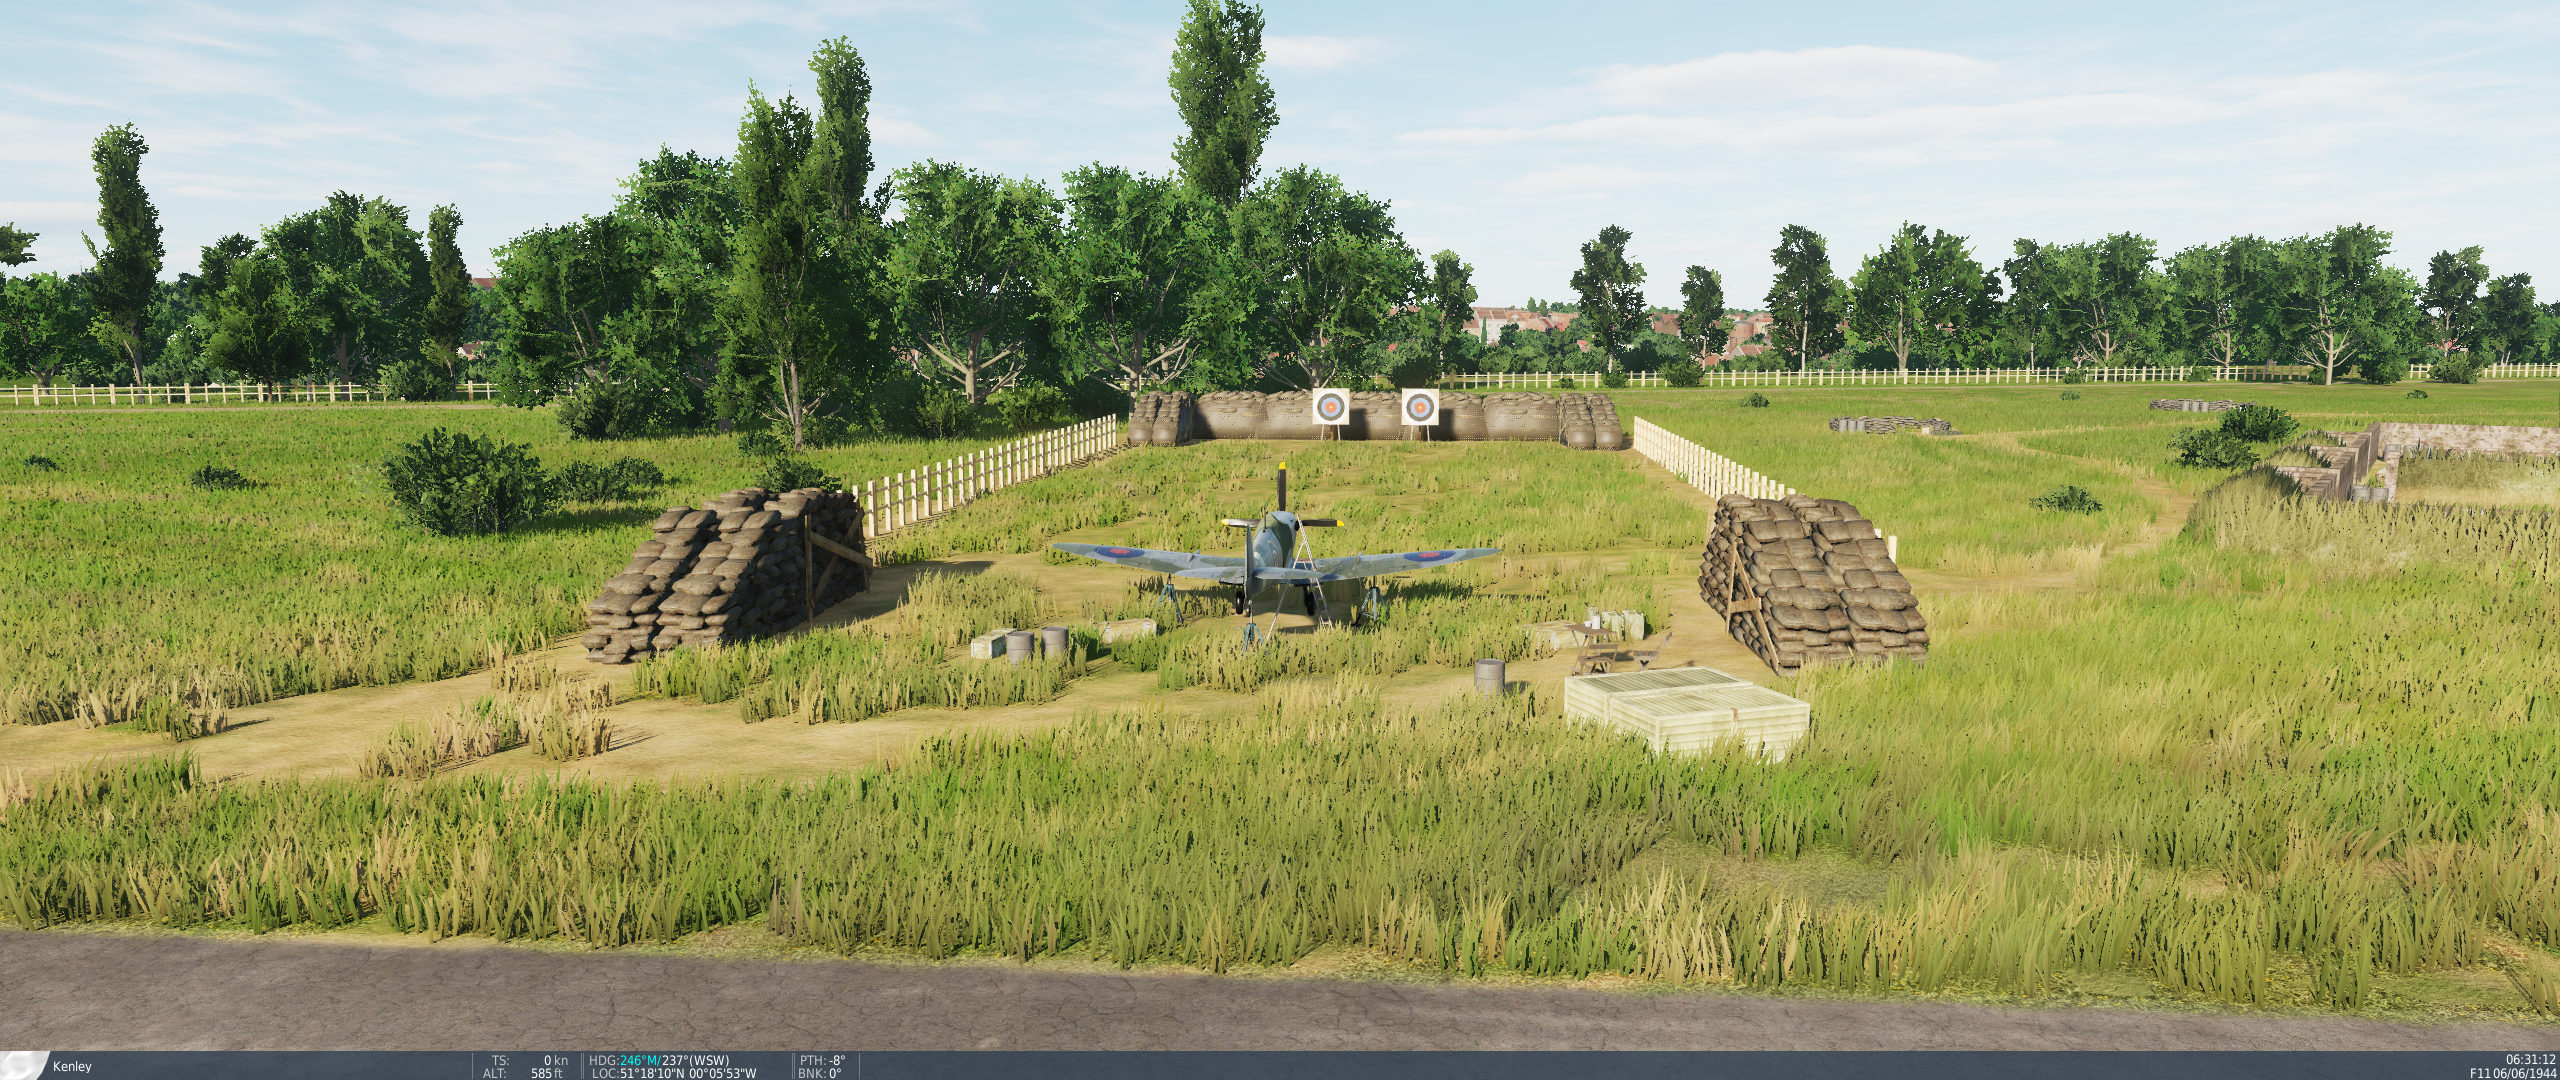
4. Airfield gun butts: Primary issue is the oversized archery style targets. Really? That's how we think guns were tested and harmonized in WW2? This was so NOT a thing. But the second issue is these really became irrelevant as the war progressed. Were there gun butts? Sure! Duxford has a brilliant example. These were found primarily on the large airfields, as pre-war built brick structures, with walls and partial roofs to catch stray richochets at a time when the biggest calibre was a .303. As the 20mm Hispano becomes more prevelant even these are found wanting and not sufficiently safe. Most gun firing tests are done on the bench on an indvidual gun. The only time aircraft were jacked up in such a manner was to harmonize the guns to ensure a good firing pattern, a process in which no live ammunition was expended. Here you can see a Spitfire in a blister hangar at Biggin Hill; the Erk on the wing is using a sighting periscope, slotted into the barrel of one of the .303s to try and boresight the barrel with the appropriate disc mounted on the white frame erected in the middle distance. This to me is representative of a systematic issue with DCS Normandy 2.0. It's a cartoon; an over-exagerrated pastiche of what was actually there. Too much "that'll look cool" and not enough "does this make sense?" And I understand why; in the past, many WW2 combat flightsims have felt sterile and without atmosphere in their airfield environments, and I applaud ED/Ugra for attempting to mitigate this and breathe some life into the ground environment. However, there are ways and means and currently DCS Normandy 2.0 it feels heavy-handed and clumsy. In the near future I will be submitting posts detailing the further issues at each individual airfield. Fair-warning: there are many unfortunately.
-
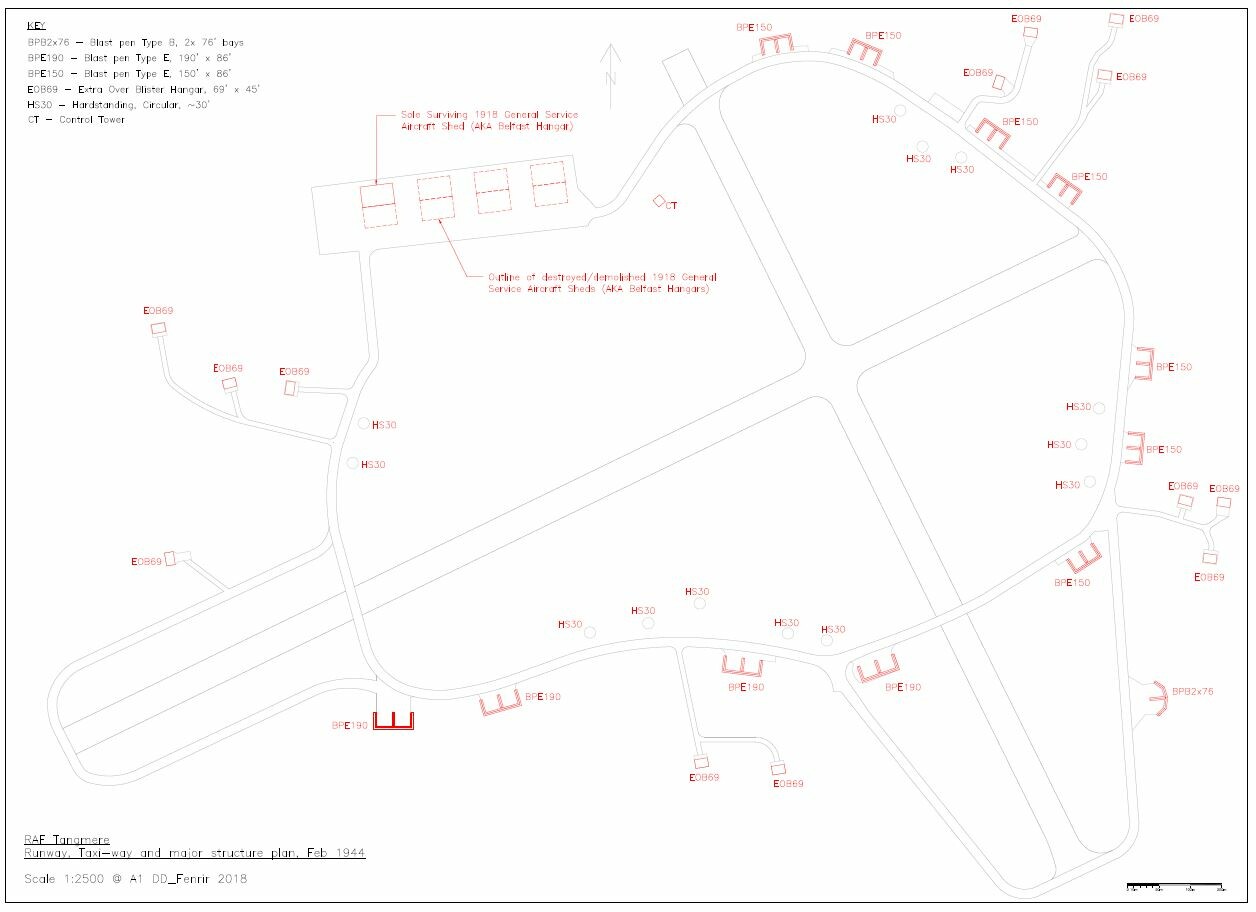
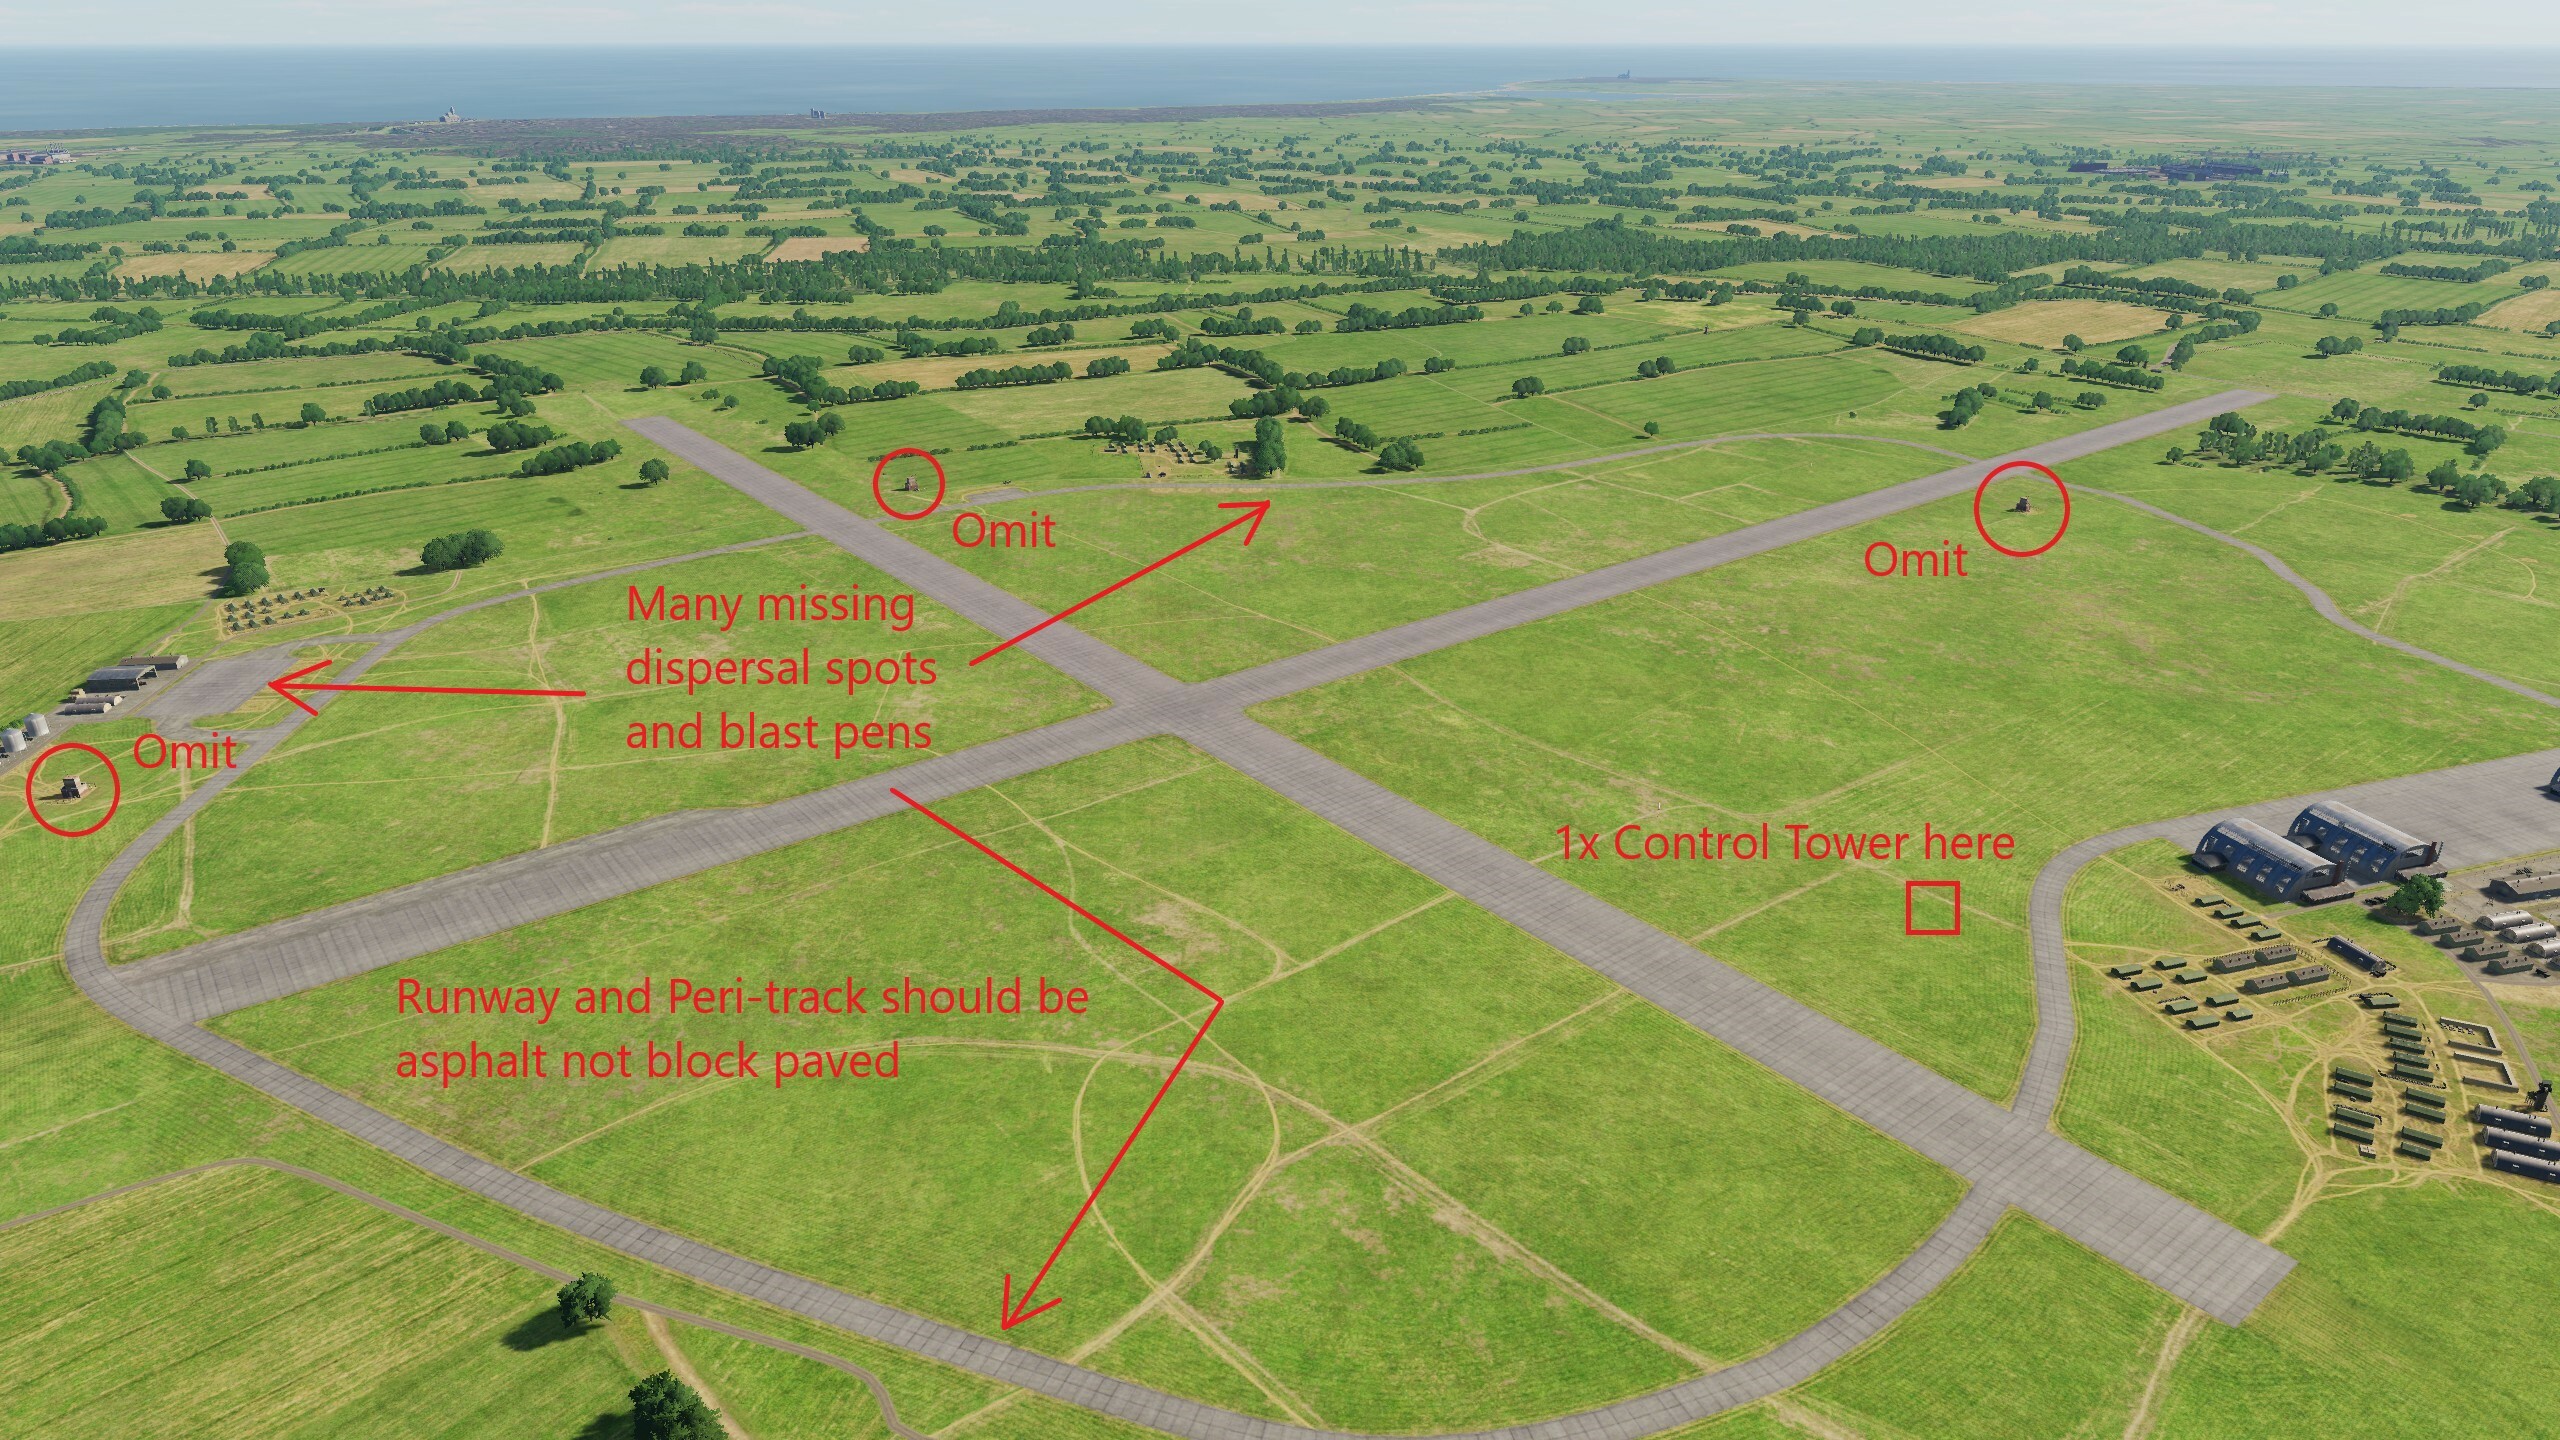
3. Over abundance of Control Towers. Current airfields affected: Tangmere, Ford, Kenley and West Malling. These airfields should have one Control Tower location; in the DCS Normandy 2.0 map they have multiple. Example: Tangmere - here is the layout in 1944; note the single Control Tower located on the North side of the airfield, East of the Hangar apron. In DCS Normandy 2.0: I appreciate this is an old In devleopment screenshot, indeed this mark-up I made I actually posted prior to release of the map but it (a) shows that despite the warnings the map was issued with this error still in situ and that (b) make it appreciated by the developer that this why we feel we are not being listened to. Please correct these airfield CT locations; should there be any questions as to where they should be located I am happy to provide references.
-
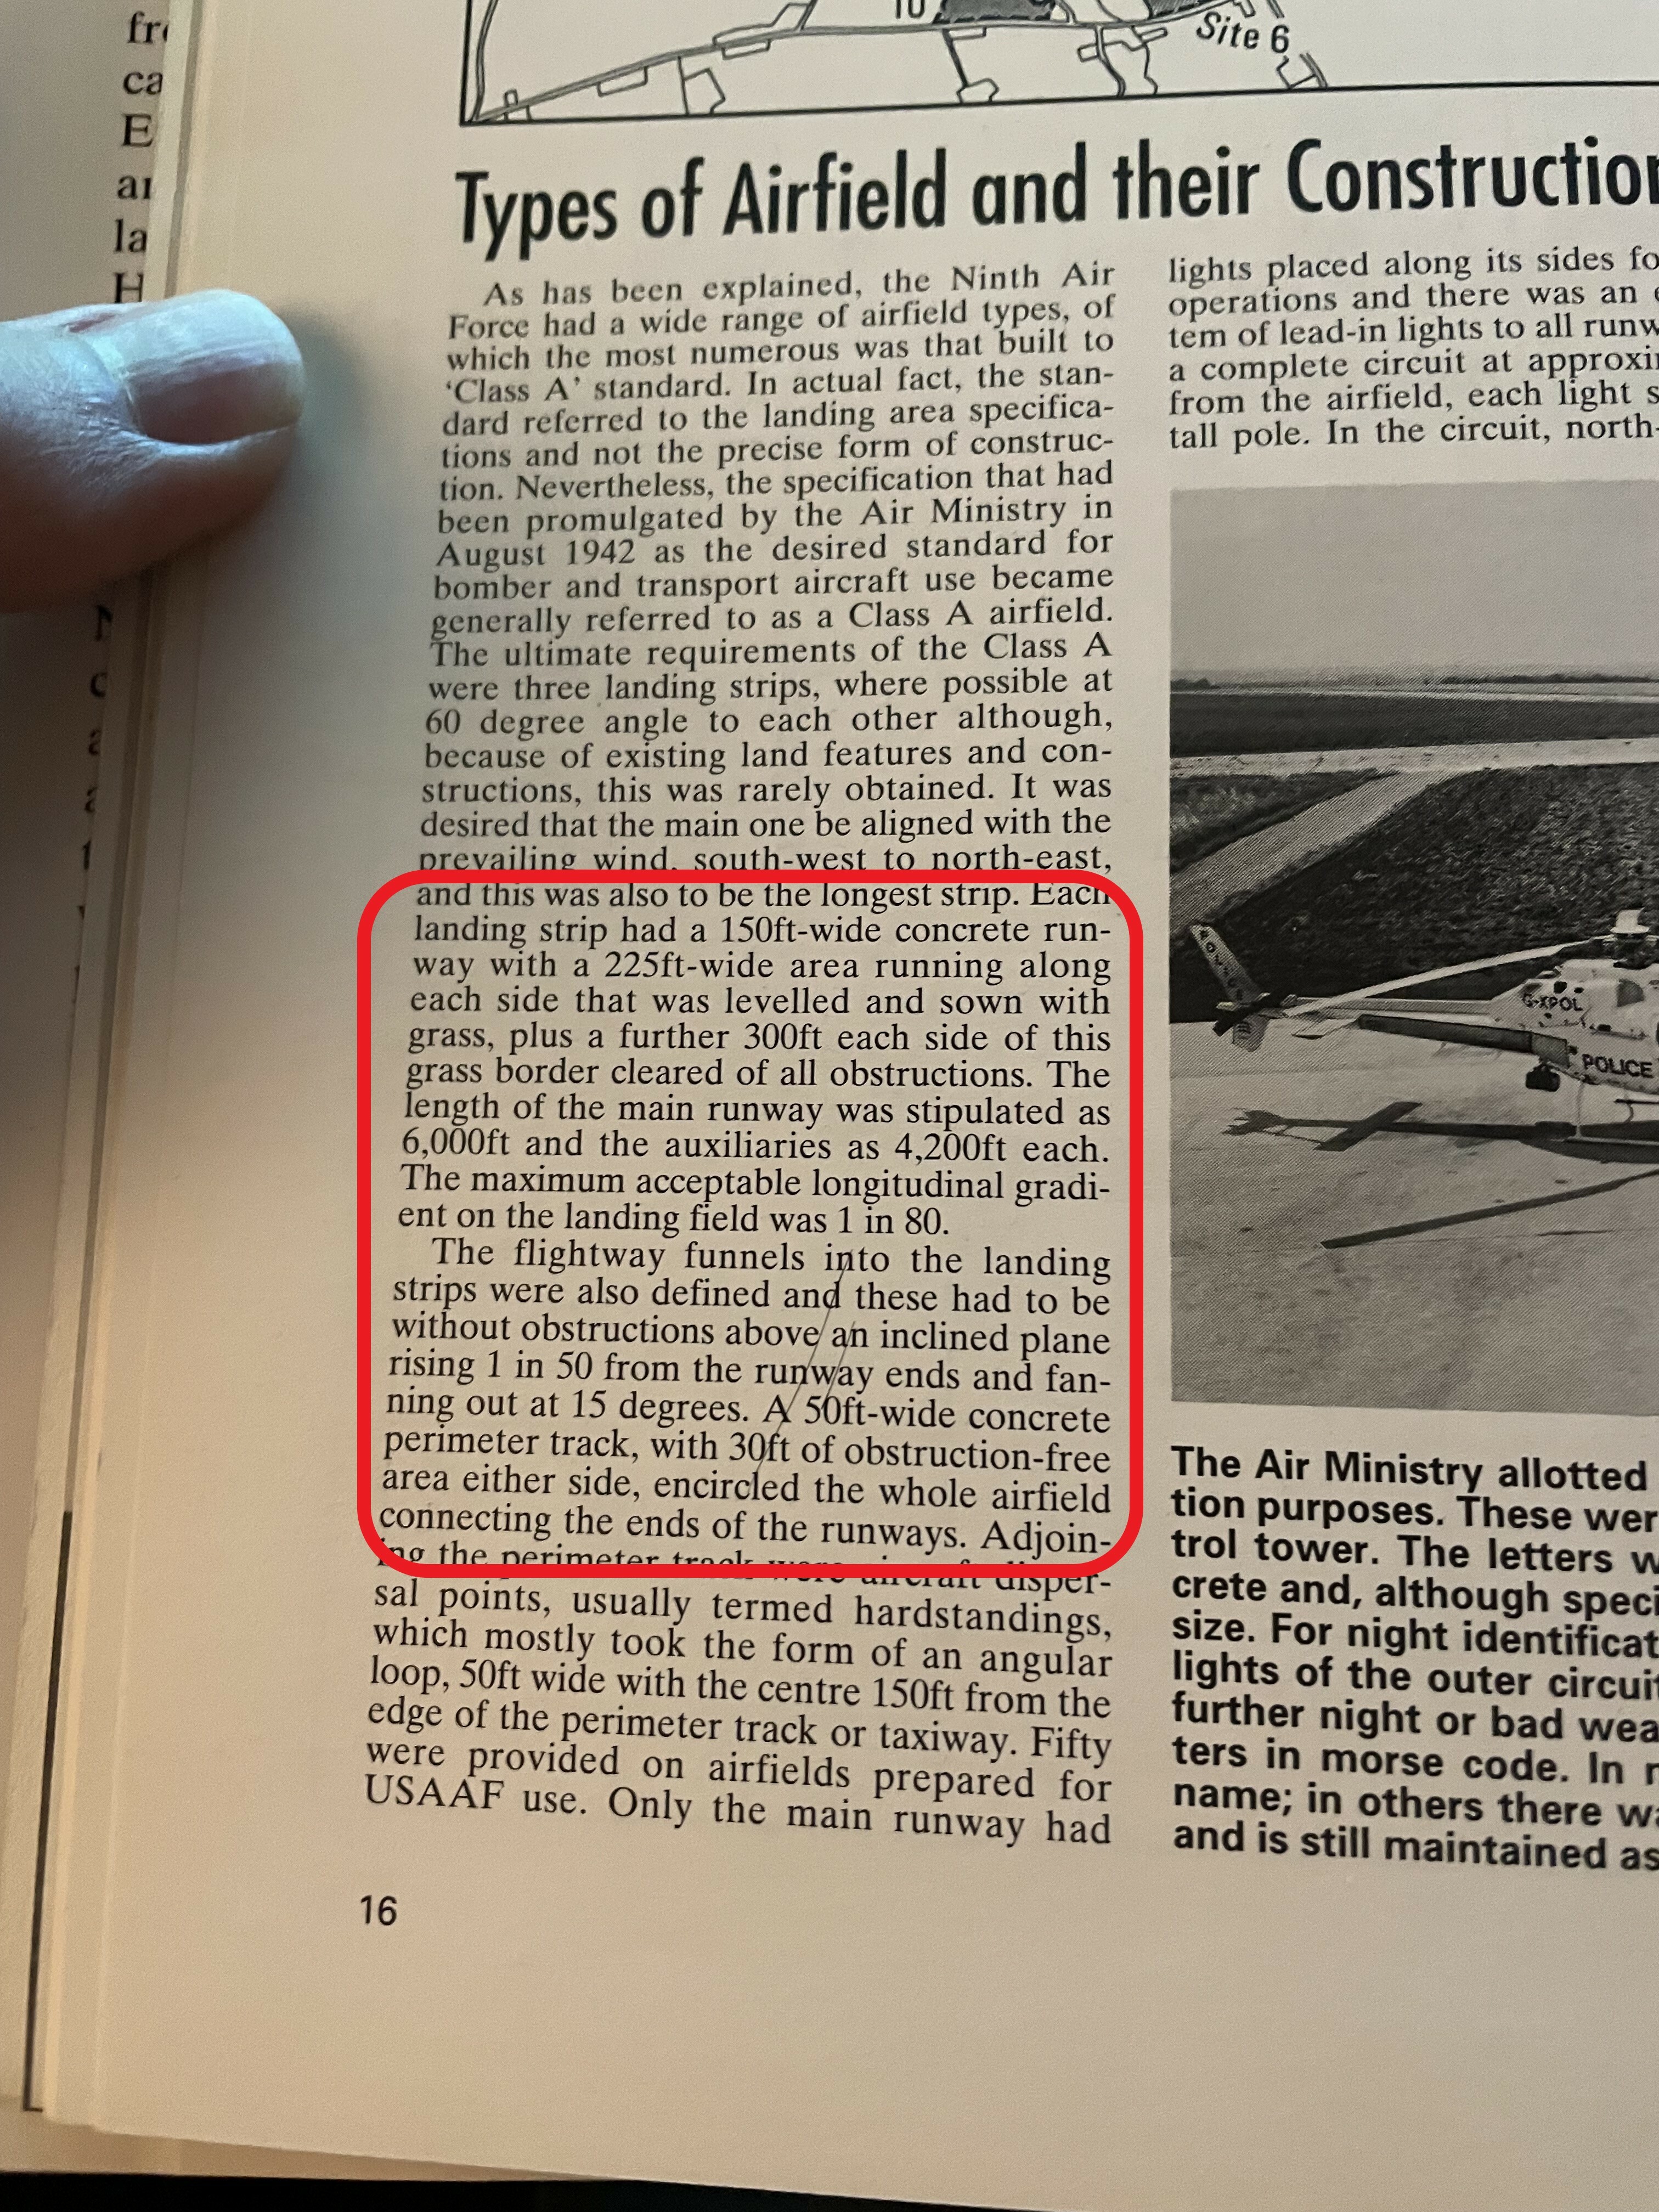
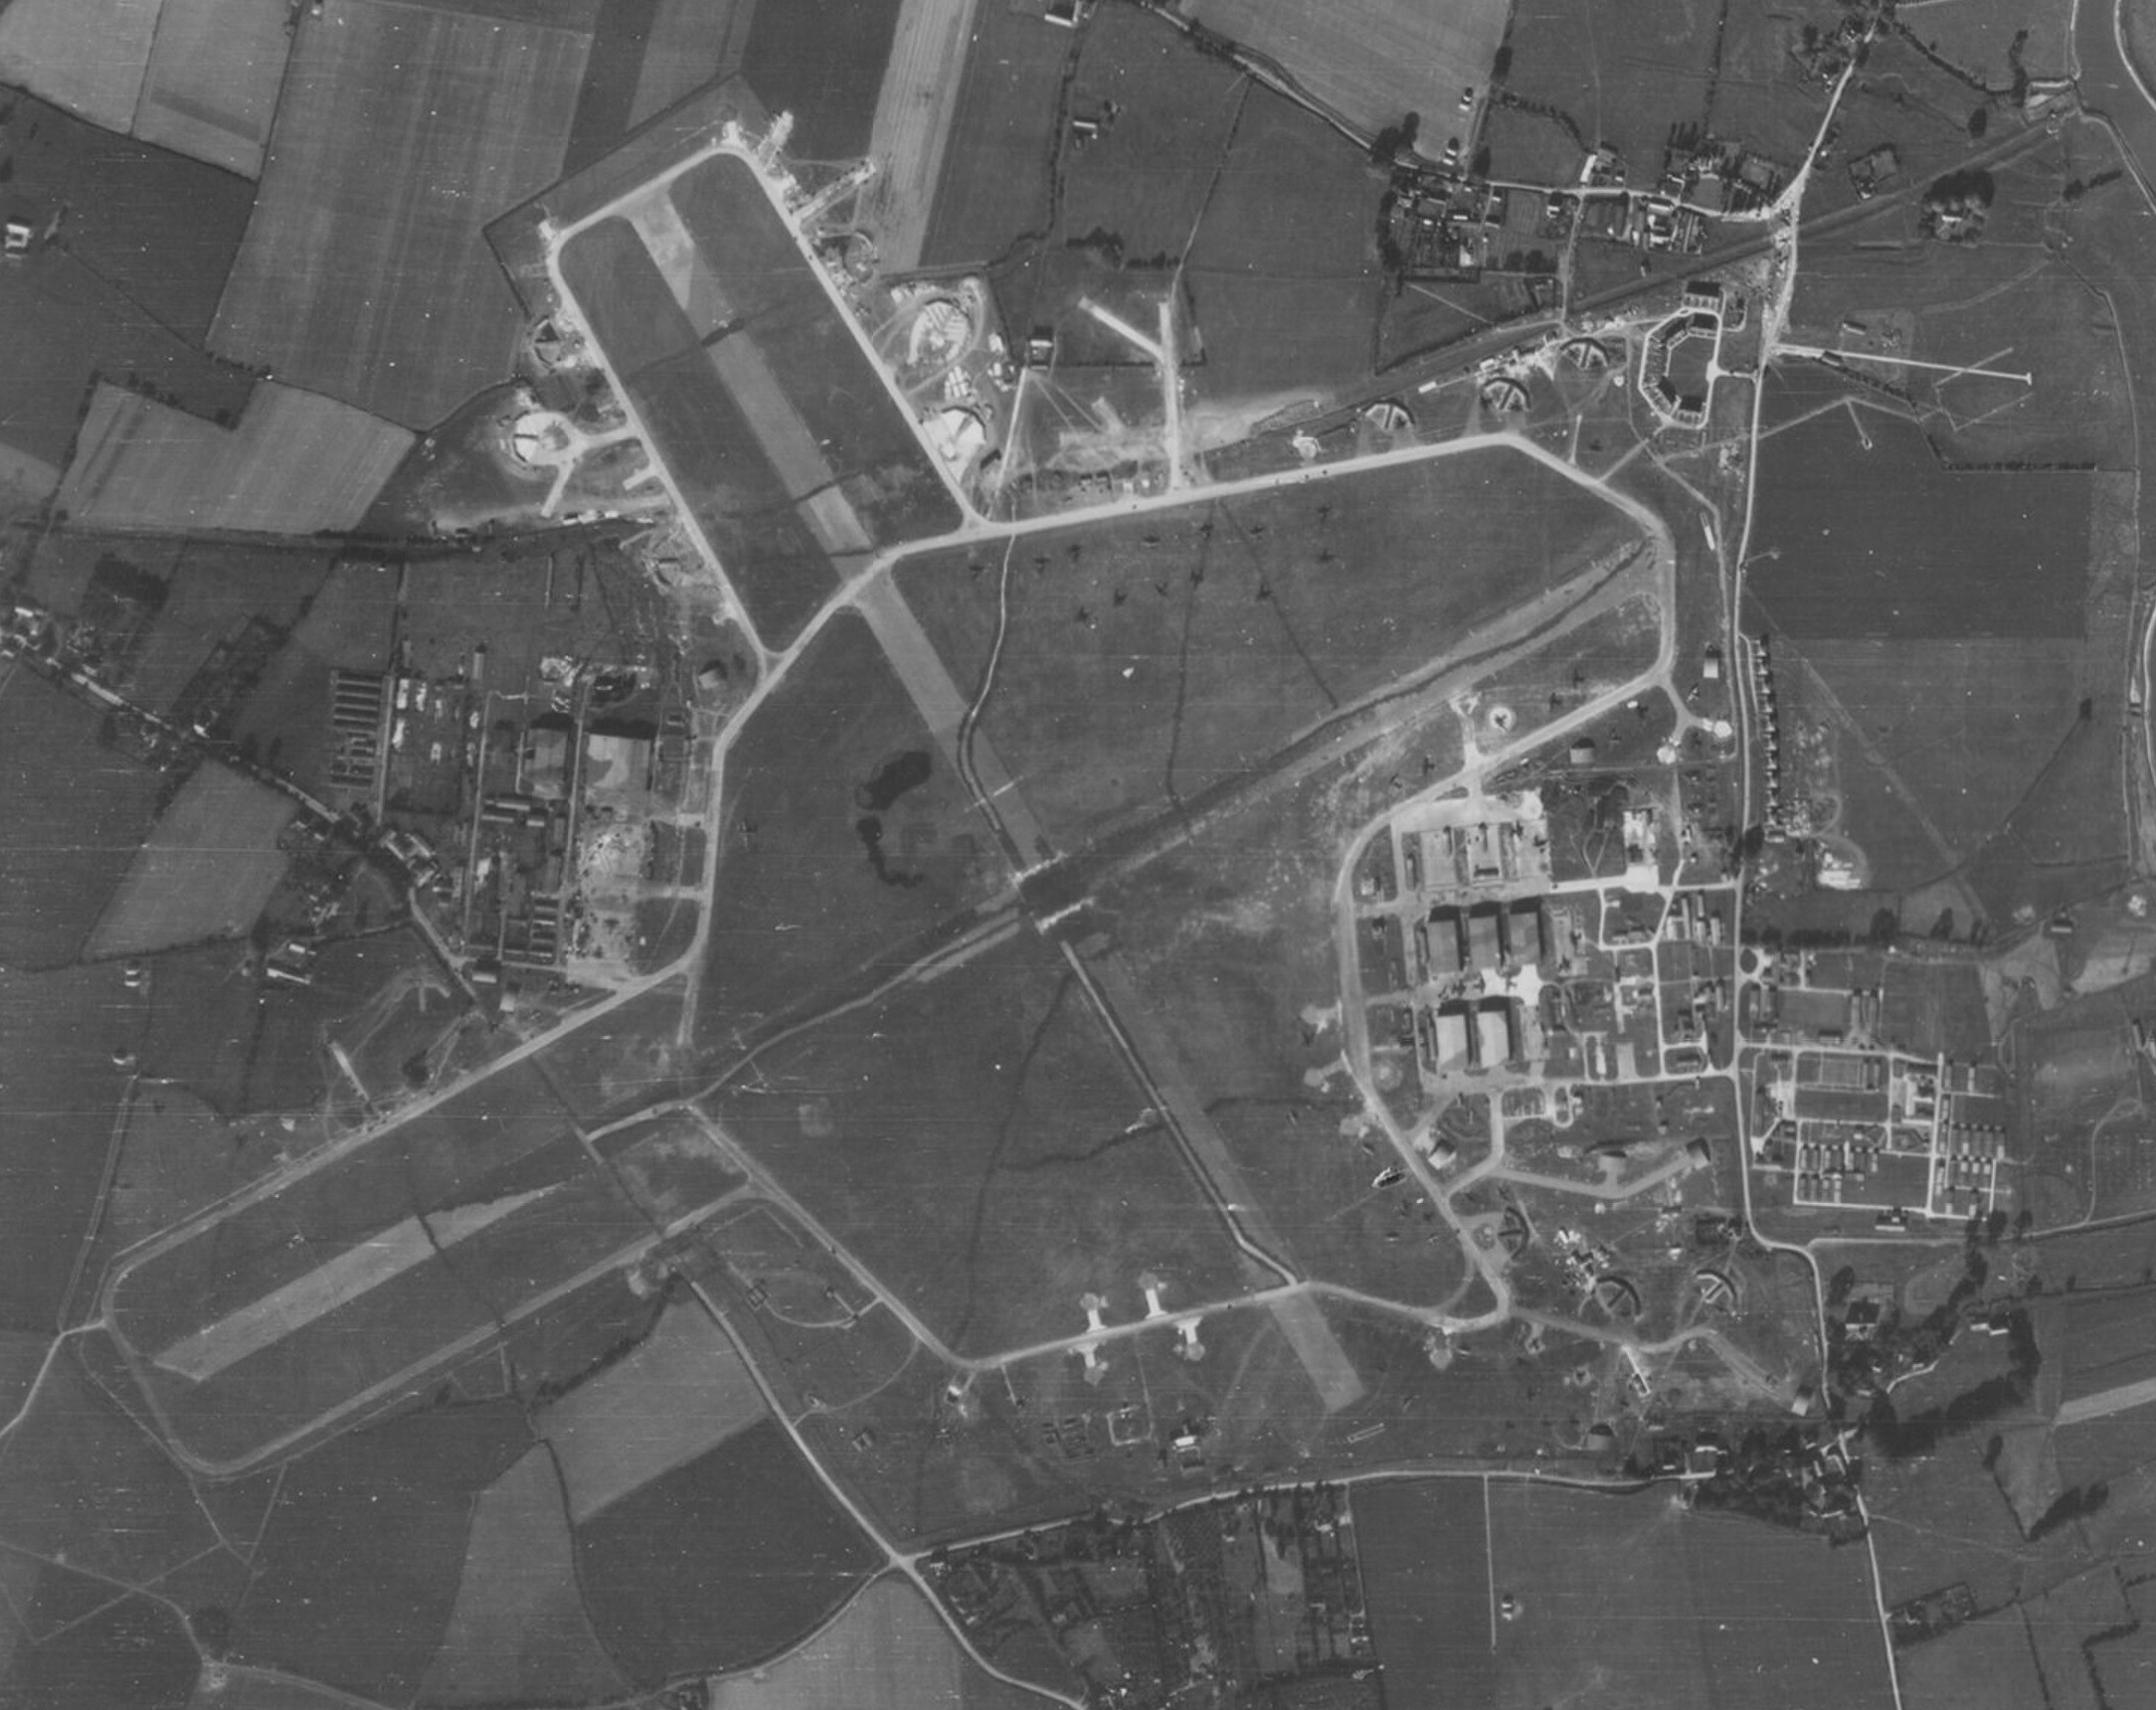
2. Trees and shrubs within the airfield perimeter. Current airfields affected: Tangmere, Ford, Kenley, West Malling, Funtington and Gravesend. Given the MOD specifications stipulating the size of run-off areas adjacent to runways (225ft each side, levelled and sown with grass) and a further 300ft each side of the runway to be clear of obstructions, the abundance of trees and shrubs in evidence between the runways and perimeter tracks on the noted airfields in the DCS Normandy 2.0 map is unprotoypical. Also note the absence of any foliage between the runways and perimeter tracks on the period aerial shots submitted in the first post. Please omit the offending vegetation.
-
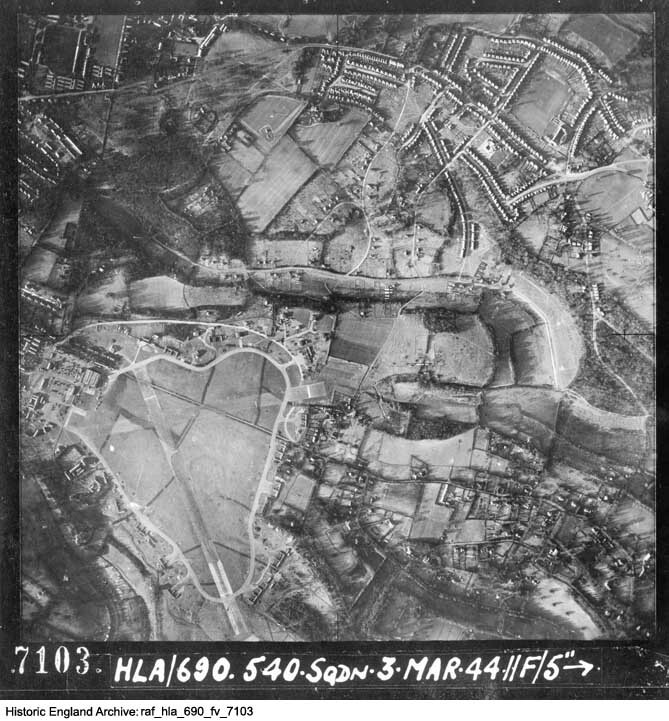
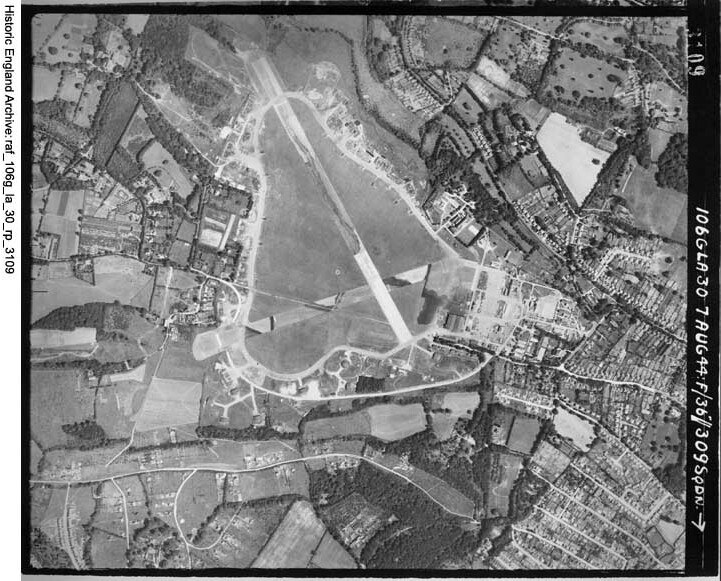
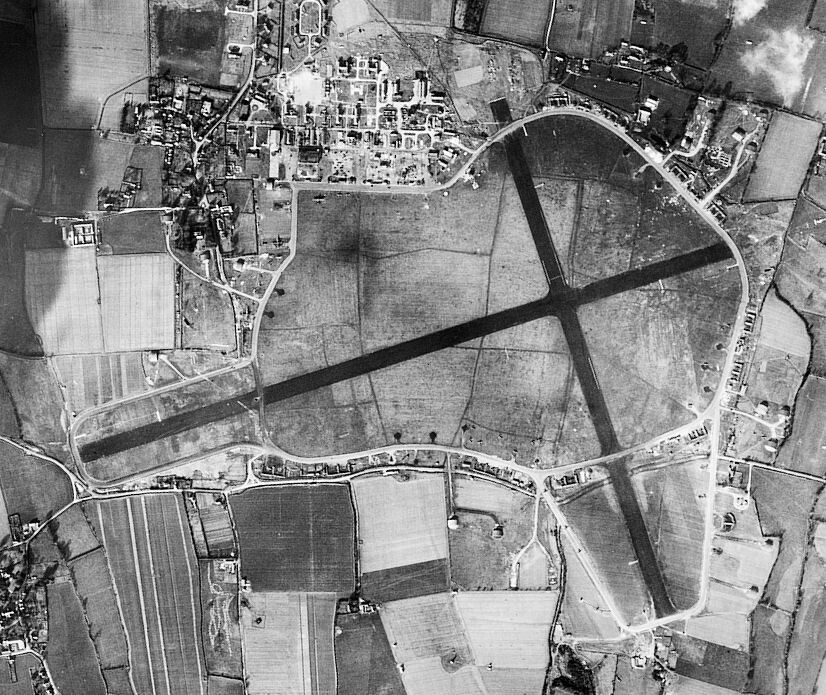
1. White runway centre line markings on hard surface airfields. Current airfields affected: Tangmere, Ford, Kenley, West Malling, Farnborough, Odiham and Needs Oar Point These are a post-war feature and should not be in evidence on WW2 period airfields: Examples: Tangmere, Feb 1944: Kenley, March 1944: Kenley, August 1944: Ford, 1945 Please remove the white dashed centre line markings from the hard surface runways at the airfields listed above.
-
Announcing the F-4 Phantom for DCS World!
DD_Fenrir replied to Cobra847's topic in DCS: F-4E Phantom
Wow. Love how your accusations of speculative release dates are completely derived from your own equally speculative opinions. #irony! The F-4 will release when it's ready. You seem to forget that these digital products are the result of many hard hours of toil by real people; those people have lives, lives are complicated and timescales slip thanks to the unexpected. Dude, get a grip, enjoy the festive season for what it is and quit being such a moaning minnie. -
Vertical Rolls In The Spitfire
DD_Fenrir replied to Screamadelica's topic in DCS: Spitfire L.F. Mk. IX
One thing to bear in mind is that as the Spit slows with power on the nose will lift; it comes with the Spitty's marginal longitudinal stability. Your stick therefore will have to move forward as the airspeed bleeds to hold your attitude. -
Vertical Rolls In The Spitfire
DD_Fenrir replied to Screamadelica's topic in DCS: Spitfire L.F. Mk. IX
Crikey, yes Kab you’re right. I was thinking because nose down gives a left force (i.e. on takeoff when you lift the tail), than the opposite is true and you simply reverse but it isn’t that simple is it? Just remembered the right hand rule and realised I have it backward. In which case scream I have no idea what is causing your problem. I’ll give it a try myself and see if I can replicate, otherwise can you post a video showing what’s happening? -
Vertical Rolls In The Spitfire
DD_Fenrir replied to Screamadelica's topic in DCS: Spitfire L.F. Mk. IX
Okay bit of minefield this but bear with me... It's down to gyroscopic precession. 1. Full left stick deflection will result in a right yaw. Why? Adverse yaw. The down-going wing creates less lift. This creates less drag. The up-going wing is creating more lift, but ergo is creating more drag. (see Induced drag). The net result is that the aircraft will start yawing it's nose to the right. The Spitfire has Frise ailerons that should mitigate the effects of adverse yaw but they only work up to a point - large lateral stick displacements will overpower any mitigating effect they have. 2. The right yaw, thanks to the massive gyroscope sitting right at the front of your Spitty, otherwise known as the propeller, will induce a gyroscopic procession reaction. In this case it will want to lift the nose up from your point of view. Ultimately, to prevent the pitch up, you must prevent the adverse yaw by inputting the correct amount of left rudder in as you move the stick to keep the nose tracking dead straight as you initiate the roll. It won't be full left rudder, not a lot at all in fact but it will need some. -
In our Air Wing given that by the time we get to Sparrow employment ranges, the fight has generally descended to 15-20,000ft I typically hold till fire till 8nm or less. This means you can expect to be defending their R-27ER/R-77/AIM-7/Matra/AIM-120 shots before you can fire. You have a few of options: 1. Defend these with notching / cold tactics as appropriate then try and get nose on for a Sparrow shot but expect a missile at you as you do so. If it's a Fox-1, hope your target goes defensive and breaks his own lock allowing you to press. If it's a Fox-3 you'll have to either (a) try to notch it and hold the notch to the merge (ballsy and risky) or (b ) go cold immediately and then re-attack when you can. 2. Get an AIM-54 out on them just prior to their weapon employment to force them defensive so they trash their own missile early and you crank. But go Hot as soon as you dare and go in full burner, balls-out, to wind the range down to <10nm quickly enough that when they start coming nose on again you're in optimum AIM-7 launch parameters. 3. If you're outta AIM-54s, waste a Sparrow on a shot to force them defensive so they trash their own missile early and crank. But, like previously, go Hot as soon as you dare and go in full burner, balls-out, to wind the range down to <10nm quickly enough that when they start coming nose on again you're in optimum AIM-7 launch parameters. Sparrow love speed so if you can be >Mach 1 on launch, it helps.
-
Their loss. After a 6 month multi-player campaign we are finding the AIM-54C mk60 Phoenixes have a Pk of almost 40%. That does not take into account the bugged implementation that occurred in May where the performance was dismal. Note that his will have brought the average down. This compares to 51% for AIM-7s. Our sister Hornet squadron was achieving a 52% Pk with their AIM-120Cs. Is this realistic? We will never know. The only succesful Phoenixes launched in anger were AIM-54As by the Islamic Republic of Iran Air Force and we have no corroborating data of what their Pk was. Several things we have learned: 1. TWS is not great for anti-fighter work. Flying as a section, sorting properly and using STT against fighter targets is much more reliable for keeping the Phoenie-bombs from going to space. It is documented by real RIOS that the AWG-9 was not brilliant for TWS tracking multiple fighter-sized manoeuvring targets over-land. Some of the problems you may be experiencing are the result of the AWG-9 and it's limitations, not the missiles. 2. Successful engagements have been had at 55nm against hot, co- or near-alt bandits from ~30,000ft. However, if the bandit is significantly lower the AIM-54 suffers a lot more from it's draggy form as the missile gets lower, resulting in lower energy at terminal phase. You have to compensate for that by reducing the launch range appropriately. Similarly, if targets are not directly hot but slightly oblique, this has to allowed for by compressing the launch range slightly. 3. Firing between 20 and 30nm is a bit of a black hole for the missile - it's trajectory, to make sure it doesn't loft over the target at this range, does not allow it to get to high enough altitude to benefit from the lower air pressure and reduced drag up there and this results in lower energy at terminal phase. Upshot, is take shots from 60nm down to 30nm. 4. Under 16nm the missile is pretty capable - the long burn time means it still has good E at burnout. Plus when it goes active you have the benefit of going cold. 5. The latest Phoenix versions have reasonable notch resistance - not exemplary, but not awful - with the important aspect that if the target reappears from the notch within the Phoenix seeker's Field of View it WILL reacquire. Compared to the AIM-120 it seems like a reasonable performer considering the older age of the Phoenix. This however relies on your target not maintaining good notch discipline. If your target is an experienced breather operator, well... they'll defeat it. 6. Your AI targets have a vote. If they defend by cranking when the AIM-54 goes active then, given good launching parameters, the AIM-54 hit's more often than not. However, if the AI have the altitude to perform a Split-S defence when they detect the active Phoenix, more often than not they defeat it kinematically. There are questions as to the whether AI's efficacy at detecting and reacting to active missiles is OP but that's an AI problem. 7. DCS netcode is a factor. I have more reliable performance from the AWG-9/AIM-54 offline than I do online. This is to be expected. Packet loss and vagaries in connection cause less reliable track files in TWS (one reason for our decision to push to STT launches) and even in STT we still get some 'airball' AIM-54s. Is there still polishing to do? I suspect so. We're still to see EDs new missile API and what that brings to the AIM-54 so... watch this space. Ultimately, expecting a 1970's radar and missile to perform as well as a 1980's radar with a 1990's missile is... disingenuous. There are challenges to using the Cat and the Phoenix. It ain't an I win button, especially against an opponent who is cogent of it's limitations. But that's where the challenge - and dare I say, the fun - lies. Again, it's not an I win button. And I for one am glad of that.
-
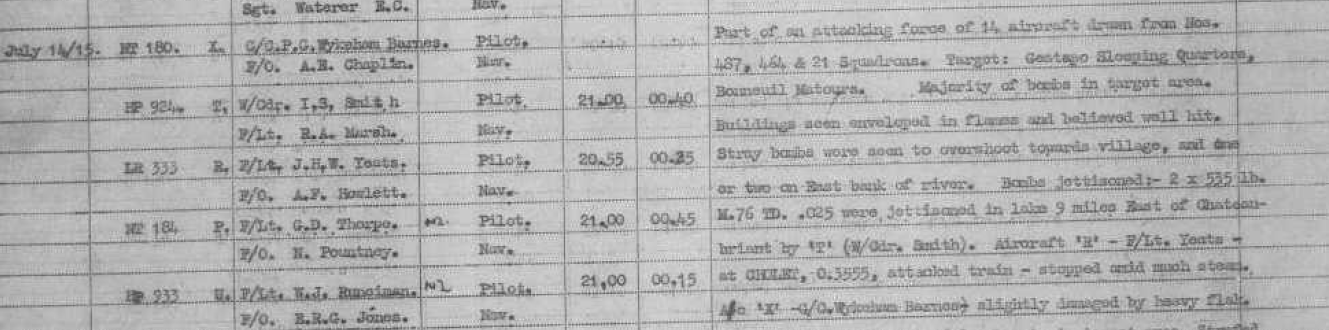
Not necessarily. You have some daylight options: 1. Châtellerault Note: "Trucks" is a British description for railway wagons - the Wing was striking fuel wagons reserved for use by the advancing 2nd SS Panzer Division Whilst 2030 may seem late, at the time the Britain was operating on GMT+2 so the actual time GMT was 18:30; plenty of daylight left. 2. Bonnieul Matours Raid 3. Caserne des Dunes Barracks, Poitiers, August 1st 1944, 140 Wing. Takeoff time: 19:40 hrs 4. SS Police HQ, Chateau de Fou, Châtellerault, & Chateau Maulny, <no location found> details , August 2nd 1944, 107 Sqn & 305 Sqn (138 Wing) Chateau de Fou: 5. German Submariner Rest Home, Chateau de Trevarez, St Goazec, August 2nd 1944, 613Sqn (138 Wing) 6. SS Barracks, large school building, Egletons, August 19th 1944, 138 Wing
-
As far as the 2nd TAF Mosquito FB.VI units in particular, of the two wings: 138 Wing, Comprising 107 Squadron RAF 305 Squadron (Pol.) 613 Squadron RAF Didn't move to the continent to A.75 Cambrai/ Epinoy until November of 1944. During the Overlord Period they were based at RAF Lasham. 140 Wing, Comprising 21 Squadron RAF 464 Squadron RAAF 487 Squadron RNZAF Didn't move to the continent to B.87 Rosieres-en-Santerre until February of 1945. During the Overlord Period they were based initially at RAF Gravesend, moving to RAF Thorney Island on 18th June 1944. In November 1944, 418 Squadron (RCAF) and 605 Squadron RAF became the last of nine Mosquito squadrons to move from Fighter Command to 2nd Tactical Air Force, joining No.2 Group. They both flew into B.71 Coxyde in March 1945 and were used to fly daylight sweeps over Germany to support the final Allied advance, carrying out this role to the end of the war. During the Overlord Operations and the Battle of Normandy, 418 Squadron was based at RAF Holmsley South, then from 14 July - 29 July 1944 at RAF Hurn and then from 29 July - 27 August 1944 at RAF Middle Wallop. 605 Squadron was based at RAF Manston throughout. There are other FB.VI units but their primary role was supporting Bomber Command by intruding the German Night-Fighter bases in Holland and Germany, so they were more of a strategic support asset than a tactical unit and their scope of operations generally outside the boundaries of the Normandy Map we have in DCS. In reality all Mosquito FB.VI units - even the 2nd TAF and ADGB units - during this time period were operating primarily (though not exclusively) at night.
-
As far as my admittedly limited research goes, the first Mosquito units of any variety to move to airbases on the continent did so in late August/early September after the conclusion of the Normandy campaign.
-
Your favourite way to get someone off you six?
DD_Fenrir replied to windsurfingstew's topic in DCS 2.9
As previously mentioned, you should be avoiding them getting to your control zone in the first place; however, for those times when I make a mistake or get jumped, the only recourse I have is to do Guns-D manoevres, with the aim of avoiding getting hit whilst sucking the bandit in close enough that a sudden hard AoA excursion might neutralise the fight. It really is the last (nee only) resort. There's a lot of Cons: Requires the bandit to not have Fox-2s (chancey that one... ), Requires excellent timing, Requires you to predict exactly when the bandit is going to fire, Requires not burning your E off too soon so you have sufficient left for the final big excursion to force the overshoot, Requires the bandit to be too fixated on getting his reticle on you and neglecting his attention to his closure, Requires the bandit being unaware of what you are doing or being so knife in the teeth he forgets, Doesn't account for the spray and pray gunners out there... ...Or the lucky snapshot from a guy pulling 'Kentucky Windage'. The closer he gets the less Time of Flight his bullets have, so you have to get even better the closer he gets. Will leave you low E with limited manouevering potential even if it works. What is Guns-D? Shorthand for Guns Defensive manouevres. When you see the bandits nose moving from Pure to Lead get ready and the moment you think he's going to fire you get out of plane and make a small energy excursion. What does that mean? You need to avoid his shot by being in a different place than his pipper is predicting you'll be when he fires his guns. His bullets take time to get to you so be somewhere else when they do. How do you do this: Roll in random direction, somewhere in the region of 30°-120° Give a brief pull to establish a new plane of motion, But remember to relax the stick again to reduce your energy consumption. DO NOT REVERSE! And again in case you missed it because it's most important: DO NOT REVERSE! The bandit will now have to reset his jet to get back into plane. When he does watch for the nose moving from Pure to Lead again and rinse wash and repeat. What often happens is a bandit will be so focussed in getting his sight on, he'll neglect his closure discipline and end up coming up on you quicker than he meant to, as you're nibbling away at your energy state using energy excursions and geometry. He's pulling lead also, compounding his closure issue. It's up to you at the right time - and there's no secret sauce to judging that, you kinda just have to feel it - you commit to a deep energy excursion pull, hard to the lift limit, hope to get a flightpath overshoot which then potentially gives you an opening to reverse and neutralise. If that was all successful what happens next depends on his E and yours; a flat or rolling scissor could result if you have really caught them by suprise but that's the best case. Otherwise just hope he doesn't have too much of an Energy budget over you and knows how to use it. The Pros are that if you can do the Guns-D successfully, even if he does keep his closure under control and cannot force an overshoot, you could force a miss so many times that you run the enemy out of ammo, or fuel or both. -
This video will change your mind about F-14
DD_Fenrir replied to pepin1234's topic in DCS: F-14A & B
- 32 replies
-
- 16
-
-

-
https://giphy.com/gifs/vidiots-official-H62aA8TKX9GPSWPLk9
-
Feedback Thread F-14 Tomcat Patch November 2023
DD_Fenrir replied to IronMike's topic in DCS: F-14A & B
If you’re turning away before pit bull then you are trashing the missile. Crank to reduce your closure whilst maintaining the track file and only go cold when your Phoenix has gone active. -
Something like this. Given that this is about 5 or 6 times the size of the current extents of the Normandy 2 map, might be a while yet...
-
For the bulk of real world Lancaster ops... neither. However, Lancasters were seen on occasion on operations, in daylight over Normandy during the invasion period. Truth be told, to best represent the areas the Lanc was operated would require a map spanning from Licolnshire/Yorkshire in the west to, dare I say, Dresden in the east.
-
The A-0 to A-4s (the lightest versions) garnered their well deserved reputation going against the Spitfire Mk.V. They were indeed better climbers and faster at all altitudes than the majority of the RAF Spitfire Mks during 1941-1943. However, as the A-5 to A-7 variants are introduced, they see progessively heavier armament (to make them more effective against allied bombers) and armour added but with no increase in the baseline engine power. Erhöhte Notleistung (smililar to the War Emergency Power setting available in the P-51) was becoming available in mid-1944 to help mitigate some of this falling power-to-weight trend but this is not currently not available in the DCS variant we have. Unfortunately for the Fw 190A, at this time the Allies see the introduction of a number of fighter types (Spitfire IX, P-51D, P-47D) with improved turbo- or supercharger technology, not only allowing them to out-power the Fw 190A variants at higher altitudes but also providing improved performance at low altitudes as well. Add to that the fact that the A-7/8 was developed to make the aircraft more effective against heavy bombers and sacrificed lighter weight performance for added hitting power at a time when the Luftwaffe didn't have to worry about Allied fighter escorts roaming around Germany. By the time the A-7s and -8s actually start their operational career the 8th Air Force have their P-51Bs suddenly appearing deep in the Reich, compounded by developments with the P-47 giving it far longer legs also. The Fw 190A-8 represents a type whose development was starting to fall behind the curve technologically. Focke-Wulf had been trying to develop improved performing Fw 190s, either by added turbos to the BMW 801 (which never happened) or by re-engining the 190 with Daimler-Benz or Jumo, but thanks to the wonders of Nazi politics, dire material shortages and a high demand but poor availabilty across the board for high altitude performance aero engines, you don't see this till the Fw 190D-9 and the Ta 152, both of which come too late.
-
Bovine excrement. You'd have got the A-6 whether you bought the F-14 or not. How you got that so profoundly misconstrued I can't begin to fathom, but the fact that you spent money you didn't need to well that's on you.
-
Both. A - for the challenge and getting a sense of what most F-14 pilots had to contend with for 20 odd years. B - for the fact that this version better represents Grumman's vision of what the Tomcat should have been (TF-30 was only ever supposed to be the development engine, the P&W F401 was intended to have powered the fleet variants). The F110 version better reflects the Power to Weight ratio the F-14 was supposed to have.


.jpg.6e3e58275a44d291fce13ea5318336b7.jpg)
.jpg.171e449f79f4b8161a752ae219d655ee.jpg)