Skall
-
Posts
187 -
Joined
-
Last visited
Content Type
Profiles
Forums
Events
Everything posted by Skall
-
Thanks for posting, GGTharos. I've been pouring over several of your older posts on BVR combat and must admit a lot of it is still over my head though I'm learning slowly. Last night was my first time attempting A2A vs the AI on "good" difficulty (I know, try not to laugh :cry:) and was getting killed every time on a 1v1 vs a Mig-29 because I just got within range, fired and prayed. After reading several of your posts and applying some of the principles (the concept of poles, cranking, etc.) I've started being able to almost consistently beat it :D. Back to the original post, I just wanted to verify that "M X X" and "T X X" where identical and would never be different. If the designers found it important enough to duplicate it, then so be it. Going on to G-loads, I've encountered the concept of corner velocity and all that jazz and (I'm probably wrong here) apparently ~4Gs at Mach 0.9ish gives a good rate of turn without losing speed. I'm starting to get a feel for what that feels like on my stick but, as a noob, it's nice to get concrete confirmation. I did not know the TM stood for Target Mach which now makes sense as to why it was always constant: the IL-78s I was practicing against where on a fixed flight plan so their speed was constant. For the AIM-9 in radar, I was just curious if there was a feasible way to launch it at the 8-10nm range with a radar lock and I just wasn't doing things properly. Also, if I'm radar assisting the AIM-9 all the way through, does it become more resilient to flares or is it still about the same as without radar assistance? Thanks again for your answers. I shall heed your advice :worthy:
-
Well, here I am... sitting next to my pile of logs. Tongue's already numb from all the blisters. When the hell is EDGE going to come out? :megalol:
-
I usually also run 3 custom programs to cover being tracked (chaff), for gun runs (flares), and for when things get ugly (both at a high rate). Usually these are programs A, B and C respectively. I default to B which is the one I mainly use. That puts programs A and C at one flick either up or down on the CMS button. Haven't yet had a need for a 4th program. I don't try to be conservative with my use of flares and chaff. I'd rather go home with low/empty stores of countermeasures than not at all.
-
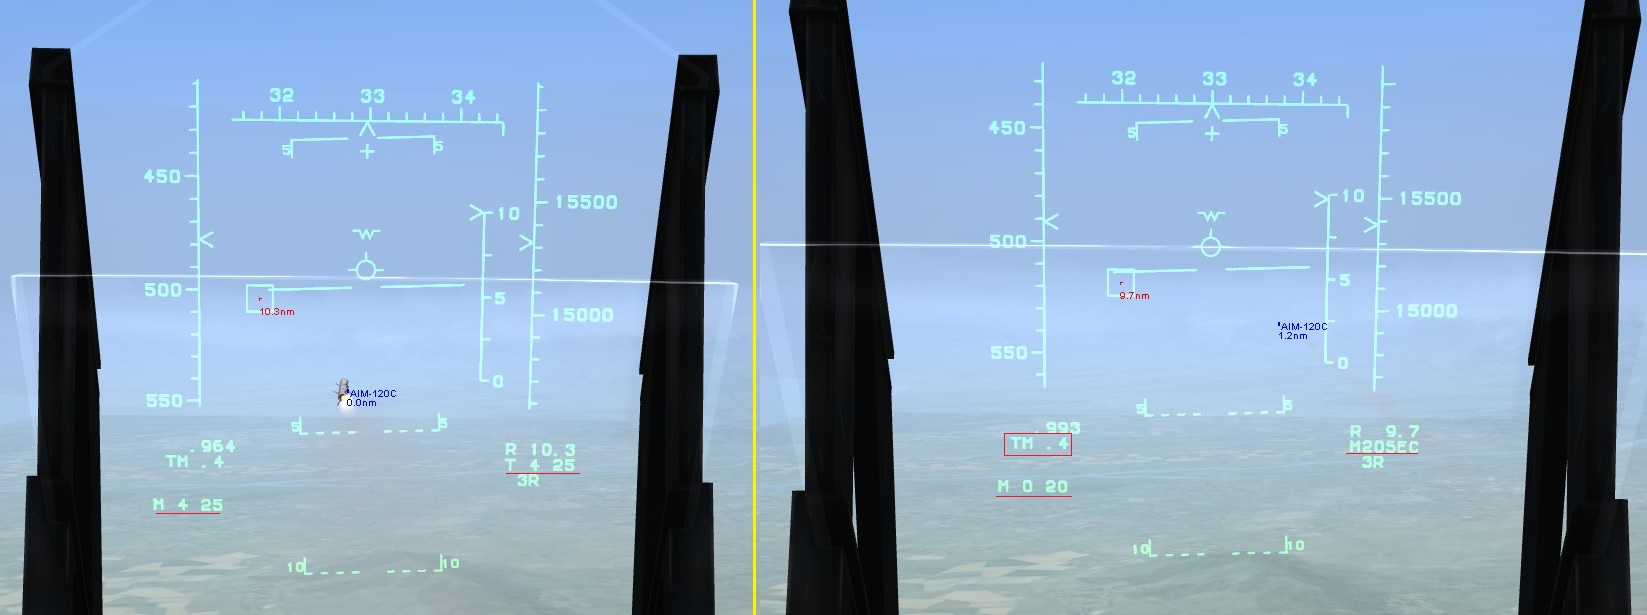
Hi everyone, Been spending some time with the eagle learning the basics of employing weapons and I noticed inconsistencies with the manual so I figured I'd ask here. Be warned that a lot of this is based on assumptions after conducting several tests. Please call me out on any incorrect assumptions I'm making. On the left side of the screenshot I just fired a 120C at a helpless IL-78. The underlined areas are identical except for one having an M and the other having a T. After several tests I came to the conclusion that the first number is the number of seconds until the missile's seeker takes over and no longer requires our help getting to the target. The second number is total number of seconds until impact. On the right side of the screenshot is the same missile 5 seconds later. The "M 0 20" lets us know the missile's seeker is active and the 20 is the seconds to impact. The right side of the HUD changes format but essentially says the same thing: seconds to impact. With these assumptions in mind, here are my questions: 1. Why is this information duplicated on the HUD? When will "M X X" be different than "T X X"? 2. Once the seeker goes active, why show the "MXSEC" when this is the same thing as "M 0 X"? 3. Side question: when I bug a bandit on my radar, my HUD stops showing me G loads and the line is instead replaced with TM .X where X remains constant no matter what I've tried. What does this mean? I think it's incredibly annoying to have my G load disappear in such a critical stage of flight, such as a BVR joust. 4. Very unrelated but still related to weapons: It appears an AIM-9 can be radar assisted to target and I can get a lock at ~10nm away but this missile always limps out if not shot within 2-3nm of the target. What's the value in radar-assisting this missile from so far away if it can never make the distance?

-
I hear ya. Are you still regularly hosting this map? I figured it'd be a good way to get me playing multiplayer so that I can hide my noobiness amidst the chaos :D Only been online once so far and didn't get to interact much with other players. Though I'm trying to get over my performance anxiety :lol:
-
Awesome work Bushmanni. Haven't played it multiplayer yet but I was checking out the mission in the editor to get a sense of what's what. I do have one very small suggestion. I noticed that in v6, the hog has both Mk-82s and GBU-12s. Would it be possible for you to swap their positions in the load out? The hog does not allow you to release Mk-82s in pairs if they are in the innermost pylons. Considering GBUs will usually always be dropped one at a time while Mk-82s are most often used in ripples and/or pairs, I figured this change would be more helpful.
-
I hopped over to the Campaign section of the Black Shark and noticed that there are 4 campaigns with different names but the exact same description. These are Georgian Oil War, Oil War - Chapter 1, Oil War - Chapter 2, and Oil War - Chapter 3. Are these all different? Are they meant to be played in sequence? What's the difference between them and which one is the "right" one?
-
Some random Q's ive came across while playing through georgian hammer
Skall replied to Skithis's topic in DCS: A-10C Warthog
CAP stands for combat air patrol. CAP flights are made up of air superiority fighters. Call them in when you encounter enemy fighters as the hog is not fit for dog fighting. SEAD stands for suppression of enemy air defenses and such flights are made up of long range strike aircraft like the F-15E which specialize in taking out air defenses from a distance. If you encounter heavy AAA/SAMs, call the SEAD flight to take them out as the hog is not fight for taking out long range AAA. -
Glad some of you guys found my post to be of some help. Ptako is correct in that things are not always THAT well defined but even then, the pilot, especially if a beginner, is expected to follow very specific orders and parameters in execution. I'm making my way through A-10s over Kosovo and one of the sortie stories has the flight lead, who is an AFAC, mark targets for the rest of his flight using White Phosphorus rockets and special Mk-82 air burst bombs designed for marking. The rest of the flight can only attack the marked target when he says so, with the weapons he specifies and only after he is reasonably sure that they are looking at the same thing. Later on when they encountered some light AAA (since any heavy AAA is not know to exist or has already been cleared by SEAD/DEAD flights), they call in a SEAD flight to take it out before continuing their attacks. And that's with both the AFAC and his wingman carrying two mavericks each. You will note that many DCS A-10 missions provide a callable SEAD flight and a callable CAP flight in the event the A-10s encounter any unexpected AAA (usually in the form of a concealed vehicle or a hastily put together site) or enemy fighters (usually in the form of interceptors scrambling in response to the A-10's appearance). You are not expected to engage fighters or AAA. The AIM-9s are there strictly for self-defense or attacks of opportunity against a vulnerable or unaware helicopter or fighter. That's not to say that A-10s might not be sent to fly low under enemy radar past several SAM/AAA sites for a precision strike deep into enemy territory. But at that point, the plan is to avoid AAA and SAMs, not to engage them. And quite frankly, from my understanding, a mission like this is what strike helicopters like the Black Shark and the Apache are for. Attack planes and attack helicopters both excel at taking out armor and doing precision strikes while flying below radar detection if necessary. The plane has the advantage in response time, durability and total payload so its more prominent in the front lines were it can take and dish out punishment. Helicopters can fly even lower to avoid detection better than their fixed-wing brethren and are usually the ones doing the sneaky flanking attacks or surprise attacks. Their primary defense against anything is that the enemy is not expecting them in the first place. Going back to the story, the only person with some elbow room to dictate plans was the AFAC. And while he actually had some freedom to operate at his discretion, his objective was still very clear: the enemy is hiding armor in civilian buildings as well as in trenches at the edges of town and the nearby mountains. Find and destroy the hidden vehicles. The AFAC found his targets by following the roads that the armor might use to travel to and from their hiding locations and then attacked. He wasn't flying 3000 feet above the ground trying to spot them with his eyes while putting himself at risk of being shot at by a MANPAD. Nor did he fly 20,000 feet high and spent the next 5 hours slewing his TGP through every inch of hundreds of square miles. His targets' locations were unknown but he had the means and a method to locate them. Sorry if I'm getting long-winded but these are the kinds of things I wish someone would have spelled out for me after my first few months of learning the systems. Nowadays, even when I use the random mission generator, I bring the generated mission into the editor and add the things that would most likely be there if it were a "real" mission: SEAD and CAP support flights, tankers and AWACS, one or more FAC/AFAC, IPs, maybe a small flight of interceptors or helicopters simulating the opponent's response to my attacks, etc. I don't always add everything and will mix and match based on the flavor I want to give the mission but they always need some touching up to make them more fit for the realistic portrayal of the aircraft we fly. I remember one mission I generated with mostly ground units on both sides ended up with a lot of tanks for my side and a lot of rocket artillery for the enemy side. So what did I do? I added Perform Task - FAC Group for the JTAC on all the artillery so that my mission was basically to take out all of the artillery threatening our ground vehicles. That was only a slight touch up and the mission now had direction and a purpose. For another generated mission, the armor on both sides was scattered across some really steep hills and valleys with a few SAMs on the enemy side. I made some slight adjustments to the enemy placing so that I could fly the mission by using the hills for cover from the SAMs. I set up a waypoint behind the hills were I would station myself and plan my next attack. I also realized that if I followed one of the rivers running through that area of the map, I could locate a good chunk of the enemy armor. This became my guide for locating targets. I probably spent more time doing pre-mission planning than actually flying and that was after I had done all the touching up in the mission editor. Though I must admit I really enjoy the planning aspect of a mission almost as much as flying it. I hate going in willy-nilly and not really having a game plan. And the fact of the matter is, for every hour an A-10 pilot is in the air, there have probably been a group of people discussing his/her objective for several hours more. Bah! Rambled on for much longer than I expected. I need to hop into my Mustang and hopefully reach some level of basic proficiency prior to DCS WWII :joystick:
-
Just to clarify on this post, set the plane skill to Player if you intend to fly the plane in single-player off-line. If you want the plane to be usable in multiplayer, set it's skill to Client. There can only ever be one plane with a skill of Player but there can be multiple planes with the skill of Client.
-
understanding the joy stick axis controls...
Skall replied to fitness88's topic in Lock On: Flaming Cliffs 1 & 2
The red dots represent the position of your joystick. The black square represents what the game reads after processing the curve applied to the axis due to the value of Curvature, Saturation X and Saturation Y. Saturation X makes it so that you hit the max value of the axis before actually reaching the max physical distance your joystick can travel. Saturation Y lowers the cap of the max value your joystick can send to the game. For example, assuming the Pitch axis reads 0 when your joystick is centered, 100 when its all the way forward and -100 when its all the way back, a value in Saturation X makes the joystick read 100 or -100 before pushing or pulling all the way forward or back. A value in Saturation Y could lower the min and max values to, say, 90 and -90 when full forward of full aft on the joystick. Most of the time, you will leave Saturation alone, apply a bit of dead zone (3-5) and 10-20 curvature to be able to have more precision when doing small movements. -
Just sent you a PM.
-
It's tough and I'm in a similar spot as you. I can fly the plane and use and configure most of its systems at their base level. It's now more a matter of practice to refine technique and delving into the more obscure details. The manual does a fantastic job of detailing the systems, however... The manual does a piss poor job on telling you HOW to conduct a mission. I've been able to piece together a rough map in my head of how to carry out a mission based on asking questions, reading articles on both the game and real military operations (which don't necessarily include the A-10 but shed some light into modern day military planning), watching documentaries on youtube, checking out user-made missions that aim for realism, etc. For example, it wasn't until I saw some real JTAC videos on youtube and asked questions here in the forums that I realized that my test/practice missions had horribly short distances from the airport, to the JTAC, to the target. That gave me a better sense of your average mission scale, distance-wise. Checking out missions in the editor revealed waypoint terms such as INGRESS POINT, EGRESS POINT, FENCE IN, FENCE OUT, STATION, and other such jargon. The manual makes little to no mention of what these points mean and what you are supposed to do before reaching them, when you get there, and after you move on. After some digging around, I learned why those points exist and what they mean. There's also very little explanation of CAS as a concept. I was practicing with missions that had a bit of everything and failing miserably. It wasn't until I did some legwork that I learned that a CAS platform like the A-10 will never get sent in unless your side has air superiority. That means a mission where an A-10 is to operate under a blanket of enemy fighters will never happen in reality. An A-10 will also never get sent into a mission if there are known long range SAMs. That's what SEAD/DEAD planes like the F-15E and F-16 are for. They take out the SAMs and heavy duty AAA defenses and then the A-10 comes in and takes out the tanks and supports the ground forces, etc. At best you are only fit to fight the smaller, less capable and less threatening SAMs with mavericks or high-altitude guided munitions. So don't go filling your missions with them because they are not supposed to be in there in the first place. If a real A-10 pilot gets sent into a SAM/AAA field, whoever is doing mission planning and/or intelligence is not doing their job. In the same vein but related to locating targets, I used to struggle with finding targets without labels and I hated turning labels on as it A) made the game ugly, B) got in the way of HUD symbols when zoomed in and C) made locating targets a no-brainer. So the all important "how" question bothered me to no end until I learned that an A-10 will never, ever, EVER be sent to the front lines with some generic loadout and told to "blow stuff up". When an A-10 is sent out on a mission, before stepping into the cockpit the pilot already knows what he will be attacking, where his target is located, what he is going to attack it with, from want direction he will attack it, from what altitude his attack will begin, what determines whether the mission is a success or not, what conditions will cause him to abort the mission, from what direction he will leave the area and how long the whole thing is going to take to name a few of the details. Often times if any of these parameters turn out inaccurate or drastically change between the planning and execution phases, the pilot won't linger in the target area and "wing it". At the first sign of inconsistency the pilot will turn around and head home because who knows what else could have changed. That's why you will see that 99% of all missions whether built in or user-made have a small element of surprise. It's because when you are on a sortie, you are supposed to know exactly what you are going to do and there's very little room for creativity or ad-hoc decision making. The only time the plan becomes a bit more fluid is when an unknown element makes its way into the picture. You can vary this up by changing weather conditions, adding elements of urgency so that speed, precision and accuracy are critical, etc. but at the end of the day you will NOT be flying around picking off targets as you see fit. And if you don't know the full details of the mission upon departure, someone at the front lines, like a FAC, AFAC, or JTAC, will give them to you. My point is that you know the systems well enough and now its time to learn to plan an execute but this is information you will not find in the game. Much like the game, you will not learn this overnight. You will have to uncover this information one morsel at a time just like you did when learning to operate the plane. The only difference is that the source material is not provided to you. You will have to figure out where to find it.
-
Happy to say that after a few days of trying on-and-off I've been able to not only NOT blow myself up, but also get some pretty decent hits in CCIP. Been doing the whole "keep target at your 10/2 and roll into them" bit. I usually try to dive no lower than 10k feet high so I have enough time to line things up. Noticed that if my dive puts me at anything shallower than -45 then I either will never get the cue or the cue comes so late I'm just hoping for a lucky shot. When I go into -60 dives, I get the solution cue early and then its just a matter of waiting till the pipper runs over my target. At 10k feet, my 10/2 targets are nearly touching the fuselage from my perspective. Thanks for all the tips guys.
-
Just learned how to put up bullseye data on the HUD...
Skall replied to Skall's topic in DCS: A-10C Warthog
Nice. Very good info there. -
Just learned how to put up bullseye data on the HUD...
Skall replied to Skall's topic in DCS: A-10C Warthog
Thank you. I shall watch this. On the side, I know this isn't the FC3 area but anyone know how to get heading/range from bullseye from the cockpit of the F15? -
For a while now I've been wondering how your wingman knows what his heading/range from the bullseye point is when calling out targets so easily. Today I decided to spend some time with the CDU in hopes to slowly conquer it and as I was mucking about I see "HUD OFF" on the ANCHOR sub page of the WAYPOINT page. I hit the LSK next to it and it turns to "HUD ON". Looking up at the HUD I see BULLSEYE followed by what I assumed was my heading and range from the BULLSEYE. A quick double-check with the ruler on the map confirmed my assumption. So I go, "ohmagerd that's how they do it". Then I think, "why isn't this on by default"? Is there an easier why to get your heading/range from the bullseye? I doubt it considering this is right in your face (HUD).
-
You bet. And that's one of the big problems with a sim this complex. 20% of carrying out a mission is flying the plane and pushing buttons. The other 80% is proper planning and technique. Neither of which are covered in the videos or manual. I understand it would be difficult if not impossible to create a manual for guidance on execution as opposed to just the technical know-how but there's just so much information that must be dug up from disparate sources to get anywhere close to proper execution of anything that often times you either do it wrong or don't do it at all. It's one of the things that keeps me from playing multiplayer. I know there's a lot I don't know and the fact that I don't know where the finish line is makes it that much more intimidating. In any case, I can confirm that I was pushing the stick every time this happened. Now I know I need to establish a proper descent into the target as opposed to forcing my nose down on it. I'll practice that today and see where it takes me.
-
Fair enough. Low-altitude high-drag bombing is on my list of things to practice. Right after I stop blowing myself up...
-
Been trying to practice dropping slicks in CCIP and I keep blowing myself up with my own bombs. I find it surprising that neither the manual or the training mission mention this one very dangerous possibility. Has there ever been a real-world case of an A-10C pulling off my stupidity or is this just a side-effect of the sim world? Feels like the window to climb or turn before impacting your own bombs is measured in fractions of a second. Or maybe I'm just diving too fast. Last time it happened I blew up 4500 feet above the ground in clear weather with no wind. God that's embarrassing.
-
Some questions for F-15 connoisseurs
Skall replied to Skall's topic in Lock On: Flaming Cliffs 1 & 2
Could explain why my testing made it seem to me like the 120 did not have an active seeker up close. The missiles seemed to leisurely stroll by instead of chasing any targets. -
Just throwing it out there if anyone has the same question. You have to radio the AWACS and use the "paint picture" option to have the AWACS give you constant updates on its findings. It's explained in the Radio Communications section of the A-10C flight manual. I had read the whole thing cover to cover 'bout 10 months ago but completely forgot it was there. Stumbled across is a couple of days ago when I was reviewing JTAC comms.
-
Some questions for F-15 connoisseurs
Skall replied to Skall's topic in Lock On: Flaming Cliffs 1 & 2
Did not know that about the 120. Thanks. I'll keep in mind the fact that the guide has not been updated for FC3. -
Guess I might be asking the wrong question. Maybe I just don't understand the role of AWACS. I thought their radar could pick up planes from long distances and relay that information to you. Time for some research. To the Internets!
-
Some questions for F-15 connoisseurs
Skall replied to Skall's topic in Lock On: Flaming Cliffs 1 & 2
1. That's just it. When I use mode 3 or 4 (vertical scan and boresight), it works as the manual states: I get up close, put the target on my boresight or just above it if vertical and I get a lock then fire away. However, mode 2 is clearly for LRS yet my HUD says VISUAL despite not being able to get a lock by putting targets on my boresight up close but being able to lock and shoot from 15nm away. 2. Makes sense and I realized it. Just pointing out the manual never mentions it.