Purzel
-
Posts
310 -
Joined
-
Last visited
Content Type
Profiles
Forums
Events
Everything posted by Purzel
-
Uih! Das ging ja schnell, gleich mal probieren... @buur Ja klappt! Saugeil! Danke! Ich füge hier morgen noch eine Zusammenfassung ein.
-
Hi @buur , Ja gerne, dieses Definition-Script läuft, für die Syrien-Map wäre "Shayrat" der Flugplatzname mit der ID "36", Eine Mission wäre zum Anschauen schon mal eine Hilfe... Danke für Dein Angebot! Ich bekomme beim Missionsstart keine Fehlermeldung, aber irgendwie muss ja da ein Flag gesetzt werden, dass ich später damit arbeiten kann. Ich weiß bloss nicht, wie ich aus dem Script das Flag auslesen kann, bzw. wo das im Script definiert wird. (evtl. ist "morto" oder "morte" der Flagname? "morte" = Der Tod, "morto" = tot ). Und wie frage ich das dann ab? Flag equals oder Flag is true? Also ich hab es schon probiert, bekomme aber die Abfrage für die Zerstörung der Runway irgendwie nicht hin. Wäre klasse, wenn Du mir eine Mission dazu erstellen könntest... Der Einfachheit halber kopiere ich Dir die Scripte aus dem anderen Thread hier her: Airbase und ID auslesen: Runway-Script: Und schonmal ein fettes Dankeschön im Vorraus!
-
Ja, das ist wohl nicht so einfach. Mit den Programmier-Sprachen kenne ich mich halt so gar nicht aus. Wo mache ich das mit dem Eventhandler im Mission Editor?
-
Danke für Deine Hilfe, aber das habe ich nicht gesucht, ich suche eine Abfrage, ob die Runway getroffen wurde. (Habe ich oben auch nochmal ergänzt, um keine Missverständnisse aufkommen zu lassen.) Die Wegpunkt-Funktion "runway-attack" (mit dem Dreieck auf der Runway) ist mir bekannt, es spielen aber Clients und dafür brauche ich eine Abfrage. Was die zwei Videos da oben zeigen ist für KI-Piloten... Ich möchte abfragen, ob die Runway von den Spielern getroffen wurde und dazu dann einen Trigger auslösen, dass alle flights wissen, dass die Runway auch getroffen wurde. Greetz Purzel
-
Hallo, gibt es eine Möglichkeit, eine Runway als Ziel für einen Runway-Strike zu definieren? Mit Gebäuden geht es ja über "assign as..." wenn man hinklickt, nur bei der Runway finde ich den Klick-Punkt für "assign as" nicht. Ich brauche eine Abfrage, ob die Startbahn wirklich getroffen wurde, damit ich einen Funkspruch an alle Spieler ausgeben kann. Ich habe auch schon mehreres probiert, wie z.B.: - Empfindliches Objekt draufstellen, das man dann halt zerbombt und der Trigger fragt das Objekt ab, ob zerstört, aber ich kriege die Dinger nicht unsichtbar, auch mit den 3 Häkchen bei "Hidden" nicht. - Mein zweiter Ansatz war eine Triggerzone mit Bedingung "Bombe in Zone", aber dann müsste ich alle (!) Bomben als Bedingung eintragen, und wenn eine Bombe 90° zur Landebahn in 50m Höhe durch die Triggerzone fliegt und abseits explodiert löst ja auch nur das Durchfliegen der Triggerzone auch aus, ob wohl die Bedingung ja nur dann auslösen soll, wenn die Bombe im Asphalt explodiert. Gibt es eine elegante sexy Lösung, die ich nicht kenne? Dann her damit! Gruß Purzel
-

CGTC - textures overhaul mod for the Caucasus map
Purzel replied to LucShep's topic in Texture/Map Mods for DCS World
I cannot install the CGTC 2.84.1 files. Is no more compatible to DCS 2.9xxxx I use OVGME. "Wrong Zip-format" Any tipps? -
Lösung: (auf Englisch)
-
X: Cockpit Perform Clickable Action – What am I doing wrong?
Purzel replied to TimRobertsen's topic in Mission Editor
Solution: -
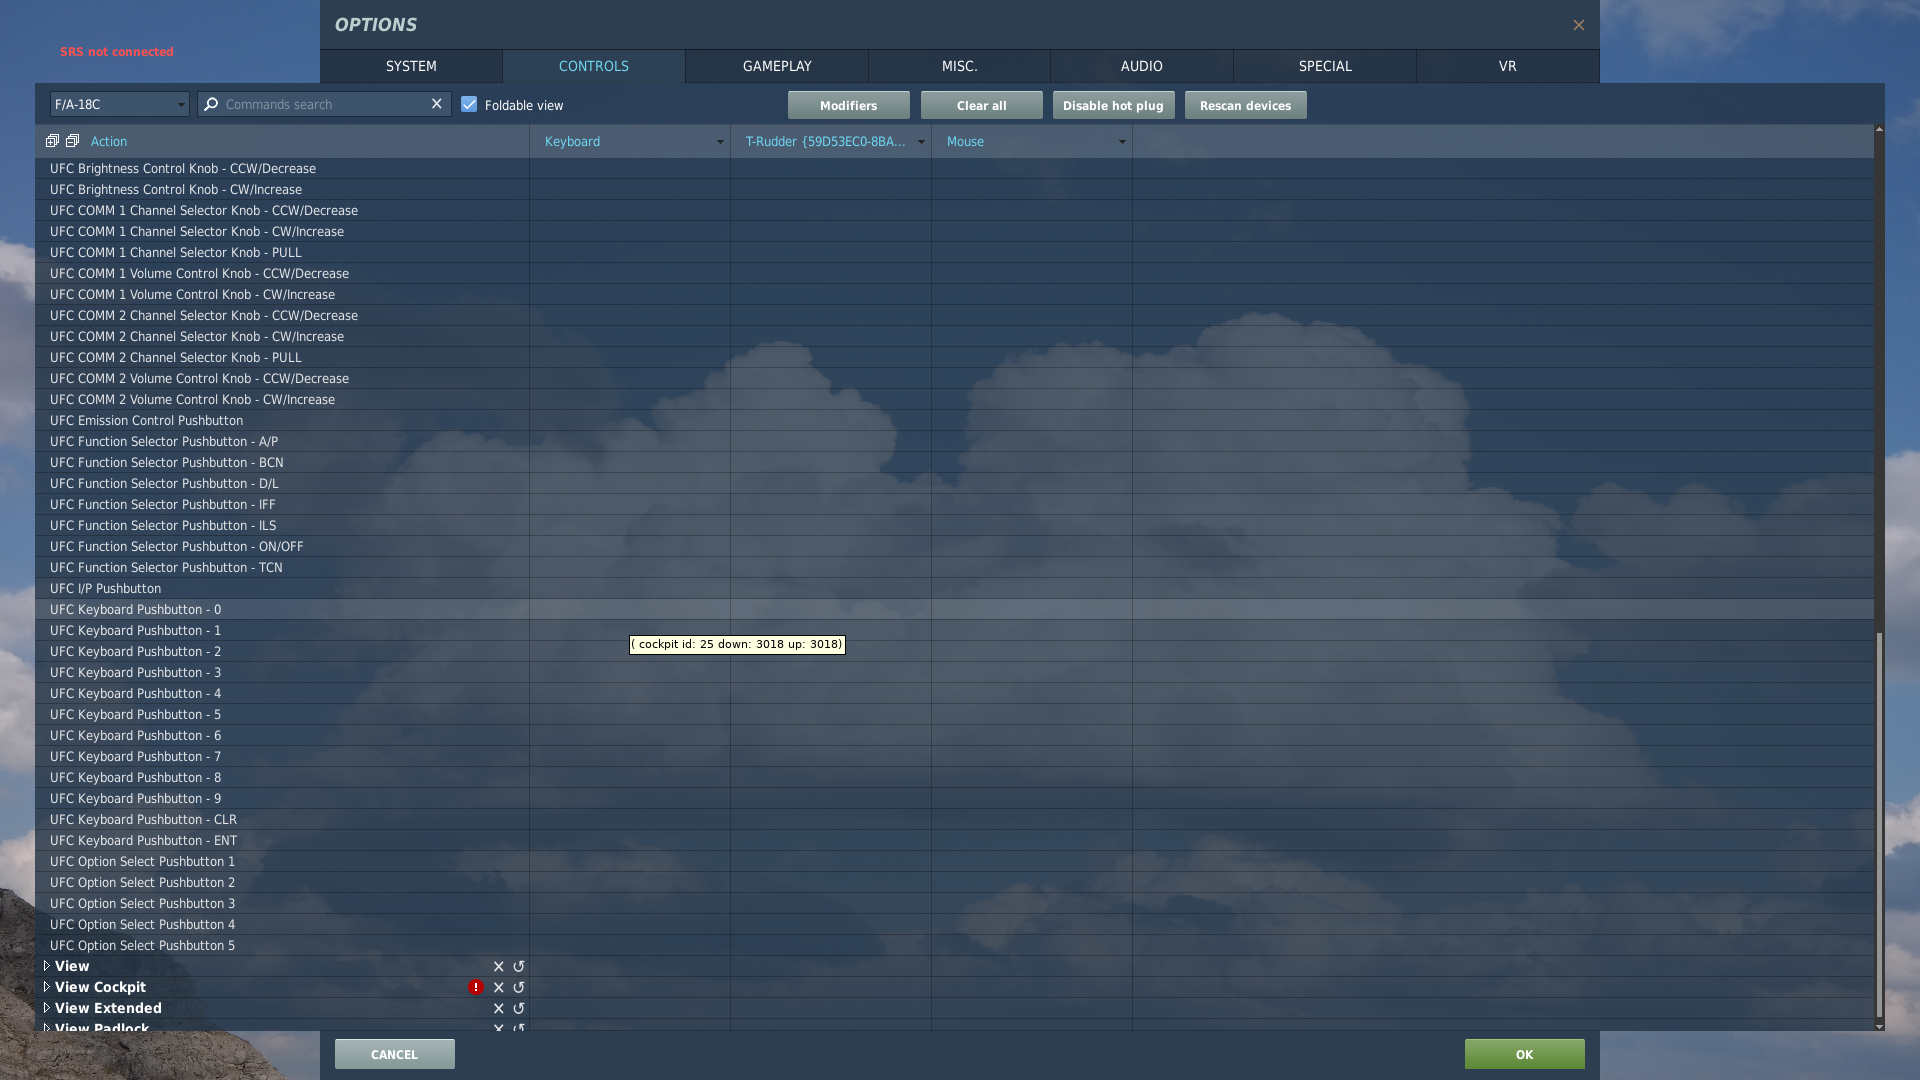
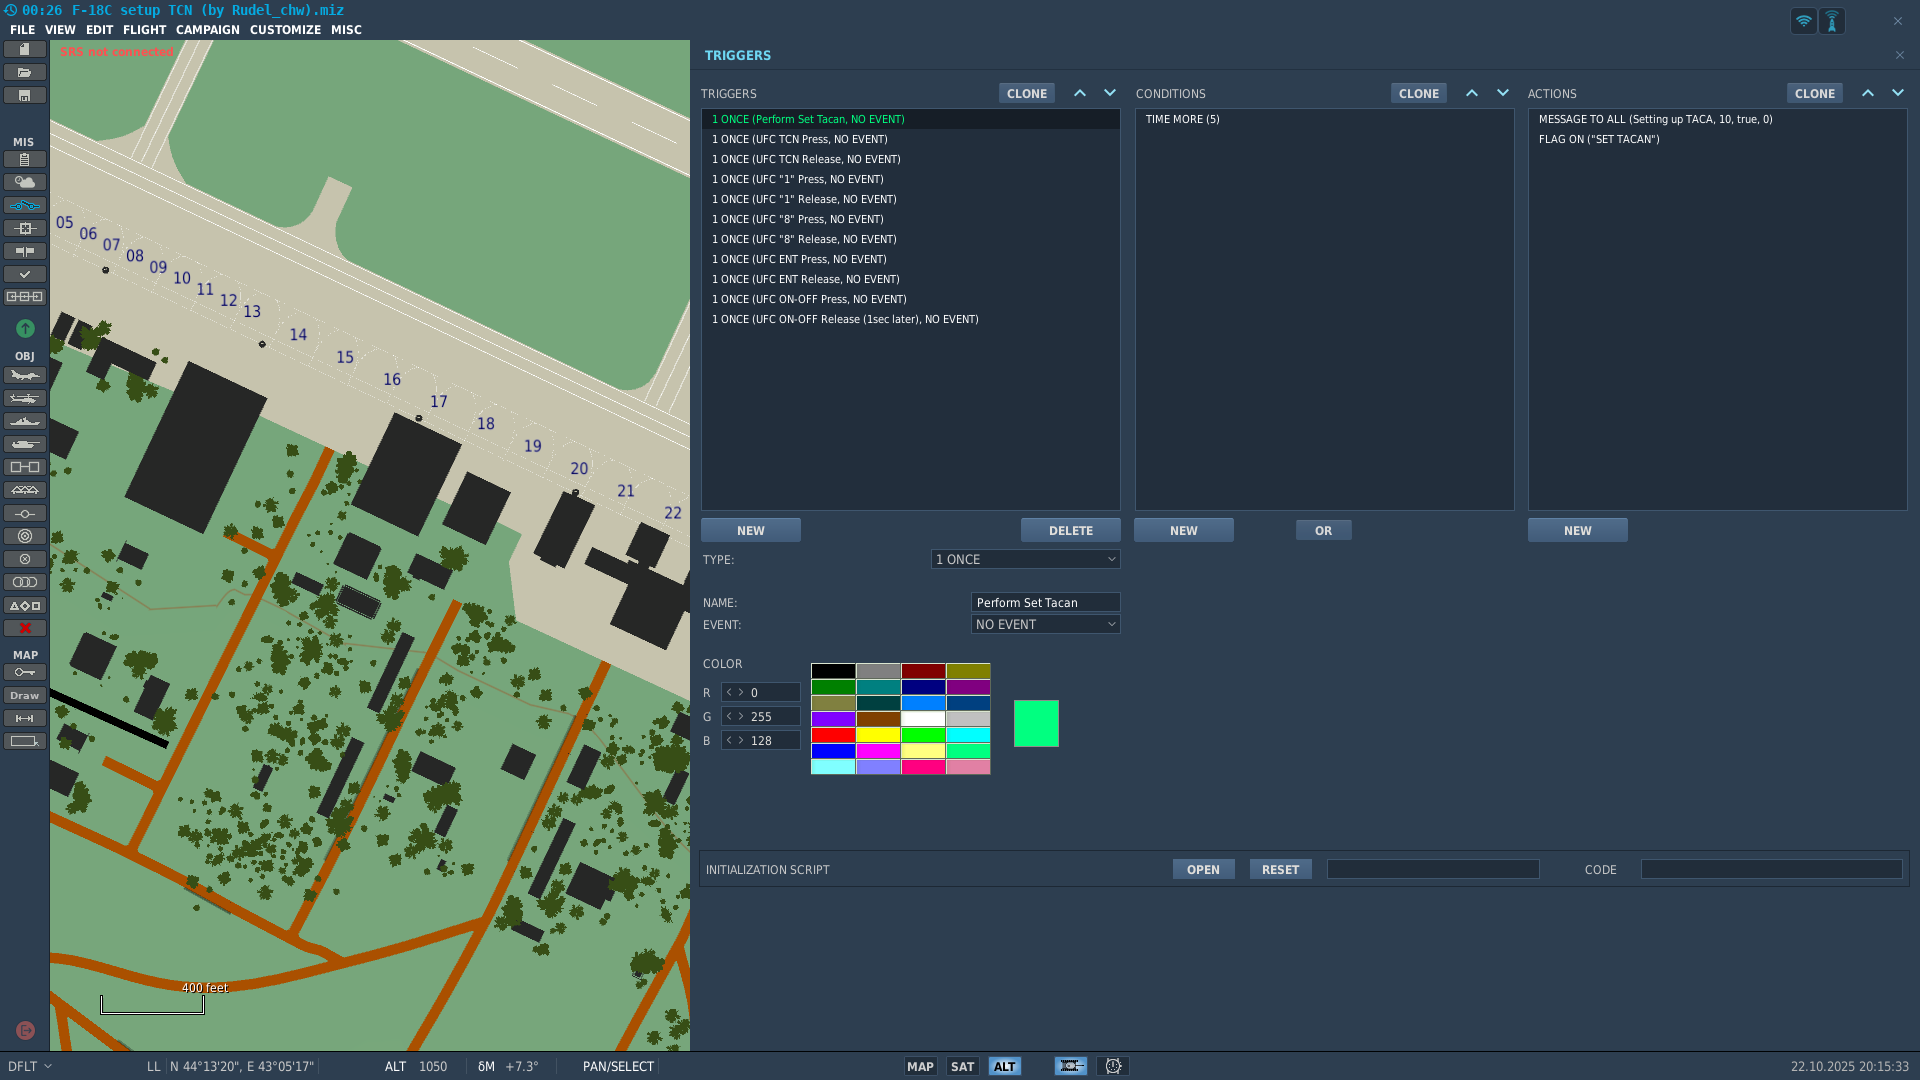
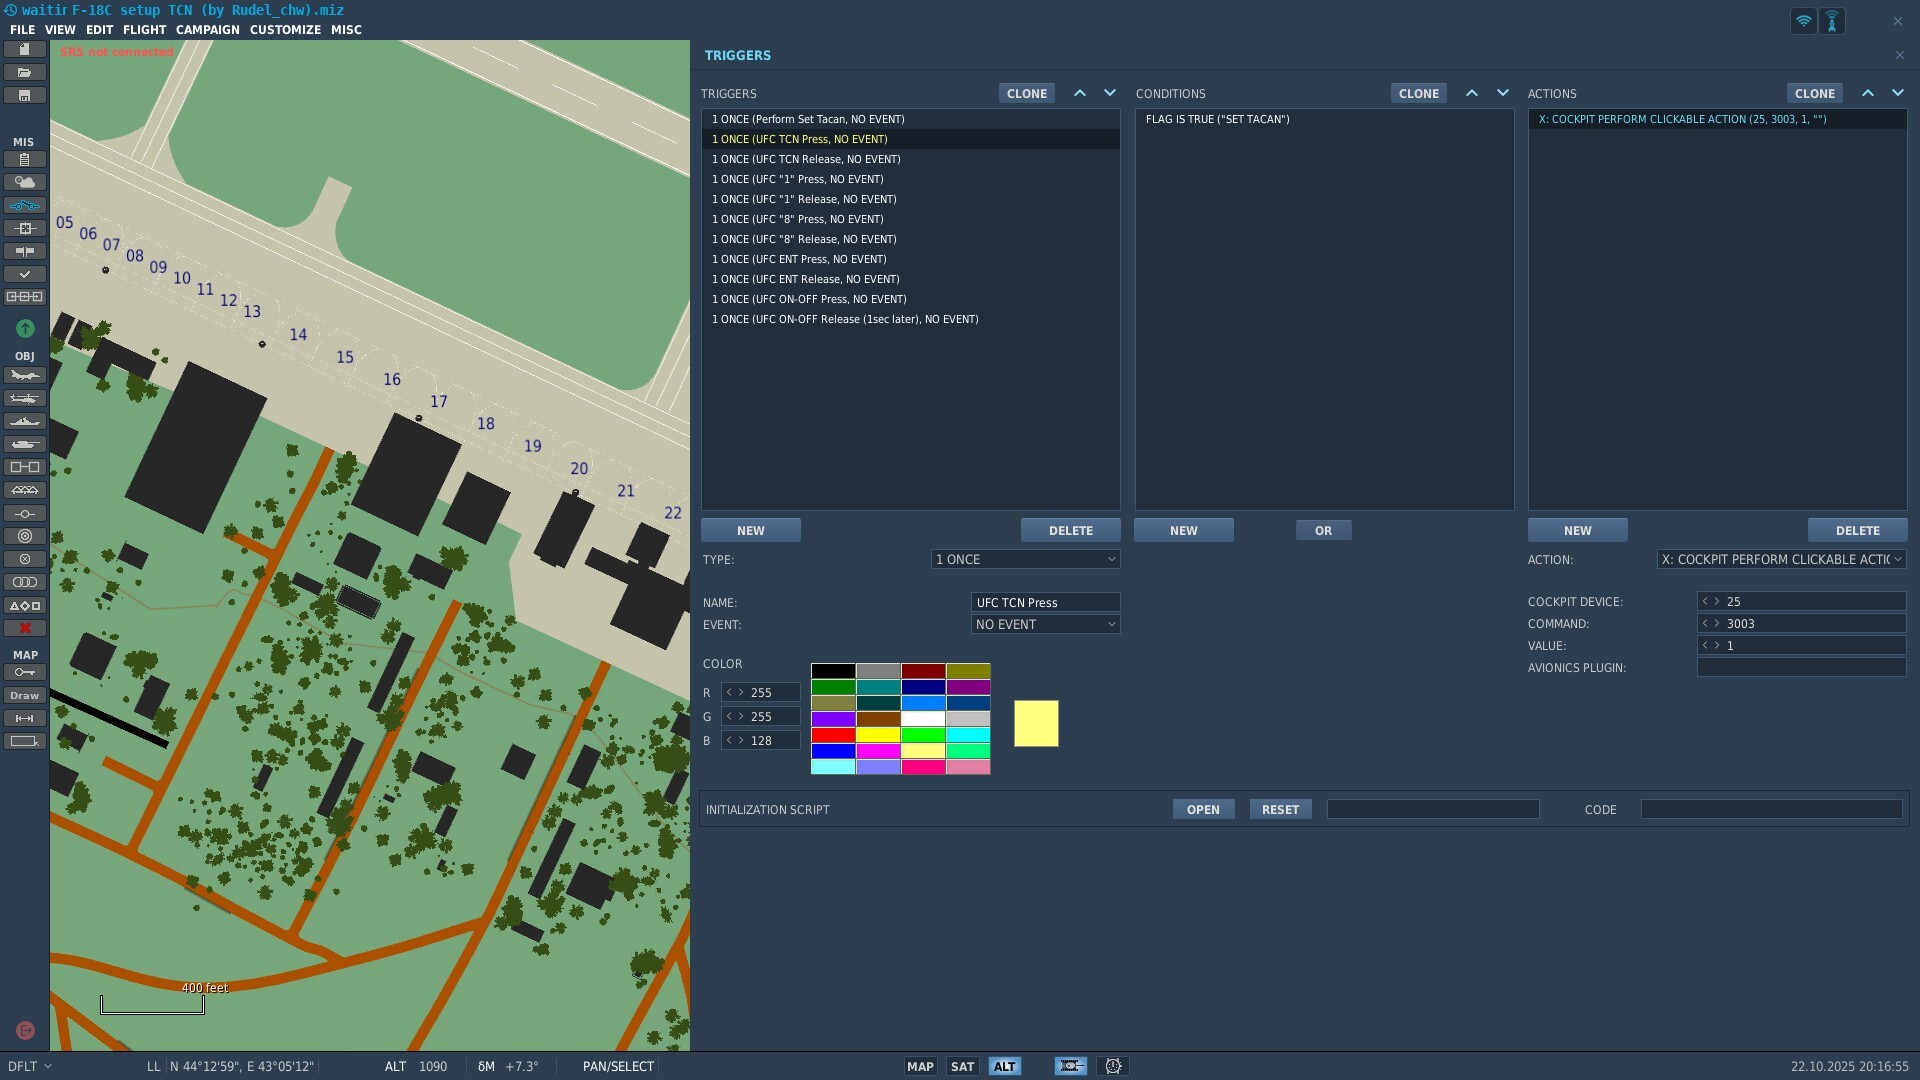
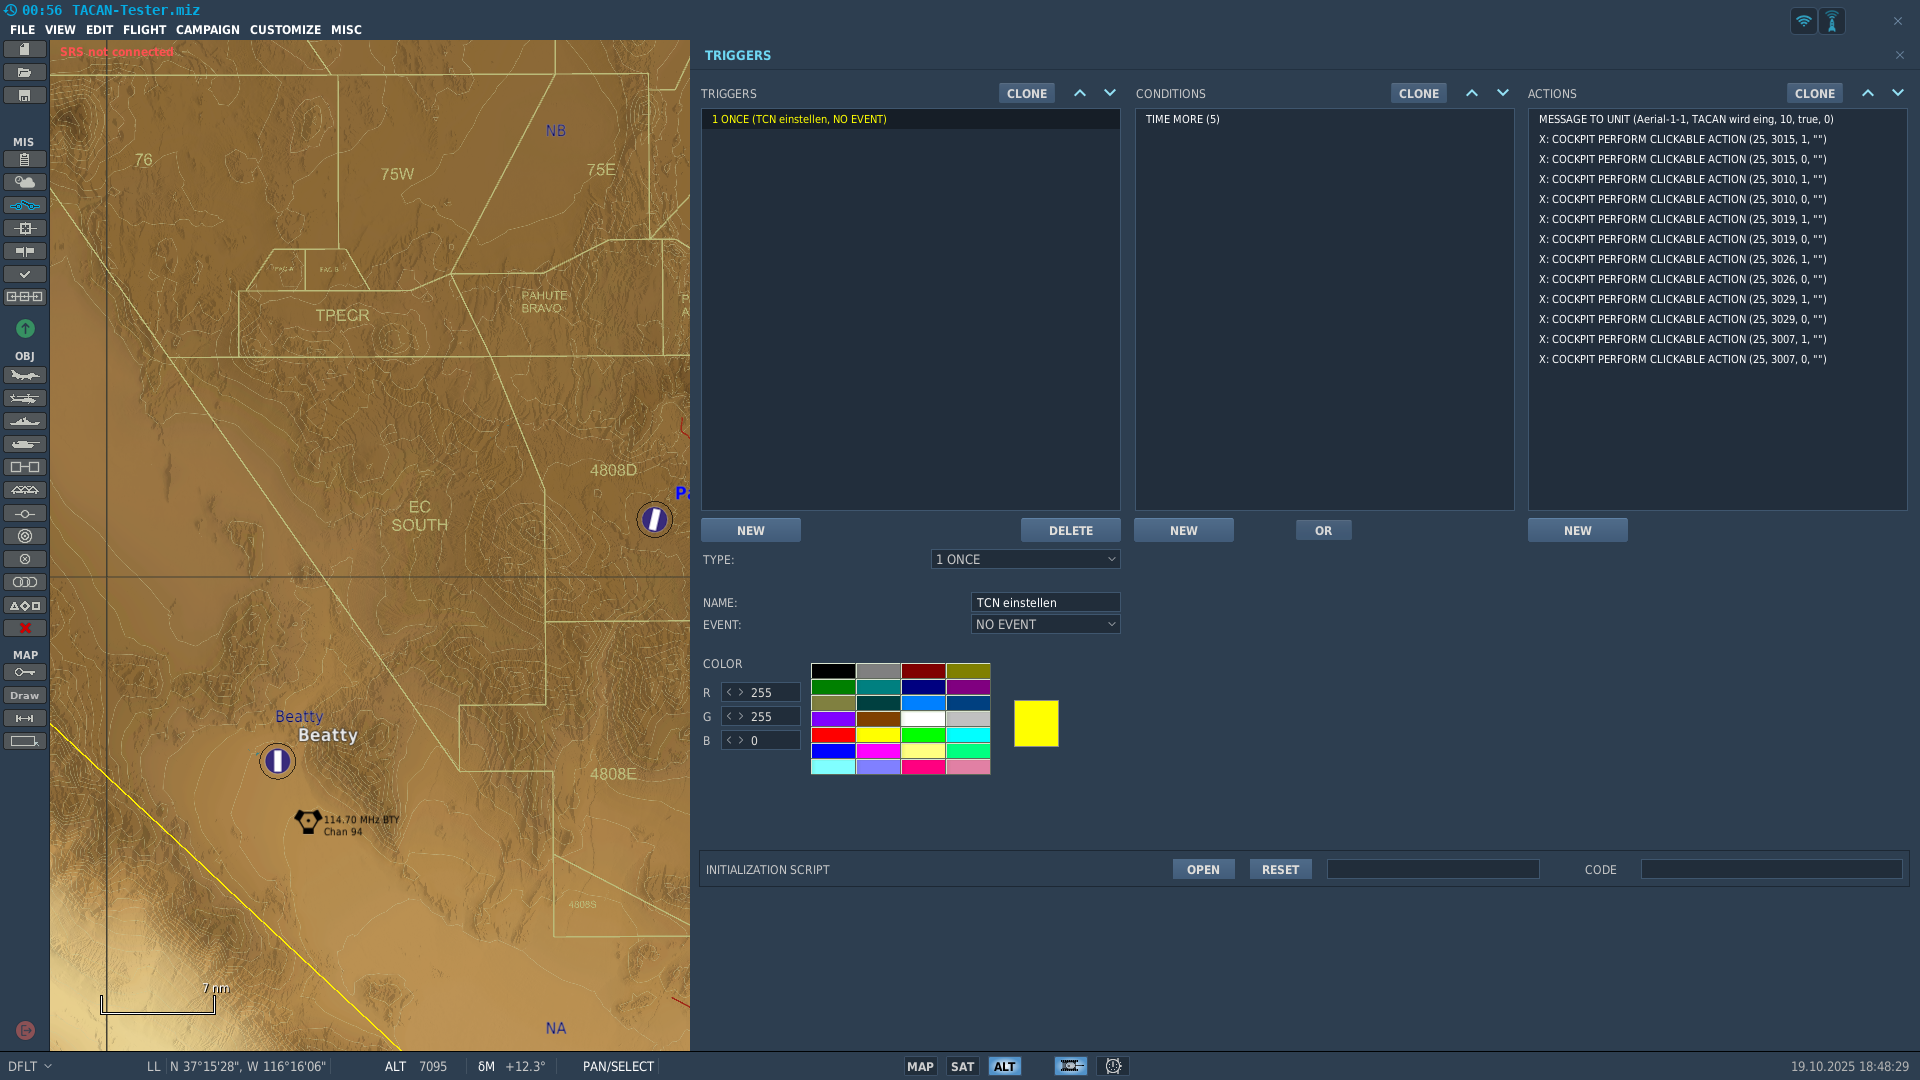
Hi, most of you know the issue, that you build a mission and want to preset some values for the player, so he can focus on flying without beeing distracted by inputs while in-flight. Imagine an AAR-scenario for training-purposes, and you just don't have to set this stuff will closing in to the tanker and even your fuel-probe comes out magically... Or (if you have no life ) you could code an personalized startup-sequence or whatever. In this tutorial I conclude several posts from different users so you don't have to search yourself for all informations. This tutorial regards to the F/A-18C "Hornet", but all "keystroke-codes" are different on each aircraft, keep this in mind if you're trying to setup other aircrafts. The tutorial can be used for airbourne or ground starts, I'm not sure, if it will work in multiplayer as well. Ok, let's go: 1.) I strongly recommend "Notepad ++" for editing .lua-files. Please note, that you'll have to set it up for DCS and .-lua-files first. 2.) Be sure DCS is not running. Open your C:\Users\YOUR-NAME\Saved Games\DCS or DCS.openbeta\Config-folder. Copy the lang.cfg-file and insert it in the same folder, rename it to autoexec.cfg ( <<< fastest way to create a .cfg-file) or use this one: autoexec.cfg Open the autoexec.cfg and insert the following code and save it: input = { command_code_tooltips = true, } 3.) After saving the file, you can close the window and open DCS. 4.) In DCS go into the options-menu (the gearwheel-symbol on top) > controls, and hover your mouse over the keyboard commands and will show you the device ID and key-stroke codes: This is the step you will have to do for every specific aircraft itself. You cannot read out the codes while ingame, you'll have to go the way from the main-menu! (click to enlarge) (This is the step you will have to do for every specific aircraft itself. Codes from the AH-64D are not the same as the A-10C, as the F-16, etc.) For the F/A-18C I've uploaded a file with the most needed codes. Keycodes DCS.xls Else you'll have to note all needed keystrokes with ID, Down- and Up-values. (Note that the down value "1" is only to push a button down, it will not get back until you create a new trigger with the UP-value "1". As an example: The TCN button is listed as ID 25, Down 3001, Up 3001. Note, that UP and DOWN are the same values. Create a new trigger "ONCE - Time more than 1 sec. - X: COCKPIT PERFORM CLICKABLE ACTION" with the following Values: Cockpit Device: 25, Command: 3001, Value:1 (This is the UFC TCN-button pushed down) It works in DCS as just a push of the TCN-button, but it stays pushed in and it will not glide back out. To released the button again you'll have to copy trigger and change the value to "0": Cockpit Device: 25, Command: 3001, Value:0 (This is the UFC TCN-button released) To change your TACAN to Ch.18 X, you have to know the keystroke-sequence (X is standard, so I'll let this out here, "Option1" is the upper one of five round buttons) (TCN - Option1 - 1 - 8 - ENT - ON/OFF) , now search in controls every keystroke you would have to do with mouse and note them. 5.) After all go into the mission-editor place your unit and open the triggers. Create the triggers (Type "ONCE", Condition: "Time more") as shown in the picture: Note that every button is triggered a second time "in and out". This will all happen in a second and your aircraft is good to go. I hope someone can use this tutorial. Greets Purzel Kudos to @Rudel_chw and @Yurgon and all others, who put their informations and efforts into this forum!

-
X: Cockpit Perform Clickable Action – What am I doing wrong?
Purzel replied to TimRobertsen's topic in Mission Editor
yeah, it's not even working with sending a blank text message to the player with a minimum display time. In your mission, what's the second trigger for? Flag on ("999") there's no reference in the other triggers? Everything else is self-explaining, thx for your great help with that topic! Actually I'm writing a list with the most important keystroke commands. I'll publish them later with a little tutorial, So everybody can use it for his own training-missions, or whatever... Greets Purzel -
X: Cockpit Perform Clickable Action – What am I doing wrong?
Purzel replied to TimRobertsen's topic in Mission Editor
THX, I did all the actions in the "ACTIONS" field one after each other, I'll try your mission later. Thx a lot! There's no possibilty to add the delay under the actions? Greetz Purzel
-
X: Cockpit Perform Clickable Action – What am I doing wrong?
Purzel replied to TimRobertsen's topic in Mission Editor
Nice, but it doesn't work for me... First I had not "autoexec.cfg", so I created the autoexec.cfg-file in Saved games/.../Config-folder. It's a blank file, I added nothing than input = {command_code_tooltips = true, } After that I'm able too read out the "cockpit-keystrokes". As example: the TCN button is listed as ID 25, Down 3001, Up 3001. Note, that UP and DOWN are the same values. So far so good, but if I create a new trigger "ONCE - Time more than 2 sec. - X: COCKPIT PERFORM CLICKABLE ACTION" with the following Values: Cockpit Device: 25, Command: 3001, Value:1 (This is the UFC TCN-button as listed above) it works in DCS as just a push of the TCN-button, but it stays pushed in and it will not glide back out. After I had a serie of clickable action in the triggers list for a change to TACAN Ch.18 X, you can see all pushed buttons (TCN - Option1 - 1 - 8 - ENT - ON/OFF), but they all stay pushed in. I even tried to put two "X: COCKPIT PERFORM CLICKABLE ACTION" each with the same values after each other, but the buttons stayed pushed. I took a look at "Banklers recovery-trainer" in which all of those switches are used the same way I did, but Bankler used only one action line to push and his cockpit-button went out again. And I don't understand the "Value"-value, it goes from "0", "0.1", "0.2", "0.3", ... up to "1" but I see no difference with any changes? What does that value mean? Any solutions to get it working? Greets Purzel -
X: Cockpit Perform Clickable Action – What am I doing wrong?
Purzel replied to TimRobertsen's topic in Mission Editor
Is there a list with all commands? I cannot find that CODES_TO_TOOLTIP line in the MissionEditor.lua? I think they changed something...? -
Hi Leute, ich möchte gerne bei einer Mission, die in der Luft beginnt, in der F/A-18C die TACAN, ICLS, ACLS, Link4 Kanäle/Frequenzen voreinstellen, dass sich der Spieler nicht mehr darum kümmern muss. TACAN und ILCS sollen im HSI auch schon geboxt sein. (Lasercodes und Bomben-Lasercodes voreinstellen wäre auch noch ein Wunsch) Wie kann ich das im Editor (ohne Moose oder so) bewerkstelligen? Geringe .lua-Grundkenntnisse sind vorhanden, mehr aber auch nicht, habe schon probiert andere Missionen zu reverse-engineeren, da werde ich aber nicht schlau draus. Mir reichen ein paar Code-Zeilen für Copy/Paste und wo man die verbaut. Danke schon mal für Eure Hilfe. Gruss Purzel
-
@Rapti I cannot open that .cmd-file with Notepad++, either by rightclick and "open with", nor by dragging the .cmd-file into Notepad++. How do I get this done? Cheers Purzel
-
### SKUNKWORKS-Installation Note > The process for updating DCS-BIOS is exactly the same as installing it. 1. Go to the [latest release][latest-release-url] 2. Download `DCS-BIOS_x.y.z.zip` 3. Extract the zip file 4. Within the extracted folder, copy the `DCS-BIOS` folder into the previously mentioned scripts folder. 5. **If your Scripts folder does not have an `Export.lua` file**, copy the `Export.lua` file over 6. **If your scripts folder _does_ have an `Export.lua` file**, add the following line to the end ```dofile(lfs.writedir() .. [[Scripts\DCS-BIOS\BIOS.lua]])``` Tip Still having trouble? Check out our [wiki][wiki-url], ask a question in [Discussions][discussions-url] or get in touch on [Discord][discord-url]. ## Usage #### Connect DCS-BIOS stream to your serial ports Both `socat` and [DCSBIOSBridge](dcsbiosbridge-url) can be used to connect to your device. This is the only part I don't understand: Which files are meant?
-
Hi folks, for my cockpit I've ordered an IFEI and an UFC from tekcreations a few years ago, when DCS-BIOS (the original Hub) was the real hot <profanity> back then. Now I've bought some newer stuff rom tekcreations (left and right brain-controllers, MasterArm and IRcool-panel), which requires Skunkworks BIOS and I've installed Skunkworks-BIOS step-by-step (see next post) as described by TekCreations (https://tekcreations.slab.com/public/posts/dcsbios-installation-skunkworks-byjgzhpu). Export.lua is updated and the new stuff is running. My older IFEI and UFC weren't running anymore (only, if I started the old DCS-BIOS parallel). As far as I understand Skunkworks is running in the background and does not have to be started everytime I start DCS (as the old BIOS). But I have to do everytime the following steps: Read out the COM-ports (4,5,9 and 13) and then I have open the "connect-serial-port" 4x and put in every window each of the four COM-port-numbers. Only after that I can use my hardware-panels. Randomly I've found out that the older IFEI and UFC are running under Skunkworks when I use the "connect-serial-port"-part as described above. Now my question: How can I spare this part with the four windows? Is there an automated way to go? Greetings Purzel PS: A I already asked Kieron from TekCreations, but he can't help me with that.
-
Excellent work! Outstanding! That's exactly, what we need.... Thank you and your team for all that efforts you put in this!!! Must be a lot of work... As far as I understand, you build a dedicated voice-setup for only NTTR, but wouldn't it be easier to generate just the names of all known airfields on all maps and just do the rest of the voice-lines in a generic way (giving runways, directions, heights, etc.), so you can mix them depending on what airfield you are? Correct me, if I'm wrong - I don't have any clue how your approach to this is or how it has to be programmed...! Do you consider a version without using "Voice Attack"...? We already have so many external tools running (as SRS, any-joystick-software, TrackIR, DCS BIOS, TacView, etc.) so another software would use resources again and I would like to have running as few as possible software in the background... Apart from this the "export.lua" needs a certain order of it's command-lines to work properly, so that could be a problem at the end... (I don't know if AI ATC will go into the export.lua, but you know what I mean... ) And if you need someone to test it, here I am... Greets Purzel
-
Hi, I've got an F/A-18C with two waypoints (1: airfield, 2: orbit). When a certain vehicle enters a certain zone the F/A-18 should get a new waypoint (WP3). Is it possible to get the new WP into the HSI, which isn't visible before activation? I've tried around with conditions and flags, but got no results. If I enter the 3rd WP from the beginning it is shown from the beginning in the HSI, no matter, if I set the WP flag true or false. If I don't add the 3rd WP I cannot adress anything to be the new 3rd WP, because of "you-cannot-activate-what-is-not-existing"... Any suggestions? Thx! Purzel
-
You'll have to get done the monitor-setup in Windows first! Try to put them beside of your main monitor ("center viewport"), because you will have less unused space to render (6.681.600 pixel vs. 7.705.600 pixel < horizontal vs. vertical alignment). Put both MFD in Windows in portrait (vertical) mode and SAVE your selection! Windows does not know, where your hardware monitors are placed in reality, so it doesn't matter, where you're aligning them in windows, for the following example-code put them side-by-side as shown below: Enter this under "Resolution" in DCS: 4.640*1440 (All monitors in portrait-mode and side-by-side!) Depending of the positions of your monitors displayed cont you may have to correct the values of the MFCDs... (Just guess and change the pixel-values in counts of 10 and see, if you're getting them to the right place, only if neccessary) Your monitorsetup.lua code then should look like this: (Hint: "Description = 'Center+LMFD+RMFD 4.640*1440' " write your resolution for this aircraft into the description-codeline, so you can change the DCS-resolution-values ingame without calculator) --------------------------------------------------------------------------------------- _ = function(p) return p; end; name = _('AH-64D'); Description = 'Center+LMFD+RMFD 4.640*1440' Viewports = { Center = { x = 0; y = 0; width = 3440; height = 1440; viewDx = 0; viewDy = 0; aspect = 43/18; } } LEFT_MFCD = { x = 0; y = 640; width = 600; height = 600; } RIGHT_MFCD = { x = 600; y = 640; width = 600; height = 600; } UIMainView = Viewports.Center GU_MAIN_VIEWPORT = Viewports.Center --------------------------------------------------------------------------------- All the above should work without the ViewportHandling-stuff. dofile(LockOn_Options.common_script_path.."ViewportHandling.lua") try_find_assigned_viewport("RIGHT_MFCD")
-
Is there a complete list with used buttons/switches/potentiometers, 4-way-switches or analog-joysticks to build into the TEDAC-grips? I don't want to buy the wrong stuff. Thx ! @Assamita: You've got PN
-
Does anyone knows the size of the tactile pushbutton-parts (for e.g. the "SYM"-rockers around the TEDAC monitor) and would be so kind and tell me... I'll print hannibals TEDAC, so I need the infos... wide should be 6x6mm, but I need the height of the push-part of such a button: (Or does anyone have a not-to-expensive shop which sells these button with LEDs, should be located in EU):
-
[How to] Export displays like RWR and CMSP set-up guide - Jan 2021
Purzel replied to jonsky7's topic in Multi-Display Bugs
*kicked again* What is the viewport for the F/A-18C? I've got one little 480 x 480px monitor plugged into my GPU (it works, it shows the desktop), is there way to connect it and get it run without that helios stuff? Somewhere I've found this code: F18_RWR = { x = 3421; y = 305; width = 480; height = 480; } Any ideas what could be wrong? Or how I could connect it via USB Thx!
-
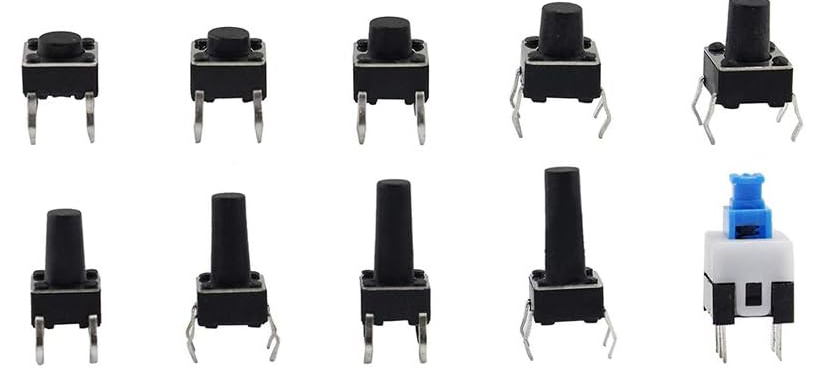
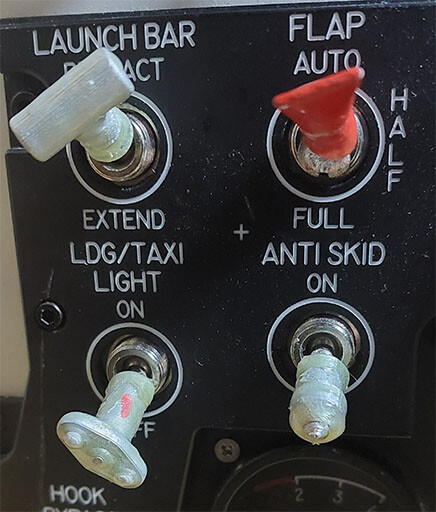
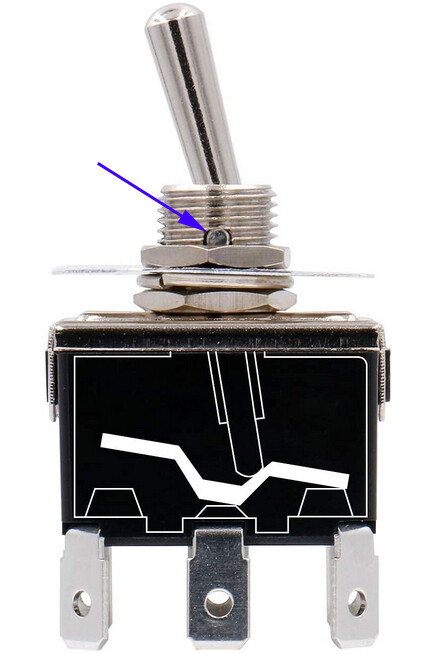
Hi folks, I'm searching for 2- and 3-way switches for my F/A-18C cockpit which have an axis so the levers cannot rotate on their longitudinal axis. I need 12mm threads to screw/fit them in the holes and more than only one switch-row (means 6-9 connectors on the bottom) Does anyone have some part-numbers or a shop for me? (Please suggest only european shops, e.g. mouser will charge 25 only for postal-fees from US to EU) I don't want to sell my left kidney and my first born, so please don't tell me original parts or something else expensive. The best option for me would be switches with flat levers, not round ones, which I can easily print caps for. I'm done with round levers, because the 3d-printed stuff will rotate on those as seen below. Thanks in advance Greetings Purzel The blue arrow points to the axis, which prevent the longitudinal rotation of the lever: Nope, the lever caps should not turn:
-
Would you please send the files, even if they're not finished, I just need to test-print them to see, if they're fitting to the grips I have.... Thx! Greetings Purzel