Purzel
-
Posts
290 -
Joined
-
Last visited
Content Type
Profiles
Forums
Events
Everything posted by Purzel
-
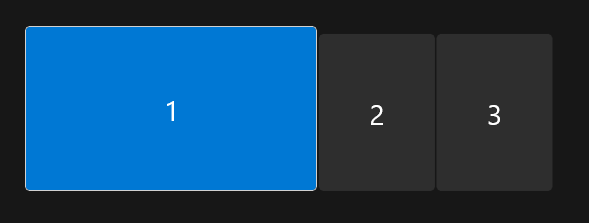
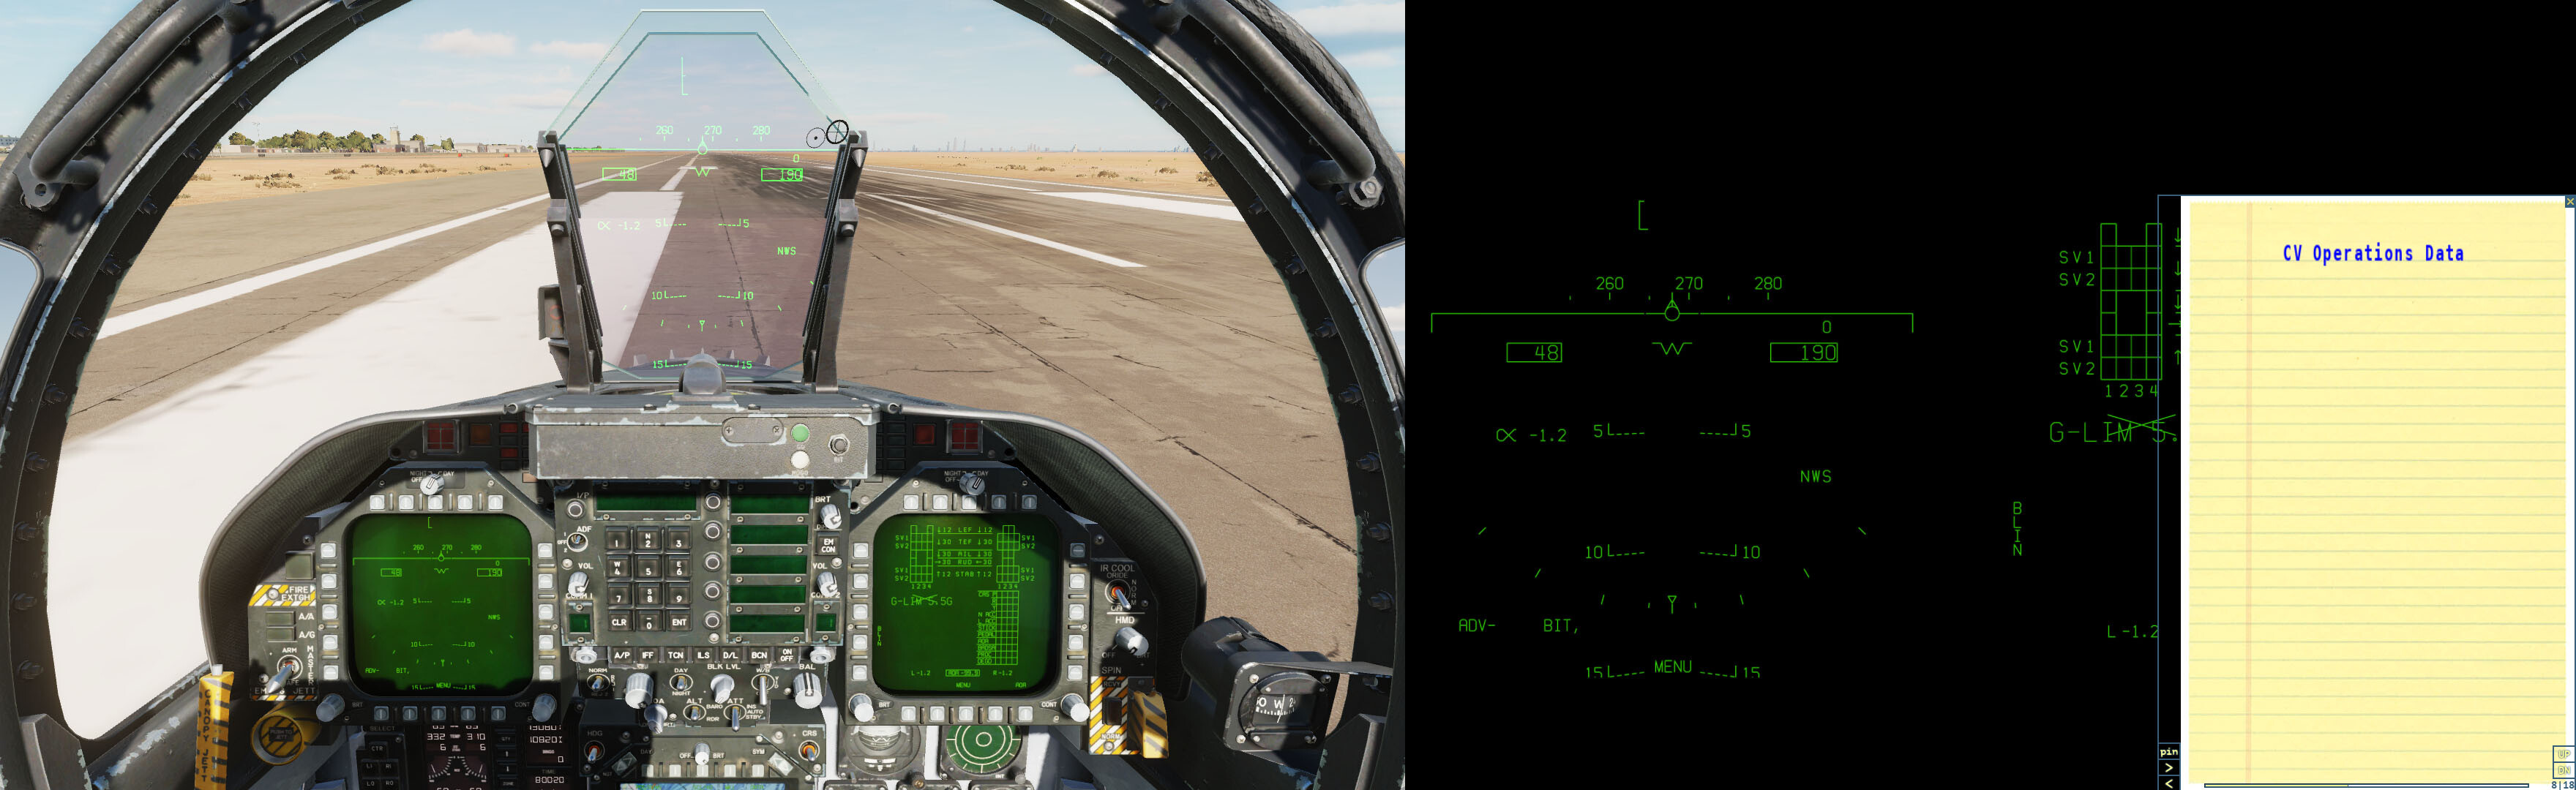
You'll have to get done the monitor-setup in Windows first! Try to put them beside of your main monitor ("center viewport"), because you will have less unused space to render (6.681.600 pixel vs. 7.705.600 pixel < horizontal vs. vertical alignment). Put both MFD in Windows in portrait (vertical) mode and SAVE your selection! Windows does not know, where your hardware monitors are placed in reality, so it doesn't matter, where you're aligning them in windows, for the following example-code put them side-by-side as shown below: Enter this under "Resolution" in DCS: 4.640*1440 (All monitors in portrait-mode and side-by-side!) Depending of the positions of your monitors displayed cont you may have to correct the values of the MFCDs... (Just guess and change the pixel-values in counts of 10 and see, if you're getting them to the right place, only if neccessary) Your monitorsetup.lua code then should look like this: (Hint: "Description = 'Center+LMFD+RMFD 4.640*1440' " write your resolution for this aircraft into the description-codeline, so you can change the DCS-resolution-values ingame without calculator) --------------------------------------------------------------------------------------- _ = function(p) return p; end; name = _('AH-64D'); Description = 'Center+LMFD+RMFD 4.640*1440' Viewports = { Center = { x = 0; y = 0; width = 3440; height = 1440; viewDx = 0; viewDy = 0; aspect = 43/18; } } LEFT_MFCD = { x = 0; y = 640; width = 600; height = 600; } RIGHT_MFCD = { x = 600; y = 640; width = 600; height = 600; } UIMainView = Viewports.Center GU_MAIN_VIEWPORT = Viewports.Center --------------------------------------------------------------------------------- All the above should work without the ViewportHandling-stuff. dofile(LockOn_Options.common_script_path.."ViewportHandling.lua") try_find_assigned_viewport("RIGHT_MFCD")

-
Is there a complete list with used buttons/switches/potentiometers, 4-way-switches or analog-joysticks to build into the TEDAC-grips? I don't want to buy the wrong stuff. Thx ! @Assamita: You've got PN
-
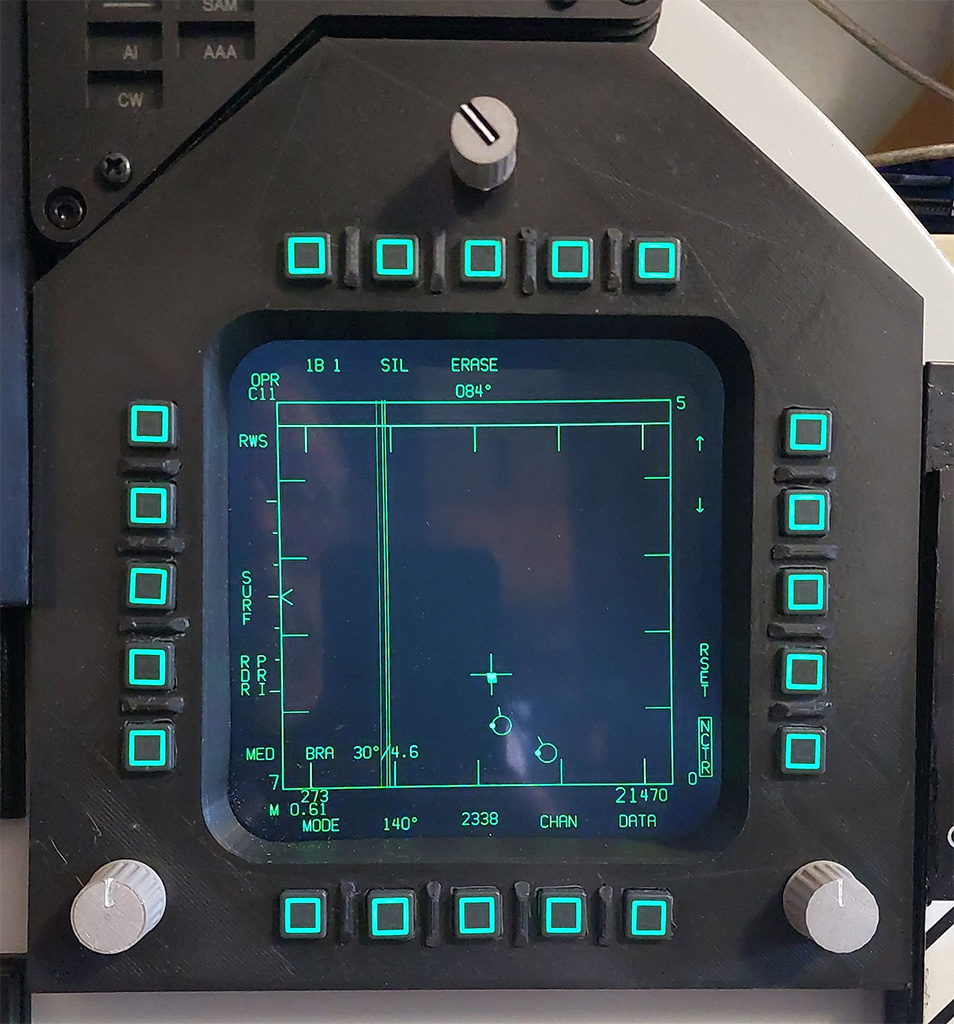
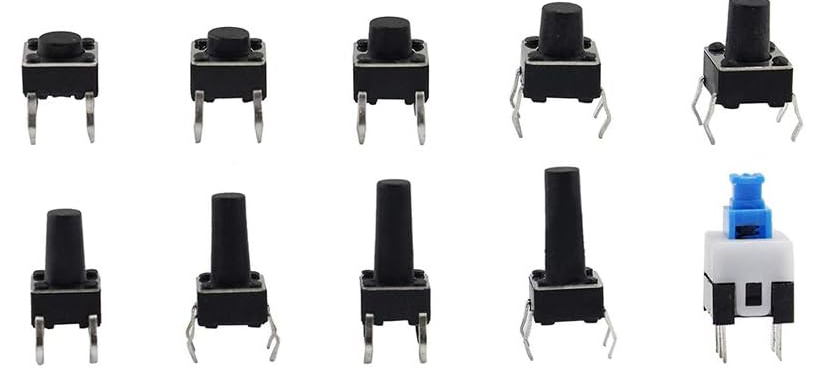
Does anyone knows the size of the tactile pushbutton-parts (for e.g. the "SYM"-rockers around the TEDAC monitor) and would be so kind and tell me... I'll print hannibals TEDAC, so I need the infos... wide should be 6x6mm, but I need the height of the push-part of such a button: (Or does anyone have a not-to-expensive shop which sells these button with LEDs, should be located in EU):
-

[How to] Export displays like RWR and CMSP set-up guide - Jan 2021
Purzel replied to jonsky7's topic in Multi-Display Bugs
*kicked again* What is the viewport for the F/A-18C? I've got one little 480 x 480px monitor plugged into my GPU (it works, it shows the desktop), is there way to connect it and get it run without that helios stuff? Somewhere I've found this code: F18_RWR = { x = 3421; y = 305; width = 480; height = 480; } Any ideas what could be wrong? Or how I could connect it via USB Thx!
-
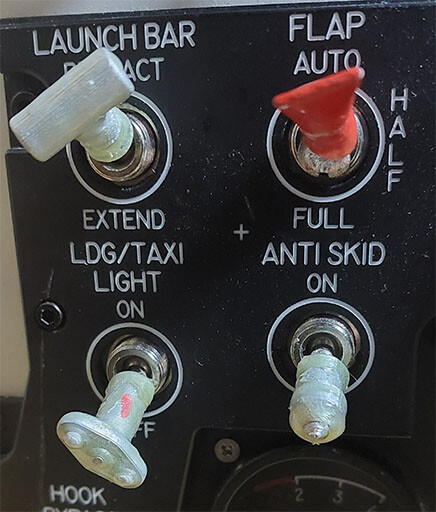
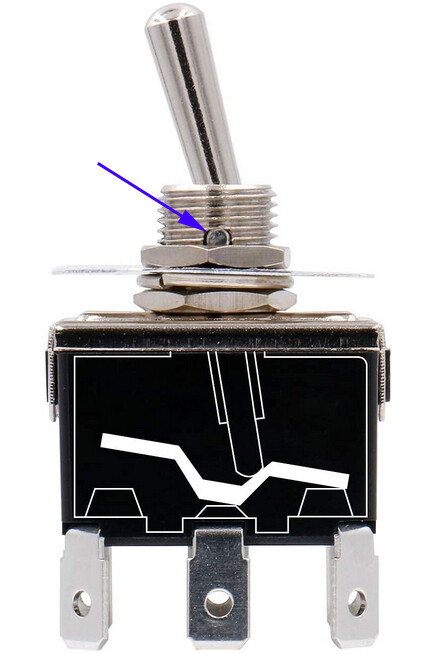
Hi folks, I'm searching for 2- and 3-way switches for my F/A-18C cockpit which have an axis so the levers cannot rotate on their longitudinal axis. I need 12mm threads to screw/fit them in the holes and more than only one switch-row (means 6-9 connectors on the bottom) Does anyone have some part-numbers or a shop for me? (Please suggest only european shops, e.g. mouser will charge 25 only for postal-fees from US to EU) I don't want to sell my left kidney and my first born, so please don't tell me original parts or something else expensive. The best option for me would be switches with flat levers, not round ones, which I can easily print caps for. I'm done with round levers, because the 3d-printed stuff will rotate on those as seen below. Thanks in advance Greetings Purzel The blue arrow points to the axis, which prevent the longitudinal rotation of the lever: Nope, the lever caps should not turn:
-
Would you please send the files, even if they're not finished, I just need to test-print them to see, if they're fitting to the grips I have.... Thx! Greetings Purzel
-
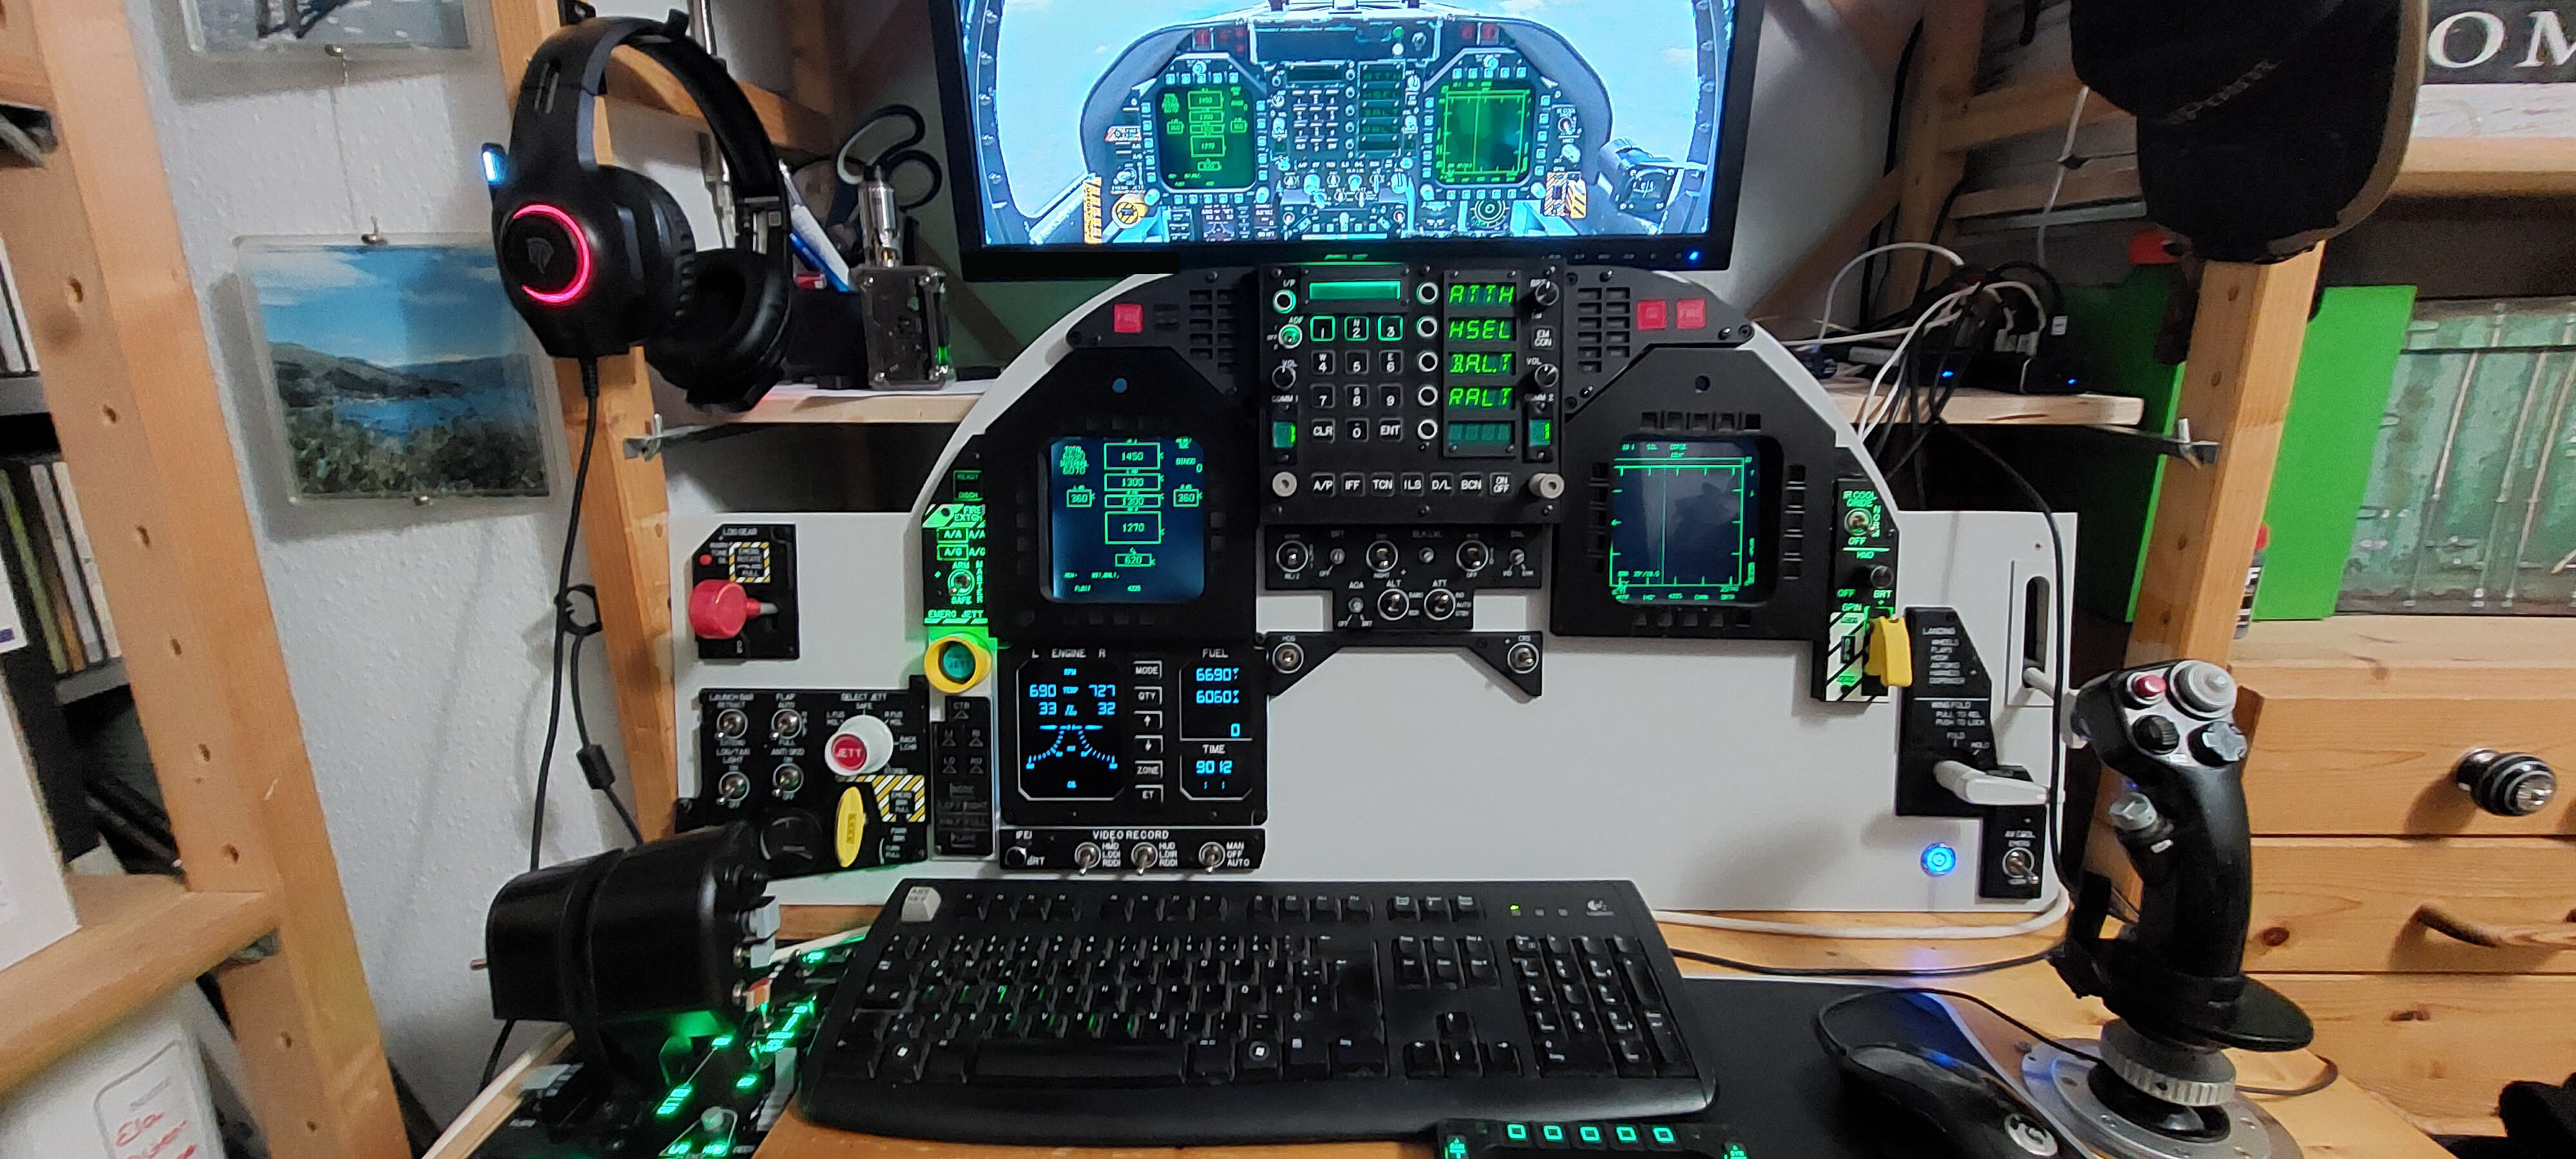
Hi folks, that's the situation: I've build a deskpit and now I want to get the panels backlit by an LED-strip I've bought. I'm using an arduino micro-pro board and the hook-/gear-down-LEDs are working. I'm working with the DCSbios original branch. But I can't find the DCSbios-code for the instrument-panels LEDs, this is the only thing I can find regarding on the instrumentpanels: So would someone be so nice to tell me the correct DCSbios-code? (I've set the code below already to PIN5 of the arduino-board.) And what ist the code to insert at the "your code here"-part? THX Purzel INST PNL Dimmer FA-18C_hornet/INST_PNL_DIMMER Input: set the position of the dial DcsBios::PotentiometerEWMA<5, 128, 5> instPnlDimmer("INST_PNL_DIMMER", PIN5); void onInstPnlDimmerChange(unsigned int newValue) { /* your code here */ } DcsBios::IntegerBuffer instPnlDimmerBuffer(0x7536, 0xffff, 5, onInstPnlDimmerChange); Integer Output: position of the potentiometer DcsBios::ServoOutput instPnlDimmer(0x7536,PIN5, 544, 2400);
-
Tonight I've got an idea... (no, not one of these "hold-my-beer"-ideas): Instead of let everybody searching on his own to get the fitting electronic-parts, why don't we just disassemble two X-Box-controllers, so everybody just need to solder some longer cables from the switches to the x-box-pcb... That would be my attempt. Does anyone have done this before? Is it makeable? Could be the fastest way to get a working TEDAC? (Downloading and printing the grips, a little soldering, put X-Box-stuff inside, assemble the grips, ready-to-fly) I don't own a X-Box, so I don't now, if the would be possible... It's just an idea - your thoughts?
-
@flanker0ne Would share these files? Are building them for already existing TEDAC-files? (e.g. from Hannibal, SrSosio or Assamita) or do you do your own TEDAC-build? Would be great to get some nice files...
-
@maikchaos Wo füge ich denn diese local kneeY (etc.) Zeilen in der ViewportHandling.lua ein? Hier ist meine ViewportHandling.lua: -- positioning on screen in HUD Only view function update_screenspace_diplacement(aspect,is_left,zoom_value) local w = LockOn_Options.screen.width; local h = LockOn_Options.screen.height; if LockOn_Options.screen.oculus_rift then local ui_x,ui_y,ui_w,ui_h = get_UIMainView() w = ui_w; h = ui_h; end local x0 = 0 local w0 = 0.5 * h local aspect = aspect or 1 local zoom_value = zoom_value or 0 local default_width = w0 + (64 * zoom_value) if default_width > h then default_width = h end if default_width > 0.5 * w then default_width = 0.5 * w end local default_height = default_width / aspect local default_y = h - default_height local default_x = w - default_width - x0 if is_left then default_x = x0 end dedicated_viewport = {default_x,default_y,default_width,default_height} dedicated_viewport_arcade = {default_x, 0 ,default_width,default_height} end function make_viewport(aspect,is_left,is_top,default_width,zoom_value) local w = LockOn_Options.screen.width; local h = LockOn_Options.screen.height; if LockOn_Options.screen.oculus_rift then local ui_x,ui_y,ui_w,ui_h = get_UIMainView() w = ui_w; h = ui_h; end local x0 = 0 local w0 = 0.5 * h local aspect = aspect or 1 local zoom_value = zoom_value or 0 local default_width = default_width or w0 default_width = default_width + (64 * zoom_value) if default_width > h then default_width = h end if default_width > 0.5 * w then default_width = 0.5 * w end local default_height = default_width / aspect local default_y = h - default_height local default_x = w - default_width - x0 if is_left then default_x = x0 end if is_top then default_y = 0 end return {default_x,default_y,default_width,default_height} end function set_full_viewport_coverage(viewport) dedicated_viewport = {viewport.x, viewport.y, viewport.width, viewport.height} dedicated_viewport_arcade = dedicated_viewport purposes = {render_purpose.GENERAL, render_purpose.HUD_ONLY_VIEW, render_purpose.SCREENSPACE_OUTSIDE_COCKPIT, render_purpose.SCREENSPACE_INSIDE_COCKPIT} -- set purposes to draw it always render_target_always = true end -- try to find assigned viewport function try_find_assigned_viewport(exactly_name,abstract_name) local viewport = find_viewport(exactly_name) or find_viewport(abstract_name) if viewport then set_full_viewport_coverage(viewport) end return viewport end
-
So, aktuell schaut's so aus: _ = function(p) return p; end; name = _('F/A-18C 4056x1080'); Description = 'Mainscreen +2 MFCDs + Kneeboard =4056x1080' Viewports = { Center = { x = 0; y = 0; width = 1920; height = 1080; viewDx = 0; viewDy = 0; aspect = 1920/1080; } } Gui = { x = 0; y = 0; width = 1920; height = 1080; } LEFT_MFCD = { x = 1935; y = 250; width = 700; height = 700; } RIGHT_MFCD = { x = 2725; y = 250; width = 700; height = 700; } KNEEBOARD = { x = 3360; y = 0; width = 630; height = 760; } UIMainView = Gui UIMainView = Viewports.Center GU_MAIN_VIEWPORT = Viewports.Center Obwohl ich die Startpunkte des 4. Monitors und die Knieboardmaße mit 600x800 zunächst eingetragen hatte, wird das Kneeboard nicht bildschirmfüllend im ganz rechten Monitor (600x800) dargestellt, sondern auch da verschoben, so dass ich es jedesmal erst verschieben und einrichten muss. Ich hatte in obigem Code zuerst die Startpunkte & Maße vom 4. Monitor eingegeben, aber irgendwie füllt mir das Kneeboard den 4. Monitor nicht aus.
-
@caponi, ich bin heute abend eh im FL-DC. Die Auflösung in DCS stimmt schon. @xfirf Das Problem ist, dass ich die Kante zum Ziehen nicht erwische, weil die DDI-Displays zu klein sind. Habe jetzt aber mal ein wenig Threads durchsucht und rumprobiert und dem Problem glaube ich auf der Spur.
-
Hi, ich habe für mein F/A-18C Cockpit drei Monitore zusätzlich zum Hauptbildschirm: Auflösung (v.l.n.r.): 1920x1080, 768x1024, 768x1024 und 600x800 Auf Monitor 4 soll das Kneeboard angezeigt werden. Es wird aber in Monitor 3 verschoben: Was muss ich in der MonitorSetup.lua eintragen, damit das Kneeboard entweder auf dem Bildschirm 1 oder auf Bildschirm 4 angezeigt wird? Gibt es dafür einen Eintrag in der MonitorSetup.lua? Aktuell schaut diese so aus: Die 700x700 Größenangaben der LEFT_ und RIGHT_MFCD Einträge sind der Tatsache geschuldet, dass ich die Displays hinter TM Cougar-Rahmen verbaut habe und die DDI's sonst abgeschnitten dargestellt würden. Ich meine, mal irgendwas zu einem Kneeboard-Eintrag gehört zu haben, diesen Eintrag suche ich... Danke Gruss Purzel
-
3D Print file repository thread for home cockpits
Purzel replied to BIGNEWY's topic in 3D Printing for DCS
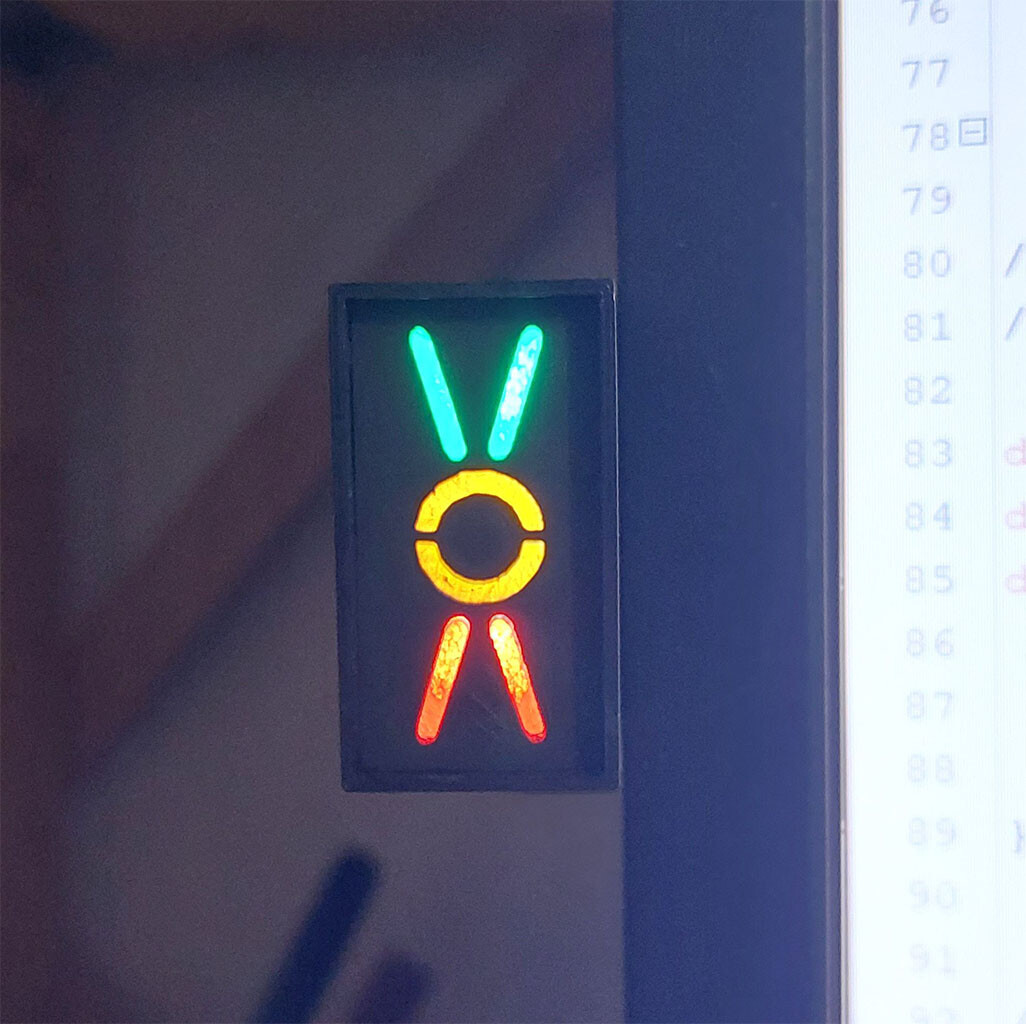
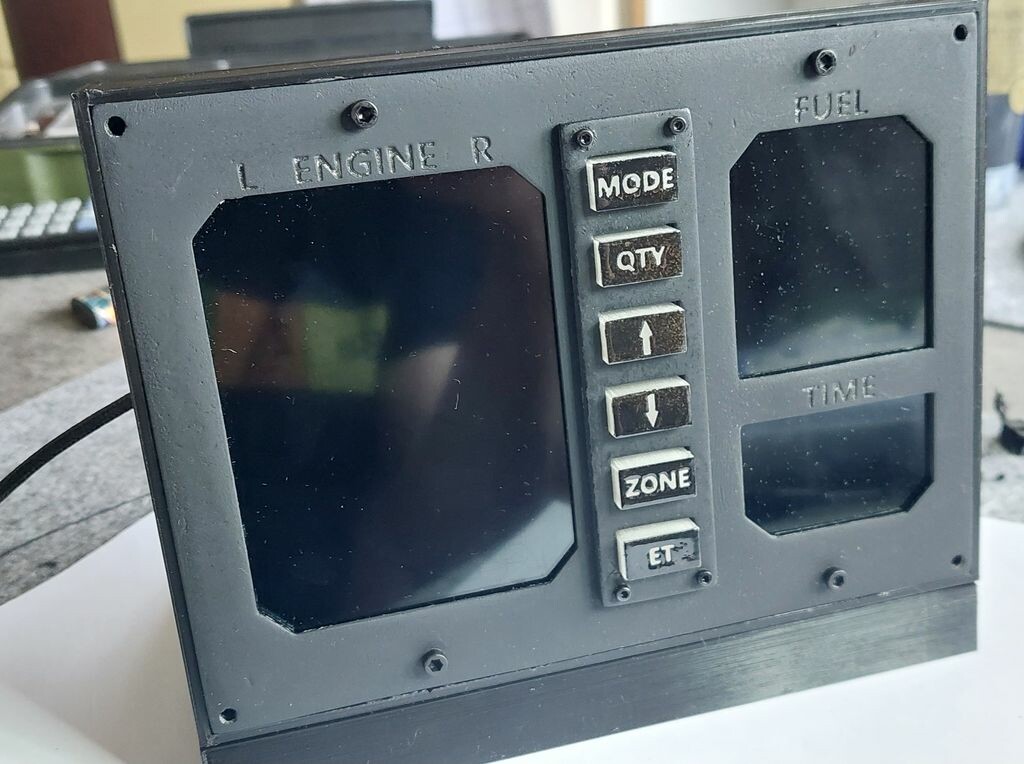
You may have a look at my thingiverse-page: https://www.thingiverse.com/purzel24/designs F/A-18C Thrustmaster Cougar Replacement: https://www.thingiverse.com/thing:5923061 AOA Indexer: https://www.thingiverse.com/thing:6274425 IFEI: https://www.thingiverse.com/thing:6242816
-
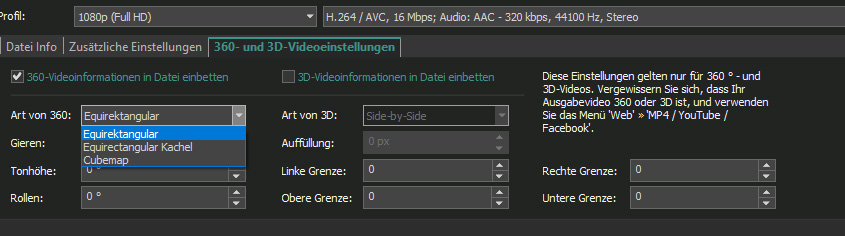
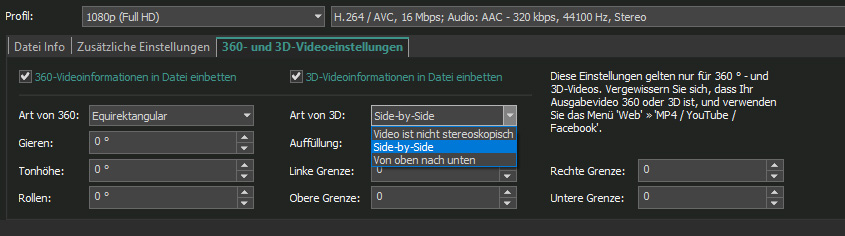
Hi pilots, I post my question here, because I think, here I'll get the best chances for an answer... Is it possible to capture a VR-video from DCS, in which the player sees my head-movement, but can change his own sight by looking arround in a 360° cockpit. Or is it only possible to do a video with only my view? Or only in 360°? The goal is to do a video, which can be viewed in a HMD-device (of course in 3D) via YouTubeVR. What kind of options do I have to set in DCS to capture correctly? (e.g. for a 360° view) What kind of settings do i have to use in a video-editing-program to save it? I'm using the free "VSDC Free Video Editor". I've tried arround with with some settings, but I can't get it work. And: The eye-distance is not correct as you can see in this video (please try with your HMD!), how do I get this done? THX in advance! Purzel
-
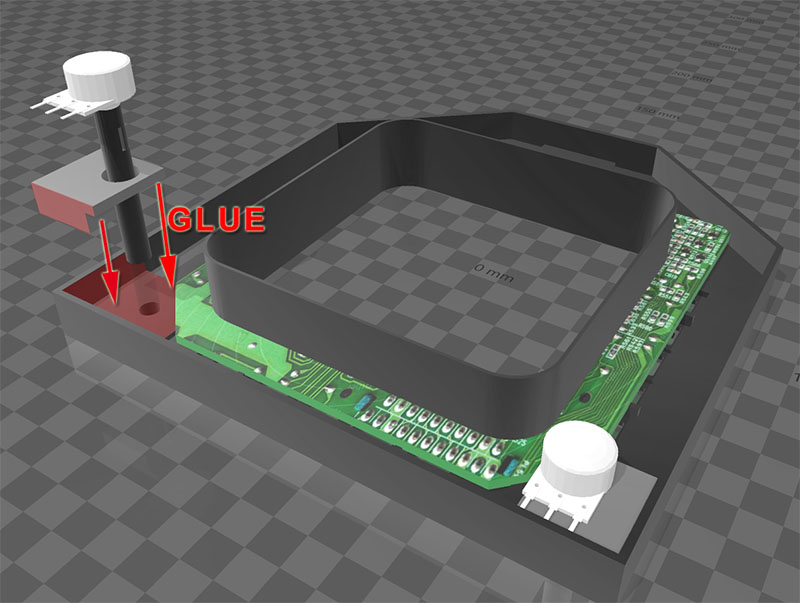
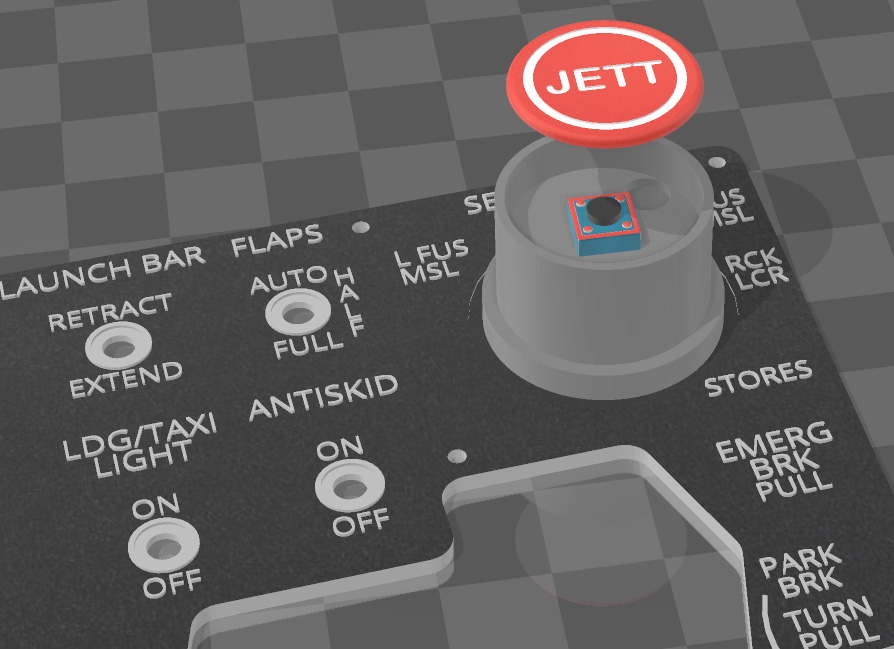
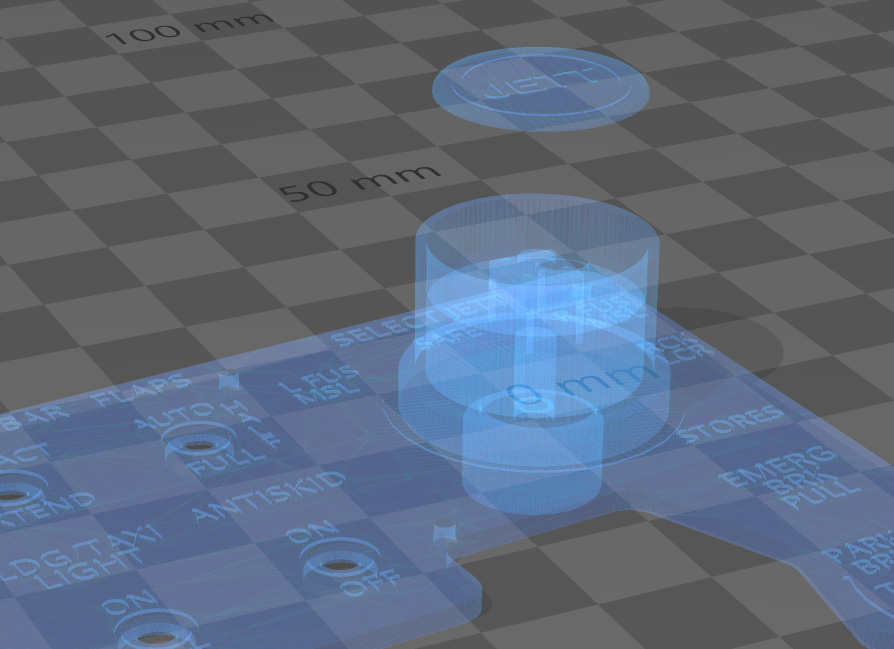
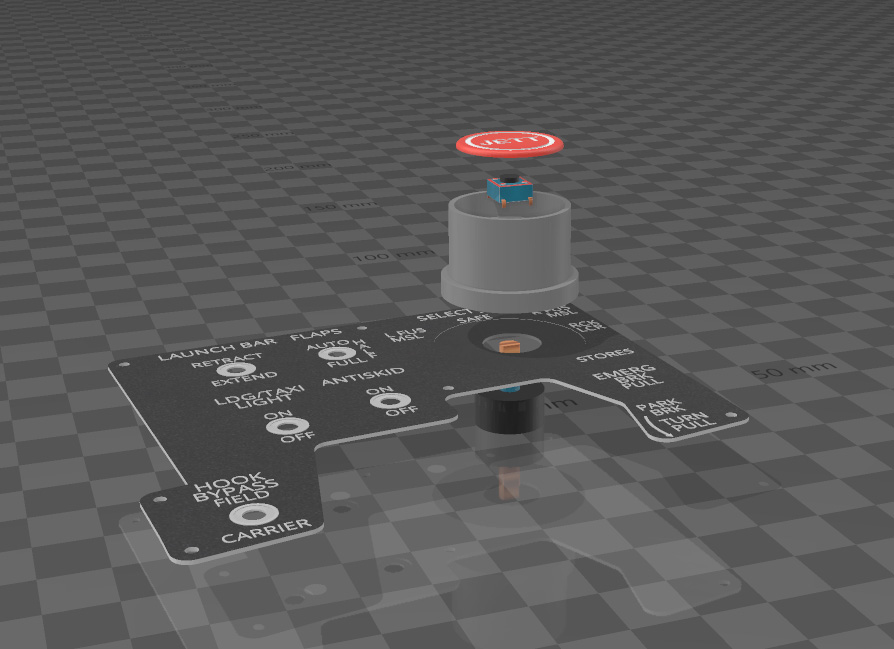
Finally I went away from the design above, which is nevertheless a great solution! @Blue73 did a great job, I really apprechiate his work! But just for some space-problems, I had to find another way. I've used the grey outer hull of the rotary-switch and glued a mini push-button into it. On top of it there's glued the red/white "JETT"-disc. The grey outer button is connected to > this < rotary-switch. Works perfectly and is way more easy to build. You just have to let the cable from the JETT-switch loose enough, so it can move with the rotary-switch. (OK, one position (clockwise from "stores"-position) is left free, but it absolutely no problem for me.) But it's a simple solution and it works. JETT-Rotary-SWITCH_small.mp4
-
@hannibal: You've got PM...
-
Hi pilots, I've build a replacement/conversion-kit for the Thrustmaster Cougar-frames, so you can fit your disassembled cougars stuff into a DDI-frame. https://www.thingiverse.com/thing:5923061 Feel free and use it, but read the text first! It's still not painted, just printed. It's a replacement for the Thrustmaster Cougar-frames to get an F/A-18C DDI. (Left and right DDI, AMPCD may come later) Angles/corners are designed to fit with tekcreations announciator-panels. (Others may fit too? Never tested by me.) Big shoutout to Walli, who helped me a lot! PLEASE READ the description on thingiverse.com carefully before you're damaging/destroying your TM Cougars! PLEASE LOOK at all pictures on the thingiverse-site before doing stuff, most of them are self-explaining! WHAT CAN YOU EXPECT: Disadvantage: You will loose the GAIN, SYM, BRT and CON rocker switches. (Maybe I will provide a version where you can keep them, but not now.) Advantage: It looks way more realistic and you will have the possibility to add two potentiometers (BRT and CON) and one rotary-encoder (OFF/NIGHT/DAY). You can use e.g. an arduino-board and DCSbios to get them working. It's a little bit of work, but it looks better! SIZE: 171mm x 182,5mm x 27mm Outside wall: 16mm Inside wall: 27mm PRINTING TIME: ~12-13 hrs If you like this DDI-conversion-kit, just let me know. Greets Purzel
-
Magnetschalter.... Bevor sich hier jmd. die Bude abfackelt... (Magnete können heiss werden, etc.) Kippschalter zerlegen und unten raus verlängern, danach nicht mit Magnet zurückschalten, sondern mit kleinem Servo, der den unten rausschauenden Schalter wieder zurück drückt (ähnlich wie bei einer useless box).
-
How to Arduino micro pro power-supply for potentiometer
Purzel replied to Purzel's topic in Home Cockpits
Thank you for your excellent help! Now i can go ahead and get my Deskpit done... THANK YOU ALL!
-
How to Arduino micro pro power-supply for potentiometer
Purzel replied to Purzel's topic in Home Cockpits
This is the arduino-code I'm using: // Version 2.0 ACHTUNG! - - - - BEIM HOCHLADEN DES CODES AUF DAS ARDUINO-BOARD DARF DCS-BIOS NICHT LAUFEN! #define DCSBIOS_DEFAULT_SERIAL #include "DcsBios.h" #include <Joystick.h> bool state = false; //LANDING GEAR-HANDLE LIGHTs - name of the function that is called, copy from DCS BIOS, CNTRL REF, F18 // CHANGE PIN NUMBER FOR YOUR LED //DcsBios::LED gearLever(0x7478, 0x1000, 0); // All "LED in gear handle"-codes to test DcsBios::LED landingGearHandleLt(0x7478, 0x0800, 0); //Working //DcsBios::LED gearDownlockOverrideBtn(0x7478, 0x4000, 0); //DcsBios::LED emergencyGearRotate(0x7478, 0x2000, 0); // DcsBios::LED gearSilenceBtn(0x7478, 0x8000, 0); DcsBios::LED hookLever(0x74a2, 0x0100, 1); // DcsBios::LED hookLever(0x74a2, 0x0100, 1); //Hook alternative code // Connect one outer pin of the potentiometer to the supply voltage, // the other outer pin to ground, // and the middle pin (“slider”) to an analog input pin on your Arduino board. DcsBios::PotentiometerEWMA<5, 128, 5> hudSymBrt("HUD_SYM_BRT", A9); // HUD potentiometer //DcsBios::RotaryEncoder hudSymBrt("HUD_SYM_BRT", "-3200", "+3200", 8, 9); // HUD rotary enconder alternative? //Joystick_ joystick; Joystick_ Joystick(JOYSTICK_DEFAULT_REPORT_ID,JOYSTICK_TYPE_GAMEPAD, 12, 0, // Button Count, Hat Switch Count false, false, false, // X and Y, but no Z Axis false, false, false, // No Rx, Ry, or Rz false, false, // No rudder or throttle false, false, false); // No accelerator, brake, or steering void setup() { DcsBios::setup(); // Initialize switch or light Pins // Tells if the pin is an input / output // INPUT or INPUT_PULLUP for button, OUTPUT for LED, steppers, etc. // pullup enables on board pullup resistor to prevent button floating pinMode(1, OUTPUT); // Will be used in future for Hook-LED pinMode(0, OUTPUT); // LandingGear LED pinMode(2, INPUT_PULLUP); // LandingGear Switch pinMode(3, INPUT_PULLUP); // Hook Switch pinMode(4, INPUT_PULLUP); // Unused pinMode(5, INPUT_PULLUP); // Unused pinMode(6, INPUT_PULLUP); // Unused pinMode(7, INPUT_PULLUP); // Unused pinMode(8, INPUT_PULLUP); // Unused pinMode(A9, INPUT); // HUD Poti 1 (Ohne Pullup??) pinMode(10, INPUT_PULLUP); // Unused pinMode(11, INPUT_PULLUP); // Unused // Initialize Joystick Library Joystick.begin(); } int keyState = false; void loop() { DcsBios::loop(); // LandingGear Switch TOGGLE 1 ON/ON (2) WAY, if (digitalRead(2) == LOW) // THIS TELLS WHICH PIN ON THE ARDUINO IS BEING READ // PULLED TO GROUND {Joystick.setButton(0, HIGH);} // THIS NUMBER IS THE BUTTON ON THE VIRTUAL JOYPAD SO 0 HERE EQUALS 1 ON JOYPAD else {Joystick.setButton(0, LOW);} if (digitalRead(2) == HIGH) {Joystick.setButton(1, HIGH);} else {Joystick.setButton(1, LOW);} // Hook Switch TOGGLE 1 ON/ON (2) WAY, if (digitalRead(3) == LOW) // THIS TELLS WHICH PIN ON THE ARDUINO IS BEING READ // PULLED TO GROUND {Joystick.setButton(2, HIGH);} // THIS NUMBER IS THE BUTTON ON THE VIRTUAL JOYPAD SO 0 HERE EQUALS 1 ON JOYPAD else {Joystick.setButton(2, LOW);} if (digitalRead(3) == HIGH) {Joystick.setButton(3, HIGH);} else {Joystick.setButton(3, LOW);} /* PUSHBUTTON, DIGITAL READ = ARDUINO-PIN 3 = PIN AUF ARDUINO, DER ABGEFRAGT WERDEN SOLL if (digitalRead(3) == LOW) // PIN 3 {Joystick.setButton(2, HIGH);} // DIESE NUMMER IST DIE TASTE AUF DEM VIRTUELLEN JOYPAD, ALSO IST 2 HIER GLEICH 3 AUF DEM JOYPAD else {Joystick.setButton(2, LOW);} // PUSHBUTTON, DIGITAL READ = ARDUINO-PIN 4 = PIN AUF ARDUINO, DER ABGEFRAGT WERDEN SOLL if (digitalRead(4) == LOW) // PIN 4 {Joystick.setButton(3, HIGH);} // DIESE NUMMER IST DIE TASTE AUF DEM VIRTUELLEN JOYPAD, ALSO IST 3 HIER GLEICH 4 AUF DEM JOYPAD else {Joystick.setButton(3, LOW);} } -
How to Arduino micro pro power-supply for potentiometer
Purzel replied to Purzel's topic in Home Cockpits
I've connected it as described, but it's not recognised by joy.cpl ( < type in windows search) -
Hi folks, I'm new to arduino/IDE/coding. I want to connect a 10k potentiometer to my arduino-board (micro pro) to get my "HUD-brightness" (F/A-18C) working with it. It's connected and powered via USB to my pc. In the reference they say: This is my arduino-layout: I've connected - one outer pin to GND, - the middle "slider" pin to an analog pin (A9), but I don't know where there power-supply is they mentioned. Can anyone point me the right pin? I've tried all black (Power) marked pins (exept the GND-pins), but when I turn the potentiometer, the arduinos fuse shuts off the board until I turn back the pot. Thx! Greetings Purzel
-
Unabhängig davon: Muss man nicht auch auf der Südhalbkugel anders rechnen? Da war doch mal was? Ich finds grad nicht. Evtl. sind da auch auf neuen Karten noch Fehler drin..? Auch wenn er keine Karte südlich deas Äquators hatte, könnte man mal mit dran denken, dass es da evtl. zu Diskrepanzen zw. Map-Hersteller und ED's JTAC geben könnte.
-
Visibilty is only for the night, so I think it would be ok. Would you be so kind and post a picture of it (night illuminated) ?


.jpg.f972ec8c97e6d7d4d0d514e5e3de6883.jpg)
.jpg.95ac8a1b50bbd09625fa19fd0e7d116d.jpg)
.jpg.cf9182563012a34e0ee41107f43c0687.jpg)