LastRifleRound
-
Posts
1188 -
Joined
-
Last visited
Content Type
Profiles
Forums
Events
Everything posted by LastRifleRound
-
The stuff in the changelog is what's been done since the last update, so it's complete at Deka but until ED pushes an update you won't see it
-
No need to switch to NAV. IFA is the standard position. It is INS coupled with GPS. NAV is INS only
-
has to be axis to work properly I believe Uboats posted that they're looking into a way to make it work with buttons as well, but it's not implemented yet
-
If TDC is set to an axis it will behave like this. I set my joystick to be tdc axis when left shift is held and use it for tdc only when guiding c802akg, otherwise I use one of my hats mapped to button presses.
-
Ah, now that makes a whole lot more sense. Very unique way of doing it. I think I like it better than the Hornet setup. A lot of smart ideas hidden in that Harrier. I hope they implement this. Seems like a key feature.
-
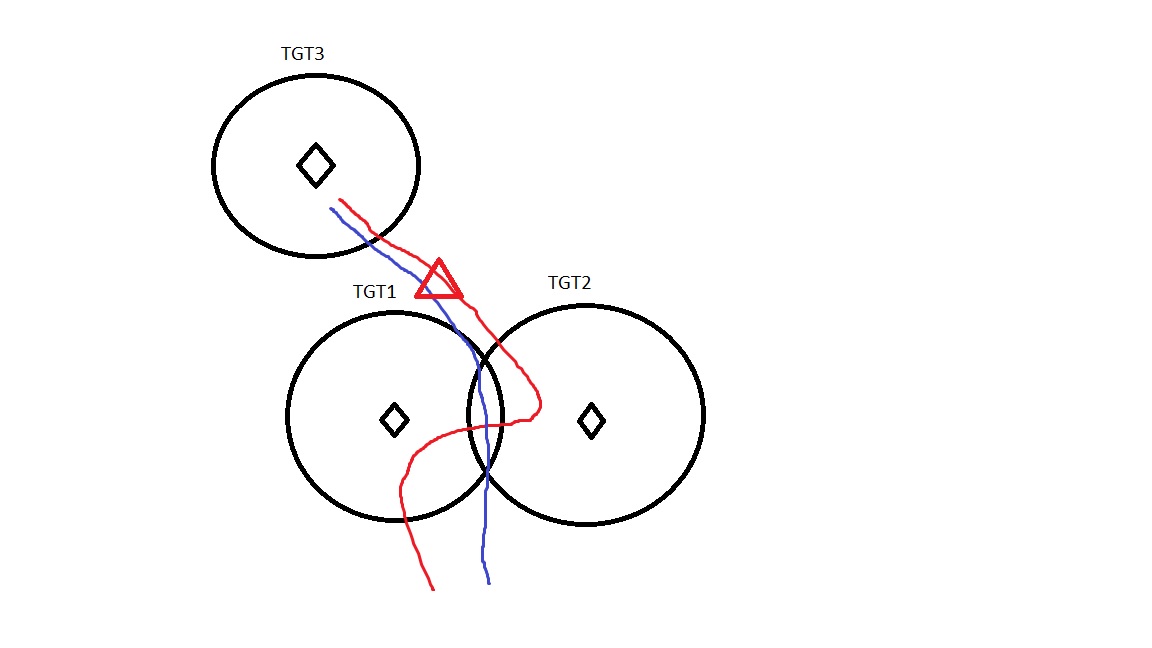
I think you might be right on that, I shouldn't assume it works the same as in the Hornet. However, without taking into account overlapping LARs, ambiguity sets in. Where exactly should you fly? To the nearest target's 100% mark? If the next target's 100% mark doesn't overlap, the system would be taking you to a point where only one drop is possible, then a hard 90 degree turn could be necessary to make the next drop, when what you should have done is navigated to the best center point and dropped both there. Since the system couldn't possibly know that you want to drop those 2 in pair, that 1 separate, then another, there is likely an explicit process for this. I'm willing to bet the Harrier has a way to explicitly declare whether you plan to do a sequential drop or a simultaneous one. This is essentially one of the key differences between AUTO and MAN in the Hornet. I just can't imagine when using a weapon that has so much pre-planning capability as the JDAM that they would inject this sort of ambiguity into the process. See the picture below. Where would the Harrier guide you in such a scenario? In the Hornet, if you had MAN, it would show you the active station, then the next one, then the next one. No problem. If you had it in AUTO, it would tell you that you can't drop all 3 at once. If you removed TGT3, it would provide a solution for TGT1 and 2 similar to my previous picture. What should the Harrier tell you to do? If TGT1 is active, and it sends you to TGT1's LAR median, you will be out of TGT2's median and likely will have to loop to the right and approach from the west to hit it, then turn left and hit TGT3. I guess you could say "well look at the circles" but they may not look that way when you get there due to the aforementioned reasons. Over a target is not the time to figure out that the drop point overlap you chose wasn't valid or even possible. The communication between pilot and airframe at this point is ambiguous. It is my belief the only logical solution is you intend to attack the targets you selcted simultaneously, else you would have only selected the one target you plan to attack at a time, E.G. select TG1 and TGT2, drop your bombs, then select TGT3. This is why they bother to plot the centroid in the first place. RAZ has it modeled accurately that whenever you change the TGT list after it has been assumed, it resets, so you don't have to deactivate TGT1 and TGT2 when you press TGT3 after your first drop. In this way, it doesn't work exactly as it does in the Hornet, but it is at least coherent from a systems perspective. How do you think it should work? As currently modeled? EDIT: Also, now that I think about it, what should it tell you if approach this from the west? The centroid doesn't allow for release of a single bomb. Going to the 100% of TGT3, then 2, then 1 would give you the most efficient sequential release in this case, but in the example for the south approach such a tactic leads to a LESS efficient drop strategy.

-
Also PU only has the OFLY method available, which is much less accurate than using the DESIGNATE method with WMD7 or DBS2 radar
-
It is supposed to steer to the centroid, just the centroid of LAR parameters, not the centroid of targets. The behavior you're describing is due to the centroid being placed at the target centroid instead of the LAR overlap area's center with respect to bearing at the moment. Basically, chart a differential equation to determine the range point where LARs are the largest for the current aircraft heading. Now compute where those areas overlap. The center of that overlapping area is your centroid. If all areas do not overlap for the targets selected, then no centroid can be displayed and release should be prohibited. Check out my graph. The red fan shaped location is such that the drop can be performed on both targets and represents that overlapping shape by the time the aircraft got to it. If you turned to the right of TGT2's LAR, no acceptable solution would exist, and so no LAR would be displayed. The target centroid is useful in that flying towards it will take you through that LAR, should one exist, you just need to watch your display for all numbers to become bold and ignore the %'s, because that % only applies to the closest target, not the best chance for hitting all targets. Of course, this goes out the window if terminal paremeters are ever considered. In that case the raw target centroid would be of little value. Picture two targets along your axis of travel, with attack azimuth 180deg of one another. If you flew to the space between the targets, the centroid would not have taken you through the release zone, and, upon arriving at the location, you would find you couldn't drop on EITHER target. Finally, the % should be the % you are in the center of the fan shape. When ED does JDAMS AUTO/LOFT mode for the FA18, if they do it properly, you will see this in action when QTY of more than 1 station is selected.
-
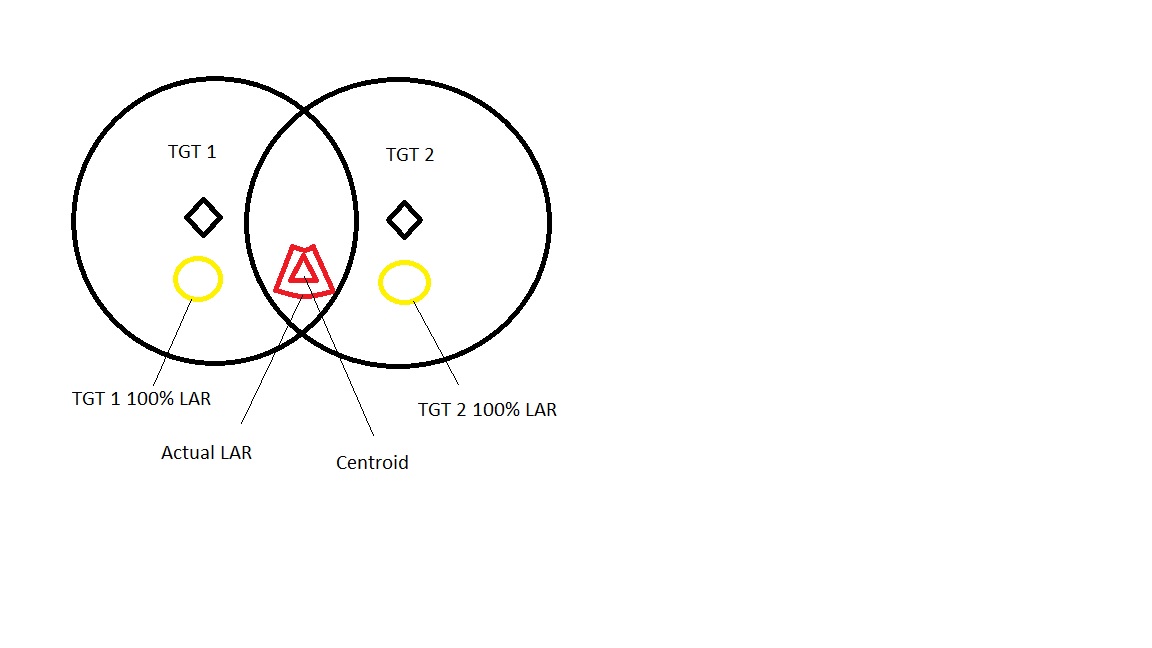
I think your implementation is somewhat flawed, however. The centroid should be on the ideal LAR's centroid for the current heading, not the targets themselves. If such a point does not exist because the targets are too far apart, multiple QTY release should show no LAR and should not allow the release of bombs. Currently, it is possible to have overlapping LAR's, that, when you get to the target and flying to the centroid, the LARs shrink past the aircraft, since you aren't flying towards either target. Here is an illustration I've made to visualize the concept. The aircraft bearing in this example would to the center of the two targets
-
A-10C not possible to trim out in roll?
LastRifleRound replied to Fred00's topic in DCS: A-10C Warthog
I love flying this thing. I agree you can't trim ut straight and level, but with no fly by wire I can dial in perfect AOA and land with throttles only in the A10. It's s joy to fly. The Harrier, for me, is by far the most hectic. I am absolutely convinced whoever positioned the refueling probe hated all of humanity and wished for all to suffer greatly. -
Same here! More about the mission below but don't want to spoil it:
-
Shaheen jokes. That's what he does. It's all good. I was wondering the same thing Fox, are you their community manager? You are super responsive and your info seems to be accurate. Either way you do a great job communicating with the devs and you probably should be the community manager if you aren't already.
-
Right, DCS does it wrong. Centroid is calculated. Here's an easy test. Make 2 targets 10nm apart from one another perpendicular to your flight path. Select them both as TGT for JDAMs. AV8 will show 2 target circles, and an additional diamond between them. Your HUD diamond cue and heading bug refer to this particular point, not either of the targets. EDIT: I also want to add that the calculation of the centroid for a QTY release is correct behavior, but the IZLAR is missing. Also, if your targets were close together, you probably didn't notice the centroid. Try my example and put the targets further away from each other. JDAMS on strike can be used on targets 2nm apart in practice, and further in theory.
-
[NOBUG] M/71 radar bombing (RR) - target firing line
LastRifleRound replied to Nighthawk's topic in Bugs and Problems
You know, I'm not exactly sure of the A2 logic, sometimes it seems centered on the waypoint, other times it seems to snowplow. I do as you do, and use A1 to help orient and get a target fix with TV beforehand if I can. I approach in A1, then push to A2 within 30km. Would be cool to know how A2 was used in real life. I'm sure it was used for this, but without being able to perform fixes or see the waypoint circle to confirm placement I generally don't find it useful. That is the way it was on the real jet. -
The standard position for the switch when alignment is complete is IFA, not NAV. They need to update the training but have acknowledged this. IFA gives GPS coupled flight with the INS, whereas NAV is INS only and will require position updates. I don't think inertial drift is modeled yet, but when it is, you'll want to know about this.
-
This is because the circle isn't correct symbology for an LAR. The circle represents the max range of the bomb for given parameters assuming the current bearing to the target. If you are not flying at the target, and instead are flying to one side or the other, the closer you get, the smaller the circle gets, until it retracts past your aircraft. This means if you have multiple targets selected with dispersion, and head to their overlap point's center, by the time you get there you will find you have an invalid solution. IRL, when your nose is within +/- 15 degrees of the target (or target centroid if more than one is selected) a fan shaped LAR appears that is the acceptable LAR of release to hit that target, or all targets selected simultaneously if more than one is selected. The steering dot, when placed in the middle of the ASE, is supposed to guide you there, but those two HUD elements are static and not really useful. In fact, when more than one target is selected, the range circles aren't displayed at all. Instead, diamonds representing the targets are displayed, and a triangle representing the centroid, and then the fan-shaped LAR when your attitude is +/- 15 degrees of the centroid. There are other restrictions if terminal parameters are selected, but those aren't modeled so are irrelevant to this discussion. This is probably really confusing sounding, so: TL:DR; the circle you see on the EHSD at any given moment represents the LAR assuming you maintain the same bearing to the target. If you are flying to side of the target, the bearing will change, and so will the LAR. The LAR should be fan-shaped, even without a terminal heading, because that shape represents and actual usable "fly-to" point.
-
To be fair, it's really slow. My Ruger 10/22 could probably shoot it out of the sky :megalol:
-
oap symbology/sensor slaving not working
LastRifleRound replied to witness_me's topic in Bugs and Problems
Hmmmm. Could be because I had IAMs equipped. Equip some LS6's and try this again. You may have to turn OAP on in the SMS CNTL page for the LS6. You will see an additional HSI indication and the bomb will guide on it. -
[NOBUG] M/71 radar bombing (RR) - target firing line
LastRifleRound replied to Nighthawk's topic in Bugs and Problems
Try the presentation in A2 mode. Works really well for RR delivery and I can get regular hits with strings of 16 LD bombs as long as the target resolves reasonably on the radar -
Check my post further back. If nothing is designated, then wpt 40 refers to your active waypoint. When you designate something, WPT 40 is overwritten with the designation. If you undesignate, it refers once again to your active waypoint.
-
You're right about DIR mode. However, COO Is for the PP points (pre planned points), 36-39. The missile will fly to the PP, then engage video about 14nm from the point you selected. MAN mode uses points 30-35 RP points. These are route points and there are generally more than one. The missile follows all RP's, and turns its camera on 2nm from the last RP in the chain. This last RP shouldn't be the target, but a point that orients the missile to the target. So, if you set waypoints 30, 31 and 32, a missile in MAN mode will go to waypoint 30, then 31, then 2nm from waypoint 32 it will turn its camera on.
-
C802 will use the current SPI in DIR mode, which is your current waypoint by default Current spi is always waypoint 40. Therefore, let's say nothing is designated with the HUD, radar or tpod and you have waypoint 3 selected. This means waypoint 3 is your SPI, and waypoint 3 and waypoint 40 will refer tothe same location.
-
oap symbology/sensor slaving not working
LastRifleRound replied to witness_me's topic in Bugs and Problems
This works for me. After pressing OAP and inputting your data, did you press OAP again? -
It still flickers and it's in the changelog as being fixed. The latest post in the changelog shows you what has been fixed since the last patch that will be included in the next one.
-
Not sure if it's intended but the terrain following kicks in before impact, making non MITL attacks impossible